
started bodywork!
suparuss - 13/2/07 at 09:03 PM
here we are at the easy bit finally! what you see here is the result of about 4-5 hours a day for the last 6 days and is coming along nicely.
unfortunately the photos dont do it a lot of justice but i cant get decent angles since it is only a single garage and the walls tend to get in the
way. it looks a lot better in person and im very happy with it so far.
here is the good stuff-
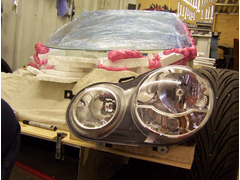
the first thing i did was cover the chassis in dust sheets and also industrial packing film to protect everything from dust/resin/foam etc. i did the
same for the windscreen and lights too.
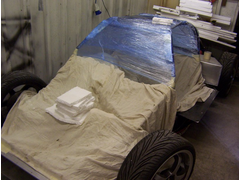
covering chassis
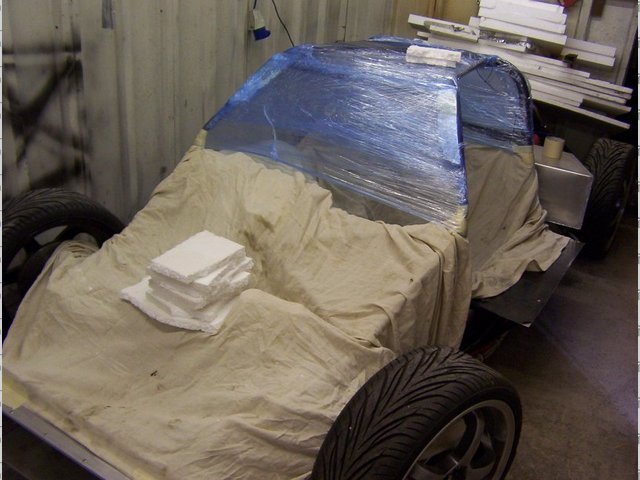
next i fitted the windscreen and headlights. the windscreen is fitted with expanding foam which helps form the screen surround without having to
adjust things a million times like youd have to with wood-
fitted screen and lights
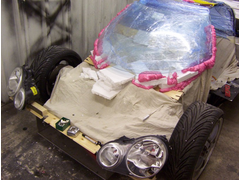
the headlights were originally going to be hayabusa headlights but since the beams are all wrong and the sva man wouldnt be happy ive used these VW
Polo headlights and im glad for it too.
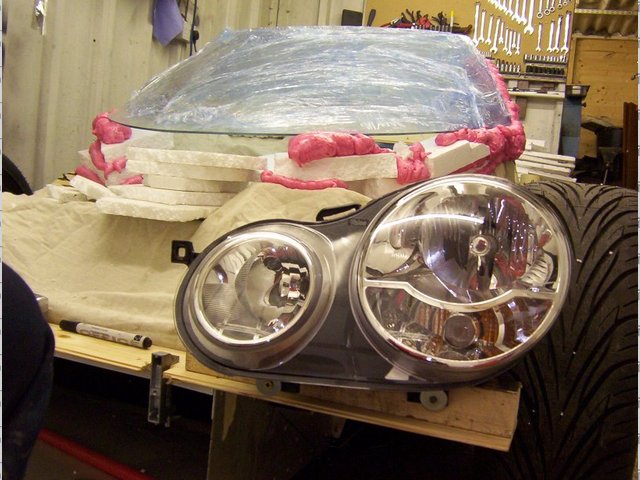
polo lights
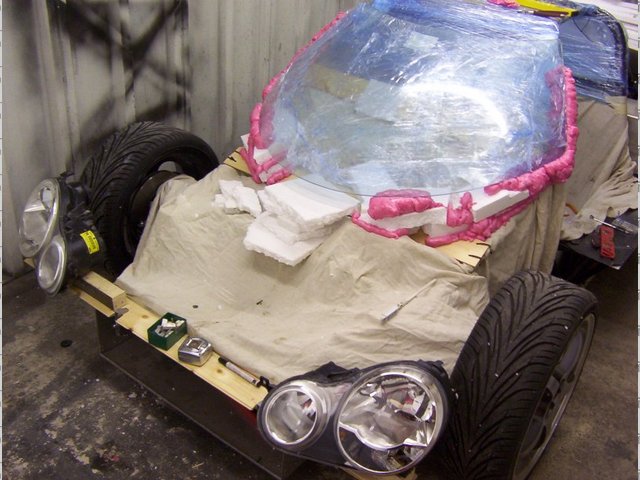
suprise! more foam! the whole car will be built in this way- using sheets of rigid foam for the ribs and then back filling with offcuts then filling
the top with expanding foam then trimming to suit. this means the surface material is atleast 2 inches thick so if i want to make changes there is
plenty to work with.
also doing it this way is very strong since it ends up as one big block of foam attatched to the chassis in places by bits of wood tied on with tie
wraps, i can grab the front end and move the car on its dolly's with the foam! so when i put a layer of fibreglass on eventually it will be
plenty strong enough.
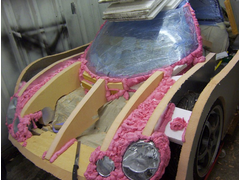

added ribs and foam
and here is a pic of the front end as it is now. as said the pic doesnt do it justice as the curves are quite subtle but im very happy with the shape
of it.
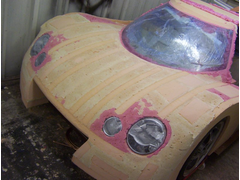
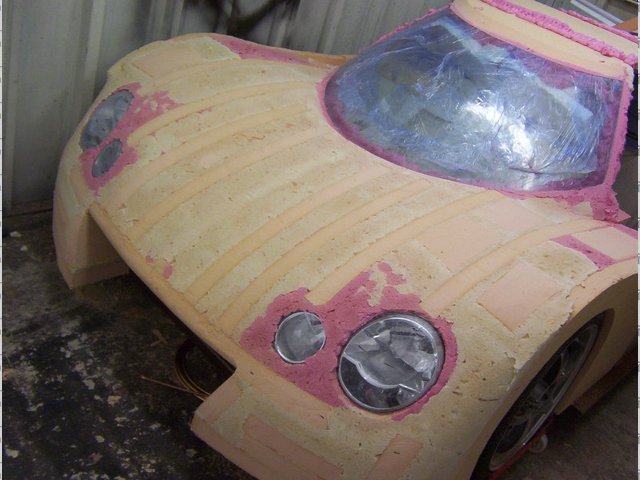
front end just about done
now i just need to work my way back along the sides and rear!
Project7 - 13/2/07 at 09:07 PM
WOW.... that is gonna be awesome!
Nice work 
Tralfaz - 13/2/07 at 09:09 PM
Brilliant start. Well done.
What windscreen are you using?
Brian
Mansfield - 13/2/07 at 09:10 PM
I was just in your photo archive drooling over your chassis and now this!
Keep feeding us the pictures, I cant get enough.
Howlor - 13/2/07 at 09:28 PM
The shape looks superb. Forgive my ignorance in the bodywork department but how will you go about finishing it?
Glass over the foam then how do you get a good finish on that?
Just interested really.
Thanks
DIY Si - 13/2/07 at 09:29 PM
Very nice! Although I do wish people would stop making sooo many nice cars that i want to copy!
gottabedone - 13/2/07 at 09:46 PM
Should be nice and warm with all of that insulation
That front is wicked!
I especially like the subtle curves and the way that the headlights look made for the car, well done
Steve
suparuss - 13/2/07 at 10:23 PM
wow, im glad im not the only one that likes it!
to answer the quetion on finishing- the next step will be to do rough fill to get rif of the bigger holes in the foam and then a layer of glass fiber,
ill have to use epoxy resin because the rigid foam is kingspan insulation (i got the phenolic stuff instead of the urethane, but hey it was free!)
once it is sealed it wont be problem so then ill put on a coat or two of gelcoat and polish.
oh and the windscreen is a lancia stratos one. all of �500 worth so i tiptoe around it!
DIY Si - 13/2/07 at 10:28 PM
Are you making moulds or just a one off?
stevec - 13/2/07 at 10:47 PM
That looks the dogs danglers. Great work.
Steve.
suparuss - 13/2/07 at 11:13 PM
quote:
Originally posted by DIY Si
Are you making moulds or just a one off?
ill make full moulds for 5 piece body work. plus an adjustable under tray at the front which will hopefully give some down force. and the doors will
probably have and inner and outer skin. so lots and lots of work to do!
ill take the mould for the doors and front and rear first and cast the final pieces then use these to shape cockpit part so that everything fits
together nicley with proper seals etc.
it will take longer but wil be lot better in the long run.
Alan B - 14/2/07 at 12:08 AM
Very nice job mate...I'm loving the shape..
Making moulds is the way go IMO....more work, but well worth it..
Alan
violentblue - 14/2/07 at 02:02 AM
is this a one off or are you going into production?
Fred W B - 14/2/07 at 05:53 AM
Awesome progress - what tools/grit paper did you use to cut and shape the foam?
Cheers
Fred W B
graememk - 14/2/07 at 08:33 AM
ooooooo very nice
RazMan - 14/2/07 at 08:38 AM
Very impressed with your technique of using rigid foam for the ribs. How did you arrive at your shape? Did you get the ribs cnc'd for consistency
or are you sculpting as you go?
It should be fairly light to lift off when the time comes but fairly fragile I would have thought, so a lot of care will be required. I suppose the
glass fibre skin will hold it all together.
The doors will be the most labour intensive part of the build (trust me on this)  and planning the hinges and catches is probably the most
overlooked part imo.
and planning the hinges and catches is probably the most
overlooked part imo.
I also love the lights - there are a lot of well designed light units which ought to be 'liberated' (I used BMW Mini ones) and they really
can make a good job much more professional looking.
Carry on the good work - I will be watching with interest 
[Edited on 14-2-07 by RazMan]
02GF74 - 14/2/07 at 08:48 AM
looking good!
what tools did ypu use to carve/shape the foam?
suparuss - 14/2/07 at 09:21 AM
cnc ribs? nah! im just sticking sheets in place and cutting them down until they look good! ive got a laser setup so i can make sure everything is
symetrical. cutting and shaping is done with a breadknife, hand saw and surform (sort of a plane designed for plasterboard)
the plug will be staying on the chassis while i take moulds. for on thing i dont have room to put it if i take the plug off. in fact i still dont know
what im going to do when it comes to casting the main center of the body.
JonBowden - 14/2/07 at 09:46 AM
quote:
ive got a laser setup so i can make sure everything is symetrical.
How do you do this?
nick205 - 14/2/07 at 09:48 AM
Awesome stuff - I never cease to be impressed with people's dedication. Look forward to seeing it develop - keep the photos coming
suparuss - 14/2/07 at 09:58 AM
simple really, the car is level and the laser emits a level laser across the car (its wide beam so you get a big red line across whatever you are
leveling) so you just use that as a datum measuring from body work to laser beam. its best to setup a grid so you can be sure you get the same place
on both sides. so you just measure one side, say it is 100mm on one side to a particular spot and the same spot on the other side 90mm you just remove
material until it is the same.
if you do this to get a rough shape, then you can blend everything in if it doesnt look right.
awinter - 14/2/07 at 01:31 PM
Just had a gander through your photies.
WOW
Hope it all works out, look forward to seeing the finished product.
Food for thought with the foam.
Allan
sgraber - 14/2/07 at 10:25 PM
Top notch! TOP NOTCH! Flat sides are the way forward. Will save you years of work.
gttman - 15/2/07 at 10:03 AM
Very nice, I really do like the shape and your progress is an inspiration.......
I'll be interested in you technique to get the sides symetrical as I think this is going to be the hardest part.
Ringius - 18/2/07 at 08:11 AM
Hi!
Impressive work!
Read in "fiberglass and composites" that one way of sealing the foam so that you can use ordinary resin is to spray latex-based paint on the
foam. After spraying, it should be possible to use filler for touching up and finishing the body work. Might save some time and money...
I am happy to give you more details if you should be interested in this approach instead of using epoxy resin directly on the body, but as I
mentioned, I have only read about this, no practical experience...
BR,
Jan
rpmagazine - 18/2/07 at 08:26 AM
try Q cells mixed with epoxy.
rav - 19/2/07 at 11:00 AM
Looking fantastic, and extra respect for working in a small garage!
Must be hard getting the shape right when u can't step back and see it from a distance.
Do you have any info on that super-sexy screen? eg maybe its width top and bottom?
Keep up the good work!
Mark
FUORISERIE - 19/2/07 at 11:10 AM
quote:
Originally posted by suparuss
wow, im glad im not the only one that likes it!
to answer the quetion on finishing- the next step will be to do rough fill to get rif of the bigger holes in the foam and then a layer of glass fiber,
ill have to use epoxy resin because the rigid foam is kingspan insulation (i got the phenolic stuff instead of the urethane, but hey it was free!)
once it is sealed it wont be problem so then ill put on a coat or two of gelcoat and polish.
oh and the windscreen is a lancia stratos one. all of �500 worth so i tiptoe around it!
Great project and the design looks really good, and the Stratos winscreen looks great.
Just a question, how long will the car be?
Keep it up and will be following your development.
TheGecko - 19/2/07 at 12:24 PM
quote:
Originally posted by rav
Do you have any info on that super-sexy screen? eg maybe its width top and bottom?
Mark,
Some time ago I got this image from (I think) a thread on this board but I'll be damned if I know who the original poster was Anyway, hope
this helps.
Dominic

Description
suparuss - 19/2/07 at 05:01 PM
i sent you that pic gecko, knew i should have copyrighted it!
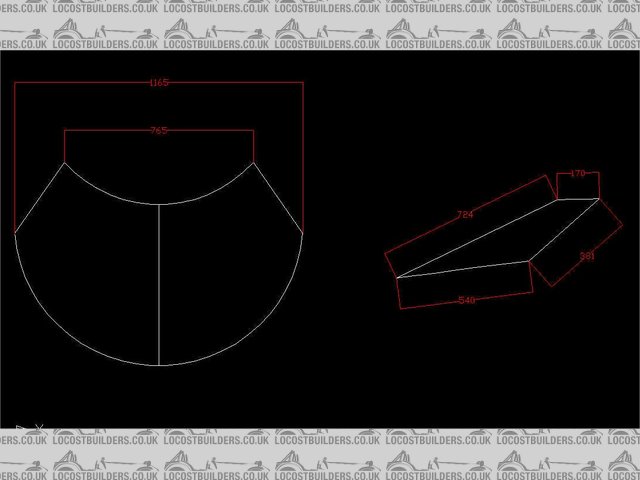
actually those dims are wrong which is strange becasue i got them from someonw who apparently used a plotter to measure his screen. ive just checked
against thos dims and it is more like this


Description
the car is about 3.6m long btw. width is 1.7m at the front and 1.640m at the rear.
height will be about 42inches i think.
rav - 19/2/07 at 05:51 PM
Just put those dims into solidworks and made a rough screen.
Am I right in thinking theres a bit of curvature on the screen, eg a straight edge would not sit flat on it running from top to bottom?
Anyway, thanks it gives me something to work with (don't ask what for - don't know yet!)
Mark
rav - 19/2/07 at 05:53 PM
oops, picture too big
rav - 19/2/07 at 05:55 PM
...
rav - 19/2/07 at 05:57 PM

gttman - 20/2/07 at 08:31 AM
quote:
Originally posted by suparuss
the car is about 3.6m long btw. width is 1.7m at the front and 1.640m at the rear.
height will be about 42inches i think.
That is very compact..... can I ask, why is it wider at the front as thats quite unusual for a midi?
ned - 20/2/07 at 09:17 AM
quote:
Originally posted by suparuss
the car is about 3.6m long btw. width is 1.7m at the front and 1.640m at the rear.
height will be about 42inches i think.
So are you going to call it a gt42?
suparuss - 20/2/07 at 10:47 AM
rav- yes there is a slight curve. dont take those dims as being bang on but they are quite close. i cant measure the bottom width properly or the
offset front to back at the bottom due to the car getting in the way.
andy- it is a bit odd, but with my feet being in line with the front wheels it gives a little more room while not compromisign on the suspension
geaometry too much. the rear was governed by the driveshaft length. i could have had a bit more room at the front without extra width as i actually
get full lock on the steering with 18inch wheels. (sierra rack and cortina uprights)
ned- you took the words right out of my mouth! not sure what ford would say though. guess they dont own gt with every conceivable number on the end.
dont know the actual height yet though, might end up as the gt42 and 3/8
Fred W B - 20/2/07 at 11:04 AM
Re the Ford GT?? name,
dont even go there
See page 3 of the thread
quote:
Ford never registered the "GT40" word mark. Peter Thorp did in 1985 to make his MkVs the only legitimate GT40s with the name and successive
serial numbers. In 1995 a toy company approached Ford to make a model of the GT40, and Ford realized at that time that they did not have any rights to
the GT40 mark. Peter Thorp granted Ford the right to register a "GT40" mark for a different class of products (toys), which registration he
could have opposed as it was a "GT40" model of his "GT40" cars. He allowed Ford to do so for no charge. Ford agreed never to
interfere with Safir's registration or use of the "GT40" mark for full size automobiles.
Cheers
Fred W B
[Edited on 20/2/07 by Fred W B]
suparuss - 20/2/07 at 11:43 AM
lol, so thats why the new one is called the ford gt then. interesting.
akrallysport - 20/2/07 at 11:49 PM
excellent choice with the lights... keep it in the VAG family.


