

Nosecone unmodified

Nosecone cut in two

Nosecone rough joined
See avatar for finished item.
ATB
Simon
How easy is it to widen a nosecone? I now have my BMW 530 donor, and the (V8) engine is approx 27-28" wide at the widest point of the heads so
it may not fit in a +4" chassis.
I'm planning on making all the rest of the bodywork from ally anyway so it's just a nosecone I need.
I know the Luego Viento is about 6 inches wider than book, perhaps they would just sell me a nose?
Form what i heard this week the problem with Luego is that they don't have anyone to do their fibreglassing so you may have to wait a VERY long
time!
I'm surprised that the engine won't fit in a +4 chassis?
Cut down the middle in big wavy line, cut a couple of bits of wood to hold the cut pieces apart, duck tape over the gap then backfill with fibreglass
extending over the join.
When cured pull off the duct tape, now fill and grind the new material to shape.
Regards Mark
[Edited on 9/3/08 by mark chandler]
^^^What he said, but in picture form
Nosecone unmodified
Nosecone cut in two
Nosecone rough joined
See avatar for finished item.
ATB
Simon
Thanks Simon, although I notice you cut yours straight, is cutting in a wavy line critical? My only guess is that it would make the join stronger?
I can't cut wavy lines
ATB
Simon
once you cut the nose in half if you place a sheet off thin alloy on the topside and clamp that into position to follow the contour, pour on some
gelcoat let that go tacky then fill with cloth impregnated resin, and jobs done.
i have just watched the experts widen my front splitter by 200mm to fit another car and was suprised at how easy it is to do, took about an hr from
start to finnish
Kaspa
When I widened my front guards, I glued a block of wood across the cut line, fitted in place with wedges. Then once I'd cut the guards, another
strip of wood could be fixed to the original to firstly ensure that the two sides were still in the same relationship to each other, and secondly,
ensure that the amount they were widened was consistent, end to end.
The photoes show it better :-
Before they're cut
After they're cut
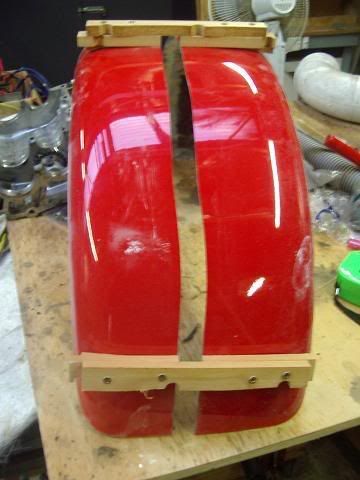
Notice particularly the technically advanced wavy cut for added strength - NAH ... I can't cut straight to save myself 
Wavy line inceases the join area, its also helps you lose the effect of two straight line joins as the ends blend and gets rid of the risk of a crack
as these tend to follow straight lines.
Wavy or zig zag is best IHMO.
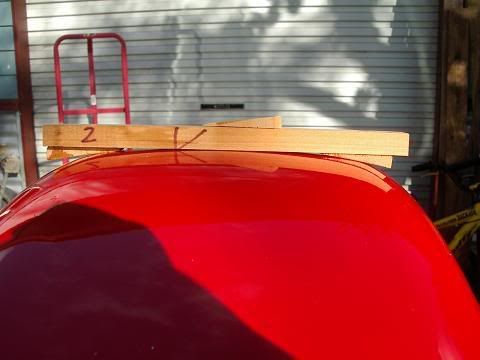
Here's mine, +2"

Rescued attachment small_front.JPG