
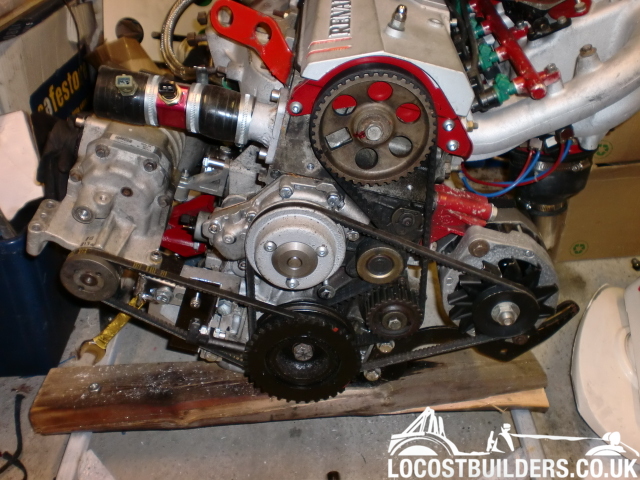
I got so fed up with the problems assciated with fitting the 2.9 cosworth engine, i thought i would change tack slightly.
I bought a renault turbo engine home yesterday from Bournemouth, and after 8 hours of fiddling, managed to get it fitted to the car with the
transmission attached today.
It needs to come out for a bit more work on the engine itself, but the engine mounts are sorted, and the engine sits really nice in the chassis.
The plan now is to get it working and Megasquirt set up so that i can drive it to the shows etc. The 2.9 cosworth and Transaxle will be a side
project and the ultimate end picture.
Just thought id share my news. Im really pleased its in and taking shape. I even drafted in the old man for a few hours which is great to have some
help at last.
Once the engine runs and the car is MOT'd i'll be looking to get the bodywork sorted, new wheels, steering rack replaced etc etc.
I would adopt your 2.9 cosworth engine for my pickup
quote:
Originally posted by mangogrooveworkshop
I would adopt your 2.9 cosworth engine for my pickup
Well, i was "working from home" today, and look what the garage fairies did for me....
Somehow i got covered in oil and grease too??? That little steamer worked a treat getting the engine clean...... apparently....

Clean Engine 3

Clean Engine 2

Clean Engine 1
:thumb:
Last night i was working away removing the old exhaust manifold studs in preparation for the new ones to arrive, and the inevitable happened....
The last bolt sheared off flush with the head.
This morning i got straight to work with the drikk and tap, and this is the result.

Studs Extracted
Happy days!
Following a coupleoffailed botch jobs at getting it off, i finally removed the supercharger pulley with a set of 50 year old pulley removers and some
brute force and ignorance.
As suspected, the pulley seems to have been heated in an oven, and shrunk onto the shaft. It was incredibly tight and needed one hell of a lot of
force to get it off. The pulley was steel after all, not aluminium and i was surprised considering that the pulley was almost brand new. This is
quite comforting though, as this means that the supercharger has had little or no use.
Dont listen to anyone else give you a load of old crap about a special tool for the eaton supercharger. Just a normal pulling tool (Heavy duty tho)
will do.

SC pulley off 1

SC Pulley off 2
How about TFSI renault engine.
Do you still have the first renault turbo you tried in the first place?
quote:
Originally posted by l0rd
How about TFSI renault engine.
Do you still have the first renault turbo you tried in the first place?
 I really do want it back for parts (and the original engine mounts).
quote:
Originally posted by MakeEverything
quote:
Originally posted by l0rd
How about TFSI renault engine.
Do you still have the first renault turbo you tried in the first place?
TFSI is essentially what my engine is,or rather SFSI. The injectors inject directly into the port.
Funnily enough, i dont CURRENTLY have the engine that i first turbocharged, however i have been offered it back free of charge, i just need it colelcted from Manchester!!
quote:
Originally posted by l0rd
quote:
Originally posted by MakeEverything
quote:
Originally posted by l0rd
How about TFSI renault engine.
Do you still have the first renault turbo you tried in the first place?
TFSI is essentially what my engine is,or rather SFSI. The injectors inject directly into the port.
Funnily enough, i dont CURRENTLY have the engine that i first turbocharged, however i have been offered it back free of charge, i just need it colelcted from Manchester!!
get it and run both turbo and supercharger.
quote:
Originally posted by l0rd
quote:
Originally posted by MakeEverything
quote:
Originally posted by l0rd
How about TFSI renault engine.
Do you still have the first renault turbo you tried in the first place?
TFSI is essentially what my engine is,or rather SFSI. The injectors inject directly into the port.
Funnily enough, i dont CURRENTLY have the engine that i first turbocharged, however i have been offered it back free of charge, i just need it colelcted from Manchester!!
get it and run both turbo and supercharger.
After breaking the first taper lock trying to shoe-horn it onto the shaft (too small) i ordered a larger one with a 20mm bore yesterday. It came this
morning, so i fitted it this afternoon.
These are the results. Sorry about the poor top photo. Its heavy to hold with one hand and take a photo at the same time!!

Supercharger Mount

SC Pulley on
looooooknnn ggooooddddd
Looking even better now!!

Charger Mock Up 1
Progress.....
One of the bolts is very loose on the far LHS of the pump, so although its loctited in, its not doing much. Im hoping that the other bolts and the
gasket will do their jobs! I know its not ideal, but i may look at something later on before the engine goes in for final fitting.

Water Pump on
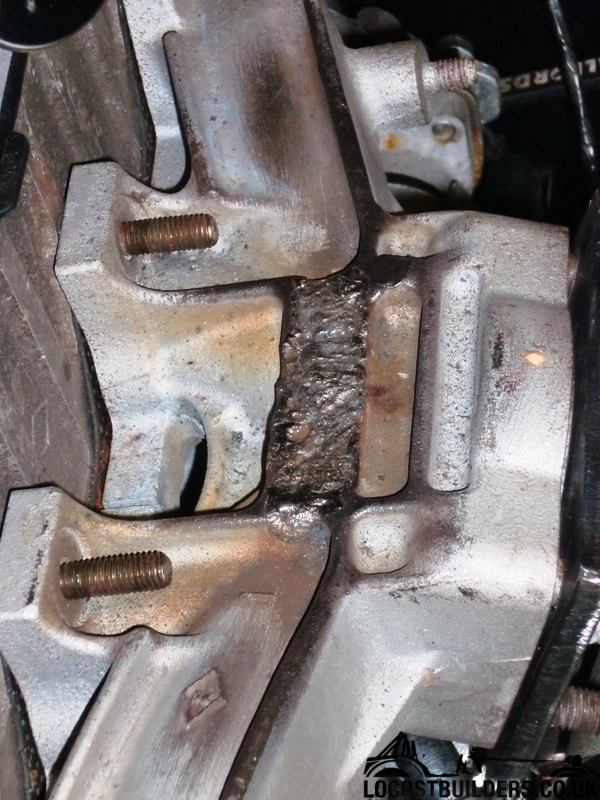
Oh, and in my attempt to TIG weld some steel brackets so that i can take some accurate measurements, i dicovered that the steel that i WAS going to
make engine mounts out of, doesnt weld!!! Just as well i was talked into using the OEM ones!
Looking good 
Keep it up Rich!
Cheers Ian,
Just getting some Ali cut for the front bracket, and i'll make one for the rear once it arrives. The front wone will look like this;

Supercharger Bracket
Look what came in the post today!!! :baby:

Distributor Cover

New Water Housings
A Perfect Fit too. Really pleased that i got the measurement of all of them correct. They just need finishing, and a piece of 38mm pipe welding to
them and hey presto, new housings.
I had some lifting eyes cut for the rear of the engine too, but i think because he had the 10mm material on the bed for the top water housing flange
he cut the lifting eyes out of 10mm!!!!! - Looks like they will be a temporary fixture whilst lifting the engine, then taking them off!!

Monster Lifting Eyes
Also, i had a text message from the same guy, who managed to cut my supercharger front bracket for me! 

Supercharger Bracket cut
Managed to get the TIG welder working better again, and penetrating the thicker metal. Didnt have enough amps for the other stuff!! derrrr,
schoolboy error!
This is the result of the bottom hose;

Bottom Hose Welded and Fitted
Sadly, i managed to get the top hose done first but spot the error.....

Top Hose SPOT THE ERROR
I need to get another and try again!
quote:
Originally posted by MakeEverything
.....
Sadly, i managed to get the top hose done first but spot the error.....
Top Hose SPOT THE ERROR
I need to get another and try again!
Afraid so! Got another one coming, rather than grind it off, as the surface needs to be flat.
The new bracket arrived whilst i was out this afternoon, but i wasnt too sure about it. I think maybe it looks a little too "XBOX" rather
than anything else. So ive redrawn the bracket to look like this;

Another bracket
It's a little bit conservative, but should be cut tomorrow and delivered before friday. This will give me a mounted supercharger at the weekend
im hoping!!!
Finished two niggly little jobs this morning. Its surprising how much you can get don in just 30 minutes of 'garage time'.
Helicoiled the water pump bolt that had stripped. All good.
Fitted the exhaust manifold bolts that arrived today, with the helicoil set and 3 pin plug for the Lambda sensor.

Helicoiled

New Exhaust Studs
Next is the new supercharger bracket (when it arrives) and the alternator lower bracket that i bought the other day.
I knew i had a box of boost hoses from the 7T that i bought as spare, but i forgot that i had kept the exhaust manifold as well!
I think it will foul the supercharger, as its not as compact as the turbo manifold, so ill have to play with it once the bracket arrives.

Look what i found in the garag
Also, in the 10 minutes i was out there, i grabbed the grinder and cut the alternator bracket off of the power steering pump. I need to remove some
of the excess metal and strengthen it again, but it looks good so far.

Alternator Bracket
As i said, its surprising how many little jobs you can get done with the odd 10 minutes here and there.
Looging goodddd
Keep it up.
Got the turbo inlet sorted this afternoon...
Now looking more like an engine again!
The aim is to get rid of all the wierd sized threads, like M7!!

Looking like an engine!
quote:
Originally posted by MakeEverything
The aim is to get rid of all the wierd sized threads, like M7!!
quote:
Originally posted by MakeEverything
The aim is to get rid of all the wierd sized threads, like M7!!
quote:
Originally posted by l0rd
quote:
Originally posted by MakeEverything
The aim is to get rid of all the wierd sized threads, like M7!!
And what is wrong with that?
Every socket set and ratchet set has it as standard.
Got busy when i got in from work.

Painted Cam Cover
Also did a bit of cooking....

cooking
And i carried on.....

Shiney covers 2

shiney covers 1
And the peace de resistance......

Covers on engine
I love how this looks now. With the red silicone hoses, its going to look awesome.
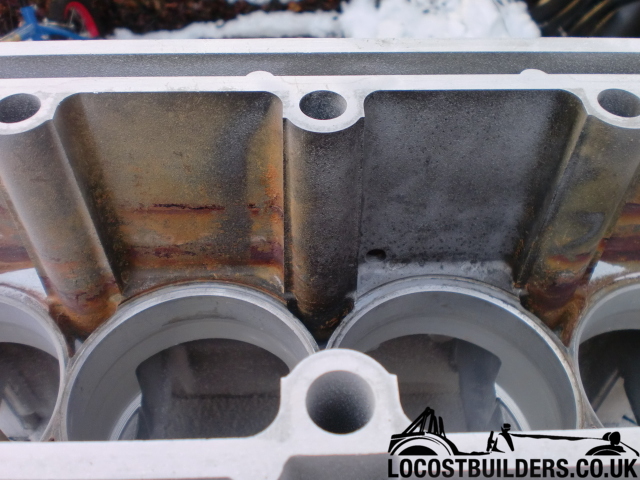
Yes, it does look good.
But, all that rust and dirt on the head is
Take it apart and clean it up.
Do it once, Do it properly
[Edited on 29/7/10 by l0rd]
quote:
Originally posted by l0rd
Yes, it does look good.
But, all that rust and dirt on the head is
Take it apart and clean it up.
Do it once, Do it properly
[Edited on 29/7/10 by l0rd]
Sorry my bad
Meant rust on the engine such as alternator, pulleys etc..
Dirt, i meant on the head and the inlet manifold.
BTW the colour of the rocker cover and the turbo cover is excellent.
What is it? From different angles, it looks like whiteish
[Edited on 29/7/10 by l0rd]
Its VHT Aluminium colour.
I sprayed two coats onto both covers, and rubbed the letters off with a sponge sanding block.
The two lines next to renault now sport red insides! I plan on doing the 5 lines on the other cover too, just to break the colour up a bit.
The top mechanisms are all painted (Red) now and are drying. The pulleys will get cleaned, as will the inlet which will also be painted. The
throttle body needs stripping and cleaning anyway.
Im replacing the alternator ultimately, but for now, ive got another (cleaner) one which will do.
The supercharger will also get some paint, though im thinking of an idea to make the whole thing stand out...... watch this space, but it does
involve red, and the gearbox as well.....
Oh, and ive painted the exhaust manifold with a 700 degree silver paint too.
Is this ok for you?? 

A Touch of Red
[Edited on 29-7-10 by MakeEverything]
quote:
Originally posted by MakeEverything
Oh, and ive painted the exhaust manifold with a 700 degree silver paint too.
Is this ok for you??
A Touch of Red
[Edited on 29-7-10 by MakeEverything]
Now that i noticed. You need to paint the filter red.
quote:
Originally posted by l0rd
Yes. Much better now.
Just being a Renault Fan, I always look forward at your pictures and progress.
I am sure, it will end up looking a beast.
You should easily see something like 180-200 bhp.
The only problems with these engines, there aren't a lot of aftermarket components as far as i am aware.
quote:
Originally posted by l0rd
You should easily see something like 180-200 bhp.
The only problems with these engines, there aren't a lot of aftermarket components as far as i am aware.

ahonhihoor monsieur, with le sexi french mistress c'est really spoilling us!
Yes, my bad again. You can indeed find aftermarket parts as you mentioned.
It's the ŁŁŁ of pounds that you need to spend that kept me from looking.
Most of the time, i was looking to find Renault replacement upgrade components.
This is the latest, with the inlet removed for brutal extraction of the injectors, ready for ultrasonic cleaning and testing.

latest 30-7-10
Where are you taking the injectors for that?
Theres a guy in Aston that does it. Look for Injector cleaning on Ebay.
Here
[Edited on 30-7-10 by MakeEverything]
Mate, give me a few weeks getting married, going on honeymoon, getting back to work for a week and finally getting on here for a quick look &
youve been a very busy boy !
Looking fantastic so far
TOP JOB !
quote:
Originally posted by Andybarbet
Mate, give me a few weeks getting married, going on honeymoon, getting back to work for a week and finally getting on here for a quick look & youve been a very busy boy !
Looking fantastic so far
TOP JOB !
So, Weekend arrived. Time for a mock up supercharger fitment.
quote:
Originally posted by l0rd
So, Weekend arrived. Time for a mock up supercharger fitment.
Happy Days, all of my bolts arrived today.

Bolts arrived
Guess what ill be doing later!!
Try to balance all the bolts one on top of the other lenghtwise?
quote:
Originally posted by l0rd
Try to balance all the bolts one on top of the other lenghtwise?
A slight change of plan this afternoon.
I started to get pissed off with working in 1 square metre of workspace, so i pushed the car out of the garage, and had a little clear out. Not as
much as i would have liked, but quite a bit given the time i had.
The cosworth engine and all its bits has now been sold, so i wrapped that for collection this evening.

Cosworth Going!
Also, during my tidying up, little man was fairly insistant that he wanted to help......

Lorry Hoisting
Still, at least now im a bit more organised. Just need my connectors to arrive from PoleVolt, then ill be starting the wiring of the engine loom too.
awesome picture.
Another little job done.
Stripped the inlet, cleaned it, painted it and refitted (temporarily) with some of those nice new bolts. Have run our of washers though, but ill get
some later on.

Inlet refitted
Also stripped, cleaned and 'serviced' (not much you can do with a TB if the springs and shaft are ok) then painted with red enamel to match
the rest of the engine. Really pleased with the nice glossy finish. same with the timing belt dust cover too.

Red TB
looks great! now go the alternator/pulleys and cam gear to finish it up.....
quote:
Originally posted by westy turbo
looks great! now go the alternator/pulleys and cam gear to finish it up.....
Ive just got in after collecting my old J7T engine from CBR. Big Thanks for managing to persuade the giant to let me come and collect!! The whole
journey was about 250 miles, 5 hours of driving, a Hazelnut Latte (for the sugar and caffiene) and about an hour in Cannock loading the engine. - All
after 8 hours of "Work"!!
I now plan to strip the inlet off (in case i need an upside down one) and the engine mounts in case the OEM ones move too much, though not tonight!!
Look what i collected this morning......

Cleaned Injectors
A nice cleaned set of injectors. One of the injectors was 30% down in efficiency, so im really glad that i decided to make this investment. It would
have taken me ages to find out why it wasnt running right!! Each injector cost me Ł10 to clean. I dropped off and collected, seeing as i live
nearby. Thanks to AndyQuadra for another excellent recommendation.
Injectors cleaned and returned with a sterling service from;
http://cgi.ebay.co.uk/Fuel-Injector-Ultrasonic-cleaning-Testing-/150472252317?cmd=ViewItem&pt=UK_CarsParts_Vehicles_CarParts_SM&hash=item
2308d85b9d#ht_5558wt_1137
or
http://www.mrinjectoruk.auctivacommerce.com/Default.aspx
Ive stripped the 7T of its engine mounts and inlet, as well as alternator.
The manifold fits directly onto the 7R and ive had some discussion with AndyQuadra regarding is origin. We are presently stumped as to what it was
from, but it does have a WEBER twin butterfly throttle body both with a bore of 37mm. First one opens up to half throttle, then the second to full
throttle. This may help stabilise the idle, and give me more control over power delivery.
Anyway, here are some pictures of it and my nice clean (now painted) injectors.

Painted Injector

Inverted Manifold 1

Inverted Manifold 3

Inverted Manifold 4
The "Inverted" manifold may be better for me, and utilise the void below it rather than the tight space above. It will also keep the centre
of gravity lower. :rockon::clap2::clap2:
Look what arrived today.

New Bits
Here is a latest picture from todays minor efforts. The new (old!) inlet manifold is currently fitted upside down to be able to put the twin barrell
TB on so that i can dry somewhere safe.

Latest Engine shot
I have also painted the fuel rail which is still drying.

Painted Fuel Rail
And a close up of the Twin Barrell Throttle Body, sporting a clean TPS.

Clean twin barrell
And the other side, which shows something else......

Weber
.... Yes its a Weber..... which is nice.
Et Voila.

Inlet and Fuel rail on
You're making a rod for your own back in the amount of work you'll now have to do on the rest of the car to make it look as good as your
engine
quote:
Originally posted by scudderfish
You're making a rod for your own back in the amount of work you'll now have to do on the rest of the car to make it look as good as your engine

Supercharger Fitte
Got the supercharger hanging off the engine now. Just need to make a stronger rear mount, and its all good.
Slow progress this week.
The smaller (Rear) supercharger bracket arrived today, and ive got belts on order for it too.

Small Supercharger Bracket
Just need to get it fitted and an adjuster made so that the tension on the belt can be adjusted by this rear bracket.

Both mounts supercharger
well done, putting us all to shame with the speed of your progress
Its taken me four times as long as anyone else to find the focus though!!
After three engines and as many months, ive finally stuck with a direction!!!
I fitted the supercharger a little more permanently tonight as a trial fit to make sure its not too weak, only being supported at two points. I think
i might add some more mounting points later on, but for now it will get the engine in and serving its purpose.

Supercharger 1
With the way that i have mounted the supercharger, allows for a little movement laterally as well as longitudinally, so i can adjust the position for
the belt, to ensure correct alignment and tension. In hindsight, this was a good move, seeing as the measurements were impossible to get 100% spot
on.

Supercharger 2
My concerns about the oil filter were correct though, and i do need a remote oil filter housing, which i will mount towards the rear of the engine,
for ease of changing. I plan on changing the oil fairly frequently once i know the engine is good. Even more so if i put a rebuilt one in. Here is
a picture of the remaining space i have for the oil filter remote cover to go into. Sorry about the poor quality, i was stretching round the engine
to take it.

Oil Filter Dilemma
The inlet for the supercharger is being cut by a mate of mine in Cornwall, so that should be ready for fabrication next weekend all being well. This
will give me a 63mm inlet to match the intercoolers. The filter is a cone type which will be located where cold air is forced in.
Looking good Rich, keep it up!
Can't wait to see the supercharged batmobile on the road
quote:
Originally posted by Xtreme Kermit
Looking good Rich, keep it up!
Can't wait to see the supercharged batmobile on the road
You need one of these
http://cgi.ebay.co.uk/Supercharger-Warning-Sticker-KO3-KO4-AUDI-TT-VW-GTI-/170405546045?pt=UK_CarsParts_Vehicles_CarParts_SM#ht_1334wt_914
quote:
Originally posted by scudderfish
You need one of these
http://cgi.ebay.co.uk/Supercharger-Warning-Sticker-KO3-KO4-AUDI-TT-VW-GTI-/170405546045?pt=UK_CarsParts_Vehicles_CarParts_SM#ht_1334wt_914
The new (first one was ordered the wrong size!) inlet rubber came today from my friendly ebay Koi centre supplier!!
All fitted using the longer band from the incorrect order, so not completely wasted.

Inlet Rubber
Also, on the way back from Birmingham, i "Popped" into peterborough to pick up another gadget......

Nitrous Home

Nitrous Home 2
[Edited on 16-8-10 by MakeEverything]
Some unexpected progress this evening following a thread earlier discussing the objective 1/4 mile time of sub-10.
I think my objectives may be a bit ambitious, but then that should bring the performance up as high as possible within the safe limits of the engine
and equipment that i have.
Anyway, i think i may need to review the objectives once the car is running and all set up.
For now, here are the pictures of this evenings progress;
Foggers mounted into the inlet;

Manifold Nozzles in

Fogger closeup

Inlet fogger
And with the 4mm nylon pipework connected. I plan to make some more at the correct lengths, but for now, the existing ones will do;

Nitrous connected

Manifold
The inlet manifold is mounted upside down, so that i can work on it easily. Needless to say, i DIDNT drill the manifold with it attached to the
engine, and it will be blown out before final fitment again.
I was waiting for some progress but this is more than i expected.
The only thing i can say
Renaults 21 used to have webbers. My uncle's 1.4 R21 had a double webber as well.
I used to love the responce of the throttle with it.
Had a week off (Malta) last week, so ive had withdrawal symptoms from the project.
Made some progress today in that i have now permanently fixed the supercharger, and found a belt to fit it though it is a little slack and may need to
be shorter.

Fixed supercharger
Plan for next week is to get the engine trial fitted to the car and the mounts sorted out. Then start to make up the inlet hoses and exhaust, ready
for firing. Mechanics by day, electrics by night, so the evenings will hopefully be filled by making up the wiring loom and megasquirt.
Had a good start to the day. Managed to get the oil filter remote takeoff drilled and tapped to 20mm (19mm drill bit came today), and fitted to the
car.

Oil Filter Remote fitted 1
With barely enough room, even after grinding off the wrench stud.

Oil Filter Remote Fitted 2
This should be ok, as it i can use a strap wrench to remove it if i need to later on. Not sure if it will still be a problem after ive adjusted for
tightening the belt, but will see.
Also, i got fed up with moving the nitrous solenoids around the garage, so i knocked up a bracket for these that i had measured a template for before
going on holiday. This is the result;

Nitrous Solenoids Mounted
Looks quite nice and compact, though i might see if i can get some M6 countersunk screws and turn the bracket the other way up to make it even more
compact. Watch this space.
Thats Better;

Solenoid Bracket 1

Solenoid Bracket 2
Welcome back. You got me worried for a sec. I was actually thinking of you a second before you posted.
Nice work.
quote:
Originally posted by l0rd
I was actually thinking of you a second before you posted.
quote:
Originally posted by l0rd
Nice work.
More progress tonight; The trigger wheel.......

Trigger Wheel Concentric

Trigger Wheel Concentric 2

Trigger Wheel Concentric 3
Sorry Andy! I was listening, but at least now i dont have to;
A) Get it machined
B) Send it away
C) Wait for it to be done!
All in all, a good day.
[Edited on 1-9-10 by MakeEverything]
3 things
Remove the rust befor welding the trigger wheel.
Paint the trigger wheel
you need to anodise the NOS solenoids (they are scratched )
[Edited on 1/9/10 by l0rd]
quote:
Originally posted by l0rd
3 things
Remove the rust befor welding the trigger wheel.
Paint the trigger wheel
you need to anodise the NOS solenoids (they are scratched
[Edited on 1/9/10 by l0rd]
quote:
Originally posted by MakeEverything
I fitted the supercharger a little more permanently tonight as a trial fit to make sure its not too weak, only being supported at two points. I think i might add some more mounting points later on, but for now it will get the engine in and serving its purpose.
Supercharger 1
With the way that i have mounted the supercharger, allows for a little movement laterally as well as longitudinally, so i can adjust the position for the belt, to ensure correct alignment and tension. In hindsight, this was a good move, seeing as the measurements were impossible to get 100% spot on.
Supercharger 2
My concerns about the oil filter were correct though, and i do need a remote oil filter housing, which i will mount towards the rear of the engine, for ease of changing. I plan on changing the oil fairly frequently once i know the engine is good. Even more so if i put a rebuilt one in. Here is a picture of the remaining space i have for the oil filter remote cover to go into. Sorry about the poor quality, i was stretching round the engine to take it.
Oil Filter Dilemma
The inlet for the supercharger is being cut by a mate of mine in Cornwall, so that should be ready for fabrication next weekend all being well. This will give me a 63mm inlet to match the intercoolers. The filter is a cone type which will be located where cold air is forced in.
I think you are right too. Ive been looking at this for a while, and i think a mount to the hole which passes through the whole charger should do the
trick. Just need to get round to designing it!
A single Vee belt should do, particularly as the supercharger isnt a heavy load in comparison to a water pump and alternator. Its certainly no more
than the power steering pump which was powered the same way.
Thought i would tack the trigger wheel on tonight and see if it was in fact concentric. Im pleased to say it was!! :first:

Trigger Wheel Tack 1
Took longer to get the TIG welder out, but at least its done now, and ready for fully welding and dressing.

Trigger Wheel Tack 2
I have the week off (Other than wednesday) so the objective of the week is to get the engine back in the car and ready for plumbing in.
Made and welded up the VR sensor bracket today. Its fairly substantial, but rather that than too weak.

VR Bracket 1

VR Bracket 2
Missing tooth should be 9 teeth ahead of the sensor.

VR Mounted 1

VR Mounted 2
[Edited on 6-9-10 by MakeEverything]
I am sorry to be such a pain in the **** but, i believe that this bracket doesn't look right compared to the high standards of work that you have
shown so far in your build.
don't swear at me.
quote:
Originally posted by l0rd
I am sorry to be such a pain in the **** but, i believe that this bracket doesn't look right compared to the high standards of work that you have shown so far in your build.


now that you have a template i am sure you can make another one that will be spot on.
Also, you might want to make a proper spacer for the VR bolt.
Now i am going to bed before i upset you
quote:
Originally posted by l0rd
now that you have a template i am sure you can make another one that will be spot on.
Also, you might want to make a proper spacer for the VR bolt.
Now i am going to bed before i upset you
Had a slow start to the day today. Expecting some rain at 10:00, i waited to see what the weather was going to do before dragging stuff out of the
garage.
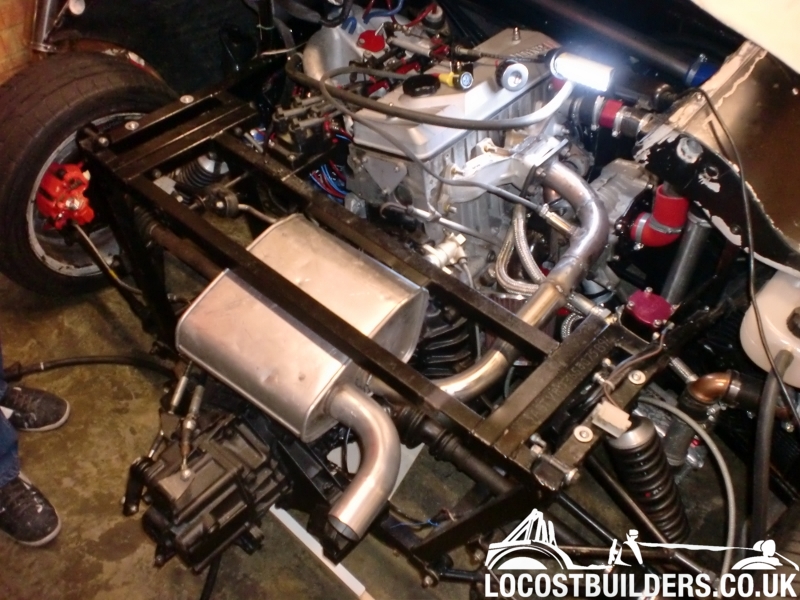
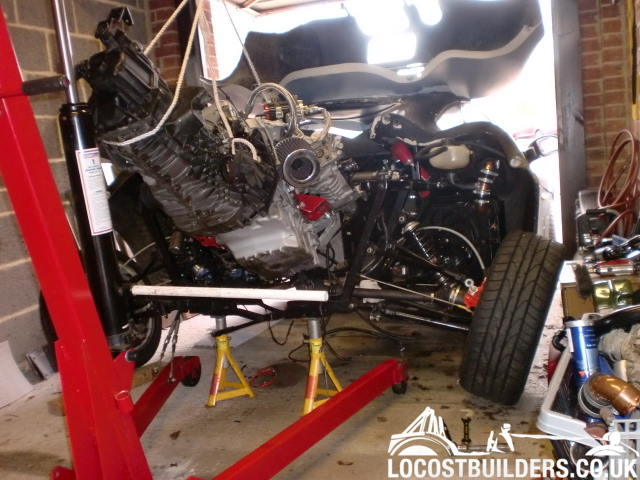
Managed to get the engine in its original mounts again;

Engine Trial Fit 1

Engine Trial Fit 2
The supercharger hits the fuel tank and needs another 40-50mm clearance to fit and move. Next job is to modify the tank, check everything again and
refit once its all clean.

Charger Vs Tank!
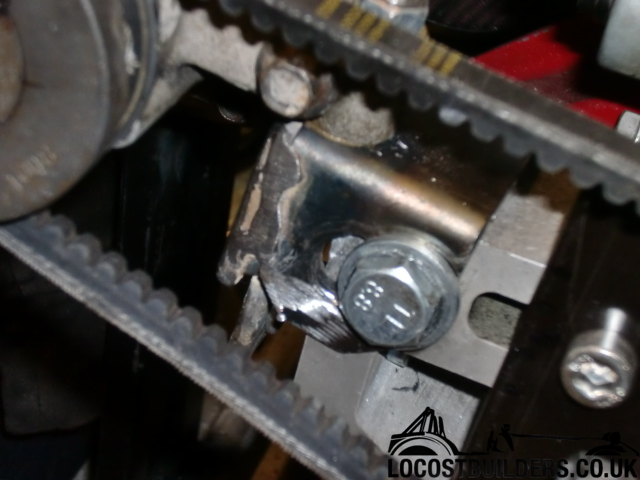
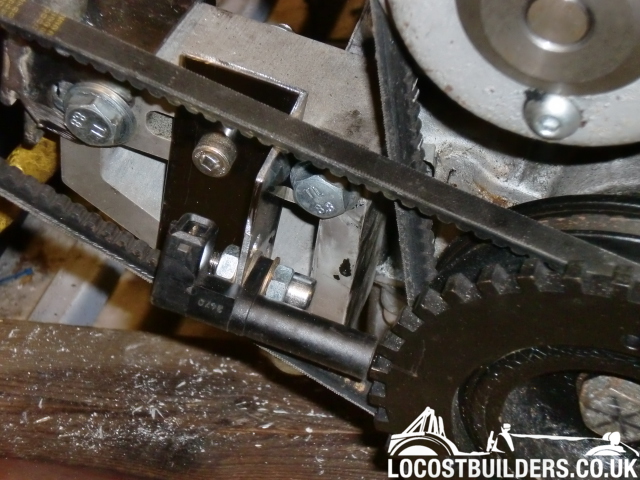
Todays final efforts with all modifications made to Tank VR mount, supercharger adjustment and timing belt. Turned over by hand very well.

Todays efforts! :)
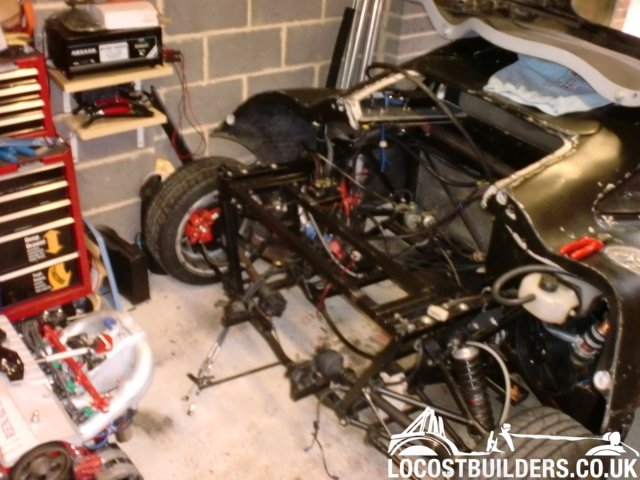
Progress from todays efforts.

She's in 1

She's in 2

She's in 3
Then it absolutely hammered down with rain!! The car got soaked, so is now drying out in the garage!

She's in 4
Next up, Wiring, Inlet plumbing, exhaust.
Had a pretty non-productive and lazy end of last week (also expensive), but i have now ordered;
New 3 core custom made Radiator
Adjustable Fuel Pressure Regulator with Gauge
Some more vacuum hose.... it was cheap!
New Radiator Fan
These should arrive this week, and im currently contemplating a race spec oil filter remote and heat exchanger.
Tonight, i also managed to make a start on the wiring, which i started to enjoy (as suspected) once i eventually got stuck in. Managed to get the two
relays wired and the fuse box wired up. Just need to complete all the field wiring and get it done.

Wiring 1

Wiring 2
This is all working from my own wiring diagram, so i hope its right!!!!!

Wiring 3
You need to slow your progress down, you're making the rest of us look bad
quote:
Originally posted by franky
You need to slow your progress down, you're making the rest of us look bad
oooooooooooo shiny........

Fuel Pressure Regulator
Bling!
How much? Do you have a spare?
Tonights Efforts saw the injector looms finished, relays finished and fuel pressure regulator installed. Also, i connected up the brake pipe unions
before i forgot about them and to give me a break from the wiring!!

Wiring 4
The FPR is mounted using the stock bracket which is very soft, so i will change or modify this at a later date, to stop it moving around too much.
For now, this will do.

Wiring 5 and FPR
Got the soldering iron sorted out and eventually managed to get some decent soldering done.
Here is the bulkhead connector and socket. MS will be connected to the socket end, and the plug onto the engine loom.

Bulkhead Connector 1

Bulkhead Connector 2
The plug is deliberately selected for durability, and the same standard as those used in MOD vehicle installations.
My new radiator arrived today, which i had made to replace the old Austin Maestro unit. It is three rows (Not triple pass as originally thought!) and
made of copper. As a result of the Copper material, it is a little heavier than i would have liked, but its repairable rather than disposable!!

New Rad
As with the water hose takeoffs that i made, the pipework is the same size, to prevent the need for reducers and subsequent pipework. I had to swage
these myself, as they were not a standard size. Took 2 minutes with my new-founded crimping tool.

New Rad Swaged
When i managed to squeeze the rad in (after getting upside down twice!!), i noticed that the bottom hose is too close to the engine mount. Ill be
moving the mounting brackets for the rad rather than send it away for modification. Shouldnt take long at all, and might even give me more room.

Rad Tight Fit
Cracking on with the wiring tonight for now, as ive now got too many jobs on the go. The radiator is staying in to keep it safe, but will be coming
out again later on.
After a bit of work, my new oil filter remote and heat exchanger arrived today.
Not feeling great, so these wont get fitted until later in the week.

Oil Filter / Heat Exchanger
........... or maybe sooner......

Oil remote fitted

Oil remote fitted 2
Here i am.
I have been monitoring your progress but didn't have the time to reply. Actually i should be getting ready for tomorrow's session and my
CCNA qualification.
Looking good. I like your Fuel pressure regulator. Nice colour. Mixes quite well with your blue and red hoses and NOS solenoids. As you said, the
bracket does look a bit flimsy and i would have expected you to have an Ali bracket already ordered or made.
Your radiator looks good, as you said, you need to change the connecting pipe as it is too close to the engine mount. Would puting it on the side of
the radiator have a negative effect? It seems you have plenty of space there.
And will you please stop the excuses that you feel poorly? You have so much work to do. Well done for fitting the remote oil filter pump but you need
to spend some time and elbowgrease in order to make the heat exchanger nice and shinny.
Now, stop reading and spending time on the forum. Your car is waiting for you.
BTW, you do realise that as soon as you finish with the installations, you need to take everything apart in order to paint the chassis.
[Edited on 21/9/10 by l0rd]
Aaah there you are!
The filter is only a filter, not a pump. I like the look of it and the fact that i can change the element without dropping oil everywhere. Trouble
is, i might need some sort of debris trap or magnet as the feed is in the bottom.
The radiator will cost me another Ł20 odd plus messing around transporting it, so ill just move the rad brackets instead.
Wiring is getting there, just need to concentrate and get a good run at it.
Yes, that's why i said you could try moving the radiator pipe on it's side and not where it is at the moment.
ohh and i forgot to add
Looking goooddddd!!!!!!!!!!!!!!!
Thankyou. Its always good to have your ego boosted once in a while!!
Broke the coil pack tonight, by knocking it off the shelf! Doh.
Ordered a plug for the TPS, and have nearly finished the wiring. All i need to do really us sort the oil pipework and see if it will fire up!
quote:
Originally posted by MakeEverything
Thankyou. Its always good to have your ego boosted once in a while!!
Broke the coil pack tonight, by knocking it off the shelf! Doh.
Ordered a plug for the TPS, and have nearly finished the wiring. All i need to do really us sort the oil pipework and see if it will fire up!
quote:
Originally posted by scudderfish
quote:
Originally posted by MakeEverything
Thankyou. Its always good to have your ego boosted once in a while!!
Broke the coil pack tonight, by knocking it off the shelf! Doh.
Ordered a plug for the TPS, and have nearly finished the wiring. All i need to do really us sort the oil pipework and see if it will fire up!
Fool!
Just thought I'd inject a bit of balance
There we go, im all balanced up! Im an egotistical fool then!
Does this mean you have done all the cooling. fuel, exhaust fabrication done?
If not
GET BACK TO THE GARAGE
PS And don't forget the pictures.
I squeaked like a guinea pig when i turned the ignition on!!

Schoolby Giggle

Amazing it Works!
At first i wasnt sure it was working and half expected an error in the wiring that i had done. Amazingly, its faultless!!
All i need to do now is finish the Lambda, water temp and TPS, then its finished. After that is Oil system, Water system, Fuel system check, Test
Fire, Boost Hoses and take it from there.
You heard it here first, Richard squeals like a pig
quote:
Originally posted by scudderfish
You heard it here first, Richard squeals like a pig

You sure got a puuurdy mouth !!
whipe clean the top cover of the engine.
I can see some oil marks there.
Ohhh FGS i am dissapointed.
Good work.
As i noticed, you haven't been keeping us uptodate as i can see that you have painted the gearbox and i cannot find any post that you mentioned
this.
haha, the build diary was getting a bit tedious with every single update!!
tried to set up the fuel pressure regulator tonight, now that the pump primes and runs. I couldnt get the pressure up, even following the
instructions so i took it apart.
The grub screw supplied and fitted isnt long enough to push the plunger into the diaphragm! i swapped it for an M8 bolt and now have a happy 3BAR
starting pressure. Might need to change the pump at a later date if i need to run more pressure.
The instructions were also completely arse about face. Even if the bolt were long enough, the instructions would have seen me remove the screw to
increase pressure! Now i understand the cheap Ł45 price!!
RICHARD
The weekend is over and you haven't updated us. Come on. What have you been doing? Still trying to get one sensor to work?
Just wack it with a hammer. You have plenty more that you need to sort.
there i said it.
lol,
Ive had the kids all weekend, so ive been indoors looking at the Cat1 alarm that i want to install soon, before the looms get all bound up in conduit
and tape.
I have been doing some work looking at the sensors, and also looking for a standard TPS which seems to also be nackered.
Ive worked out what brackets i need to weld into the chassis for the heat exchanger and radiator, so i can get cracking again soon.....
i have a TPS but it is on ebay.
That was on my Clio RSi
Well, because of you L0rd, i went out in an attempt to make some progress.......
And almost blew up my ECU!
Ive checked it with the STIM, and it all seems fine, but i still have the same problem with the temperature going down when it should be going up.

ECU Recheck
With the bias Resistor setting at 2490 Ohms, and everything connected (MAT), the temperature is showing extremely high, and not the 5 degrees it
should be.

Picture of Screen
Now im stuck and about to buy a different MAT sensor.
quote:
Originally posted by MakeEverything
Well, because of you L0rd, i went out in an attempt to make some progress.......
And almost blew up my ECU!
Ive checked it with the STIM, and it all seems fine, but i still have the same problem with the temperature going down when it should be going up.
Now im stuck and about to buy a different MAT sensor.
i believe i still have a couple of sensors left from my clio but not a MAT.
I think i have radiator fan sensor, engine temperature sensor, MAP and some others.
If you want, i can look around to dig them up.
Well, maybe not because of you, but im blaming you anyway!!
That would be great if you do have some sensors please bud. Ive got two toyota water ones, which need different plugs - what a pain in the ass! I
think it might have been plugging these in that nearly blew the MS.
At the moment, i need TPS (standard with 7mm D shaft) MAT, CLT x 2.
Might get a TPS sensor new from a supplier, so just need MAT and CLT.
I will try to dig up my clio parts tomorrow.
Night night
Well, after a really busy week at work and a dream about sprinting in the kit last night, i finally bit the bullet and spent Ł60 on a brand new MAP
sensor, IAT Sensor and Coolant Sensor.
Ive missed the deadline of the 31st to get the electrics finished, but its not too far away to be honest, though i think starting up might still be
four or five weeks away.
Jobs left to do;
Finish ECU & Test. Hopefully its not blown.
Inlet & Discharge Flanges for supercharger
Mount Oil Heat Exchanger
Re-Mount Radiator
Mount Intercooler
Pipework for Coolant
Pipework for Oil
Boost Pipework
Transmission Oil Change
Starter Bolts at rear
Make the exhaust
Final check of Fuel System
Try and Start the Engine!
Then;
Clutch Slave
Brakes
CV Bolts
New High Pressure Fuel Pump
Secure Battery
Then thats about ready for MOT again.
[Edited on 3-10-10 by MakeEverything]
Well done.
I missed your update just didn't want to ask this time.
TPS sensor and temperature sensors arrived today and.......
They work great. Just need to fit the TPS properly, mount the oil heat exchanger and get the hoses measured up ready for a trial startup!!
Slow progress expected now though, as work has taken a priority!! Doh! Still, good while it lasted!
That is excellent news. looking forward for the first startup soon. not long left.
Managed to get into the Garage today, and complete a couple of jobs that ive been putting off.

S/C Inlet welded up
Got the inlet flange welded up, but i think this might strangle the inlet a bit. I think ill open this out at a later date, as in my enthusiasm to
trial fit, i managed to get it stuck on the supercharger!

S/C Inlet welded up2

S/C Inlet welded up3
The other job i finished was the Coil Pack bracket. Looks quite good, and is simple, yet effective.

Coil Pack Fitted

Coil Pack Fitted2
Fancy making me a couple of those coil pack brackets?
quote:
Originally posted by scudderfish
Fancy making me a couple of those coil pack brackets?
I'll be in touch.
Chocolate Hobnobs are best!!! 
Always welcome Dave. You have U2U.
Thanks to Scudderfish Dave's moral support (and the packet of hobnobs that we never opened!), i wheeled the car out and managed to get some more
painful jobs out of the way. Cut and welded a bracket for the heat exchanger, then mounted it with cable ties temporarily.

Heat Exchanger fitted
Also managed to finish off the intercooler bracket, and get this in situ. Once im finished with the TPS and inlet, ill mount this permanently.

Intercooler Fitted
Trouble is, the new TPS i bought is a lot smaller, and has less girth than the original, so im on the lookout for a new original, or some brackets to
take up the gap between it and the throttle body.

TPS problem!
Getting happier now, and more motivated. Im sending the radiator back for some modifications, so that i dont have to move the mounting points, so
once i have that back, ill be ready for oil hoses and water hoses, though i think im going to order a selection of bends and get the oil hoses made
ready.
If I'm provided with tea, I can support any morals Good to see what you've been up to.
quote:
Originally posted by scudderfish
If I'm provided with tea, I can support any morals
Good to see that you have made progress.
Wish i was closer.
nice one rich...looking good...i reckon you will be done before me
Went outside when X Factor started, with the intention of only fitting the TPS.

New TPS Fitted
Got the TPS fitted, tested, set up as well as the TB Fitted back onto the inlet, and a couple of other little jobs finished.
All in all, a good couple of hours. Now i need to catch up with the washing up!
good to see that you made a bit of progress. I knew you had quite a bit of work to do so i kept my mouth shut.
Might be going into the garage to start mocking up the exhaust tonight....
[Edited on 17-10-10 by MakeEverything]
After a few weeks of actually working for a living ive needed to take a week off to recover!
The radiator came back modified, so there are no nylon ties through the core, and the pins have been moved to move the radiator forward a bit.
Trouble is, now i need to move the heat exchanger bracket that i put in a couple of weeks ago! Its only a 10 minute job, so ill do this when i get
the engine running, to save me having to push the car in and out of the garage!
On monday, i also managed to get the oil hoses made up and installed;

Oil Hoses In
So i fulled the engine with oil, and tried to start it but there is a problem with no spark. It could be that i have damaged the ECU previously, or
it could be the ford EDIS module, so i have bitten the bullet and bought a new megasquirt unit which will eliminate the use of the EDIS system, as
well as the potential damage on the old unit. Once the car is running ill be able to swap them back over, and verify if it is damaged or not with a
view of selling the old one on.
Currently, there isnt much more i can do that is worth dragging the car out for regardless of the sunshine at the moment!
Just a bit of an update;
I have had my old ECU repaired by a mate of mine which seems as though it was built wrong by the original builder, so am just waiting for it to be
sent back to me. Once i have it, i'll be installing it and trying again!
Progress is very slow now mostly because of work, but if i get the engine started before christmas, then the rest should flow fairly quickly.
Watch this space!
BIG BIG BIG BIG BIG thanks to Scudderfish for his help this afternoon.
We connected the ECU and tried to fire it up, but my timing light is not working after numerous bounces on the floor. So we checked the spark from
the coil using a grounded spark plug. Only coil 1 was firing, so i changed it for the spare coil pack i had and we had spark on all 4 cylinders.
Plug it all back in and crank it over.......
After a few seconds of cranking it fired up!!!!
WWwwwwhiiiiiiiiiiiiiiiiiiinnnnnnne
Straight up to 3500 RPM and sounding good (and loud!). Supercharger spins up nicely, and all seems to be good for now. Just need to get the hoses
connected up to run it for a longer period.
All in all a great afternoon, and impossible without the good old LCB and the help from fellow LCB'ers. Thanks Dave.
Will post a video shortly.
http://www.youtube.com/watch?v=ZJUTNpcGhM8
Full fat video is 30Mb or so. I'll figure out a way to get it to you.
Regards,
Dave
Finally
A tear just dropped from my eyes. (not but nearly there)
Well done m8. It's good to see all that hard work finaly paid off.
Yes, im really pleased after such a heavy few weeks at work. Now i can concentrate on using the facilities at work to get all my pipework etc made
up!
I was thinking about the revving, and I don't believe it's too much fuel, it's got to be too much air. Have you blanked off all the other holes on the inlet manifold? What about the vac pipe to the MS? we never plugged it in so it would have been sucking through that.....
quote:
Originally posted by scudderfish
I was thinking about the revving, and I don't believe it's too much fuel, it's got to be too much air. Have you blanked off all the other holes on the inlet manifold? What about the vac pipe to the MS? we never plugged it in so it would have been sucking through that.....
Exhaust
Ive ordered some silicone hoses and have bought some steel tube which i will bend to fit the application, with the silicone used as joiners. This is
massively cheaper than silicone bends, and will hopefully look a lot better once theyre painted up etc.
Im not sure when my next allocation of "Garage Time" is, but certainly i wont get much done before friday, as the bender i need is at work.
Im borrowing it over the christmas break, so at worst i'll have all of my bends made up before January.
Well, the pipework i ordered yesterday came today. Work now in progress on the coolant system - FINALLY!!

Coolant Pipes 1

Coolant Pipes 2
Im currently putting a bead on all of the fittings so that the silicon hoses dont slip off. I could have used yorkshire fittings, but they are more
expensive. This is a low budget build after all (If there is such a thing!)
[Edited on 30-12-10 by MakeEverything]
All Done. Going to try and get it all fitted this afternoon / this evening.

Coolant Pipes 3
Managed to get the hoses in the other night, but stood back and immediately saw that i could do it better and with less pipework. These are tonights
efforts;

Coolant hoses in 1

Coolant hoses in 2
I also had a clean up of my clutch slave which i need to put back together and test before installing. the only replacements for this i can find are
Ł80 from De-Lorean Motor Company. A last resort, though there are some questions over their reliability.
Picture shows a wet slave, hanging from a bit of wire to dry.

clutch Slave painted
More progress to be made once im settled back at work no doubt.
Put the finishing touches on the nitrous kit, plugging the four surplus holes in the 6cyl distribution block. Just the wiring to go.
Managed to get some jubilee clips on the coolant hoses (Thanks Davegtst) and the coil pack put into the bracket.
All the little jobs coming together.....
Finally managed to fit the last jubilee clip to the coolant system, and fill it up. 2L of neat coolant and about 8L of water......
I could hear a dribble, but couldnt see it. Looked for about 5 minutes, and had to get the missus's mirror to look underneath. One of the hoses
was a bit loose, so i nipped it up and it slowed down. However.......
......theres water in the bottom of the radiator between the fins, and its dripping onto the floor. Im hoping its just another loose hose clip and
not a leaking radiator that cost me nearly Ł300.
Will keep you posted, but i suspect that all of the coolant will be on the garage floor by morning.
All sorted now. It was another dodgy Jubilee Clip.
If the weather is good, ill be starting her up tomorrow to get it up to temperature.
THIS THREAD IS WORTHLESS WITHOUT VIDEO!
quote:
Originally posted by scudderfish
THIS THREAD IS WORTHLESS WITHOUT VIDEO!
I'm at work
quote:
Originally posted by scudderfish
I'm at work
quote:
Originally posted by MakeEverything
quote:
Originally posted by scudderfish
I'm at work
Blimey!
quote:
Originally posted by scudderfish
quote:
Originally posted by MakeEverything
quote:
Originally posted by scudderfish
I'm at work
Blimey!
Well someone has to do the work to earn the pay to pay the taxes that funds the educational system that supports the site that subcontracts your firm that pays your wages that you fritter away on a kit car

TB Stuck Open
Looks like the idle screw is set incorrectly, causing the problem. I need to think whether i want to re-fit this once repaired, or fit the other
manifold.....
[Edited on 18-1-11 by MakeEverything]
Well, i took the manifold off, plugged all possible air leak offenders, and put the manifold back on. IVe taken a video of the results which im
uploading now. All i can say is that theyre good!! Really happy now, as this is real progress.
The smoke is (im hoping) as a result of starting and stopping and having not been under load for a while. It should clear once its up to temperature
and run for a while.
watch this space for the link to the video.
HERE it is
[Edited on 18-1-11 by MakeEverything]
Made more progress today. Since closing the throttle body totally, i was using the vacuum takeoffs as temporary air valves. It worked well (as in
last vid) but was causing turbulence and running reeeeally rough.
I also changed the scale on the acceleration enrichment settings, which made a massive difference.
Here is the latest video from today.
[Edited on 19-1-11 by MakeEverything]
At this rate, you'll be able to sort out my idle issues for me
quote:
Originally posted by scudderfish
At this rate, you'll be able to sort out my idle issues for me
How i've never seen this thread before, i don't know, but that just kept me occupied for the last couple of hours, nice build thread,
Subscribed now Keep us updated, where abouts are you?
After Too-ing and Fro-ing from B&Q, i finally managed to get in the garage and get some work done.
These are the photos of todays progress;
The nibbler is the best tool ive ever used. Soooo efficient, and safe too. Highly Recommended (AB Tools?)

Nibbler

Inlet
The Supercharger exhaust is all finished.

SC Discharge

sc discharge 2
A good days work. Should have the inlet (air filter inlet) done by tomorrow.
ooooooh shiney.....
This arrived 24h after ordering.

New Coolant Bottle
Ill be installing that tomorrow, along with my boost hoses.
These are the photos of todays efforts. The boost hoses themselves didnt actually take that long, but i ran out of hoses. Thanks to Andy for the
help and the flexible hose, and to Toxic Rides for making two new elbows available.
New coolant bottle in place. From a Jeep Cherokee, apparently.

New bottle in place
Yeah yeah, i know the blue is a bit out of place, but im not bothered at this stage. Just want to get it going now. Its sooooo close!

Boost Hoses 1
These were a challenge to get in.

Boost Hoses 2
Picture of the dump valve and where the hoses poke.

Dump Valve in
All in all, a good days work. Going to check the megasquirt settings tonight, so make sure im doing it right!
Over the weekend i managed to make a back plate for the electrics, and install the IAT sensor into one of the hoses from the intercooler. Its been
curing on the radiator since sunday, and i remembered it last night!

IAT

IAT2
Over the past few nights and last weekend, i managed to get a lot of the wiring tidied up. I took these photos today, as i came home feeling like
crap and needing cheering up!
This is the progress i had made. The fuse box is complete, so just the "Field" wiring to get done one evening.

Wiring Stage 1
Having re-worked all of the wiring, i discovered that the relays would go inside the same box, rather than have them in a separate one. The little
brass screws are holding them in (glued in from inside). The whole lot is mounted on an ali plate, with a boost gauge sender and narrow band plug on
the rear. I have an independent controller for a wideband, though i may well upgrade this at a later date.

fuse box
Will try and make progress before the weekend, with a view to starting the engine on sunday. Lots to do though, and only the evenings to do it!
You have to fuse your fidle? sounds painful ( or illegal).
More Progress last night.....

Throttle Linkage Bracket

Throttle Linkage Bracket2
Also put the electrics in the car, and ordered another load of wiring stuff from PoleVolt so that i can make the looms up properly.
At last, ive pretty much completed my final version of wiring, which just needs the Coil pack connections soldering, and the VR Sensor - which im
planning on getting a waterproof connector for, just in case i need to replace that part of the loom (Its high risk, given that its near the pulleys
etc).
This particular job seems to have taken ages, and loads of soldering, but its all finished. I've replaced all of the spade connectors with
soldered and heat-shrinked joints. Even the fuse box is soldered, so theres less chance of a loose connector.
All that needs to happen now, is the fitting of the Odyssey Battery, and functional tests.

Wiring Complete 2

Wiring Complete 1
Excellent, the V5C came through the post today with the new engine number and displacement.
But does it still run?
Well, FINALLY, after three glasses of wine i managed to get the car to fire. It was the Earth to the ECU itself that i changed position, and changed
the trigger offset and "Skip Teeth" setting to default that did it.
Really, really really chuffed.
Watch this space for some pretty major progress now then.
Woohoo! Top work Rich.
quote:
Originally posted by Xtreme Kermit
Woohoo! Top work Rich.
About bloody time
Good news!
quote:
Originally posted by scudderfish
About bloody time
Good news!
Great news mate, i'll have a whisky to celebrate
I was itching to get into the garage tonight, so as soon as little man was asleep i fired it up again. Got it idling (albeit a bit rough) and all
checked. It seems to be fine. The dump valve acts as a bleed valve at idle, and closes when boosting which was what i was hoping it would do. Now i
need to get the clutch and brakes bled and exhaust made up, inlet finished off and lambda mounted to start tuning. Then i can get it Insured to
drive, MOT'd, Taxed and start on the bodywork.
Happy days.
After a very productive few hours in the garage;
Mock Up

mock up 1

mock up 2
And finished in about an hour.

Finished 1

Finished 2
Ive also mounted the Lambda boss and am now starting to look at getting it started and tuned.
Awesome. Turning out to be a great weekend.
http://www.youtube.com/watch?v=NGUyYypwb3s
[Edited on 23-4-11 by MakeEverything]
Just managed to get it running with up to 20psi of boost at 3500rpm.
Should be interesting to get a proper RR tune on it. Might look at that sooner rather than later.
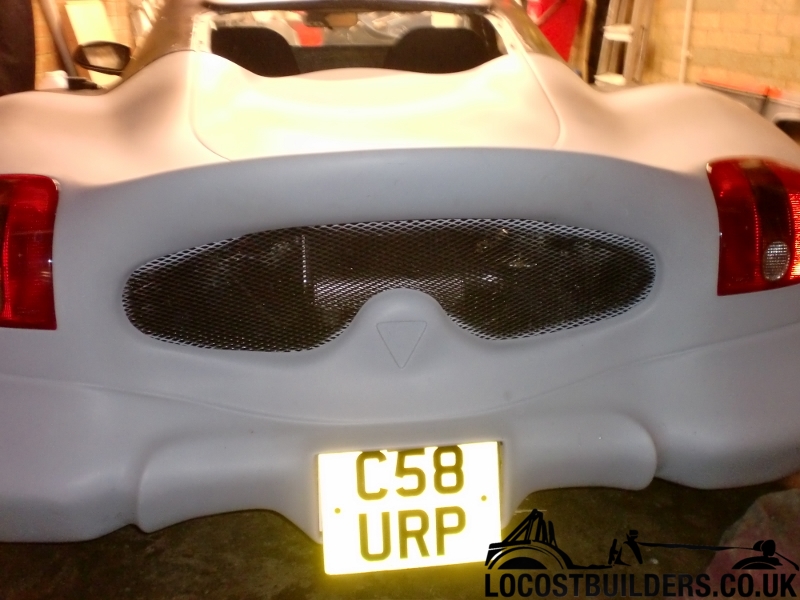
The clutch slave held out and works really well. I also took the rear of the car off and removed the spoiler ready for collection by the old man on
Wednesday, who is going to fibreglass the holes and blend it all in. I think hes also going to prep and paint the whole thing afterwards.
These are the photos from this mornings efforts;

Description
How it looks all put together

Description

Description

Description
Next up, is a bloody good clear up! Then its brakes, secure everything down and check everything, gear oil change and MOT.
[Edited on 25-4-11 by MakeEverything]
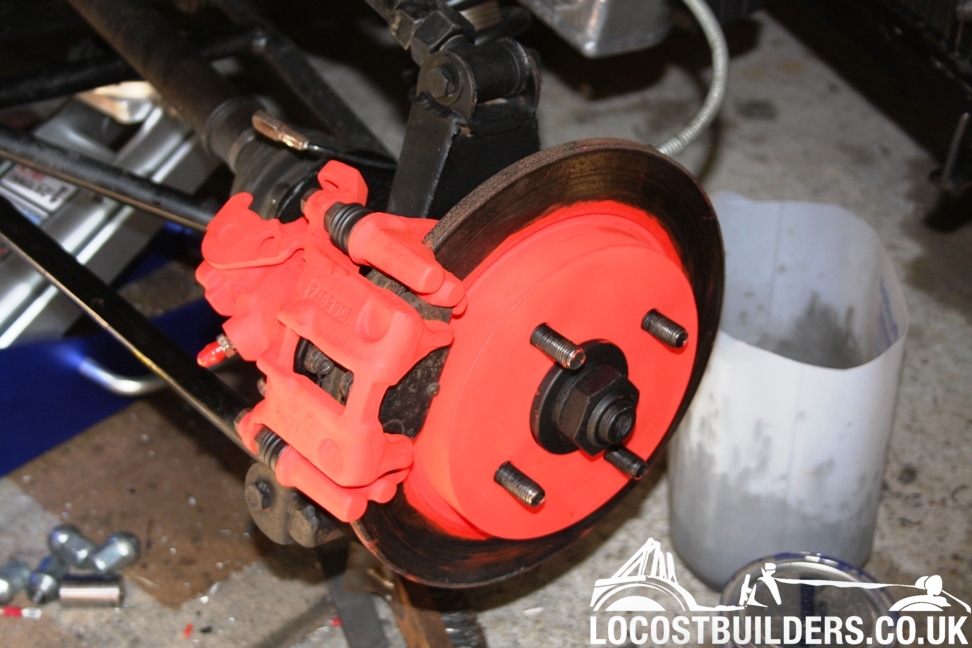
This morning i got impatient and went out to buy some VHT paint, instead of waiting for Stoneleigh for the proper Caliper Paint.
Theres a bit of crazing in the paint, but itll do for now. The biggest priority was to clean them up and get new seals into them which was easier
than i thought. I left the internal seals alone, as they werent leaking and the inside looked as new.
This is the latest video after todays work.
I changed the fuel pressure regulator, as it was proving to be inconsistent and causing spikes in running lean. This would be enough to kill the
engine under full load, particularly with the nitrous.
I also had to install an air trap / fill point as a result of discovering a massive air lock because of the design of my cooling system. It works
well now though.
The coolant temperature sender needs calibrating again, but is stable for now and the radiator fan switch needs testing again once the engine is up to
working temperature.
All-in-all, a very good day. Got a decent tune on it as well so that it runs and accellerates well off load, though im going to change the injectors
for the 803's as soon as ive had them cleaned and serviced to try and eliminate running lean.
http://www.youtube.com/watch?v=MbCtoaEiT5g
Im at the stage where im stopping and starting the engine, during testing and tuning. Because of the confined space in the garage, i have to squeeze
down the side of the car to the switch which is not just awkward, but if i need to turn it off in a hurry, i cant.
So, to make things a bit safer for me and the car, ive rigged up a remote starter and isolator;
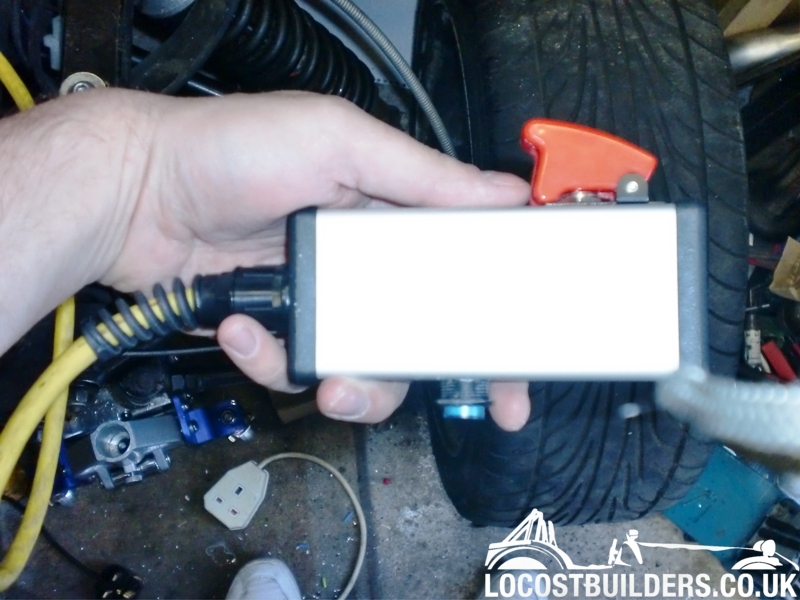
It works really well, and improves control of the car from standing still or even from outside the garage. All i need now is a 5m VGA lead so that i
can stand outside the garage whilst tuning to stop poisoning / deafening myself!!
Tidy
That does look neate without the spoiler too mate - progress is snowballing now
Tonight, i fitted my 803's instead of taking them for cleaning and refurb because they were in really good nick. Made a huge difference to the
running, and now i just need to replace the pump for a high pressure pump.
Tomorrow, the rear bodywork goes away to the old mans house for some work, so ill be cracking on with the brakes.
Had a nightmare day today.
It started off productive, by getting the TIG welder out to eliminate some tiny leaks on the exhaust, and wrapping it in the ceramic cloth that Rabson
gave me over a year ago! Then, i started to weld the crack in the manifold.....
After i had drilled holes at the ends of the crack, I had the whole of the top of the thing glowing with the TIG, and added some stainless rod to try
and make it more weldable. It worked quite well, but took aaaaages. Then i tried to grab it without thinking, and quickly put it down again! It nearly
burnt my hand through the gauntlets!! This knocked all of my manifold nuts onto the floor which i need to gather up again at some point.
So, with a shiny mess on the top of the manifold, i turned it over and noticed two more cracks. I tried to weld these as well, but by this time i had
lost the will to live, and had the welder running for about two hours! Im going to run with it for now, and make up a tubular jobby at a later
date.
Also had a look at the brake master cylinder, and i think i need a new push/pull cable to replace the existing one.
Not much progress today, but rather find these things out now.
[Edited on 14-5-11 by MakeEverything]
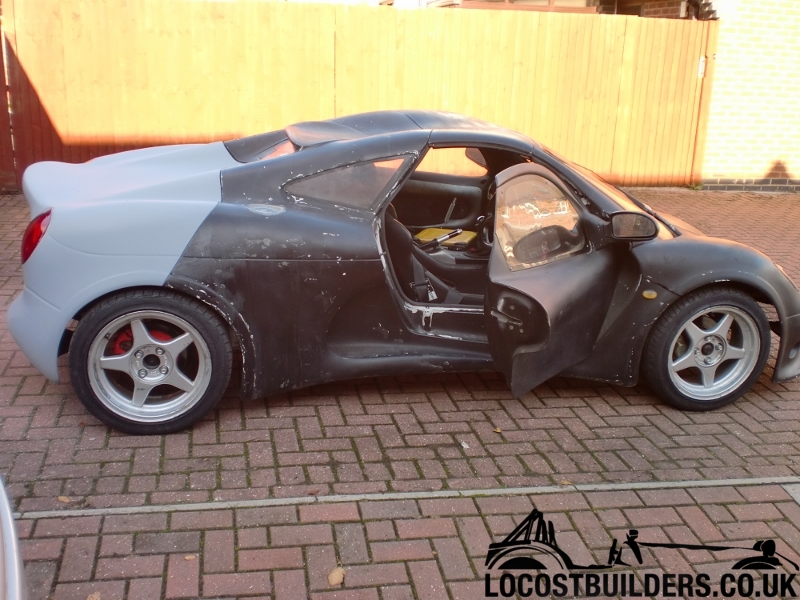
After yesterdays 'not so productive' day, i thought id go and check on the progress of the bodywork.
This is what i found;


Really pleased with how its turning out.
Hi All,
Its been a while so thought i should update;
Went and picked up my injectors which i had cleaned. One was completely blocked as suspected, and all four were within 10cc/min of each other. Ive
set the ECU to 370 which is the mean of all four.
Anyway, after much cocking about, i decided to start again with the software, so created a new project to bring things back to earth a bit. after
some more fiddling with the fuelling, this is the subsequent result;
http://www.youtube.com/watch?v=mbbFlg3G7FQ
Its a bit smoky and i needed to come out a couple of times as my eyes were streaming! The fuel is up as high as i can get it on idle for now, i just
need to adjust for higher RPM to prevent leaning out.
The video doesnt do it justice, and it is LOUD!!
Just ordered a 36psi MAP sensor to replace the current one, and i'm still working on the maps to get it to run at high RPM properly. I had the
accel settings set up wrong, so was only putting say 2% PW instead of 102%.
anyway, my blog is being updated more often than this, so have a look there for any updates.
[Edited on 13-9-11 by MakeEverything]
Brakes fully bled again today, and managed to remove the remaining air from the system.
I drove the car along the driveway and tested the brakes which are as they were when i first got the car. Trouble is, thats still not as sharp as i
would like!
Progress, nonetheless.
Believe it or not, this is the closest the car has been to the MOT since ripping out the 2.2!
Only 6 items to go, and new tyres being fitted tomorrow.
[img]http://21toc.com/attachment.php?attachmentid=1735&d=1318371651[/img]
[Edited on 11-10-11 by MakeEverything]
Enjoying this thread a lot, stick at it!
Good luck with the MOT.
Ali
Time for another update i think!
Well mechanically, all i need to do is get a replacement alternator as the two i have are fooked. The throttle return spring idea i am particularly
happy with.


been following this for ages and good to see its getting some paint work, it will really look the part then
Thanks. The rear section is now in three coats of primer filler, and the car will go for MOT before the rest is done. Then once shakedown is
complete, the paint will get finished.
Do you still need the alternator?
Are you still up for exeter??
Steve
Yes to Both! Dave, can you measure the distance between the front and ream mounting lugs please mate?
I'm still up for exeter subject to shakedown going to plan.
Well, im there. I'm sorely tempted to drive it to the MOT station as is, but really should have a working alternator first! I am waiting to see
if i can get a known good (new) alternator this evening before i buy one. Here is the car;
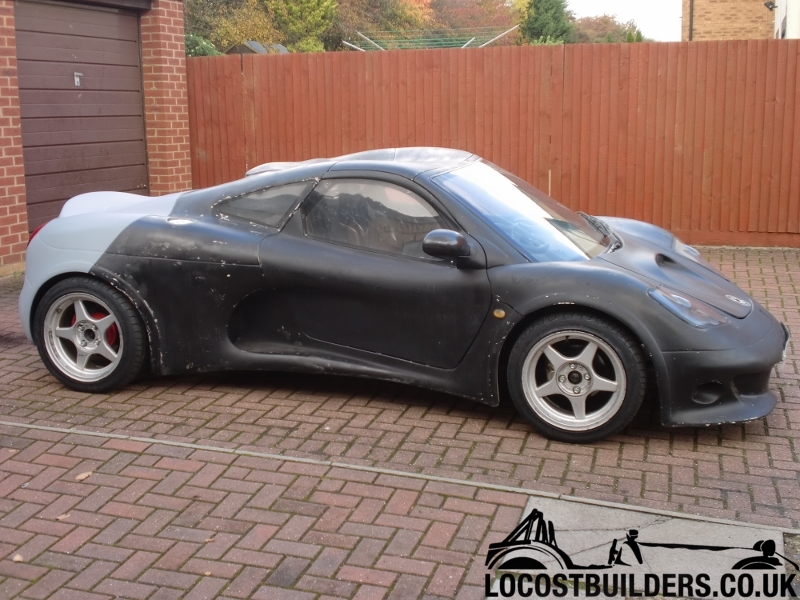


Really pleased with it and the way it drives already, but it is uber loud!
Looks good but it needs a proper paint job
quote:
Originally posted by l0rd
Looks good but it needs a proper paint job
MOT Booked for tomorrow with an open minded inspector.
good luck
Thanks Howard.
Well, Had an absolute feckin nightmare today!.
The drive to the MOT station was actually quite pleasant, but the exhaust is just too loud. I got a headache in the 20 minute drive there! The car
pulled well, and the power band is at about 3500 and still have lots of work to do to tune the car up.
MOT Failed on Emissions, Tail light out (came on when i banged it!) number plate light (D'oh, forgot to check this) and play in the wheel
bearings.
The emissions were 2100 (limit 1200!) HC and 12.36% CO (Limit 3.58!). Need to work on this with the ECU to control this better. Maybe with an MOT
map!
All in all, he was going to pass it with advisories, but the brakes sealed its fate! Brakes were 53% and 40% efficient, and i think the new cable
that i fitted has been kinked because of the force needed to apply.
On the way home, the gear selector cable broke, leaving me in 3rd. Selected 4th manually, and rode the clutch home! Car is now at my dads because i
was running out of electrons as well! As i was looking for a place to pull over, (and having a police car 2 cars behind), i clipped a stone kerb and
shredded the rim protectors on both NS tyres! Bollocks! - See what stress does?
Anyway, im contemplating removing the engine to fix a couple of problems and fit a S/C Belt tensioner, new fuel tank, brakes re-engineered etc etc.
Positives to take from it;
The car weighed in at 572Kg. Lots less than expected.
Exhaust will be lots quieter!
The brakes will be upgraded, even though the machine passed them today.
Gear controls will be revised to Rods to the rear, and cables from there. This makes it easier to repair!
If i do take it off the road, ill lose more weight with ali tank and might lose the heat exchanger.
I might fit the larger supercharger...
A good result! Are you going to make it back for the free retest in the allocated time?
[Edited on 2/11/11 by McLannahan]
quote:
Originally posted by McLannahan
A good result! Are you going to make it back for the free retest in the allocated time?
[Edited on 2/11/11 by McLannahan]
You could always make it quieter by fitting a turbo
Looking good, Get those things sorted, and as mentioned, once you paint it up, that will look great
Thanks for the encouragement fellas.
have you seen how many views this thread has had!! car looks fantastic mate cant wait to see it finished your going to have a very unique car
there.
quote:
Originally posted by lewis
have you seen how many views this thread has had!! car looks fantastic mate cant wait to see it finished
Had a look at my car this afternoon (which is still parked at my Dads with few electrons left!) and have diagnosed two of the main problems and fixed
one.
The brakes.
The master cylinder has a VACUUM ASSISTED SERVO. Clue is in the title really, but it hadnt occurred to me that when removing the old engine, i had
removed the old vacuum hose and tied it to one side with the heater hoses. I found this this afternoon, reconnected it and tried the brakes. They
work!
Gear Shift Linkage
Looking into the darkest depths of the transmission tunnel, i could see that the cable has unscrewed itself from the fitting and hasnt broken at all.
Result. Just need to find a smurf to get in there and re-screw it into the thread!
All in all, quite positive, but it doesnt solve the alternator problem?????
This afternoon i got over to have a look at the exhaust and quieten it down using the V6 mondeo rear box that i bought yesterday.
Its so much better, and even sounds as though it does run a little smoother though anything sounds smoother than the original exhaust! - Might make
another one like that as a drag exhaust!!


[Edited on 5-11-11 by MakeEverything]
But can you still get 3ft flames out of it?
quote:
Originally posted by scudderfish
But can you still get 3ft flames out of it?
Well ive had to take the engine out to replace the lower alternator bolts due to stripping the threads. Now ive got it out, im thinking i might take
advantage and do a little bit more;


Now im looking at some jobs to make my life easier and improve reliability;
This afternoon, i went to a mates house to abuse his axminster, and this is the result following centering onto a rotary table and setting up.

This is the hub that i plan to have cut. The hole in the centre is for a shank to be inserted to align the table and flywheel on the table using the
chuck on the mill.

[Edited on 22-1-12 by MakeEverything]
[Edited on 22-1-12 by MakeEverything]
Had a good productive afternoon once i got going. Managed to remove the supercharger and make up a tensioner on the existing brackets. Somehow, the
nose is dipping down so the belt is twisting slightly now, but ill sort that next time i go out there (5 minute job). The belt is now much tighter
with 8-10mm play, and the alternator is also the same.

Once its all finished, ill take the brackets out, clean them and powdercoat the steel ones with my powder coating machine.
I also re-made the VR bracket more secure, to prevent the sensor moving around. This is much better, and should avoid any problems as it is also
independently mounted as opposed to sharing the S/C mounting bolts. It is still very close to the S/C belt, but ill keep an eye on it. At worst, the
bracket will bend away from the trigger wheel and stop the car from running.
Then it snowed, and got even colder! Time to warm up and prepare for painting the Kitchen ceiling!
Had a go with the soda blaster whilst everything in the street is already white, and these are the results.
This was setting up the blaster, as i had to take the metering jet out (broken in transit).
Then i finally got the hang of it. Believe it or not, the BLACK is the cleaned area (Ali oxide is white).


(Yes i know the engine plate is missing, but i took it off to drill out the broken rivet and replace it once cleaned.)
Then i wondered what it would be like on the rust inside the block;
All in all, some pretty good results. Just need to get some goggles and a dust mask!!
I have this week off work, and have had some time in the Garage getting those little jobs done and out the way so that i can get the engine back in.
Tonight, i have dug out the powder coating kit i bought a while back to try, and its feckin awesome! Painted my boost hoses with it so that they dont
rust (Yes, theyre steel to fall in line with the "Make Everything" philosophy), and just have a couple more soldering jobs to do before
putting the engine in.
Should get those last soldering jobs done and the boost hoses finished tonight, and maybe start putting the engine in tomorrow, all being well.....
Nearly on the road! (again)
glad to see the project is on the go again
Thanks Fellas. The project was always on the go, but winter slows it down a little. Im hoping to have the engine back in the car by the end of the week. After that, who knows, i might even chance an MOT again!!
MOT - Mostly Off T'Road ( say with yorkshire accent )
Just noticed, i haven't posted on this for a while
Good progress but, FGS get in the garage and finish it off. It's been nearly 2 years now.
quote:
Originally posted by l0rd
Just noticed, i haven't posted on this for a while
Good progress but, FGS get in the garage and finish it off. It's been nearly 2 years now.

I've got one of those filters unused if you want it?
quote:
Originally posted by MakeEverything
quote:
Originally posted by l0rd
Just noticed, i haven't posted on this for a while
Good progress but, FGS get in the garage and finish it off. It's been nearly 2 years now.
At least i havent run away from mine by leaving the country!!
It lives again, but surprise surprise, not without problems!!
The alternator light is still on, so i need to check the wiring for this.....again!
My fuel pump sounds as though its straining, so i changed the HP filter, and found this;
Description
Perfectly clear on the outlet, but the inlet was like diahorrea!
Hmmm. Changed it, and still sounds like its struggling after a few seconds. Could it be the FPR....?
So im pretty much back where i was, except for the alternator bracket bolts being stripped! Ive replaced the VR sensor bracket as well, so thats stronger too.
[Edited on 13-4-12 by MakeEverything]
I sorted the fuel problem. The advice i had was that the inlet to the FPR was at the bottom, but that wasnt working. When i took the hose off, i
ended up wearing about a pint of fuel at 4Bar! It stings in the ball bag area as well, so i dont recommend it. Hoses swapped, it now seems to be all
good and idle is stable at about 600RPM.
http://youtu.be/tRINdrulpw4
Not long now before shes back on the road and ready for power tuning at a rolling road....
L0rd, dont they have parts in Greece?
[Edited on 13-4-12 by MakeEverything]
quote:
Originally posted by scudderfish
I've got one of those filters unused if you want it?
quote:
L0rd, dont they have parts in Greece?
quote:
Originally posted by l0rd
quote:
L0rd, dont they have parts in Greece?
Rules in Greece are not the same as in UK. You can only have a factory built car with EU compliance.
ATM only caterhams and westies have it.
I have some parts that i brought back with me from UK in case i start building at some stage track car.
I am looking to build a tot rod for my newborn at the moment and this is a mission. Parts in Greece are soooooo expensive. I could be better off buying a new ATV as a donor than buying the parts even second hand.
At the moment i cannot afford to live here
Since i got back to Greece, i finished my Military services and now i am unemployed. Due to the crisis, I am spending all the money that i have in the bank to pay extortionate taxes.
This year so far, i have payed 2000 euros on tax. My income is 7500 euros from renting 2 properties i have. Next year, i will have to pay 3500 euros on taxes for my properties, an extra 250 euros as income tax. I will also have to pay god knows how much money on fines because i have a car that according to Greek financial rules, i cannot afford (clio 1.4), a good size house i live in and because i am married.
[Edited on 13/4/12 by l0rd]
It's been a while, but i Sorted the alternator wiring this afternoon (BIG Thanks to Davegtst), and got the car running again. Because of the higher voltage though, I've had to re-map a base map which still isn't quite right. I need it cold again to set up the warmup settings, and I also need to reset the TPS. All in all though, pretty good and ready for MOT as long as I can get a base map that doesn't give over the required HC threshold!!
It passed the MOT!!! Now I just need to tune it!
Just refound the thread and been engrossed catching up.
Well done for the MOT - don't break it now....
Len
quote:
Originally posted by avagolen
Just refound the thread and been engrossed catching up.
Well done for the MOT - don't break it now....
Len
quote:
Originally posted by MakeEverything
It passed the MOT!!! Now I just need to tune it!
quote:
Originally posted by Xtreme Kermit
quote:
Originally posted by MakeEverything
It passed the MOT!!! Now I just need to tune it!
Bl@@dy fantastics!
Well done Rich! Just don't stuff it whilst sorting the map...
Can't believe you haven't gotten round to that yet... (says he with a garge full of unfinished project parts...)
Lol
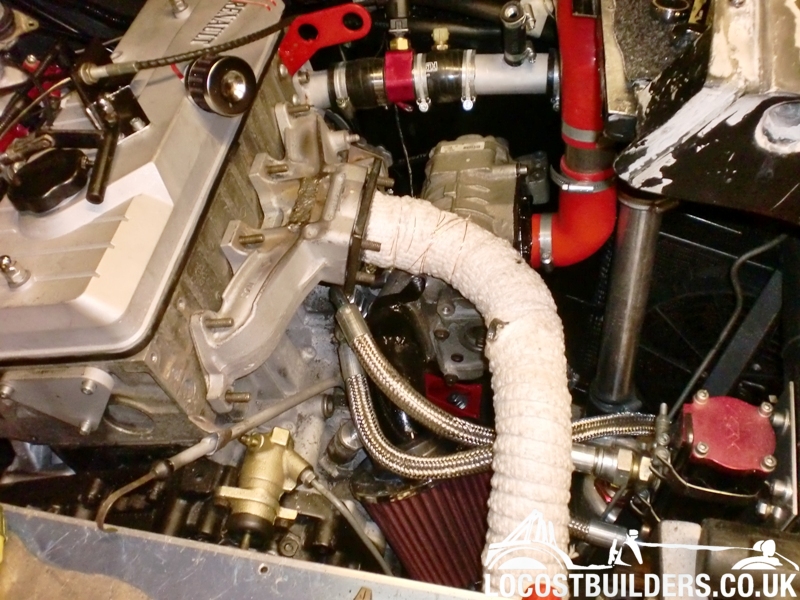
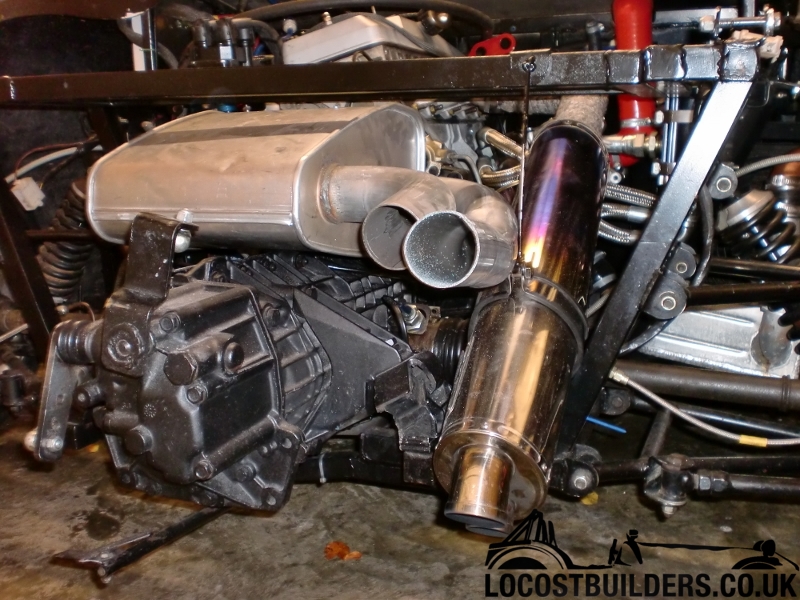
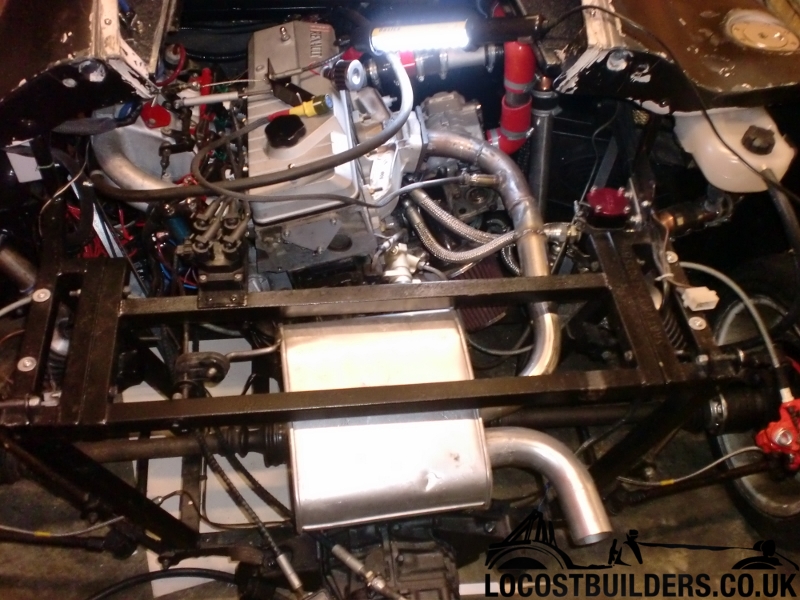
Its alive again!!
I got so fed up with Megasquirt and also the development using a supercharger; especially with the weather we've had, so ive gone standard with a
renault 21 ECU and loom, and a T34 Turbocharger (Ok, well not completely standard!!).
Not much to do now before ive finished the mechanical side of things now.
[Edited on 5-8-13, by MakeEverything]
Nice one Richard! just got to give it a coat of paint and ready to roll
I think it needs a bit more than just a coat of paint!!!
Thanks. Ive found motivation again, with massive thanks to Davegtst.
Ever done one of those personality evaluation things Rich?
I reckon starter/finisher was waaay down the list!
I'm betting one Plant - constantly innovating...

quote:
Originally posted by Xtreme Kermit
Ever done one of those personality evaluation things Rich?
I reckon starter/finisher was waaay down the list!
I'm betting one Plant - constantly innovating...
quote:
Originally posted by scudderfish

I saw one of those on the way home the other night...
Was that you doing an attack run on Flitwick?
Just read this from start to finish. Epic thread!!
quote:
Originally posted by Xtreme Kermit
I saw one of those on the way home the other night...
Was that you doing an attack run on Flitwick?
quote:
Originally posted by MakeEverything
quote:
Originally posted by Xtreme Kermit
I saw one of those on the way home the other night...
Was that you doing an attack run on Flitwick?
Luton......
Right, ive deliberated this for a while now....
I'm thinking of selling the project, due to having another activity that is taking up my time. If i sell, then it is likely that i will replace
it with something complete or maybe even a factory built car, but likely to be a V8 at least so i would consider a swap / Part ex. W.H.Y.
The car has a renault 21 Turbo engine in it with OE ECU, which runs and just needs the coolant system finishing. I'll probably do this and get
it to a condition where it can be driven. Turbo is a good Garrett T28. Custom Radiator (Cost Ł350), intercooler and oil filter remote.
Body is all fibreglass and solid, though needs painting as it has never been painted.
Front hubs are Cortina, rear are Sierra. UN1 Gearbox is good. Tyres are new.
I have a spare 2.2 engine that i would throw in with the car (needs refurbishment)
On its last MOT, the car weighed in at a calculated 572Kg with me in it (Calculated by brake roller system). Car will pass MOT at the moment once the
engine is running, but i have it SORN due to changing from megasquirt to standard.
Will also throw in the Megasquirt system that i was using, and a rugged laptop.
Not quite sure what its all worth, because it is certainly unique and there is a lot of kit there. I know i wont get all of my investment back, and
have enjoyed the majority of the work that i have done on it.
Serious Offers Only please.

![]()
(As is at the moment)
Sorry to hear this Rich
She'd look good with a lick of paint!
Good luck with the sale.
quote:
Originally posted by Xtreme Kermit
Sorry to hear this Rich
She'd look good with a lick of paint!
Good luck with the sale.
Well, she now purrs like a cat, and gets very shouty at full throttle!
Nect job on the list is intercooler, battery mount and boost hoses, rather than having it directly piped in as it is now!
