
Newbie and a Rebuild: Westfield Megablade ZX10R
BigMac - 3/2/11 at 09:46 PM
Hello All
My name's Ben and I'm based in Cheshire, I have a Westy Megablade with a Kawasaki Ninja ZX10R engine in at present.
Unfortunately, can't say I built it myself initially, I ended up buying one first to see if I'd catch the building bug... Safe to say I
have! While I've always been into cars from an early age, I'm not a full blown mechanic/engineering type like most of you on here, so
I'm humbled to be part of the group!
The car's currently undergoing a complete strip and rebuild, as it seemed that some of the parts (especially wiring etc) were an afterthought, so
could be done better! SWMBO wasn't best pleased with the idea generally, especially after me spending a Sunday afternoon fitting seats and
harnesses, only for her to open the garage door to find the car in bits a few hours later... Still, onward and upward...
Thought I'd keep a build log on here to primarily ask for advice and guidance, but also to show others what work is involved for someone with a
similar amount of mechanical knowledge.
The Plan:
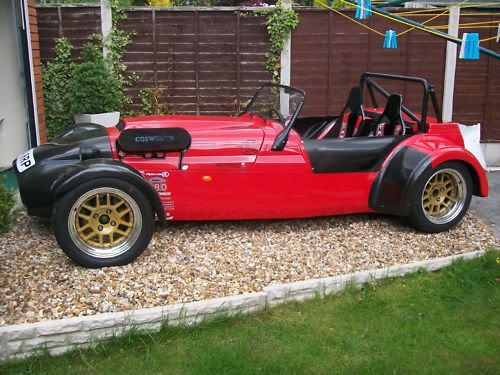
Chassis: Shot-blasted, zinc sprayed and epoxy painted in Sunlight Yellow (Honda's Spoon Sports Colour)
Brakes: 4 Pot Wilwoods up front, standards on rear. Braided lines all round with a decent fluid (RBF600)
Suspension: Poly bushes all round, Pro-tech dampers, revalved and setup in pairs. Full alignment/geometry setup with corner weighting
Body: Will probably go White, with some bits of Carbon Fibre dashed everywhere, i.e. Dash, Aero Screen, Arch Guards etc
Electronics: Custom loom made by Rapidfit Looms, tailored and labelled for my electronically simple mind! Standard lights, with all LED rears. FIA
approved Master Cut Off with Odyssey cell battery
Wheels, Tyres: 13x6 Front, 13x8 rears (probably Comp CXRs) with either R888s or Yoko A048Rs
Interior: JK Composites seats with Schroth 4 point harnesses. Original Koso digi dash, but replacing all the 'Savage' switches; while they
look the part, I just couldn't get used to them, so replacing for standard, high quality toggles.
Some of the original stuff will be going up for sale when I've got a few more posts on here, too.
A couple of pictures of it before the build started:


The build so far:

This is what the other half opened the garage door to find...

Majority of the ally panels stripped, with rivets drilled out... fun fun!

Major mechnicals still in, at this point I took a step back and realised what I'd bought wasn't much in terms of components!

Yep, engine out on your own is an interesting one...

A slightly 'heavier duty' seat mount... old one was peppered with holes so I couldn't locate the new seats for my leg length

Bracket going in, unfortunately not me doing it, don't trust my welding skills yet!
As and when I get more done, I'll pop the page links at the top, so it's easy to see the updates between the myriad of questions from me!
Hope people find this interesting/useful!
BigMac.
MakeEverything - 3/2/11 at 09:59 PM
Hi there and welcome.
Good luck with the rebuild.
Have you checked your tyre widths? - The fronts look wider than the rears though it might be an optical illusion.
BigMac - 3/2/11 at 10:03 PM
quote:
Originally posted by MakeEverything
... Have you checked your tyre widths? - The fronts look wider than the rears though it might be an optical illusion ...
I'd taken all four off at some point so I could get to the panels, I just bunged them back on so I could roll the car out of the garage, so most
probably on the wrong way round! That said, I was using a cheap phone camera, but doubt that would make them look THAT different!
carpmart - 3/2/11 at 10:46 PM
Welcome!
Not everyone on here is a fully fledged engineer or mechanic type, I'm a less than talented amateur myself! 
BigMac - 15/2/11 at 03:09 PM
Thanks for the warm welcome :-)
A little update, the chassis and all the wishbones and ancillaries have gone off to the shot-blasters today, all going to be zinc sprayed then coated
in Sunrise Yellow (Spoon Sports Yellow).
The last week has been quite busy in terms of the rebuild, mostly with rebuilding worn bits, cleaning and greasing up others etc...
All the bits and pieces are ready to be put back on now!


So hopefully another update soon when it all comes back from the shot blasters!
andyfiggy2002 - 15/2/11 at 07:16 PM
nice westfield, by the way have you tried the Westfield Sports Car Club (WSCC) site for info yet? Mines a proper megablade as opposed to a megaquack
but i come on here because they refuse to have a BEC forum
[Edited on 15/2/11 by andyfiggy2002]
Rocket_Rabbit - 18/2/11 at 01:18 AM
This has to be you Ben 
BigMac - 19/2/11 at 01:53 PM
quote:
Originally posted by Rocket_Rabbit
This has to be you Ben
Ah, Ron! Took me a while to figure out who it was!
Yep, it's me... lol.
This is the main reason I've not brought it round to show you, yet!
Give me a shout if you ever want to drop by for a look-see...
BigMac - 21/2/11 at 09:24 PM
Right, stopped by the shot-blasters on the way home from the office to check on progress.
Chassis and all the components have been blasted, zinc sprayed and primed. Looking good!


Still working on the loom, bike loom has been completely stripped of insulating tape and ready to be worked on. I'll be doing a test fit when the
chassis comes back and making any adjustments needed (i.e. increasing length of certain connectors), then that'll be ready to go on.
Russbost is now making up my fully braided lines, so we're now cooking on gas!
More pictures to follow once the components have been painted...
BigMac - 25/2/11 at 04:20 PM
It's been a goodie loaded week!
Nylon bushes (Westfield)
Brake light switch (Westfield)
Top/bottom ball joints (Westfield)
Braided brake lines (Russ Bost @ Furore Cars)
Protech dampers (Procomp Motorsport)
Pictures to follow, but now nearly have all the kit to get rebuilding the Westy.
The chassis has now been Zinc sprayed and epoxy primed, it's curing while we wait for delivery of the paint. Should be back with me by
Wednesday!
Have spent a lot of time this week working on the electronics and loom. Was going to have a loom made up by RapidFit, but at the moment I can't
justify spending the money. I have a friend (auto-sparky) who can make a good loom with quality fittings for the price of a few beers and a 'bab!
Decided that the engine loom will be seperate to the car loom, so now just need to get a diagram drawn up and get the thing built. But can only do
that when the chassis is back from the blasters. Also stripped the bike loom of all it's insulating type to show the wiring underneath, looks
like some connectors will need lengthening in order to create a good clean fit to all the sensors on the block.
So now it's a case of waiting for the chassis to come back...
Rocket_Rabbit - 27/2/11 at 10:56 PM
quote:
Originally posted by BigMac
Looks like a giant airfix kit!!
Parts/updates are of good quality, just DON'T go mental on blingy expensive carbon bits
[Edited on 27/2/11 by Rocket_Rabbit]
BigMac - 11/3/11 at 07:07 PM
First update in a while, the chassis was finally prepped for final painting today, should have had 2-3 coats of Gloss Black know, so that'll cure
over the weekend and be ready for dropping off on Monday/Tuesday next week. Then, let the rebuild begin!
A couple of pics of it all ready to go, apparently the yellow is the primer, the grey in the previous pictures was the zinc coating:


Also finally managed to get the loom labelled and all the insulating tape off. Clear that the wiring was an afterthought as there was quite a lot of
poorly connected items and wires cut rather than spliced and extended. Luckily, have found someone to help with the loom. Plan for the loom is to keep
the bike and car electronics looms as seperate as possible. If I ever need to change the engine, it's a more simple case of modding the bike
loom, rather than tailoring the entire thing to work... Still, NOT looking forward to the electronics!
(Still had the tape on at this point)

Ta,
Ben.
matt_gsxr - 11/3/11 at 07:29 PM
nice quick progress there.
How are you going to line the holes in the new panels with the holes in the chassis?
Or are you going to recycle the old panels?
Matt
daniel mason - 11/3/11 at 07:29 PM
are you keeping the blue bodywork with the yellow chassis? looks like a nice car mate. im sure i saw this car when it was for sale a while ago!
chasis is similar colouur to mine, although my grp pannels are BRG
BigMac - 11/3/11 at 07:45 PM
@matt_gsxr I'm going to jump that hurdle when I get to it, but I'm having new panelling made up in Carbon fibre by a friend on here,
so hopefully he'll have some ideas, worse case, I was thinking of drilling the holes and riveting at 5mm intervals, between where the current
holes are, covering the lot with sealant for completeness... Keep checking back and I'll let you know! lol
@daniel mason I've decided against the Yellow now- as much as I wanted to do it, I was thinking of selling the car once it was rebuilt
(i'm definately NOT anymore!), so figured a car with a black chassis would probably sell easier. But the body will be going either White or Black
(eventually!)
daniel mason - 11/3/11 at 10:00 PM
I think yellow chasis oon BRG body will look superb on a westy! One thing for sure is you don't want to look like all the others around
tony.g - 11/3/11 at 11:17 PM
I see where you are coming from.
Tony
Rocket_Rabbit - 12/3/11 at 03:07 AM
quote:
Originally posted by BigMac
I was thinking of selling the car once it was rebuilt (i'm definately NOT anymore!), so figured a car with a black chassis would probably sell
easier. But the body will be going either White or Black (eventually!)
I must say Ben, I did laugh when Will told me you were selling. Then he came back the next day and said you weren 't!!
As much as you want a Trevor, you'll be better off in this, especially since you are doing the complete job on it 
I have to disagree with Dan Mason though - Don't want it looking like the others?! Just how many ZX10R Westfields do you see?!?!
The white and black will look good IMHO
[Edited on 12/3/11 by Rocket_Rabbit]
andyfiggy2002 - 12/3/11 at 12:01 PM
looking good Ben, brings back memories when mine was a box of bits, very daunting but the sense of achievement when i put it all together was immense.
We talked about what bits where unnecessary weight on my megablade & i see you ground off those heavy inertia seat belt lumps, not sure where your
taking your speedo pulse pick up from, drive shaft bolts, prop shaft bolts or front disc bolts? but if not coming off driveshafts you can get rid of
that bracket to, i had quaife freelander 3.21 LSD so mine came off propshaft via transducer unit & to be honest as mine does 10mph/1000 revs i
normally go by rev counter anyway. Also the clamps on the rear lower cross member for the spare wheel can go as well as the 2 studs sticking up on the
bottom cross member that the rear bulkhead panel fits to, also theres a U bracket & rectangular strap with hole in it on the lower cross member
just in front of the fuel tank thats not needed. Another added weight is that big lump of lead called the battery, WF supply a heavy car one but i
swapped for lighter bike one as i don't have headlights due to only doing summer daylight dry blats & my MOT is classed as a daytime MOT!!!!
As regards panel refitting have you kept old panels to use as a template so you can transfer holes from them onto new panels?
& you gonna use air sock filter with dynojet for more umph? i uprated from standard 115 jets with bike airbox to 132 with sock
[Edited on 12/3/11 by andyfiggy2002]
BigMac - 14/3/11 at 11:26 AM
quote:
Originally posted by andyfiggy2002 We talked about what bits where unnecessary weight on my megablade & i see you ground off those
heavy inertia seat belt lumps, not sure where your taking your speedo pulse pick up from, drive shaft bolts, prop shaft bolts or front disc bolts? but
if not coming off driveshafts you can get rid of that bracket to, i had quaife freelander 3.21 LSD so mine came off propshaft via transducer unit
& to be honest as mine does 10mph/1000 revs i normally go by rev counter anyway. Also the clamps on the rear lower cross member for the spare
wheel can go as well as the 2 studs sticking up on the bottom cross member that the rear bulkhead panel fits to, also theres a U bracket &
rectangular strap with hole in it on the lower cross member just in front of the fuel tank thats not needed. Another added weight is that big lump of
lead called the battery, WF supply a heavy car one but i swapped for lighter bike one as i don't have headlights due to only doing summer
daylight dry blats & my MOT is classed as a daytime MOT!!!!
As regards panel refitting have you kept old panels to use as a template so you can transfer holes from them onto new panels?
& you gonna use air sock filter with dynojet for more umph? i uprated from standard 115 jets with bike airbox to 132 with sock
[Edited on 12/3/11 by andyfiggy2002]
Hey Andy. I'm looking forward to putting it back together, hopefully won't be too long now!
Yep, seatbelt mount points went, those were a bugger to grind down properly as they were solid lumps, got there in the end though. In terms of the
other 'bracketry' I decided to keep most of it on, I was going to remove any non necessary stuff before having it blasted and repainted, so
I'll keep what's left on there for now, but may look at doing that next time around!
My speed transducer is pointed at the bolts on the propshaft near the reverse box, so no need for any of the brackets at the back.
Battery wise, it's currently got a beastly Halfords lump, but this'll go in place of a Cell battery when I get round to swapping it over!
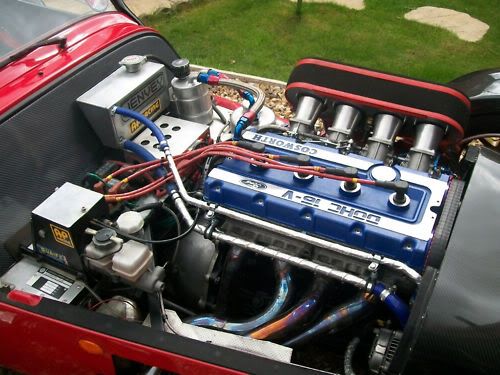
Power wise, the engine will have the Mac#1 Airbox fitted with a conical filter, as the filter will be right next to the vent for the bonnet, so no
need for a NACA duct- should give it plenty of air (that majority coming from the Vent and not the bay). Not sure what I'm aiming for power wise,
but it already runs on a GIPro, but will also be going Power Commander when the time comes...
Now it's just a case of waiting the last day or two before I can get started...
More pictures due very, very soon!
andyfiggy2002 - 14/3/11 at 02:51 PM
this is quite interesting to have a build diary on a forum that other members can chip in with hopefully helpful comments as most build sites are just
a diary, ok its a westie on a locost site but in the end its a BEC
BigMac - 14/3/11 at 03:22 PM
Chassis has arrived. Massively impressed with the quality of the finish. The guys were really professional and took great care in shifting everything
for me.
To summarise the chassis bit, it's been shot blasted, zinc sprayed, primed and epoxy painted in gloss black. All for a very good price IMHO (PM
me if you want details).


Had a quick trial fit of the brake lines, will be spending this evening plumbing them in properly with zip ties and p clips, pictures to follow once
that's done...
Ta,
Ben.
JeffJeffers - 15/3/11 at 01:16 PM
Looks to be coming along nicely.
Good to see you are busy taking pictures rather than helping unload!
BigMac - 19/3/11 at 08:00 PM
Managed to get a good few hours in on the Westy today, weather was brilliant, shame I couldn't get the car out of the garage! Some of you may
notice that I'm not putting the panelling on yet. Figured it was easier to work on the car mechanically, so they'll be going on once the
major mechanicals and brake, fuel and loom lines are in.
So far, this stuff's in/done (pictures due tomorrow, probably):
Differential- pain in the arse to get that in on your own, took some careful use of a ratchet strap! Also managed to catch my thumb whilst
hammering the lower bolt through.
Driveshafts- decided to be VERY picky with putting these in. First got all the bolts and brackets and gave them a good clean to remove grease
out of the threads, copper slipped lightly then partly bolted in without the drive shaft in, to make sure they went in easily. Then dropped them into
the CV joints and bolted it all up, cleaning away the grease that spits out of the bolt holes.
Rear brake line assemblies- p-clipped in (some zip ties remain in a couple of the harder to reach areas!), all rear of the car is done and
connected up to the flexy hoses that pump fluid out to the calipers, not a bad job for a guy that spends his day in the office and never goes near
anything mechanical!
Prop shaft- another pain in the arse, one of the threaded holes in the diff had blocked, so had to use a donor bolt and spend 20 minutes
getting it through to clean all the crap out, then connect everything up.
Reverse box- went in easy peasy, probably lucky that I cleaned and prepped it all before putting it back in the chassis.
Next up will be the wishbones, shocks/springs, hubs and brakes. Just a shame that I can't get the bloody wishbones to fit now I've
polybushed them! I need to file a small amount of the PE off the bush so that the crush tube is the longest part of the arrangement, as at the moment,
the bushes are staying fixed against the chassis brackets when it's all bolted up, meaning I'm going to get a load of wear due to the
wishbones moving around the bushes, rather than the whole arrangement around the crush tube.
Update to follow soon :-)
BigMac - 24/3/11 at 08:14 PM
Hi All
A few pictures to complement the previous update...


Build manuals... check... complete toolkit to build car... check... let's get building!!
Also invested in a rubber coated dead blow hammer, for the more fragile bike components in the Megablade manual... 

Also honoured with a visit from Mr Hignett, who told me I was doing everything wrong and I should stick to IT Good to meet him, great guy with lots
of experience, hope he's got plenty of patience to deal with my multitude of questions!
Ta,
Ben.
Steve Hignett - 26/3/11 at 10:10 PM
I hope you phrased a bit of the above wrong!!!
I think I told you, that you were doing a fab job!!!
fimi7 - 26/3/11 at 11:32 PM
Seems like you are running stainless steel braided lines throughout, no hard lines?
BigMac - 28/3/11 at 03:23 PM
quote:
Originally posted by Steve Hignett
I hope you phrased a bit of the above wrong!!!
I think I told you, that you were doing a fab job!!!
Yeah of course I'm joking! lol. Good to hear from a seasoned builder that I'm on the right tracks :-)
Yes, stainless steel PVC coated braided hose throughout, no hard lines. It's one of the long term debates such as BEC vs Car Engine, JDM vs UKDM
Integra, Turbo vs Supercharged, Full Braided vs Hard Lines. I chose full braided, courtesy of Russ Bost off here. Very good quality and an awesome
price, also fitting the entire system was short and sweet!
BigMac - 22/4/11 at 06:18 PM
Hi All
Figured it was time to do an update, not been on here in a while!
Managed to get quite a bit done with the car now, I'm currently on hold while Mr Hignett constructs my Carbon Fibre, then we're ready to get
going again!
Had a blonde moment when fitting a rear wishbone, managed to properly cross thread a rose joint, knackering the threads within the wishbone. Luckily,
my dad has a Snapon thread repair kit, so ran a tap down the wishbone and (luckily!!) everything was sorted.
Spent a large amount of time recently, extending the bike loom. Got quite picky here, got a copy of the wiring diagram and ordered identical colour
wires so that the plugs are extended properly, here's hoping my soldering is up to scratch. All the engine electronics that are in the bay are
also covered in black expandable glass sleeving, p-clipped to the chassis and feed into the scuttle panel through the tunnel, so there should be no
visible wiring at all. I'm still very, very nervous about my electronics, here's hoping it all works when it's back together! Will put
some pictures up shortly, though.
Still have the car electronics to do, I'm still contemplating building/buying in a seperate car loom that powers the radiator fan (other than the
thermostat switch), lights etc.
Relieved now that the shocks and springs from Procomp have been fitted. Lowered the car onto the floor and it sits nicely, glad that's sorted!
So far then, the following is done:
Transmission: Reverse box, prop shaft, diff, drive shafts and hubs, linkages for reverse and gearbox
Braking: Front and Rear brake discs, hubs, all lines and master cylinder
Suspension and steering: Wishbones, shocks and springs, poly bushes, steering rack, upper and lower steering columns and wheel (for now!)
Electronics: Engine loom connected
The next few weeks should see the carbon panels being fitted, then we can really get down to business of tidying up loose ends and sorting electronics
and engine!
Last round of pictures I managed to take (even though we're a little further on now!).
Mac#1 Airbox In

First time lowered onto it's wheels! (Alignment has been sorted now, well, by eye at least)


Will keep you posted!
Thanks,
Ben.
andyfiggy2002 - 22/4/11 at 09:59 PM
is the quaife reverse box just held on by bottom bolts only? its just i notice the westfield item is mounted higher up & has both top & bottom
mounts???? just seems a bit minimal to me considering the rotational forces that are going to go through it, i even had to wirelock my lower bolts
after they loosened off with all the oil spewing out around them, not such a prob now since i fitted new oil seals & breather catch tank
[img]


[/img]
you have to hover your curser over image for some reason
[Edited on 22/4/11 by andyfiggy2002]
BigMac - 26/4/11 at 08:49 AM
quote:
Originally posted by andyfiggy2002 ... is the quaife reverse box just held on by bottom bolts only? its just i notice the westfield item
is mounted higher up & has both top & bottom mounts???? just seems a bit minimal to me considering the rotational forces that are going to go
through it, i even had to wirelock my lower bolts after they loosened off with all the oil spewing out around them, not such a prob now since i fitted
new oil seals & breather catch tank...
Yep, the reverse box is mounted on two solid pieces of box section steel (apologies if my terminology's wrong, I basically mean two solid pieces
of square steel bar!) with some pretty heavy duty bolts going through (M10s) with metalock nuts. When I dismantled the car they were a pain to remove,
but weren't thread locked! So the current setup seems suitable, as far as I can see.
Only thing I have done, is switch the direction of the bolts, so the bolt heads sit under the floor, minimising anything stick out under the car (as
per Steve H's advice!).
Peteff - 26/4/11 at 09:12 AM
You are not seriously going to do any work on the car with a claw hammer  Get a ball pein, claw hammers are for Morgan and Locust owners.
BigMac - 26/4/11 at 10:03 AM
quote:
Originally posted by Peteff
You are not seriously going to do any work on the car with a claw hammer Get a ball pein, claw hammers are for Morgan and Locust owners.
I was hoping I'd get someone with that
No, the claw hammer has gone no-where near the Westfield, it simply lives in the toolbox! Neither have really been used, the dead blow was used
briefly to knock the track rod ends out, but other than that, nothing!
BigMac - 4/5/11 at 01:20 PM
Right-o.
Another quick update as to where we are now!
No mechanical work has been done to the car since the last update, it's all be electrics. I spent the majority of the bank holiday weekend going
through the wiring diagram and front and rear looms on the car to understand how the car electronics interfaced with the bike loom.
Now I am in no way an electronics person, the whole thought has scared me to death! But I spent yesterday evening with the entire bike loom sat in
front of me, checking every single wire against the diagram, suffice to say I'm feeling a little more confident now. Found one or two minor
problems with cut through cables, but also soldered back together now. Providing my soldering is up to scratch, hopefully we won't have too many
problems come startup.
The car electronics are now all removed from the loom too, the loom purely runs fuelling and engine management now. I've already started
designing the car electronics loom on paper, hopefully have that done soon, too. Am going for a startup in a week or so's time, once the radiator
and fuel system is plugged up. As is tradition, I'll do a video if it works!
Will post some pictures up of the (for now anyway) final bike loom, with the extended plugs and so on, so everyone can have a look-see. Looks better
though, let's just hope it works!
Ta,
Ben.
BigMac - 18/5/11 at 09:35 PM
OK, so this week hasn't gone as well as I'd planned, whilst I do have a spark and the starter motor is working, I just can't seem to
get the fuel pump priming, not matter what I try... Have gone through the wiring diagram, removed all of my soldered joints to the necessary wires and
replaced with crimped connections (minimise the possibility of it being me). Still won't fire up. Did find out that the pump is not off a ZX10R,
but a ZX6RR from 2005, needless to say I now have that diagram and (to me) everything looks as it should.. I hate this electrics business!!
On better news, I got round to cutting the floor panels out the other day, with a surprising amount left over with which to play. Some pictures (not
riveted in at this point, more for an example of what it'll look like, once done. The panelling for the transmission tunnel is also seperate,
that will be held on with rivnuts and bolts, meaning I can drop the panels out if I ever need to work from the underside of the car...
Oh and no, the fuel pipe isn't in at all yet, merely draped in!


OK, so I'm jumping the gun a bit with this one, but hey, looking at the final product keeps me motoring through!

Any handy hints/tips with regard to the darn electrics, feel free to PM me!
Ta,
Ben.
BobM - 19/5/11 at 06:54 PM
Likely to be one of the ECU interlocks although the fact that you can turn it and get a spark narrows it down a bit. I'm guessing you don't
have the luxury of the bike clocks to get the FI warning codes?
I did familiarise myself with all the details of this lot when I wired mine but the knowledge unsurprisingly decays quite rapidly with time. I think
the clutch switch just disables the starter, the others disable the FI system.
The main interlocks are:
1. Engine stop switch
2. Clutch switch/neutral indicator
3. vehicle down sensor
4. Sidestand switch
Depending on which loom/ECU you've got you also need a resistor for the grey wire to the ECU.
Here's what I did on mine (07 ZX10R), I actually completely cut out the bike relays.
- ignition +ve to Red wire
- ignition +ve to Brown wire (ECU)
- 12v to White/Black (ECU)
- Earth Red/Green (=clutch in) and Green/Black (=sidestand up and either neutral or clutch in)
- Fuel pump relay supply to White/Red (fuel pump, injectors etc.)
- Brown/Yellow to fuel pump relay � negative switch
- Grey wire to ignition 12v via � watt 100 ohm resistor
- Starter switch 12v to Yellow/Red (starter relay) and Black/Red (ECU)
- Light Green to DigiDash (neutral)
- Pink � ECU fan control
- Light Blue � tacho feed
I also eliminated the tip-over sensor by substituting with a 68kohm resistor
HTH and hope I'm not teaching granny to suck eggs!
Stuart_B - 19/5/11 at 07:11 PM
wow, that is a great looking build
is that a carbon kevlar floor?
stu
BigMac - 19/5/11 at 07:17 PM
quote:
Originally posted by Stuart_B
wow, that is a great looking build
is that a carbon kevlar floor?
stu
Hi Stu, thanks for the reply... Yes it's a 1.2mm Kevlar floor- whilst the rest of the panelling is Carbon, I wanted a little more reassurance for
the floor!
Courtesy of Mr Hignett I may add :-)
[Edited on 19/5/11 by BigMac]
Rocket_Rabbit - 20/5/11 at 11:47 PM
Must say Ben, it's looking good!
I have a new bat myself
BEC vs CEC and all that
Steve Hignett - 21/5/11 at 09:06 PM
quote:
Originally posted by BigMac
quote:
Originally posted by Stuart_B
wow, that is a great looking build
is that a carbon kevlar floor?
stu
Hi Stu, thanks for the reply... Yes it's a 1.2mm Kevlar floor- whilst the rest of the panelling is Carbon, I wanted a little more reassurance for
the floor!
Courtesy of Mr Hignett I may add :-)
[Edited on 19/5/11 by BigMac]
Ahem, I thought that I was going to continue the CF/Kevlar theme for other panelling
andyfiggy2002 - 22/5/11 at 10:17 AM
great build, the problem with the westfield site which you dont get on here is they categorically refuse to have a BEC forum so when you add a BEC
question you always get the BEC v CEC slanging match which then detracts from the original topic & eventually becomes somewhat boring,
quick question do you have any contact details & prices per square metre of all this kevlar & carbon panelling???
BigMac - 22/5/11 at 09:03 PM
quote:
Ahem, I thought that I was going to continue the CF/Kevlar theme for other panelling
Funnily enough, I was going to PM you about the very same thing... Yes, we are indeed continuing the Kevlar appearance for all the other panelling, as
it looks too damn good not too. Let me know when you're free this week and we'll get the measuring done...
Andy- no prices, but hopefully Mr Hignetts reply has answered your question :-)
BigMac - 4/6/11 at 04:34 PM
OK, so with the arrival of some good weather and a fairly sizable collection of rivets, I've finally managed to make a start to panelling the
chassis... It's only taken 3 months to get this far!!
This is the first time I've ever done something like this, so figure preparation was the most important thing. In addition to my lack of skill,
I'm also obviously using a chassis with holes already drilled for the last rivets that were in there. I decided that I'd mark up new holes
on the panelling and drill directly into the chassis using those as a guide, rather than trying to line up with the original holes.
Panel edges were masked first, then the panels lined up and clamped into place. I then traced the outline of the chassis onto the masking tape so I
could see how much I have to work with, then came the enjoyable (sorry, I mean dull!) task of marking up the new holes. To help me out I found a video
on CBS' Youtube showing a neat little trick with some elastic, so I followed that. Got the first panel clamped in and ready to go using some neat
little spring clips I got from Amazon, ok, so they're not as good as the big ones, but they help spead the load evenly over the carbon and more
means I could put one between each hole that needed drilling...

Today I've managed to get one panel fully drilled and 'porcupined', here's the obligatory shot that I've heard so much about!
(This is the Australian variant as I decided to leave the frame and running gear the right way up!).

Managed to get another panel lined up with the holes from the original, that's all clamped in ready to go, too...

I'm just being extremely cautious with drill bits, as I bought 5, but seem to have lost 4 without even using them (I blame the father here), so
here's hoping this one lasts at least for one side until I can get some more ordered!
Plans for tomorrow is same again for the drivers side, along with the trans tunnel pieces. Not fully bonding and riveting in place yet, until
I've done all the other panels...
Updates soon :-)
BigMac - 9/6/11 at 09:04 AM
More time drilling and riveting last night... Covered in swarf shards this morning, everynow and then I'll catch one on my shirt and it's
getting really annoying!
Fitted the 'Service Panels' under the floor for the transmission tunnel last night. The remainder of my Carbon turns up this evening (all
things being equal), so we're now cookin' on gas!!
Also bought the 'Automotive Electrics' book the other day. Very, very expensive given the content, but was a worthwhile buy for me, having
had no previous experience of car electrics other than changing a headlamp bulb and fitting a HID kit. Now in the process of doing a full wiring
diagram to the lucas colour codes, so that I actually understand what I'm doing when it comes to wiring the thing back up!
Pictures to follow soon...
Steve Hignett - 9/6/11 at 09:23 AM
Looking great so far!!!
Still on for tonight?
Kriss - 9/6/11 at 11:19 AM
amazing build bigmaccy!
steve, you need to hook people up with this kevlar shizzel!!!!
BigMac - 9/6/11 at 11:47 AM
Cheers Kris, hopefully there'll be some more pictures of the rest of the stuff tonight!
Steve- am indeed, give me a call when you're on your way round and I'll make sure I've got a brew ready...
BigMac - 12/6/11 at 08:02 PM
Not had much chance to work on the car this weekend, but managed to get some more panelling measured and cut this afternoon. Nearly there with
panelling now, transmission tunnel and the drivers footwell plate and we can seal and rivet the lot in, then get onto nuts and bolts :-)
One thing I've been quite disappointed with overall is the quality of the epoxy paint. Very little effort is required to actually chip it, which
is annoying. That said, it chips down to the primer, but never goes past the zinc coating on the chassis, so short of cosmetic damage, the chassis
should still be relatively well protected from the elements. As you'll see from the photo's, I've managed to chip it quite a bit,
despite being overly careful. Decided not to worry about it for now, will get it sorted, then touch it up properly at the end of the build. Annoying
though!
Pictures aren't great, but give you the idea!


BigMac - 13/6/11 at 08:37 PM
Driver's footwell panel done today... Nearly there!
(Tidying up of the edges will get done once all the panels are drilled and ready to fit proper!)

BigMac - 19/6/11 at 07:41 PM
Last lot of panels cut and done today... Now onto bonding and riveting the lot in!
Drivers foot panel in... Took me an entire evening to do that, as I can do squares and cut outs for chassis sections, but adding bits in the middle
made it a little too much for me to do quickly... Two templates worth and this was the result:

Passenger foot panel was easy enough...

Transmission tunnel and top are done, including cutting out the hole for the gearstick and reverse box selector. Still need to do the handbrake,
though. None of it is riveted in yet, but you get the picture... Went for a larger weave on the transmission tunnel, thought it looked pretty cool!


Update to follow once all the panelling is in... Which hopefully should be the end of the week...
Ta!
BM.
fimi7 - 19/6/11 at 08:07 PM
Whats is the black edging you are using on the tunnel? Plastic?
BigMac - 19/6/11 at 10:48 PM
It's rubber U trim I think, I ordered it ages ago and found it in the garage under a mound of other bits I'd bought on a whim, lol.
I think if you search for U-Trim on eBay, there's a guy that specialises in Mini's that sells it, I think it's arch trim for minis?
Have a feeling this is the stuff I bought, may even by the same guy!
U CHANNEL RUBBER WHEEL ARCH TRIM 6MM WIDE MINI COOPER | eBay UK
Steve Hignett - 19/6/11 at 11:25 PM
To be fair... It looks alright...
andyfiggy2002 - 21/6/11 at 10:46 AM
heres one i made earlier, yours should look like this when finished
[Edited on 21/6/11 by andyfiggy2002]
BigMac - 23/6/11 at 08:43 AM
OK, so the passenger side tunnel, both footwells and rear bulkhead panel are bonded and riveted in place now. I've come to the conclusion
I'm never putting that many rivets in by hand again 
I'm off to borrow an air rivet gun... 
Steve Hignett - 23/6/11 at 10:34 AM
quote:
Originally posted by BigMac
OK, so the passenger side tunnel, both footwells and rear bulkhead panel are bonded and riveted in place now. I've come to the conclusion
I'm never putting that many rivets in by hand again
I'm off to borrow an air rivet gun...
I told you well in advance to get a lazy riveter so it's all your own fault!
By the way, all the panelling is looking ace - I don't know what you were worried about!!!
BigMac - 24/6/11 at 01:56 PM
quote:
Originally posted by Steve Hignett
quote:
Originally posted by BigMac
OK, so the passenger side tunnel, both footwells and rear bulkhead panel are bonded and riveted in place now. I've come to the conclusion
I'm never putting that many rivets in by hand again
I'm off to borrow an air rivet gun...
I told you well in advance to get a lazy riveter so it's all your own fault!
By the way, all the panelling is looking ace - I don't know what you were worried about!!!
Aye you did warn me to get a non-manual rivet gun! Figured I'd give it a go, wanted to see what everyone was whinging about! :-) Safe to say
I'm part of the club now...
Air rivet gun found, so should be pressing on and getting the rest of the panelling done over the weekend, you'll have to stop by for a look-see!
Black rivets look awesome by the way... Nice hint ;-)
BigMac - 24/6/11 at 10:00 PM
So just how good are Air Rivet Guns?! The first time I used it I honestly thought it didn't work... "... can't have been THAT easy ...
Oh wait, maybe it is!"
So just the two major floor panels to bond and rivet now, decided to leave those until tomorrow as they'll be stood on plenty of times, so
I'd rather they're done right! (They're just clamped in in the photos).
So my general process for the panels was key the edge of the carbon and the frame with some scotch pads, clean with spirits, apply a decent bead of
sealant, clamp panel on, then rivet to close everything up. Here's hoping it works. Decided to leave everything to set for the next day or so,
will probably revisit the car on Sunday now, though...
Still not best pleased with the tunnel top, but I'll see what can be done to it later on...
Piccies, apologies about the quality...
Rear bulkhead looks a little flexed, but with the seats in you can't tell...

Complete looking toward the front of the car...

Driver's footwell, complete with Kevlar chassis protector...

Another shot looking toward the back of the car, still need to drill the holes in the bulkhead for the wishbone and shock bolts...

Passenger's footwell...

God save Air Rivet Guns!

BigMac - 26/6/11 at 05:52 PM
So nice to get a chance to work outside for a change!
All the panelling is now bonded and riveted in, also managed to get the drivers seat bracketed and bolted in properly as well. Ok, so these will more
than likely be coming out again, but at least I know everything fits together.
Next up now is to tidy up the loose ends with the panelling and look at getting the ZX10R lump back in, then the remaining mechanicals. Decided to
leave the electronics to near last, just behind bodywork fitting!
Pics... and yes, my rear nearside is as flat as a pancake, thanks to letting the drill fall off the workbench and land bit down into the sidewall
...


Ta!
Ben.
Rocket_Rabbit - 27/6/11 at 07:18 PM
Looking good Ben!
We have track days planned for 10th August and 2nd september. You up for it?
BigMac - 28/6/11 at 09:05 AM
quote:
Originally posted by Rocket_Rabbit
Looking good Ben!
We have track days planned for 10th August and 2nd september. You up for it?
Sounds like a plan, am aiming to have the thing finished for mid to late July at the latest really... What tracks are you doing?
BigMac - 5/7/11 at 09:33 PM
OK, so loads done over the weekend in an attempt to get the car looking more... car like!
* Engine in (last time, this time!);
* Cooling system, pipework, radiator, fan and expansion tank;
* Steering column et al;
* Cycle wing brackets;
* Modified the trans tunnel cover to allow me to run cables through and the breather for the reverse box (bottle isn't secured yet!);
* Sprayed the Mac1 Airbox up Black, figured it'd look better! (Missed a slight amount round where the filter mounts, but as it's not staying
I figured I'd leave it for now;
* Fuel tank in properly along with the fuel pipe (all p-clipped nice and secure!);
* Engine loom in (needs a few slight modifications);
* Crafted up the single piece scuttle (few minor rough edges to tack down with some sealant), now need to get some dzus fasteners to keep it in
place;
* Reverse box in properly along with both prop-shafts;
* Gear and reverse box linkages in.
Also thanks to BigRich, I may have found the fuel pump issue. Seems my over-zealous nature to shorten cables, I've removed the 200 Ohm resistor!
So will replace that and see how I get on...
Pictures... again, quality's not the best as the light's not brilliant in the garage.


Next up, few final preps before starting her up! Then onto $50 paintjobbing... ;-)
Ta,
Ben.
[Edited on 6/7/11 by BigMac]
Steve Hignett - 5/7/11 at 11:17 PM
I will make you a steering column cover in the next few weeks (read months lol!)
Everything else is looking amazing!!!
(give me a call anytime after 9am tomorrow matey...)
welderman - 6/7/11 at 08:58 AM
This is the first time ive seen this thread, very nice work indeed, i see you have a carbon fettish too lol .
BigMac - 6/7/11 at 02:08 PM
quote:
Originally posted by welderman
... very nice work indeed, i see you have a carbon fettish too lol ...
Thanks very much! It's taking me a lot longer than the seasoned builders as I'm trying to be really careful with how I put things together!
Really enjoying the build so far, even if the electrics have annoyed and scared the hell outta me!
Oh yes, I only planned to have a Carbon tunnel top, kind of went overboard a little there...
BigMac - 6/7/11 at 09:42 PM
The resistor was the issue! 200 Ohm resistor (20p worth!) soldered in and turning the key everything magically worked as it used to! Time to fill up
the rad and cooling system and get her fired up... Video to follow as per the locost rules!
BigMac - 7/7/11 at 06:04 PM
IT'S ALIVE!!!
http://s757.photobucket.com/albums/xx213/BigMacVtec/?action=view¤t=Video0000.mp4
bigrich - 7/7/11 at 07:13 PM
That will do mate,
PS added you on FB if you want to accept
Benzo - 8/7/11 at 12:56 PM
I need some kevlar in my life! where did you source it from?
Proby - 11/7/11 at 07:06 PM
Excellent work, new members first view and I'm very impressed. let's see an update soon!
BigMac - 11/7/11 at 08:46 PM
quote:
Originally posted by Proby
Excellent work, new members first view and I'm very impressed. let's see an update soon!
The first comment from a new member, I'm honoured! Welcome to the fold! Here you go Proby... ;-)
Still waiting on car electrics, but nearly there now... Then just odds and ends... Then the really fun painting, painting :-)
Started to cut the nosecone in prep for painting. Pictures really don't do the Kevlar justice- makes it look very tacky, but seeing it for
real is much better, trust me!

Rear shelf in and trimmed

Interior looks better now I've painted the inside of the fibreglass up black. Still a few loose ends to tidy up here, dashboard also needs
finishing (wiring, switches and then flocking)

Got grommets on the way for the holes cut in the rear bulkhead for the wishbone and damper bolts. Did spend a load of time on Saturday masking off,
sealing, then smoothing over between the panelling corners, wanted an F40 look to it!

Particularly impressed with the 'bay... well, now that I know that all the tidied up electronics are working as they should Still need to
fit a new, shorter throttle cable, and also do the wiring for the front loom, but it'll be well out of sight ;-)

Oh yes, also going to be removing all the foam tape, since the body is going to be painted anyway... May go for Black hoses at some point, but
they're a good brand and do what they need to do, so no rush!

So quite a few more niggly, fiddly little jobs to do before I can cover everything up and start $50 paintjobbing!
Ta,
Ben.
[Edited on 13/7/11 by BigMac]
Winston Todge - 17/7/11 at 04:55 PM
Great quality re-build bud!
Should be a good giggle when you've finished it.
Chris.
andyfiggy2002 - 17/7/11 at 05:46 PM
did u say u were going to paint body? any clues what scheme u have in mind?
BigMac - 18/7/11 at 10:42 AM
Thanks for the comments guys, I'm looking forward to having it back on the road so I can start enjoying it again!
Not really much done with it over the last week, as work commitments have got in the way. I've managed to get hold of a CBS wiring module and
cover from one of the guys on here, so hopefully wiring up the car electronics will be relatively painless. Few other loose ends to tie up including
new throttle cable, adjusting the clutch cable and getting the brakes bled. Also need to get the geo setup so the car is at least driveable (I'm
planning on getting it setup at procomp later in the year, once the car's MOT'd and back on the road).
Update on the body work though:
I'm comfortable I've done enough reading up and research on the '$50 paintjob', so it was time to get going! I bought a 2.5 litre
tin of Gloss White Rustoleum off the web, along with some decent foam rollers and some White Spirits. After spending all of Saturday sanding, keying
and thoroughly cleaning the removable body panels (so nosecone, scuttle, bonnet and rear wings) we started the first coat on Sunday. We did roughly a
15% White Spirits mix, which gave the paint a nice consistency that wasn't too thick, mixing plenty into a sealable container so we can do every
panel a few times. The other half was in charge of rolling, I was the 'painting buddy' that loaded up rollers, checked for errors (I still
wouldn't recommend saying "you missed a bit", despite that being the honest truth!) and held the panels steady while she painted. We
worked to ensure an even coverage across the panels, removing hard roller lines and so on. Everything's been left to dry over night, so hopefully
when I get home it'll be good for flatting, then another coat tomorrow.
Decided that instead of doing a preset number of coats, I'm just going to keep coating until I've used the tin. From what we've done so
far, I'm thinking we'll get 5-6 thin, good coats with a little paint left over for future touch-ups.
Observations so far though:
* It's tough stuff to work with, even indoors on not-too-hot a day, it was drying pretty quickly, you really do have to work quickly in order to
avoid going over bits that have already gone tacky;
* Unlike normal glossing, so long as you carefully load the roller with paint (try to use as much as you can without re-loading) you get few/if any
drips;
* Intricate bits are tough with a roller, so I've have had to purchase some foam paintbrushes (for the grand sum of �4 for 20 off the
'bay);
* Paint doesn't seem to want to stay in stone chipped parts of the panels, am thinking I'll have to load up a few cocktail sticks and dab
paint in, but that said, it's only the first coat. Not too much of a problem on bonnet and nosecone, rear wings are like a mine field, but I have
some Carbon arch guards to go over the top;
* The gloss from one layer is good, I'm thinking after 5 coats and flatting and polishing, it's going to look goooood!
Pictures to follow soon!
Ben.
BigMac - 19/7/11 at 08:31 PM
OK, so I'm now slightly behind on the pictures, but the second coat went on this evening, now it's start to look gooood!
Pictures below are for the last update ;-)


Will keep the pictures minimal on these updates, as no one likes watching paint dry!
More to follow...
Ta,
Ben.
Steve Hignett - 19/7/11 at 10:52 PM
I haven't checked on your progress just recently as had a bit of rough week and a bit, but it's looking fantastic Ben!!!
Anything you need, just drop me a text and I may be able to help out (grommets for eg. I have a box full of all diff sizes etc) Happy to help if I can
matey!!!
BigMac - 24/7/11 at 08:45 PM
Very quick update (a beer beckons!)
All removable panels have had 2 flats back and three coats, now leaving to harden for a week or so before attempt at flat and polish (not too shabby
for a roller job though!)


Bodywork has had it's first coat today, another two coats and we should be looking good!


Ta,
Ben.
BigMac - 26/7/11 at 08:54 PM
OK, so I've learnt the hard way the past 24 hours.
Decided that as the Mrs was too run down after work to help paint the car, figured I'd flat down the last coat to the body and prep it for the
next. Once done, thought "this painting malarky can't be THAT hard"... So cracked the roller out and gave it a go. I came to the
conclusion very quickly that in order to paint the stuff properly, you need the patience of a saint and in order to get it right need fists made of
something other than ham. Needless to say I finished doing the rear of the car and gave up promptly, deciding that now I've made the back end
look like a shattered Aero Chocolate bar it was time to step AWAY from the roller!
So I got a decent telling off for ruining her precious paint work (and I'm not being sarcastic, honestly I've no idea how she does it!),
before being shut in the garage to wet send it all back to how it was, that was a nightmare in itself... One thing comes to mind:

Still, minor set-back. Onward and upward!
Ta,
Ben.
Rocket_Rabbit - 26/7/11 at 10:02 PM
Looks good mate - something i'll be doing with my Westfield. Even the Mrs said she'd muck in
Are you going to be ready for 2nd September and Anglesey? Be good to have you there.
andyfiggy2002 - 26/7/11 at 10:14 PM
have to admit your the first person ive seen who has painted a car this way, be aware that the front wheels throw up a lot of stones especially if
your running AO48,s or R888,s so i hope they dont chip & also the bottom of the rear arches take a hammering to
BigMac - 27/7/11 at 08:47 AM
quote:
Originally posted by andyfiggy2002
... be aware that the front wheels throw up a lot of stones especially if your running AO48,s or R888,s so i hope they dont chip & also the bottom
of the rear arches take a hammering to...
Thanks Andy :-) When I flatted the car back I found a few spots that were hammered with stone chips. As you say, primarily the bottom of the rear
arches (these looked like a minefield in mine) and also the bottom of the tub where the side panel bowsto accomodate the footwells, found quite a few
there! I'm hoping that it doesn't chip too! That said, all the research I've done seems to show that you just need to put sufficient
layers of paint on and allow it to harden properly before you do any serious driving, so I'd rather get it right before taking it back out on the
road- I'm determined to get this $50 paintjob working! Also have a set of Carbon rear arch guards ready to go on after we've finished
painting ;-)
quote:
Originally posted by Rocket_Rabbit
... Even the Mrs said she'd muck in
Are you going to be ready for 2nd September and Anglesey? Be good to have you there...
If she's anything like mine, I'd let her do the painting if you prefer your mechanical tinkering to aesthetic! Mine just won't do the
sanding/cutting back, apparently that's the man's job...
I've still got another month before September, so that should be plenty of time to let the paint harden and get everything finished, will keep
you posted!
BigMac - 31/7/11 at 04:46 PM
Final (5th) coat went on yesterday, now leaving for a few days to cure!


So now just the odd bits and bobs to get sorted, bleed the brakes, new throttle cable, finish off the dashboard and do the wiring. Update to follow
soon!
Ta,
Ben.
Stuart_B - 31/7/11 at 06:06 PM
that is looking fantastic
nice work
stu
Rocket_Rabbit - 31/7/11 at 10:42 PM
Looks brilliant and a great locost/high quality job.
You and Kat should be very pleased with yourselves
Steve Hignett - 31/7/11 at 11:16 PM
As (directly) above...
Money spent in the right area's on the right thing - really decent upgrades/mods and then care/attention/skill paid to the non-expensive
upgrades...
Once again, all praise to you and your lovely "other-alf"!!!
It's not often a KC floats my boat, but this one certainly does and as I mentioned to you, really looking forward to watching it lap Oulton!
[Edited on 31/7/11 by Steve Hignett]
BigMac - 4/8/11 at 10:22 PM
Thanks for the kind words everyone, good to know I'm on the right tracks :-)
Have to say I think I'm starting to experience the 'lull' during the build/rebuild now. Can just see more and more little jobs and
extra little expenses, a silicone hose bend here, a throttle cable, steering rack boots there etc. Starting to get wound up by the fact that the
Pareto principle seems to be in full swing. Funny how you read everyone's posts similar to this and say "nah, won't be me!". My
daily driver's even had a thorough clean inside and out, a full service and tidy up of the paintwork.
Haven't worked on the car in a week or so, but just finished sorting out the garage, putting all the tools away, cleaning the place up, trying to
make it less of an "oh dear god" every time I open the door. Pushed the car out in the evening light and have to say, felt better looking at
it now it's nearly there. Also decided to make a list of jobs that need doing to finish the car, unfortunately most of them cost some money, but
it's helping a little. Still think the whole process of wiring the CBS module in is dragging me down somewhat; I take one look at the diagram and
the module and immediately want to do another job on the car.
Part of me really wants to finish this car at the weekend, so I can get it out in the sun and have some fun- a nice gentle (serious!) drive up the Cat
and Fiddle, chill out and look at some of the other cars. The other part of me wants to take my time, do things right and accept that I may miss
RocketRabbit's track days and the remaining sunshine for the year. The way the Mrs is going on, may well be the only kit car I build*, so
I'd rather be safe in the knowledge I did things properly and exactly how I wanted...
Still, I started the first item on the list of ordering some new steering rack boots, cheap and easy, so will do that little job and hopefully I can
pick myself up that way.
Ta,
Ben.
* That's what she thinks ;-)
Steve Hignett - 4/8/11 at 11:25 PM
The wiring loom worked fine before you took it to bits and absolutely ZERO has changed between now and then, so get it plugged back In and enjoy the
car for the amazing thing it is while we still have a couple of summer weeks left man!!!
BigMac - 14/8/11 at 06:47 PM
OK, so have done a few more jobs over the weekend, still not the electrics though!
* Steering rack boots on;
* Battery tray in;
* Roll bar on;
* Driveshaft bolts lock-tite'd and torque'd up;
* Dashboard switch gear in (just needs wiring!);
* Front indicators in;
* Nosecone grille on;
* Fuel gauge sender wiring done;
* Handbrake gaitor trimmed;
I really am starting to see the Pareto Principle in full swing here, 20% of my time was doing 80% of the build, now I'm finishing the last 20%
and it's taking 80% of the build time!! Still, got my list, so working through it, bit-by-bit. Pictures:


Ta,
Ben
BigMac - 15/8/11 at 03:48 PM
No point putting it off anymore, have been bigging myself up all day, time to hit the electrics, figured I'd just have a go at the side lights
tonight, something small and easy!...
[CHARGE!] Aaaaaahhhhhhh!!!!...
BigMac - 23/8/11 at 08:07 PM
Figured I hadn't been on the thread in a while, so best do an update!
All the wiring is now in, cable tied, p clipped, and spiral bound. Finished off the earthing point and connections for the front of the car this
evening, had to file for quite a bit to get past the paint, primer, zinc coating in order to get some bare metal! Tested all the wiring and
connections, everything working as it should!
Next job is to do all the earthing points for the rear of the car and test those connections. Once everything is earthed up, I can start wiring
everything up to the dashboard and CBS Wiring Module. I know this may seem I'm doing things a long winded route, but I find doing things
methodically means I don't miss anything important!
Not really eventful, but here's the pictures of the front loom now fitted, it's only cable tied to the chassis at the moment, but as soon as
I get the rivet gun back, they'll be p-clipped in properly! Pictures were also taken before I tided up the earthing connections, so the mess of
wires at the front is gone now!


Cheers all!
Ben.
BigMac - 28/8/11 at 05:05 PM
OK, so electrics are nearly there, just the hazard switch and manual rad fan switch to wire in! Only reason I've not done them yet is because
I'm slightly confuzzled on the circuit side of things. Decided to mount the CBS wiring module to the removable panel, but with enough wire travel
for me to be able to move the panel around without having to un-couple everything. Also mounted the module 5mm from the panel itself, so worst case I
get caught out in the rain, the water runs underneath the unit, and not over it!
Dashboard all wired up, LEDs now come on with the toggle switches, an easy spot for which ones are on/off!

Wiring module in, with the cover on, still need to find a way of keeping cover on!

Wiring module without the cover, I'm hardly using any of the circuits on the module! Radio- No. Heater- No. Windscreen wipers- No...
etc!

Gap between panel and module, just in case it rains!

Headlights in and working, indicators work too, but no hazard switch wired up to show them working at the same time yet.

Tail lights in and working, along with rear fog...

Thanks,
Ben.
Ivan - 29/8/11 at 03:17 AM
Looking good - don't forget the grommet where the wires pass through the bulkhead.
BigMac - 29/8/11 at 09:49 AM
quote:
Originally posted by Ivan
Looking good - don't forget the grommet where the wires pass through the bulkhead.
Thanks Ivan, it's on order courtesy of eBay!
Benzo - 29/8/11 at 11:14 AM
Looks great big mac.. Mine is certainly getting a colour change and a wiring tidy up this winter!
Did you have any other colours in mind?
I'm considering White as well but with the black arches and nose to break it up
BigMac - 29/8/11 at 02:23 PM
quote:
Originally posted by Benzo
Looks great big mac.. Mine is certainly getting a colour change and a wiring tidy up this winter!
Did you have any other colours in mind?
I'm considering White as well but with the black arches and nose to break it up
Thanks Benzo :-)
I considered doing it Black or a lime green, but figured that the Kevlar looks much better against the white! The $50 paintjob is good so far, the
paint's hardened pretty well, dropped the ratchet on the rear wing yesterday and no so much as a chip... It's a lot of effort, lots of
sanding back between coats, but if you're prepared to put the time in during the prep stage (and have a Mrs that's good with a foam roller!)
then you'll get a good result!
Black highlights is a good idea, I've got some additional Kevlar parts to go on yet, so hoping those will break the colour up nicely...
Benzo - 29/8/11 at 03:19 PM
quote:
Originally posted by BigMac (and have a Mrs that's good with a foam roller!).
Unfortunately not.. mine spends her time, reading daily mail and shopping.. thats a hard days work to her! 
There is a guy in my Racing Series, his is Kawasaki Green which would have been my other choice..
So yeah i think the white with the black arches/nose and my Carbon detailing will be the job..
What colour of white did you use? until i started looking at whites i didn't realise there was such a variation, id say it will end up Audi Ibus
white for BMW Alpine white... Which ever is easier to paint!!
PS i really like the bike gauges.. could a fuel sender now have been used to match up to the bikes fuel gauge?
beaver34 - 29/8/11 at 03:46 PM
coming along great, mine and your look quite alike!

Benzo - 29/8/11 at 04:17 PM
^ nice
BigMac - 29/8/11 at 04:23 PM
quote:
Originally posted by beaver34
coming along great, mine and your look quite alike!
Mmmmm, I like! What section are those tyres?? > 205?? I was thinking about doing a full cage for mine at some point, what brand is that? Caged?
Good looking piece of kit! I'm trying to get Carbon Mods to make me an aeroscreen out of the remaining Kevlar fabric, but no one's agreed
yet. I'd settle for a Carbon one, but they've stopped making them!
Benzo- I ended up using Rustoleum's Gloss White colour, but thinking about it, Audi's White is a good one, that or the Balloon White used on
Murcielago's, mmm! In terms of the gauges, the dash is actually a Koso rather than a specific bike one, you can buy an adaptor so you can use
most senders with the gauge. Only problem I found though, is the fuel readout is difficult at best, no low fuel light either! The gauge came with the
car and is good enough for me, for now... I may eventually swap everything for a Dash2 or similar...
[Edited on 29/8/11 by BigMac]
Benzo - 29/8/11 at 04:32 PM
quote:
Originally posted by BigMac
the dash is actually a Koso
[Edited on 29/8/11 by BigMac]
Ahh, very good, where did you source that from? i was just about to get a new sender for my Fuel Guage to change to a Tube type sender.. I might price
one of those gauges.. how does it pick up mileage? is see yours has 18k already lol did you get the dash 2nd hand?
Thanks mate, keen on this kind of install.. looks great!!
Any more close up pics? is that a shift light on the top right?
Tempted
[Edited on 29/8/11 by Benzo]
[Edited on 29/8/11 by Benzo]
BigMac - 29/8/11 at 04:37 PM
quote:
Originally posted by Benzo
quote:
Originally posted by BigMac
the dash is actually a Koso
[Edited on 29/8/11 by BigMac]
Ahh, very good, where did you source that from? i was just about to get a new sender for my Fuel Guage to change to a Tube type sender.. I might price
one of those gauges.. how does it pick up mileage? is see yours has 18k already lol did you get the dash 2nd hand?
Thanks mate, keen on this kind of install.. looks great!!
Funnily enough, a mate of mine had the same problem reading the gauge, it's actually done 1800 odd, the last digit is .9 of a mile! The gauge
actually came with the car, but I found a place online that sells them (digitalspeeds.co.uk) that I may buy some accessories from (additional temp
pickups etc). In terms of mileage, I'm not sure, it probably calculates that from the speedo sensor, no idea if I'm honest! I have the
sensor pointing at the propshaft, rather than a drive shaft though. It's a cool little piece of kit to be honest, also got a built in shift light
amongst other things!
beaver34 - 29/8/11 at 04:50 PM
quote:
Originally posted by BigMac
quote:
Originally posted by beaver34
coming along great, mine and your look quite alike!
Mmmmm, I like! What section are those tyres?? > 205?? I was thinking about doing a full cage for mine at some point, what brand is that? Caged?
Good looking piece of kit! I'm trying to get Carbon Mods to make me an aeroscreen out of the remaining Kevlar fabric, but no one's agreed
yet. I'd settle for a Carbon one, but they've stopped making them!
Benzo- I ended up using Rustoleum's Gloss White colour, but thinking about it, Audi's White is a good one, that or the Balloon White used on
Murcielago's, mmm! In terms of the gauges, the dash is actually a Koso rather than a specific bike one, you can buy an adaptor so you can use
most senders with the gauge. Only problem I found though, is the fuel readout is difficult at best, no low fuel light either! The gauge came with the
car and is good enough for me, for now... I may eventually swap everything for a Dash2 or similar...
[Edited on 29/8/11 by BigMac]
thanks,
yes 205 50 front and rear 7" front and im going for 8" rear, was worried there too wide but came with the wheels so might aswell make the
work
the cage is from caged seem good would be a little worried without a full one but maybe thats just me
my aero screen is just fibre glass, seem to do the job!
Benzo - 29/8/11 at 04:51 PM
quote:
Originally posted by BigMac
quote:
Originally posted by Benzo
quote:
Originally posted by BigMac
the dash is actually a Koso
[Edited on 29/8/11 by BigMac]
Ahh, very good, where did you source that from? i was just about to get a new sender for my Fuel Guage to change to a Tube type sender.. I might price
one of those gauges.. how does it pick up mileage? is see yours has 18k already lol did you get the dash 2nd hand?
Thanks mate, keen on this kind of install.. looks great!!
Funnily enough, a mate of mine had the same problem reading the gauge, it's actually done 1800 odd, the last digit is .9 of a mile! The gauge
actually came with the car, but I found a place online that sells them (digitalspeeds.co.uk) that I may buy some accessories from (additional temp
pickups etc). In terms of mileage, I'm not sure, it probably calculates that from the speedo sensor, no idea if I'm honest! I have the
sensor pointing at the propshaft, rather than a drive shaft though. It's a cool little piece of kit to be honest, also got a built in shift light
amongst other things!
Yeah i really like it mate, i have to have one now, its my next job on the car, new Carbon blank dash and KOSO... I like Gismos!
BigMac - 29/8/11 at 06:18 PM
Ok, so had a chance to do a quick demo of the dash and switchgear now that it's all working, simple stuff to everyone on here, but am proud of
the fact I've managed to do it all myself!
Das
h Demo
Just a few more minor jobs to do now, throttle cable, clutch cable adjustment, torque everything up, cycle wing fitment and a brake bleed, then
it's ready for it's MOT!
[Edited on 29/8/11 by BigMac]
johnny chimpo - 5/9/11 at 10:30 AM
If you dont mind me asking, what kind of seats are they and where did you get them? Im looking to replace my padded vinyl set for something similar to
what you have.
Cheers
JC
BigMac - 5/9/11 at 06:17 PM
Hi JC- dropped you a PM r.e. the seats.
OK, so the latest is that the bloody engine won't start now- still not too sure why, but took the plugs out this evening and they're wet
with petrol, so looks like the thing has flooded, still concerned as to how that happened!
Also did a test fit of the rear fog light, too. It's stuck on from the outside currently, rather than inside out, but at least it works!

BigMac - 10/9/11 at 11:50 AM
Well that was fun, borrowed a Gunsons Eezibleed kit from the father to get the brakes bled, all hooked up, no leaks. Bled the nearside rear, offside
rear, nearside front, then come to do the last wheel and get nothing but air... The eezibleed kit was that old, the tube in the bottle had dislodged
from the top, resulting in the MC being completely dry... Couple that with the fact the bike engine won't start and it's been a pretty s***
weekend so far...
Steve Hignett - 10/9/11 at 04:28 PM
Even with an easibleed - I always use two people to do brakes - it's just an area of a faster car that I put faith in!
Give me a shout, I'll help you do them matey.....
BigMac - 12/9/11 at 03:28 PM
quote:
Originally posted by Steve Hignett
Even with an easibleed - I always use two people to do brakes - it's just an area of a faster car that I put faith in!
Give me a shout, I'll help you do them matey.....
Cheers Steve, will give you a call or drop by soon (work's keeping me away from the car still!)
BigMac - 17/9/11 at 03:51 PM
Thought it was time for another update!
Decided that with Winter making itself more visible by the day, the car isn't going back on the road this year now, I won't get enough
enjoyment out of it for the money I'd spend taxing, fully insuring and MOT'ing. Decided I can work on the last few little bits over the
winter, as and when I get chance.
So the bike loom has come back off the car for now, no major obvious defects that would cause the starting problem, but I'm guessing closer
inspection will probably find the fault. My thoughts are it's been in and worked, so it's either a faulty connection (i.e. a wire's
come loose from a crimp) or I've accidentally snipped something when tidying up the cable ties... Decided that while it's out I'm going
to solder and heatshrink the crimped connections, just for my peace of mind. Either way, I WILL find what's wrong with it!!
Been working on the brakes recently as previously posted, despite pushing litres of fluid through and there being no air coming out of the bleed
nipples at any brake caliper, I still have no pedal. Had a friend come round today to take a look over, we're guessing it could be goosed seals-
the cylinder's been sitting dry for months and inspection under the rubber boot did find some signs of that. Need to find out if I can get a
replacement seal kit for my MC, or whether I'll need to get a new one. Am tempted by a new one or a tandem set, whilst I'm at it.
Aside the engine starting and brake issues, all the other little jobs are progressing well. The Project Management side of me has finally shown
itself, as I now have an MS Project Plan hanging in the garage showing everything that needs doing, I just pick a few tasks a day and cross them off
the list, makes me feel a whole lot better!
Ta,
Ben.
YODI - 21/9/11 at 04:40 PM
Fantastic car, love the build but remain unsure about the paint, almost like it deserved much better as the last pic with the foglight shows the
orange peel. Saying that the car looks great, loving the kevlar touch too.
RK - 21/9/11 at 05:14 PM
Nice work!
BigMac - 29/9/11 at 11:43 AM
quote:
Originally posted by YODI
Fantastic car, love the build but remain unsure about the paint, almost like it deserved much better as the last pic with the foglight shows the
orange peel. Saying that the car looks great, loving the kevlar touch too.
Thanks Yodi :-) At the moment I've not had chance to flat everything back and polish due to the mechanical/electrical issues that have been
occuring, but needless to say it will get done! Here's one car that has been done that I found during my research, needless to say I'm well
aware of the amount of work that needs to go in, to get this finish!

BigMac - 10/10/11 at 11:54 AM
OK, time for another update!
Still haven't found the issue with the engine yet, but I'm putting that to one side until the rest is finished (thanks to everyone
who's been offering ideas and suggestions for troubleshooting!). I'm finding it much easier to cope with the last few bits of the build
remaining by using a task list, it's properly satisfying to be able to cross a few jobs off the list each night!
I'll upload pictures later, but other little jobs done since my last update:
* Bonnet catches fitted- need I say more really;
* Cycle wings fitted along with mudguard material- the definately are NOT coming off! Ground the wing brackets back to bare metal, scored the
underside of the wings, bonded and riveted in. The mudguard material makes a great finishing touch! Arches have been lacquered several times, just
need polishing up to bring back to the shine (they look Matte at the moment);
* Exhaust manifold surround built and fitted- cut from a spare piece of Kevlar I had lying around, the clearance between the sides and the manifold
are better than last time, again, just adds that finishing touch!;
* Properly fitted the fog light and covered the reverse light hole.
Still a few jobs left to do, but majority should be done before the week is out, providing I get the time to do it all!
Ta!
Ben.
JeffJeffers - 9/12/11 at 04:57 PM
Have you managed to get your engine running yet it has been a while since you have updated?
BigMac - 21/12/11 at 01:30 PM
quote:
Originally posted by JeffJeffers
Have you managed to get your engine running yet it has been a while since you have updated?
In short, No. :-(
I spent a while going over the loom, replacing all the crimped connections with soldered, heatshrinked joints. The loom is back on the car, I just
need to reconnect it to a power supply and try. Call me a coward here, but I've put off doing even that just because I can't bear it to not
start! I really am 'boned' if it doesn't start, as I've checked everything I can check!
BigMac - 9/1/12 at 04:40 PM
Decided I'm long overdue an update on this thread! Some of you may have noticed I've been paying closer attention to my
other thread!
I'm very nearly there with the rebuild now. Whilst I've been figuring out the starting issues (nearly there on that too), I've been
motoring away on the other jobs- fitting grilles, tidying up wiring etc. Also tidied up and fitted my CSR style wings and mud guards, quite impressed
with these if I'm honest! One thing I need to do is give them a couple of coats of lacquer to get them nice and shiny again. Followed Mr
Hignett's advice on fitting them, doubt they'll be coming off anytime soon ;-)
There's a few final fiddly bits to do- primarily getting some touch up paint from the guys who did my chassis and go over where I've damaged
the paint (learning point, not having it epoxy painted again!). Oh, and also finding the damn original keyring as it's got the key for the fuel
filler cap!
Short of getting it started, a brake bleed and a basic geo setup, it's ready for it's MOT :-)
Pictures (eagle eyed viewers will notice the lack of wiring going into the CBS module, that's because I did it after taking the pictures )


Thanks,
Ben.
[Edited on 9/1/12 by BigMac]
JeffJeffers - 10/1/12 at 05:21 PM
Looking good now. A lot different from when I 1st saw the pile of parts in your garage.
BigMac - 21/2/12 at 01:14 PM
Hi All
Haven't updated the thread in a while since my starting woes, so figured it's time for an update.
I've been doing nothing but diagnostics on the loom in an attempt to find out why it's not starting- still no luck, despite everyone's
helpful advice and pointers. Decided that I've spent enough time on fault finding, so have been recommended a local automotive sparky who's
coming over on Saturday. I think someone with plenty of experience of electrical fault finding will probably be able to tell me pretty quickly
what's wrong.
The electrics have knocked my enthusiasm in the build, it has to be said. I have been trying to do other bits and pieces to keep me going, like
flatting back some of the paintwork ready for a finishing polish, but I'm running out of things to do!
Have also finally ordered a new Master Cylinder from Westfield which should be with me tomorrow. So brakes should be sorted by the end of the week,
too.
Other than the electrics, it's practically finished now. So- I'll update you all when we've looked at these electrics on Saturday!
Ta,
Ben.
BigMac - 26/2/12 at 09:16 PM
OK, so a good weekend as far as the rebuild goes!
The car is now starting, well, the starting problem is fixed, I just seem to have run out of fuel...
Decided as the weather was good to first of all give the garage a good clear/brush out- I always feel much better working in a 'clean'
garage.
Aside from spending most of the day clearing the garage, I also got round the fitting my Kevlar NACA duct to the nosecone. Decided to take a great
deal of time with this, else it was a nosecone (and more importantly Mrs BigMac's paint job) in the bin, I'll let you draw you own
conclusions as to which of the two would have landed me in trouble...
So at the moment the whole thing is sealed in place- it doesn't look the best right now, but I had to use something I could mould around the
edges to form a seal between the flange and the bodywork. I know it looks messy, but once the sealant has dried over the next day or two, I'll
run a blade around the edge and tidy up the overspill. Worst case, I can flat it back and touch it up- I do have 2 litres of touch up paint left...
Also fitted the new Master Cylinder from Westfield on Thursday, brakes have been bled and I'm getting some pedal, but it's no-where near
right. I'm thinking that my front calipers are leaking and drawing air back into the system when you release the pedal. Some more diagnosis to do
yet on that front.
Short of sorting out brakes and tidying up the loom (again), it'll back on the road very soon...
Pics:
The new NACA duct mounted to the nose cone, as soon as the sealants had time to dry the edges will be cleaned up properly

Have run some flexi-hose from the duct to the bottom of the air filter (the top gets plenty of fresh air from the bonnet vent already)

Cycle wings still need a new coat or two of lacquer to bring back the shine

Also need to cut the offside wing off at an angle to match the nearside


JeffJeffers - 26/2/12 at 10:41 PM
Car is looking really good. Its always nice when you get it running especially when its an easy fix.
Bet you can't wait to get it on the road again.
ceebmoj - 27/2/12 at 09:48 AM
quote:
Originally posted by BigMac
[Edited on 9/1/12 by BigMac]
Where did the wings come from? They look good.
andyfiggy2002 - 27/2/12 at 01:03 PM
so are you going to tell what you did to get it started? im sure all the guys that have added their pennys worth of help would love to know
JeffJeffers - 27/2/12 at 01:44 PM
quote:
Originally posted by andyfiggy2002
so are you going to tell what you did to get it started? im sure all the guys that have added their pennys worth of help would love to know
I'm guessing put some fuel in it reading his last post
BigMac - 27/2/12 at 04:46 PM
Hey guys- the full problem has been described at length in this
thread, but let's just summarise it by saying it was a dodgy earth connection that I've now rectified!
ceebmoj - Thank you, the wings came from a friend on here, but were originally made by Carbon Mods and are designed to replicate the Caterham CSR
style wings, the addition of the mud-flaps at the back are my little addition!
Jamie- yes, can't wait to get it back on the road, here's hoping that the lack of pedal feel is just the front calipers and not the rears
too!
Thanks,
Ben.
andyfiggy2002 - 27/2/12 at 08:26 PM
so it was just a bad contact, hopefully you can now get on & enjoy
BigMac - 4/3/12 at 07:38 PM
Right, engine is now starting reliably!
Spent an hour or so today going over everything, wrapping the loom and connectors up. Found the primary reason for it not starting smoothly (and
running 'lumpy' was the air hose going from the inlet air pressure sensor to the airbox was disconnected- tried sealing it back on but
it's not going to hold- am tempted to put a hose connector in and do it up with a jubilee clip, but by doing that I'm reducing the volume
inside the hose so it'll give a false reading. Still not quite sure how I'm going to do that- am open to suggestions!
I've also noticed that the relay box is making quite a buzzing noise whilst the engine's running; it was never that bad before the rebuild.
For the sake of �20 I'm going to get a replacement off the 'bay and see how it gets on, fingers crossed it's just a dodgy/broken
soldered joint.
With the bike engine seemingly running OK, I just need reconnect the dash switchgear and the electronics side of things is done. That leaves the
brakes (yes, quite an important system!) and a proper basic geo setup and torque tighten, then she's ready for MOT...
Here's hoping it's a quiet week in the office so I can motor through everything!
Thanks,
Ben.
Steve Hignett - 4/3/12 at 08:20 PM
Sounds good Ben!
Would be great to see you at Oulton some time soon...
BigMac - 29/3/12 at 09:37 PM
Evening, all.
Determined to get it back on the road now, following all this good weather we've had. Desperate to get it out to shows, meet a few of you guys
and definitely get it to CPoP this year!
Went back to the garage today to check she would still fire up... A little lumpy and took some persuading, but she seems to be starting relatively
reliably now. I think the cause is a loose vacuum pipe from the airbox, I must have split it when I was fitting the new one. Engine seems to run quite
lumpy if you move the hose away from the airbox and you can hear it sucking on air. Problem is, no sure how to fix it! The connection is made by two
flat faces (the pipe and the connector) meeting, there's no extrusion that you can push the pipe onto... Short of impact adhesive, I can't
think of anything! If I use a hose joiner, I'm limiting the volume that can be carried within the pipe, so that would give me a false reading?
(Correct me if I'm wrong there!).
Also turned my attention to the brakes, new Master Cylinder fitted, bled the system, better feel than before but still a very spongy pedal that you
can push right to the floor. Rear calipers have locked tight- you can push the car forwards and backwards, but you can't turn the wheels by hand.
I'm thinking it's the front calipers at fault, in my earlier, more naive days I split them whilst they were off the car. I put the seals
back in place, but I'm guessing they're letting air in on the pedal return. So two questions for people:
1. If I wind back the pistons in the rear calipers, will they be fine from there on in, or is there something more I need to do to stop them clamping
the discs without any pedal at all;
2. Do I mess around blanking off front vs rear and checking for leaks, or do I just take the plunge and get a new set of M16 calipers for the front?
I'm 80% sure it's my splitting them that's causing this issue now (Budget won't allow for 4-pots right now)
Advice/guidance on this would be appreciated!
Thanks,
Ben.
BigMac - 14/4/12 at 01:11 PM
Well, managed to get in the garage this morning and have a look over the brakes. Seems the front calipers could do with a rebuild, as the rubbers are
near perished and the pistons were seized. To be honest, I'm going to take the opportunity now to fit some Wilwoods up front, rather than buy a
standard set of M16 calipers, then upgrade later...
Rear calipers seem to be off a Sierra and don't look too bad, but as it's the braking system (and I'm not skimping on brakes!)
I'll treat them to a rebuild kit (or a newer replacement set if I can find some cheap enough). Looks like BiggRed have an order coming their
way!
Also checked the MC was ok by putting some bleed nipples in and giving it a go, solid as a rock so I'm happy that at least one part of my current
setup is working as intended!
Tried starting it up again the other day and it still struggles to get going... Once it's run for a few minutes it'll start and stop on the
button every time. I'm thinking it probably needs a good run to bring everything back into check? Am going to treat it to a new oil filter and
engine oil before I get her ready for MOT, me thinks.
Have also provisionally booked myself on the Locostbuilders bash, so I have a completion date to aim for!
RK - 17/4/12 at 12:00 AM
I don't think my previous comment was quite strong enough: this looks absolutely fantastic, Ben, and gives a lot of us inspiration. Thanks for
taking the time to post your progress.
BigMac - 17/4/12 at 09:47 AM
Thanks RK, it's great to know it's benefitting people!
All 4 calipers went off to Bigg Red yesterday to be rebuilt, decided that to do the same job on my own (including shot blasting and refinishing) would
be a comparable price but take considerably longer if you include visits to the shot blasters etc.
Once I'd taken all 4 calipers off the car, I was up for doing more work, but there's hardly anything left to do! Once the calipers come
back, they need fitting and brakes bleeding- it then needs a basic geo setup, car electrics plugging back in, a torque tighten and that's about
it. All-in-all, about a days work... Now itching to get the calipers back!
I'm just praying I can get it all sorted before the sun disappears for the year!
BigMac - 23/4/12 at 04:55 PM
Had a phone call today, all four calipers are fully refurbished and on their way back to me, hopefully should be with me for Wednesday!
BigMac - 24/4/12 at 01:07 PM
Time to get braking!

yellowcab - 24/4/12 at 07:26 PM
They look awesome! Bet you're chuffed with those!
SausageArm - 24/4/12 at 08:28 PM
Keep at it, lots of lurkers don't like to comment on things but they enjoy reading them, you've got a lot of views of the thread so people
must be taking an interest, even if they choose not to show it.
BigMac - 29/4/12 at 09:11 PM
Thanks for the good wishes guys... I'm well impressed with the quality of the calipers, glad I got them refurbished rather than bought new
ones!
Well, all four are now back on the car, should hopefully get time between work and uni to get them bled this week, then we should be ready to go for a
short pootle up the street, for the first time in nearly 2 years!!
BigMac - 11/9/12 at 09:13 AM
Wow, talk about a long time since I last posted...
So let's cut to the chase, it's still not finished- but it runs and drives! The last few months have been spent purchasing the first house
with Mrs BigMac. Couple that with an Open University degree and a rather time consuming job and I've had little time to dedicate to the beloved
Westy.
I had the first proper play last night and despite a slight struggle, it started fine (thank god). I've started flatting the $50 paint job back
ready for polishing- I have to admit that a flat finish looks good, without having to polish it up! That's where the majority of my labour is
going right now.
Other than the bodywork, finishing the car off is straightforward now- fabricate and fit brackets for the seats, speed sensor and reverse box oil
catch tank; put the wiring for the car loom back in and tidy the cabling (it's already all labelled, so it's literally just a 'wire it
up' job) and a rear wheel alignment.
I'm properly procrastinating on the bracket fabrication, as (a) my metal working skills aren't the best and (b) I don't have the kit to
do it! Still, I'll have to get it done, as I'm desperate for a drive before the weather takes a turn!
BigMac - 8/9/13 at 07:59 PM
Seems I've not posted in a LONG time; figured I'd best give everyone an update!
So it's finished, not MOT'd as of yet and probably won't be this year (not much point given the weather is now turning). There are
always things I want to keep doing with it, but it starts, runs and drives- so I'm considering it finished
I still need to machine polish the $50 paint job- since it's been flatted it looks immense in Matte White, but I'm keen to give it a more
durable/desirable finish, so it'll be going gloss white over the next two weeks.
The bad news is that I'm going to have to offer it up for sale soon, as Mrs BigMac is talking weddings and will not doubt be talking MacMinis
following that. I'll be immensely sad to see it go, that said I am keen to sell to a member of the LCB fold if anyone is interested- at least I
know it will be looked after!
BigMac.


ben2011 - 23/10/13 at 11:06 AM
Great pics, been following this thread for a long time!
[Edited on 23/10/13 by ben2011]
hkp57 - 23/10/13 at 08:31 PM
10 out of 10 very clean well thought out re-build
BigMac - 17/11/13 at 11:54 PM
Thanks very much for the feedback guys, it's nice to see all the hard work being appreciated!
Decided that whilst it's off the road for the winter I'm going to be undertaking a few minor projects, namely getting rid of the Koso gauge
and doing a new dash using OEM ZX10-R clocks. Updates due soon!
BigMac - 25/11/13 at 01:08 PM
Time for a winter update...
Decided that whilst the car is up for sale, but the season is leading to no one buying, I'd undertake a little 'winter project' on the
Westy to keep me busy; this being swapping the Koso dash over to a set of original 06/07 ZX10-R clocks. Removing the need for the CBS wiring module,
as well as an additional speedo pickup.
So far I've managed to remove the old dash and CBS module- both which sold quickly to guys on here. This in turn has funded a replacement ZX10-R
loom and an original set of clocks from a 20k mile bike, in great condition.
When the loom first arrived, I found that it was from a Euro spec bike, so had additional wiring for two o2 sensors and an immobiliser system. As
I'm running a US spec loom, I've had to go through the diagram and remove the unnecessary cabling; keeping everything on the loom that was
only strictly necessary. Funnily enough, having spent so much time with the 10-Rs wiring diagram over the past 2 years, I was perfectly comfortable
doing everything. Now armed with more experience than the first time I did this, I removed the disused connectors and left plenty of cabling, doubling
the ends over and sealing with heatshrink- just in case I ever need to put everything back! Much better than my approach 2 years ago where I simply
cut the cabling out and chucked the stuff (which I could have sold!!) in the bin.
So I managed to convert the loom over from Euro to US spec and plumbed it in on Saturday afternoon for a quick test. Given my previous success with
electronics, I wasn't hopeful everything would work. Needless to say, connect everything up- twist the key and what do you know- the throttle
bodies set themselves, fuel pump primes and the dials come on- so no immobiliser issues at least! That said, the error light did come on, but that
will more than likely be down to the fact I'm not running an exhaust butterfly valve actuator, which throws up an error code if the wiring is
open. A quick scour of eBay should get that sorted, though.
So next steps now are to route the loom properly, then start wiring in headlights, tail-lights, brake lights etc. The FIA master switch is also going
in at the same time. Should keep me busy for a few evenings!
BigMac - 27/7/14 at 11:05 PM
Hello All
A long time since I've posted on here, but a quick note to say that now the car is fully completed after all this time, it is for sale! It's
been fully finished and shakedown/tested by a local motorsports specialist, as well as just flying through it's MOT on Friday with no advisories.
Taxed as of Friday afternoon, it's ready to go!
I'll post proper/full details up here shortly along with the latest pictures when I collect the car from the specialist who's been looking
after it.
MOT: July 2015
Tax: Jan 2015
Price: �15,950 o.n.o
Location: Cheshire, 10 minutes from M6 J.16
If you are genuinely interested in buying, please do drop me a U2U and I'm happy to discuss further or arrange a viewing.
Thank you,
Ben.
[Edited on 27/7/14 by BigMac]
BigMac - 28/7/14 at 05:40 PM
Hello All!
So having collected the car today, I've finally managed to get some much better pictures and also write a proper ad. The full details can be
found on both Car and Classic and PistonHeads:
http://www.pistonheads.com/classifieds/used-cars/westfield/other-models/fully-refurbished-carbon-kevlar-2004-westfield-mega-r/2667012?isexperiment=tru
e
In terms of pictures:


Thanks,
Ben.
[Edited on 28/7/14 by BigMac]
[Edited on 29/7/14 by BigMac]
Rosco86 - 31/12/14 at 08:42 AM
Cracking rebuild mate, how do you find the zx10?
BigMac - 31/12/14 at 10:40 AM
quote:
Originally posted by Rosco86
Cracking rebuild mate, how do you find the zx10?
Thanks very much, it was my first venture into the world of mechanicals, so couldn't go anywhere near the quality of what you're doing with
fabricating up your own chassis!
The ZX10 lump is definately a bit of a monster in such a light car, albeit driving a car with a bike engine does take some getting used to. It took me
a good few hours of driving to get to smooth, slow speed changes and using the clutch properly. Power delivery is great- a very linear delivery that
just gets frantic the higher up the rev range you go. I use mine on the road and barely touch the throttle- every now and then a nice clear stretch of
road opens up and I can give it full throttle- it surprises me every time, it never really stops surging forward even when you get near the
limiter!
You may not notice overly much when you track yours, but it obviously lacks torque lower down which means it only really starts to sing past 4k rpm or
so. Not much of an issue when you're moving, but trying to pull away quickly you can get a little bogged down off the line until it really starts
to rev. I stuck a GiPro on it with the ATRE function which has helped, but I'm thinking of getting it on a Power Commander and a proper map to
make it a bit more road car friendly.
If your car is predominantly going to see track use I'd get a baffled sump from Andy at AB Performance as well as an Accusump with a manual valve
and uprated clutch springs. Judging from the work you've done so far on the car though, I'd go as far as to say you're probably way
ahead of me on that one!
[Edited on 31/12/14 by BigMac]


