
Warner R4 Build Diary
cloudy - 24/10/06 at 01:37 PM

This project has now significantly changed (see below) from the early design, see the latest pages for the new project...
More information/vids available at: www.wr4.co.uk


[Edited on 27/2/09 by cloudy]
[Edited on 19/5/09 by cloudy]
[Edited on 8/6/09 by cloudy]
[Edited on 8/6/09 by cloudy]
cloudy - 24/10/06 at 02:07 PM
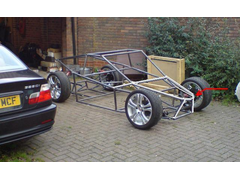
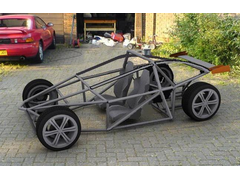
A few mock ups of front end shapes, it always almost looks better without it at all 
FUORISERIE, you mentioned you would do the front a bit differently any suggestions?
ideas + drawings welcome!


FUORISERIE - 24/10/06 at 02:50 PM
ok, send me a few 3/4 front and rear view and a side wiew image, for my rough sketches.
I tend to agree with you, it does look better with the steel tubes showing...
I will try .....but the concept looks really good, will see what i can do for you.
[Edited on 24/10/06 by FUORISERIE]
dr-fastlane - 24/10/06 at 04:21 PM
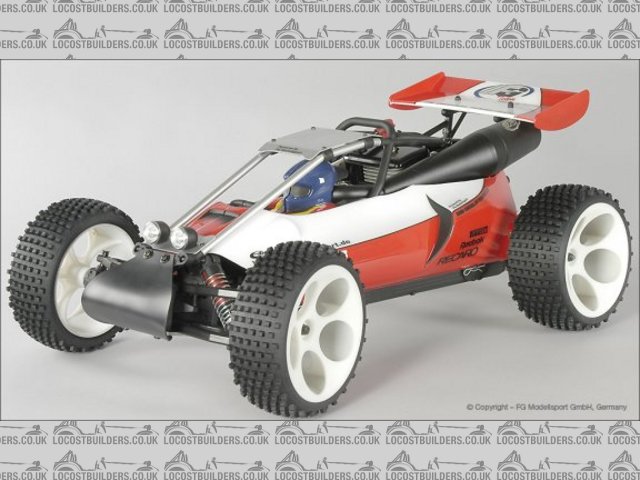
That is a really “cool” buggy which you building. If I can do a suggestion for the front of the car. Perhaps its an idea to bend the top tube from the
nose round out of one tube, if you understand what I mean. It keeps the front of the car simple but smooth.
Greets Roy.
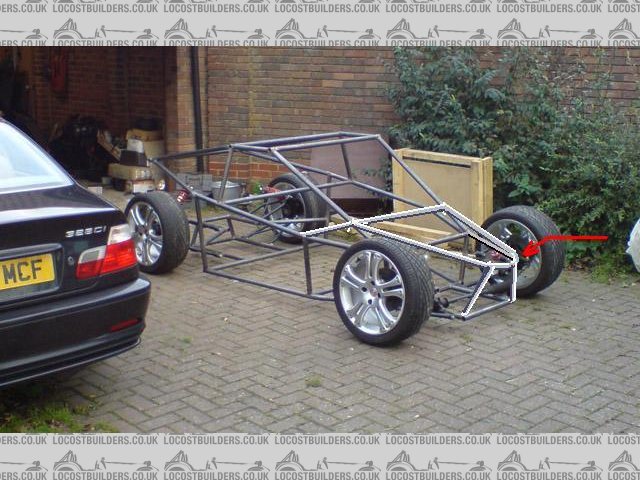
Rescued attachment buggy.JPG
thomas4age - 24/10/06 at 06:54 PM
Looks very nice when it's this low to the ground, what ground clearance are you goin to run?
also not clear to me is what are you going to do with the diffcradle it looks like it's only attached to the rest of the chassis with 4
horizontal tubes? shouldn't that be braced very well?
grtz Thomas
btw nice project and should be quick aswell!
cloudy - 24/10/06 at 07:05 PM
diff mounts are not made yet, don't worry far more framework to surround it yet.
I like that design, i'll try it with photoshop
Ground clearance wise I will run about 120mm. I have 2x tiny 600kg electric rams, it would be quite cool to make a system to raise the front right up
for speed bumps - then I could run more like 100mm
Fuoriserie some plan views for you:


James
cloudy - 24/10/06 at 07:15 PM
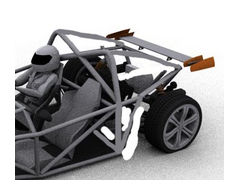
I'm really keen on that design dr fast lane - here's it in tubing

Doug68 - 25/10/06 at 12:31 AM
Have you built a stress model in the computer yet or a scale balsa model of the thing?
300kg is a very ambitious goal and I would guess you’re trying to work out where the
tubes need to be to be effective rather than just what looks good.
If you keep at it long enough you should be able to make it work and look good at the same time.
Doug.
cloudy - 25/10/06 at 01:28 AM
It's a good suggestion - i've tried a few bits of force analysis software to model it - but all go way over my head, and I just dont'
havce the time to learn how to use it properly. I've just been using common sense and judging myself how the forces are likely to propagate
James
[Edited on 25/10/06 by cloudy]
Doug68 - 25/10/06 at 06:17 AM
If the software is a mystery to you then build a 1/8th scale model of the frame using 1/8" square balsa and model glue.
Then pick it up and twist the thing.
Make another model of a cube X braced on all 6 sides say 100mm square and compare the 2 models.
Keep modifying your model until you are hard pushed to tell the difference between the 2 models.
Remember if your chassis is not stiff (which is different to strong). All the carfully worked out suspension geometry will go out of the window.
It may seem that this sort of stuff takes a lot of time when you could be welding things together, but I expect like me you want to make the best
vehicle that you can.
Doug.
iank - 25/10/06 at 07:43 AM
Agree completely, a balsa model gives a really good idea of how stiff your chassis is, and is far more intuitive than a computer simulation. Takes an
evening, and you get to bore your mates with it  . If you need/want a number the FEA can be done later to confirm.
It's amazing how one tube can make a huge difference, it's not something that can be done by eye, at least not until you've done a
few.
See this thread:
http://www.locostbuilders.co.uk/viewthread.php?tid=53918&page=1
Buggy looks really good so far BTW
[Edited on 25/10/06 by iank]
cloudy - 25/10/06 at 08:11 AM
OK I shall give the model a go
FUORISERIE - 25/10/06 at 03:27 PM
This was a personal project of mine, that due to time and work constraints I never came around in building it...., i
I couldn't build it myself, so why not have someoneelse try instead!.
Having seen your chassis, i thought about adapting my original design to your chassis setup.
this is just a very rough 10 min. sketch, but will be more detailed later in the process.
Let me know what you think, and if you like it?
]
[Edited on 26/10/06 by FUORISERIE]
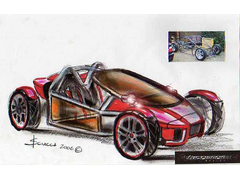
Rescued attachment img584.jpg
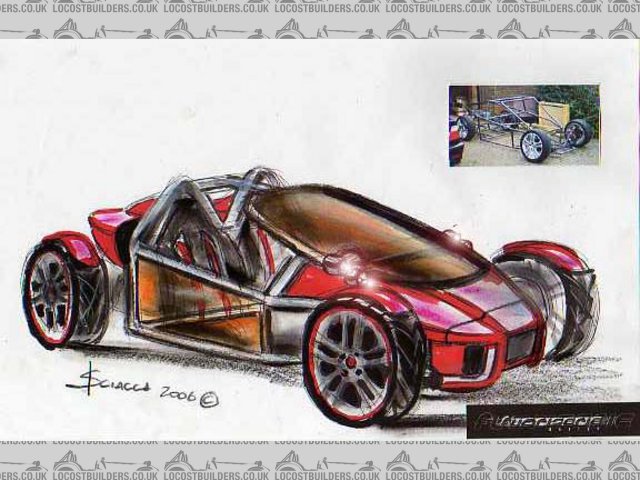
cloudy - 25/10/06 at 04:22 PM
I love it, especially the nosecone area, You'd need to be pretty handy with fibreglassing!
PS: the "final" design for mine...

[Edited on 25/10/06 by cloudy]
ettore bugatti - 25/10/06 at 09:05 PM
Looks cool,
I think with some extra tubes diagonal placed. You would end up with something much stronger.
What is the width of the interior and how much is the track f/r?
FUORISERIE - 26/10/06 at 09:49 AM
quote:
Originally posted by cloudy
I love it, especially the nosecone area, You'd need to be pretty handy with fibreglassing!
PS: the "final" design for mine...
[Edited on 25/10/06 by cloudy]
Actually i think you wouldn't need much work for the nosecone,....... but I like your new bare bones chassis, maybe it looks better without the
body panels....
So no need for it, keep it simple as you have done.
cloudy - 26/10/06 at 10:55 AM
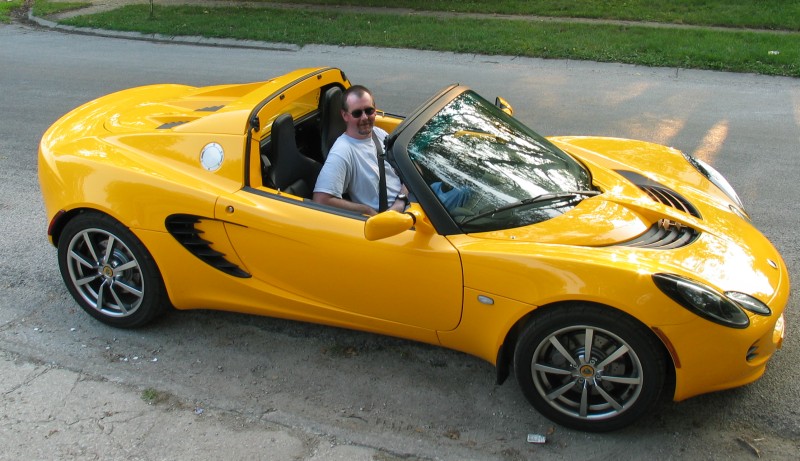
I was thinking of perhaps redoing the chassis when I got bored, and i'd like to loosely base the design on this:

Big problems are going to be making the panels, and getting glass to fit that...
James
iank - 26/10/06 at 11:19 AM
Now that would be a big job.
If you are serious pick the glass first - wander round a big carpark to find something.
The front end looks a bit like the WLR, so getting a nose from them might be a good start for a buck.
[img][/img]
cloudy - 26/10/06 at 11:54 AM
you might be onto something - the elise glass looks similar!
Dick Bear - 29/10/06 at 05:18 AM
There's nothing like seeing 10-minute sketches that look like auto design museum pieces, custom design frames that sit low and stable between the
wheels or a group of visionaries throwing out top-notched suggestions for the benefit of everyone to get the Creative Juices flowing!
Just two pages into Cloud's build and there's already been more helpful suggestions and imaginary response than some sites receive in a
year!
Great start, Cloud! may I suggest aluminum, hand-shaped body panels? Sure would be weight reducing,
Dick Bear
dr-fastlane - 30/10/06 at 07:33 PM
The final design is great looking Cloudy!
I would not put on too much bodywork. The chassis has an raw and racing look, keep it that way. Perhaps it sounds funny but way not copy the looks of
a RC model (toy) buggy. Something like this, but with a glass front window, polycarbonate side windows (like most sevens) and some cycle wings.
Greets Roy
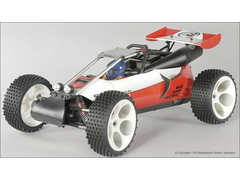
Rescued attachment Baja-Buggy.JPG
ZEN - 30/10/06 at 09:32 PM
For me less is allways more and I like toys for big boys
cloudy - 30/10/06 at 09:50 PM
quote:
Great start, Cloud! may I suggest aluminum, hand-shaped body panels? Sure would be weight reducing,
Dick Bear
Sounds good, I think i'll follow everyone's suggestions and keep panelling to a bear minimum, except where requiured to keep away debris, to
help the shape or to improve aerodynamics..
When the chassis is finished (soon) I'll throw it up to the excellent talent here for some pointers
PS. dr fastlane - exactly the sort of car I was drawing inspiration from, definately a boy's toy!
James
[Edited on 30/10/06 by cloudy]
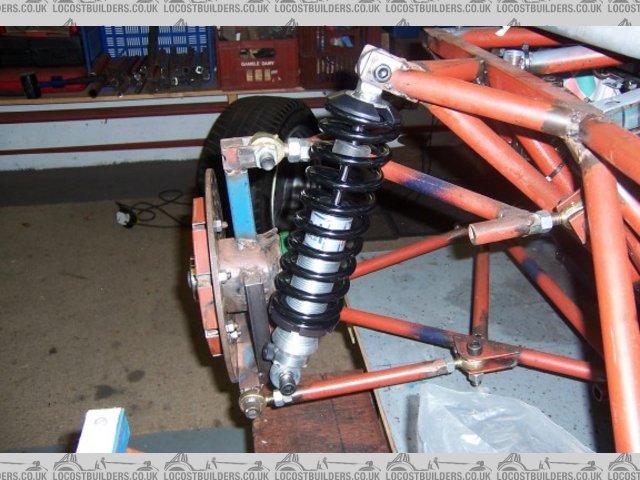
cloudy - 1/11/06 at 11:16 AM
I've posted the below in the chassis section, but included it here as you midy guys probably are used to more weight over the rear suspension.
OK I've welded the rear shocks on, it gives about 1" ground clearance with the bumps fully compressed and 2" as it starts to hit the
stops
This gives just over 10cm of suspension travel, with the car resting at about 6cm, leaving 4-5cm of upwards travel.

am I going to get away with this based on the photo + measurements above or do I need longer shocks?
James
[Edited on 31/10/06 by cloudy]
[Edited on 1/11/06 by cloudy]
Doug68 - 1/11/06 at 12:02 PM
This is a hard question to answer. But I'd think you'd want 2" at least of clearance at full bump. From reading the book a typical
locost has ~5" of static clearance and ~2" of travel from there to get to full bump.
More of a worry to me would be having the shock laid over that far. Effectively the suspension will get softer as its compressed, which if anything
is the reverse of what you want to happen. I'd get the shock as upright as possible.
Also I'd not want to put the load into the middle of the tube like that at the top end, hopefully you're planning bracing on it?
Similarly at the lower front wishbone point I'd want that braced, I guess I assume that theres going to be a lot more bracing everywhere?
But I'm possibly too worried about that sort of thing, after all I've been tinkering with my design for over a year now and still not got a
single weld done.
Doug.
cloudy - 1/11/06 at 12:26 PM
The angle isn't far off the angle most sevens seem to use at the front, perhaps I could compensate by using rising rate springs?
Obviously the angle is a trade off, the further you lean it the more travel at the wheel you get. where does 10cm sit compared regards
"normal" middy travel?
as regards bracing, yes theres a tube that goes horiztontally from the top shock mount across to the other
[Edited on 1/11/06 by cloudy]
Doug68 - 1/11/06 at 01:11 PM
Just because most 7's do it doesn't make it the best way to do it.
If you look at the front end of a 7 either you have 3 choices:
1. Do what most people do now.
2. Use a push rod type suspension.
3. Build a really ugly frame out the side of the nose to get the shock more upright.
So given the choices I can understand why most people go for choice 1.
10cm (4" is exactly what I'm working around myself and basically what you get from a book built Locost also.
I expect ~5cm to be used by the static load of the car leaving ~5cm movement left for bump absorption.
Doug.
cloudy - 1/11/06 at 01:34 PM
that's pretty much how it is, i'll go with it for now, I can always redo it later with longer shocks so they can be upright - the beauty of
having no bodywork!
James
Fred W B - 1/11/06 at 02:51 PM
quote:
3. Build a really ugly frame out the side of the nose to get the shock more upright.
Like this - note this is VERY rough mock up work
Cheers
Fred W B

rough upright
[Edited on 1/11/06 by Fred W B]
cloudy - 6/11/06 at 09:30 AM
Anyone know of anywhere to get high range top joints for cortina hubs? I've heard these discussed before. Basically it jams up before the bump
stops will be reached, which of course is pretty dangerous.
James
cloudy - 17/11/06 at 05:14 PM
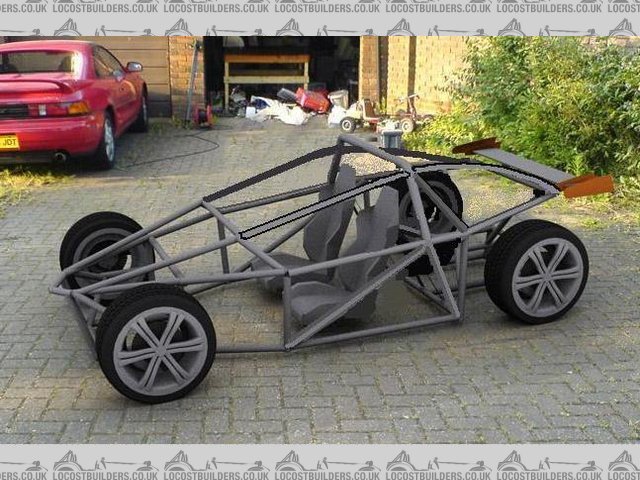
I'm starting to have reservations on the design so far - it looks malproptioned a little when I wheel it out of garage.
I'm still not 100% happy that the design is the best shape I could choose, what's the general feeling about taking off roof and using a roll
hoop design as below, allows the main body to sit much lower....

cloudy - 17/11/06 at 10:45 PM
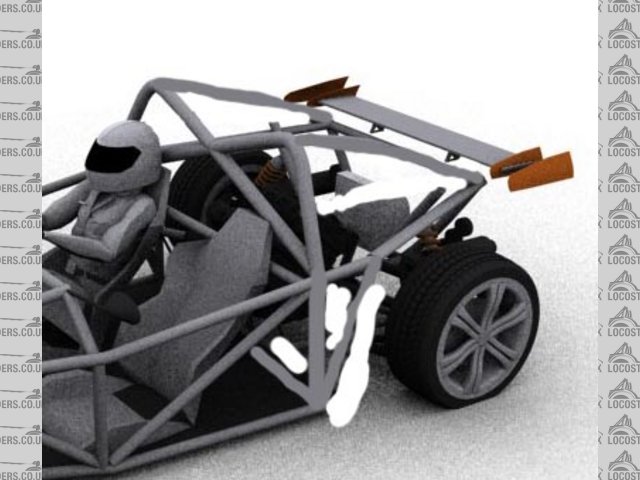
haven't seen any responses so i've progressed a litte, what do you think?

cloudy - 18/11/06 at 12:15 AM
plan view

ZEN - 18/11/06 at 12:26 AM
This one loks MUCH better and MUCH more professional looking styling.
Aren't the side bards to close to the drivers and passenger heads on the bottom 2 pics?
I think it would look rely nice with just the side pannels, air intake at the front F1 "nose up" style and opend rear like the Porsche 917
racing car.
What software are you using for the design?
[Edited on 18/11/06 by ZEN]
iank - 18/11/06 at 12:52 AM
Looks very nice, but I thought the original looked good
The side bars do seem very close to the drivers head - not good in an accident. The optional ones on the sylva r10t and full cages on 7's tend
to kick out as far as practical.
Also it won't be as ridged as the full cage version, but it looks close to a balsa model I made a while back which was pretty good.
cloudy - 18/11/06 at 01:31 AM
cheers guys, it's 3dsmax 7 i'm using, given up trying to figure out solidworks! you are right on the proximity to head - will have to mull
that one over...
The old design looked very odd at certain angles (especially the back) , so far this is OK from all
Here's a slightly more refined version, still not happy with the shape of roll bar, and obviously it can't sit on the middle of a tube as
per the current design...

Doug68 - 18/11/06 at 09:10 AM
Firstly I applaud your desire to be original, there's not enough of that these days.
Maybe its the angle of the view but the roll bar looks too low to touch down before the occupants head does.
On the same vein either the seats are too short or those are big wheels?
I'd push the roll tube back to match up with the rear bulkhead then it can be one tube all the way up over and down again. You can then cut
holes for the side tubes to pass through. which means even if the welds fail it can't come apart.
I do like the concept though, I had thought of doing a similar thing at one point using flat ally or carbon panels screwed in between the tubes to
form the body work.
I've been using Solid Edge which due to my CAE background didn't take too long to work out. The 'arty' packages are still a
mystery having tried Studio Tools PLE etc. As at some point I'm going to have to go back and have a look again, did you settle on 3DSMax for a
reason, or was it just what came to hand?
akumabito - 18/11/06 at 02:03 PM
Wow! I think this new design looks damn sexy! I already like the original, but it just gets better and better every time you alter the design!
*joins the requests for an entry-level kit*
Peteff - 18/11/06 at 02:24 PM
If the roll bar is level with the driver's eye which it looks like there you will need a hoist to get in and out of the car. Your vision will be
severely restricted by the bar in front of you as well. The roll bar and seats look out of proportion.
[Edited on 18/11/06 by Peteff]
cloudy - 18/11/06 at 03:27 PM
yeah, still progressing with the design - took the grinder to the chassis this morning took off the old roof
Sat in it to get head height measurement, and therefore the roll bar height required...
James
cloudy - 18/11/06 at 05:21 PM
OK, the bars along shoulders are now further apart - and the roll bar is the correct height.
Not sure on the shape? would a plain hoop be better? or maybe two hoops?

James
dr-fastlane - 19/11/06 at 03:28 PM
Hello Cloudy,
The new design looks much better than the one with the roof on it. And very original I must say. In my opinion build a plain hoop.
One question, how do you get in the car? Climbing over the upper frame tubes doesn’t seems practical.
Greets Roy.
akumabito - 19/11/06 at 05:22 PM
I love the design! Leave the hoop as it is now, it looks great! However, are you sure the scale of the seats/driver is correct in respect to the rest
of the car? Or are you running 24 inch wheels? It just seems a bit off..
cloudy - 19/11/06 at 06:38 PM
Yes i'll be just climbing in over the chassis! Shoulda seen me trying to get in the roofed one! I'll go with the old standard plain hoop - I
won't be able to make the bendy one with the bender i've got access to anyway...
I've measured it simulating the recline of the replacement seat, the 3d copy man is probably a little on the small side!
Here's a pic I took, however these seats are going in favour of some more reclined ones, i've used this lower measurement in the 3d copy

[Edited on 19/11/06 by cloudy]
[Edited on 19/11/06 by cloudy]
[Edited on 19/11/06 by cloudy]
sgraber - 19/11/06 at 09:18 PM
The chassis has a very sexy line to it. But I must caution you on the use of the upper frame tube in it's current position. It is too close to
the head. A side impact and the bar will definitely impinge on the head. You simply cannot forsee that everyone driving this vehicle would wear a
helmet and it's possible that even with a helmet, a side impact of medium or large intensity will cause serious neck and or head injury. Please
re-evaluate this!
Graber
akumabito - 19/11/06 at 09:29 PM
Wouldn't that problem be fixed by fitting those rally seats that keep the head in place? (ya know, like a bucket seat but with extra
'flaps' to keep the head/helmet from bouncing all over the place for when the going gets rough...)
Sortof like this:

Only way less ugly and probably a helluvalot cheaper that $1,700.
Or this:

Ohh well, ya get the idea..
cloudy - 19/11/06 at 11:59 PM
I taken your comments on board, i'll look into a solution
James
Doug68 - 20/11/06 at 12:57 AM
I think SVA would throw a fit if you try to use seats with the side restraints, due to the reduced peripheral vision.
In the picture what the heck is the remote controlled do-dad with the camera strapped to then?
akumabito - 20/11/06 at 03:11 PM
Hmm... maybe you could simply cover those bars with rollbar padding? It looks kinda cool without any body panels. Just add padding to the chassis
around the driver area.
cloudy - 20/11/06 at 05:26 PM
the doodad is a (now) PC tele operated exploration robot I built, tested 1km range - theoretical 5km range
some video from the field trials
http://www.digital-car.co.uk/video/trials.wmv
I built it in the times the car was giving me grief and I needed something else to work on....
cloudy - 19/12/06 at 08:12 PM
Some progress, sorry for the awful pic - it was dark.....

Now thinking about fuel tank placement, its the half round object in the back center of this render. Is this a really bad idea for location? Shame as
it works well in this orientation....

Peteff - 19/12/06 at 08:17 PM
Is it going to have an engine, where is it going to fit and how are you going to get it in there? There's not going to be a lot of options with
the bar from the roll bar over the gap behind the seats and the diff cage and suspension there as well.
cloudy - 19/12/06 at 08:24 PM
read back through the thread before asking stupid questions!
Yes it will have an engine, a new concept I know 
It's a motorbike engine, and it's already included in that render if you look carefully!
James
gttman - 19/12/06 at 08:53 PM
I have to say I share the concern about getting in and out with the side bars so high.
Like the design though and I think you are definatelly on the right lines.
cloudy - 19/12/06 at 09:07 PM
this won't be a luxurious ride! you will need to get in by stepping in on the bar
I expect the discomfort to continue during the journey with the engine exhausts behind your head, and the possiblility of wheels falling off....
James
Peteff - 20/12/06 at 12:26 AM
I posted earlier in the thread and you answered that you had removed some bars if you go back over the thread. I view things from a practical
perspective and think other people do the same. If something looks right it probably is and the bar over where your engine drops in doesn't look
right to me, possibly a bar either side with a gap in the middle. Show me the engine in place with a viable drive solution and I'll admit
I'm stupid. I have built cars and driven them and helped build cars from scratch and from kits and have a good idea of what works.
cloudy - 20/12/06 at 01:21 AM
The top bar is removable, yes the engine fits through the gap, and yes the entire drivetrain fits. I may be new to this and learning, I am not
however, stupid.
James
Doug68 - 20/12/06 at 01:35 AM
Like - lets chill dudes!
I think that there's plenty of pre-Christmas tension in the air at the moment. 
Sven - 20/12/06 at 05:49 AM
James,
I love it. Like the look, the idea and your execution. Nice!
I agree with others that the topmost horizontal tubes near the passengers heads need moving for safety and that the rear bulkhead outer tubes and
rollbar should be one. Does seem to be a lot of unusable space behind the drivers seat.
The gas tank is right out there. Could you fit one in the front, forward of the passengers feet? That way it'll help balance the car and keep
it inside the frame away from annoying SUVs and whatnot.
-Steve
cloudy - 20/12/06 at 09:17 AM
Sorry, bad day!
I've built the entire car around the engine, it fits in the space, as i've already hoisted it in to check, I wanted the minimum wheelbase I
could get away with
Agreed on the tubing near the head - Im' still mulling that one over!
James
cloudy - 20/12/06 at 09:28 AM
you can see here how it fits in the space:
gttman - 20/12/06 at 10:04 AM
quote:
Originally posted by cloudy
this won't be a luxurious ride! you will need to get in by stepping in on the bar
I expect the discomfort to continue during the journey with the engine exhausts behind your head, and the possiblility of wheels falling off....
James
LOL, very good
Actually my concern is not getting in, its getting out.
But it will be no harder than the Batmobile and Robin used to manage.
cloudy - 20/12/06 at 10:12 AM
lol i'll be sure to provide a video for your entertainment
James
gttman - 20/12/06 at 12:25 PM
Will that mean you will also be wearing tights?
Peteff - 20/12/06 at 06:19 PM
See, that's all it needed, now it makes sense. Is it mounted same as the bike with a chain driven diff? I can't see it in your render
although I have looked.
cloudy - 20/12/06 at 10:13 PM
yeah, sorry for going off on one - yeah its a chain driven cossie diff
James
andyd - 20/12/06 at 10:51 PM
quote:
Originally posted by cloudy
yeah its a chain driven cossie diff
Can I ask where you sourced the diff from? I'm still deciding whether to use a chain driven one or use a very small prop shaft.
cloudy - 21/12/06 at 09:11 AM
I bought the entire rear axle from ebay. Then took the diff out of the casting, knocked the bearings off - made up some spacers and fitted sealed
block units. Then had B&C express make up the correct sprocket to match up with the crown mounts
James
andyd - 21/12/06 at 10:48 PM
quote:
Originally posted by cloudy
I bought the entire rear axle from ebay. Then took the diff out of the casting, knocked the bearings off - made up some spacers and fitted sealed
block units. Then had B&C express make up the correct sprocket to match up with the crown mounts
Ah right you did it the easy way then!
Doug68 - 22/12/06 at 12:25 AM
The fuel tank looks relatively small 20L or less?
If thats the case why not put it on top of the engine behind the roll bar, essentially where it'd be on the bike?
I had a 1993 GSXR-1100WP it didn't have a fuel pump so going for gravity feed may be cause less aggro in the carburation dept.
Given a small tank i don't think the change in height of the CofG would be much to worry about.
cloudy - 22/12/06 at 09:32 AM
yeah i'm tempted to do it that way, trouble is the shape, its very tall and thin - I was hoping to have the nice curved back polished and
engraved with the logo for that extra something, so wanted it to be on show. I know 7's have it right at the back, but they have the fibreglass
offering *some* protection. What do people reckon?
James
gttman - 22/12/06 at 09:48 AM
On your car I'd put it between the front wheels if there is room, this is what I have done and it keeps the variable weight low and protected by
the chasis.
Most ideal place for it though is right in the centre of the car, but not very practical.
cloudy - 22/12/06 at 09:54 AM
I'm hugely lacking in space at the front end, I *might* manage it but it would be VERY close to a front impact, just a bit of a worry
James
iank - 22/12/06 at 11:04 AM
I've seen triangular (prism shaped) tanks that fit behind the seats. Good weight distribution, but you lose the helpful little space that can be
used for weathergear and an emergency toolkit.
Minicooper - 22/12/06 at 05:47 PM
quote:
Originally posted by iank
I've seen triangular (prism shaped) tanks that fit behind the seats. Good weight distribution, but you lose the helpful little space that can be
used for weathergear and an emergency toolkit.
The Atom has the tank behind the seats see piccie, but it doesn't look like you have the room with the bike engined being further forward than a
car engine would be
What wheelbase are you going to have? I know it would be a total pain but a few more inches always helps......probably the safest bet
Cheers
David
[Edited on 22/12/06 by Minicooper]


sgraber - 22/12/06 at 06:05 PM
I'm really intrigued by your chassis shape and I think it has a lot of potential. It just looks 'fast' sitting still and that's
great. I would like to know about the sightlines for the driver and have you done any modeling or research into that and let me tell you what I am
thinking. The trouble right now is the side bar and the head, Your current seating is very upright. So why not recline the seating position
drastically and get the noggin below the bar? Then remove the crosstube in front of the passenger area, replaced by a triangulation brace forward.
That would open the sight line to the front, and lowering the head would give you a sight line out between your top tubes?
Just an idea....
Graber
thomas4age - 22/12/06 at 06:23 PM
I don't now how wide the area between the seats is, but MR2 MK1's have very slim tanks in the transmissiontunnel, maybe one of those would
fit your needs,
they're steel items so easily modified
here's a piccie

That would sureley be the best spot to put the tank cog wise and safetywise
Nice going there btw!
grtz Thomas
[Edited on 22/12/06 by thomas4age]
gttman - 22/12/06 at 06:44 PM
quote:
Originally posted by cloudy
I'm hugely lacking in space at the front end, I *might* manage it but it would be VERY close to a front impact, just a bit of a worry
James
Why is it a worry... it'll be better protected than a tank at the rear and further from the driver and no hot engine to ignite it!
And its not always the front of the car that takes the impact in a crash, you just as likelly to go backwards into a hedge or get hit from behind etc.
Doug68 - 23/12/06 at 08:56 AM
The thought with my previous post was to tip it so the flat was on the bottom.
I'm sure I've seen more than one trike with a beer keg as a petrol tank and those things are near indestructible (the keg that is)!
In my design the tanks on the floor behind the seats BTW, but I want to have 40L+ on tap.
Dick Bear has really neat pictures of doing it this way where he used 2 separate tanks.
Merry Christmas!
erwe - 23/12/06 at 08:16 PM
quote:
Originally posted by cloudy
I was thinking of perhaps redoing the chassis when I got bored, and i'd like to loosely base the design on this:
James
Do you more information or pics of this desing?
cloudy - 23/12/06 at 11:12 PM
To answer your comments,
sgraber - many thanks, re: the seats - that's the current plan, but as you rightly point out reclining the seats may bring out serious visibilty
problems, at the moment it's fine - I will have to do a bit of experimentation when it's warm enough to get back out to the garage
erwe: That car is an australian concept I can't remember the name - it's similar to the caparo T1, will post if i can think of it
EDIT: It's the "Hulme F1"
as regards the tank, it fits well where it is, and would be great for a logo, (see latest renders) - any comments on whether this is safe
'enough'


J
[Edited on 23/12/06 by cloudy]
kb58 - 24/12/06 at 12:32 AM
I haven't read the entire thread, so maybe I missed it, but my only concern is how close the driver's head is to the side bars. As long as
the helmet isn't optional.
Other than that, I think it's fantastic.
gttman - 24/12/06 at 11:02 AM
Well the tank does have some chasis protection at the rear, my only real concern is that it is above the engine so if it does get damaged.......
But lets be realistic here, bikes have them above the engine, and many other kits have them completely unprotected and by the engine.... so if thats
what you want, go for it.
Now its been pointed out, Kb has a very good point about how close your head is to that top rail.
cloudy - 24/12/06 at 01:27 PM
yeah its been pointed out numerous times, I have a few ideas - the only practical one so far is to step the curved tubes lower for the cabin but it
totally ruins the lines - Still scratching my head on this one.
tank would be behind the engine (over the diff)
J
James
gttman - 24/12/06 at 04:47 PM
How about lowering the top one 2inches or so and also the one below it by similar amount.
Have you also considered curving the lower bar to a similar shape to the upper one? I think that would compliment the lines well.
BTW It's looking awsome at the moment, great project.
cloudy - 24/12/06 at 05:54 PM
the lower half has all been built as per my other version, I don't want to have to rip up any more than I have already.....
James
JoelP - 24/12/06 at 06:24 PM
Id be happy with the tank there. Maybe use a fuel cell inside the metal tank? Dont know lots about them but some sort of tear proof tank sounds a good
idea
dr-fastlane - 25/12/06 at 11:54 AM
Hello James,
Because I had nothing better to do on this Sunday morning. I did some brainstorming, how to get the upper curved tubes free from the driver’s head.
And not to disturb the lines of your buggy. Probably taking the upper tube higher, would be the only solution to not hit your head. And it makes it
easier to get in and out of the car. Perhaps you can do something with this idée.
Happy Christmas, greets Roy.
Rescued attachment roofless_sketch.JPG
cloudy - 25/12/06 at 12:03 PM
interesting approach, I'll have a play about with it - thanks
akumabito - 25/12/06 at 08:24 PM
I don't like the high bars..
Just make it a center-steered single-seater! 
JoelP - 25/12/06 at 09:00 PM
i like the high bars myself. I would also make it a centred single seater, but have a pair of 'seats' on either side (more like padding and
harnesses) so that you can still have passengers. I know a bec isnt ideal for a 3 seater but when theres no one in it, its only a few kilos extra, and
i think the centre driving position would make up for it - especially the better corner balance.
cloudy - 25/12/06 at 11:36 PM
quote:
Originally posted by akumabito
Just make it a center-steered single-seater!
sooooooo tempting!
Sven - 26/12/06 at 07:33 AM
I wonder if you could cross those top two tubes or make a halo and join the front and rear to the halo?
-Steve
designer - 26/12/06 at 02:42 PM
This style has been done before
http://twintechcars.com/
Alan B - 26/12/06 at 03:40 PM
quote:
Originally posted by JoelP
......... I would also make it a centred single seater, but have a pair of 'seats' on either side (more like padding and harnesses) so that
you can still have passengers..........
Ohhh...sounds familiar...
JoelP - 26/12/06 at 03:51 PM
must be a good idea then! I have plans from '04 and a lawyer at the ready! lol
cloudy - 26/12/06 at 04:57 PM
quote:
Originally posted by designer
This style has been done before
http://twintechcars.com/
that's awfully malproportioned, not keen!
Ratman - 26/12/06 at 11:54 PM
I like this chassis. I like the high bars. When you compare frame designs, ask yourself, which one whould I prefer to be strapped into when the car
rolls through the fence and down a bank. High bars win. Note that F1 cars have special inserts each side of the cockpit to limit the sideways movement
of the helmet. Obviously the bars will need to be padded. I like the idea of making the finish shape of the car in the frame. But this can have weight
liabilities if the resulting frame shape gets compromised when it comes to getting ridged support to the suspension etc mounting points. Permission to
rave sir? My preferred concept is (a) make the suspension and engine mounts and seat mounts and roll-over protection frame. (b) locate all these in
space. (c) joint them all with straight tubes (d) make it all triangles with extra tubes (e) make closed solid shapes (pyramids etc) with more tubes
to give torsional stiffness (f) then start making compromises and contrivences so there is actual space the the engine and driver etc... but try not
to compromise the step (e) structural achievements. Shouldn't need to use anything stronger than 20mm ms tube with 1.6 wall. Might not look so
svelt, but gets best stiffness for weight. Cheers, Brian
kreb - 27/12/06 at 03:46 AM
If I may chime in, the overall design is quite pleasing to the eye, but as has been previously noted, the high side bars are lethal. Also very
important is that they'll be a distraction and create a claustrophobic effect. If you've a light car, it should feel light, not like a
coffin. Don't be a slave to fashion.
kb58 - 27/12/06 at 06:12 AM
The side tubes appear to be at eye-level. If so, the driver has no peripheral vision, and to see what coming from the sides means raising or lowering
the head to see above or below them.
cloudy - 13/1/07 at 08:13 PM
OK, two possible solutions - after some feedback from you guys...


iank - 13/1/07 at 08:33 PM
I'd vote for the second option. Looks less fussy to my eye, and can't obscure vision to the mirror (might just be the angle it's
rendered) or the front wheel (nice to see exactly where you are putting it.
Mansfield - 13/1/07 at 09:03 PM
Second option me definately. I laid out the basics of a midi design in CAD and came up against all the same problems as you. I had to get rid of the
files as it was driving me mad. I really admire the work you have done so far.
I can't photoshop it but I quite like removing the top rail as your second picture, replacing it with the bracing as you have from the scuttle
back down to the mid (or new top rail) AND similar bracing from the rear down to the mid (or new top rail) at around a 45deg angle. To me it looks
better with the extra triangle.
I quit the idea of making my own middy because it took me a year to decide between a +4 and a +442 Locost and I realised I would never build a thing
at my rate of descision making.
I am following your progress (and JC's) with immense interest, I wish I had the bottle to go for it as you have. I think your car is fantastic.
cloudy - 13/1/07 at 09:09 PM
thanks both of you
I prefer different soluctions depending on the angle viewed, I'll play around with a few more ideas.
Mansfied, i'll give your idea a spin later, just have to avoid introducing the problem again, as anything there is instantly close to the head
James
Dick Bear - 14/1/07 at 03:49 PM
James,
I haven't kept up with your thread in a while but did my usual backwards reading of it today. It is great to see the progress and the
suggestions at each stage in your design process. Brings the best out in everyone! The result so far is a great looking and a promising solution to
an original build... keep it goin'!
I wish you had picked up the moon rover just once so we could see its' camparable size. Pushing the barrel up the hill was the only time that a
perspective of size could be judged.
I'm sending the clip to my son in California who is an active DP (Director od Photography), thought perhaps he would be interested in its use in
filming from angles and environments not suitable for current rails, slides or other contraptions.
Now if you can only make the little monster clean up the junk in your yard.... you'd really have something!
Kidding, of course!
Dick Bear
cloudy - 14/1/07 at 04:13 PM
I'm baffled by your last 3 paragraphs?
James
Dick Bear - 14/1/07 at 06:49 PM
I'ms sorry James that was a bit of a curve ball but wasn't meant to be.
I was refering to the link you posted on page 5 of this thread and the video of the RC car. That's what i get for reading things backwords. The
first intallments are thought of as the most recent and sometimes I forget that what is news to me is old news to those who do things more
conventionally.
http://www.digital-car.co.uk/video/trials.wmv
I hope this makes sense to you now.
Dick Bear
cloudy - 14/1/07 at 07:44 PM
ah right with you now. It was way too big and heavy for the usages I require - so it's currently being scaled down. Going back to tracked drive
to allow it to use stairs...
tadltd - 15/1/07 at 11:54 AM
Put the tank behind the seats, there's plenty of space (so it could be bigger), it's safer, AND it improves weight distribution.
quote:
Originally posted by cloudy
as regards the tank, it fits well where it is, and would be great for a logo, (see latest renders) - any comments on whether this is safe
'enough'
[Edited on 23/12/06 by cloudy]
[Edited on 15/1/07 by tadltd]
akumabito - 15/1/07 at 02:10 PM
Designwise I prefer the first option, although as other have pointed out, the second option is much more practical.
rav - 16/1/07 at 12:19 PM
Love it!
Really fresh concept, that front end looks spot on IMO and I think using panels here and there as needed rather than hiding everything in a jelly
mould is a very good idea.
I'm a beliver in form follows function so I tried extending the tubes in the second render so they run right back to the roll hoop, which should
make the chassis stiffer and probably a bit stronger.
Also added another diagonal bracing the roll hoop. Is it a bit too functional??
Fuel tank in the space behind the seats seems logical to me too - keeps it low and central, and in the part of the car which is best protected in a
crash - at lleast you'd hope so if you're going to be strapped in there!
Someone mentioned fitting exhausts in. If space is a problem, they could be run forwards between the seats in a very narrow 'tunnel', which
needn't be structural - just folded ali sheet for example. Then exit at the front somewhere, may help with fitting in silencers as well. Its
worked pretty well that way on my middy project - see pics.
Not sure how that would work if you had tank behind the seats as well though.
Anyway, just some ideas to add to the pot, keep up the good work!

Rescued attachment middy car.jpg
cloudy - 16/1/07 at 12:39 PM
I quite like the straight tubes actually, they echo the tube below nicely, I also like the extra bracing on the roll hoop.
have actually welded the roll hoop to the chassis at the weekend, but found despite many measurements sitting in the car - I just dont feel it's
high enough to be safe without having a very laid back driving position. Trouble is as soon as I put even just the 8cm rise I calculate will make it
safe, it destroys the proportions entirely
I will produce some more updated renders with the revised roll hoop tonight, you guys are always great for fresh idea's
James
cloudy - 16/1/07 at 12:59 PM
OK easier to just photoshop the change on, here's it with the revised height. Those rear braces certainly help to avoid it looking like an after
thought towering above the chassis.
But it still look a lot less sleek than I'd hoped for. Obviously this is a fixed measurement - any ideas where i might be able to rescale to
reduce the apparent height?

James
[Edited on 16/1/07 by cloudy]
[Edited on 16/1/07 by cloudy]
akumabito - 16/1/07 at 01:21 PM
Hmmm, the high-hoop is definitely less sexy looking, but safety is more important than looks, I guess.
I still like this look best though, it gives a really nice look to the car:
Perhaps you cold try something like that again? With the higher rollbar you just might have enough headroom..
I guess that would make it more similar to this:

Idunno... it may make things easier if you'd ever decide to fit weather gear
cloudy - 16/1/07 at 02:10 PM
truth is none of these designs appeal to me like the original one with the complete curves did - it's just starting to look boxy like the first
one did again. Might revert to this design and try and again find a solution to the head + visibility problem...
James
sgraber - 16/1/07 at 04:11 PM
quote:
Originally posted by cloudy
truth is none of these designs appeal to me like the original one with the complete curves did - it's just starting to look boxy like the first
one did again. Might revert to this design and try and again find a solution to the head + visibility problem...
James

[Edited on 1/16/07 by sgraber]
cloudy - 16/1/07 at 05:07 PM
I hear's you still cannot see any traffic to the left or right though
sgraber - 16/1/07 at 09:45 PM
quote:
Originally posted by cloudy
I hear's you still cannot see any traffic to the left or right though
You're right. Visibility in many directions is a huuge issue with your best looking design, even if you can solve the head against the steel tube
problem the visibility problem will not go away...
Doug68 - 17/1/07 at 07:21 AM
I feel your pain.
Go back to the beginning keep what you liked ditch the rest and keep going until you get something that works.
And remember whatever you make will be better looking than the thing below

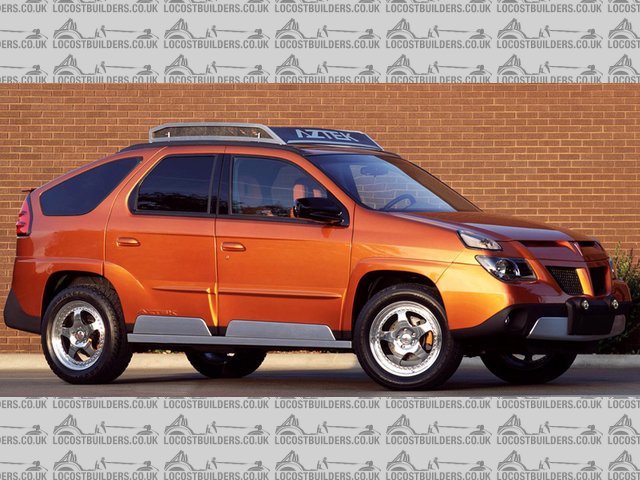
Rescued attachment pontiac_aztek_2001_01_b.jpg
gttman - 17/1/07 at 08:37 AM
quote:
Originally posted by cloudy
have actually welded the roll hoop to the chassis at the weekend, but found despite many measurements sitting in the car - I just dont feel it's
high enough to be safe without having a very laid back driving position. Trouble is as soon as I put even just the 8cm rise I calculate will make it
safe, it destroys the proportions entirely
I will produce some more updated renders with the revised roll hoop tonight, you guys are always great for fresh idea's
James
I went through the same thing on the GTT and ended up raising it around 80mm higher than I planned as safety overuled looks.
cloudy - 17/1/07 at 11:53 AM
looks like that's the magic measurement then!
James
gottabedone - 20/1/07 at 04:04 PM
James,
your original design is cool but the progressive edits are moving further from what you wanted and closer to many designs that have already been used
- Atom etc. etc.
Keeping the reclined seating, are you able to scale up the design slightly and raise the offending top rail and incorporate it as a roof line? Maybe
use gullwing doors or Nova styled front hinged roof. You could then keep the original proportions.
regards
Steve
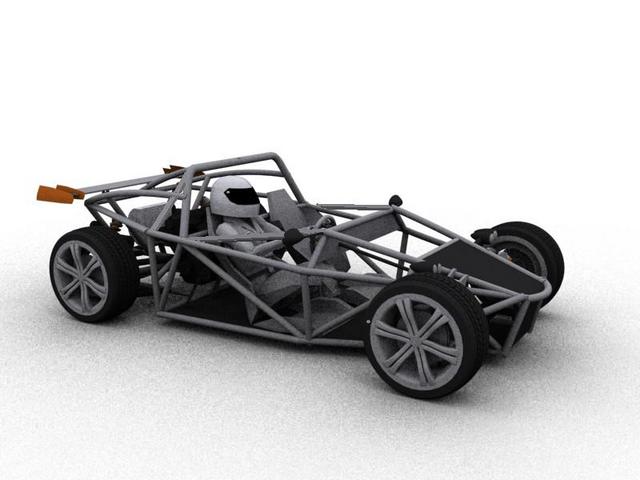
cloudy - 17/2/07 at 02:40 PM
Working long hours at the moment, so not much progress - but I finally got the correct fuel parts, so I gave the engine a good thrashing. Gives me
some inspiration to keep going!

cloudy - 21/2/07 at 02:05 PM
With some inspiration I saw on MK engineerings site for a roll bar, I think i've cracked the issue with making a roll bar that's tall enough
for safety that also doesn't make it look overly tall
I see you've been working your magic again in the MEV thread Fuoriserie - feel free to experiment on mine too!
Thoughts?


Oh and also - I know you all like videos here's that engine run up from last weekend. Don't worry the engine was up to temp and I was just
checking the rev limiter...
http://www.digital-car.co.uk/wr4/r4_engine.wmv
gttman - 21/2/07 at 04:00 PM
it certainly ticks the boxs for me
sgraber - 21/2/07 at 04:40 PM
I must say, I REALLY like that shape. I think you nailed it.
iank - 21/2/07 at 04:43 PM
Agree time to tack tubes I'd say.
FUORISERIE - 21/2/07 at 09:59 PM
quote:
Originally posted by cloudy
I see you've been working your magic again in the MEV thread Fuoriserie - feel free to experiment on mine too!
Thoughts?
http://www.digital-car.co.uk/wr4/r4_engine.wmv
Thanks....will see what i can do., but yuo've done a great job so far!
[Edited on 21/2/07 by FUORISERIE]
Doug68 - 22/2/07 at 12:43 AM
Looks superb
If it were me and for give the rubbish photochop I'd make the mods below:
Also the front tube going over the dash is shown as 3 bits welded together if this were one bent tube with the fore-aft tube butting into it it'd
look much better I think.
Top man for sticking at it!
Rescued attachment altrollbar1.jpg
Fred W B - 22/2/07 at 06:05 AM
I also wanted to suggest Doug's mods.
Cheers
Fred W B
rpmagazine - 22/2/07 at 08:51 AM
Doug has a point, the previous setup would risk folding in half in a serious rollover.
cloudy - 22/2/07 at 10:56 AM
I like you're thinking doug although it would be destroying a lot of chassis that has already been built - would look something like this....


[Edited on 22/2/07 by cloudy]
[Edited on 22/2/07 by cloudy]
[Edited on 22/2/07 by cloudy]
Doug68 - 22/2/07 at 12:39 PM
Yep, that's it.
cloudy - 4/3/07 at 06:28 PM
I'm moving forward with this new design - thanks everyone for the great input
Sorry about the messy garage!


cloudy - 5/3/07 at 04:58 PM
OK the fun old job of mounting the steering rack this coming weekend. I've bought myself a laser level to visualize my bump steer, but where
should I be mounting rack fore/aft? should the rack arms be straight at centered steer?
James
Doug68 - 7/3/07 at 12:58 AM
Go get yourself a copy of the Race & Rally Car Source book it'll explain what you need to do better than any answer you'll (probably)
get here.
[Edited on 7/3/07 by Doug68]
cloudy - 13/3/07 at 01:38 PM
It's too quiet in the middy section of late, we are all slacking!
Last weekend I put my new digital angle gauge to good use, by setting up the front suspension for 6 degrees of castor. Also tested out the laser level
method of bump steer checking, which seems to work a treat. Next weekend I hope to get the rack positioned and mounted. Cleared up the build area a
little....
A bigger job is to extend the car to give another 10-15cm in the cabin, another mis-calculation on my part 
All part of the learning experience I suppose - although I seem to be having more of the experience than most
Another render as I'm bored in work today!

cloudy - 16/3/07 at 06:46 PM
any comments on suitability/improvements to this rack mount i've designed? It's based around the locost mount, but uses 3mm plate boxed into
an L profile for strength

Alan B - 16/3/07 at 07:51 PM
I'd brace directly between the mounts parallel to the tubes as close as possible to the rack and then use just one diagonal.
cloudy - 18/3/07 at 08:07 PM
Something strange happened when I tried to position out the bump steer, the rack had to sit a lot lower than the line between the pivots rule would
suggest.
I believe the reason for this is because of the unequal length wishbones, which obviously add camber in bump, which in turn move the steering arm in
and toe out occurs. Presumably this applies to locosts that also have unequal length wishbones, I cannot see any others with such a low mounting
point however?
Any ideas? Should I just go with it here as it's resulting in least bump steer - or do I have another problem at play here?

Ratman - 19/3/07 at 03:41 AM
I resently worked through a similar rack and bump-stear problem with a friend's car. I suspect, that low position that you have indicated will
give a small amount of bump stear with small suspension movement, and then will get very bad if the suspension moves further.
Long and short wishbones is not a problem. But the suspended tierod needs to be in proportion. As an initial set up, if the outer end is at say 30% of
the vertical distance between the suspension joints, then it should also be 30% of the vertical distance between the suspension joints at the inboard
end. The length of the suspended tierod should then be proportional to it's location. i.e. average of upper and lower wishbone if it is located
at mid point, ands correspondingly longer or shorter if it is not.
When I was doing this we made up a very crude dummy tierod for one side and made endless 5mm adjustments with clamps and blocks of wood etc. Using a
two meter long bar attached to the hub, to measure bump stear, you can expect to get the end of a 2m bar staying within 20mm of a vertical line as
you move the hub up and down 200mm.
because there are several dimensions that you can change, and you can't be sure what the effect is going to be, keeping good records of your
trials is important. We used a spreadsheet to plot the results, and that helped zero in on the optimal tierod length and inboard location.
You are very likely to find that your rack is too long or too short. Nothing you can do about this except change the length some how. be sure that you
have the ackerman angles that you want at this stage, as any change in the stearing arm on the hub for this reason will directly affect the length of
the rack, if you want to keep zero bump stear.
let me know if you want more (clearer) description of the way we did this.
Cheers, Brian
gttman - 19/3/07 at 09:18 AM
looks like the rack is too wide to me.....
cloudy - 19/3/07 at 09:36 AM
That's the odd thing though, it is adhering to the proportion rule in that it's sitting proportionally about the same height as the steering
arm. I'm only measuring around 2 cm of deviation of the laser on the wall about 4 meters away, which by my calculations is about half a degree of
bump steer, which must be pretty good?
James
Ratman - 20/3/07 at 06:59 AM
That sounds very good. For that deviation, is that moving the hub through it's full range of suspension movement?
cloudy - 20/3/07 at 02:33 PM
damn, now the bump steer is better (rack still needs shortening) The TRE's bind at full bump
It would be ok if the pivot went through the uprights, upright - but its at a funny angle, common problem?
James
cloudy - 2/4/07 at 01:54 PM
I don't know if you stumbled across my other threads, but was basically having all sorts of travel issues.
I've managed to get around this by raising all mounts and moving upper mounts inboard allowing for a longer top wishbone (via adjuster) and
therefore less angle on the top joint for a given deflection...
(The top mounts will be webbed in, just temporarily mounted in the pic)
Only complete on one side, but happy to be over this hurdle. Well aside from needing to find different TRE's or bend the rack ends
I promise better updates soon!

[Edited on 2/4/07 by cloudy]
[Edited on 2/4/07 by cloudy]
FUORISERIE - 15/4/07 at 01:05 PM
quote:
Originally posted by cloudy
I don't know if you stumbled across my other threads, but was basically having all sorts of travel issues.
I've managed to get around this by raising all mounts and moving upper mounts inboard allowing for a longer top wishbone (via adjuster) and
therefore less angle on the top joint for a given deflection...
(The top mounts will be webbed in, just temporarily mounted in the pic)
Only complete on one side, but happy to be over this hurdle. Well aside from needing to find different TRE's or bend the rack ends
I promise better updates soon!
[Edited on 2/4/07 by cloudy]
[Edited on 2/4/07 by cloudy]
Looking very good so far, any updated pictures of your project? I like how it's progressing........
Cheers
Italo
cloudy - 27/5/07 at 08:11 PM
Sorry no updated pictures yet - i've been slacking!!
I have a new render though

DIY Si - 27/5/07 at 08:31 PM
Just stop doing renders then you lazy bum!
Looking good though so far.
cloudy - 27/5/07 at 11:11 PM
I'll go out and get cracking tomorrow if the garage isn't underwater of course....
[Edited on 27/5/07 by cloudy]
FUORISERIE - 4/6/07 at 09:12 AM
quote:
Originally posted by cloudy
Sorry no updated pictures yet - i've been slacking!!
I have a new render though
Nice rendering, is that a RHINO 3D Render? or 3DMAX?
Looking forward to more, and keep it up
Ciao
Italo
cloudy - 8/6/07 at 04:46 PM
That's 3dsmax using the mental ray renderer
James
FUORISERIE - 10/6/07 at 09:42 AM
quote:
Originally posted by cloudy
That's 3dsmax using the mental ray renderer
James
James,
I should get you to work on a few of my sketches....., your talent with 3dmax is great...
Italo
cloudy - 20/6/07 at 09:44 PM
Bit more done on the chassis:


Here's a pic with the roll bar taped on at correct height - looks huge in comparison to the rest, any good ideas for a clever shape or reducing
the height i'll need?

Tralfaz - 20/6/07 at 11:05 PM
Painting the bar darker than the frame should reduce it's impact.
T
Doug68 - 20/6/07 at 11:39 PM
What's it look like when someones sitting in it?
I expect it will look just right then.
To me aesthetically it looks just fine the way it is.
If you don't like it though maybe disguise by mounting the rear wing off it or something like that?
cloudy - 4/7/07 at 08:27 PM

Thanks to 'rickys2000' for lending me his engine hoist - which will allow me to drop the engine in saturday!
James
FUORISERIE - 4/7/07 at 08:30 PM
That looks really good.........I like your latest chassis design.....
Italo
cloudy - 7/7/07 at 02:59 PM
The engine is mounted, I couldn't resist starting it up (with the help of some gaffa tape!) - here's a vid
http://www.digital-car.co.uk/wr4/r4firststart.wmv
and some pics:


[Edited on 7/7/07 by cloudy]
sgraber - 8/7/07 at 12:07 AM
It looks simply SMASHING!!!!
Can you tell me the wheelbase and width (out to out) front and rear?
kb58 - 8/7/07 at 12:25 AM
quote:
Originally posted by cloudy
The engine is mounted, I couldn't resist starting it up (with the help of some gaffa tape!) - here's a vid
http://www.digital-car.co.uk/wr4/r4firststart.wmv
[Edited on 7/7/07 by cloudy]
"Windows Media Player cannot play the file because a network error occurred. The server might not be available. Verify that you are connected to
the network and that your proxy settings are correct."
Doug68 - 8/7/07 at 03:58 AM
It works OK for me, a bit slow to buffer but it gets there.
you could also right click and "save as".
Its coming along nicely!
I particularly like the part where you duck in to get the ear defenders!
And the exhaust routing may need a bit of a rethink
cloudy - 8/7/07 at 11:13 AM
Steve,
Wheelbase: 229cm
Track front and rear(out to out) 162cm
James
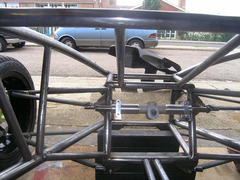
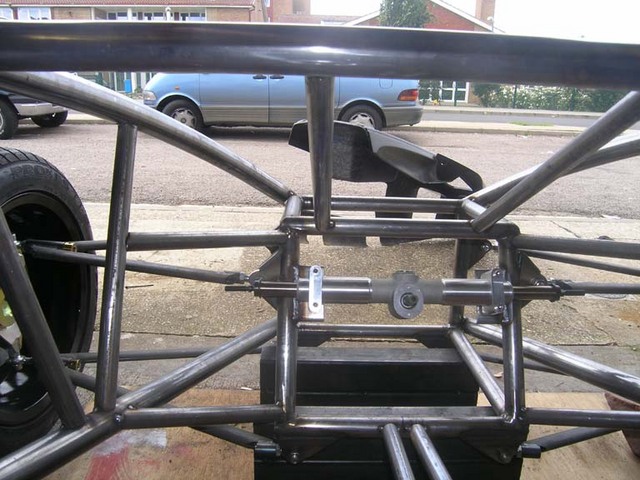
cloudy - 25/7/07 at 08:36 PM
Thanks to some rack extensions from MAC#1 i've installed the steering system.
It feels fairly smooth - but does this look like too much of an angle for the UJ? (It's around 45 degrees)

[Edited on 25/7/07 by cloudy]
sgraber - 26/7/07 at 01:04 AM
I think that angle will be ok as long as you don't feel a 'hitch' at any specific point as it rotates?
However... I am not too happy with your rack mounts. At least not if you are leaving it that way... They should be much beefier.
quote:
Originally posted by cloudy
Thanks to some rack extensions from MAC#1 i've installed the steering system.
It feels fairly smooth - but does this look like too much of an angle for the UJ? (It's around 45 degrees)
[Edited on 25/7/07 by cloudy]
Ratman - 26/7/07 at 05:23 AM
maybe you could replace the fibre disk joint with a UJ and split the angle between the 2 UJs. this way you can get exact CV between the steering wheel
and the rack. I have been surprised to find how many cars use common splines in their steering systems. If you use Toyota stuff you can find shafts
and UJs of all lengths that can be cobbled together.
cloudy - 26/7/07 at 12:18 PM
Good idea - I think rally design sell a compatible UJ
There is no notching of the UJ, just thinking about logievity
The rack mounts are not finished, I have both an X brace to prevent sideways movement and a another two to prevent any fore-aft movement
nkosta - 26/7/07 at 01:07 PM
Hi !
It is time to promote this design in to Mk I ( beta version ) of official locostbuilders`s mid engine car?
Many good and competent gay are included in discussion and I suppose that exist general agreement about look and strength and easy to build quality
of this particular design
Or I am wrong and this is only special BEC construction not strong enough to carry MOST of contemporary FWD car modules (many Japan models , WV ,
PSA group of France etc. .. etc)?
I am sorry not to hear Rorty opinion here (read historical tread : http://locostbuilders.co.uk/viewthread.php?tid=34017 )
At least I am middle aged man ( mid.... if you assume that life expectancy are about 100years!) and not have a time to wait next 50 y. for new FWD
locost.
Spend last 2-3 y. on the NET looking for something that I can build ( in the first time buggy , lather super 7 and at the end middy with Suzuki
Swift 1.3 GTI module ...single seater may be for general safe?)
My "neighbor" kikiturbo have nice space frame single seater and I waiting for final conclusion
after careful FEA work (whatever mean that).
May be I can finally bay plans from somebody similar to Book Design and finish little screamer before going to die("Never attempt to build
locost after 40thy probably you not drive them"
cheers to all
[Edited on 26/7/07 by nkosta]
Alan B - 26/7/07 at 05:15 PM
quote:
Originally posted by nkosta
....It is time to promote this design in to Mk I ( beta version ) of official locostbuilders`s mid engine car?......
As much as like Cloudy's car I'm obviuosly going to answer no......I think all of us doing our own thing would probably say "no, pick
mine instead"......IMO it's down to someone building one, writing a book, offering parts etc.....until then we'll go our own
way....which isn't necessarily a bad thing.....
cloudy - 26/7/07 at 08:16 PM
I wouldn't even volunteer my own car for it! I'm brand new to all this and i'm making it up as I go - far better designed by someone
with experience...
James
nkosta - 27/7/07 at 08:05 PM
With all my heart I support diversity ( ..of species ....Charles Darwin my favored tuner ) And concern and modesty of some"non
experiencing " but generous people .... but IMHO its time that Lord ( Law and Order) take things in hands ''
I t is time to make some basic recommendation about tube material ,cockpit , front end , front suspension etc. .. etc at least in level of so many
Book design ? . Ariel Atom established one particular point of view and slowly become standard. Especially with this large-long- curved good looking
tubes up ( a MUST for mid engine?) . It is time to identified a couple most affordable front end donor? .. across the world of course. Many good gay
almost finished their FEA-patran - nastran work
At the end this while help diversity its self
Good plan and numerous variants of this plan are key for longevity
Who are a Jim McSorley in mid-engine-transverse mounted kingdom?
(sorry splecheckered English)
Thank you for patience
kosta
[Edited on 27/7/07 by nkosta]
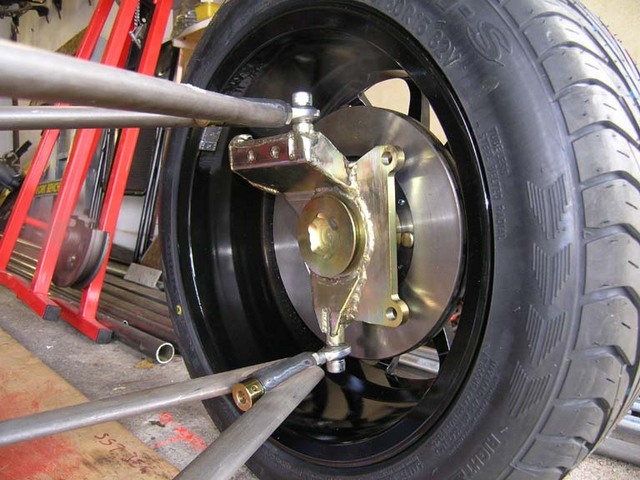
cloudy - 9/9/07 at 10:28 PM
It's still coming along,
Brakes are in and almost completed gear change assembly...
Have been throwing some idea's round for a 1+1 revision to the chassis to be completed after mk1 is complete - a few renders...
The basic layout:

Atomesque?

cloudy - 9/9/07 at 11:01 PM
The design for the "transmission tunnel" for the current car

cloudy - 21/9/07 at 04:45 PM
was hoping for some input there on the 1+1 design
Just weighed the car today, 345kg minus floor, exhaust and diff - on the heavy side!
I will definately have to rebuild the chassis at some point with lighter tube and be more intelligent with my space frame attitude
Weight distribution is 58:42 rear:front - sound OK for a middy?
James
thomas4age - 21/9/07 at 05:19 PM
wait a minute, your whole car weighs in at 345kg with engine and everything you need, exept exhaust, diff and 2 floor pannels? and you're on the
heavy side?
I can only dream........
grtz Thomas
[Edited on 21/9/07 by thomas4age]
cloudy - 21/9/07 at 05:25 PM
I was aiming for 350kg all in!
I must weigh my alloys at some point, I suspect the final wheels will weigh considerably less (16"
James
thomas4age - 21/9/07 at 05:34 PM
maybe team dynamics are something to look at those seem to very light and not really expensive
still I can only dream, that things going to fly, a Global GTlight weighs in at 380kg with an R1 fitted, yours is very light indeed
grtz thomas
[Edited on 21/9/07 by thomas4age]
cloudy - 21/9/07 at 06:01 PM
My 17 "wheels are 21.6kg a pop with rubber - how's this compare to a light 16"?
Just weighed all of the additional components to add - just a shade over 30kg's making a total of 375kg dry
Tralfaz - 22/9/07 at 12:18 AM
Light 16's with rubber should be down around 15-16 kg.
The 15's I am looking at are 11.5-12.8 Kg dependant on tire width.
T
Doug68 - 22/9/07 at 09:29 AM
Scour Tirerack.com for tyre and wheel data, there's a lot on there.
As for the 1+1 I've never seen this arrangment look anything other than fugly to me.
The roll bar won't protect the driver and the passenger never has any legroom.
We need to see more pics of the the current project coming along!
Confused - 22/9/07 at 09:02 PM
I echo the "more pics" comment!
Someone on my "local" forum posted this information up, might help if you try
to find some lighter wheels!
Garry
cloudy - 23/9/07 at 05:19 PM
I've made a temporary dash just to house the clocks for now: (Notice the gear lever - thanks Steve!)

Here's the spoiler i've just picked up in place - it needs one of the wings taken out and the whole thing made thinner. Hopefully this
avoids the chav looks it's currently adding to the car!

cloudy - 1/10/07 at 09:52 PM
OK, decided to remake the chassis properly now - the dimensions are a little large in passenger area. All the sus mounts will be kept in the same
locations though...
I know i'm seriously in atom territory here, but i'm not too bothered. Thoughts (back needs a little work)?


Fred W B - 3/10/07 at 05:25 PM
Looks awesome, seems you are also suffering what I am finding, which is that you work out how to do it better once you have actually made it up.
WRT the rear, if you want to even pretend the rear wing will work at all it needs to be higher.
Cheers
Fred W B
violentblue - 3/10/07 at 07:11 PM
the height of the rear wing, may not be functional, but looks much better than way up in the air.
FUORISERIE - 26/10/07 at 11:56 AM
quote:
Originally posted by cloudy
The engine is mounted, I couldn't resist starting it up (with the help of some gaffa tape!) - here's a vid
http://www.digital-car.co.uk/wr4/r4firststart.wmv
and some pics:
[Edited on 7/7/07 by cloudy]
I Like your chassis, are you going to sell plans for it ?, it does have potential
[Edited on 26/10/07 by FUORISERIE]
FUORISERIE - 26/10/07 at 11:58 AM
quote:
Originally posted by cloudy
OK, decided to remake the chassis properly now - the dimensions are a little large in passenger area. All the sus mounts will be kept in the same
locations though...
I know i'm seriously in atom territory here, but i'm not too bothered. Thoughts (back needs a little work)?
design looks good in my opinion, maybe an engine cover
cloudy - 29/10/07 at 07:27 PM
Maybe in the distant future when i've finished it and smoothed out any problems
quote:
Originally posted by FUORISERIE
]
I Like your chassis, are you going to sell plans for it ?, it does have potential
[Edited on 26/10/07 by FUORISERIE]
FUORISERIE - 31/10/07 at 04:16 PM
2008..??
quote:
Originally posted by cloudy
Maybe in the distant future when i've finished it and smoothed out any problems
quote:
Originally posted by FUORISERIE
]
I Like your chassis, are you going to sell plans for it ?, it does have potential
[Edited on 26/10/07 by FUORISERIE]
cloudy - 31/10/07 at 05:31 PM
2050?
nkosta - 21/11/07 at 06:43 PM
just watching
any progres or decision ?
cloudy - 25/11/07 at 02:55 PM
Little bit,
My homemade tube roller (my tube bender won't produce smooth large radius bends)


Yesterday's progress on the chassis:

Doug68 - 27/11/07 at 01:16 PM
The tube bender looks great!
I love this thread when you go back to page one and look at how this project has progressed its just great to see the evolution of it.
cloudy - 28/11/07 at 10:33 PM
Little more progress

FUORISERIE - 29/11/07 at 12:59 PM
Nice work on the new chassis..
Italo
cloudy - 29/11/07 at 03:22 PM
I'm making good use of some time off work!


cloudy - 29/11/07 at 08:56 PM
and some more

nkosta - 2/12/07 at 07:47 AM
perfect , just perfect shape! ( girl like )
Can you PLEASSSEEEE put on pictures some dimension (weight , tube diameter , wall of tube , steel quality , current Amp for welding , MIG or TIG
, material for welding)
I know its time consuming but while be of greatest help for rest of us
And final question : do you ,PERCHANCE , have some plans for this , just for reading before slip
Mave - 2/12/07 at 09:31 AM
I love it. (but your "old" one was also very tasty)
But just a slight remark; your wishbones look a bit flimsy compared to the rest of the car. I've seen people using 40x20x3 elliptical tubing, and
I think that would look just great with the rest of your car. Again; I'm only referring to the looks of your wishbones, I'm not saying that
they're not strong enough.
nkosta - 2/12/07 at 02:26 PM
or, maybe,main tubes are slightly huge
never mind
Mr Whippy - 2/12/07 at 05:48 PM
wishbones look normal
cloudy - 2/12/07 at 11:03 PM
They are standard book locost wishbones - on a car I expect to weigh a good 100kg less than a seven. Should be plenty strong enough - allthough had I
not bought them early on, i'd probably had a go at it myself...
nkosta: I'm using 1 1/2" and 50mm tubing, both in 16g (bright steel)
I'm welding using a clarke 160en MIG - using 0.8 wire with just co2 shield
no plans as yet, i'm still rejigging things slightly as I go...
James
Mave - 3/12/07 at 06:39 PM
As I said before, I'm not referring to the strength, but purely the cosmetic part of the 'bones. I think it would look great when the
wishbones are more in line with the chassis, dimensionwise.
But each to his own of course!
nkosta - 6/12/07 at 06:11 PM
Thanks James
kreb - 6/12/07 at 10:00 PM
Am I the only one who thinks that you should throw some planking on the sides and a propeller on the back?!
Seriously, nice, clean work. Thumbs up!
cloudy - 7/12/07 at 10:55 PM
A little more progress on the front, just making up the rack mounts. I'm still ooming and aahing about my rack position in the fore/art direction
- any comments? I think i'm happy about where it is..

James
Echidna - 8/12/07 at 02:51 PM
Steering rack position is not for the faint of heart. You should "design" its position as it will determine the amound of bumpsteer you will
get.
kb58 - 8/12/07 at 03:13 PM
Moving the rack fore/aft sets Ackerman, a hotly debated issue as far as how much or little you need.
cloudy - 9/12/07 at 12:40 AM
Indeed, I have a test method for achieving zero bump steer, but on the ackerman side nobody has a clear answer - some people have more than that some
less!
James
nitram38 - 9/12/07 at 09:32 AM
Seeing as you have lots of space at the front, why not make an adjustable bracket in the plain where you have dialed out the bumpsteer?
That way you can experiment with the rack position if you are unhappy with the way it behaves.
hughpinder - 10/12/07 at 10:52 AM
In the picture of the front end of your car, it looks like the steering arms are angled further 'in' at the front, to a front mounted rack.
Surely they need to be 'out' at the front for ackerman steering???
Hope I'm not being stoopid here.....
Hugh
cloudy - 10/12/07 at 01:26 PM
It's standard cortina uprights so I assume its right - but I can see where you are coming from, anyone else have any comments on this?
sgraber - 10/12/07 at 01:41 PM
quote:
Originally posted by kb58
Moving the rack fore/aft sets Ackerman, a hotly debated issue as far as how much or little you need.
Agreed. My basic comment without hotly debating the issue of ackerman is that you should attempt to engage each steering arm in a direct plane with
the tie rods to avoid any unforeseen geometric changes due to the differences in the arc of motion caused by the steering rack not being in plane with
the outer tie rod ends. That's just my .02cents which are virtually worthless anyways!
My rack is foreward of my tie rod outers by a good 3 cm and it induces negative ackerman. (Being changed for the next one) This makes it difficult to
push the car at full lock. Never mind that people say a bit of negative ackerman makes a car more stable at high speeds. I wouldn't be able to
tell the difference.
nitram38 - 10/12/07 at 02:00 PM
That is why my rack is set at the same height as my bones (pivot same as bones for no bump) and straight onto my uprights:
Description
You can see where the tie rod goes at the top rear of the upright:

Description
[Edited on 10/12/2007 by nitram38]
cloudy - 13/12/07 at 08:14 PM
Can anyone comment on the best aluminium alloy for use as floor material?
6082 T6 or 5251 H22?
Aluminium alloy 6082 is a medium strength alloy with excellent corrosion resistance. It has the highest strength of the 6000 series alloys. Alloy 6082
is known as a structural alloy. In plate form, 6082 is the alloy most commonly used for machining. As a relatively new alloy, the higher strength of
6082 has seen it replace 6061 in many applications. The addition of a large amount of manganese controls the grain structure which in turn results in
a stronger alloy.
Aluminium alloy 5251 is a medium strength alloy possessing good ductility and therefore good formability. Alloy 5251 is known for work hardening
rapidly and is readily weldable. It also possesses high corrosion resistance particularly in marine environments.
Alan B - 14/12/07 at 04:15 AM
5251 is the one to use IMO...good formability
cloudy - 14/12/07 at 06:12 PM
reckon the rapid work hardening could cause a flintstone effect with all the flexing though ?
James
nkosta - 15/12/07 at 09:14 AM
just for ilustration:
russian Midy Lada Revolution 650 kg , 1600ccm 165-215 ks
http://autoreview.ru/new_site/year2004/n22/ladarev/1.htm
[sorry slightly of topic but i am suprised with this lada]
More on this place
http://www.locostbuilders.co.uk/viewthread.php?tid=79347
[Edited on 15/12/07 by nkosta]
[Edited on 16/12/07 by nkosta]
[Edited on 16/12/07 by nkosta]
cloudy - 28/12/07 at 02:55 PM
Had to take it out of the garage to spin round today - so I put some wheels on (completely wrong size - going for 195/45/15 I think) while it was
outside to get some idea of how it was progressing...


cloudy - 28/12/07 at 08:24 PM
Also a check layout check on the engine/diff combination...
I intend to have some driveshafts made up so the engine is able to sit centrally. Anyone have any comment on whether such a short chain is likely to
have alignment issues?


James
clanger - 1/1/08 at 06:34 PM
CURSE YOU !!!!!!
Just read your thread. Pure inspiration. Hats off to your design and ingenuity. Brilliant
I been umming and aarhhing about a RWD bike engine Mini project I'm planning and waking up in cold sweats about the design. Can't bring
myself to shell out Ł5K+ for a Zcars one, nice though they are
Your car makes my plans look like an infants school project, and me with 25 years engineering experience
What's your background, If you don't mind me asking ??????
Great stuff, best of luck. I'll be following closely from here on in.
cloudy - 3/1/08 at 12:20 AM
My very limited (I'm 22) background is IT - which is not proving very useful so far except with the CAD drawings!
I recommend you just go for it, if you look back in this thread you'll see it's taken a good few tries to get to this point so don't be
afraid to experiment
James
COREdevelopments - 4/1/08 at 07:30 PM
,22! by just reading all this thread tonight i would of never thought you the "creator" would be 22. not knockin you in anyway. im 24 and
would love to have come up with this design (btw can i copy it in the future as it looks the dogs balls) any more progress?
cloudy - 6/1/08 at 02:52 PM
Engine's going in today - will have some more pics in the next day or two...
Just two of the latest renders showing the OZ alloys and the diff mounts...


COREdevelopments - 6/1/08 at 05:57 PM
just how do you do these detailed pics. they are amazing and must take a while??
how come got no pic archive?
Rob
cloudy - 6/1/08 at 06:10 PM
All made in 3D studio max - I still can't get my head around solidworks!
Benonymous - 7/1/08 at 01:08 AM
I'm trained in 3D Studio Max and I found Solidworks quite easy to use. The big difference with SW is that you have to be much more deliberate in
how you do things. Another snag is that Max is designed to let you make absolutely anything whereas SW is an engineering program. When I was
designing my chassis I found that it wouldn't put a weldment profile on a spline. It only wanted to play with arcs so I made my tube an arc and
worked with a regular shape rather than a custom one. Another downside is the rendering in SW. I don't have the 'Photoworks' package
so I'm limited to screen captures as far as I can tell. After using Max and Mental Ray, it's a real let-down! I'm still learning SW
and I no longer use Max but if you can learn Max you can easily learn SW. Hard to put down the familiar tools though
Alan B - 7/1/08 at 02:10 AM
I guess the difference is that 3DS max will let make anything on the screen...whereas the parts in SW you can make in real life (for the most
part)...
How would you detail an extrusion extruded along a spline?...how do you do any detail drawings from 3ds max?...I don't think you can (can you?)
because it is just a visualisation program...as opposed to (as you say) an engineering design tool...
cloudy - 7/1/08 at 12:10 PM
I've just assumed the units in 3dmax are millimeters, so I can design to scale. I do have to read off all my dimensions on the fly as I
can't get a good printout, but I just take a laptop outside with me
James
[Edited on 7/1/08 by cloudy]
[Edited on 8/1/08 by cloudy]
Alan B - 7/1/08 at 12:54 PM
quote:
Originally posted by cloudy
I've just assuming the units in 3dmax are millimeters, so I can design to scale. I do have to read of all my dimensions on the fly as I
can't get a good printout, but I just take a laptop outside with me
James
[Edited on 7/1/08 by cloudy]
Whatever works for you mate..
Splendid job so far...keep up the good work..
Benonymous - 8/1/08 at 06:13 AM
quote:
Originally posted by Alan B
I guess the difference is that 3DS max will let make anything on the screen...whereas the parts in SW you can make in real life (for the most
part)...
How would you detail an extrusion extruded along a spline?...how do you do any detail drawings from 3ds max?...I don't think you can (can you?)
because it is just a visualisation program...as opposed to (as you say) an engineering design tool...
Yes, for me Max is about making fantastic models and animating them. Solidworks forces you to make a proper job of the model and as you say, the
parts made can be birthed into the real world via the magic of CAM and laser cutters (joy!) I always found it nearly impossible to stick to doing
things accurately, it was easier to do them for maximum visual appeal.
SW and Max aren't comparable products in many ways but you can output .DXF files from Max so if you did everything properly I can see no reason
why you couldn't use it to have parts made with CAM processes.
BTW James, I'm very impressed with your design and your progress. So many inspirational people on this forum
Gakes - 11/1/08 at 05:56 PM
Amazing work dude
cloudy - 12/1/08 at 05:01 PM
Small update, I've turned up my chain tension adjusters and test fitted the chain:


nitram38 - 13/1/08 at 06:20 AM
My only suggestion for your chain adjusters is that I recommend some top guides for your diff carrier.
From your 3D drawing there is nothing stopping side loads pushing the diff brackets over at the top.
Remember that as your driveshafts are moved up and down, there is a chance that thse will put side loads on your diff carrier.
This is not to criticise your work, but to stop any problems.
cloudy - 13/1/08 at 11:30 AM
Good spot - thats something I have thought about but haven't yet designed, I think I'll do it once the adjusters are in...
James
cloudy - 13/1/08 at 08:47 PM
Remade the diff plates in ally, with an offset to allow a chassis tube between it and the engine. I also made up some temporary driveshafts from my
sierra ones to get the lengths right....


nitram38 - 14/1/08 at 05:45 AM
Just got to say, that it looks the Dog's Cahoonas !!!!
Benonymous - 14/1/08 at 10:52 AM
Hey Cloudy, sorry if I missed it but how did you bend the main tubes for your frame. I have considered CNC bending but I'm aware that I may
suffer from 'sticker shock' after asking the price. If you have used a lower tech method I'd be interested.
Cheers.
Ben.
cloudy - 14/1/08 at 11:55 AM
I built myself a tube roller from parts I had lying around see here:
http://www.locostbuilders.co.uk/viewthread.php?tid=54042&page=20&contribmessage=none
It can't bend the tube much tighter than I have for the side tubes, as the tube starts to oval....
James
[Edited on 14/1/08 by cloudy]
cloudy - 20/1/08 at 05:15 PM
Span the engine up tonight to check everything so far, here's a little video
Video
Ignore the wobbly driveshafts they are just temporary cut and shuts till I'm happy with the lengths...
[Edited on 20/1/08 by cloudy]
clanger - 23/1/08 at 06:54 PM
Hi James,
Project looking cool as ever.
Quickie question:
Rear suspension pick points, they based on the book chassis or your own design ?
What tube & wall thickness are you using for the diff mounting / rear suspension monuting.
keep up the good work !
cheers
cloudy - 23/1/08 at 08:06 PM
They are of own design but will inevitably sit fairly close to the book dimensions as it's an MNR rear wishbone setup
James
neilj37 - 24/1/08 at 08:05 AM
This project is looking really good. I just wish you would hurry up and finish so you can make me one.
Did you ditch the cross over roll bar idea al la MK?
BTW can you make mine a single seater with the seat in the middle of the car
[Edited on 24/1/08 by neilj37]
COREdevelopments - 24/1/08 at 06:29 PM
ye this project is amazing! cant wait to see it finished. put me down for one too!!
Rob
defcon - 27/1/08 at 11:18 AM
Im amazed by your tube rolling device. Can you tell me the wall thickness you are able to roll?
cloudy - 28/1/08 at 12:59 AM
I've only tested it up to 3mm wall tubing, I suspect thats close to it's limit as the screwjack becomes very hard to turn!
Does anyone know a supplier for the foam commonly used for hand shaping moulds intended for glass fibre layup?
I'm going to take a crack at building a CF/GRP composite bonnet!
James
[Edited on 28/1/08 by cloudy]
Delinquent - 28/1/08 at 08:55 AM
I go to local building insulation companies (if you have a Sheffield Insulation near you give them a try)
cloudy - 28/1/08 at 10:27 AM
Thanks any idea what they call it?
James
Delinquent - 28/1/08 at 11:47 AM
Insulation foam
Comes in a variety of densities and block shapes, have a look at Fred's thread re his bodywork, he mentions his preferred density in there
somewhere and I think he'd have a better idea on what's good for a project of this size. I've always just gone for the highest density
offcuts they have as my mouldings have always been relatively small.
nitram38 - 28/1/08 at 01:06 PM
Just make sure that you go for a non-styrene based foam, otherwise it will melt when you put styrene based filler/fibreglass.
Polyester does not react with styrene, so go for polyester foam or similar
cloudy - 28/1/08 at 02:56 PM
OK will remember that
James
sgraber - 28/1/08 at 04:34 PM
Just don't try to shape that expanding foam with a hot-wire as it lets off very noxious fumes. A serrated blade and sanding block would be the
way forward.
Best of luck and congrats on a fine design it very attractive and from all appearances should be a successful design.
Fred W B - 28/1/08 at 06:40 PM
I used polyurethane foam, with a density of 32 kg/m2.
The "surform" tool works great on foam
Cheers
Fred W B
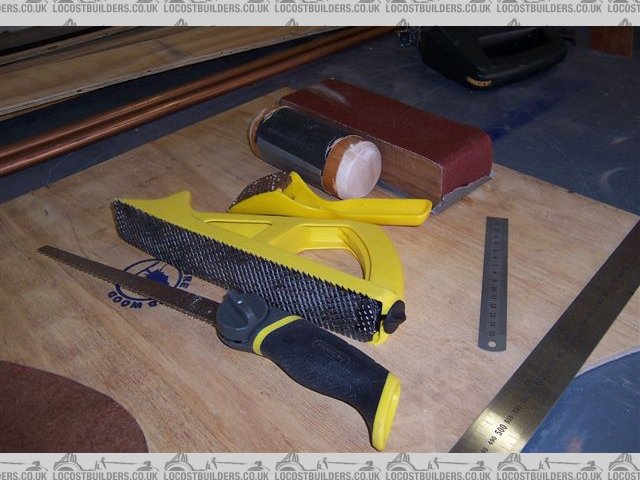
body23
[Edited on 28/1/08 by Fred W B]
cloudy - 28/1/08 at 07:02 PM
Thanks guys, all good info
I take it you coat the foam when you have finished. Then you lay up straight on that which gives you the mould?
James
Schrodinger - 28/1/08 at 09:02 PM
quote:
Originally posted by cloudy
I've only tested it up to 3mm wall tubing, I suspect thats close to it's limit as the screwjack becomes very hard to turn!
Does anyone know a supplier for the foam commonly used for hand shaping moulds intended for glass fibre layup?
I'm going to take a crack at building a CF/GRP composite bonnet!
James
[Edited on 28/1/08 by cloudy]
http://www.cfsnet.co.uk/ sell it look in the catalogue under foams and core materials
nitram38 - 28/1/08 at 09:22 PM
quote:
Originally posted by cloudy
Thanks guys, all good info
I take it you coat the foam when you have finished. Then you lay up straight on that which gives you the mould?
James
You will need a smooth surface on your "buck", plus plenty of release wax. Also you will need to work out if the panel will come out of the
mould. This means breaking it down into smaller moulds by creating flanges to join the mould before laying up.
It is a long and time consuming job!
Fred W B - 29/1/08 at 06:24 AM
WRT surfacing the plug I have been advised by a very experienced pattern maker to proceed as follows:
Cover foam with a layer of csm and resin, and sand.
Coat with body filler, sand, finishing with 180-240.
Spray with a purpose designed product called Durabuild
duratec
(only need the primer) and sand, finishing with 1000, then cut and polish.
Cheers
Fred W B
[Edited on 29/1/08 by Fred W B]
cloudy - 30/1/08 at 10:31 PM
Managed a 32kg weight saving by swapping to 15" superleggera alloys totalling 13.5kg (they have some cheap heavy rubber on at the moment)
I'm hoping to get that down to 12kg with a sensible rubber choice...

[Edited on 30/1/08 by cloudy]
[Edited on 30/1/08 by cloudy]
ZEN - 31/1/08 at 07:04 PM
The OZ Ultraleggera weights just 5.44kg/piece and are the lightest 15" alu wheels. At least that is stated in POWER TUNING MAG.
[Edited on 31/1/08 by ZEN]
[Edited on 31/1/08 by ZEN]
cloudy - 31/1/08 at 10:21 PM
The superleggera's are lighter, but you cannot buy them anymore - this was a well looked after set from ebay...
superleggera 7x15 = 4.9kg
[Edited on 31/1/08 by cloudy]
ZEN - 31/1/08 at 10:27 PM
Lighter than Ultraleggera??
cloudy - 1/2/08 at 12:34 AM
yup
cloudy - 2/2/08 at 03:05 PM
Pushed her outside today to see how it's looking


nitram38 - 2/2/08 at 03:33 PM
Looks great to me!
Seems you will beat me to the finish first!
I'd better get going to salvage some pride
cloudy - 2/2/08 at 03:50 PM
Not sure about that!, I've got a helluva lot to still do - it's the fiddly stuff that takes the time as I'm sure you know
nitram38 - 2/2/08 at 03:56 PM
quote:
Originally posted by cloudy
Not sure about that!, I've got a helluva lot to still do - it's the fiddly stuff that takes the time as I'm sure you know
That is where I am at right now.
kikiturbo - 2/2/08 at 05:45 PM
may I kindly ask you, and nitram of course, the weight of your chassis.
I can't seem to decide how light is light enough in my build... and while the FEA numbers are OK, I sometims want to keep slightly thicker tubing
around the passenger compartment then strictly necessary.
cloudy - 2/2/08 at 09:52 PM
I must admit I did not weigh it bare, Can probably come up with a guess based on tubing length if you'd like?
Incidentaly weighed it today at 294kg - looks like I need to do some work on the heavy sierra components at the rear....
James
ZEN - 2/2/08 at 10:15 PM
Nice progress!
Here are some styling ideas


[Edited on 2/2/08 by ZEN]
cloudy - 2/2/08 at 10:56 PM
oooh interesting, any idea where I can find more info?
Alan B - 2/2/08 at 10:57 PM
Wow..never seen the Kirkham Rush before...soooo much like what I'm doing except for only being 2 seats of course...
[img][/img]
ZEN - 2/2/08 at 11:00 PM
quote:
Originally posted by cloudy
oooh interesting, any idea where I can find more info?
http://www.kirkhammotorsports.com/custom/rush_index.html
nitram38 - 2/2/08 at 11:52 PM
quote:
Originally posted by kikiturbo
may I kindly ask you, and nitram of course, the weight of your chassis.
I can't seem to decide how light is light enough in my build... and while the FEA numbers are OK, I sometims want to keep slightly thicker tubing
around the passenger compartment then strictly necessary.
Not weighed it yet, sorry
kikiturbo - 3/2/08 at 02:48 PM
ok nitram, no problem, I am hovering around 50 KG, and am not comfortable in getting it lower than that..
I'll cheack what different sanctioning bodies say about tubing size vs. vehicle weight next..
[Edited on 4/2/08 by kikiturbo]
kikiturbo - 3/2/08 at 02:49 PM
quote:
Originally posted by cloudy
I must admit I did not weigh it bare, Can probably come up with a guess based on tubing length if you'd like?
Incidentaly weighed it today at 294kg - looks like I need to do some work on the heavy sierra components at the rear....
James
oh, yes, an estimate based on tubing length, size and wall thickness would be great thanks..
cloudy - 16/2/08 at 04:49 PM
Need a bit of advice if poss...
I have two options for seat mouting, the top one is the "traditional" steel plates or the second a possible design that also allows for
moving the seat and is potentially lighter?
Any problems you can see with either? I will have a very thin ally floor so that won't add any additional strength. Is it desirable to have some
flex in the mounts for comfort?


Thanks all,
James
nitram38 - 16/2/08 at 05:11 PM
Wouldn't you feel better about using some 2" X 1" box section?
That is what I am using on my car.
It is the one thing that I believe should be strong as it will take all of your weight and any forces.
I have used mine to pick up 4 of the 6 point harness points aswell (per seat).
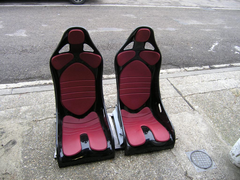

seats on subframe


seat subframe
cloudy - 16/2/08 at 05:41 PM
Need my bum to be as close to the floor as possible to maintain the proportions
The seats don't have to take much force at all really plus no shock loads at all. The seat belts take all forces in an impact...
James
nitram38 - 16/2/08 at 05:55 PM
If you look at the frame/seats, the curved bottom of the seats fits in the frame cut outs.
In otherwords your bum does come level with the floor (less the 4mm skin thickness and 5-10mm pad). It is only the Aluminium side runners that sit on
the frame.
I wanted the lowest seat I could get too.
I also wanted some comfort this time around so I opted for the bucket seats/pads.
They weigh about 5kg each with the side runners.
Admitedly, my seats are supported at each end and not in the middle, so that has a little bearing on my choice of material.

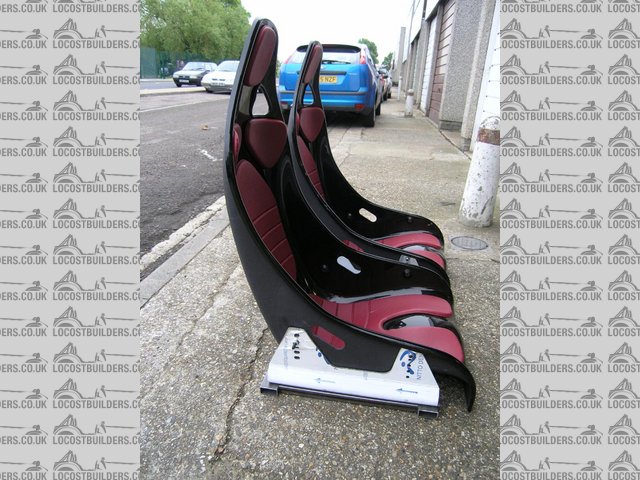
seats subframe side
[Edited on 16/2/2008 by nitram38]
kb58 - 16/2/08 at 06:10 PM
What brand of seat is that (knowing full well it'll be a English brand, with a shipping cost to the USA of more than what they cost )
nitram38 - 16/2/08 at 06:17 PM
From a uk ebay seller redpip1984
Seats around Ł200 per pair, pads another Ł40 per seat and side brackets about Ł30 a set, but you could make your own
cloudy - 16/2/08 at 06:40 PM
5kg per seat is quite an achievement!
James
Tralfaz - 16/2/08 at 08:43 PM
see www.jkcomposites.com for more info.
I was quoted 115 pounds for shipping a pair to the USA. (That was East coast,would expect more to CA)
kb58 - 16/2/08 at 11:20 PM
quote:
Originally posted by cloudy
5kg per seat is quite an achievement!
James
As long as they don't collapse or break in an accident.
nitram38 - 16/2/08 at 11:25 PM
quote:
Originally posted by kb58
quote:
Originally posted by cloudy
5kg per seat is quite an achievement!
James
As long as they don't collapse or break in an accident.
They aren't stranded fibreglass, but the black core mat which is a lot stronger.
The 6 point harness I am using would be doing most of the work in an accident
tks - 17/2/08 at 11:39 AM
puff very very nice build pics are beeing show over here....
sad to see that the well bespoke rollbar idea is ditches (its was 3 pages discussion ) also i noticed that you changed the engine???
wy you changed for a 4inline and chain diff instead of the turned V2 and prop???
maybe this is lighter (no diff) but don't you suspect that chain getting hot (i mean really hot??) its a small chain you know.
keep up the good work!
saying that your project looks very very good/promising!
Tks
cloudy - 17/2/08 at 08:29 PM
The engine has always been the GSXR powerplant, right from the off!
The crossover rollbar is still a possibility, haven't decided yet...
Chain heat shouldn't be an issue - this setup is pretty common with BEC middy's
James
cloudy - 22/2/08 at 09:23 PM
Rear wilwoods have finally arrived!

There does seem to be a problem with the connectors for the willwood MC's, see below for the recommended part from rally design, fully screwed
in. Looks awfully wrong to me!

Last question, has anyone flipped the disc round on a cortina hub so the bell points outwards? moving the disc nearer the outside of the car. With the
disc mounted to the hub instead of sandwiched between the wheel it looks rather odd being so far recessed...
James
Delinquent - 22/2/08 at 09:50 PM
quote:
Originally posted by cloudy
Rear wilwoods have finally arrived!
Looking good cloudy, hate to be the bearer of bad news though - that wheel aint ever going to fit over the brake disc...
Fred W B - 23/2/08 at 07:06 AM
What part number calipers are those?
Cheers
Fred W B
Sven - 23/2/08 at 04:37 PM
quote:
Originally posted by cloudy
There does seem to be a problem with the connectors for the willwood MC's, see below for the recommended part from rally design, fully screwed
in. Looks awfully wrong to me!
What's that 2nd/outer adapter? It definately looks wrong to me. For the M/C you need a 3/8-24 to flare adapter and then you can just connect
with a flare fitting on a hardline.
-Steve
cloudy - 24/2/08 at 03:27 PM
Figured it out, just had to remove the silver section - Not sure what that's for, but the copper fits suitably on its own...
Took the chance in the daylight to get a pic

[Edited on 24/2/08 by cloudy]
stuleah - 24/2/08 at 05:21 PM
hi
i am a noobie on here but have been following your progress (and getting some ideas) for quite a while.
just thought i would say that your doing a wonderful job and cant wait to see it finished. i am only down the road in peterborough so maybe when its
finished you wouldnt mind me coming and having a look.
keep up the good work
stu
nitram38 - 24/2/08 at 06:32 PM
Cloudy, your car is something else!
Somehow it looks a lot lower than mine.
Hopefully I will get the engine out sometime this week and then finish the welding.
Once welded, it is on to painting etc.
I am looking at different coatings/paints and at the moment I favour POR15 primer and and enamel top coat (advise appreciated).
I will still need to fabricate a mold for the floor pan (fibreglass) before I put the top coat on the chassis. I want to put the primer on asap as I
want to make sure that there is no rust forming.
cloudy - 24/2/08 at 06:41 PM
I'm completely in the dark with paint, would be very interested to hear any progress you make there
Have you wheeled yours outside for a few sneaky pics yet? I suspect its just the lack of roll bar that's making mine look lower....
James
nitram38 - 24/2/08 at 06:49 PM
I have just removed all the bones at the moment, so no rolling pics, sorry.
COREdevelopments - 4/3/08 at 06:24 PM
James its looking amazing!! it looks so low and small, i love the shape of it and would love to see it in the flesh one day!!
keep up the good work and the updates.
Rob
cloudy - 12/3/08 at 01:52 PM
One to watch - Footman James just invalidated my build up quote when I called to take out the cover. For get this - my age!
I'm 22 and they say they would not insure me with a bike engine on the road so they cannot insure it offroad. What utterly flawed logic - how
does my age have any telling on whether the car is stolen? The policy does not and cannot cover any form of driving.
I've taken up a slightly more expensive quote with AF instead.
chunkytfg - 12/3/08 at 02:05 PM
quote:
Originally posted by cloudy
One to watch - Footman James just invalidated my build up quote when I called to take out the cover. For get this - my age!
I'm 22 and they say they would not insure me with a bike engine on the road so they cannot insure it offroad. What utterly flawed logic - how
does my age have any telling on whether the car is stolen? The policy does not and cannot cover any form of driving.
I've taken up a slightly more expensive quote with AF instead.
Just out of interest how much does build insurance cost? and how old do you have to be?
cloudy - 12/3/08 at 05:19 PM
FJ wouldn't say but i'm now with Adrian Flux for Ł61 for the year with no time limit on finishing the build...
James
Triton - 12/3/08 at 10:33 PM
cracking car matey...
chunkytfg - 13/3/08 at 04:58 PM
quote:
Originally posted by cloudy
FJ wouldn't say but i'm now with Adrian Flux for Ł61 for the year with no time limit on finishing the build...
James
Cheers James.
Cracking car by the way
I can only hope for half the talent you have when i start my build
cloudy - 16/3/08 at 08:33 PM
I'm having some trouble with my pedal box, when the pedal is depressed the arrangement pivots as shown in the pic, eventually ending up at about
45 degrees and impeding further travel!

Any ideas on this one? I know I need to move the pivots closer together, but I don't think this will solve it...
nitram38 - 16/3/08 at 08:35 PM
Any clearer and closer photos?
Kaspa - 17/3/08 at 02:20 AM
Cloudy, your going to have to mount your pedal box to a substantial surface, either the floor plate, or to full width brackets, just picture in your
mind how much force the brake pedal in particular will get , that will give you a good idea how strong the mounts need to be
cheers Kaspa
cloudy - 17/3/08 at 08:04 AM
If you look closely you can see it's mounted with a G clamp to a temporary chassis rail! I'm a little offended you'd think I'd
leave it like that!
Alan B - 17/3/08 at 11:29 AM
Cloudy, I'm pretty sure Kaspa assumes you'll remove the clamp (as we all would). However, there is no other clue as to how the pedals will
be mounted..presonally I am pretty sure you will do something substantial, but without a being mind readers we have a duty in the interests of safety
to point out things like that.
As Martin points out a better picture would help too.
Please don't take offence....it's all meant as constructive observation (not even critisism, as we don't know your plan)
Looking really nice BTW
Lippoman - 18/3/08 at 08:10 AM
The pivoting is in the balance bar? Are the MCs moving smoothly?
More detailed pics showing the situation when it "jams" (preferrably from the top and side) would make troubleshooting easier, could be
geometry issues...
cloudy - 18/3/08 at 08:28 AM
What i'll do is wait till it's all pressurised and then get pics if it's still doing it....
James
COREdevelopments - 18/3/08 at 08:10 PM
james/cloudy what pedal box you using? i have a luego/obp one. and mine used to jam up when depressed. turned out it was the hole where the balance
bar pivots had distorted during welding. it was easy to fix just reamed it out. pedal now travels all the way smoothly. (please ignore me if this is
not the case)
hope this helps
atb
rob
[Edited on 18/3/08 by COREdevelopments]
cloudy - 20/3/08 at 11:06 PM
It's better now, it doesn't jam at least - will add brake fluid tomorrow...
James
Kaspa - 21/3/08 at 07:33 AM
sorry bloke i wasnt questioning your engineering i just didnt look at the big picture or totaly understand your question, i to have an OBP floor
mounted pedal box and it was sticking as well when first fitted, but a light ream with some emmry paper and some lube in the housing and bobs your
uncle, works extreemly well now
every thing else is looking good, you should be proud of yourself
Kaspa
cloudy - 23/3/08 at 11:39 PM
A disappointing day - I managed to get it onto the drive under it's own power but I'm having engine troubles - it's only running on 1
or 2 cylinders - whilst you can pull off the engine just dies a few seconds later. Suspect fuelling issues.
Here's the vid anyway:
http://www.digital-car.co.uk/wr4/mk2/video/firstdrive6.wmv
[Edited on 24/3/08 by cloudy]
neilj37 - 24/3/08 at 07:53 AM
Really like the look of your car but you need to re-think the brakes. Using your feet to stop the car al-la Fred Flinstone his going to hurt after a
while k
nitram38 - 24/3/08 at 08:51 AM
Your car is really cool
You seem to have a lot simpler chassis than mine and it appears to be more compact.
Maybe I shouldn't have looked at the atom so hard!
Seeing your car move has made me want to speed up a bit, but hopefully I will catch up as you have still got to dis-asemble it for painting.
Mine is in pieces so that I can finish the chassis and paint it.
Hopefully, this will be the last assembly before driving it!
cloudy - 24/3/08 at 10:27 AM
A lot of it is temporary to be able to test it, I've got to take a lot off now it works!
I'm sure you'll catch me up
cloudy - 24/3/08 at 03:20 PM
Twas the plugs causing the problem - I only had spark on one plug! Renewed all 4 as it needed doing anyway and she purrs again
James
cloudy - 24/3/08 at 06:39 PM
Right, now we are talking:
http://www.digital-car.co.uk/wr4/mk2/video/seconddrive.wmv
Snapped one of the cut and shut driveshafts but made a quick repair...

James
[Edited on 24/3/08 by cloudy]
[Edited on 24/3/08 by cloudy]
quinnj3 - 25/3/08 at 09:49 AM
nice.
its bound to feel good when you get to that stage.
COREdevelopments - 26/3/08 at 01:02 AM
nice, bet you are so tempted to just go for a blast down the road!!! whats with the earmuffs? dont you wanna hear it roar?! she sounds nuts.
good work i really like it.
Rob
Fred W B - 26/3/08 at 09:08 AM
Looking great!
You guys who build cars in single garages are heroes - don't know if I could keep up my enthusiasm in those conditions
Cheers
Fred W B
cloudy - 7/4/08 at 08:42 PM
I need a some advice on this one...
Trying to work out how to sort my cooling system. The bike stock has one water rad about 400mm x 350mm and one oil cooler about half this.
I like to keep things symetrical so was thinking about putting them as follows, but I don't like the idea of one having a fan and one not...
Any other good idea's where they could go? The water exits top left of engine and enters bottom left, the oil enters and leaves at the bottom of
the front under the exhausts...
I don't want to mount it at the front of the car due to the extra weight of coolant it would require...
Also bear in mind I'm planning to have the air intake between the seats atom stylee


[Edited on 7/4/08 by cloudy]
[Edited on 7/4/08 by cloudy]
nitram38 - 7/4/08 at 08:52 PM
The atom has a single rad at the front of the car as per the picture.
My R1 oil cooler is built onto the engine and pipes into the standard rad. Can't you come up with a similar set up?
Thinkautomotive do oil coolers that plumb into your water system.


Description
My rad on my front subframe:
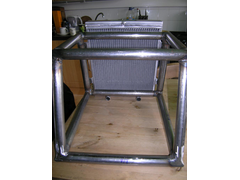
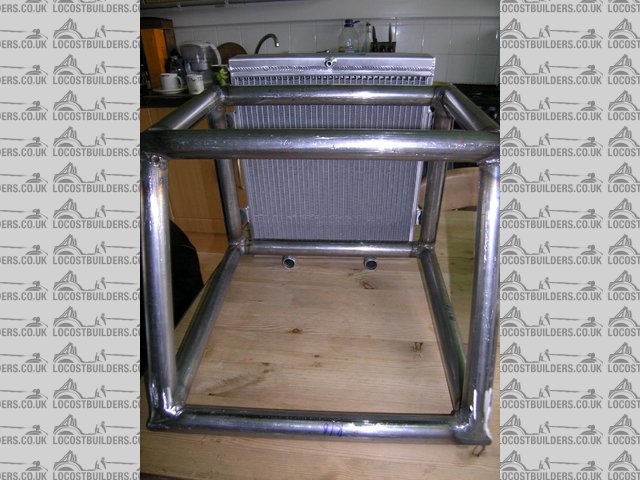
front subframe
[Edited on 7/4/2008 by nitram38]
Doug68 - 8/4/08 at 12:44 AM
The later GSXR-1100 lumps were water - oil cooled. The early ones were air - oil cooled.
If I were to replace the air to oil heat exchanger I with a water to oil exchanger then I'd want to really make sure it has sufficient cooling
capacity as these engines do rely on the oil for cooling. Particularly in a car where the engine is gong to get worked hard than it would in the
bike.
I like where the rads are positioned now, I'd build entry and exit ducts to protect them from road crap and make them work better though.
neilj37 - 8/4/08 at 06:50 AM
Personally I think mounting them to the side spoils the clean lines of the car.
I would either mount it at the front of the car as per the atom setup or somewhere around the back within the frame work and duct the air in.
nitram38 - 8/4/08 at 07:37 AM
Regarding oil and water temps, I know that this is slightly different, but every week I run the diesel generators at work.
We monitor the oil and water temps.
The oil temp (sump monitor) always matches the water temp (about 70oC) when the engine is flat out.
What temp does a bike engine water and oil differ?
Do they run the same or different?
[Edited on 8/4/2008 by nitram38]
Puk - 8/4/08 at 07:41 AM
James - How about a horizontally mounted rad above the diff, with a fan under it to move the air when stuck in traffic? If you can find an oil to
water heat exchanger then a single water rad sized to handle all of the heat losses could be used. I guess you'll need to relocate the fuel tank
though. Is there space to build a scrutineer friendly enclosure between the seat backs and the engine? Or perhaps between the engine and the diff and
offset from the center line (to avoid the chain).
cloudy - 8/4/08 at 10:34 AM
Another idea what about one of these one side?
http://www.rallydesign.co.uk/product_info.php?cPath=340_367&products_id=2261
and then one the same size the other side for the water?
I presume you can't "overcool" the oil?
I quite like the side mounted ones as it helps it look a little less odd from the front 3/4 where the body tails off at the bottom... I had thought of
making a big air duct atom shape between the seats and then splitting this between the engine intake and a horizontal rad as suggested by Puk
Puk - 8/4/08 at 10:53 AM
quote:
Originally posted by cloudy
I presume you can't "overcool" the oil?
Is there such a thing as an oil flow thermostat?
andyd - 8/4/08 at 03:55 PM
quote:
Originally posted by cloudy
I presume you can't "overcool" the oil?
Oil must have a working temp though to be any use to the engine? No expert on the matter but I'd say for optimum lubrication there could be such
a thing as too cold... although too cold for oil might be pretty damn hot!
Trying to bypass the cooler in some way when it's below a certain temp might be worth investigating but I'm sure an oil expert will be along
shortly to confirm if it'll be an issue or not.
hughpinder - 8/4/08 at 05:28 PM
I have a book of tuning 4 stroke engines that reccommends oil temp should be 95 to 110 degC. Above 130 - too hot and breaks down, below 95 the oil is
thicker and does not lubricate as well, and can rob a small percentage of your engine power.
Engine is usually more efficient if water is set cooler (70 degree thermostat), but can also run water temperature up to 110 (as its under pressure).
Regards
Hugh
SeaBass - 15/5/08 at 11:52 AM
Another consideration is that the placement in the pic is directly in line of anything that gets thrown out from the front wheels...
I know my wing protectors get hit a lot there!! Not sure I'd like an ally rad to be blasted in that way.
quote:
Originally posted by cloudy
cloudy - 15/5/08 at 01:36 PM
That is a good point actually...
andyd - 15/5/08 at 02:15 PM
Could you not use the airbox for all purposes or do you think it'd have to be huge to cope with all three things?
cloudy - 18/5/08 at 09:02 PM
Just a pic from yesterday - roll bar and rear suspension is in

andyd - 18/5/08 at 09:12 PM
Damn fine work there my good man.
I bet you're itching to get out there for a blast aren't you?!
nitram38 - 18/5/08 at 09:25 PM
That looks
cloudy - 18/5/08 at 09:41 PM
quote:
Originally posted by andyd
Damn fine work there my good man.
I bet you're itching to get out there for a blast aren't you?!
I may have already done so - resulting in soiled underwear!
Benonymous - 19/5/08 at 01:30 AM
Awesome work Cloudy The finished car will be something to be proud of.
Gakes - 19/5/08 at 06:36 AM
Cloudy, I'm sorry if u thort i was copying ur design, I never new how similar our frontal section is, where the suspension mounts are.
Gakes - 19/5/08 at 06:36 AM

[Edited on 19/5/08 by Gakes]
sgraber - 19/5/08 at 04:19 PM
I'd like to throw my opinion in here about a few things.
#1 - the car is abso-f-ing-lutely GORGEOUS. I think it ranks in the top 10 of my all-time best looking list. It's just tubes for godsake, but the
proportions are just right and don't need panels to cover it up. So congrats on hitting my g-spot cloudy.
#2 - It was just mentioned about stones and other items being thrown up that might impact your cooling and that is a valid point. A friend of mine
spent a week recovering from a stone that impacted his left gonad while driving an Atom at 80mph. He tells me that he will never drive in it again as
he seriously thought he had lost the nad. You may want to consider the direction that stones can leave the tyres?
Might I suggest mocking up in 3D the coolers in a duct above the engine F1 style above the seats. Air blows down across the coolers then flows across
the engine and forces the air out the back. The shape of the inlet might be rectangular and sit along the top of the rollbar?
cloudy - 19/5/08 at 04:49 PM
quote:
Originally posted by Gakes
Cloudy, I'm sorry if u thort i was copying ur design, I never new how similar our frontal section is, where the suspension mounts are.
I was only kidding with you - yours definately has it's own style, looking forward to see it for real...
James
cloudy - 19/5/08 at 04:52 PM
#1 Coming from you - with your beauty of a car I consider that high praise indeed - thankyou!
#2 That sounds really painful! I'll certainly take that into account! perhaps impact resistant clear polycarb sides would increase safety in the
cockpit...
#3 Ive managed to move the fuel tank to behind the seats in an effort to increase safety and reduce the C of G. Hopefully this allow for more space at
the top/back for cooling - Will mock something up....
quote:
Originally posted by sgraber
I'd like to throw my opinion in here about a few things.
#1 - the car is abso-f-ing-lutely GORGEOUS. I think it ranks in the top 10 of my all-time best looking list. It's just tubes for godsake, but the
proportions are just right and don't need panels to cover it up. So congrats on hitting my g-spot cloudy.
#2 - It was just mentioned about stones and other items being thrown up that might impact your cooling and that is a valid point. A friend of mine
spent a week recovering from a stone that impacted his left gonad while driving an Atom at 80mph. He tells me that he will never drive in it again as
he seriously thought he had lost the nad. You may want to consider the direction that stones can leave the tyres?
Might I suggest mocking up in 3D the coolers in a duct above the engine F1 style above the seats. Air blows down across the coolers then flows across
the engine and forces the air out the back. The shape of the inlet might be rectangular and sit along the top of the rollbar?
Gakes - 19/5/08 at 06:03 PM
Cloudy, how was the test drives so far, hows the handling and acceleration?
how much does she way?
cloudy - 19/5/08 at 06:10 PM
Haven't weighed it recently but three people can lift it off the deck and move it around
Handling I think can be summed up as lairy!
COREdevelopments - 31/5/08 at 07:01 PM
hey any more progress? i love the pic on page 34 of the car it looks great with you, keep up the quality work!!
Rob
cloudy - 14/6/08 at 03:22 PM
Thanks to Wadders for the design of this part. I think it's a really good solution, for a stronger, lighter cycle wing mount.
I've cut the holes in the carbonmods wings (That was fun!) and mocked up the mount. Just need to jig up the position of the wing and then make
it!


[Edited on 14/6/08 by cloudy]
Fred W B - 14/6/08 at 07:55 PM
Re positioning the wings, I really like the trick I saw on American chopper of laying a hose (would use two on a car) on the tyre and putting the wing
on top of it. Select the hose diameter to set the gap to the size you want.
Cheers
Fred W B
cloudy - 14/6/08 at 08:40 PM
You'll laugh - I'm using a christmas rope light to make the gap! Was the only thing the right size
Alan B - 15/6/08 at 07:18 PM
Great minds think alike-ish...
I thought I better show what I'm doing before anyone says I'm copying....
The diference is that I'm going to use flat brackets bonded under the wing bent 90 down and then bolted to the stay.
The rear stay isn't trimmed to length yet, but you get the idea.


cloudy - 15/6/08 at 08:40 PM
The trouble I found when building prototypes, was even with 5mm thick bar there was unacceptable flex at the outer edge! I've got a larger air
gap by the looks of things, so perhaps this isn't possible on yours - but i'd recommend tube if possible?
Alan B - 15/6/08 at 08:53 PM
I guess it depends what is unacceptable flex....many stays across the wheel arch part are only around 3mm (it seems from my research)...I was looking
at using 1/4" (6.35mm) Ali....
Of course the more gap you have the deeper the section you can use which will stiffen things up considerably...I was going for the minimum clearance
for looks.
It's all fun though isn't it?
cloudy - 15/6/08 at 09:51 PM
Yup! I imagine they create a fair few kilos of downforce at triple figures.... Anyone ever taken any measurements?
James
nitram38 - 16/6/08 at 10:10 AM
cloudy, I have two sets of those carbon mods wheell arches and they are a copy of the catering van aero ones.
They are supposed to reduce lift and so stay on!
I put two 8mm bushes in the top of my uprights to pick up my wheel arches. This means that the stays will be nice and short.
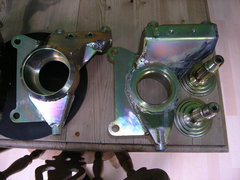

Description
[img][/img]
Alan B - 17/6/08 at 05:30 PM
This is mine a little more complete...should be self-explanatory.
The actual top brackets will be ali and bonded to the wheel arch..the ones shown are steel prototypes. I may possibly come off the top of the upright
with a pair of bracing members to the stays if it needs it.

cloudy - 19/6/08 at 09:06 PM
Finished them off today - solid as a rock


[Edited on 19/6/08 by cloudy]
Alan B - 19/6/08 at 10:12 PM
Sweet.
Look good.
Omni - 19/6/08 at 11:04 PM
Cloudy, that is one serious bit of kit your are building. Well done.
Can I ask how much your build has cost you?
Thanks,
O
nitram38 - 20/6/08 at 07:40 AM
Cloudy I like the mounts for the arches.
Seeing how mine are the same ones, a bit of copying is coming up!
cloudy - 20/6/08 at 07:58 AM
Well I copied Wadders - so copy away!
As for how much it's cost - I don't dare go through the receipts I'm guessing in the 5-6k region so far...
cloudy - 28/6/08 at 09:04 PM
Some work on the dash today, have built this in ally, the carbon fibre and buttons are photoshopped in. Excepting the radiusing/edging required round
the edge can anyone see any SVA problems?

James
cloudy - 8/7/08 at 06:18 PM
Wow it's quiet in the middy section at the moment!
Ah well, a little more progress from me:
The rear cycle wing mounts are done


Alan B - 8/7/08 at 06:58 PM
quote:
Originally posted by cloudy
Wow it's quiet in the middy section at the moment!.......
Quiet because some of us are building rather than theorising.....
That'll get 'em going.....
quinnj3 - 8/7/08 at 07:56 PM
Cloudy i don't know how you have the drive and perseverance to push the car along that quickly. What's your secret? I spend most of my
time on forums and the net 'researching' and very little time down in the garage.
forgot to add cars looking great.
[Edited on 8/7/08 by quinnj3]
carpmart - 8/7/08 at 08:29 PM
I have to say what an impressive project you have there! I'm based in mid beds, where abouts are you?
iank - 8/7/08 at 08:30 PM
quote:
Originally posted by quinnj3
Cloudy i don't know how you have the drive and perseverance to push the car along that quickly. What's your secret? I spend most of my
time on forums and the net 'researching' and very little time down in the garage.
forgot to add cars looking great.
[Edited on 8/7/08 by quinnj3]
I think you've answered your own question there... get in the garage if you want to see progress.
p.s. I'm just as guilty, though pretend I have the excuse of working away from home and doing stupid things like playing with the kids at the
weekends.
Delinquent - 8/7/08 at 09:59 PM
Hats off to you mate, I have to say that this is probably the best looking exoskeleton type car I've seen - and that includes the atom.
nitram38 - 9/7/08 at 02:55 AM
I also have to say that the chassis is a lot simpler than my car and I wish that I had thought of it!
I am now trying to get the floor pan made which if you look at the atom, has some quite alkward angles. Your simple flat floor pan would have made
life easier for me.
Gakes - 9/7/08 at 06:48 AM
Forgive me cloudy if my design looks similar, but i too went the flat floor root coz of time and simplicity
cloudy - 9/7/08 at 07:59 AM
I think the atom's floor design is a nice touch - suits the shape of the main tubes, not sure it's any good for the aerodynamics mind you!
jabbahutt - 11/7/08 at 09:43 AM
As said before, that is one good looking car.
You are to be seriously congratulated on producing something that looks that good and isn't even finished.
I hate to think what the finished item will look like, starting to turn slightly green with envy just thinking about it.
all the best with the remainder of the build
cloudy - 19/7/08 at 09:07 PM
I think I already know which i'm going to go for, but do you guys prefer the lights on the left or the set on the right?

James
Sven - 19/7/08 at 10:31 PM
Left, deffo ..
Omni - 28/7/08 at 10:13 AM
Left
COREdevelopments - 13/8/08 at 06:53 PM
james any updates? hows it looking?
atb
Rob
cloudy - 29/8/08 at 10:27 PM
I've been involved with Scrapheap series 11 for a month - so I've not even touched the car! Will get back to installing the harness'
next week
James
cloudy - 29/8/08 at 10:31 PM
I've been involved with Scrapheap series 11 for a month - so I've not even touched the car! Will get back to installing the harness'
next week
James
cloudy - 29/8/08 at 10:35 PM
I've been involved with Scrapheap series 11 for a month - so I've not even touched the car! Will get back to installing the harness'
next week
James
Doug68 - 31/8/08 at 07:40 AM
Scrapheap Challenge? I've been doing that for the last year and half ha ha
Doug68 - 31/8/08 at 07:45 AM
Scrapheap Challenge? I've been doing that for the last year and half ha ha
jabbahutt - 5/9/08 at 02:51 PM
set of lights on the left get my vote. When are we going to get to see more photos I'm really interested how it's coming along.
Omni - 11/9/08 at 12:26 AM
Update please
O
Enne_aitch - 11/9/08 at 02:55 PM
wow that was a quick hour lol... just read your topic through.
man i love your vision. very cool.
car looks awesome.
cloudy - 14/9/08 at 10:56 AM
For some reason I'm working on a scrapheap project again!
Hopefully can get back to her in a month....
FUORISERIE - 19/9/08 at 09:11 PM
quote:
Originally posted by cloudy
I think I already know which i'm going to go for, but do you guys prefer the lights on the left or the set on the right?
James
Your car looks great !, I like the rear lights on the left
Cheers
Italo
Omni - 16/10/08 at 11:33 AM
This thread is useless without updates
cloudy - 16/10/08 at 08:23 PM
I've finished my five minutes of fame, so back to the grindstone. I have some STUNNING projector lights to fit from furore, will get some
pictures and a full review soon!
Omni - 16/10/08 at 10:24 PM
quote:
Originally posted by cloudy
I've finished my five minutes of fame, so back to the grindstone. I have some STUNNING projector lights to fit from furore, will get some
pictures and a full review soon!
Good to have you back! Need to see the car updated
O
COREdevelopments - 20/10/08 at 05:42 PM
ye cant wait to see some more progress.
rob
cloudy - 20/10/08 at 06:35 PM
Two options, do I....
Send chassis away for blast + powder coat
Make a homebuilt blasting/painting tent and do it conventionaly at home with spray gun?
James
Omni - 20/10/08 at 06:37 PM
Option A
O
cloudy - 20/10/08 at 08:14 PM
Trouble is the cost and the fact I can't make any changes when it's done - and I see this as an evolving project...
nitram38 - 20/10/08 at 08:25 PM
I got slated for what I did to my chassis but I don't care!
I hand painted mine with Epoxy 121 paint which is a two pack that is impervious to salt/acid/brake fluid etc and does not chip/flake.
It looks rough, but at least I won't be fretting everytime a stone hits the car.
I figure that if you buy a new car, put the first dent in it with a hammer so that you can relax when you put it in a car park!
Being a rough finish, I will be able to repaint any damage without it noticing.
If you use powder coating, I guarantee it will chip/rust in a few short years and p*ss you off.


Description
cloudy - 20/10/08 at 08:48 PM
Half the powder coat has come off my wishbones already and I haven't even driven it!
Can that epoxy paint be sprayed?
James
ZEN - 20/10/08 at 08:55 PM
In the shippyard that I'm working the 2 component epoxy paint is used for painting transoceanic ships. And yes it is sprayed.
I guess you coud polish it for a smooth aperance.
[Edited on 20/10/08 by ZEN]
cloudy - 20/10/08 at 09:21 PM
sounds like a great middle ground!
Nitram where did you get hold of yours?
James
nitram38 - 20/10/08 at 10:07 PM
quote:
Originally posted by cloudy
sounds like a great middle ground!
Nitram where did you get hold of yours?
James
www.rust.co.uk
Benonymous - 22/10/08 at 02:27 AM
+1 on the powercoating. Avoid. I had a chassis done in it once and it cracked and peeled off before the thing was even built. Almost impossible to
repair too.
Go with an epoxy (lots around) or an enamel. The important part is the bond so the chassis will HAVE to be etch primed after sandblasting.
Powdercoat looks good to begin with but if it's done wrong it's useless. If the coaters heat the chassis too much the coating becomes
brittle and will flake off and chip really easily.
Coating over bare steel does not achieve a bond either so even if the coating comes out right, its still not really stuck to the metal.
nitram38 - 22/10/08 at 07:10 AM
Epoxy 121 bonds straight on bare steel without a primer. That was another reason I choose it.
cloudy - 22/10/08 at 09:01 PM
Is there a choice of colours? Or any colour long as it's black?
James
nitram38 - 23/10/08 at 04:55 AM
Although it doesn't say so, they do different colours, but not that many!
cloudy - 26/10/08 at 01:30 PM
Here's a few pics of the new projector headlights, (available from Russ of furore cars)
Extremely pleased, and have a good UK beam pattern, construction is high quality and solid - much nicer looking than the standard 7 style
I'm not 100% sure about the location of them, I'd prefer them lower - but they are at the minimum height for SVA. Maybe I'll move them
further up the body... Comments on the positioning welcome!


[Edited on 26/10/08 by cloudy]
akumabito - 26/10/08 at 03:48 PM
Integrate them in the front fenders for swiveling headlights?
nitram38 - 26/10/08 at 07:51 PM
Cloudy, they look the dogs!
Just remember to check that they are no further than 400mm from the outside of your cycle wings (the widest part of the car).
They look a bit too far inboard but I could be wrong.
[Edited on 26/10/2008 by nitram38]
cloudy - 26/10/08 at 07:59 PM
That only applies to the dipped beam I belileve, which is mounted on the outside - within spec... I may be wrong though!
James
nitram38 - 26/10/08 at 08:38 PM
quote:
Originally posted by cloudy
That only applies to the dipped beam I belileve, which is mounted on the outside - within spec... I may be wrong though!
James
I just checked the sva manual and I can't believe what it says.
Under each heading of distance/height etc for main beam, it says "No requirement"
So judging by that comment they can be anywhere!
cloudy - 26/10/08 at 10:44 PM
That's how I read it too...
It's only the dipped that is restricted!
Delinquent - 27/10/08 at 11:30 AM
I love the lights, but not sure on the position - looks a little, erm, goofy!
I presumed they would sit further up, bit like this...

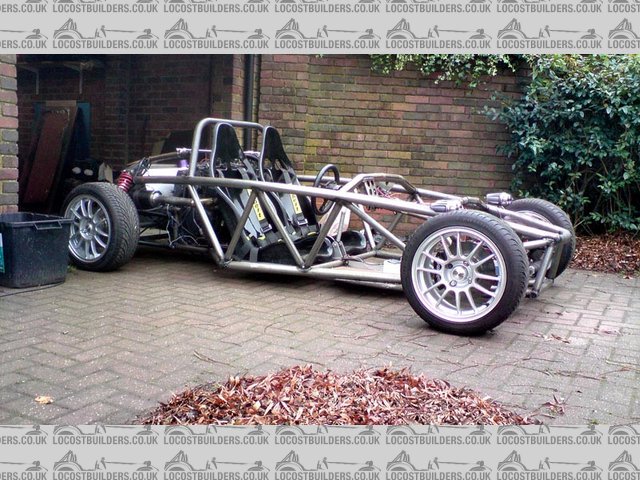
Description
cloudy - 27/10/08 at 12:28 PM
As you've drawn was the original design, and I agree - I prefer that to the current location
I think I'll move as shown until after SVA at least...
BenB - 1/11/08 at 01:24 PM
quote:
Originally posted by cloudy
I've been involved with Scrapheap series 11 for a month - so I've not even touched the car! Will get back to installing the harness'
next week
James
I thought scrapheap series 10 was the last one?? Was that just a vicious rumour spread by Bob?
cloudy - 1/11/08 at 02:30 PM
There certainly is another series
cloudy - 9/11/08 at 09:52 PM
Slowly progressing with the cooling system...
Dyna 2000 ignition, coils and leads fitted, and another set of carbs as the others were playing up
You can see the two oil coolers, the 34 row one is being used as the water radiator - we'll see how that goes , rather experimental...


James
designer - 9/11/08 at 11:32 PM
Are the radiators too near the exhausts?
cloudy - 10/11/08 at 12:05 AM
No - or I wouldn't have put them there
In all seriousness, yes - but the exhausts will be either wrapped, or a heatshield will be made to protect the rad
The pictures are deceptive there's a good 4-5inch gap between the two, and most of the heat is convected upwards
James
[Edited on 10/11/08 by cloudy]
geoffreyh - 10/11/08 at 10:30 AM
Wouldn't you get better air-flow if you turn them 90°?
Geoff
cloudy - 10/11/08 at 11:58 AM
Yes, but it looks rubbish - There will be ducting to pull air in and force it through
James
cloudy - 14/11/08 at 08:24 PM
I've moved the lights further up
Have also fitted wing mirrors, and front indicators...
Will get some pictures on the ground again in the light over the weekend along with a full review of the furore lights

James
[Edited on 14/11/08 by cloudy]
cloudy - 15/11/08 at 01:37 PM
I've put the fuel tank behind the seats, but I've got two problems -
a) the proximity to the exhausts - is this something to be concerned about?
b) The seat belt lower mounts are directly under the engine raising up slightly, so the tank would have to move up about 2 inches from this position
(It can't - would have to have a tank made)
So my questions are, do I have a tank made to fit here, or make a bar to keep the belt mount down (I can't move mounts forward as there is no
strong structure) or do I move the tank into the space above the diff. The last options sounds easy - but will raise the CofG and move more weight
over the rear axle...


stevebubs - 15/11/08 at 02:25 PM
Personally I don't like the tank in it's current location....
If you had a bit more room, I'd suggest perhaps looking at an MGF tank but as it stands, I think above the diff is the best option...
*but* if you *do* want to keep it in that location, I'd have a talk to Bryn@alifabs about a custom tank ... I was pleasantly surprised at the
cost of mine...
I'd also think about some sort of heat shroud to go between the exhaust / engine and tank...
[Edited on 15/11/08 by stevebubs]
cloudy - 15/11/08 at 02:32 PM
Another idea is to have two tanks, shaped to fill each side,with a 45 degree end to match the chassis, meaning it clears the exhausts better, and
doesn't interfere with the belts...
Steve, any contact details for alifab?
James
[Edited on 15/11/08 by cloudy]
nitram38 - 15/11/08 at 02:46 PM
It's a pity you are not near me, I got a mate to make mine from a pattern that I made in cardboard.
I also agree about some protection. Even if you get warm fuel it will affect your performance.
I have fitted a Aluminium plate with some of that heat blanket (not cheap).

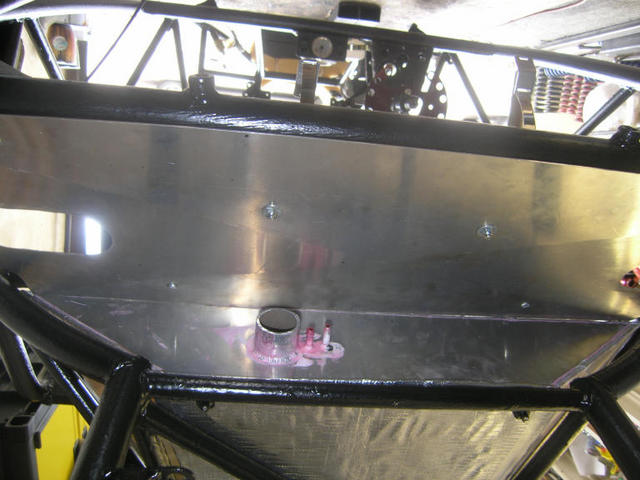
Description
[img][/img]
You can see the tank in front of the engine, and I have an aluminium firewall between the tank and my seats. I also have a plumbed extinguisher. I
have seen and met a few motor racing burns victims, so I take no chances!

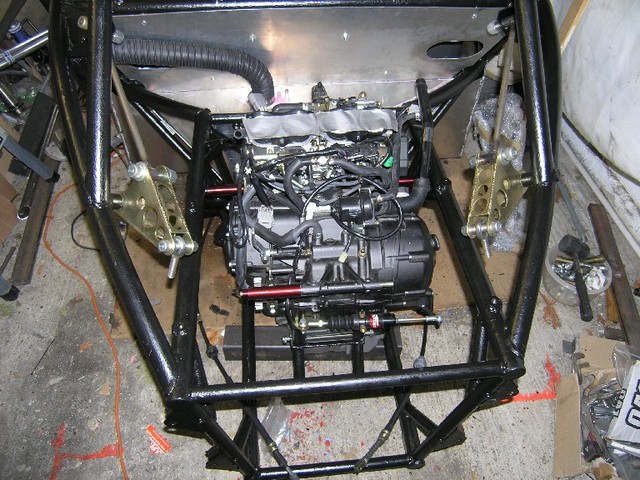
Description
cloudy - 15/11/08 at 03:15 PM
Nitram- looks like a good solution - to what is basically the same problem,
here's what the 3D model says how tanks should be shaped, looks like a good capacity too..

James
stevebubs - 15/11/08 at 04:56 PM
http://www.allyfab.co.uk/
Made me a near - mm perfect tank for my Fury based on a set of diagrams for less than a smaller standard tank from the manufacturer...
stevebubs - 15/11/08 at 04:59 PM
Just one other thing to consider - Nitram's tank is outlined by a kind of cradle which (I should imagine) gives the tank some protection from the
engine in a rear-end impact
cloudy - 15/11/08 at 06:39 PM
Also weighed it again today, with fluids - no fuel 340kg. Few more kilos to be added with the cycle wings - but generally happy...
Hopefully a later weight reduction excercise on the rear diff, driveshafts and CV's will get this close to the 300kg target... They are seriously
overengineered!
cloudy - 16/11/08 at 04:02 PM
Added up the project receipts for a laugh! I think it's surprisingly low actually, Ł2500 all in so far...
James
COREdevelopments - 19/11/08 at 09:01 PM
quote:
Originally posted by cloudy
Added up the project receipts for a laugh! I think it's surprisingly low actually, Ł2500 all in so far...
WOW that is seriously low for a one off car!!
especially at the stage you are at!
when's it going to make an appearance at a show? i am so eager to see it in the flesh, and can you put my name on the list for a chassis?
please?
Atb
Rob
cloudy - 19/11/08 at 09:50 PM
Sooon! Promise!
The diff has been rebuilt with one of the Westgarage covers, ready for installation

nitram38 - 19/11/08 at 10:11 PM
The diff carrier looks
Any pictures of it before you put it on?
I have a welded cover that I have never liked
cloudy - 23/11/08 at 05:32 PM
Le bonnet

paul the 6th - 25/11/08 at 02:46 PM
speechless
nitram38 - 25/11/08 at 06:12 PM
quote:
Originally posted by paul the 6th
speechless
is a word
Cool is another
TimC - 29/11/08 at 07:58 PM
Did you say that you're 22?
Holy sheesh - but I suppose as Wenger would say, if you are good enough you're old enough.
Unbelievably impressive work.
jabbahutt - 1/12/08 at 08:35 AM
as ever it's looking stunning!! just don't ask how envious I am of your skills and natural aptitude
cloudy - 1/12/08 at 05:01 PM
Just an interesting shot showing the side by side on the 3D model, versus what's complete so far - rather similar

nitram38 - 1/12/08 at 05:39 PM
Wow! You built two at the same time!
Gakes - 1/12/08 at 06:10 PM
youve done very well....some just have a natural flair. cant wait to see it painted up
COREdevelopments - 1/12/08 at 10:14 PM
looks spot on james, just love the stance of the car, looks fast just sitting there!!
Rob
cloudy - 2/12/08 at 03:03 PM
I need to brace the rear suspension box, but the optimal tubes pass about an inch and or so above the exhaust just before it reaches the can... Is
this just going to destroy any coating I try on the tube? Could heat reflective tape be used on the underside of the tube?
James
yahshuatwo - 2/12/08 at 05:30 PM
love it! Dynomite! Need plans to purchase so I can build one in the USA.
cloudy - 5/12/08 at 04:33 PM
Well I've just taken the plunge and bought 5 litres of Epoxy mastic 121 as used on the motaleira, I'm going to try and spray it with an HVLP
gun - hopefully it works!
James
Hammerhead - 6/12/08 at 01:06 PM
do you think that it will be hard to spray in cold temperatures?
cloudy - 6/12/08 at 01:26 PM
I have got together some parts to make myself a heated spray booth (miles of platic sheet and an oil heater )
I wouldn't even attempt to spray at ambient temps at the moment
[Edited on 6/12/08 by cloudy]
cloudy - 6/12/08 at 10:32 PM
Spent today taking every last component and bolt off the chassis ready for blasting + painting...
First time i've had the complete chassis on it's own - Can just about pick it up with one hand
cloudy - 7/12/08 at 06:13 PM
Spent today cleaning up the chassis, and tidying any welds that needed it....
Will continue this tomorrow, I'm in two minds as to whether the rails that go lengthways up the middle of the chassis (the top one is in place
you can see the mounts for the others) Should be made of steel and therefore can be welded to the chassis, there is a visible lack of strength down
the middle there and the rails are just T6 ally with 3 M6 bolts each end....

cloudy - 12/12/08 at 04:49 PM
Painted the bottom in my little indoor tent!!
Spraying this epoxy mastic 121 seems to be the best way to apply, its so sticky it's like warm toffee! I'm not surprised nitram gave up
trying to get a smooth brushed finish!
Required 10% thinners, they recommend 15% maximum and the paint flow on the gun turned up to max, running at 80psi!!


locoR1 - 12/12/08 at 04:56 PM
Looking James cant wait to see it finished!
Don't forget you owe me a ride
cloudy - 13/12/08 at 03:51 PM
I'll get some when its dry, if you spray a dry edge you can give it a nice textured finish, rather like a textured powder coat, spraying a wet
edge gives a satin finish but with orange peel - Both I think are actually quite nice on tube, I've tried to spray the top coat dry, as this will
hide imperfections and knocks far better...
James
nitram38 - 13/12/08 at 05:23 PM
Naw.....just brush it on
cloudy - 18/12/08 at 07:27 PM
Chassis is still cooking under some sheet, have managed to get it up to 40 degrees even with the sub zero temps in the garage
I'm really happy with the finish - and it should be really durable if I can get it to dry well in these cold conditions...
My air riveter arrived today - It makes the most satisfying noise in the world! Kerchunk PSSSSHHHHH
Anyone have any recomendations for where to get closed rivets for the floor panel - what size and length should I be after?
James
[Edited on 18/12/08 by cloudy]
tomprescott - 28/12/08 at 06:12 PM
I think it looks absolutely awesome with the roll bar style, only reservation I would have is that it might end up looking too short and aggressive,
if it was mine I would build it long and low, like a cross between a sand rail and one of those american drag racers. But to be honest i think it
looks great and it'll probably start to look even better when the frame is full!
cloudy - 2/1/09 at 07:38 PM
Waiting for bloomin rivets to arrive - I hate this time of year where everywhere is closed!
The floor laid out...

[Edited on 2/1/09 by cloudy]
cloudy - 7/1/09 at 09:06 PM
More waiting... Have corner pegged the panels ready to draw out the rivet locations and predrill them...
Using my new 8.1mp phone for pics - SE C905, I recommend it highly..


[Edited on 7/1/09 by cloudy]
pocket rocket - 7/1/09 at 09:22 PM
that is a work of art! amazing work!
can't wait to see it out and about at some show's, its going to pull a big crowd!
cloudy - 11/1/09 at 12:17 AM
Right, I've spent from sunup to midnight in the garage today - and finally I've made some progress !!
Fitting the floor:


Finally the right way up with some of the wishbones fitted.... (The red glow is a reflection from the heat lamp )


[Edited on 11/1/09 by cloudy]
COREdevelopments - 11/1/09 at 07:57 PM
finish looks great james! keep it up.
Omni - 11/1/09 at 08:11 PM
AWESOME as always James
WELL DONE MATE.
O
cloudy - 11/1/09 at 09:20 PM
Another long day - lots of pics for you!


[Edited on 11/1/09 by cloudy]
Omni - 11/1/09 at 09:27 PM
Blimey! You are soooo nearly done. You gonna make SVA?
O
cloudy - 11/1/09 at 10:00 PM
Should be able to, long as I keep the pace up...
neilj37 - 13/1/09 at 10:48 AM
Most important question is when can i have one
nitram38 - 13/1/09 at 05:38 PM
quote:
Originally posted by neilj37
Most important question is when can i have one
Probably when you build one!
COREdevelopments - 13/1/09 at 07:50 PM
wow your progress is great! its really coming together! cant wait to see it at the shows, stoneleigh maybe?
Rob
carpmart - 13/1/09 at 09:07 PM
That really is coming together in an impressive way now!
Keep up the good work!
cloudy - 15/1/09 at 08:14 PM
I have decided the epoxy 121 is NOT the one to go for, it's marking at the slightest hint of contact with anything - I don't forsee it
lasting long on the road
James
nitram38 - 15/1/09 at 08:32 PM
That is why I brushed it on.
I had to remove some to weld a bracket on and it is tough stuff. I had to burn it off to clean the metal enough to weld.
Tough but shows scuffs.
cloudy - 15/1/09 at 08:41 PM
I've sprayed a textured matt finish Martin, it should hide scuffs fairly well - I dont think its the application method...
Parts that were baked in the oven seem far tougher - so i'm hoping a day in strong sunlight should get the paint temp up enough to harden it
further...
James
nitram38 - 15/1/09 at 09:00 PM
It is not the application method I am on about, it is the ability to touch up the paint with a brush without anyone noticing. On a smooth paint job,
it will show.
I still like how tough this paint is and after your car has been on the road a while, you will probably like it too.
cloudy - 16/1/09 at 11:57 AM
Well a screwdriver I baked - I had to use a hammer to knock the paint off - so I'm hoping the chassis will eventually set to the same...
James
COREdevelopments - 16/1/09 at 07:07 PM
as for your paint issue, if you say you have sprayed a textured finish, you would be able to re-spray any scratches and get a decent blend in as its a
matt.
both yours and martins build look awesome.
rob
BATHO - 16/1/09 at 08:59 PM
car looks great, are you thinking of producing this? I think you should!!!
cloudy - 21/1/09 at 10:12 AM
There might be plans to do so, depends how SVA + road trials go...
The big day arrived today - I put in my SVA1 form, applied for a date in about 4 weeks, so the heat is on!
James
cloudy - 21/1/09 at 09:49 PM
Finished making a template fuel tank from steel to send to allyfab, There will be a pair of these giving just over 25 litres in total (5.5gallons) -
This should be enough I think


[Edited on 21/1/09 by cloudy]
Valtra - 22/1/09 at 02:07 AM
Don't know what to say . Just stumbled on this thread and spent a couple of hours skipping though it .
I firmly believe you must be one of the greatest natural talents off all time .
Colin Chapman
John Barnard
Adrian Newey
You
Etc etc
MK9R - 22/1/09 at 07:52 AM
only just seen this, awesome!!!!!
cloudy - 25/1/09 at 04:42 PM
Wiring is pretty much done, and have modified the Photon lights with an LED sidelight...


[Edited on 25/1/09 by cloudy]
nitram38 - 25/1/09 at 06:14 PM
I need to get my finger out!
I've still got loads to do!
Very nice work James
suparuss - 25/1/09 at 07:14 PM
im very impressed with your build! i can remember you starting it a bit before i dissapeared, i cant believe you are almost finished! very nice work,
well done i hope you pass the sva.
Russ.
Valtra - 25/1/09 at 07:45 PM
quote:
Originally posted by suparuss
im very impressed with your build! i can remember you starting it a bit before i dissapeared, i cant believe you are almost finished! very nice work,
well done i hope you pass the sva.
Russ.
Another monumental effort ....we are not worthy etc etc
body work photos are mid blowing
cloudy - 26/1/09 at 06:50 PM
Yet more wires fitted today, I think aside from the temp and speedo sensors it's all done. The speedo hall sensor I will run down screened cable
which I will chassis ground, It's a KOSO unit so can be rather flaky..
Had a bit of a nightmare with my SVA paperwork which I sent last tuesday on RM recorded 1st class, the tracking number said it hadn't been
delivered still this morning, called SVA office and they had received it weds - tracking system must have a problem...
Not sure how long to expect to wait for the call saying the details have been passed to the SVA test centre?
James
FUORISERIE - 26/1/09 at 09:26 PM
quote:
Originally posted by cloudy
Wiring is pretty much done, and have modified the Photon lights with an LED sidelight...
[Edited on 25/1/09 by cloudy]
great pictures cloudy...!!, are those aftermarket front mounted lights ? or are they bespoke ?
Cheers
Italo
nitram38 - 26/1/09 at 09:30 PM
James, you mentioned an Led sidelight.
Is that in the lamp housing?
Any info, pictures of this?
I am planning on using the lucas landrover style sidelights for mine.
cloudy - 26/1/09 at 09:44 PM
Italo, the lights are "Photons" available from Russ bost of this forum
Martin, the back of the directing lens has two manufacturing flats, I put a 5mm hole through one of these and epoxied a 8000mcd megabright LED in it -
It's in the high beam unit so all 4 lamps are illuminated during normal driving - They are not massively bright but have the option of adding a
second LED in each if SVA needs
James
nitram38 - 26/1/09 at 09:47 PM
Will the led's survive the heat of the halogen lamps?
Just as an aside, your dipped beam must stay on when you put your main beam on on twin light setups.
On single lights this does not apply
[Edited on 26/1/2009 by nitram38]
cloudy - 26/1/09 at 10:03 PM
Bugger! The sierra switches dont do that - no problem i'll just wire the main beam relay signal onto the dipped so they are both forced to fire
together - is this stated in the sva manual anywhere?
I bench tested the high beams for half an hour with the LED only becoming lukewarm, there isn't much light hitting it
nitram38 - 26/1/09 at 10:08 PM
It is definitely an sva rule.
At least you found out now!
cloudy - 26/1/09 at 10:31 PM
The only mention I can find is on section 9.1 page 4 where it states
(If the lamp is of a gas discharge type)
dipped beam remains on when the mainbeam is on
along with other rules such as must have a washer system..
Presumably that only covers HID lights?
Can you explain where it's stated?
James
[Edited on 26/1/09 by cloudy]
nitram38 - 26/1/09 at 10:45 PM
James......Oops
I have just spent half an hour re-reading and it looks like you are right.
Sorry to give you a heart attack!
cloudy - 26/1/09 at 10:52 PM
I may go armed with some electrical tooling just in case! There is a case for it I suppose as there is a momentary point during the relay switchover
where the lights are off, though only for a tiny fraction of a second....
James
nitram38 - 26/1/09 at 10:54 PM
I'm still going to wire mine so that they are both on.
cloudy - 26/1/09 at 11:00 PM
I think I will too, if I can simply jump across the relays....
James
Doug68 - 27/1/09 at 06:19 AM
What instrument panel is that? I can't see it referred to in the thread.
It looks really good I'd like to investigate them further.
Thanks,
[Edited on 27/1/09 by Doug68]
cloudy - 27/1/09 at 09:11 AM
It's a KOSO RX1N
cloudy - 29/1/09 at 06:00 PM
Wahoo, VOSA have cashed my SVA cheque - hoping for the call any day....
James
Valtra - 29/1/09 at 09:59 PM
quote:
Originally posted by cloudy
Wahoo, VOSA have cashed my SVA cheque - hoping for the call any day....
James
When the phone call comes your stomach will instantly drop and your heart will pound , as you realise how little time you have to do a million and one
jobs . The very best of luck to you
cloudy - 29/1/09 at 11:00 PM
Hopefully it's not too many jobs - list is:
Fit cycle wings
Fit fuel tank (when it arrives)
bolt in seats/belts
fill and bleed brakes
Nut covers
Clip back all wiring
Battery terminal covers
Speedo calibration
Fit driveshafts...
I'm sure that list will double!
Fred W B - 30/1/09 at 11:09 AM
All the best with the final push
Do you have to add wheel alignment to the list, or did you do that earlier?
Cheers
Fred W b
cloudy - 30/1/09 at 11:32 AM
I did do that earlier but will redo it in case anything has moved in the reassembly...
james
[Edited on 30/1/09 by cloudy]
cloudy - 30/1/09 at 01:36 PM
I was expecting a call to say my details had been passed on, but instead a letter arrived on my doorstep today from Leighton with a test date of 27th
Feb - the race is on!!
Date is a friday - not sure if thats a good day or not to have it?
James
[Edited on 30/1/09 by cloudy]
pocket rocket - 30/1/09 at 02:27 PM
best of luck mate
wish mine would be ready before dam iva price!
Valtra - 30/1/09 at 06:27 PM
Do you need to check emissions?
My tester also told me that because my boot had no cover , technicly it is also tested for sharp edges (there were none) as yours is an open design do
you need to install a temporary engine cover for example?
[Edited on 30/1/09 by Valtra]
nitram38 - 30/1/09 at 06:50 PM
I am going to put a 1" X 1" mesh over my engine.
I had to do it on the F1-2 as the tester said my engine had too many projections.
The atom has to do the same to pass and these bits disappear after the test!
cloudy - 30/1/09 at 07:10 PM
Pre 95 engine, so no emissions - but I suspect I will need to cover the engine...
How "permanent" does this have to appear? I don't want to drill loads of mounting holes...
James
nitram38 - 30/1/09 at 07:14 PM
If you form a piece of steel band that wraps around your rails and clamps like on a bike exhaust box, then you will not have to drill your chassis.
That is what I am planning to do
cloudy - 30/1/09 at 07:16 PM
Are tie wraps going to be obviously temporary?
James
nitram38 - 30/1/09 at 07:19 PM
quote:
Originally posted by cloudy
Are tie wraps going to be obviously temporary?
James
That depends on your tester, but I would say not permenant, although you could argue as most cables are held permenantly, they might say that if you
cut them for access, that they might not be able to be replaced if you are not carrying any.
cloudy - 30/1/09 at 07:31 PM
Yes good point, perhaps if I cable tie some mounts to the chassis then screw the cover on - allthough that might look equally as
"disposable", I'll just have to see what I can do...
Actually I think I can get away with 4 mounts, so maybe just rivet in some ally corner pieces, that way I just have to fill in 4 or 8 4mm holes...
James
James
[Edited on 30/1/09 by cloudy]
Valtra - 30/1/09 at 07:39 PM
quote:
Originally posted by cloudy
Yes good point, perhaps if I cable tie some mounts to the chassis then screw the cover on - allthough that might look equally as
"disposable", I'll just have to see what I can do...
Actually I think I can get away with 4 mounts, so maybe just rivet in some ally corner pieces, that way I just have to fill in 4 or 8 4mm holes...
James
James
[Edited on 30/1/09 by cloudy]
jubilee clips or stainless cable ties (screwfix) maybe ?
nitram38 - 30/1/09 at 07:47 PM
James, take a look at a bike exhaust box clamp. It is a complete circle with two folded tags that a bolt can go through.
Make some to wrap around your rails and the bolt/tags will go through your mesh. No holes in your chassis required.
jabbahutt - 4/2/09 at 07:55 AM
Any more progress? I'm keen to see the latest photos to see how she's coming along.
Nigel
cloudy - 4/2/09 at 08:07 AM
It's all little details at the moment, hoping to get some major components like the tank in this weekend...
James
cloudy - 9/2/09 at 11:12 AM
Some rather large (rear ) discs arrived today

cloudy - 9/2/09 at 08:59 PM
Springs fitted, and correct size brake discs fitted at the rear...
A few blatant brake porn pics:


Gakes - 9/2/09 at 09:35 PM
Looking so hot!!!!
jabbahutt - 10/2/09 at 10:59 AM
That's indeed looking awesome. Can't wait to see an up to date whole car photo.
Hurry up and finish so we can see some photos to drool over.
pocket rocket - 10/2/09 at 04:24 PM
dude thats hot
wilwoods on the rear aswell... should stop well lol.
did the make the rear uprights yourself?
cloudy - 10/2/09 at 05:57 PM
rear uprights are from MNR, but ive lightened and modified to take rear cycle wings...
James
neilj37 - 11/2/09 at 10:42 AM
OMG just soiled myself
cloudy - 11/2/09 at 07:08 PM
Custom tanks arrived and test fitted!
Made by Paul Talbot (U2U for contact details) recommended by russbost - Ł200
Internal anti surge pot too about 4.5 UK Gallons total....


cloudy - 12/2/09 at 07:57 PM
Tanks are all plumbed in, so a chance to clear out the cobwebs!
Video
[Edited on 12/2/09 by cloudy]
Hellfire - 12/2/09 at 08:37 PM
Sounds great.
Phil
Meeerrrk - 12/2/09 at 09:28 PM
sweeeet!!!
Hammerhead - 13/2/09 at 02:10 PM
mental!
pocket rocket - 16/2/09 at 12:00 AM
dam thats the best thing iv seen all week
good work dude, can't wait to see it at some shows!
nitram38 - 16/2/09 at 03:10 AM
The race to finish is on James!
I've managed to get the brakes and clutch working, although I need to change the clutch master to a bigger one. The coolant system is filled and
has held a pressure test allday yesterday and apart from a lug (will get today) my wiring is in.
Hopefully I will be starting the car in a few days.
I have the cycle wings to fit and make up some lighting storks and I will be finished.
SVA cheque has been cashed and I am waiting on a date.
Hopefully I will see you on the road in a few weeks/summer and we can both meet up and go out for a "mild" roadtest?
cloudy - 16/2/09 at 09:53 AM
Sounds like a plan Martin!
cloudy - 25/2/09 at 09:11 PM
Just been having a tweak of the lights and made a banner from one of the pics
I've aligned the lights by putting my tintop (also with projectors) in a marked position that I replicated with R4, using masking tape as guides
(the beam is slightly high as the lights are higher in R4) Does it look about right?

[Edited on 25/2/09 by cloudy]
Valtra - 25/2/09 at 11:02 PM
Looks near enough . The tester gave mine a tweek to get them how he wanted them (my headlights that is ) so you should be fine . looking good
Xtreme Kermit - 27/2/09 at 03:09 PM
Come on cloudy - what's the news?????
Ian
stuleah - 27/2/09 at 09:13 PM
ditto ^^^^^^
cloudy - 27/2/09 at 09:37 PM
All the gory details here:
http://www.locostbuilders.co.uk/viewthread.php?tid=107437
stuleah - 27/2/09 at 10:49 PM
well done for a not to bad fail, hope mine goes aswell.
cloudy - 2/3/09 at 03:46 PM
Just made an 80 mile round trip to DVLA Borehamwood - they were calling 191 when I arrived, the ticket they gave me was 262
When I did eventually see someone, they checked my ID, arranged for a "3rd party" to come and do a home visit and took Ł120 + 55
registration for my road tax.
Does this all sound about right? Who is the 3rd party likely to be?
James
otodb - 2/3/09 at 07:34 PM
Hi James,
I've only just joined & have really enjoyed reading your build thread, you've made a great job of your car.
Last year I finished building a Foreman Mk4 & had it SVA'd at Birmingham. After passing the SVA it had to be inspected by the DVLA to ensure
the Doner engine & chassis No & correct Doner parts matched the paperwork they had in order to get an age related plate. You are lucky to get
a home visit, I had to deal with Northampton DVLA & they had stopped doing them & although you could drive the car to the SVA test, they
insisted it was trailered for the DVLA inspection.
I don't know if your car will qualify for an age related plate but even if not they will still need to inspect the car to make sure the engine,
chassis No's match the paperwork.
Fingers crossed for the retest.
All the best,
Brian.
cloudy - 3/3/09 at 06:39 PM
Somebody called today to inspect the VIN's this friday, if I manage to cover all the bases and the exhaust/emissions problem gets solved I could
well have plates by thursday!
James
Scouse Monkey - 3/3/09 at 07:13 PM
Just checking by for updates...
Good luck!
jabbahutt - 4/3/09 at 12:26 PM
James
Quick question for you. your rendered vision of the car had it sporting a rear spoiler. do you still intend to fit one or has this part of the
original design idea bitten the dust?
Cars looking fantastic, a real credit to you.
Nigel
cloudy - 4/3/09 at 01:51 PM
Spoiler is ready to go on, just leaving it off for now...
cloudy - 4/3/09 at 08:03 PM
Can recommend Yamaha 1100 bulldog exhausts , pulling 100.3db @ 8000rpm without covering the intake or engine either... (From 109db @ 7500rpm with
my carbon ones)
James
[Edited on 4/3/09 by cloudy]
cloudy - 6/3/09 at 11:09 AM
I've just had my DVLA home inspection, no problems - but he did mention they might want to assign me a VIN number
Well I did speak to Borehamwood before stamping and they confirmed it was OK, so I'll just have to stand firm on that one..
James
nitram38 - 6/3/09 at 12:31 PM
Tell them it is a manufacturers vin.....mine accepted that on the F1-2
quinnj3 - 6/3/09 at 07:42 PM
nearly there! I've been following your progress for almost a year and it seems like no time ago since I've been watching this thread. Your
build was done very quickly, especially for a scratch build. well done!
cloudy - 11/3/09 at 11:01 AM
About to leave for SVA no2 - bit worried as the EGT is far higher on my left bank to the right Either a misfire in 3/4 or 1 or 2 is running very
lean... Either is not good for the emissions test!
James
pocket rocket - 11/3/09 at 01:12 PM
ill keep my fingers crossed mate
cloudy - 11/3/09 at 02:49 PM
Brakes - fine when I left, no leaks - tested by standing on brakes for extended periods of time, I get halfway to SVA and they've done it again.
Must be a mix of the small reservoir and the vibration. New master cylinders needed I think
James
cloudy - 11/3/09 at 03:06 PM
I'm about ready to throw in the towel.
DVLA just called to say they are denying my application because they consider a bike gearbox to be seperate from the engine. Therefore you cannot get
a new registration with a bike engine.
Needless to say the timing was impeccably bad and I was rather angry. She's gone to check with her superiors.
James
cheapracer - 11/3/09 at 03:46 PM
Hmmm, so it's not just Australia.
Another thing we do here is try different rego branches as the attitudes change from branch to branch.
Oh and try Friday arvo at 4pm especially before a long weekend, they just want to get you out of there as fast as they can so they can get out
themselves.
[Edited on 11/3/09 by cheapracer]
pocket rocket - 11/3/09 at 06:16 PM
oh mate you must be gutted but try not to stress... have a sit down and a beer and come back to it tomorrow.
IT WILL BE WORTH IT IN THE END! and you'll be able to look back had have a giggle about all the things that have gone wrong along the way.
carpmart - 11/3/09 at 07:38 PM
Keep at it fella!
After all, it can't get any worse.......can it?
Doug68 - 12/3/09 at 04:15 AM
Just some thoughts...
What do you think is going on with the brakes?
From the thread, its the fronts that are losing power?
You say you think its vibes doing the damage, whys that? The rotors you have are solid, so they can't be knocking the pads back in, I assume
that the calliper mounting is strong enough not to be flexing in use or over bumps?
One other thought is, your MC's are mounted on the floor with the pedals? Which is lower than the callipers? Maybe fluid is draining back from
the callipers and pulling the pistons away? There's residual pressure valves sold to overcome this issue.
jabbahutt - 12/3/09 at 08:41 AM
try not to let it get you down. You've produced a stunning looking car which many people here are envious of (well I am!!)
The grin produced driving with plates and going wherever you feel like will compensate for the hassle you're experiencing now.
cloudy - 13/3/09 at 04:00 PM
Nice box arrived today from Rally Design
Some wilwood MC's this time, they look of better quality than the girling ones, and a remote reservoir. Will get it all fitted over the
weekend...
One problem: The fluid sender is only a 2 wire type, my others are 3 wire types which let you wire the check light through it. Is this a problem for
SVA?
James
otodb - 13/3/09 at 07:59 PM
Hi James,
My car uses a BMW MC & it has only two wires for low level & it passed SVA OK, it is wired in parallel with the test switch which is operated
by the handbrake lever.
Hope you get the paper shufflers sorted soon.
All the best,
Brian.
[Edited on 15/3/09 by otodb]
greggors84 - 14/3/09 at 12:49 AM
You in the garage this weekend James? Im back down south and hoping to get the MK back on the road and insured tomorrow. Might pop up if your about.
Its been a long time since ive seen your build.
cloudy - 14/3/09 at 12:59 AM
I'll be working on it tomorrow yup
Would be good to catch up
James
Scouse Monkey - 15/3/09 at 12:30 AM
quote:
Originally posted by cloudy
remote reservoir.
fingers crossed it sorts it.
what grade of fluid are you running?
[Edited on 15/3/09 by Scouse Monkey]
nitram38 - 15/3/09 at 06:43 AM
quote:
Originally posted by cloudy
Nice box arrived today from Rally Design
Some wilwood MC's this time, they look of better quality than the girling ones, and a remote reservoir. Will get it all fitted over the
weekend...
One problem: The fluid sender is only a 2 wire type, my others are 3 wire types which let you wire the check light through it. Is this a problem for
SVA?
James
Regarding your check light, it doesn't matter wether 2 or 3 wire as long as you can test the check light.
You need an ignition feed to your light then the other light terminal light needs to loop from there to one terminal on the brake resevoir and then
loop to a test switch or handbrake switch. The other resevoir terminal and handbrake or test switch are earthed. Basically you have two switches in
parrallel.
Hope that it makes sense!
cloudy - 15/3/09 at 01:25 PM
quote:
Originally posted by Scouse Monkey
quote:
Originally posted by cloudy
remote reservoir.
fingers crossed it sorts it.
what grade of fluid are you running?
[Edited on 15/3/09 by Scouse Monkey]
I'm using DOT5.1
cloudy - 19/3/09 at 04:17 PM
Off goes another half inch thick bundle of paperwork to Borehamwood, this time with detailed drawings of my powertrain, showing where all the receipts
apply
I really hope this fixes it, I believe the car is due a new reg! I hope you don't get lumped with this martin
James
cloudy - 20/3/09 at 12:02 PM
My frustration is now immense - they've yet again rejected the application.
I am now having to escalate...
Omni - 20/3/09 at 12:08 PM
OH NO! That is STUPID!
Have you called any of the the manufacturers to ask how they get it through? I have always found MAC1 etc... very helpful.
Regards,
O
cloudy - 20/3/09 at 12:20 PM
... oh and they want to reinspect the car!
nitram38 - 21/3/09 at 08:31 AM
quote:
Originally posted by cloudy
Off goes another half inch thick bundle of paperwork to Borehamwood, this time with detailed drawings of my powertrain, showing where all the receipts
apply
I really hope this fixes it, I believe the car is due a new reg! I hope you don't get lumped with this martin
James
I hope all goes well for you.
Last time the wimbledon vro visited me, they only wanted a reciept to prove the chassis steel was new and took my word for the rest of the
details.
I'm hoping I get the same person!!!!
cloudy - 25/3/09 at 09:04 PM
Failed again, just on emissions and noise..
emissions I can fix fairly easily
Noise is a whole different ball park, its gone up 4db since I fitted the exhausts, no idea why...
I'm running out of ideas! I've bought stuff to deaden the panels and move the air intake...
James
stuleah - 26/3/09 at 07:02 PM
you could possibly try one of these
http://www.merlinmotorsport.co.uk/p1527/JETEX-UNIVERSAL-DECIBEL-INSERT-2%22/product_info.html.
Scouse Monkey - 27/3/09 at 06:52 PM
what about whacking on a set of OEM car exhausts for now?
The indirect path should be better than bike cans for noise.
cloudy - 27/3/09 at 06:55 PM
It already has some indirect path ones on there
James
dr-fastlane - 29/3/09 at 09:52 AM
What type of air filter are you using? The noise level was a big issue on my car to. Go for a normal car exhaust and don’t use a open air filter. Take
one from a production car, the box and paper filter type of thing. Old Chrysler Voyagers v6 have nice small filter boxes. That did the trick for me
and dropped the noise level with 5 dB(A).
cloudy - 29/3/09 at 10:13 AM
Already had!
Plan is:
Add deadening sheet to all rear panels
Add "firewall" at back of engine with more deadening sheet
Use hose to move air intake to front
Failing all that, ask If I can set my rev limiter to 9000 and be tested at 6750
cloudy - 30/3/09 at 07:12 PM
Wish me luck...
A tiewrap round the crankcase breather connection which seemed loose got it down to 800 a side, but only for about 30 seconds after the purge,
I'm hoping the test can be taken before then..
after that it sits about 900-1000 and occasionally goes up to 1200
James
[Edited on 30/3/09 by cloudy]
jabbahutt - 31/3/09 at 07:01 AM
All the best James it deserves to pass
cloudy - 31/3/09 at 03:38 PM
And that's a pass!!! Noise was 101 and emissions was 1159 out of 1200HC - talk about close. Now I just need to argue with DVLA about a reg
airframefixer - 31/3/09 at 05:14 PM
Congrats on the pass. Good luck with the rest of the process.
Andrew
nitram38 - 31/3/09 at 05:25 PM
Wahooooooooo! Well desrved!
scudderfish - 31/3/09 at 05:59 PM
Fantastic!
Valtra - 31/3/09 at 08:11 PM
Fantastic well done ...let battle commence.
cloudy - 31/3/09 at 08:29 PM
The youtube action
http://www.youtube.com/watch?v=RtdnsY4D7t8
locoR1 - 31/3/09 at 09:16 PM
Nice one James congratulations mate love the video brings a new meaning to drive it like you stole it and its not even registered yet
cloudy - 31/3/09 at 09:21 PM
I'm going to try and make the baldock meet on sunday dave, all depends on DVLA
Might see you there...
locoR1 - 31/3/09 at 09:27 PM
Going to tax mine tomorrow so will see how mine runs fri/sat
If your going ill do my best to get there. If you cant make it i probably wont bother this month so let me know.
cloudy - 31/3/09 at 09:28 PM
I'll drop you a txt/u2u
minitici - 1/4/09 at 12:15 PM
Well done! - but just watch it in the wet......
cloudy - 1/4/09 at 01:34 PM
DVLA are completely useless - Borehamwood (A huge office) has one lady dealing with all the applications - I was told she would call me back but was
only in today, waiting for the call - I call again - they refuse to put me through but promise a call back. Gets to 2 so I decide to drive there in
person (40mile round trip) get out of work on holiday, and they call me as I'm leaving to say she's gone home now so will call me
tomorrow...
I don't understand how they are so hugely rubbish at basic simple tasks.
James
Xtreme Kermit - 1/4/09 at 07:14 PM
Top job James.
I hope you get sorted in Borehamstupid.
Hope to see you at the George IV on Sunday!
jabbahutt - 2/4/09 at 06:57 AM
Congratulations on a fantastic achievement, well deserved. Try not to let DVLA get to you too much, just enjoy the grin of getting hold of the MAC
certificate.
Look forward to seeing the car in the flesh at one of the shows this year hopefully.
Chris_G - 2/4/09 at 08:06 AM
Congrats on getting this far!
To lighten your mood a little, a friend of mine started to have similar problems with the Bristol DVLA office. He decided to play at having learning
difficulties and dyslexia and all of a sudden they couldn't do enough for him and had his paperwork sorted out for him in no time!
Now I must remember to tax mine today!
Chris
cloudy - 2/4/09 at 11:41 AM
DVLA just called me back after 4 callback requests to tell me they want to inspect the car AGAIN!
Needless to say I've started the formal complaint procedure.
James
woodsy144 - 2/4/09 at 10:55 PM
Great build!!
Quick question, I am very interested in finding out more about your headlamps, could you please provide me with some information,
How much? where did you get them from? brand? E marking?
Thanks for your help and look forward to hearing from you soon. Thanks
Tim
cloudy - 2/4/09 at 11:02 PM
Get in contact with Russbost of this forum, He'll be able to sort you out
woodsy144 - 2/4/09 at 11:43 PM
Thank you for your help, ill try and get in contact with him
Thanks again.
Tim
Steve Hignett - 4/4/09 at 10:32 PM
Fantastic achievement James.
Can't wait to see it at the show...
ATB
Steve
cheapracer - 5/4/09 at 09:11 AM
James,
If it gets too much contact your local Member to help. Your car is Internationally known (hell just point out this forum and how many views) is a
symbol of one Englishman's skill and dedication blah, blah.... and is a disgrace on the English Public Service whats happening blah, blah...
May help.
cloudy - 9/4/09 at 09:14 AM
Another week has passed - The application was passed to DVLA swansea because borehamwood "couldn't decide"
I've called again today to find out why they've had it for a week at head office with no result, and it's been escalated in
swansea!!
How on earth can it take almost 7 weeks now to decide whether it can have a new reg? It's hardly the end of the world if they get it wrong!
Complete waste of time.
Omni - 9/4/09 at 09:26 AM
What a joke
James, you got anymore up to date pics???
Cheers,
O
cloudy - 15/4/09 at 11:30 AM
After calling them yet again, they tell me swansea said no (this is despite the inspector OK'ing my argument that the transmission should be
classed as the chain drive in this instance)
Told me now they want to assign a fresh chassis number!!! This will be sent out later this week and then I have to have it stamped and signed off by a
garage.
Needless to say I went completely off on one on the phone, didn't help but the lady at least agreed to send off the new chassis number today.
Oh and they've decided they want all the paperwork resubmitting because it now requires the other V55 form.
An absolute farce on every level. Martin I wish you the best of luck!
James
[Edited on 15/4/09 by cloudy]
nitram38 - 15/4/09 at 05:11 PM
Sorry to hear all of your problems James.
The reception I got last time I went down to the Wimbledon VRO has probably set the tone for what I can expect......much the same as you.
My sva is this Monday, so one step at a time.
I go with the expectation of a fail so that I won't be disappointed.
My aim was to get the car on the road for stoneleigh. You never know!
COREdevelopments - 15/4/09 at 06:31 PM
Tbh i had issues with swansea as i wanted to use my own chassis number. i really hope you get this sorted dont give up. they really do take the pisss.
i really cant see how they can tell you to amend the chassis number when it has been through the sva . i was really hoping to your car at stoneliegh.
And i bet you are too.
atb
Rob
perksy - 17/4/09 at 09:31 PM
Very Very Nice Work
Hope you don't mind i've linked this thread to the WSCC Boardroom so the Lads there can take a look
[Edited on 17/4/09 by perksy]
[Edited on 17/4/09 by perksy]
cloudy - 17/4/09 at 09:39 PM
Thanks no worries
I've finally had DVLA agree to process my paperwork, it will be a Q plate though, so a lot of wasted effort there!
Ah well, I'm sure the thrill of having it on the road will help me forget!
Valtra - 18/4/09 at 12:02 AM
quote:
Originally posted by cloudy
Thanks no worries
I've finally had DVLA agree to process my paperwork, it will be a Q plate though, so a lot of wasted effort there!
Ah well, I'm sure the thrill of having it on the road will help me forget!
"Qs" rule . remember that a new reg is only new for 6 months max but Qs never age
Look forward to seeing your car at Stoneleigh just try to keepit boney side up untill then
cheapracer - 18/4/09 at 02:21 AM
Whats a Q plate for us out of town'ers?
Chris_G - 18/4/09 at 09:25 AM
quote:
Originally posted by cheapracer
Whats a Q plate for us out of town'ers?
Clicky....
cloudy - 18/4/09 at 11:01 AM
Just seen the thread over there, I think my diary should be read backwards as somebody has posted the tack welded chassis! every weld was ground out
and remade when I was happy with the final design...
James
JC - 18/4/09 at 07:28 PM
Congratulations. Perhaps not the exact result that you wanted but fantastic news nonetheless. You can be proud of your car - I look forward to
seeing it at Stoneleigh if you are there.
Well done!!!!!!
JC
:{THC}:YosamiteSam - 18/4/09 at 10:50 PM
some good work there - isnt it nice to see people having an idea and going for it without having someone saying - 'oooo cant do that' just
do it.. enjoy it - keep it secure too!
i would watch how you position / design any body panels - may destroy the look.
also think about when your driving it - iv a westy megabusa - you have to use waterproof gear when driving it - but when you have all the warm gear on
you will be suprised how much your driving position moves with the layers on.. feels different..
love it tho - keep the momentum.. your gf must love you..
cloudy - 20/4/09 at 11:50 AM
After the DVLA promised it would be done that day or the day after (last thursday) I took today off work as I was told monday latest. Also refused I
collect the paperwork
Guess what? nothing in the post.
Called up and....
"Oh yes I haven't done that yet..." It will be with you in another couple of days.
These people have no sense of how they muck people around
Please don't use Borehamwood - use anywhere else, but not them.
[Edited on 20/4/09 by cloudy]
Valtra - 20/4/09 at 01:04 PM
don't want to rub salt in but you would have been better trippin up to Peterborough . vehicle inspector there seemed quite an enthusiast
(showed me loads of photos on his phone ) and delt with mine quite quickly
It will all be worth it !!!!
cloudy - 20/4/09 at 02:05 PM
I really wish I had, i'd be on the road with an 09 plate by now...
COREdevelopments - 20/4/09 at 05:51 PM
That really is a shame James, but when you jump in and drive off it will all be forgotten. would look so cool being an 09 plate(sorry) so will you be
attending stoneliegh? i settled for a Q as i just wanted it on the road that day. and i did as i went to cardiff not bloody swansea!!
hope to see you and the car at the show
Rob
cloudy - 21/4/09 at 06:35 PM
Nothing yet again, suspect it hasn't been processed, but I was cheered up that my GPS arrived!
Navigo v2 which is about Ł50 from ebuyer, and is capable of running all major GPS apps.
Only problem is where to put it! Without refabbing the dash the only place I could find, that you can
a) reach
b) see
is in the steering wheel center, it looks tidy with and without the gps clipped in and is nice and visible. Potentially not very good for seeing where
your exit on the roundabout is!
Any comments/experiences/suggestions?

nitram38 - 21/4/09 at 07:04 PM
It needs to see the sky so I don't know how accurate it will be there . Can't you put it above your speedo?
cloudy - 21/4/09 at 08:00 PM
It wouldn't matter where I put it in R4, it "see's" the sky everywhere. Notice the strong lock whilst inside the garage with
the door closed - not an issue...
nitram38 - 21/4/09 at 09:01 PM
I have a tomtom 940 and a set of scala Q2 headsets and I'm thinking of getting another sat nav.
The Q2 can only connect to tomtom rider via bluetooth and not other tomtom models.
The headset has an FM radio and the 940 transmits on FM, but tomtom decided to remove the navigation instructions via fm due to a new eu rule
regarding transmission with no sound.
I've bought a cheap fm transmitter that I can plug in to the line out and it works, but it is just more wires and things to unplug.
I want a cheap fm transmitting sat nav for the Motaleira.
Does yours have fm?
[Edited on 21/4/2009 by nitram38]
cloudy - 21/4/09 at 11:14 PM
No, I chose the one without - I have no desire to have headphones in whilst driving, I find them distracting at the best of times!
James
cloudy - 22/4/09 at 07:01 PM
She's registered, plated, taxed and insured!
it's completely and utterly mental, cue vid
http://www.youtube.com/watch?v=-wOk76YGc9c
Omni - 22/4/09 at 07:07 PM
AWESOME! Well done! You must be very proud indeed. We need an outside vid now? I wanna see it in ALL it's glory.
O
locoR1 - 22/4/09 at 07:31 PM
That's fantastic news James looking forward to seeing it at Stoneleigh do you know what day your going yet?
nitram38 - 22/4/09 at 07:35 PM
I'm still trying to get the noise down and fit stupid mesh grilles everywhere
Inspiring to see your video though, especially as the view is very similar to my car!
Chris_G - 22/4/09 at 07:37 PM
Nice one Cloudy!
Hope to see you/the car at Stonleigh too.
Chris
cloudy - 22/4/09 at 07:56 PM
I'll be the sunday with a few mates, and possibly camping to the monday
Valtra - 22/4/09 at 08:04 PM
Don't spose it will be difficult to find you we'll just look for a large crowd
cloudy - 24/4/09 at 09:04 PM
250miles on the clock!
Only three problems so far
1) the crappy plastic gps mount fractured under the vibrations
2) all the bulbs at the rear blew due to vibrations, now all replaced with LED models
3) After a drive, the left rear wheel bearing has a squeak when you push the car. It sounds very much like the oil seal, its a rubbery squeak not a
graunching or metallic noise. Reckon it warrants stripping the bearings? (Don't relish the job as the sierra ones are a pain) There's no
wheel rock and the hub isn't getting hot...
James
sgraber - 28/4/09 at 03:42 AM
Loved the vid! Is the car everything you imagined it would be and then more? I will assume the answer is yea!
Steve
cloudy - 28/4/09 at 06:41 AM
So far, it's doing everything I've asked of it - but has highlighted pretty early that I need to get it on a trackday pronto!
cheapracer - 29/4/09 at 10:20 AM
Vid? Theres a vid? Where dat at? (please!)
cloudy - 29/4/09 at 10:25 AM
Search youtube for Warner R4 I think that gets one of them, view other videos from for the rest
COREdevelopments - 29/4/09 at 07:18 PM
Nice one james. it looks ands sounds fantastic!! cant wait to see it at stoneliegh.
well done
Rob
cheapracer - 1/5/09 at 03:56 PM
quote:
Originally posted by cloudy
Search youtube for Warner R4 I think that gets one of them, view other videos from for the rest
..which is great if your Country hasn't currently got Youtube banned.....
Thanks anyway ;-)
Valtra - 5/5/09 at 12:32 AM
did you make Stoneleigh ? (not checked the events tab yet)
cloudy - 5/5/09 at 08:30 AM
I did indeed
Valtra - 5/5/09 at 09:08 AM
Well done , so did I after 16 years of dreaming of rolling up at the gates great feeling isn't it
I didn't arrive untill 5pm on Sunday due to BBQ commitments on Saturday spoiling my hood / bootcover fitting schedule . most people had gone home
by then and I spent the coldest night of my life in a Tesco value tent (with vital bits missing) listening to loud music and shivering .
Had a great time nontheless but missed your car hope to catch it some other time
adithorp - 5/5/09 at 09:44 PM
quote:
Originally posted by cloudy
I did indeed
...and very nice it looked.
adrian
jabbahutt - 8/5/09 at 07:17 AM
any recent photos of the completely finished car? I've followed your build and it would be great to see some photos of the finished article
plated up from different angles if you've got any.
Cheers
cloudy - 8/5/09 at 07:54 AM
I've been meaning to get a friend to take some on his DSLR, they are coming..
James
jabbahutt - 8/5/09 at 02:25 PM
Cheers looking forward to seeing them.
Omni - 8/5/09 at 06:49 PM
Just what I have been waiting for too
O
COREdevelopments - 20/5/09 at 03:23 PM
Hey James just checked your website out and it looks great. looks really proffesional.
Rob
cloudy - 20/5/09 at 04:01 PM
Thanks very much
For those asking for pics, loads of them and vids available at www.wr4.co.uk
Valtra - 20/5/09 at 04:09 PM
Very slick it is too (car and site)
cloudy - 2/6/09 at 11:55 AM
I've passed the magic 1000 mile mark
nitram38 - 2/6/09 at 05:14 PM
So where are you now? Majorca?
cloudy - 25/6/09 at 11:53 AM
I'm working on a PIC based circuit to generate an adjustable ignition kill when I shift up using the kliktronic, to allow for full throttle up
shifts.
Also I've programmed in a semi automatic option to allow it to shift up itself. It'll fire the kliktronic and cut the ignition at a set rpm
sensed from the tacho
Watch this space!
I should really fix the massive oil consumption first, but oh well!
[Edited on 25/6/09 by cloudy]
cheapracer - 25/6/09 at 01:49 PM
quote:
Originally posted by cloudy
I'm working on a PIC based circuit to generate an adjustable ignition kill when I shift up using the kliktronic, to allow for full throttle up
shifts.
Also I've programmed in a semi automatic option to allow it to shift up itself. It'll fire the kliktronic and cut the ignition at a set rpm
sensed from the tacho
Watch this space!
I should really fix the massive oil consumption first, but oh well!
[Edited on 25/6/09 by cloudy]
Well when I was young..... in my bike racing days we just used brake light switches connected to the gearshift lever - when you changed up the brake
light switch killed the ignition for that moment, worked a treat for about 5 bucks and a bit of time.
cloudy - 25/6/09 at 02:03 PM
It really needs to be adjustable to prolong the gearbox life and make for a smooth change... Total hardware cost is Ł9 so far...
James
cheapracer - 26/6/09 at 05:08 PM
quote:
Originally posted by cloudy
It really needs to be adjustable to prolong the gearbox life and make for a smooth change... Total hardware cost is Ł9 so far...
James
Well thats Locost!!
dave_vic_ozz - 7/7/09 at 02:51 PM
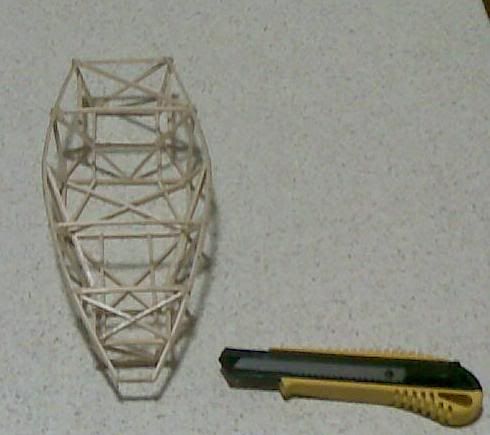
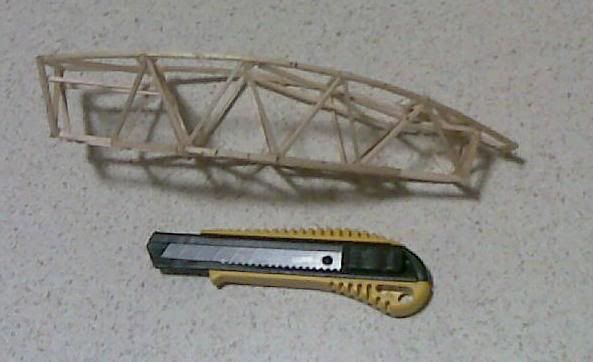

Cloudy, I cannot improve on your chassis design. You hit the nail on the head.
It is very good in beam and torsion.
[Edited on 10/7/09 by dave_vic_ozz]
Fred W B - 7/7/09 at 05:18 PM
Hi Dave
looks like some nice work you are doing, but you might get more (warmer?) response if you post up in a thread of your own?
Cheers
Fred W B
cloudy - 8/7/09 at 08:17 PM
Finished my shift controller, currently giving me adjustable ignition cut for flat shifting, and I've also designed in a tacho/shift light input
and upshift output for auto upshifting which I'll wire in later


dave_vic_ozz - 10/7/09 at 08:44 AM
quote:
Originally posted by Fred W B
Hi Dave
looks like some nice work you are doing, but you might get more (warmer?) response if you post up in a thread of your own?
Cheers
Fred W B
Fred you make a good point.
It is a great chassis in both looks and strength. Awesome and inspiring.
cloudy - 13/7/09 at 11:54 AM
Have some R888's on the way, first trackday at barkston heath next sat Just need to be really wary of oil surge...
James
stuleah - 17/7/09 at 09:59 PM
cloudy your car is on page 22 of complete kit car and the write up says they are keen to learn more about it.
cloudy - 18/7/09 at 01:12 AM
Thanks for the heads up! I didn't know about that
geoffreyh - 19/7/09 at 11:37 AM
Hi,
First of all congratulations for everything.
It would be great if you could give some more information on your experience with the clicktronic. It looks like it worked quite well at your first
track day.
Geoff
cloudy - 19/7/09 at 12:29 PM
I have a lot of problems getting 1st to 2nd at full throttle - it misses and gets neutral a lot but I suspect thats my old engine rather than the
klicktronic - above that the cut is about 40ms and you dont feel the change
I was shifting 1st to 2nd with manual liftoff + clutch in case it missed hence the pants 0-60
James
geoffreyh - 19/7/09 at 02:02 PM
Is there a way to tweak the movement of the clicktronic or are you doing it manually?
maybe to space between 1 and 2 is a little different?
stuleah - 19/7/09 at 04:36 PM
quote:
Originally posted by cloudy
Thanks for the heads up! I didn't know about that
No problem
matt_gsxr - 18/9/09 at 10:22 PM
So, Cloudy,
I hear that you have only gone and deserted the GSXR1100. Not many people running these engines and you go on and swap to the ubiquitous R1.
I must admit that I have fuel injected mine (carbs were getting too complicated and leaky for me, and tuning them up was a nightmare).
So, my question is. Was it worth it? and why no updates on this build diary?
Matt
cloudy - 18/9/09 at 11:36 PM
I'll have some new pics soon - but yes I've deserted the GSX-R, as it was forever the only source of problems in the car, Will miss the
torque from the 1200 cc's but I'm looking forward to not having to stop for oil after each journey!
James
nitram38 - 19/9/09 at 10:46 AM
quote:
Originally posted by cloudy
I'll have some new pics soon - but yes I've deserted the GSX-R, as it was forever the only source of problems in the car, Will miss the
torque from the 1200 cc's but I'm looking forward to not having to stop for oil after each journey!
James
You can say that again!
cloudy - 18/10/09 at 08:00 PM
R1 engine is running! should be back on the road next week pending fuel tank....
James

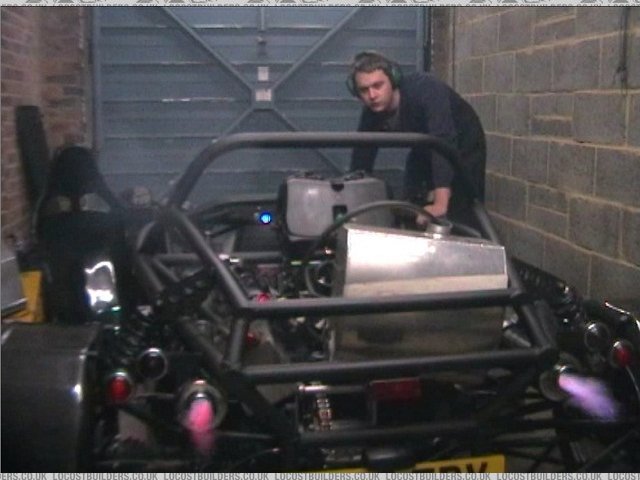
Rescued attachment running.jpg
nitram38 - 19/10/09 at 10:45 AM
Wow flames!
Nice one James. I'm looking forward to seeing the car on the road again!
scudderfish - 19/10/09 at 11:45 AM
Flames, an open fuel tank and an enclosed garage... What could possibly go wrong?
cloudy - 19/10/09 at 01:41 PM
I'd bank on it being safer than the car in motion
cloudy - 21/10/09 at 10:48 PM
mnn yes it seems to work 70mph in 1st anybody?
James
nitram38 - 21/10/09 at 10:51 PM
quote:
Originally posted by cloudy
mnn yes it seems to work 70mph in 1st anybody?
James
I know what that is like!
A1, Roundabouts, what roundabouts?
cloudy - 21/10/09 at 11:07 PM
won't spin the wheels on a rolling start till about 40mph, probably need to gear it down a little, will run a few 0-60's to see how badly
it affects standing starts...
James
nitram38 - 21/10/09 at 11:29 PM
You need a power commander if its injection and get it remapped.
I need to rolling road mine
205/50/15's with a 51 tooth sprocket on mine
[Edited on 21/10/2009 by nitram38]
cloudy - 21/10/09 at 11:46 PM
What front?
James
cloudy - 22/10/09 at 10:29 PM
Not greatly impressed with the ratio, I either break the tyres loose off the line, and spin all the way to 70mph (see pic below :O)
Or if I pull away normally, it bogs down till about 20mph - returns a 0-60 of about 3.5 much slower than the 162hp gsxr at around the 3 mark (with a
gearchange!)
Think i'll drop the gearing a tooth at the front, means a top speed of just 125 though - stupid r1 gearing

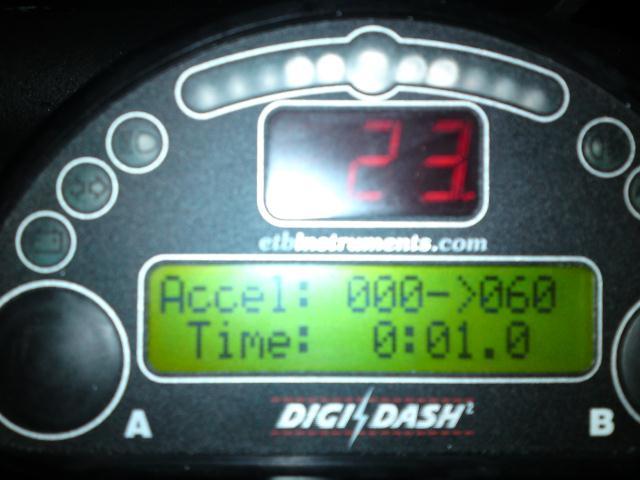
Rescued attachment DSC01242.JPG
nitram38 - 22/10/09 at 10:37 PM
Front cog from memory is 17 teeth.
Someone on here worked out the ratio for me based on the gears in the gearbox, so if you want perfection, I think the gear ratios need altering
too.
A fuel remap will help
cloudy - 22/10/09 at 10:42 PM
17 is stock!! running through my calc gives
83 in 1st!
You will transform the perfomance by dropping that to a 13/14!
James
nitram38 - 22/10/09 at 10:44 PM
Question is, do you have one? and how many teeth does your sprocket have?
If you decrease teeth on one and increase teeth on the other don't u end up with the same output or have I missed something?
Why not change your larger sprocket instead?
[Edited on 22/10/2009 by nitram38]
cloudy - 22/10/09 at 10:46 PM
I may have a spare boxed 14P depends if they will take it back for a 13 or not...
52 is largest I can fit at the back...
James
[Edited on 22/10/09 by cloudy]
nitram38 - 22/10/09 at 10:51 PM
Some Gear calcs sent to me maybe they can help:
GearCalc v2.0.0.1 Copyright ©2001, Peter Ogden
Gear Ratio, Speed and RPM Calculator
Gear set: Manually entered values
Gear 1 2 3 4 5 6 Final
Ratios: 4.004 3.261 2.785 2.406 2.156 2.006 3.058
RPM Limit: 13750
RPM @Peak Power: 12000
Tyre Size: 195/50 x 15
Tyre Diameter: 577.00 mm
Tyre Circumference: 1812.70 mm
Gear Km/h per 1000 RPM Km/h @12000 RPM Km/h @13750 RPM
--------------------------------------------------------
1 8.88 107 122
2 10.91 131 150
3 12.77 153 176
4 14.78 177 203
5 16.50 198 227
6 17.73 213 244
Km/h RPM (in Gears)
----------------------------------------------------------
1 2 3 4 5 6
----------------------------------------------------------
10 1126 917 783 676 606 564
20 2252 1834 1566 1353 1212 1128
30 3377 2751 2349 2029 1819 1692
40 4503 3668 3132 2706 2425 2256
50 5629 4584 3915 3382 3031 2820
60 6755 5501 4698 4059 3637 3384
70 7880 6418 5481 4735 4243 3948
80 9006 7335 6264 5412 4850 4512
90 10132 8252 7047 6088 5456 5076
100 11258 9169 7830 6765 6062 5640
110 12384 10086 8613 7441 6668 6204
120 13509 11003 9397 8118 7274 6768
130 11919 10180 8794 7880 7332
140 12836 10963 9471 8487 7896
150 11746 10147 9093 8460
160 12529 10824 9699 9024
170 13312 11500 10305 9588
180 12177 10911 10152
190 12853 11518 10716
200 13530 12124 11280
210 12730 11844
220 13336 12408
230 12972
240 13536
Gear Change RPM drop (change @12000) RPM drop (change @13750)
-------------------------------------------------------------
1 -> 2 -2227 (to 9773) -2552 (to 11198)
2 -> 3 -1752 (to 10248) -2007 (to 11743)
3 -> 4 -1633 (to 10367) -1871 (to 11879)
4 -> 5 -1247 (to 10753) -1429 (to 12321)
5 -> 6 -835 (to 11165) -957 (to 12793)
GearCalc v2.0.0.1 Copyright ©2001, Peter Ogden
Gear Ratio, Speed and RPM Calculator
Gear set: Manually entered values
Gear 1 2 3 4 5 6 Final
Ratios: 4.004 3.261 2.785 2.406 2.156 2.006 3.375
RPM Limit: 13750
RPM @Peak Power: 12000
Tyre Size: unknown
Tyre Diameter: 540.00 mm
Tyre Circumference: 1696.46 mm
Gear Km/h per 1000 RPM Km/h @12000 RPM Km/h @13750 RPM
--------------------------------------------------------
1 7.53 90 104
2 9.25 111 127
3 10.83 130 149
4 12.54 150 172
5 13.99 168 192
6 15.03 180 207
Km/h RPM (in Gears)
----------------------------------------------------------
1 2 3 4 5 6
----------------------------------------------------------
10 1328 1081 923 798 715 665
20 2655 2163 1847 1596 1430 1330
30 3983 3244 2770 2393 2145 1995
40 5310 4325 3694 3191 2859 2661
50 6638 5406 4617 3989 3574 3326
60 7966 6488 5541 4787 4289 3991
70 9293 7569 6464 5584 5004 4656
80 10621 8650 7387 6382 5719 5321
90 11949 9731 8311 7180 6434 5986
100 13276 10813 9234 7978 7149 6651
110 11894 10158 8775 7864 7316
120 12975 11081 9573 8578 7982
130 12005 10371 9293 8647
140 12928 11169 10008 9312
150 11966 10723 9977
160 12764 11438 10642
170 13562 12153 11307
180 12868 11972
190 13583 12638
200 13303
Gear Change RPM drop (change @12000) RPM drop (change @13750)
-------------------------------------------------------------
1 -> 2 -2227 (to 9773) -2552 (to 11198)
2 -> 3 -1752 (to 10248) -2007 (to 11743)
3 -> 4 -1633 (to 10367) -1871 (to 11879)
4 -> 5 -1247 (to 10753) -1429 (to 12321)
5 -> 6 -835 (to 11165) -957 (to 12793)
cloudy - 22/10/09 at 10:54 PM
Thanks - it's ok I have a calculator I designed...
James
cloudy - 22/1/10 at 06:20 PM
Winter mods have been a bit lax - I did get her out in the snow though
Another good run out today, after the addition of ducted intakes - the noise was just unbearable and meant wearing earplugs for all journeys even
under the helmet! Panel filter replaced for K&N too, will need a powercommand and mapping at some point...
Still need to tidy up the R1 loom


cloudy - 22/1/10 at 06:24 PM
Gear ratio dropped too - now a 4:1 reduction to the rear axle - about 63mph in 1st gear...
aitch - 22/1/10 at 07:03 PM
why so noisey ???
aitch
cloudy - 22/1/10 at 08:45 PM
Intake is 3 inches from your left ear....
nitram38 - 22/1/10 at 10:23 PM
quote:
Originally posted by cloudy
Gear ratio dropped too - now a 4:1 reduction to the rear axle - about 63mph in 1st gear...
James, What cogs (number of teeth) and what tyres are you running?
Is the car better to drive?
I'm interested in any mods, plus I need to have my power commander re-mapped.
Cheers Martin
[Edited on 22/1/2010 by nitram38]
cloudy - 22/1/10 at 10:41 PM
52 to a 13 tooth front (hard to get hold of...). Yes much better on normal pull offs - would bog down unless you broke traction before
cloudy - 22/1/10 at 11:20 PM
Tyres are 205/50/15
pocket rocket - 23/1/10 at 10:18 AM
hey mate,
car is looking amazing! will you be taking the car to the shows this year?
im really keen to get a close look at it and get your opinion on a few things.
what year is your R1 engine? is it the 09/10 engine with the cross plane crank?
cloudy - 23/1/10 at 11:21 AM
I wish! Barely could afford this one (05 5VY)
Will be at as many shows as I can this year
James
nitram38 - 23/1/10 at 06:01 PM
My next question is does anyone have a 13 tooth cog going spare?
pocket rocket - 23/1/10 at 06:55 PM
i have a friend who works for yamaha, they always have loads of stuff kicking about the work shop (which is where i got my R1 exhaust from) so i will
ask him.
same for you cloudy, if you have any worries with the engine or need any parts i should be able to get them at cost :-)
just drop me a pm
cloudy - 24/1/10 at 05:20 PM
Thanks, much appreciated
franky - 24/1/10 at 05:51 PM
quote:
Originally posted by pocket rocket
hey mate,
car is looking amazing! will you be taking the car to the shows this year?
im really keen to get a close look at it and get your opinion on a few things.
what year is your R1 engine? is it the 09/10 engine with the cross plane crank?
You wouldn't want one of the new R1 engines as they make about 15bhp less than the rest of the big 4, and less bhp than the version with the
normal crank.
nitram38 - 26/1/10 at 10:56 AM
pocket rocket, I have sent you a u2u regarding a 13 tooth cog
Cheers Martin
cloudy - 26/1/10 at 11:03 AM
If not martin try B&C express, they don't stock it, but were able to eventually get one from renthal on special...
James
nitram38 - 26/1/10 at 01:28 PM
B&C say the smallest is 14 tooth. Is that right James?
cloudy - 26/1/10 at 01:52 PM
No, that's what they told me too! It's renthal Part No:309--530-13P
nitram38 - 26/1/10 at 02:08 PM
Cheers for the part number!
pocket rocket - 26/1/10 at 07:57 PM
quote:
Originally posted by franky
quote:
Originally posted by pocket rocket
hey mate,
car is looking amazing! will you be taking the car to the shows this year?
im really keen to get a close look at it and get your opinion on a few things.
what year is your R1 engine? is it the 09/10 engine with the cross plane crank?
You wouldn't want one of the new R1 engines as they make about 15bhp less than the rest of the big 4, and less bhp than the version with the
normal crank.
this is true but the engine wasn't designed to have more bhp, its been designed to have more low and mid range torque and a flatter torque curve
with no or little torque inertia.
nitram38 - 26/1/10 at 09:25 PM
B & C Express are being alkward about getting the part even though you have bought one James!
Here is an excerpt from the latest email:
"I cannot give you a price for a part that we do not list and never have.
If you give me your friends postcode, I will be able to look on his customer screen to see what he has ordered."
Its always what you want that is difficult to buy, why is that?
They have plenty of the stuff I don't !!!!!
cloudy - 27/1/10 at 12:25 AM
See U2U
minitici - 27/1/10 at 09:14 AM
The 309--530-13P is certainly listed as an alternative for the YZF-R1 on the Renthal "Fit your Bike" website.
nitram38 - 27/1/10 at 11:15 AM
I've got 2 ordered (one spare) from Renthal via B & C Express.
Apparently Renthal only have 16 left and once they are gone, they are gone.
Thanks James!
nitram38 - 29/1/10 at 12:00 PM
I'm absolutely amazed.
B & C quoted 4 weeks delivery on my sprockets.
They have arrived today, 2 days after ordering!
cloudy - 29/1/10 at 12:06 PM
They are pretty good Did a great job on my custom rear sprocket too...
nitram38 - 27/2/10 at 10:34 AM
James thanks for the info about changing my sprocket to a 13T.
I only took the MotaLeira out around the streets where I live because of the weather, but the transformation in getting the power down in a more
useable way is amazing!
I don't have to rev it high to pull away
Thanks again!
Martin
My set up now:
205/50/15 Toyo T1R tyres
52 tooth rear sprocket
13 tooth front drive sprocket
cheapracer - 27/2/10 at 04:38 PM
quote:
Originally posted by franky
[
You wouldn't want one of the new R1 engines as they make about 15bhp less than the rest of the big 4, and less bhp than the version with the
normal crank.
You should ride one of those 'gutless' Ducati 999's one day with 40 hp less then you might understand.
cloudy - 13/5/10 at 08:37 AM
Ian from Complete Kit Car took some photo's of the car yesterday at a local lime kiln, look out for it in the June and July issues

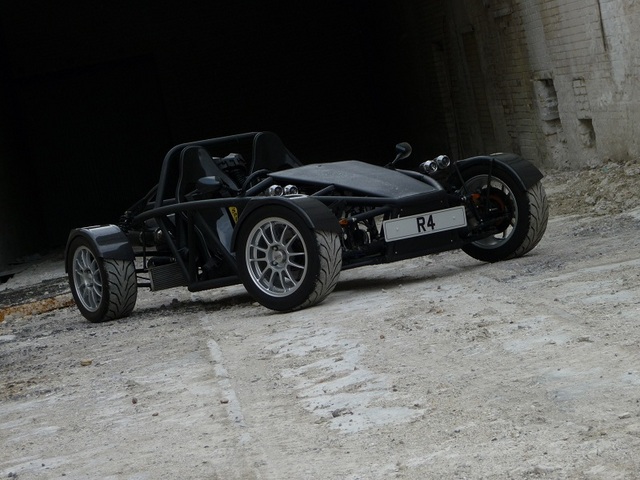
Rescued attachment P1000329small.jpg
welderman - 13/5/10 at 10:24 AM
nice
stuleah - 13/5/10 at 06:13 PM
cool will look out for it, at the same time Adam from complete kit car was taking photos of mine down a local lane, should also be in the same issue
so look out for that aswell.

cloudy - 13/5/10 at 06:41 PM
Ah good stuff, it was probably somewhat less dusty! I assume it'll be the july one - as the article they wrote for the June issue was
completed a few weeks ago...
James
stuleah - 13/5/10 at 06:53 PM
hope the weather was better when he took the photos, we were waiting upto 30mins between cloud breaks to get a photo in the sun. typical british
weather
Valtra - 13/5/10 at 10:45 PM
quote:
Originally posted by stuleah
cool will look out for it, at the same time Adam from complete kit car was taking photos of mine down a local lane, should also be in the same issue
so look out for that aswell.
had a gander at your build photos stuleah, frame looks monumentaly strong. looking forward to paying you a visit over the summer (we spoke at
Stoneleigh) when you get settled in, good luck.
Looking mean cloudy
stuleah - 22/5/10 at 02:20 PM
see youve got a pic on the front cover..
http://www.completekitcar.co.uk/Issue/latestissue.html
expatkiwi - 4/7/10 at 09:07 PM
Hi James
I had a good look round your car today at the autosolo. I was hoping to have a chat about it but family stuff meant that I had to dissapear just after
lunch.
You have done a top job and I am now wondering if i should get the westfeild sold and go bec
Cheers
Brian (FDMC member)
cloudy - 7/7/10 at 01:28 PM
Thanks Brian, a BEC is quite a different animal, both in positive and negative ways - just make sure it suits...
vid from barkston on sat:
Youtube
loggyboy - 20/7/10 at 12:42 PM
Great to see it in the flesh the other weekend.
Bro took some video and caught you but only stationary.
http://www.youtube.com/watch?v=j8SM2Xz_5R8
[Edited on 20/7/10 by loggyboy]
cloudy - 29/11/10 at 08:01 PM
Just back from my first track day - brands
Little bit of video: (forgot to take telemetry!)
http://www.youtube.com/watch?v=KAbeFhT07s4

[Edited on 29/11/10 by cloudy]
Fred W B - 30/11/10 at 08:16 AM
Looks great!
Have you got the rear wheels standing straight up at rest? Maybe a little rear camber would be beneficial?
Cheers
Fred W b
[Edited on 30/11/10 by Fred W B]
mrxmn - 4/1/11 at 02:59 PM
James that looks awesome on the track though maybe not the best time of year. At least it was dry. Would be wicked to do a track day in the summer
with the r4 and the MK Indy. Maybe rockingham?
Mark (SJ's brother)
cloudy - 4/1/11 at 04:48 PM
You are on
Dick Bear - 23/1/11 at 06:14 PM
Cloudy.......
I've been absent from the site for a while but viewing your completed build was one of the first things I wanted to do upon my return.
FANTASTIC!!!!!!!!!
Dick Bear
cloudy - 24/1/11 at 09:36 AM
Good to see you back! Liking the new track car
Weather almost good enough to start taking the R4 to work again, can't wait - poor things only been out a few times since last summer!
James
nuvolae36 - 24/1/11 at 09:00 PM
hi, I don't post here often so please excuse me if you already answered this question. I want first to make you huge compliments for the car.
Now questions:
I see it's bec and mid engine and I see how much is "tail happy" on corners, so I see it's very demanding when driving fast...
Have you got a chance to "race" against other fast becs in same tracks? I'm asking because I want to know if all the involvement needed
to drive this car fast really pays in laptime or if a fury same engine 470kg would nearly as fast as that for a mid experience driver.
How is weight distribution?
I'll build a BEC and I'm struggling between something MID or a Fury Fisher (front engine, RWD).
cheers,
Roberto.
cloudy - 16/3/11 at 11:25 PM
It is significantly faster than similarly powered cars on the sprints i've taken it to, and i'm not the best driver in the world! So yes,
the mid engine'd layout seems to pay off when going balls out...
Weight distributon is about 65/35, which works better than you'd think - the front is extremely 'pointy'
Depends what you are after really, on the road you'll go just as quickly with a "normal" layout...
cloudy - 16/3/11 at 11:40 PM
Just thought i'd post some pictures of my new improved v2 homemade electronic gear shift controller TM!
The old one only supported upshifts, with a single cut duration set by a variable resistor - this has several drawbacks!
Features:
Downshift Blip Control
Safety lockout if a downshift would over-rev engine
Secondary upshift cut duration for cruising (activated when engine below a configrable rpm)
Digital adjustment of durations in 5ms steps
Blip lockout at idle rpm (stops the reving at the lights when block shifting to neutral)
Semi automatic mode - automatically shift up at certain rpm
Pushbutton programming via LCD
Maybe went a little overboard with the code (~500lines!) but I think it covers everything and more the commercial flatshifter/trickshifter type things
support
Just hope it works as well on the track as I hope!
[Edited on 17/3/11 by cloudy]
matt_gsxr - 24/9/11 at 08:23 AM
James,
Why no updates? I know you are putting in a new engine. Go on, share the story.
Matt
cloudy - 24/9/11 at 09:58 AM
The turbo engine isn't for this car - I've started building something else I've come up with I'll be making that one available
for sale as a turnkey car next year hopefully!
[Edited on 24/9/11 by cloudy]
matt_gsxr - 27/9/11 at 10:56 AM
awesome news
cloudy - 12/4/12 at 07:46 AM
On the road for 3 years now! Had it's first MOT last week (passed ) Seems like yesterday I was driving it home from it's SVA...
J
Mike_82 - 14/10/12 at 04:43 PM
Hi - been foloowing this thread for a while and was just wondering if there were any updates? you mentioned before you were looking to do a kit for
others to build - is there any developements there?
Great car by the way!


