
Finished Dash and how I made it (5 days solid working on it)
Findlay234 - 30/10/07 at 09:48 PM
Right heres a 'small' post to chronicle how I made my dash. Couldnt afford new instruments so wanted to use the dials from the MR2 my engine
came from. As you can see below they looked pretty horrid so I wasnt going to just place them in straight. So I came up with the design I wanted on
paper and set about crafting it.
So starting with this.......
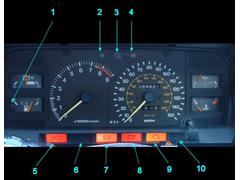
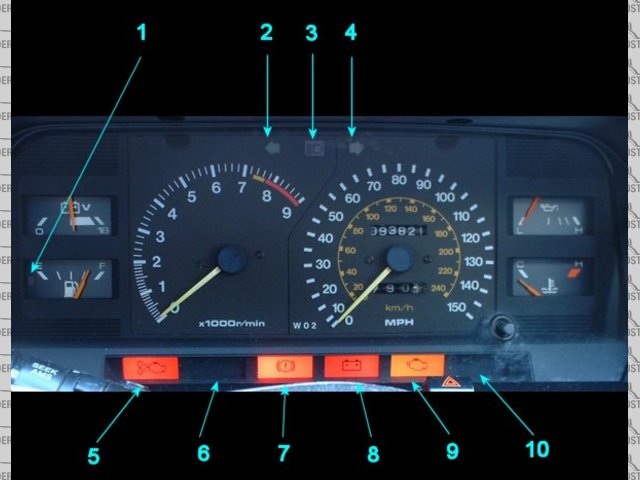
Original dash as in the mr2
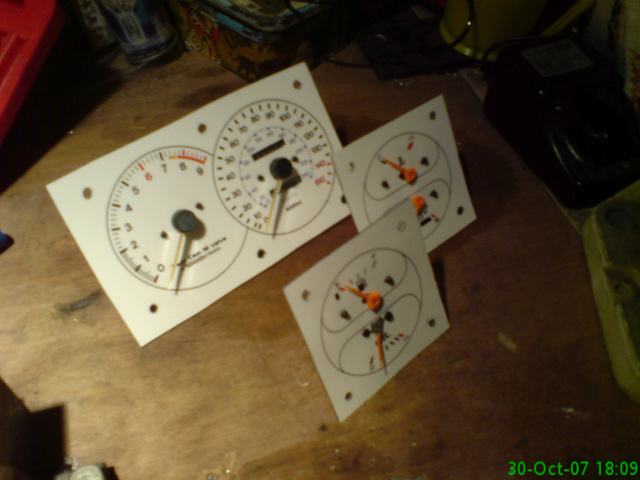
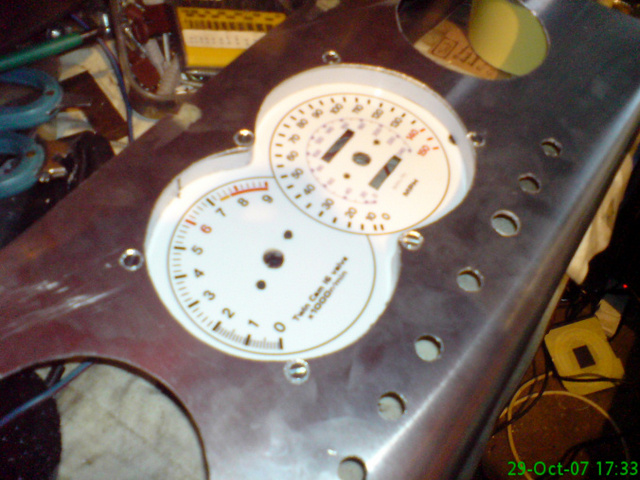
I took all the instruments out of the cluster removed the needles and the dial facias themselves. Managed to find an image of some white dials someone
had designed on a toyota forum. This printed out on clear acetate and then painted the back white. I did this so they could be backlit.

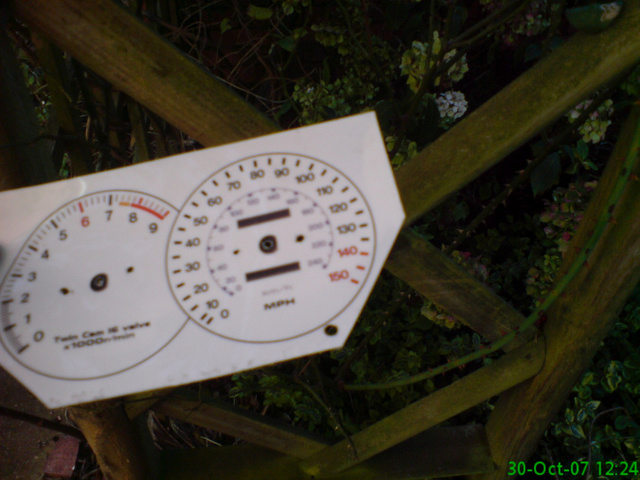
Dials printed and painted
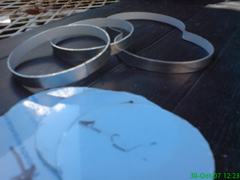
Then I got a sheet of 2mm transparent acetate to make the backing and the front windows for the dials. Cut this to shape simply with a pair of
scissors. Holes were also made for mounting the instruments and feeding the dial needles through...

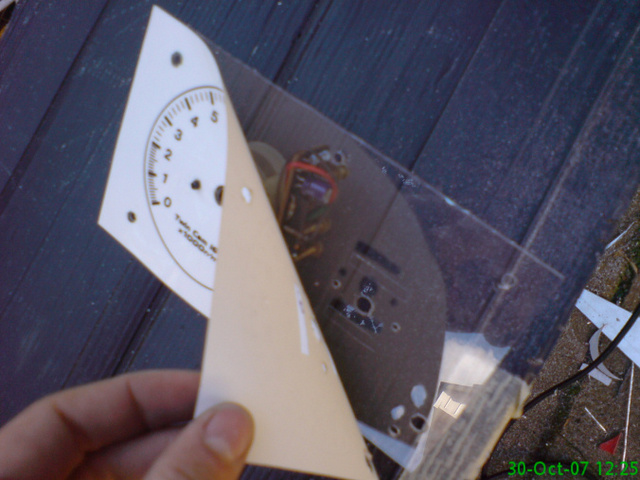
Dials on poly onto instrument

Dials ready for use
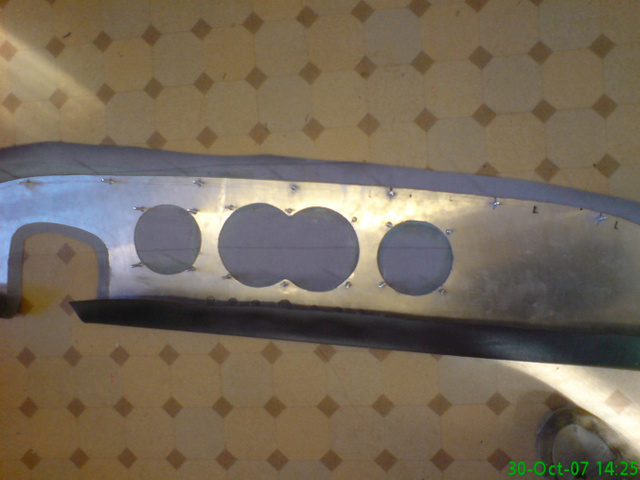
Next step was to take the 1.6mm ali sheet Id bought off ebay, cut it to size with a Jig-saw and give the lower edge a radius. Jig saw worked really
well with a metal cutting blade and I found that with a little concentration I was able to get some very neat cuts. The lower edge radius was achieved
by clamping a 35mm diameter broom handle onto the underside and using a rubber mallet to bend the lower dash around it.
Dash ready to have instument holes cut

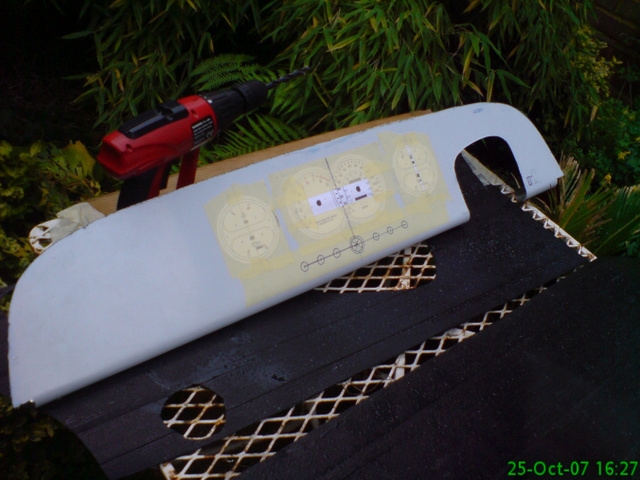
Blank ali dash, cut & radiised
Holes for the instruments were again cut with the jig saw. Would have been nice to have a good large hole saw but as im not a student any more (dont
get a student loan) and havent started my job yet (which is working at Qinetiq incidently) im fairly poor and couldnt afford one. The jig saw works
fine anyway when used carefully.

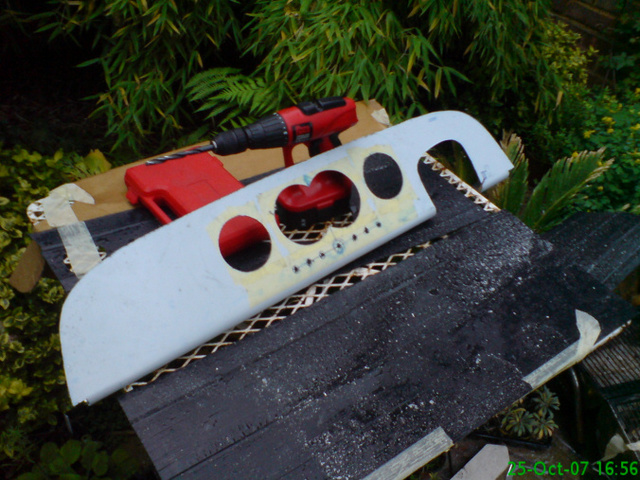
Instrument holes cut
I had decided the front windows of the instruments would be inline with the main dash and therefore to fit the needles in between them and the printed
backing a set of spacers would be made. Heres a nice crude image to show a cut through the side of an instrument....
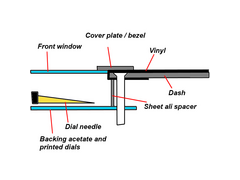
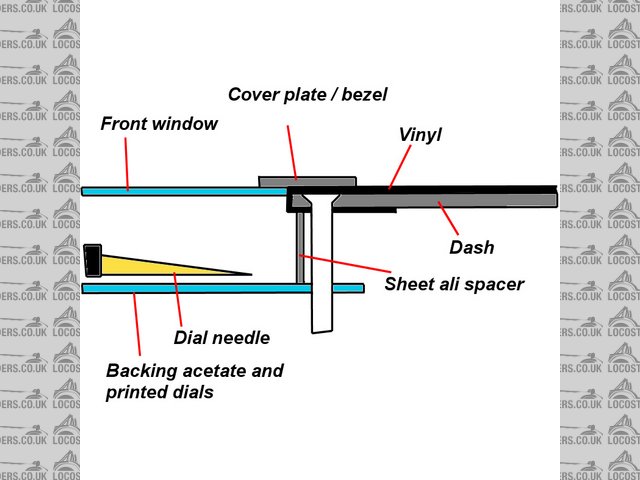
cut away diagram
The spacers were made from sheet ali, the same ali the dash was made from.

Dial spacers/surrounds
Counter sunk holes were used to trial fit the instruments in the dash before vinyl covering could commence. The countersunk screws were bonded in to
the dash before covering over the top of them.

Trial fitting

Vinyl covering
Finally the dials, lights and switches could be mounted into the dash to complete the job. As yet the front covering plates still need to be polished
and/or painted before i can truely say the job is done
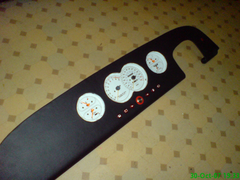
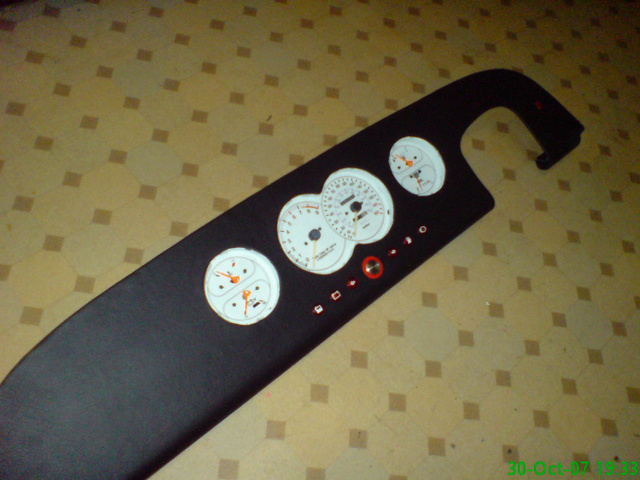
Finished 1

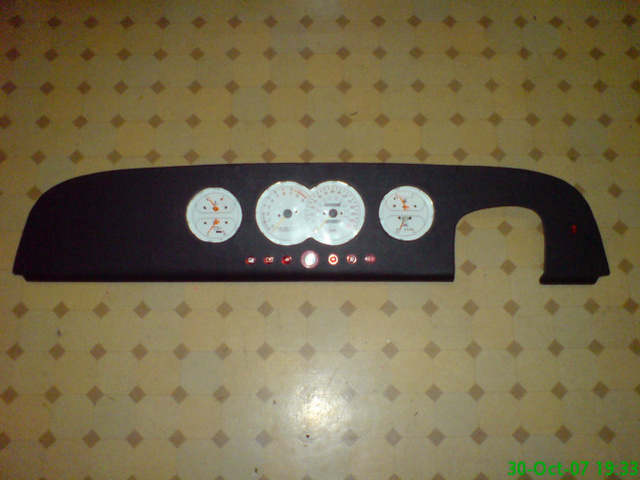
Finished 2
PS. ignore the small red circle around the start switch. it has been removed and the silver switch sits directly on the vinyl.
cheers for listening
Fin
fatfranky - 30/10/07 at 09:53 PM
Well done!
Nice looking job that, I do like it when someone comes up with a locost solution to create a nice looking result.
BenB - 30/10/07 at 09:53 PM
Nice one geezer! Looks very good and very un(locost)!!!!
Danozeman - 30/10/07 at 09:55 PM
Very nice job there mate. Looks very nice indeed.
I like it alot. I was planning to do something similar using sierra clocks but couldnt be bothered in the end. It wouldnt have come out looking as
good as yours does either..
[Edited on 30/10/07 by Danozeman]
nick205 - 30/10/07 at 10:19 PM
That's a cracking bit of work
Amazing what a bit of time, patience and ingenuity achieves.
ed_crouch - 30/10/07 at 10:19 PM
Agreed. Well done! A sierra pod still looks like a sierra pod even behind some GRP.
But that looks proper!
Again, nice job.
Ed.
Findlay234 - 30/10/07 at 10:30 PM
Yeah it was the time vs money trade off i had to consider. I spent...
ali dash - �13
printing - �4
paint - �0
vinyl - used about �3 worth
screws - �3
lights - �4
switches - �7
adhesive - �4
acetate - �4
Time and Patience - �priceless 
RK - 30/10/07 at 10:35 PM
Hey, that's the same original dash from the Canadian edition 84 Celica, that I happen to have. Hats off to you for that. It looks great! I would
have a fridge full of whatever you're drinking if you fly over to this part of Canada some time and do mine!! I am useless at this and I now
defer to experts.
Findlay234 - 30/10/07 at 10:54 PM
One thing i would recommend to someone about to do the same job is to keep the cluster surround so you know how to wire up the dials. Took me a while
(and a plea on the Mk1 Mr2 club forum) to work it out.
[Edited on 30/10/07 by Findlay234]
Jimbob - 31/10/07 at 12:10 AM
Very impressive, top job that man
Simon - 31/10/07 at 01:17 AM
Fin,
Very nice, as Nick 205 says
RK,
Stop putting yourself down - most of us haven't done any of this before and make the odd booboo. It took me two or three attempts to make scuttle
how I wanted it to look. Have a go, if you're not happy with result, have another go, using your experince gained first time round.
ATB
Simon
RK - 31/10/07 at 03:21 AM
Point taken. I hadn't actually realised I was doing that. My point here is that I do admire those who do a good job, especially on a budget.
It's very hard to do both.
Macbeast - 31/10/07 at 05:29 AM
Thanks for taking the trouble to share that. Nice job
Findlay234 - 31/10/07 at 08:37 AM
cheers for the replies lads...
and as simon says give it a go, youre going to make a few mistakes. Ive never done something like this and wasnt going to do it thinking 'if i
mess up the dash ill be looking at it for a long time' but then realised im building a whole car, a dash is small fry compared. Oh and i did make
a few mistakes.
Wanted to have frosted backing... didnt work too well had to paint it white to get the effect i was after (ruined a portion of the acetate was ok
though because id bought enough)
More issues with acetate, ruined a bit more when i started drilling holes using the original backing as a template. Got through three holes before
realising i had made my printed dials about 10% smaller. Purely my fault.
There is still a little issue with the dials at the moment and im deciding whether i can be bothered to rectify it or not.
cheers
Fin
02GF74 - 31/10/07 at 08:41 AM
good effort - especially the lower curvered dash - better than mine but then I was going to cover the dash. ?So it is not just me that spends days
working on an item.
you know you can on ebay buy nicely printed dial guage faces?
also with the pointers - if the speed is mechanical, the spindle is spring loaded so removing the needle may upset its 0 position so speedo may not
read correctly - likewise with the rev counter. It you have refitted in exactly same position, you should be fine.
You should try testing these prior to final fitting.
Have you forgotten to put the instrumenbt bulbs in?
Findlay234 - 31/10/07 at 11:18 AM
yes the speedo will need some work before SVA. the fact that the dials are 10% smaller also means that they might need a bit of fettling. But because
i printed them out myself and i have the layouts on the comp i can alter the dial to match the speedo. the dials are just held in with small nuts so
its easy to remove and adjust.
No bulbs. the dials will be backlit with either high power LED's (which i have lots of from my old job) or that thin neon style wire chavs use to
make christmas tree style interiors to their cars. ill post a lit up pic when its done
RazMan - 31/10/07 at 01:21 PM
Excellent work my man!
Just a thought about back lighting with LEDs. You might want to put a variable resistor in the power hookup to control the brightness. My Savage
switches were far too bright at night and all I could see was yhe reflection in the screen - very distracting.
bob - 31/10/07 at 03:39 PM
will we be admiring that dash at uxbridge next year finn, brilliant job 
thebull - 31/10/07 at 03:46 PM
very impressed. well done.
Findlay234 - 31/10/07 at 05:20 PM
Bob, itll be admired at every show and meet i can make!!!
Fozzie - 31/10/07 at 05:29 PM
Well done Fin!
Very innovative!
Looking forward to seeing your car at Uxbridge next year!
ATB Fozzie
John Bonnett - 1/11/07 at 01:40 PM
It never ceases to amaze me at the wealth of talent and skill here on the Locost site.
Your dashboard is a really fine piece of work brought together by creativity and skill and determination to produce a really profesional job.
p.s I liked it too!!
MikeRJ - 1/11/07 at 06:13 PM
Cracking job! I reckon some polished aluminium bezels would set that off a treat
Findlay234 - 1/11/07 at 08:51 PM
Thats exactly what im planning to do but how is the question. I need them to cover up the not 100% perfect fit between the windows and the dash. At
the moment ive got some surrounds about 10mm wide ali using the same 1.6mm sheet as the dash. To me they seem a bit wide im undecided about using them
as yet.
Is there anywhere i can get hold of proper bezels? Or does anyone have a simple way of making any? Only thing i can think of would be to get them
fabricated.
Will stick with the simple surrounds for now. can change later.
DavidW - 1/11/07 at 09:44 PM
Great job!
jabbahutt - 5/11/07 at 04:16 PM
that looks superb!!! quick question what did you use to bond the countersunk screws into your dash?
I'm just about to sort out the countersunk scews so your post is very well timed.
If mine turns out half as impressive as yours looks i'll be really happy with the result.
Nigel
Findlay234 - 5/11/07 at 08:16 PM
well i started by making over sized holes. drilled them standard 4mm but then went nuts with the countersinking bit. making the holes larger sinks the
heads a little more and allows a bit of space for glue underneath the vinyl. Then i superglued the screws in just to hold them lightly. After that i
gave them a good go with epoxy resin. theyre pretty solid. mum did manage to break one but i havent had any troubles and ive had to put the dash on
and remove it to make adjustments a number of times.
cheers
RichB - 6/11/07 at 01:17 PM
You've done a really good job here, you should be proud! I actually love the way the dials look with the bare ali.
Findlay234 - 7/11/07 at 07:39 AM
had thought about leaving it like that but worried about glare from the dash and id have also needed to edge it somehow or spend ages trying to make
the top edge as smooth as possible


