
Mould Making
OliilO - 2/2/15 at 11:17 PM
As a first proper effort at fibreglassing, I quite want to make a mould off one of my cycle wings and make a couple (as one is currently cracked a
bit), possibly with view of producing a carbon fibre pair in the future. I've had a look at the carbon mods/easycomposites guides but could
someone confirm the following process is roughly correct:
1. Apply appropriate release agent to finished surface of cycle wing (any recommendations that are both gel coat and cf friendly?)
2. Apply layer of gel coat and allow to set until tacky.
3. Apply layer of fibreglass tissue and then layer fibreglass as usual. How many layers and what density is a good guide for a mould?
4. Leave to set, remove original wing, finish any imperfections.
5. Apply release agent, then use mould to create new cycle wing.
Do I need to make the mould bigger than the cycle wing by extending the edges somehow, in order to give a bit of material to be trimmed/finished on
the final product?
With a view to using resin infusion techniques in the future, is it worth building some sort of flange round the edge of the mould to stick the
vacuum bag on? If so, how?!
Thanks in advance.
Oli
phil m - 3/2/15 at 06:55 AM
Hi
Easy composites site shows how to make a flange for future purposes.
Mould making is as you describe, but it's probably worth making a few small test pieces to begin with. In normal circumstances there's no
need for a an extra flange, you just trim back to the original.
I've made a mould for remaking cycle wings with excellent results
Phil
mark chandler - 3/2/15 at 08:42 AM
I made my moulds for front and rear wings out of MDF, cut the radius and hardboard
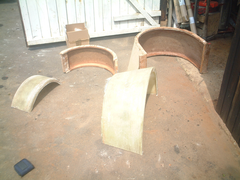

Wings
I then used some old multifinish plaster I had lying around and a ball to make the inside curvered edges, polished with beeswax and glassed up.
They came out pretty well, surface had a few pin holes but I just sanded down and painted, my aim was for very close fitting front wings, they sit
1/2" above my tyres, the stays are bolted and glued in place.
They front wings have broken free a couole of time now and survived so strong enough, the rear got smashed in a shunt so have replaced with second
hand items as I got bored with the shape I made.
No need then to make expensive blanks and cast moulds for these easy to make items.
HTH
steve m - 3/2/15 at 09:42 AM
My moulds were virtually the same as Marks, and just like his, my Front guards sit about 10mm of the tyre
steve
b14wrc - 3/2/15 at 12:14 PM
Hi,
Your method is about right for what your doing, i would use to layers of tissue as it helps stop the CSM from printing through and dont be tempted to
put too much gel coat on, if you can, two thinner coats are better than a really thick one.
I made my own bucket seat in a similar way, i made the plug (buck or pattern) from plasterboard and fibre glass. Note the flange around the outer
edge, if your going to do carbon, this is a must have because you will most likely be using the resin infusion RI method to make the panel, the flange
will give you a surface to attach the vaccum bag.
http://www.locostbuilders.co.uk/viewthread.php?tid=168685
My seat is just the prototype, i intend making carbon versions later.
Rob
OliilO - 3/2/15 at 11:55 PM
Thanks all, some useful stuff to think over. I'm not looking to start from scratch, Mark and Steve, as I'm happy with the shape of the
existing wings; just want to tidy up a tatty one and probably have a play with cf in the future.
I'll have a look at the easy composites site for detail on adding flanges.
How thick does the mould need to be to make it sufficiently rigid? 4/5 layers of CSM?
[Edited on 3/2/15 by OliilO]
