
Carbon Fibre - Making It Tidy
SmudgerEBT - 1/6/16 at 07:26 AM
So I need to do some side vents (mid-mounted with rads in the back as no room in the front), I have a basic mould (which I need to reinforce and add
layers too) which I will use to make a wet layup part (whilst it would be nice to do vacuum resin infusion its not worth the outlay for a handful of
parts) probably using epoxy clear coat.
Now it has 3 lots of right angle, getting the cloth into those corners will be difficult without distorting the cloth and probably the odd void.
So my idea is to run black (or maybe green/orange) gel coat with a width of 5mm around the edges and into the corners, this means the carbon fibre can
be cut into a sheet (3 pieces) and as long as time is spent getting it to line up, should be easier.
But will it just look cheap part finished with the gel coat strips and with that in mind is it worth investing into vacuum resin infusion and get that
to force the carbon into the edges?
My car is Green, would it be to much to do the parts in Green Carbon?
bi22le - 1/6/16 at 08:19 AM
I have never done carbon lay soy opinion is actually worth 0 but when watching youtube clips on this it actually seems quite easy to shape into
corners.
I use youtube to learn most car related things and there are loads of good bits on there about CF fabrication.
Personally i feel a slightly off weive would look better than green gelcoat and certainly less risk of breaking, unless you run the weive throught the
gelgoat aswell.
Maybe increase the rad to make it easier to form?
Neville Jones - 1/6/16 at 08:48 AM
Wet layup and a bit of vacuum will do the job for you. Forget resin infusion as it ends up with resin rich/dry areas, and gets messy, and also wastes
far too much in consumables.
Done every day in the marine industry, and a lot of the times an ordinary household vac will be more than adequate, depending on resin.
Cheers,
Nev.
coyoteboy - 1/6/16 at 08:52 AM
Could you not get a metre or two of prepreg, shape, vacuum and oven cure?
Personally I've never managed to get a decent finish on a wet layup without massive excess resin and hours of sanding.
Neville Jones - 1/6/16 at 09:02 AM
quote:
Originally posted by coyoteboy
Could you not get a metre or two of prepreg, shape, vacuum and oven cure?
Personally I've never managed to get a decent finish on a wet layup without massive excess resin and hours of sanding.
That's the difference that 40+ years of experience gives. 
Beginners tend to overwet the layups, and don't roll out the layup properly, if at all.
Prepreg can introduce a minefield of problems. It can have anywhere between 35% and 45% resin, and the lighter end will definitely need a clave, and
even then will end up with pinholes in the surface.
The higher resin pregs are mainly used as surface.first layer, to get that pinhole free smooth surface then layup with dryer behind. Not something
for the budget conscious!
Tooling finish has as much to do with end result as anything else. Then there's release systems. Some will let the resin spread nice and smooth,
some quite the opposite.
Cheers,
Nev.
Theshed - 1/6/16 at 11:40 AM
Can you not iron out the right angles with a fillet of wax? Look on the easy composites web site. I agree that it is a bugger to get carbon into a
right angle.
I am not sure many would agree with the suggestion that resin infusion is more likely to give resin rich areas than wet layup and a household
vac....
A household vacuum will pull 80 inches of water - about 3psi. A proper vacuum pump will (as it says on the tin) get close to a vacuum - so 14.7psi
That said I see no reason why a careful wet layup will not be both strong (enough) and good to look at.
SmudgerEBT - 1/6/16 at 11:44 AM
Trying to do things on a budget (or as much as I can).
So wet lay up is cheaper than vacuum, no expense on breather fabrics, pump etc
However, just lay a sheet of carbon cloth in the make shift mold and vacuum would force the cloth into shape, where as wet lay up might not (not
without some weave going wonky), which with vacuum means I wouldnt have to have a band of gel coat around the edges to keep it pretty.
But if I invest in vacuum, that does open to do brackets for various things.
Neville Jones - 1/6/16 at 11:53 AM
Resin infusion by its very nature and method, will give a rich area where the resin is introduced. Then there's the pitfalls for the unwary.
I've made nearly all the mistakes, but I'm sure there's a few that have still to come. It's not something for the amateur to dive
into, unless he is prepared for a string of mistakes. Then there's the waste, as I mentioned.
Vacs..Our shop vac will pull down to 120mb, our household Henry down to 200mb. Both way more than you need for wet layup vaccing. If your household
vac is what you say, you better get down to Argos and buy a Henry. Best home vac we've ever had! 
My pump for the clave is two stage and oil lubed to run constantly and give about as ultimate a vacuum as you can get. Not cheap, and definitely not
for a home hobbyist to consider.
Cheers,
Nev.
FuryRebuild - 1/6/16 at 01:06 PM
Hi All
I disagree that resin infusion leaves dry and rich areas. It's one of the most reliable methods to get a uniform, bare minimum amount of resin in
the part. However, it is an involved technique and requires the correct equipment and you need to hone your technique. You won't properly pull
resin through a part with a household vac, and without a catch-pot you run the risk of getting resin in it. That's the end of the Vac. For a
reasonable part, it's not unheard of to pull vac for 30 mins or more just to get the resin through. A household vac would suffer with that kind
of duty cycle. Vacuum pumps are designed as 2 stage pumps so they can run for hours.
You only end up with a resin rich part if you let the resin run in after you turn off the vac. To do it properly, you have the mould and resin at
about 30C where the viscosity is then correct for infusion resin such that when the visible part fully penetrated with resin, it will have run all the
way through. If you are getting dry spots with cores, that's usually when the core hasn't been scored properly to allow resin travel
underneath - flow-mesh takes care of on top.
To get a structurally correct part, you get the resin fully flowed through, then shut off the feed and let the vac run until it gels off. This
guarantees the bare minimum of resin in the part. It also gives you the best chance of pulling out any air you've introduced. Infusion resin is
carefully designed for viscosity - once it's all in and wetted out, you have the correct resin/cloth/core ratio. Any more than that which you
need is waste. You do lose some to the tubing, flow mesh, etc. but that's still far less resin in the part than say wet-lay. Oven-temp non
autoclave pre-preg is an option, but it can be difficult to avoid pin-holes, and you still need a method to properly press the layers together into
one fused part (say vacuum) to avoid delamination. With resin infusion, if you are unlucky and get air in the part, you run a risk of pin-holes as
well. There are ways of being certain you haven't introduced any air. As I said, technique.
With regard to surface finish, it does depend on mould surface, keeping air out of the part, and release agent. PVA will get you a release from
anything, but it's hard to get a shine on it.
With regards to right-angles - don't do it. I generally run to a minimum radius of 10mm when making a buck for a mould (quadrant beading from
B&Q is your friend). If you try and get into right angles you will get bridging and it will look bad. If you need right angles, I would lay into
the mould in right angles, but then put a equilateral triangle of core material into the corner and put the backing layers in that way so you avoid
bridging. Bear in mind if you're using something like 200gsm cloth then you will need a minimum of 2 layers facing to avoid seeing whatever
backing layer you're using. You may still end up with dry spots this way.
I also use plasticene to make fillets, and then a filleting tool to push it in and simultaneously shape the fillet. East Coast Fibreglass sell this
stuff, and I have loads of spare plasticene. I'll post you a brick if you want.
I'd advise for 'on the cheap' just having a crack at wet-lay if you just want to have done it. It's the cheapest way in. For a
structural part, I'd look at infusion but you need to consider the cost of entry. OR ... find something out there that you like and buy it.
If you take a read of this blog post www.furyrebuild.co.uk you can see where I put a part and a couple of test
parts under the microscope to show air bubbles in a part and one where it was infused without any air-ingress.
[Edited on 1/6/16 by FuryRebuild]
Theshed - 1/6/16 at 01:35 PM
err 200mb = just under 3psi
The other reason not to use a domestic vacuum is that they rely on air flow to avoid overheating. You could use a domestic vacuum to pull out the
majority of the air but that is about it.
Have a read here.
http://www.fram.nl/workshop/vacuum/
Vmax1974 - 1/6/16 at 02:53 PM
Where are you based i have my composites pump you could come and use if your north east
bi22le - 1/6/16 at 03:06 PM
I fancy doing something like this but i get the gist that the best idea is to use GRP or fab from from ali and weld. . .
bi22le - 1/6/16 at 03:08 PM
Actually on this topic can I ask a really silly question?
Most CF mouldinng is using a buck that you lay onto, the the contact netween the buck and the part is the outside of the finished part.
Can i make a male mould so i skin the buck with CF and then seperate. Will I be able to get a good finish on the outside still?
SmudgerEBT - 1/6/16 at 03:10 PM
North West, Stockport (near Manc).
So could I wet lay then just vacuum (thru the ply etc) to remove excess resin?
Have seen that easycomposites do a cloth with resin impregnated already, so that will make it stay in one place a bit easier.
Now to get the rear arches and start sorting out the vents, so I can build then.
Will post a pic of an early attempt to show what I mean.
Vmax1974 - 1/6/16 at 03:23 PM
quote:
Originally posted by bi22le
Actually on this topic can I ask a really silly question?
Most CF mouldinng is using a buck that you lay onto, the the contact netween the buck and the part is the outside of the finished part.
Can i make a male mould so i skin the buck with CF and then seperate. Will I be able to get a good finish on the outside still?
The mould is just a polished negative of the final piece the finish you get is always the same as the mould if you spend thw time and effort when you
make the mould the less time and effort you need to put into finishing the final item
If you skin the buck with CF you will have to spend ages finishing the part and it will be about 2mm bigger than the buck due to the thickness of the
materials you use
Hope that helps
SmudgerEBT - 1/6/16 at 03:39 PM
Am just waiting for easycomposites to confirm me on the forum so I can annoy them with questions.
Off to take pics of what I want to make, both in terms of mold and parts.
Pics will explain better than my co-codomol ramblings.
SmudgerEBT - 1/6/16 at 04:28 PM
So looking at making a mould of this:


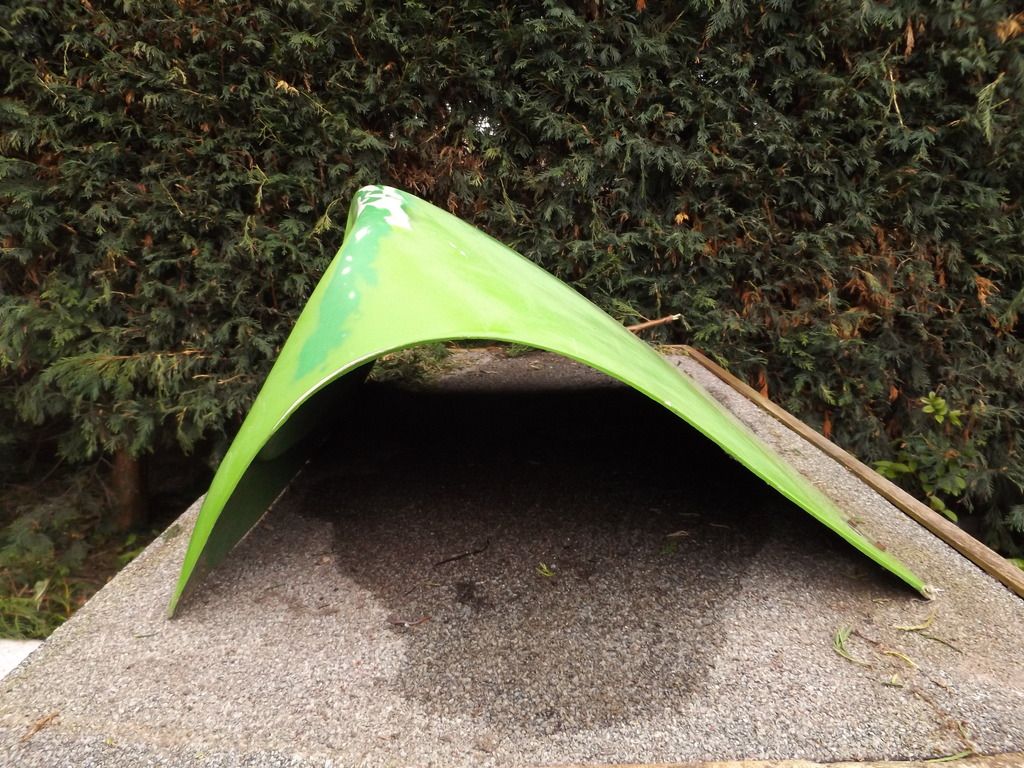
Would it be better to extend the part for the mould (for instance use playing cards taped up to give an extra 4 inch or so) or do it at right angles
and 2 part the mould?
Now in the center pic you can see the "ridge", now will the carbon go into that or deform? If deform its not a problem since just get it
painted green (with the rest of the car) and only leave certain sections showing.
Or just do it in csm & woven and vacuum that. The idea is to reduce weight a bit and if possible a bit of bling.
Now the vents:
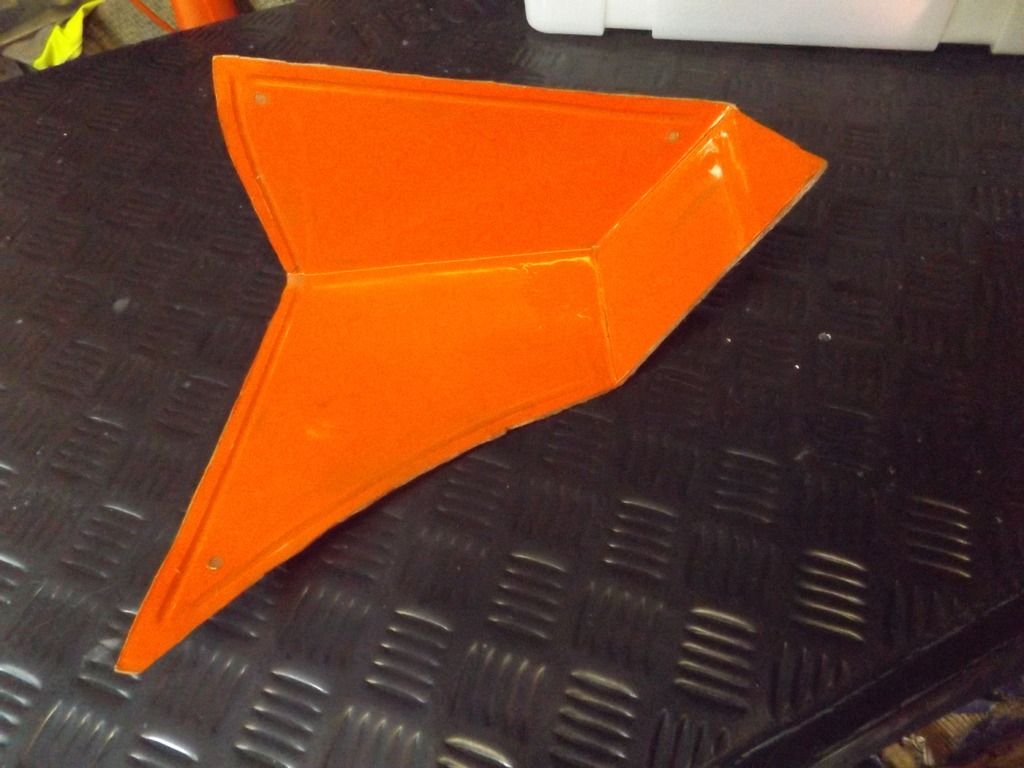
Basic mould.
As you can see, some sharp curves, will the vacuum press the carbon into that with deforming or is my idea of running a (black) gel coat strip around
edges and the center joins a better idea?
Vmax1974 - 1/6/16 at 04:42 PM
The larger part with work could be moulded as 1 piece maybe use corex to make a flange all the way round
Laying the carbon i would lay it in sections maybe use a 2 inch tow as a racing stripe to separate the layers from one side to another
The vent could be made in sections or you could use the gel depending on your preference
Neville Jones - 1/6/16 at 04:52 PM
The pressures I stated are ultimate, ie gauge. So 200mb is ~800mb below ambient, and not 3psi less than ambient. Maybe I wasn't clear.
There seems to be a lot of people with conflicting input. I just wonder, how many do this stuff for a living?
There's only one sure way of getting even resin distribution, and that's prepreg. Everything else is second best. Any man who suggests resin
infusion is as good as prepreg, hasn't done the resin content testing on finished parts. There is a well known composite company not a mile away
here, and they've tried everything, and have settled on prepreg and/or their own novel material system with vacuum. They tried resin infusion, in
all it's iterations, and customer tests on parts had them discarding up to 75% of parts. Customers include Rolls Royce and Aston Martin. There
was a boatyard in Lymington, who were sold the idea of infusion as far back as 1978. The results were sat out in the back of the yard up until a few
years ago.
Don't get me wrong, infusion has its place, but not anywhere in my work or workplace. I know tractor people who use it, and also
commercial/industrial/architectural parts makers who use it. All of which don't give a monkeys about resin content or rich/dry areas. All they
want is a quick cheap part, and that's what it gives.
Resin infusion with a home vac is not what I suggested either.
A wet layup, ie put the fibre in the mould then brush in resin without letting it pool, then peel ply (supermarket bag), then breather (wadding from a
clothing material store) and a bag made from heavy plastic ( or clear heavy duty bin bag, or heavy plastic from Screwfix for covering for painting )
sealed up with duct tape or any decent tape. Put the vaccuum on it and let it cure.
What's so technical and difficult about that? The only difference to what I wrote above in my work, is that I buy peel ply on 200m rolls, and
same with breather. Times when I've run out of breather it's off to the local dressmaking shop, for wadding. Same stuff. I do this work just
about every day and first learned it back in 1972, making helicopter blades in remote parts of the commonwealth, and doing wet layup work boatbuilding
for a lot of years before that. Anyone who can hand lay poly resin and get minimum content, can do any sort of laminating.
There's a lot of people on Youtube and the 'net who want you to believe that vacuum consolidation is a mystical art, it's not.
I'm writing this as I wait for an intake plenum to set in the moulds, and it's being made just as I wrote above, but with an old vac pump
and not a cleaner. Noisy old pump it is too!
At the other end of the scale, I use prepreg in autoclaves that I build myself from commercially available parts. Again, no great science, just
simple, practical applied common sense and engineering.
Cheers,
Nev.
Vmax1974 - 1/6/16 at 05:04 PM
quote:
Originally posted by Neville Jones
The pressures I stated are ultimate, ie gauge. So 200mb is ~800mb below ambient, and not 3psi less than ambient. Maybe I wasn't clear.
There seems to be a lot of people with conflicting input. I just wonder, how many do this stuff for a living?
There's only one sure way of getting even resin distribution, and that's prepreg. Everything else is second best. Any man who suggests resin
infusion is as good as prepreg, hasn't done the resin content testing on finished parts. There is a well known composite company not a mile away
here, and they've tried everything, and have settled on prepreg and/or their own novel material system with vacuum. They tried resin infusion, in
all it's iterations, and customer tests on parts had them discarding up to 75% of parts. Customers include Rolls Royce and Aston Martin. There
was a boatyard in Lymington, who were sold the idea of infusion as far back as 1978. The results were sat out in the back of the yard up until a few
years ago.
Don't get me wrong, infusion has its place, but not anywhere in my work or workplace. I know tractor people who use it, and also
commercial/industrial/architectural parts makers who use it. All of which don't give a monkeys about resin content or rich/dry areas. All they
want is a quick cheap part, and that's what it gives.
Resin infusion with a home vac is not what I suggested either.
A wet layup, ie put the fibre in the mould then brush in resin without letting it pool, then peel ply (supermarket bag), then breather (wadding from a
clothing material store) and a bag made from heavy plastic ( or clear heavy duty bin bag, or heavy plastic from Screwfix for covering for painting )
sealed up with duct tape or any decent tape. Put the vaccuum on it and let it cure.
What's so technical and difficult about that? The only difference to what I wrote above in my work, is that I buy peel ply on 200m rolls, and
same with breather. Times when I've run out of breather it's off to the local dressmaking shop, for wadding. Same stuff. I do this work just
about every day and first learned it back in 1972, making helicopter blades in remote parts of the commonwealth, and doing wet layup work boatbuilding
for a lot of years before that. Anyone who can hand lay poly resin and get minimum content, can do any sort of laminating.
There's a lot of people on Youtube and the 'net who want you to believe that vacuum consolidation is a mystical art, it's not.
I'm writing this as I wait for an intake plenum to set in the moulds, and it's being made just as I wrote above, but with an old vac pump
and not a cleaner. Noisy old pump it is too!
At the other end of the scale, I use prepreg in autoclaves that I build myself from commercially available parts. Again, no great science, just
simple, practical applied common sense and engineering.
Cheers,
Nev.
I have to agree i have been working with composites for coming up for 19 years now and prepreg does produce the best results i have cured prepreg with
a few bits of foil backed foam insulation board from bond and quale and a electric 3 bar heater and barbecue thermomiter it should be considered a
real contender for what you're looking for
SmudgerEBT - 1/6/16 at 05:09 PM
Always interested in learning new things and ways.
So corex glued on the underside, all painted with (for instance) EasyComposites Pattern-Coat Primer followed with EasyComposites Pattern-Coat Hi-Gloss
then go with epoxy resin (for clear coat) carbon, carbon, carbon, carbon, breather etc vacuum pull?
Any cheaper Primer etc links please.
Vmax1974 - 1/6/16 at 05:28 PM
Imho Start with the vent mould first use plenty at least 10 coats of wax to get good reliease take your time and enjoy the process
The bigger part i would take it to a local bodyshop and say "paint that in whatever colour the next job is painted in" i get a lot of raf
grey like that as my neighbour paints aircraft for the raf then i would take a grp mould then "break that in" then pull the carbon from that
finish will be much better when your finished
Tip if you use a piece of masking tape push it against the waxed surface of the mould if when you pull it off if there is very little resistance then
there is enough release agent in the mould if in doubt add another coat of wax
twybrow - 1/6/16 at 05:50 PM
quote:
Originally posted by Neville Jones
Resin infusion by its very nature and method, will give a rich area where the resin is introduced. Then there's the pitfalls for the unwary.
I've made nearly all the mistakes, but I'm sure there's a few that have still to come. It's not something for the amateur to dive
into, unless he is prepared for a string of mistakes. Then there's the waste, as I mentioned.
Vacs..Our shop vac will pull down to 120mb, our household Henry down to 200mb. Both way more than you need for wet layup vaccing. If your household
vac is what you say, you better get down to Argos and buy a Henry. Best home vac we've ever had!
My pump for the clave is two stage and oil lubed to run constantly and give about as ultimate a vacuum as you can get. Not cheap, and definitely not
for a home hobbyist to consider.
Cheers,
Nev.
Nev that is not correct unkess you cure with your inlet open to atmosphere. During thr infusion there will be a pressure drop between inlet at
atmospheric and outlet at vacuum. Once all wet out and before gelation, you need to shut off the inlet and the pressure gradient will equalise and
the resin rich areas should disperse. Once the inlet is shut, it is exactly the same as wet layup and vac bag.
The problem with sharp right angle corners is that the fibre will never want to take up that shape without some force (vac) to hold it into the rad.
It is better to fill out thise corners with filler to give you a larger radius rather than bodging with gel coat.
And in case you are unsure, yes, i do this for a living for one of the largest composite suppliers in the world - string and glue is the future!
SmudgerEBT - 1/6/16 at 06:02 PM
quote:
Originally posted by twybrow
quote:
Originally posted by Neville Jones
Resin infusion by its very nature and method, will give a rich area where the resin is introduced. Then there's the pitfalls for the unwary.
I've made nearly all the mistakes, but I'm sure there's a few that have still to come. It's not something for the amateur to dive
into, unless he is prepared for a string of mistakes. Then there's the waste, as I mentioned.
Vacs..Our shop vac will pull down to 120mb, our household Henry down to 200mb. Both way more than you need for wet layup vaccing. If your household
vac is what you say, you better get down to Argos and buy a Henry. Best home vac we've ever had!
My pump for the clave is two stage and oil lubed to run constantly and give about as ultimate a vacuum as you can get. Not cheap, and definitely not
for a home hobbyist to consider.
Cheers,
Nev.
Nev that is not correct unkess you cure with your inlet open to atmosphere. During thr infusion there will be a pressure drop between inlet at
atmospheric and outlet at vacuum. Once all wet out and before gelation, you need to shut off the inlet and the pressure gradient will equalise and
the resin rich areas should disperse. Once the inlet is shut, it is exactly the same as wet layup and vac bag.
The problem with sharp right angle corners is that the fibre will never want to take up that shape without some force (vac) to hold it into the rad.
It is better to fill out thise corners with filler to give you a larger radius rather than bodging with gel coat.
And in case you are unsure, yes, i do this for a living for one of the largest composite suppliers in the world - string and glue is the future!
So would you say the orange pic is ok to do with carbon and vacuum?
Vmax1974 - 1/6/16 at 06:17 PM
I have made envelopes from vag bag and just put the part in that i can put my wheel arch and dash moulds in them as they dont have the edge to seal
the bag too so doing the same on that vent mould will be simple enough ,
bi22le - 1/6/16 at 08:18 PM
I habe just watched the easycomposite how to guides.
My god that looks like a lot of hard work. The chances of me being able.to make a buck, to make mold to then layup and make a part properly are slim.
I would say Im good with practical things but it looks tough.
So, i may give it a go and therefore have some questions!
In the vid they have a dedicated oven with timer and vac line, i assume making one of these will be hard work at home?
Also the pump is specialist as previously discussed on this thread. I bet they are expensive and see non second hand on ebay. What are my options?
twybrow - 1/6/16 at 11:17 PM
Smudger - that orange part could be made by any of the processes discussed. Wet lay, wet lay and vacuum, resin infusion or prepreg. If you have the
tool, it isn't much work to have a crack at a part, post the results and we can help with any problem areas. The joy of composites is for these
sorts of parts, they are very repairable should you make a pigs ear of it.
I agree with Nev that consumables can add up, and infusion uses a little more than just bagging, but when you get your technique sorted, it is a great
process to do at home. Vac pumps can be had on ebay for �50 (or make one from an old fridge!). Just remember to wear PPE, and take your time.
ceebmoj - 1/6/16 at 11:37 PM
I'm central stockport if you fancy having a look at what I have been up to. Which is a combination of wet lay up and resin infusion carbon bits.
SmudgerEBT - 2/6/16 at 07:30 AM
quote:
Originally posted by ceebmoj
I'm central stockport if you fancy having a look at what I have been up to. Which is a combination of wet lay up and resin infusion carbon bits.
Thats a nice offer of which I will take you up on that!
Just up the A6 in Hazel Grove.
SmudgerEBT - 2/6/16 at 07:33 AM
quote:
Originally posted by twybrow
Smudger - that orange part could be made by any of the processes discussed. Wet lay, wet lay and vacuum, resin infusion or prepreg. If you have the
tool, it isn't much work to have a crack at a part, post the results and we can help with any problem areas. The joy of composites is for these
sorts of parts, they are very repairable should you make a pigs ear of it.
I agree with Nev that consumables can add up, and infusion uses a little more than just bagging, but when you get your technique sorted, it is a great
process to do at home. Vac pumps can be had on ebay for �50 (or make one from an old fridge!). Just remember to wear PPE, and take your time.
Am thinking vacuum even if it with wet layup (rather than infusion unless I can see it being easier in the long run) which means epoxy?
So when you say vac pumps on ebay for �50, which ones? Have read the the old fridge ones contain oil? Is that right? Also would need a catch can for
the excess resin, is it better to buy one of them from easy (for instance) then gamble on an ebay special?
Neville Jones - 2/6/16 at 09:05 AM
There's a point which needs to be made, and it's usually taught on the very first day.
In any sort of composite work, from poly resin and csm, to carbon and the latest high spec fibres, and the point is that any corners need as big a
radius as possible. Whether the corner is inside or out, the fibres don't like to bend. At least not without a lot of help.
In the clave we get corner radii down to 2mm by using intensifiers, but for anything else, the limit seems to be about 8mm for inside, maybe 5~6mm at
a push.
As for resins, we use a lot of vinylester for marine work, and some car stuff. It's a good halfway on costs and strength, and different hardeners
can be had to push out gel times, and some that only react with higher temps, making working times a lot more sensible.
And for the man in his garage, resin infusion is not a cheap option. You'll most likely throw away everything that comes into contact with the
resin, unless you buy the silicone diffusers and hoses and special fittings, and a lot of mek to clean what is disconnectable after the resin is
input, with.
Nev
twybrow - 2/6/16 at 07:34 PM
quote:
Originally posted by SmudgerEBT
quote:
Originally posted by twybrow
Smudger - that orange part could be made by any of the processes discussed. Wet lay, wet lay and vacuum, resin infusion or prepreg. If you have the
tool, it isn't much work to have a crack at a part, post the results and we can help with any problem areas. The joy of composites is for these
sorts of parts, they are very repairable should you make a pigs ear of it.
I agree with Nev that consumables can add up, and infusion uses a little more than just bagging, but when you get your technique sorted, it is a great
process to do at home. Vac pumps can be had on ebay for �50 (or make one from an old fridge!). Just remember to wear PPE, and take your time.
Am thinking vacuum even if it with wet layup (rather than infusion unless I can see it being easier in the long run) which means epoxy?
So when you say vac pumps on ebay for �50, which ones? Have read the the old fridge ones contain oil? Is that right? Also would need a catch can for
the excess resin, is it better to buy one of them from easy (for instance) then gamble on an ebay special?
Single Stage 2.5CFM 1/4HP Rotary Vane Deep Vacuum Pump 180W 1/4HP
These are the same as easy composites sell. A catch pot can be made very simply with any sort of sealed tub that you can fix pipes in via the lid. A
roll of tacky tape to sesl it uo and off you go. The pvc hose costs peanuts as does spiral wrap (and yes, they are consumables) so not really sure
why Nev thinks it is all so costly. You could be fully setup for �100 and never have to expose yourself to resins, which is a plus imho.
Nev see my earlier point re the radius - fully agree with your numbers. Better to sort it than bidge a sharp edge.
SmudgerEBT - 3/6/16 at 08:19 AM
The hunt is on for cheapness!
Going for release wax rather than pva as well.
Glasplies seem nice and cheap for things.
Moulds: Now thinking tissue, csm, woven and then tissue to keep it tidy?
Or go with the uni-mould kit from Easy?
Vmax1974 - 3/6/16 at 08:29 AM
quote:
Originally posted by SmudgerEBT
The hunt is on for cheapness!
Going for release wax rather than pva as well.
Glasplies seem nice and cheap for things.
Moulds: Now thinking tissue, csm, woven and then tissue to keep it tidy?
Or go with the uni-mould kit from Easy?
For moulds just keep is simple i use
Tooling gel
6x 450g csm
Braced approapriatly with bits of wool or steel or ally whatever is laying about and will do the job
Leave it to harden for a week
20 coats of wax applied 1 hour apart
Gelcoat
100g csm resin
Pull and bin
The mould will be then ready to use
Never used the unimould system but it looks like an easier alternative
SmudgerEBT - 3/6/16 at 08:44 AM
Easier (and I do like green) but more expensive.
Suppose have to look at time/cost ratio.
The less time spent messing with resins and csm the better.
Neville Jones - 3/6/16 at 12:54 PM
The reason I see infusion as costly is that you are having to throw away tubes and fittings that get resin in them. If you can disconnect at least the
tubes and clean them, then that's a cost saved, but at the added cost of solvents to clean them. Goes in roundabouts. Then there's the
exposure to the solvents to deal with, and dispose of.
The proper silicone infusion pads aren't cheap but a one-off setup cost.
As for exposing to resin......the health and safety stuff about epoxies is endless. The epoxy hardeners are among the worst carcinogens known to
man. Don't say you weren't warned in twenty years time! So it's big gloves and respirators when mixing the resin. At the local
place I mentioned, it's rare for employees being there more than a year and not developing skin conditions, even if they don't go close to
the raw materials.
H&S about poly and vinyl esters is a very small number of sheets,(mainly don't drink it or spread it on bare skin!) compared to the volumes
about epoxies and phenolics.
I don't want to continue this, those who think infusion is the best thing since a factory bread slicer, will keep arguing the pro's. I know
that it is a practice that has been tried around here and promptly dropped. The reason it's not used here is the type of work being done, and
demanding standards the work has to be inspected to. I've never seen an infused part pass ultrasonic testing for uniformity of thickness and
resin content. Without knowing the infusion points, you can see them plain as dogs danglies on a cat, on the screen, as the sonic head is passed over
them, when a large car bonnet is tested. That's enough proof for me.
The same bonnet hand laminated wet then bagged, showed none of the prominent points. The only proviso in all this, is that the wet layup needs to be
done by properly experienced workers, who are meticulous. A bad wet layup can be worse than a badly infused part, it comes down to skill and care of
the operators involved. Autoclaved prepreg shows up as near to perfect as can be achieved.
Infusion has it's place, as I put a few posts ago, with cheap and quick parts. I wouldn't waste good carbon or expensive fibres on infusion
though.
I really don't want to continue this. I've got my opinions, formed from nearly fifty years of messing with fibres and resins or all types,
the i'net experts have theirs. And like backsides, mine smells like roses, and yours stink! 
Cheers,
Nev.
twybrow - 3/6/16 at 01:56 PM
quote:
Originally posted by Neville Jones
The reason I see infusion as costly is that you are having to throw away tubes and fittings that get resin in them. If you can disconnect at least the
tubes and clean them, then that's a cost saved, but at the added cost of solvents to clean them. Goes in roundabouts. Then there's the
exposure to the solvents to deal with, and dispose of.
The proper silicone infusion pads aren't cheap but a one-off setup cost.
As for exposing to resin......the health and safety stuff about epoxies is endless. The epoxy hardeners are among the worst carcinogens known to
man. Don't say you weren't warned in twenty years time! So it's big gloves and respirators when mixing the resin. At the local
place I mentioned, it's rare for employees being there more than a year and not developing skin conditions, even if they don't go close to
the raw materials.
H&S about poly and vinyl esters is a very small number of sheets,(mainly don't drink it or spread it on bare skin!) compared to the volumes
about epoxies and phenolics.
I don't want to continue this, those who think infusion is the best thing since a factory bread slicer, will keep arguing the pro's. I know
that it is a practice that has been tried around here and promptly dropped. The reason it's not used here is the type of work being done, and
demanding standards the work has to be inspected to. I've never seen an infused part pass ultrasonic testing for uniformity of thickness and
resin content. Without knowing the infusion points, you can see them plain as dogs danglies on a cat, on the screen, as the sonic head is passed over
them, when a large car bonnet is tested. That's enough proof for me.
The same bonnet hand laminated wet then bagged, showed none of the prominent points. The only proviso in all this, is that the wet layup needs to be
done by properly experienced workers, who are meticulous. A bad wet layup can be worse than a badly infused part, it comes down to skill and care of
the operators involved. Autoclaved prepreg shows up as near to perfect as can be achieved.
Infusion has it's place, as I put a few posts ago, with cheap and quick parts. I wouldn't waste good carbon or expensive fibres on infusion
though.
I really don't want to continue this. I've got my opinions, formed from nearly fifty years of messing with fibres and resins or all types,
the i'net experts have theirs. And like backsides, mine smells like roses, and yours stink!
Cheers,
Nev.
So the infused primary structures on aircraft are clearly flying in the face of convention then Nev! I can assure you, it can be made well, and pass
NDT. I am not saying it is the only process, far from it, just that it has its place, and can be great at home. There is a chap on here who has made
some beautiful parts with infusion. For the applications being discussed, who cares if it has porosity/voidage, these are not structural parts!
If you comment about iNet experts is aimed at me, feel free to do your research first.
Neville Jones - 3/6/16 at 02:06 PM
quote:
Originally posted by twybrow
.......
So the infused primary structures on aircraft are clearly flying in the face of convention then Nev! I can assure you, it can be made well, and pass
NDT. I am not saying it is the only process, far from it, just that it has its place, and can be great at home. There is a chap on here who has made
some beautiful parts with infusion. For the applications being discussed, who cares if it has porosity/voidage, these are not structural parts!
If you comment about iNet experts is aimed at me, feel free to do your research first.
The comment isn't aimed at you, so don't get all in a tizzy, but mainly at the Youtube 'how easy is it..' videos.
I'm intrigued to know what stressed 'primary structures' you refer to???? All that I encounter are prepreg and claved.
SmudgerEBT - 3/6/16 at 03:49 PM
A thing for me is I can't do the 2k top coat myself, so would have to farm that out.
Happy to go with wet vacuum, but needs to be uv stable straight from the mould, otherwise its just another cost.
And for me its always informative to read as many points of view as possible, especially from those who are working within the industry and may/will
have ways of working.
Hence me asking about ways of making tidy carbon fibre.
twybrow - 3/6/16 at 10:29 PM
quote:
Originally posted by Neville Jones
quote:
Originally posted by twybrow
.......
So the infused primary structures on aircraft are clearly flying in the face of convention then Nev! I can assure you, it can be made well, and pass
NDT. I am not saying it is the only process, far from it, just that it has its place, and can be great at home. There is a chap on here who has made
some beautiful parts with infusion. For the applications being discussed, who cares if it has porosity/voidage, these are not structural parts!
If you comment about iNet experts is aimed at me, feel free to do your research first.
The comment isn't aimed at you, so don't get all in a tizzy, but mainly at the Youtube 'how easy is it..' videos.
I'm intrigued to know what stressed 'primary structures' you refer to???? All that I encounter are prepreg and claved.
Fair enough, I thought it was aimed at me.
The Bombardier C-series has infused wings, and we have just done another large passenger aircraft wings, but it hasn't been publicised yet.
Airbus and Boeing are moving this way in a big way - infusion has come a long way! Agrees it isn't easy, but i would say more accessible at home
than a lot of people think.
Cheers Nev - I bet we have met at some point, the composites world is still.small enough that most of us know each other!
Neville Jones - 4/6/16 at 02:41 PM
Airbus and Boeing? They're having enough problems getting weights down with prepreg. They'll never do it and achieve integrity, using
infusion. It's been tried at the locals who make flight surfaces for Boeing and Airbus, without much joy, and for the reasons previously
mentioned. The Boeing inspectors are particularly fastidious priks!
I'll avoid Bombardier aircraft in future, thanks for the heads up.
And before someone mentions home build amateur aircraft, I am well aware of how some of the modern machines are built, and also how often they fall
out of the sky. Two here in the last six weeks, but no mentions on the news.
Carbon fibre works - 5/6/16 at 07:16 AM
quote:
Originally posted by SmudgerEBT
So I need to do some side vents (mid-mounted with rads in the back as no room in the front), I have a basic mould (which I need to reinforce and add
layers too) which I will use to make a wet layup part (whilst it would be nice to do vacuum resin infusion its not worth the outlay for a handful of
parts) probably using epoxy clear coat.
Now it has 3 lots of right angle, getting the cloth into those corners will be difficult without distorting the cloth and probably the odd void.
So my idea is to run black (or maybe green/orange) gel coat with a width of 5mm around the edges and into the corners, this means the carbon fibre can
be cut into a sheet (3 pieces) and as long as time is spent getting it to line up, should be easier.
But will it just look cheap part finished with the gel coat strips and with that in mind is it worth investing into vacuum resin infusion and get that
to force the carbon into the edges?
My car is Green, would it be to much to do the parts in Green Carbon?
You could wet lay and vac bag but if you want a high standard of finish you will have some work to do when you de mould, just a note on so called
coloured carbon (carbon is black) weave distortion when lay up can be a major issue plus no matter what the fabric looks like dry it can darken
considerably when wetted out with resin.
Regards Chris
Carbon fibre works LTD
carbonfibreworks@aol.com


