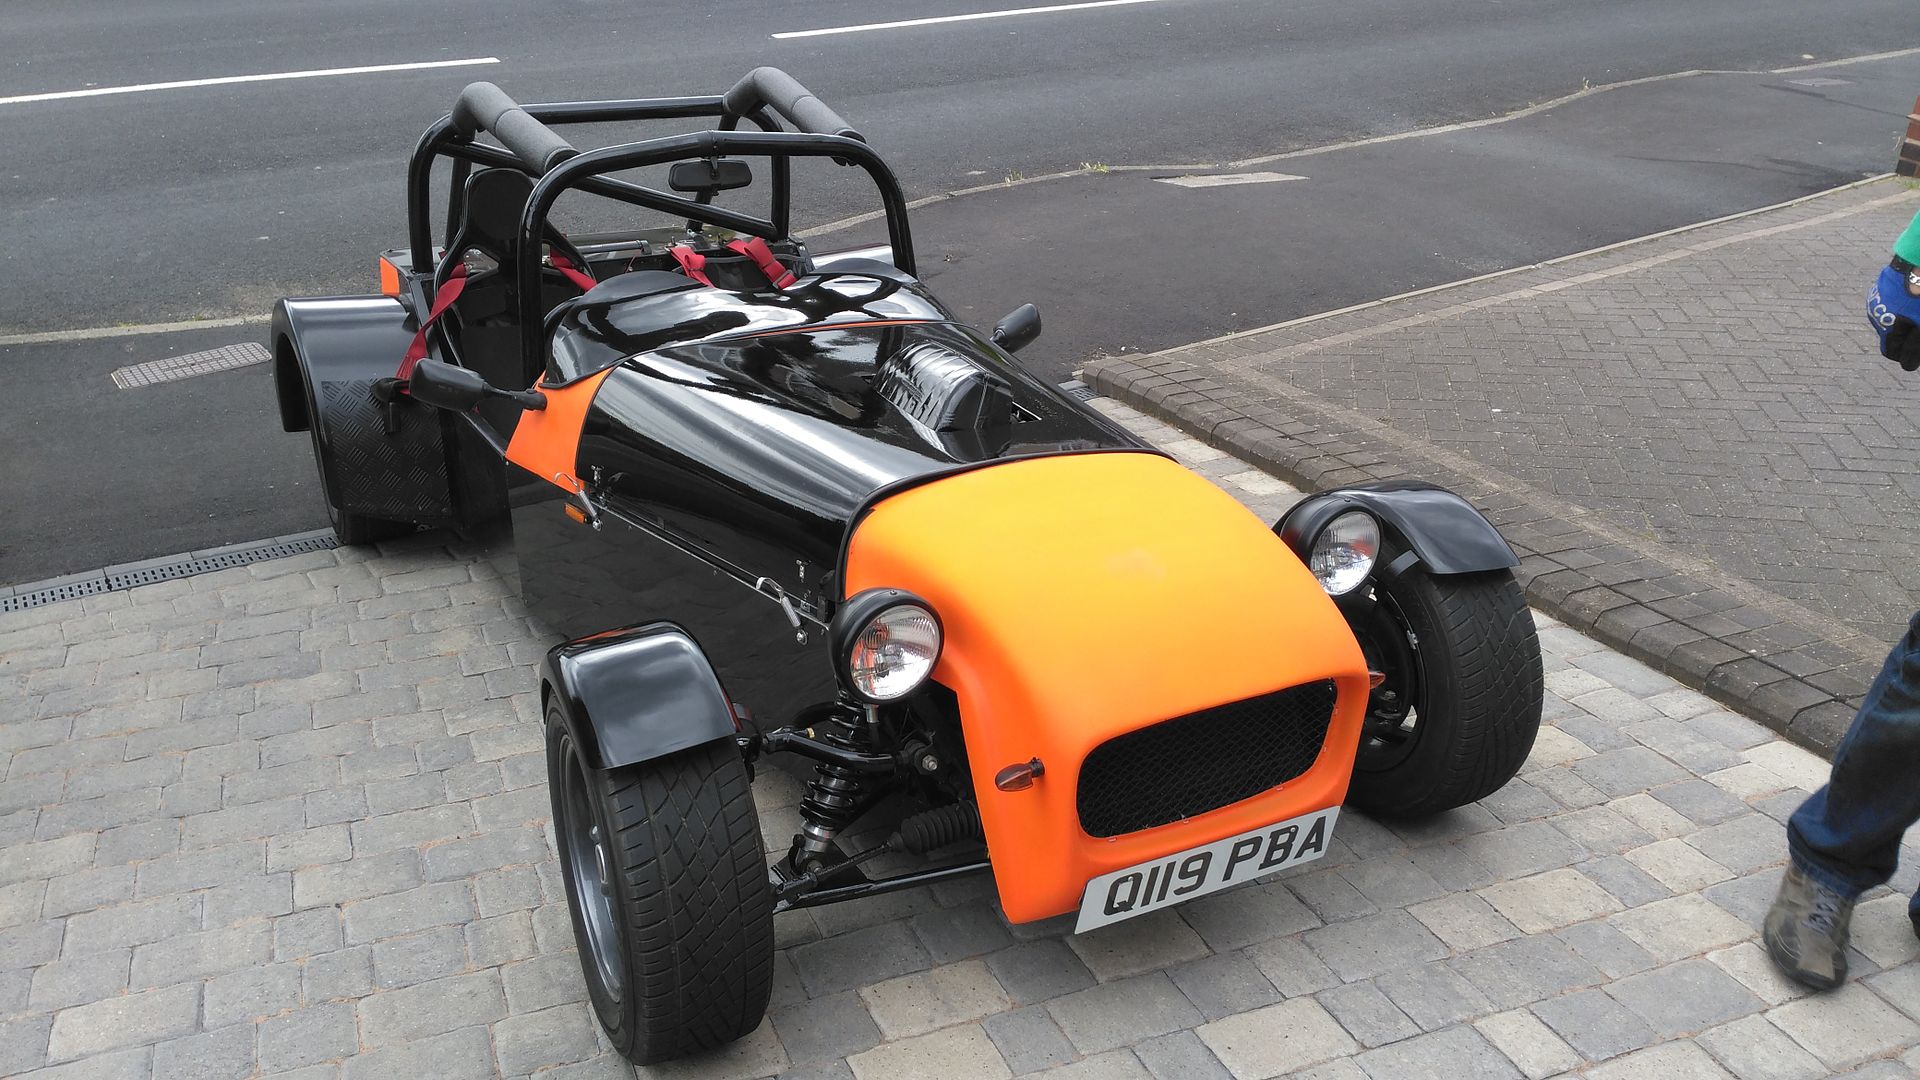
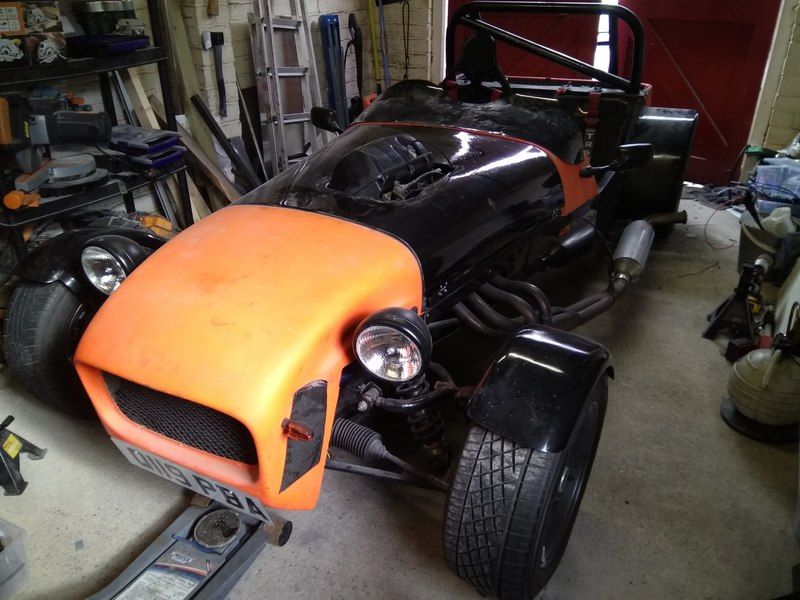
Fireblade Engined LocostMurdoc - 4/9/16 at 12:31 PM
I didn't build this locost, I bought it from a member on here unseen and my brother drove it 200miles back for me. A text book example on how not
to buy a car but I though whatever is wrong with it, I will enjoy fixing. I have had the car just over a month so far.
The car:
This is just after my brother stepped out the car at my parents house, he refused to drive it 20miles further south to my house. I don't blame
him and I really owe him a trackday in it.
Immediate issues when he got back were, the car was very loud, the speedometer didn't work, the tacho didn't work, no neutral and gear
indication, stalls when cold, the brakes were woeful and the clutch was digital. Good news though, engine runs well and the chassis is very well made
with excellent welding.
The magnetic pickup for the speedo was in but just not set up, no idea why. Easy fix, I drove along with my phone taped to the dash measuring GPS
speed and adjusted accordingly.
The exhaust had a pretty serious crack in it so I welded that up, now it's much quieter.
I adjusted the clutch and lubricated the cable, again easy fix.
The tacho was a bit more of an issue, I got the car two weeks before going on holiday so I only had limited time to play. It was dancing around on the
Acewell dash, I put an old oscilloscope on the signal and could see it was going between 14V and 5V. A function generator connected to the dash
confirmed it would be happy with 0 - 5V so I dropped a Zener in but no luck. I tried to design a filter when that didn't work I changed
components on a breadboard until it did work. Ended up using a high pass RC filter with another cap across the resistor. Not something you would ever
design, but it works.
The neutral switch simply wasn't connected to the right harness, the neutral input connected to somewhere daft (can't remember now).
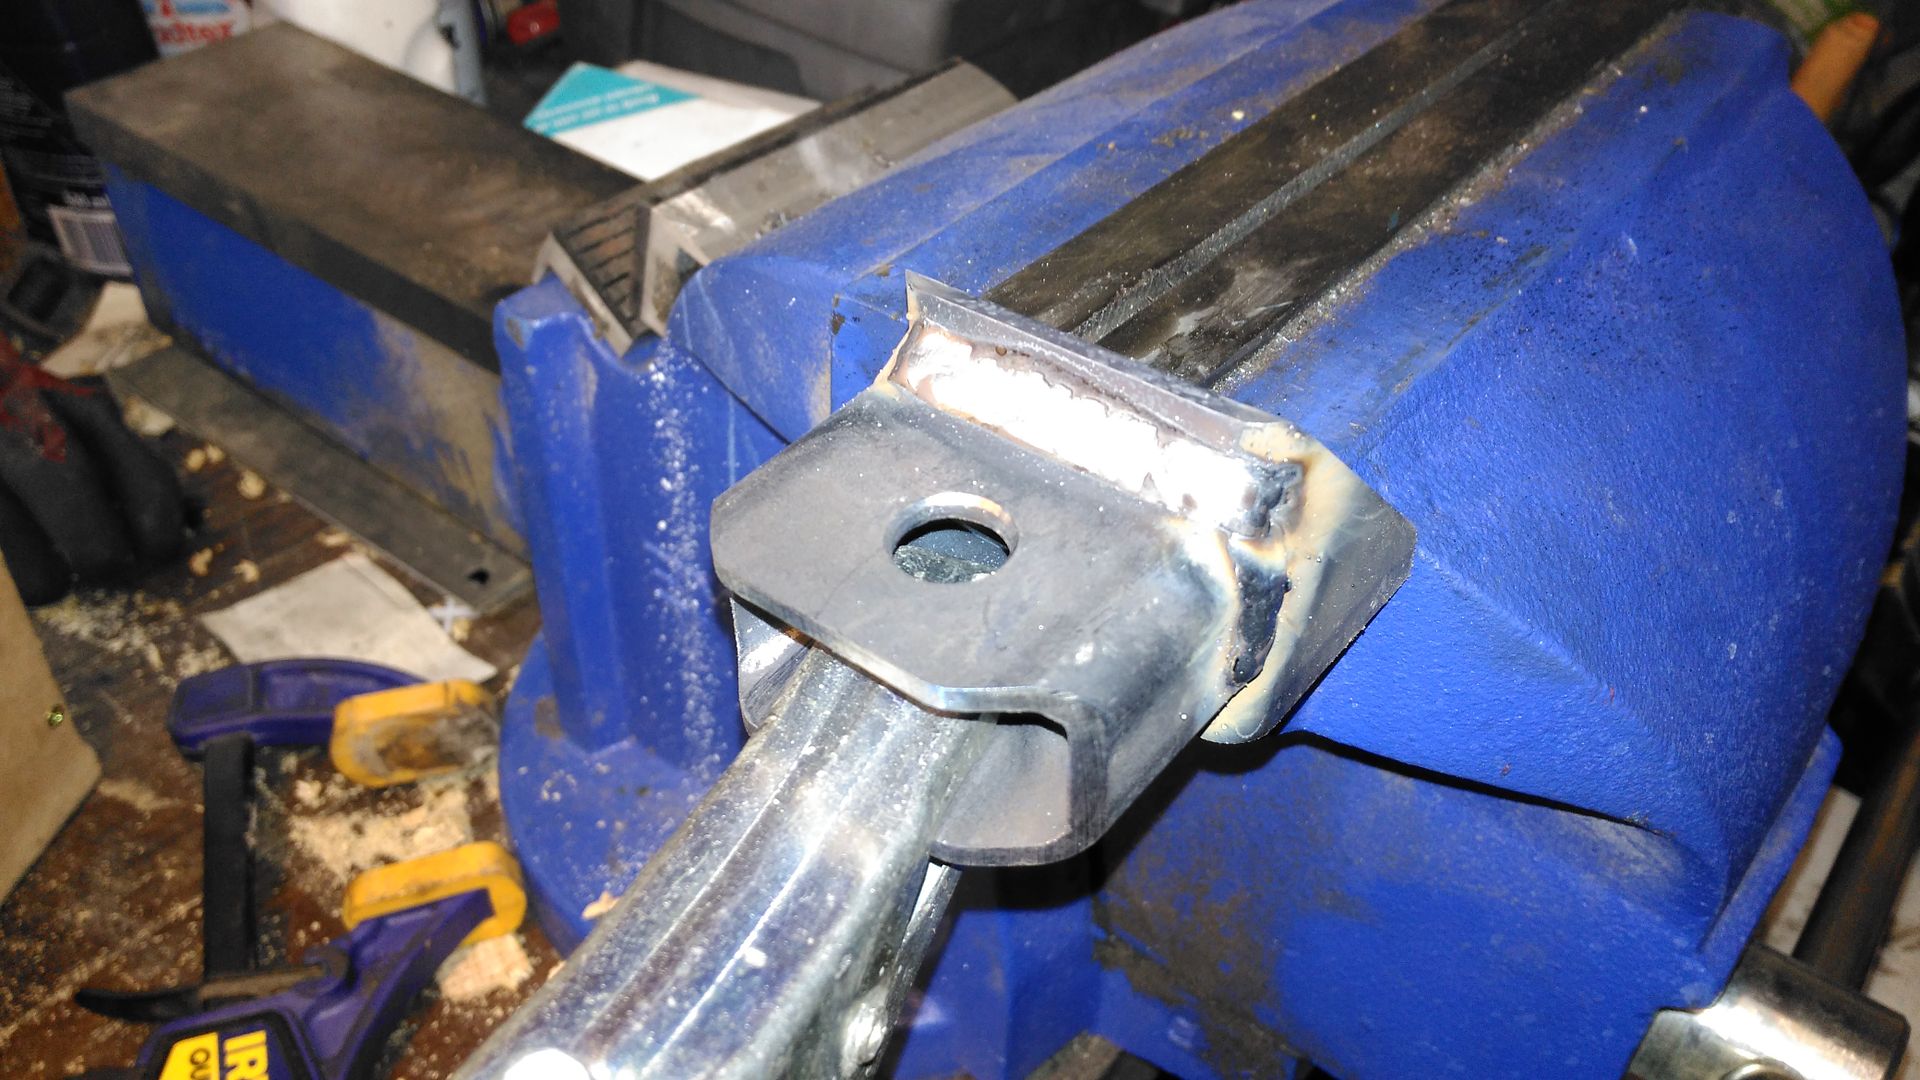
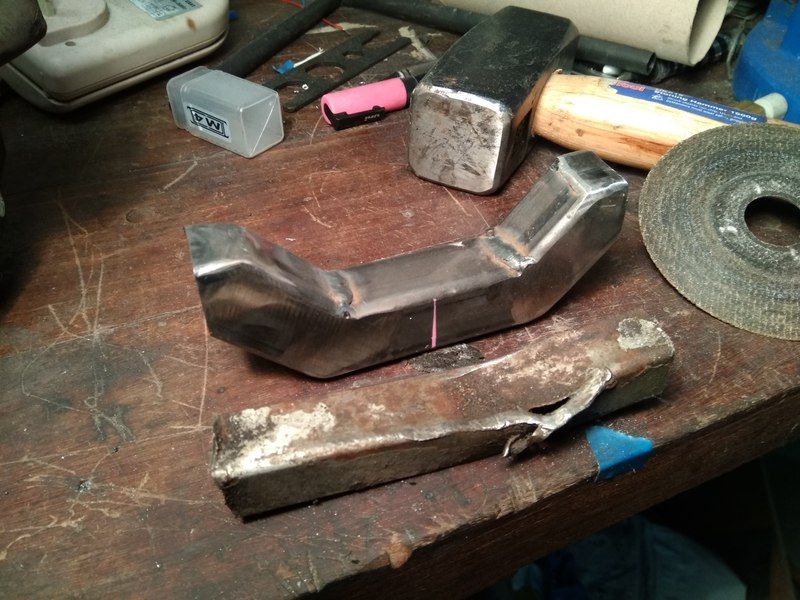
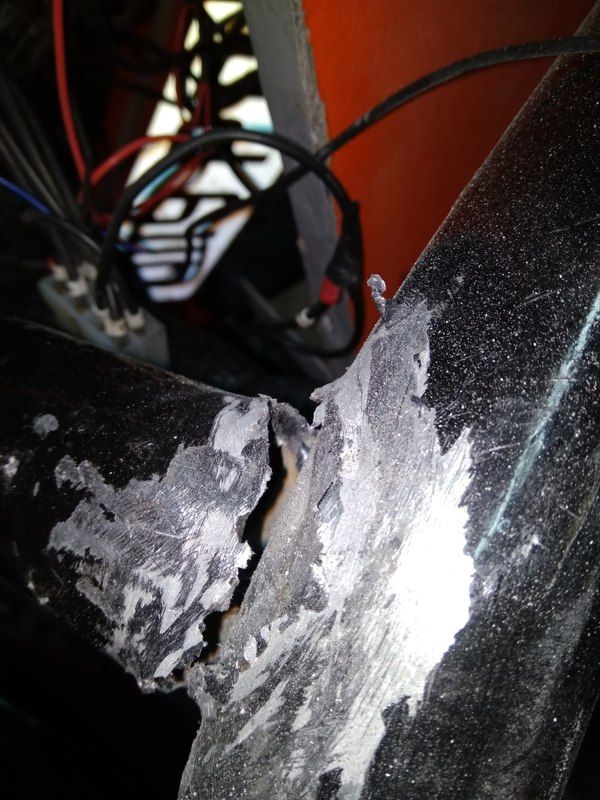
At this point the car was fairly drivable but made a terrible banging/scraping noise going around a corner hard, I had a look under the car and a
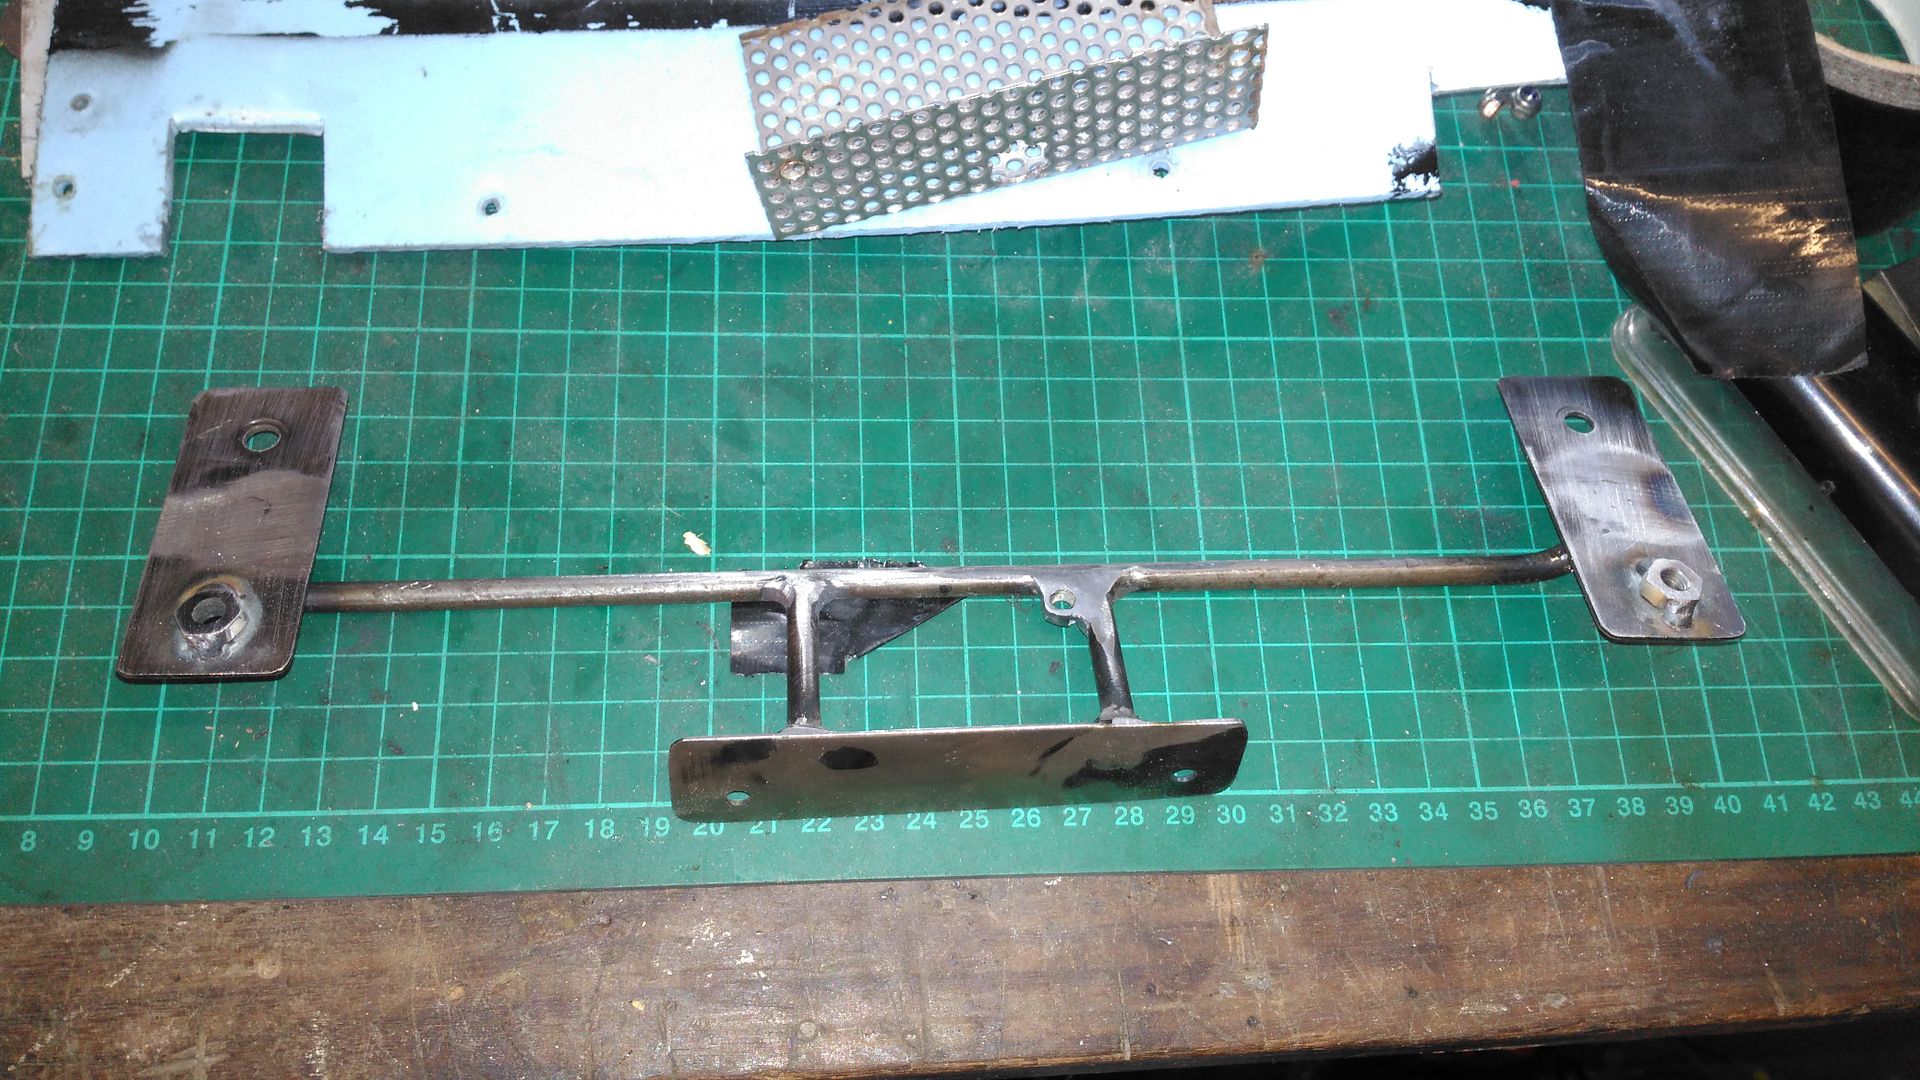
number of bolt threads had been left long and were clearly scraping on the ground. So I remade the exhaust bracket as the one on the car was rough and
put and extra bolt in the passenger seat to make the required 4.
New bracket (wet paint still) and old bracket:
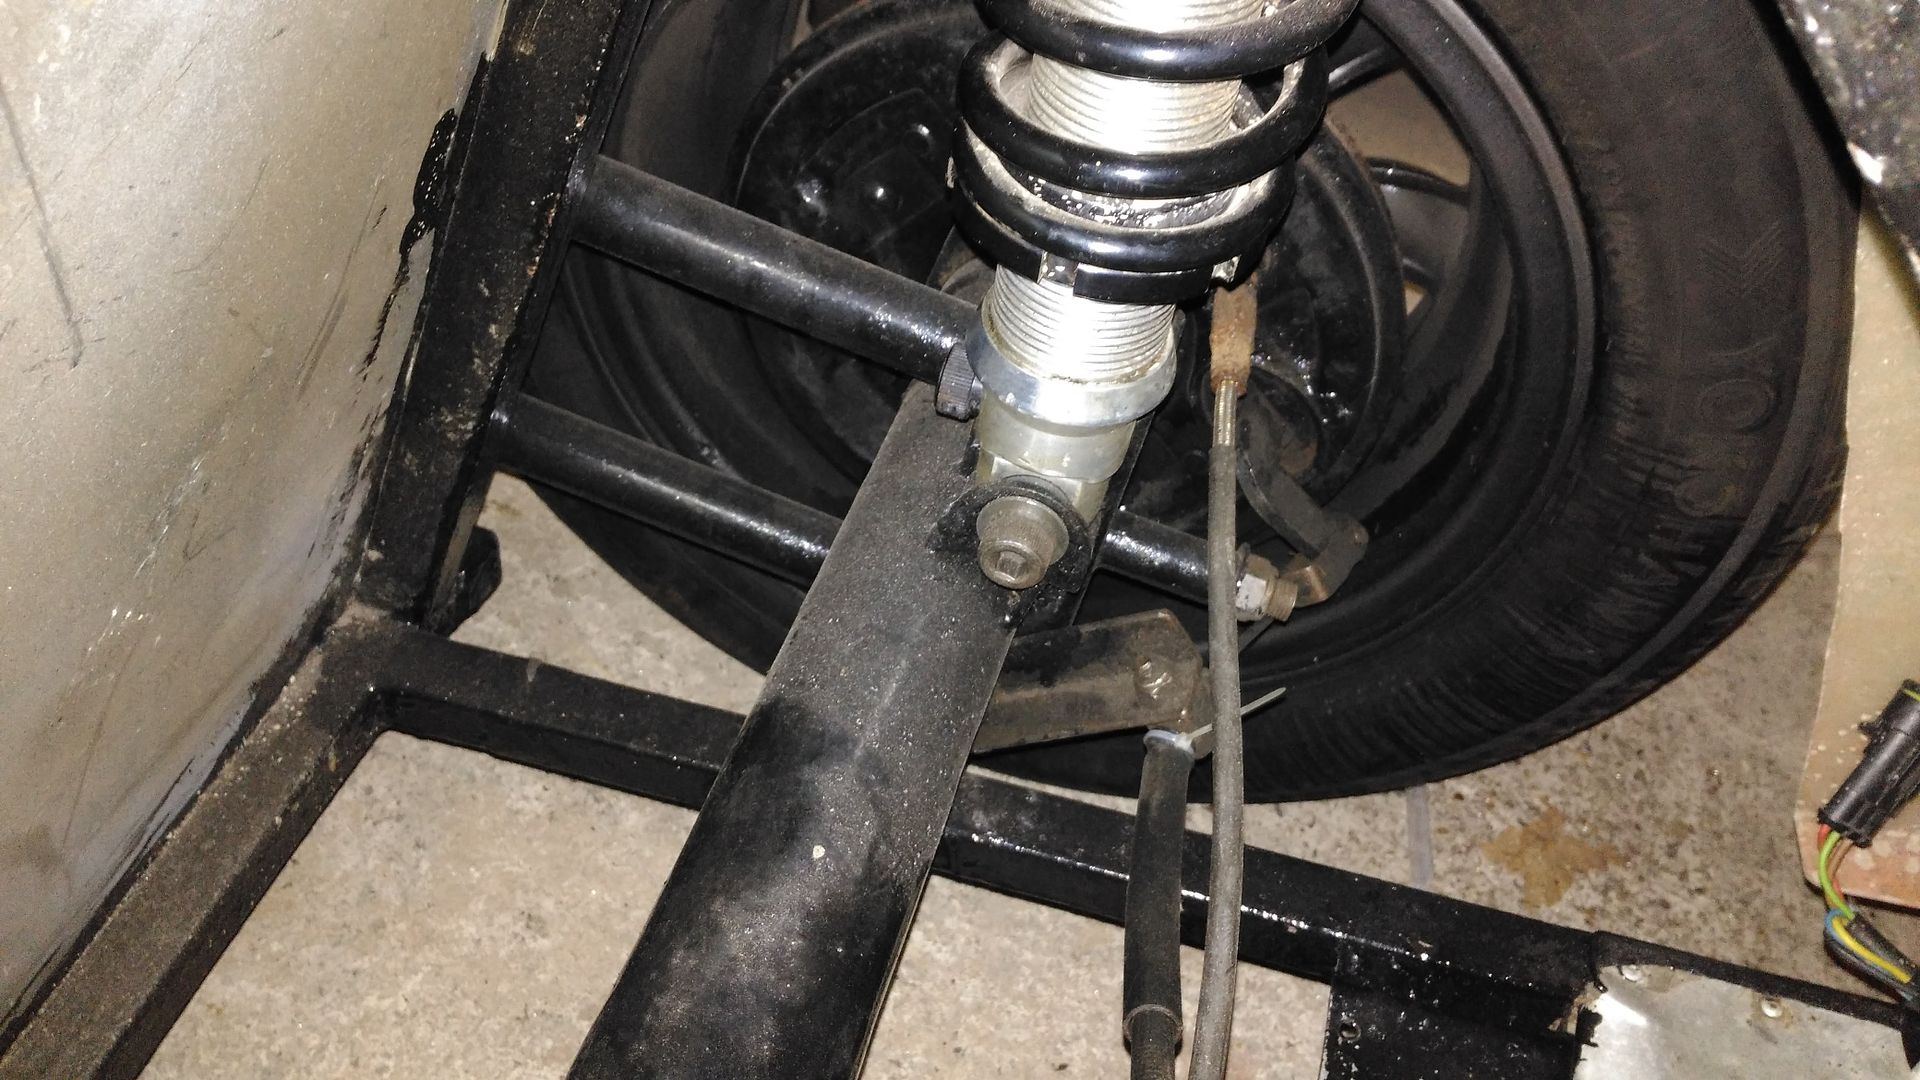
I had noticed that the chassis moved a lot on the rear axle and I could see the diff and prop had been hitting the chassis. I know only a bit about
live axle suspension but I had watched enough Motor Trent Youtube videos to know about Panhard rods so I was a bit surprised there wasn't one.
There is a thread on here asking if they are considered optional, the answer is no, very much not.
No rod:
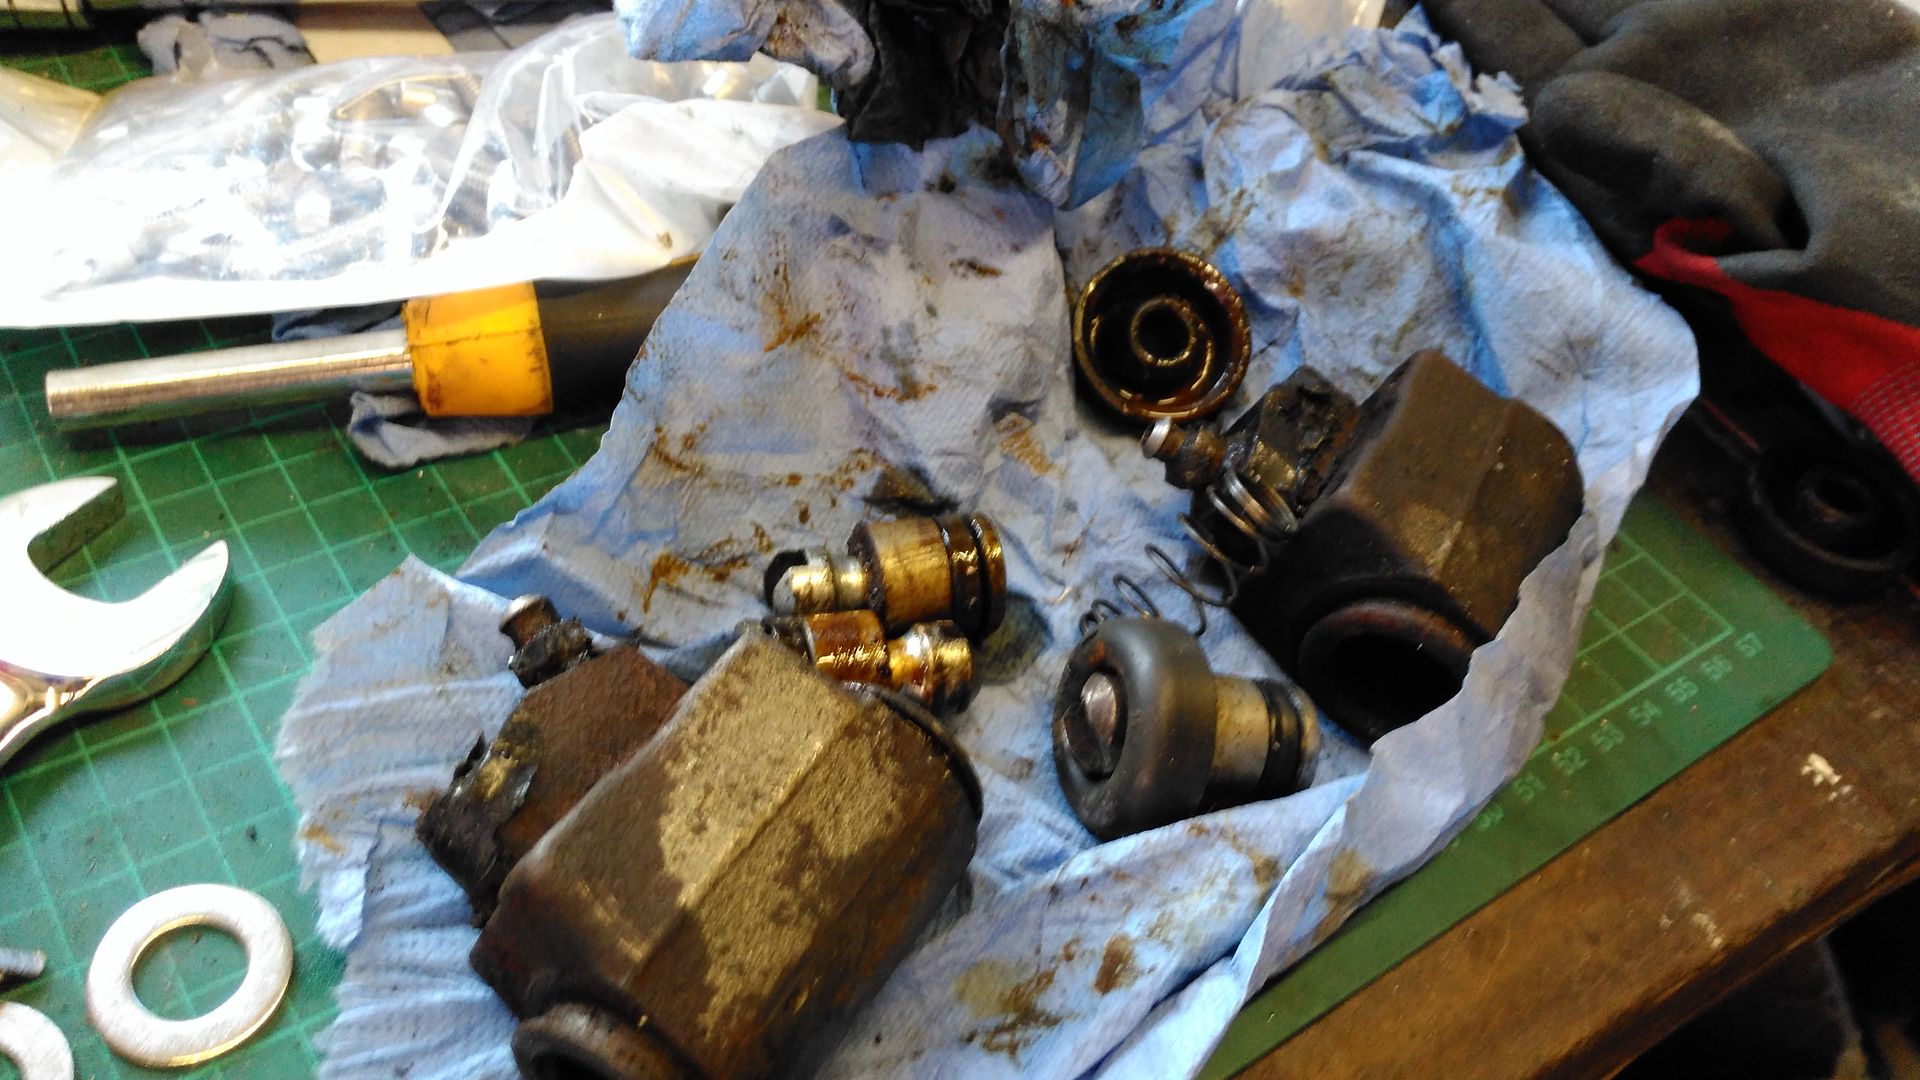
I took the rear of the car off and found a number of other issues; heavily leaking wheel cylinders, fuel tank attached with loose m4 machine screws,
roll bar rear stays not attached, poor welding on the roll bar.
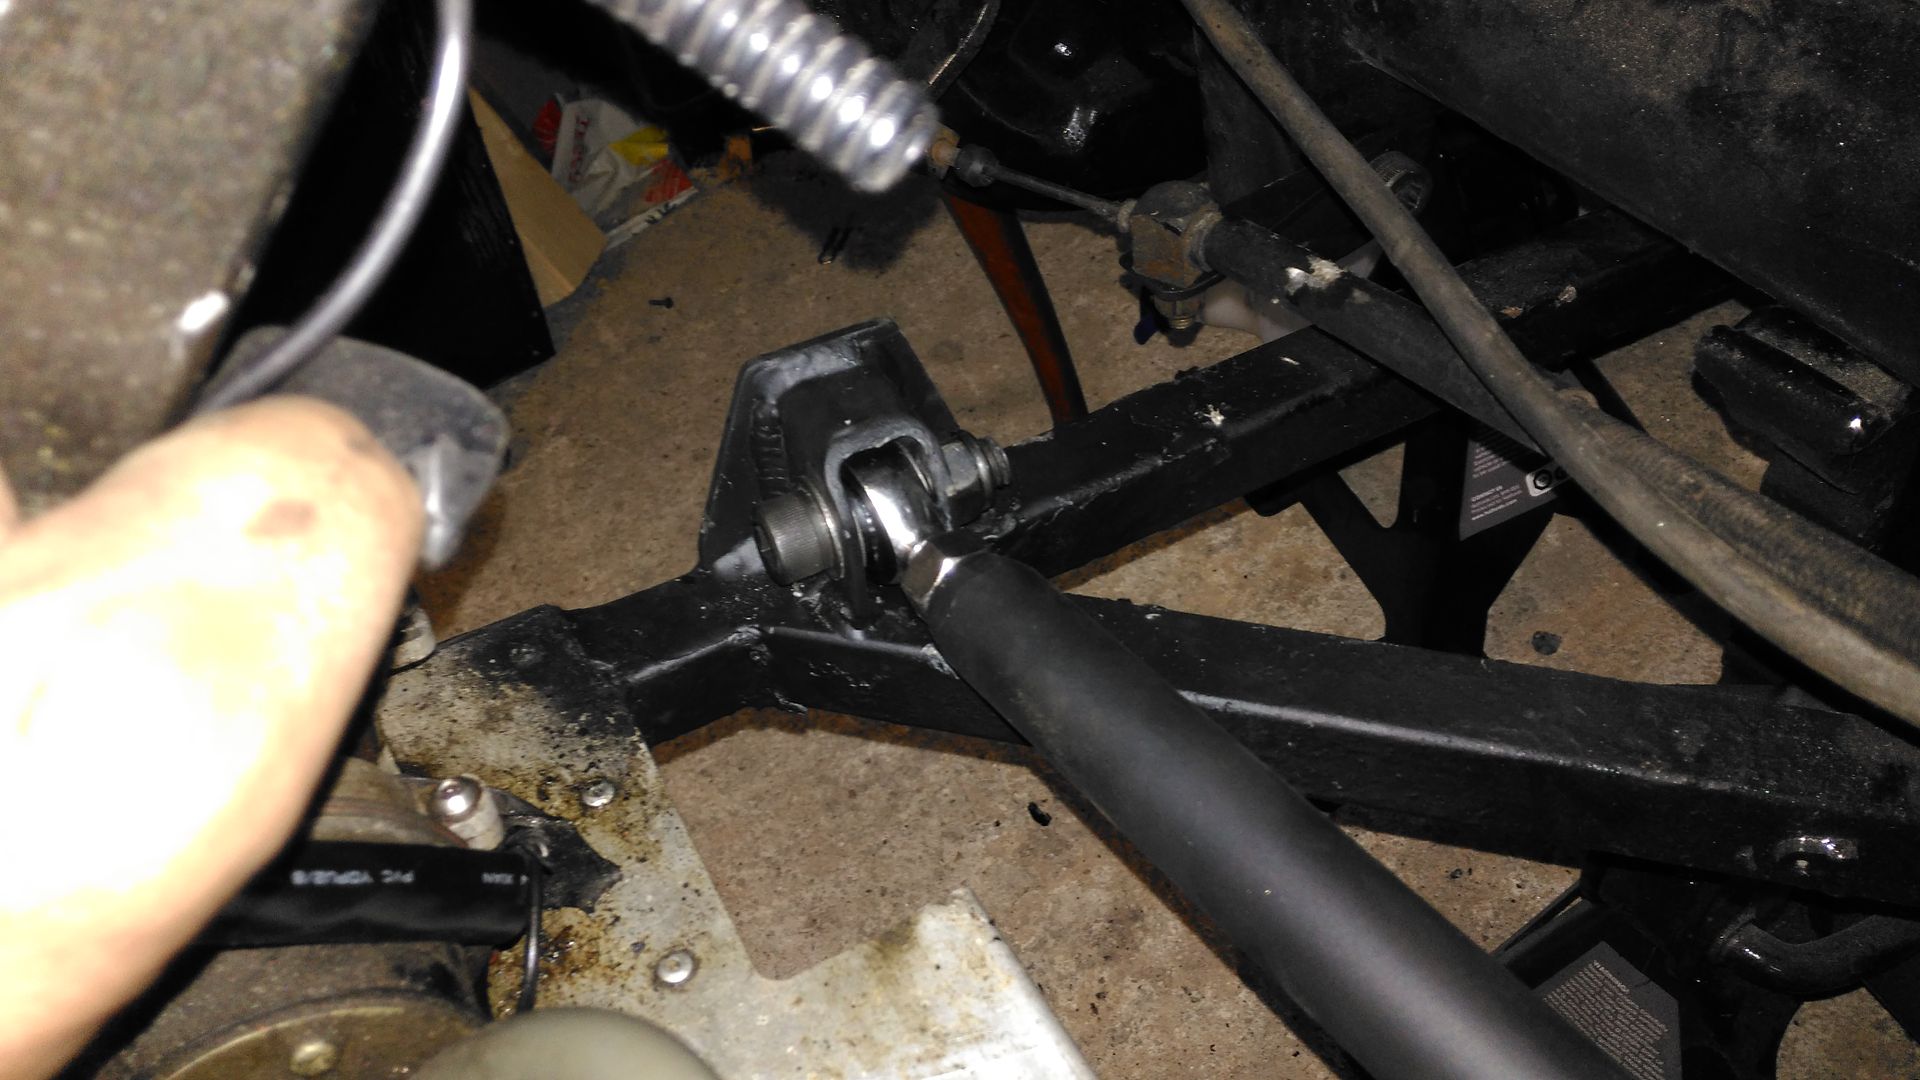
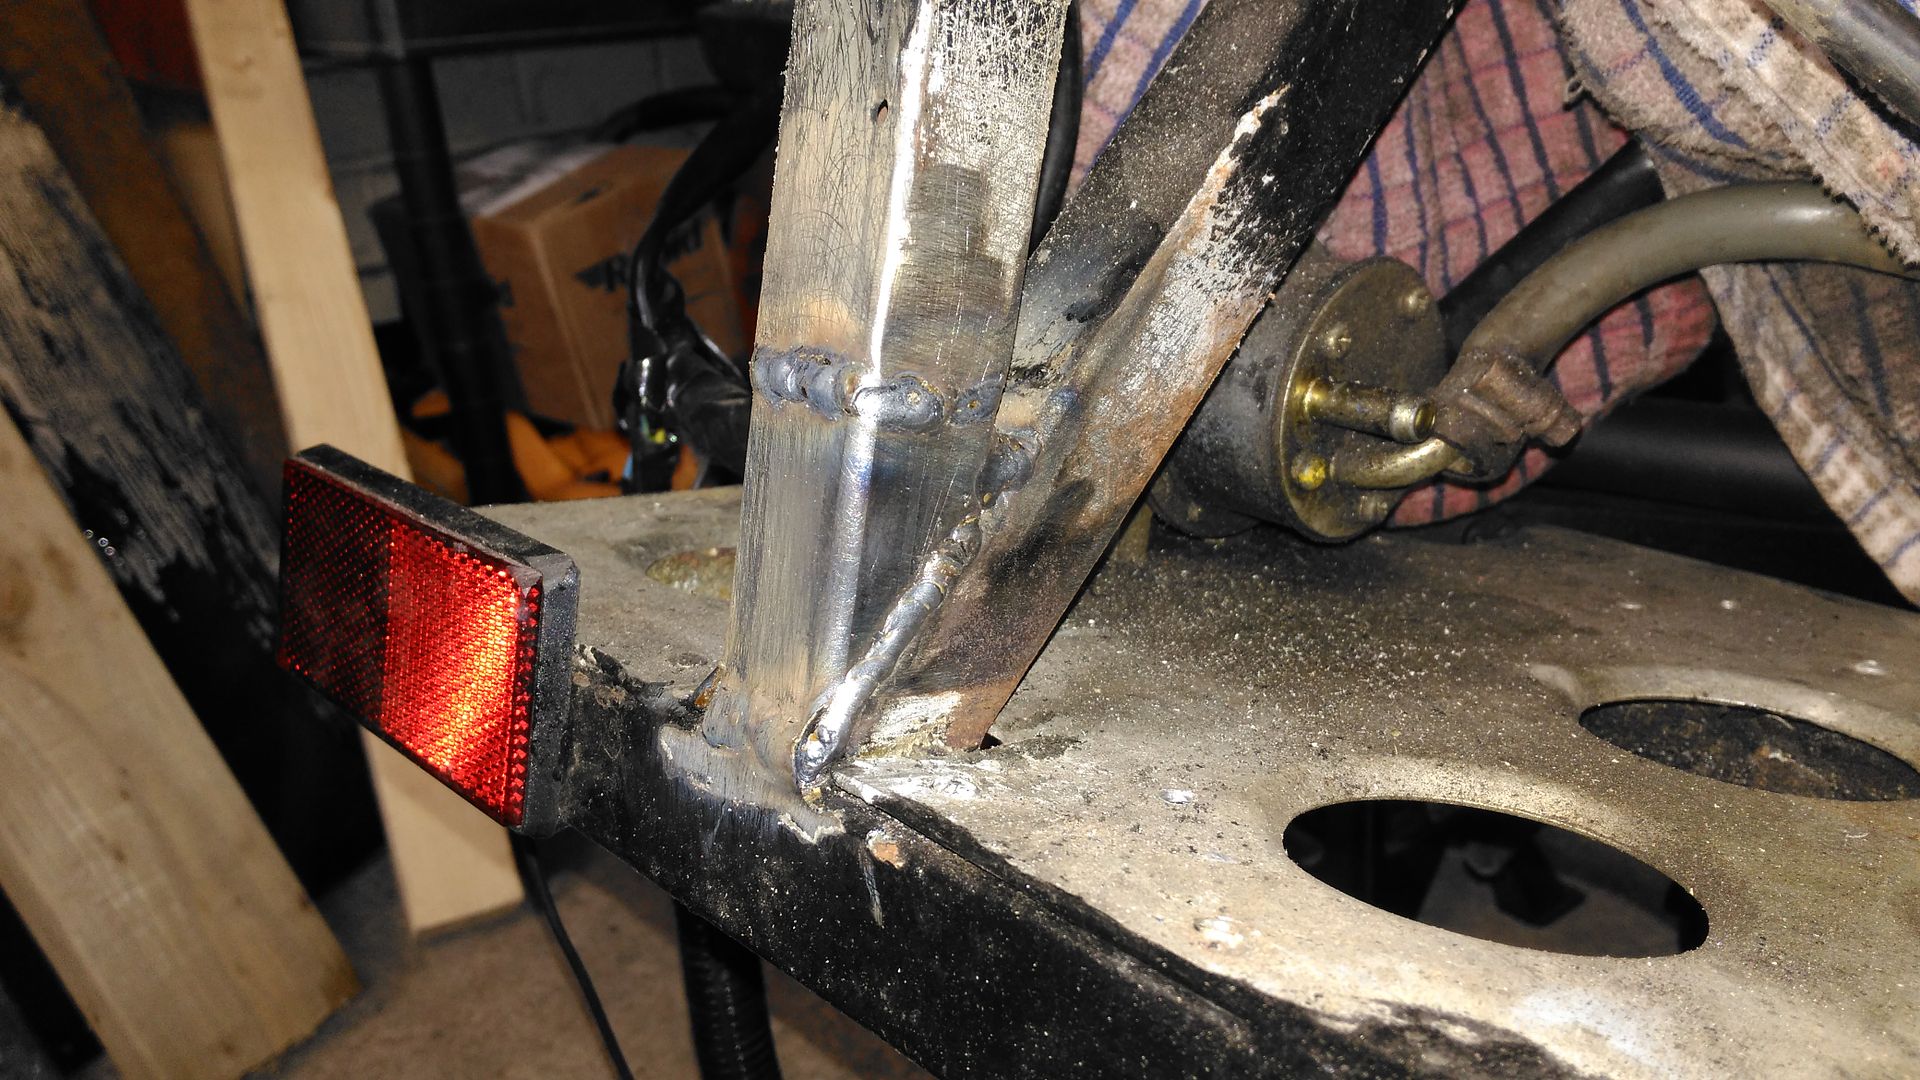
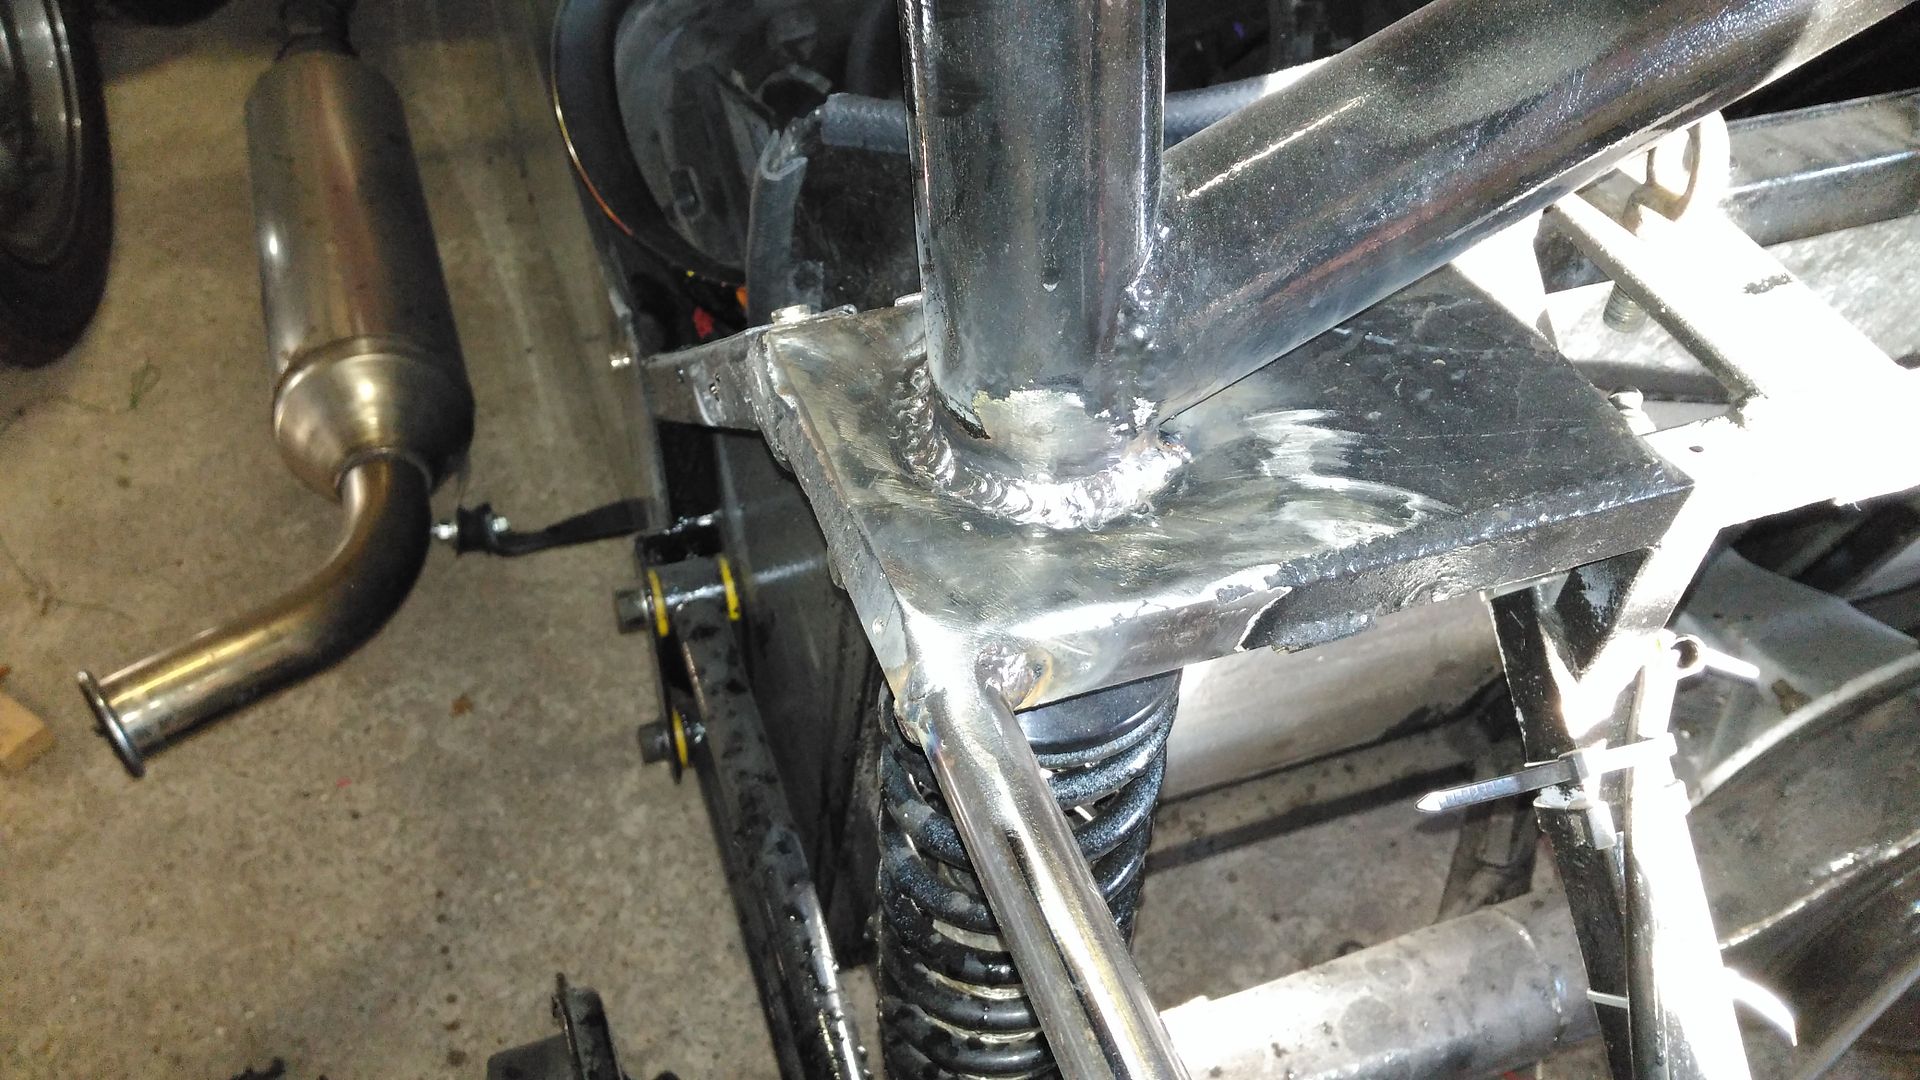
I ordered rose joints from McGill Motorsports and set about making the brackets required:
Next was the roll cage that wasn't attached at the rear, made some filler pieces and closed the box at the top (not a fan of this
arrangement).
Replaced the rear bodywork supports, removed old cage welds and re-welded:
Replaced brake cylinders and adjusted brakes:
Moved the fuel tank forward to clear the Panhard rod and so I could attach it to the chassis rather than a thin bit of aluminium, used some M8 and M6
A2 stainless set screws.
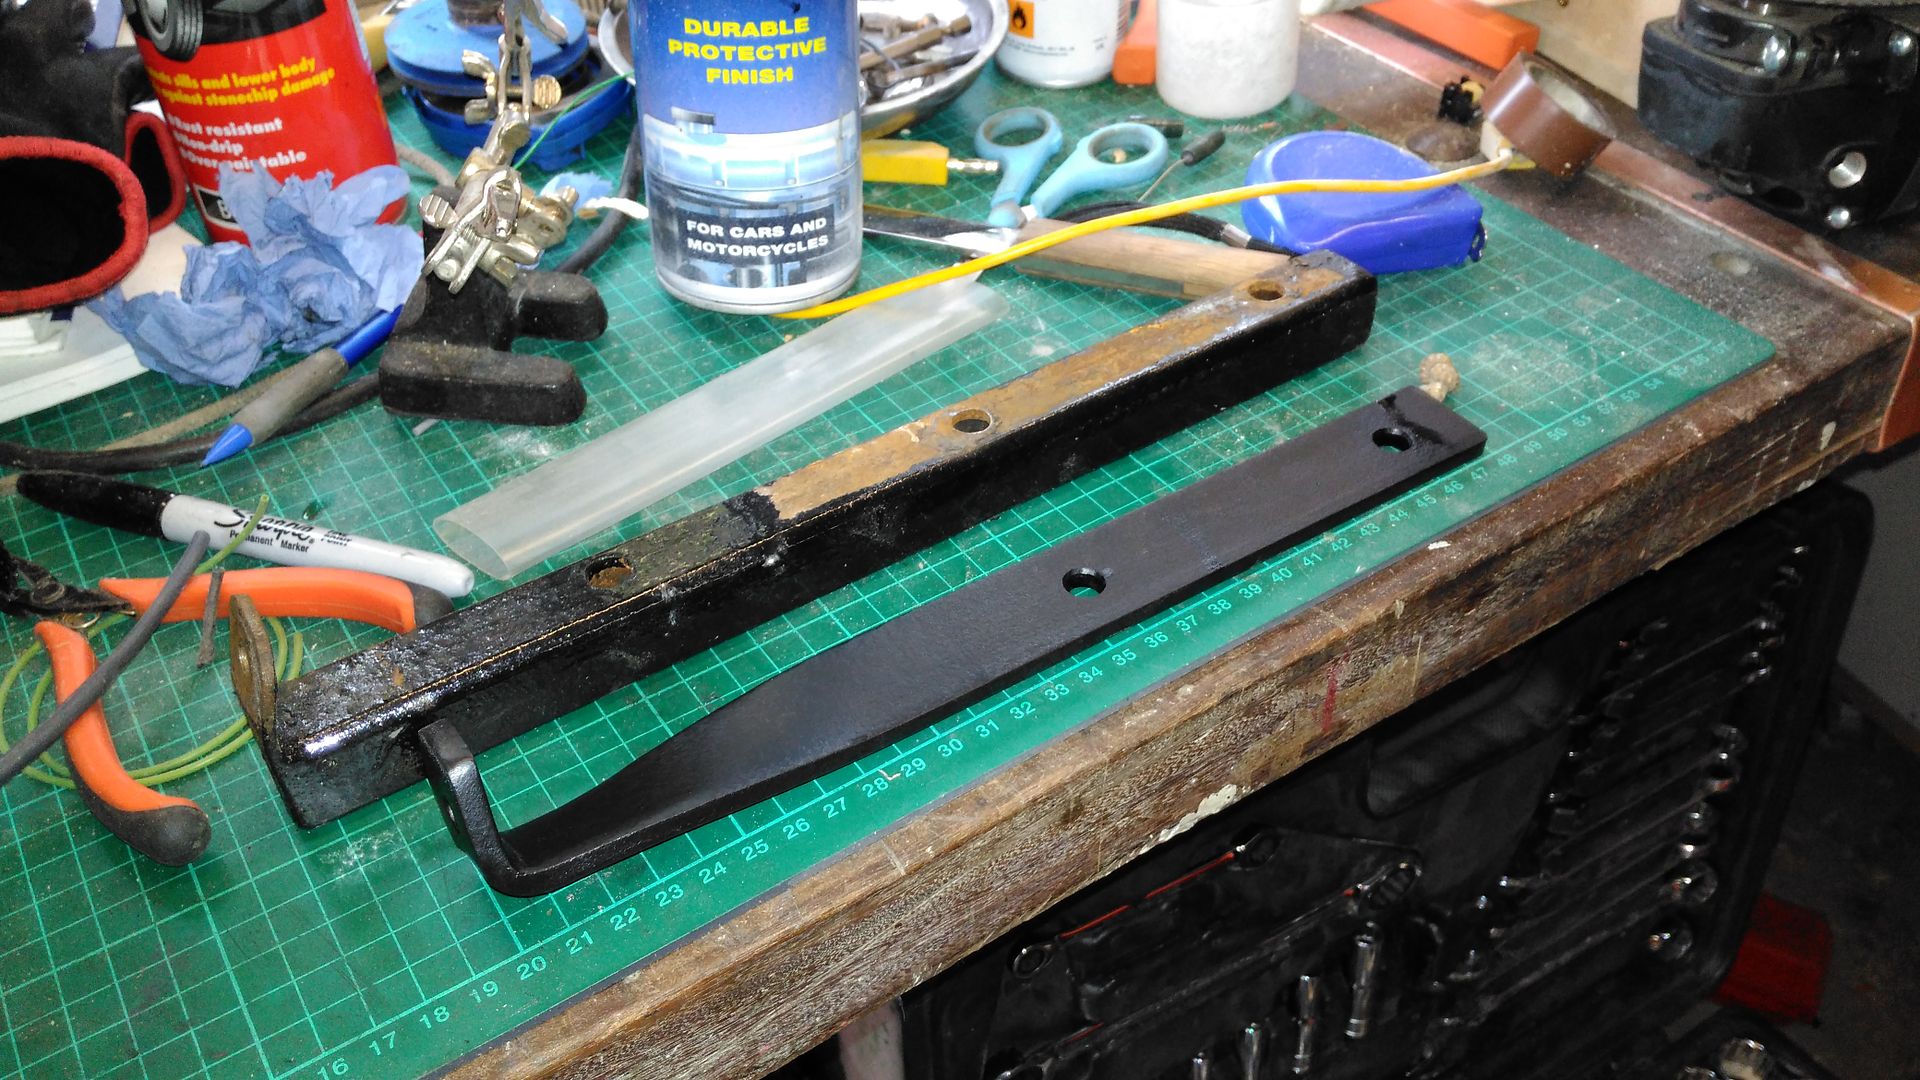
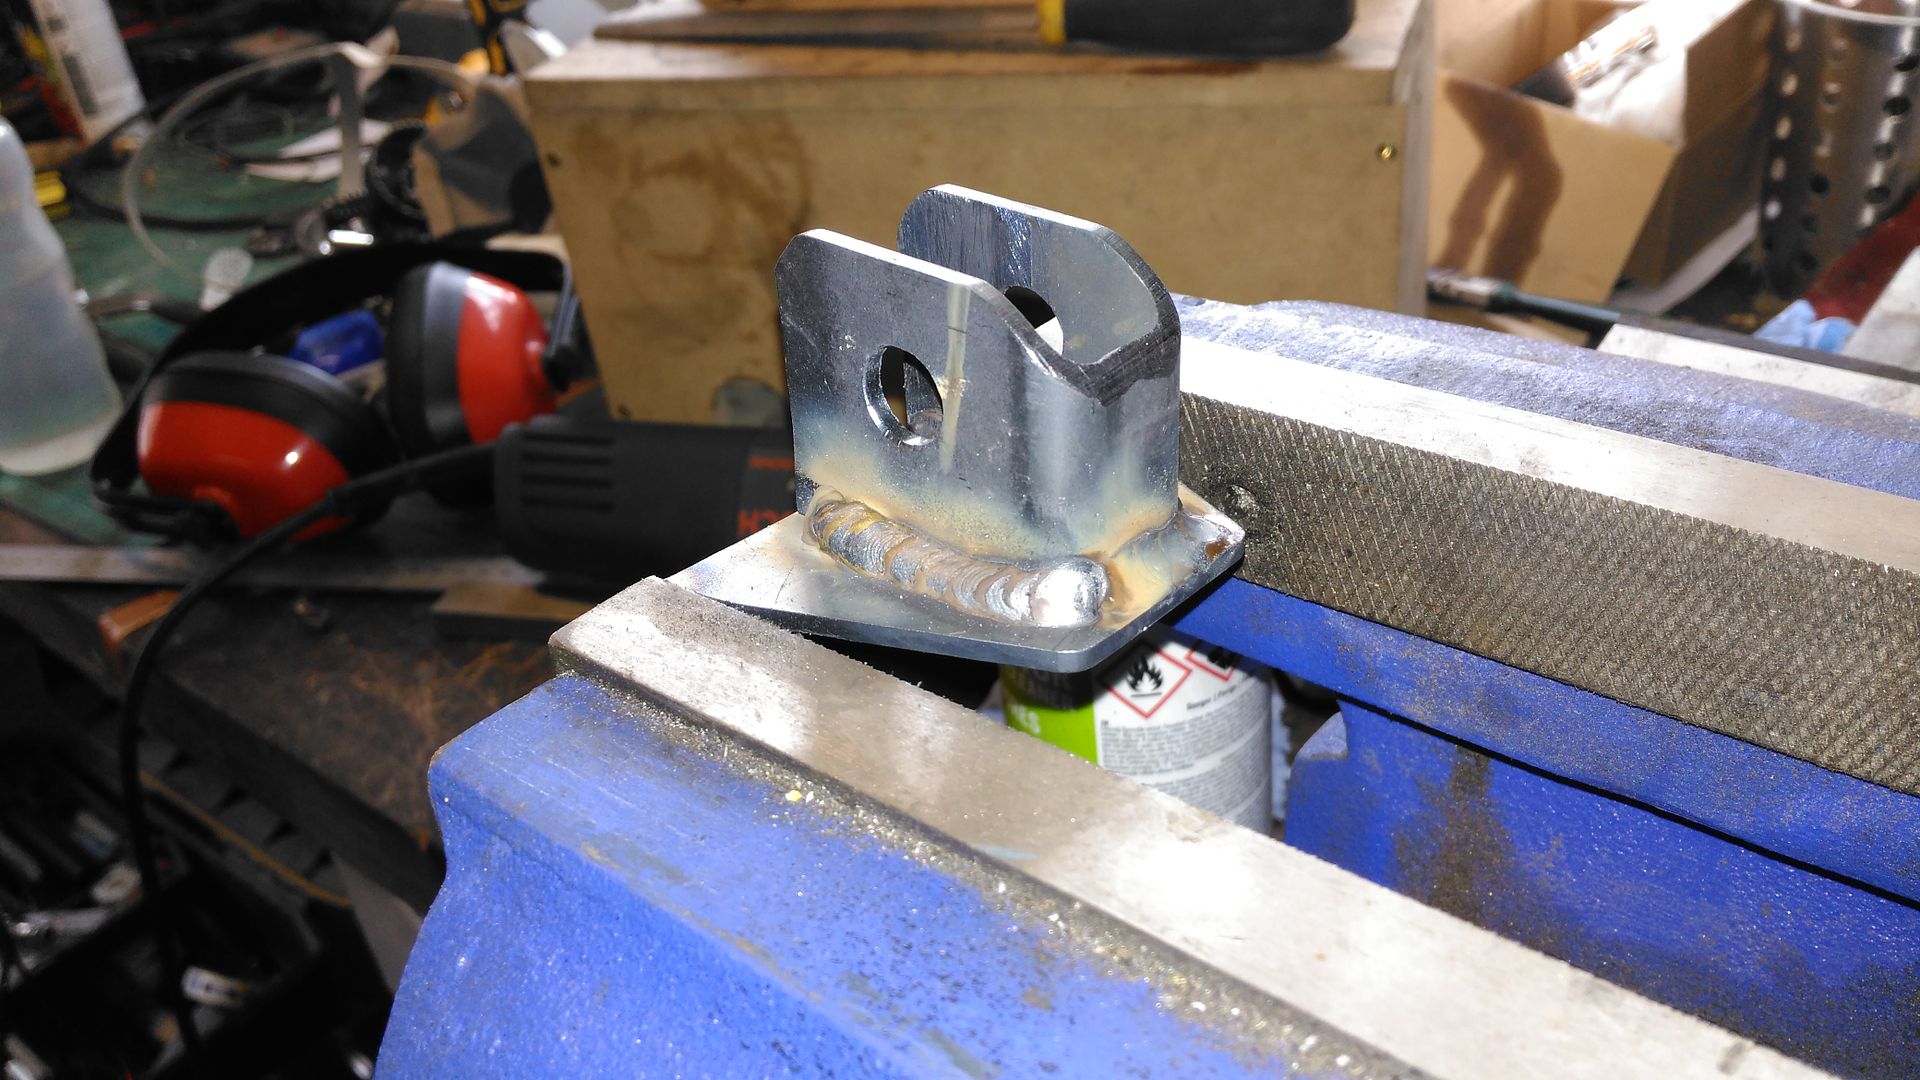
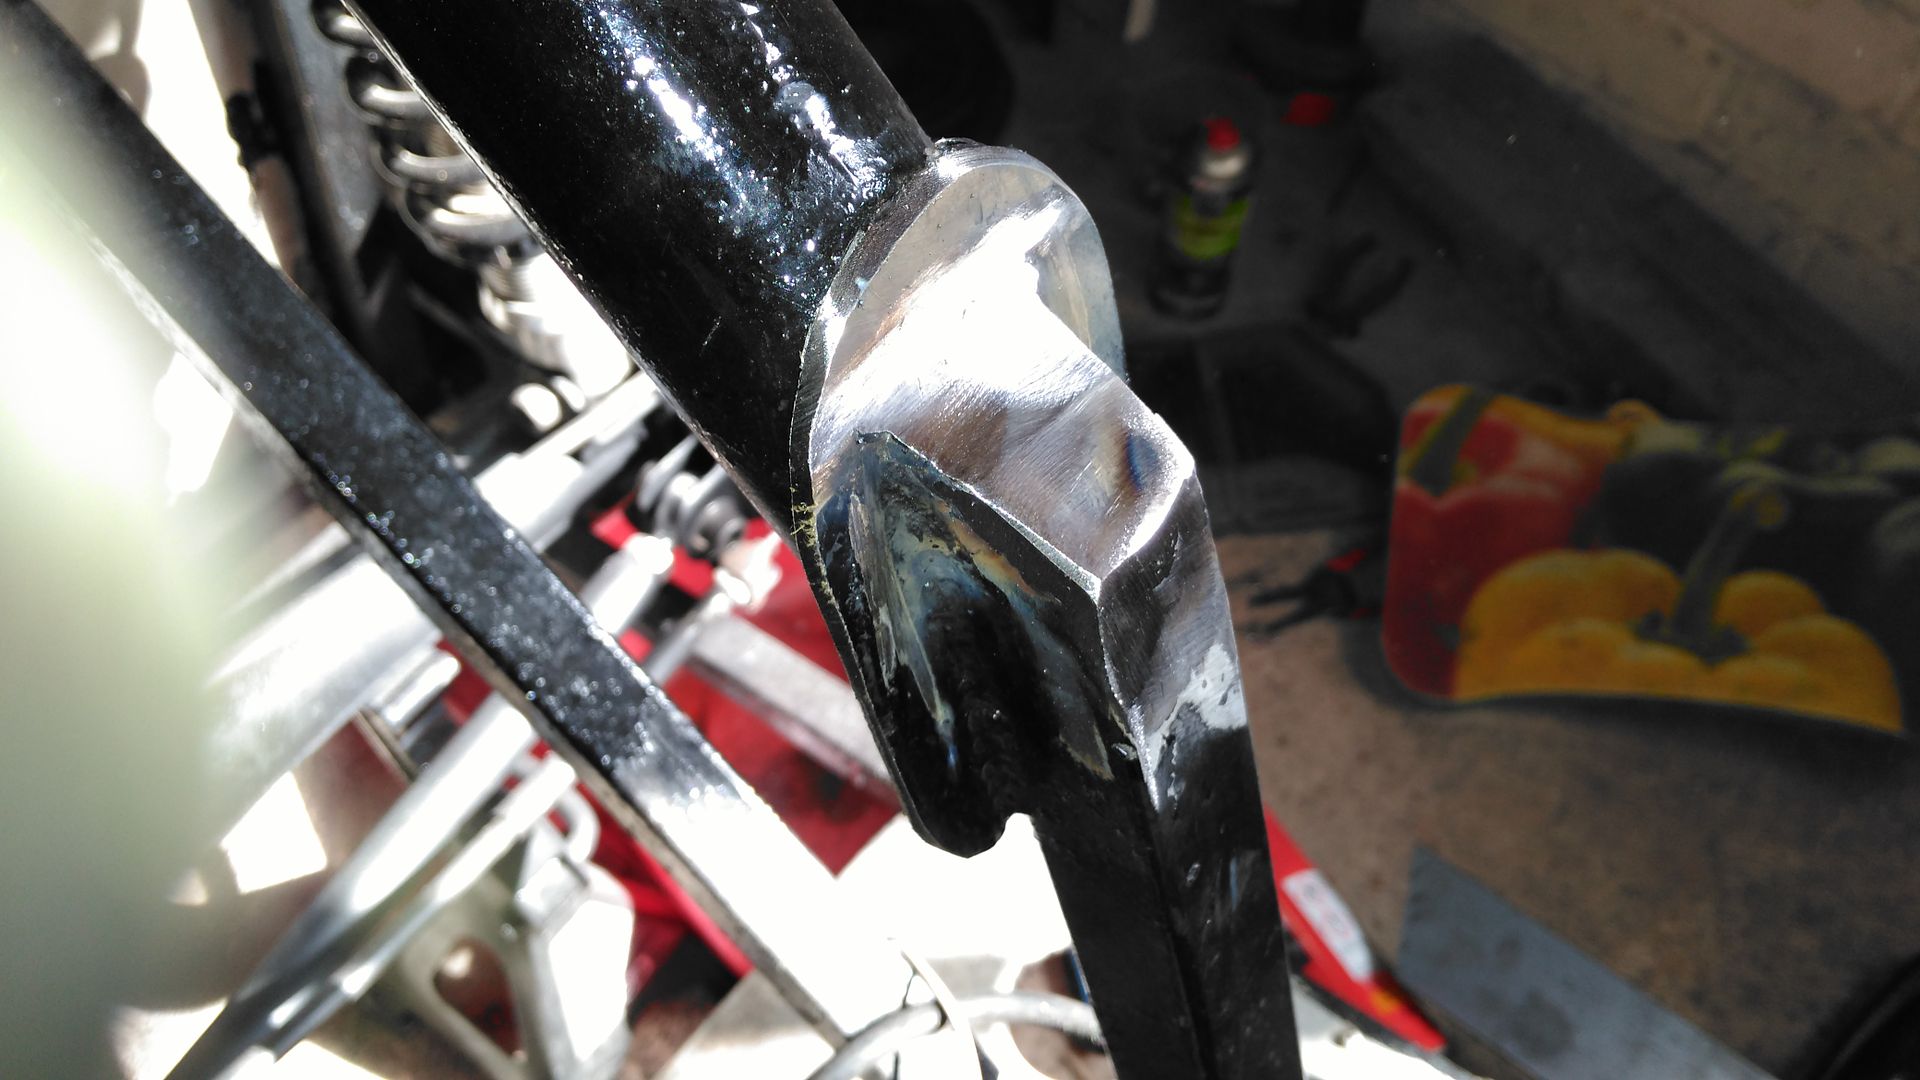
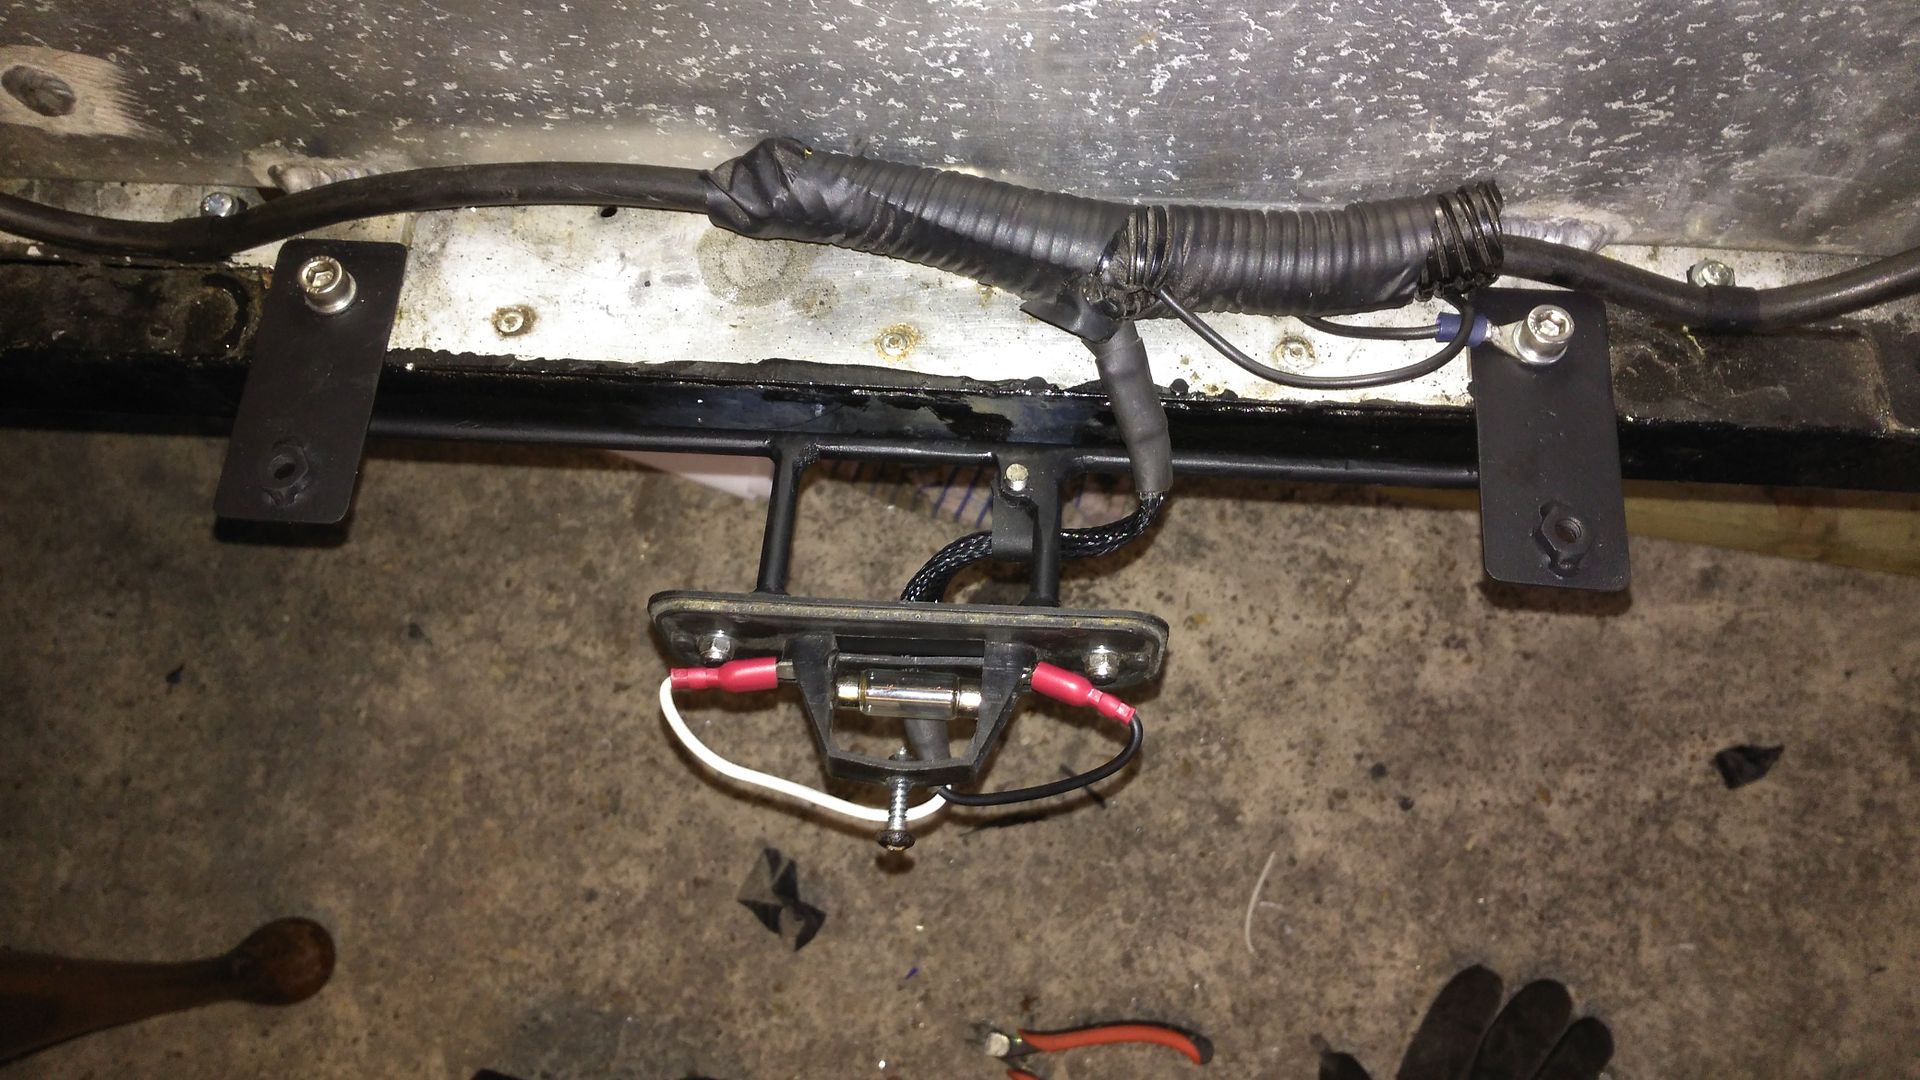
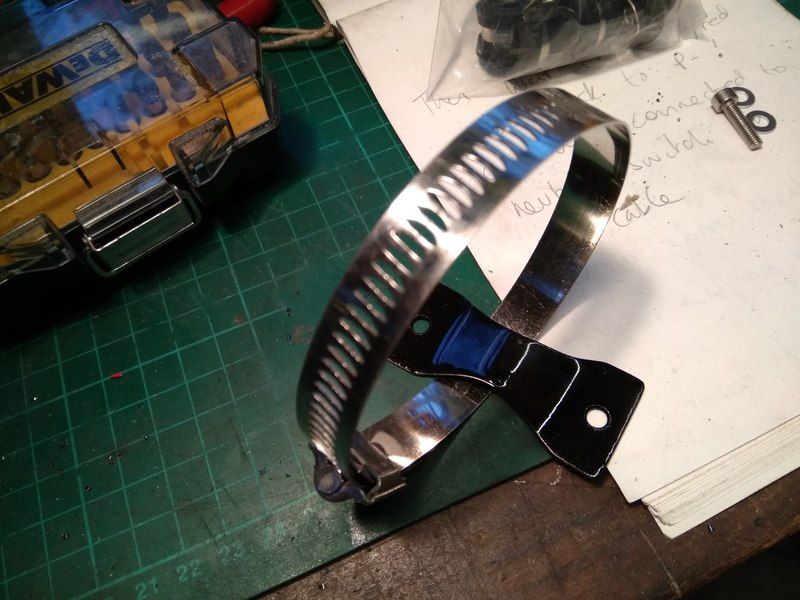
At the point of putting the rear back on I couldn't bring myself to use the old bracket that attached the bodywork and numberplate light which
can be seen in the picture below above the new bracket I made:
Painted and fitted, I neatened the wire up with heatshrink and braid too:
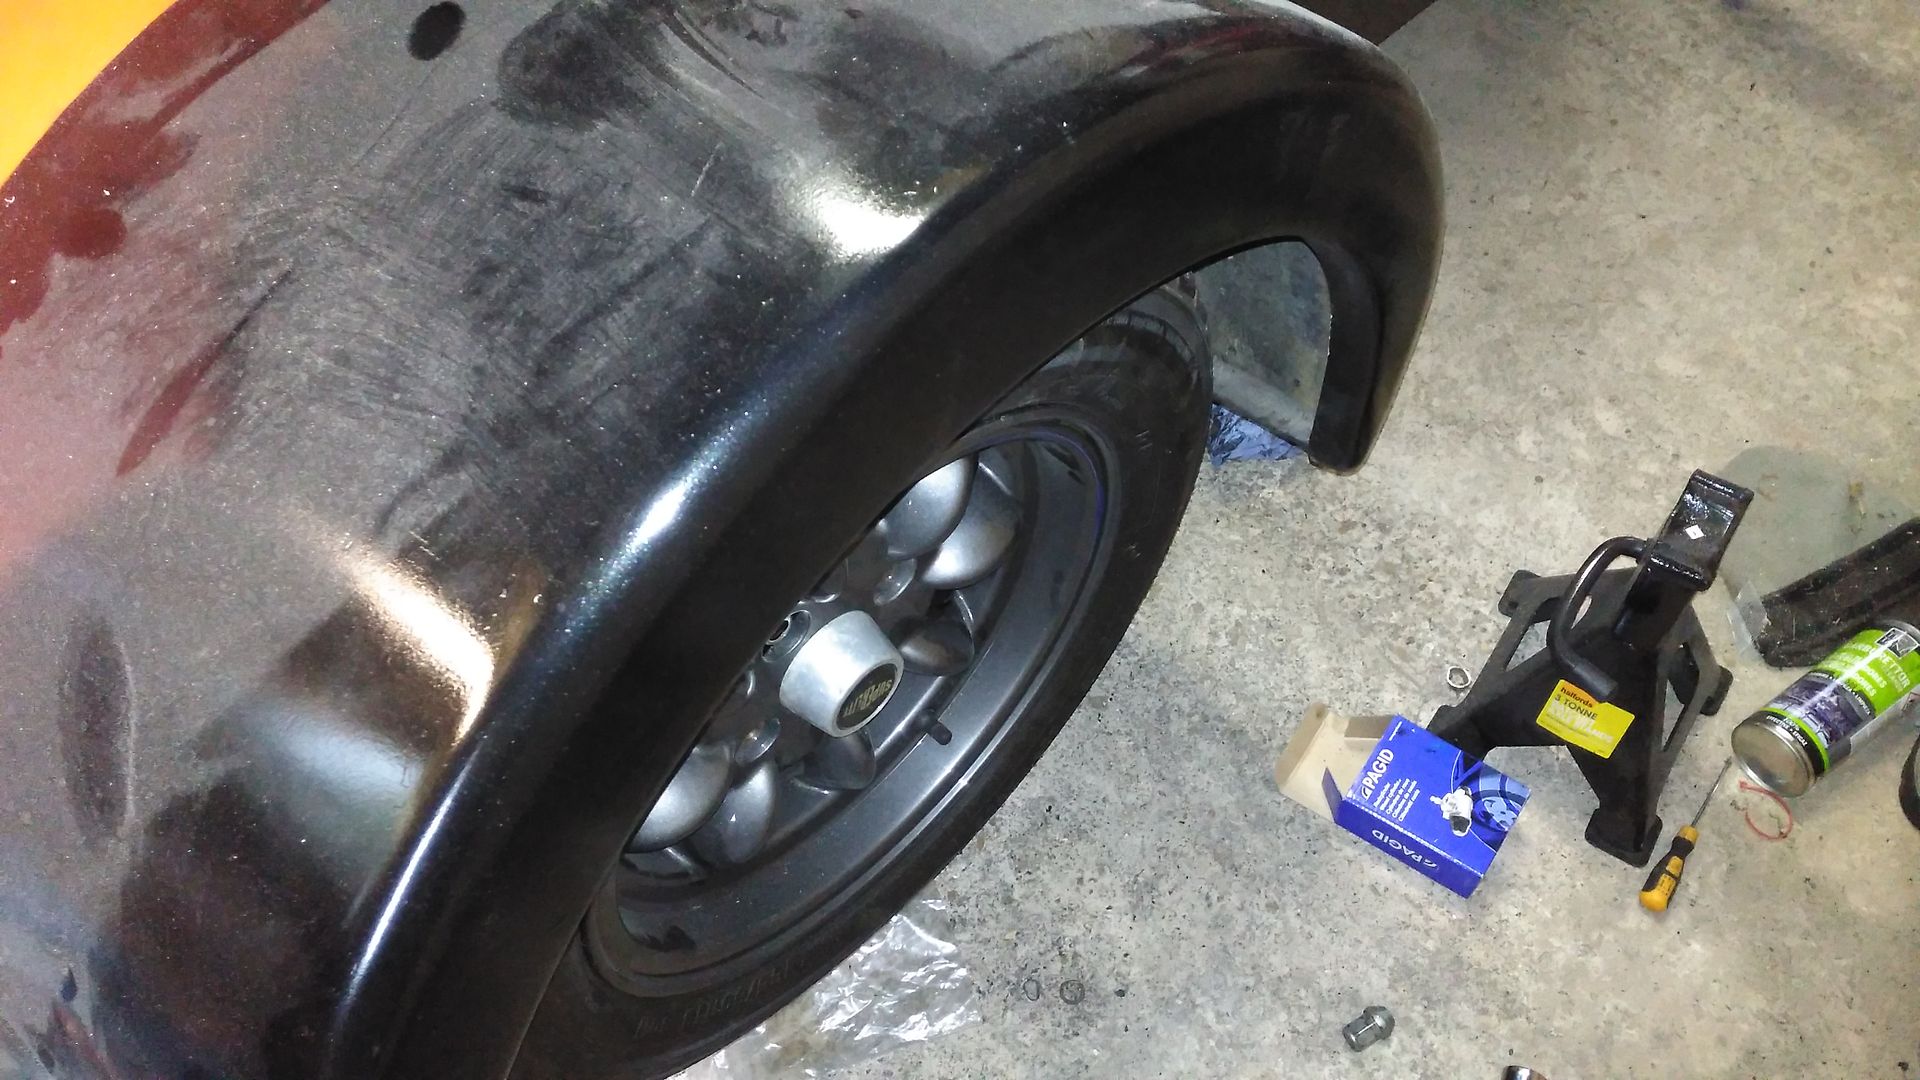
I did a few other jobs also, such as attaching wires and fuel lines with P clips and fixing poor wiring. I have also taken the 25mm lug centric wheel
spacers off the rear, I really need narrower wheel arches:
Went out for a drive today and it feels so much better, very composed now. The original chassis builder did a great job but unfortunately some of work
since (by subsequent owners) has been a lot of ambition but not enough skill and there are still things to put right. I'm enjoying working on it
as much as driving it.
Plans: Bodywork, dynojet kit, neaten the dash, tidy the wiring, drive it.
CosKev3 - 4/9/16 at 01:15 PM
Looks ike you know what you are doing, which this car obviously needs!!!
Fairdos to your bruv driving it 200 miles with those issues!!!
Rear arches do make it look ridiculous,first thing I noticed in the for sale advert
Matt21 - 4/9/16 at 04:09 PM
Without the panhard rod, I assume when you are cornering there would have been massive amounts of lateral stress on the trailing arms/bushes?! I
can't see how it would even last one hard corner with that kind of set up!
And the rear roll bar tubes not welded on to anything?!
Looks like you're going in the right direction with it!
Murdoc - 4/9/16 at 04:31 PM
Thanks chaps.
While the lateral movement was fairly unrestrained the magnitude wasn't that great. A combination of the diff hitting the tunnel and chassis
hitting the handbrake brackets meant it couldn't put that much stress on the other 4 links. I have inspected everything and it all seems fine.
The previous owner put poly bushes in not that long ago and they are still tight, the chassis really is well made and the mounts look spot on.
On wheel arches, mine are ~290mm at the top. What width are normal ones, a quick search suggests this is normal, then why are my wheels so lost?
I haven't worked with fibreglass before. How easy would it be for me to resize them?
Thanks.
ceebmoj - 4/9/16 at 05:22 PM
The origonal builder of this car is on hear.
I am a previous oner of the car, I sold it on a number of years ago in a semi striped state because it did not fit my needs and ended up building from
scratch. I have tried contacting the seller a number of times to get them to edit the advert.
Please can I advice that you strip the paint from the two lower cassis rails between where you have put the new parhard bracket and the rest of the
car and check the welds where the rear of the car was welded back on.
Murdoc - 4/9/16 at 05:32 PM
Cheers ceebmoj, will do. I have sent you a PM.
Murdoc - 5/9/16 at 06:42 AM
Hopefully you don't mind me posting this ceebmoj.
Summarising the conversation with ceebmoj. Part of the rear, which up until now has only supported the fuel tank and fog light (now plus panhard rod),
was removed and later welded back on by someone after he sold it, thankfully not the person I bought the car off. I had a quick look without removing
paint and the welds aren't the 'pigeon poo' style I found from the last owner. I will get the paint off in the next few days to double
check but I don't expect them to be an issue. I have now tied this structure in to the rear roll bar stays which were previously unconnected.
As for ceebmoj's request for the seller to change the advert, the most sever misrepresentation isn't something I purchased and the other bit
wouldn't have changed my decision to buy the car, it's just a bit more run in than I thought.
Is there a supplier of rear wheel arches besides kit car direct, theirs seem to be too wide?
Thanks.
[Edited on 5/9/16 by Murdoc]
[Edited on 5/9/16 by Murdoc]
Daf - 5/9/16 at 12:26 PM
I'd have a go at narrowing your rear wings yourself, I recently did some fiberglassing for the first time in my life on my nosecone and I'm
really pleased with the results. There are plenty of videos and guides online and it doesn't matter how much mess you make you can always flat it
back, polish it and you'd never know! You clearly have the skills to be able to do it - give it a try
Don't hold me responsible if it goes wrong though!!
Matt21 - 5/9/16 at 01:33 PM
Has it got the right offset/width wheels?
I saw someone had narrowed some carbon rear wings, they basically cut the inside edge off that has the mounting face on it and the required width to
be removed and then sikaflexed it back on to the inside of the arch. When its mounted the edge of the wing where it was cut sits up flush to the main
body work.
That still gives you the mounting face but gets rid of the extra width.
Does that make sense?! haha
To me, the arches don't look wide, they look normal. It's just the set up of the axel/wheels that has something a miss.
Murdoc - 5/9/16 at 01:52 PM
I did wonder if the ET was right, they a 6jjx13 so fairly wide. The tyre is near the rear bodywork when the spacers are removed.
What should the ET be?
That makes sense, I was thinking the same. I have thought about making a jig with my angle grinder to make a consistent cut. Can you cut fibreglass
with a TCT router bit? That may be another way.
Murdoc - 5/9/16 at 03:53 PM
Just pulled the wheels off and measured the offset as ET+14, so the mounting face is closer to the outside of the car than inside. Is that backwards?
There seems to be a mix of people getting -ve and +ve offset confused on the forum.
CosKev3 - 5/9/16 at 05:32 PM
quote:Originally posted by Murdoc
Thanks chaps.
While the lateral movement was fairly unrestrained the magnitude wasn't that great. A combination of the diff hitting the tunnel and chassis
hitting the handbrake brackets meant it couldn't put that much stress on the other 4 links. I have inspected everything and it all seems fine.
The previous owner put poly bushes in not that long ago and they are still tight, the chassis really is well made and the mounts look spot on.
On wheel arches, mine are ~290mm at the top. What width are normal ones, a quick search suggests this is normal, then why are my wheels so lost?
I haven't worked with fibreglass before. How easy would it be for me to resize them?
Thanks.
Just checked my rear arches and they are 290mm at the top.
Strange how yours look so big,could be the angle on them that makes them look strange,they slope down towards car.
Pretty sure the majority of people run a 7 inch wide alloy if they are using aftermarket ones.
CosKev3 - 5/9/16 at 05:35 PM
Not sure on the recommended offset for a live axle,but mine on Sierra rear irs is running a 7 inch wide alloy with a ET25 offset iirc
Murdoc - 5/9/16 at 05:39 PM
Is that ET25 with the mounting face closer to the car or away from the car.
The wings do slope away, optical illusion I think. Although, I'm sure they are fixed too high.
Have a look on www.willtheyfit.com
Stick in your wheel size/offsets etc and new sizes and it will show you how the new set up will sit.
If going to a 7inch wide rim, and you need them to sit 40mm further out, it will need to be a -10 to -15 offset
Keeping the same size rims you have, you would need to get ET-25
(The 40mm is just rough guess at how far your wheels sit in the archs)
I did a quick look about and it seems a few folk are using ET-7 ET-10 on an english axel, so I reckon whoever got them wheels for it just got them
because they were a good price and would do the job, but not be the right fit.
That will make the outer edge sit out 33.7mm, and give you 8.3mm extra inside clearance
Sound perfect to me!
Murdoc - 6/9/16 at 08:53 AM
Matt, thank you very much for the research. I will have a look at those wheels they look great.
Murdoc - 11/9/16 at 05:45 PM
I didn't buy the wheels in the end (probably should have) I will give it a bit of time and think over the options.
The arches do seem a bit 'heavy' in their design, so even with the correct offset wheels I may have to do something with them.
I have replaced the radiator fan switch, had a poke around the carbs and adjusted the throttle. The throttle was only opening about 70% so the car is
a fair bit quicker at high rpm now. The airbox wasn't attached to the carbs also for some reason, it just came off in my hand, not sure if the
screws worked loose.
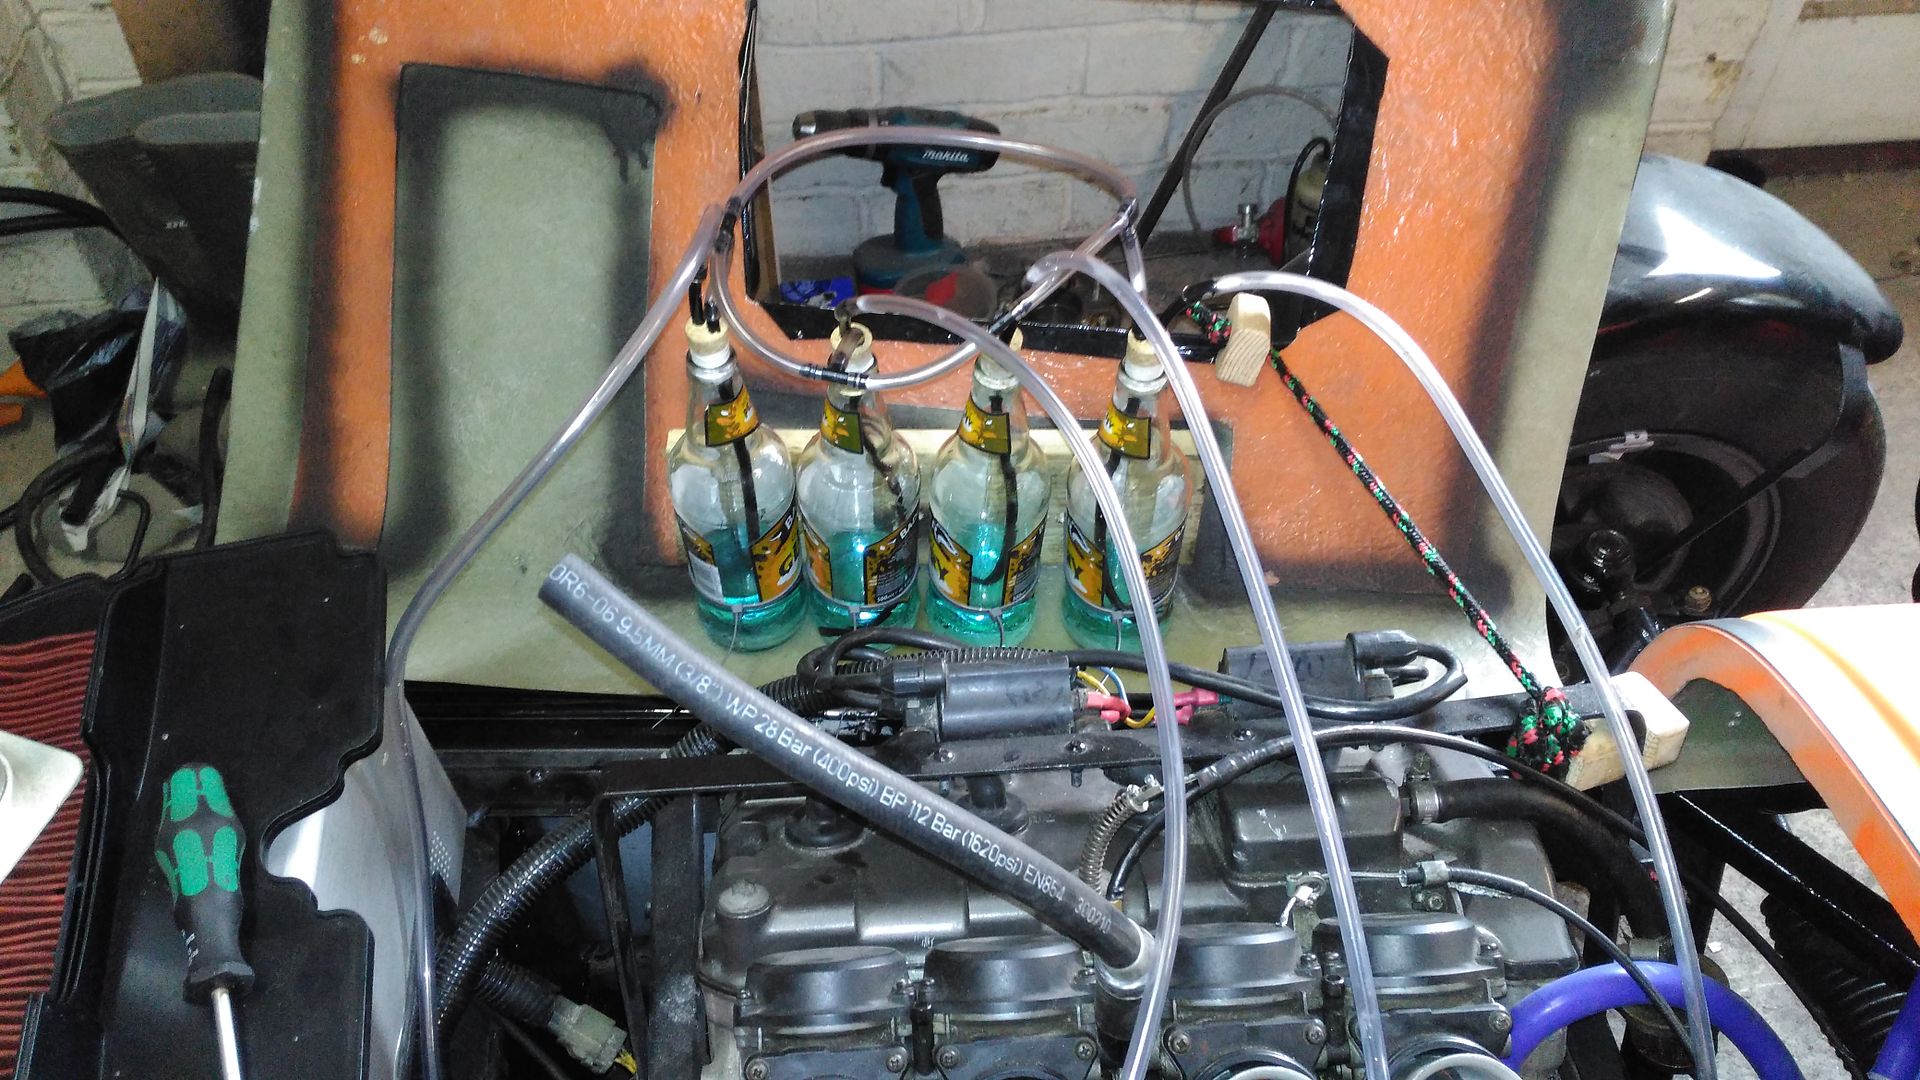
I'm going to build a manometer to balance the carbs, just need to get 4 plastic bottles the same. It's still not happy idling when cold and
I think this may be the reason.
I have gone out for a few blasts in the car, with the suspension fixed, the brakes biting well and the extra power it really feels great and a lot
more in control. My last 4 daily drivers have been RWD and the locost feels comfortable and predictable on the limit which I was a but surprised with
given the short wheelbase.
Harrodbear86 - 13/9/16 at 08:12 AM
Hi mate,
Just reading your thread and noticed they were my wheels you were looking at. These are still for sale as the buyer didn't realise they are pick
up only.
Let me know if you're interested.
Cheers,
Danny
Harrodbear86 - 13/9/16 at 08:18 AM
Hi mate,
Just reading your thread and noticed they were my wheels you were looking at. These are still for sale as the buyer didn't realise they are pick
up only.
Let me know if you're interested.
Cheers,
Danny
Murdoc - 19/9/16 at 04:47 PM
Hi Danny, thanks for letting me know. Unfortunately I have found a bunch of other things to spend money on at the moment so I'm going to have to
miss them unless they are around for a while.
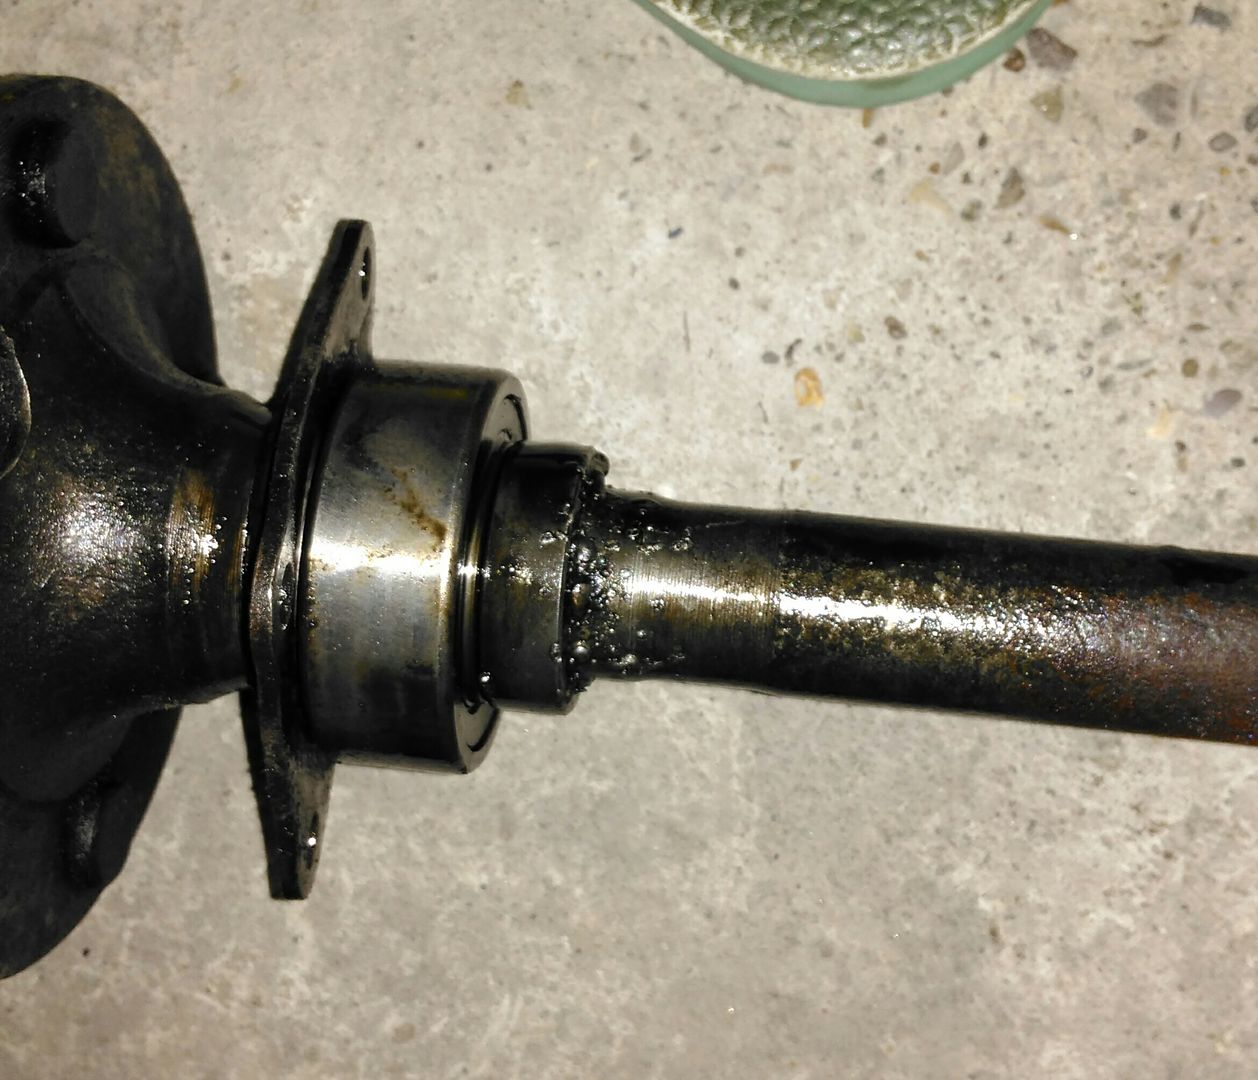
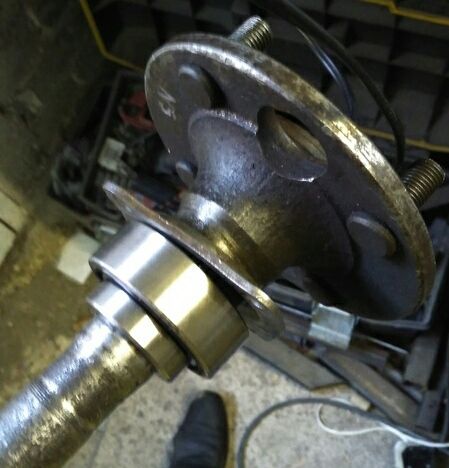
I went out for a spirited drive with a friend on the weekend, only 10 miles or so. On the way back I could smell gear oil. The insides of the rear
wheels are coated, it seems the seals have gone on the bearing on the half shafts. I ordered a slide hammer but in the mean time managed to come up
with a way to press them out.
It seems an attempt has been made to 'weld' the retaining collar in. Hopefully I can grind the pigeon poo out and get the collar off. Unless
someone has some half shafts going cheap?
Do they have to be pressed back on or can it be done with careful application of a mallet?
I build a manometer to balance the carbs, acquiring the raw materials wasn't much of a hardship.
I replaced the coolant (it was just plain water), fixed the choke, bought a second hand K&N filter ready for the dynojet kit but I'm
considering converting the engine to fuel injection instead. I have seen a 929 intake with injectors etc for �100.
Cheers
Murdoc - 12/11/16 at 10:27 AM
I have done a few things on the locost.
EDIT: Forgot about the bearing, spoke to Steve at SP Components and went for the SKF kit, the other option seemed to be a bad idea. Steve's a
really nice guy and helped me out getting the bearings on. The diff had around 20ml of oil in it when I pumped it out :/
/EDIT
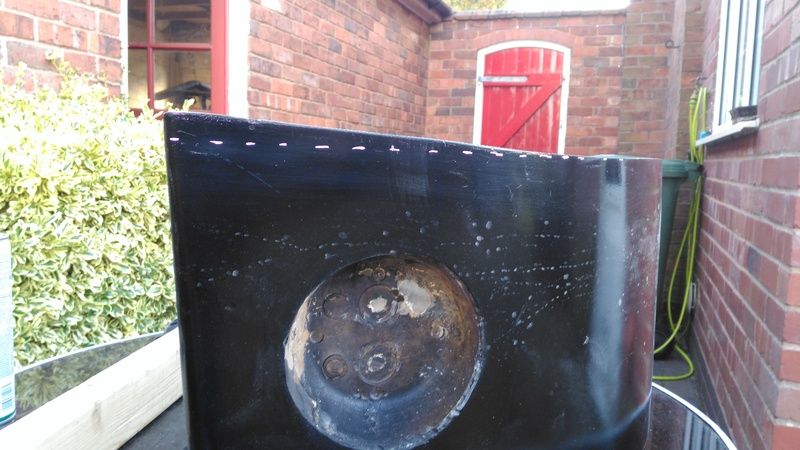
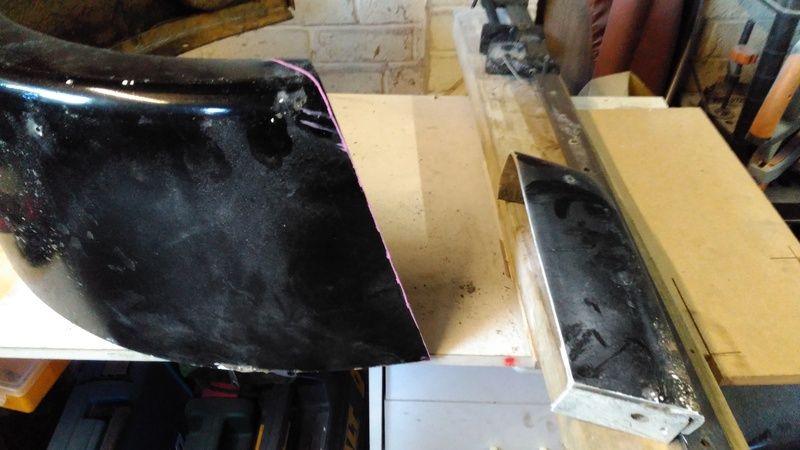
I spent quite a while making the wheel arches fit correctly, I had them on and off quite a few times and trimmed a lot of material out. The arches had
a flair out on the inside which was causing them to angle in, someone pointed this out earlier and I dismissed it as an illusion but it
wasn't.
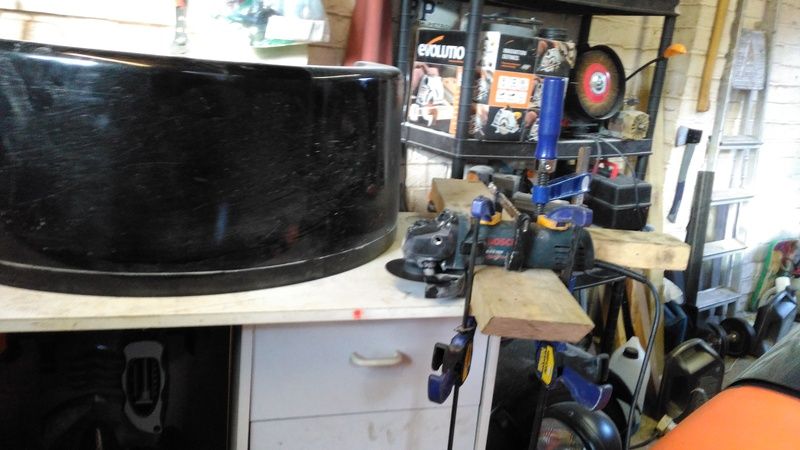
I had to trim the flair out by hand, then made a jig to take some width out:
Sliced some off the front to make them look less heavy using a similar jig:
End result looks a lot better I think:
The full beam lights wouldn't stay on so I took the scuttle off, decided I really need to rewire the car from scratch. The bike harness is still
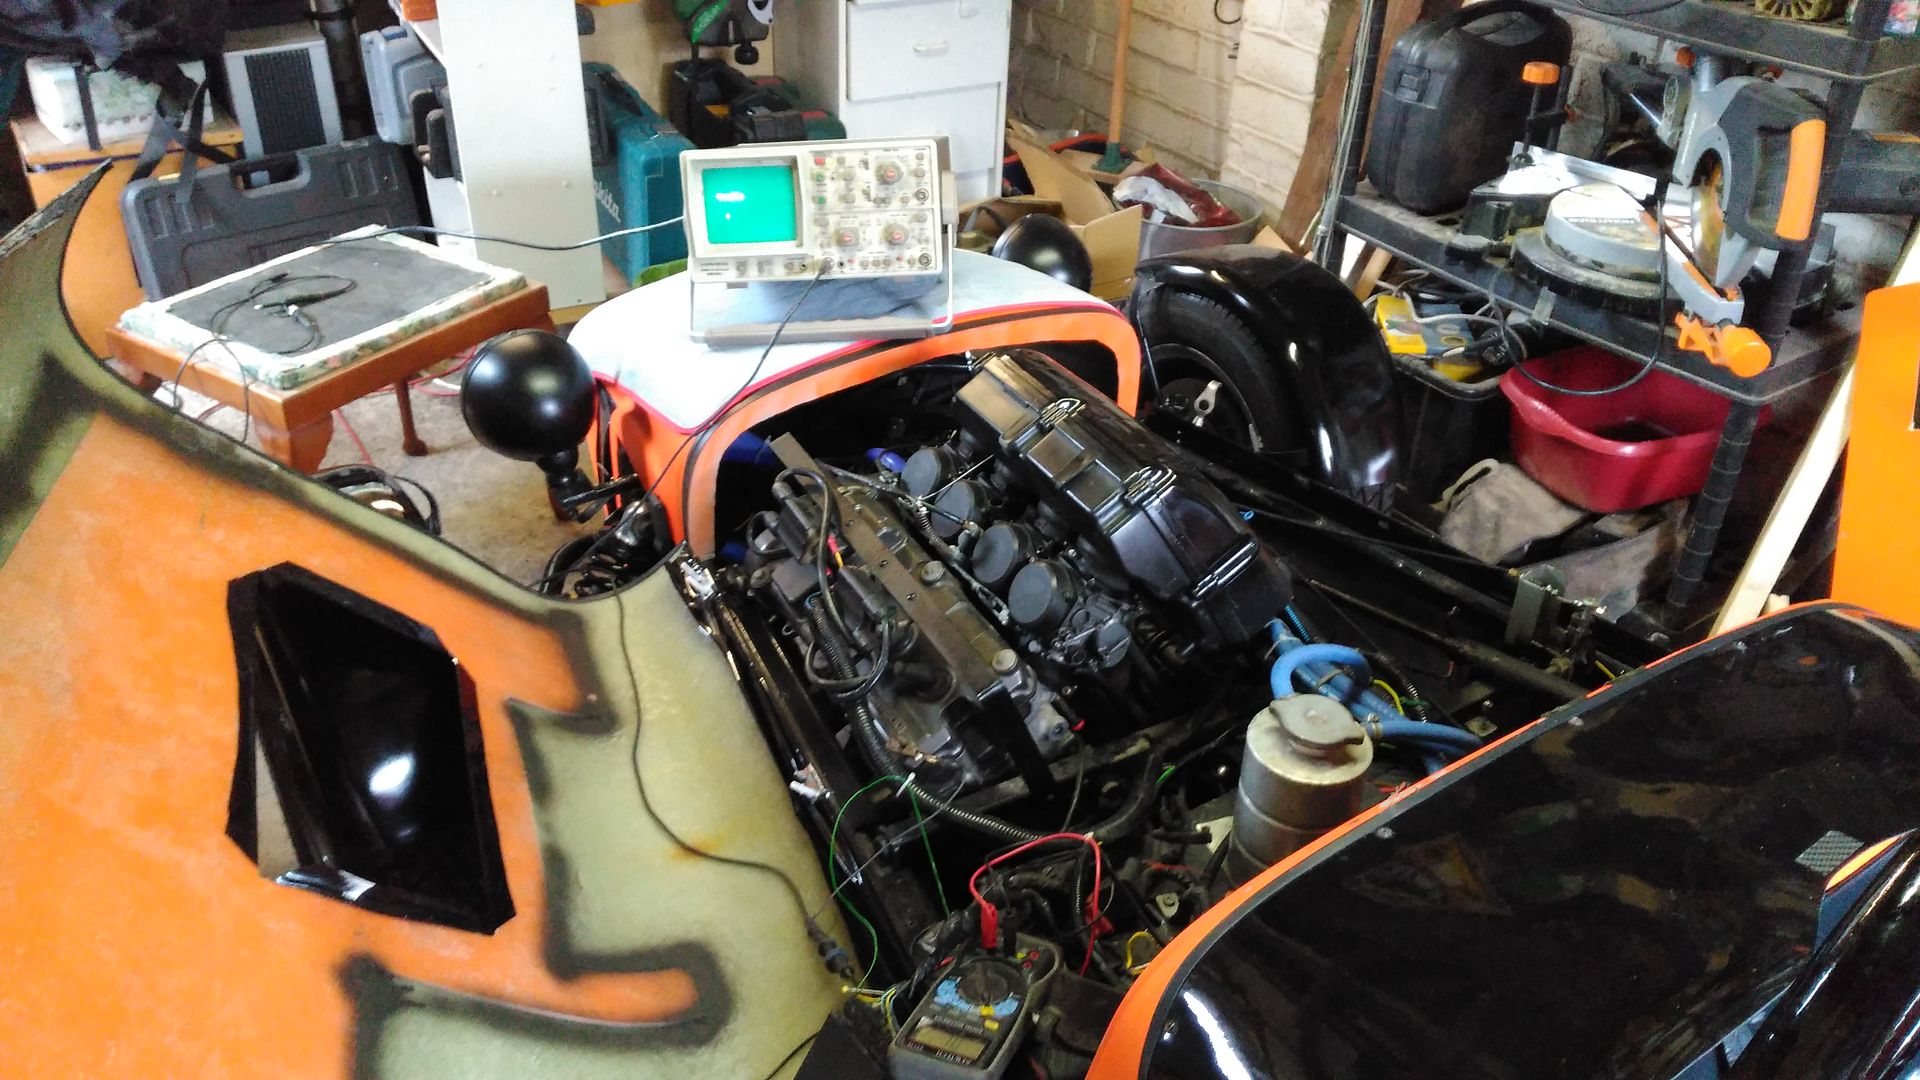
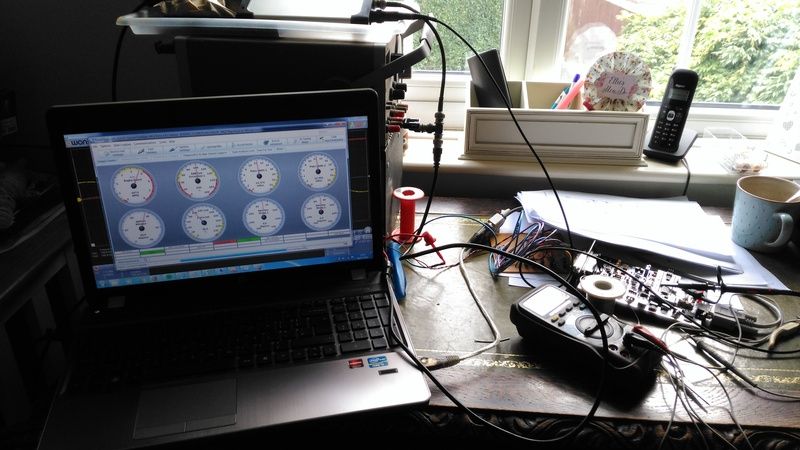
in there mostly complete and has been modified over the years. Easiest way to get rid of the bike harness is to convert it to run on a megasquirt.
I built this one for an MX-5 so had to swap the rpm input circuit from optical to VR in, using the latest MSII V3.0 filter it works great. Few
different parts using what I had to hand or could get easily.
VR sensor output in yellow, signal to microcontroller in orange:
I didn't want to pass a large current through the MS so rather than fit a coil driver/IGBT in the MS I bought a MX-5 1.6 ignition amplifier off
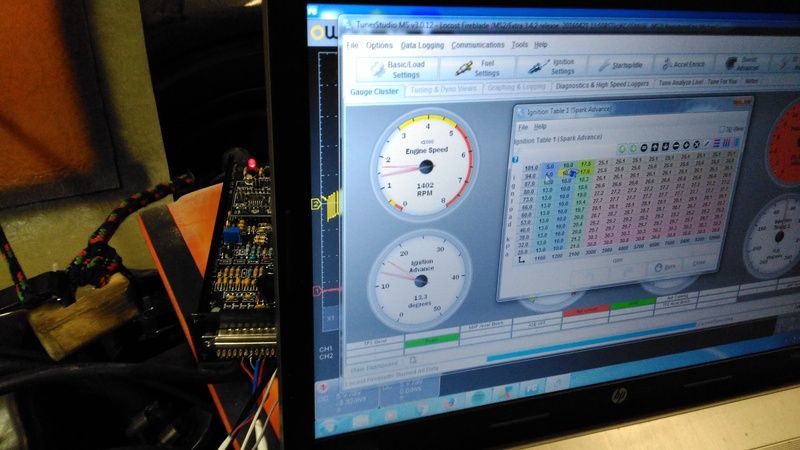
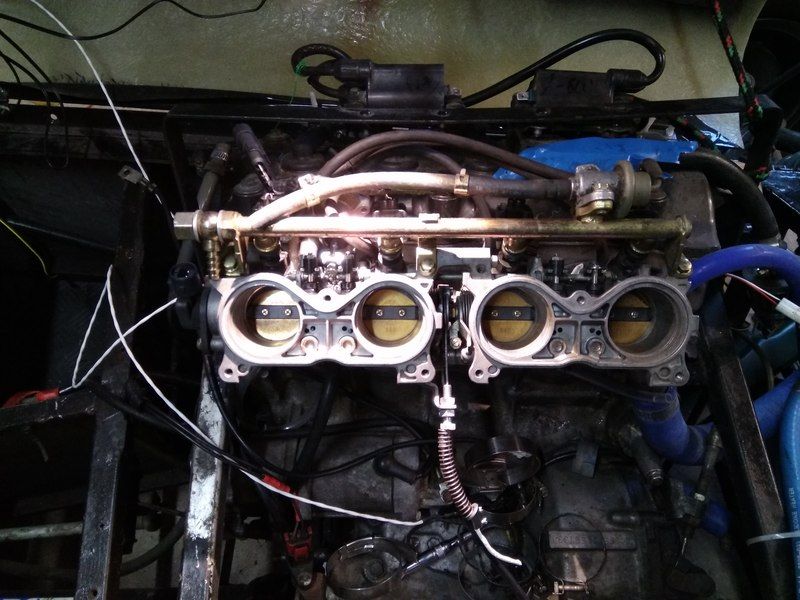
ebay, it works well. After poking around a fair bit, measuring toothed wheels on my spare engine and a few backfires the engine is running:
The manifold pressure is taken from the ports after the butterflies on the engine block, I have tee'd them all together but the engine
doesn't seem to be pulling enough vacuum, it is near atmosphere as you can see in the picture above ~100kPa. I have double checked this with an
old fashioned analogue gauge, opening the throttle the engine revs up. Holding my finger over the port on one cylinder it seems to suck and blow.
Does anyone know if this is normal? Doesn't look it to me, maybe the timing is off or the valves are worn?
Next I'm buying 954cc throttle bodies, injectors and intake (and maybe fitting the spare engine/investigate timing).
[Edited on 12/11/16 by Murdoc]
Murdoc - 29/12/16 at 11:08 AM
Got a bit more work done.
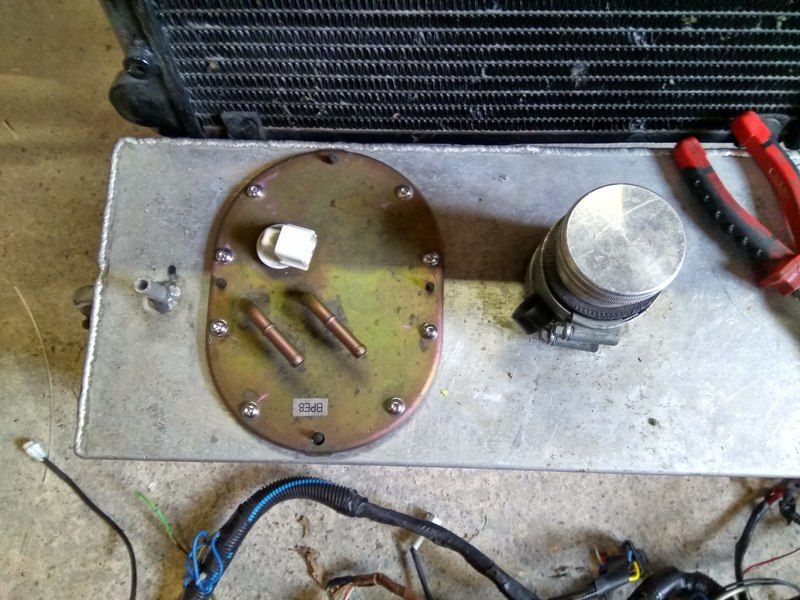
Fitted the MX-5 fuel pump to the tank, the unit has a sender in too that I will wire up to the dash. The sender was at the wrong angle to fit in the
tank but a blowtorch and adjustable spanner and it was the right way.
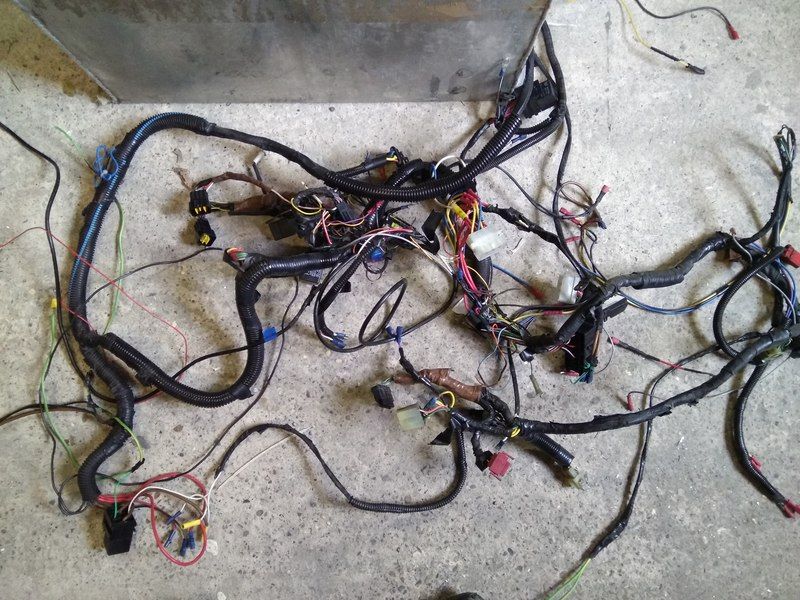
The existing wiring harness was in such a state I cut it out, it's full of bad crimps twisted wire and electrical tape.
Much better, although the car no longer runs
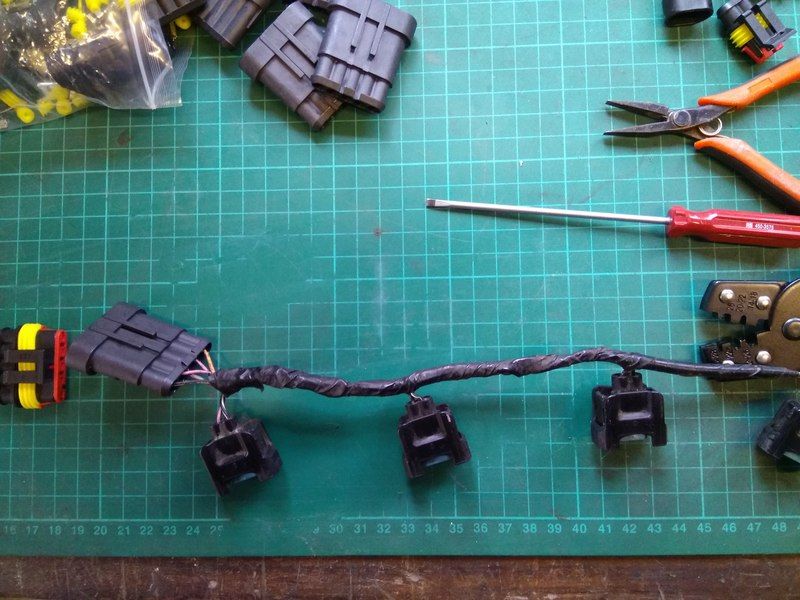
I have started to make parts for the harness, this is the injector harness swapped over to a superseal connector.
I'm going to attach the throttle bodies upside down compared to there position on the bike, this give the fuel a better shot in to the cylinders,
I'm not sure why Honda did it any other way, perhaps packaging.
This meant the wax valve that controls the cold idle fouled on the cam cover so I had to drill and tap the throttle bodies to mount the wax valve
between cylinders 1 and 2 instead of 3 and 4.
I'm waiting for some silicone hose to come in the post, then I can attach the TBs and work out the harness lengths.
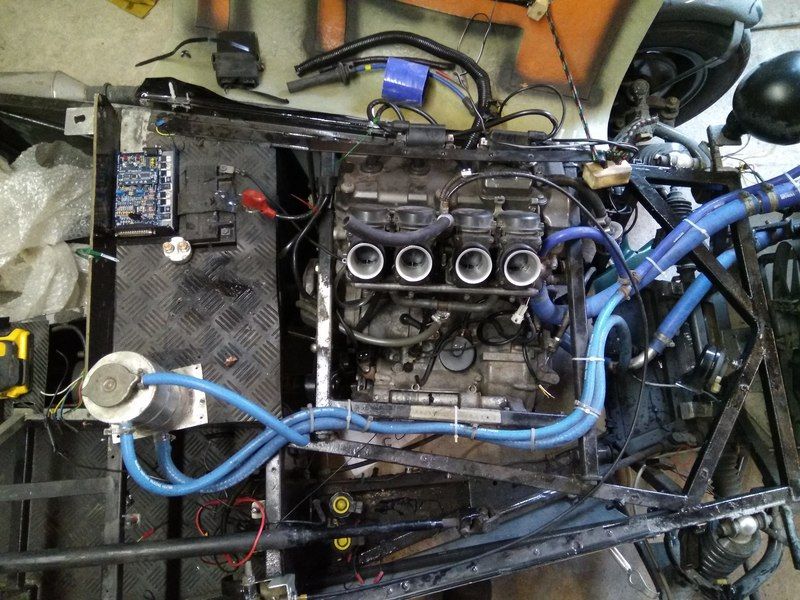
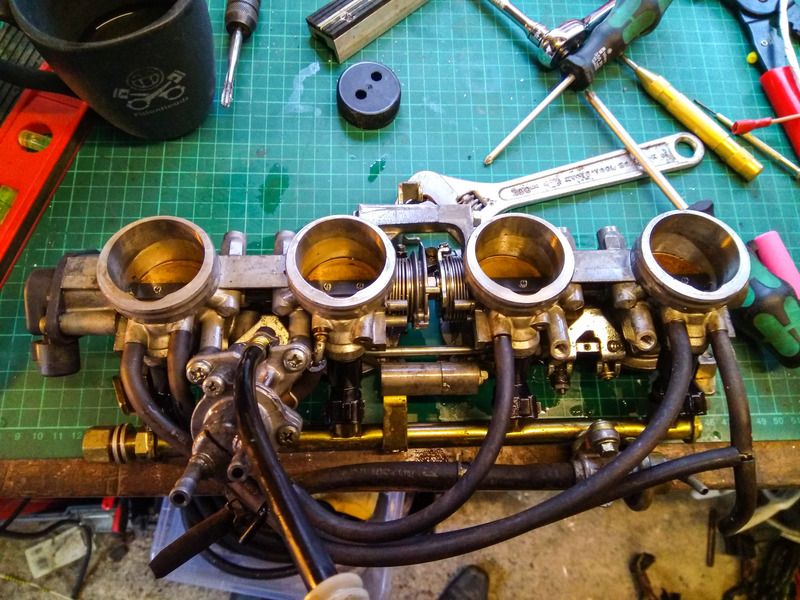
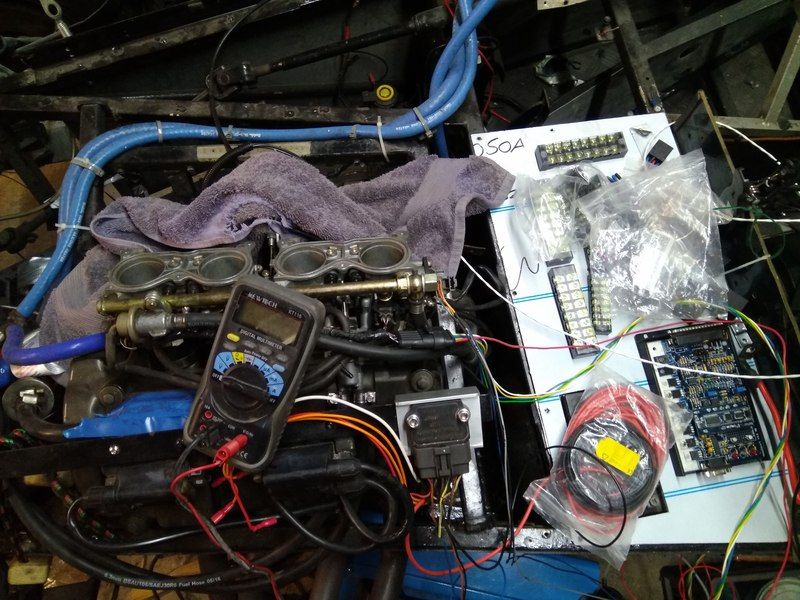
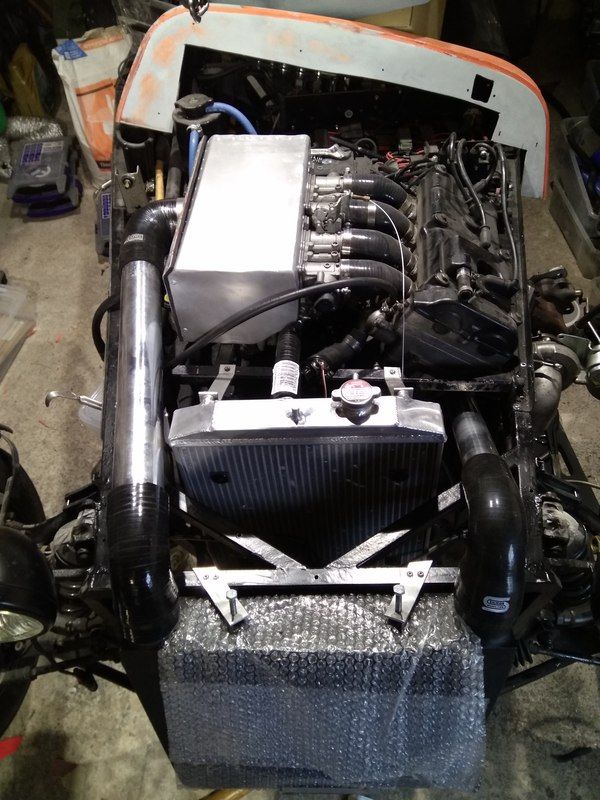
Murdoc - 29/12/16 at 11:15 AM
Got the TBs mounted on the engine. The engine has 45mm ports and the TBs are 50mm OD using 48mm hose I managed to get a good seal on both and account
for the different bore spacing.
The wax valve clears the cam cover.
I started to run the new fuel lines, I took the prop out for access to fit the P clips, the cable ties used previously weren't quite up to the
job. Unfortunately the prop bolts to the diff weren't even finger tight, they loosely moved when I touched them. The bolts the other end were
finger tight but not much more. It seems the prop departed the diff at some point and chewed out the chassis so I had to make up a new cross piece
with a bit of added clearance.
Fuel lines run, clearance is a bit more than it appears in this picture, I have jumped around on the suspension and it doesn't come close.
Made a simple bracket to hold the fuel filter.
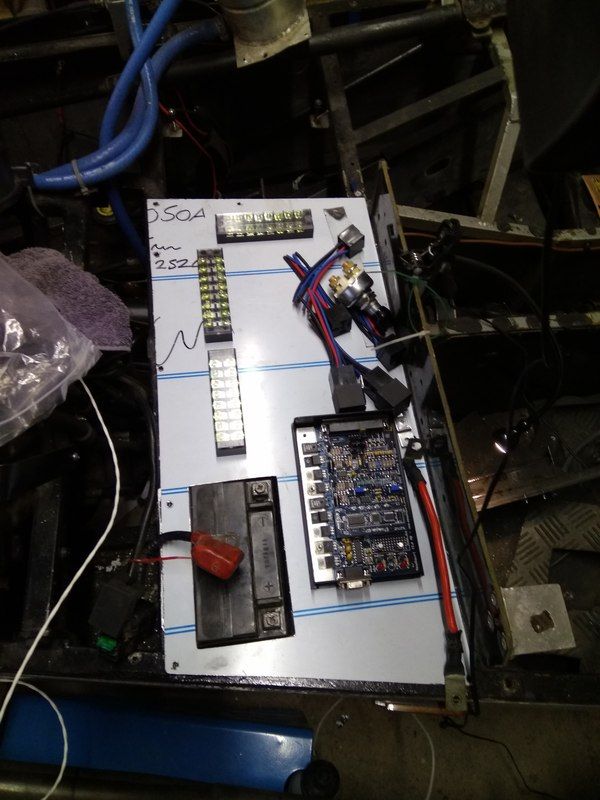
Made a new panel and battery holder and the other one looked like it had been shot at and started to test fit.
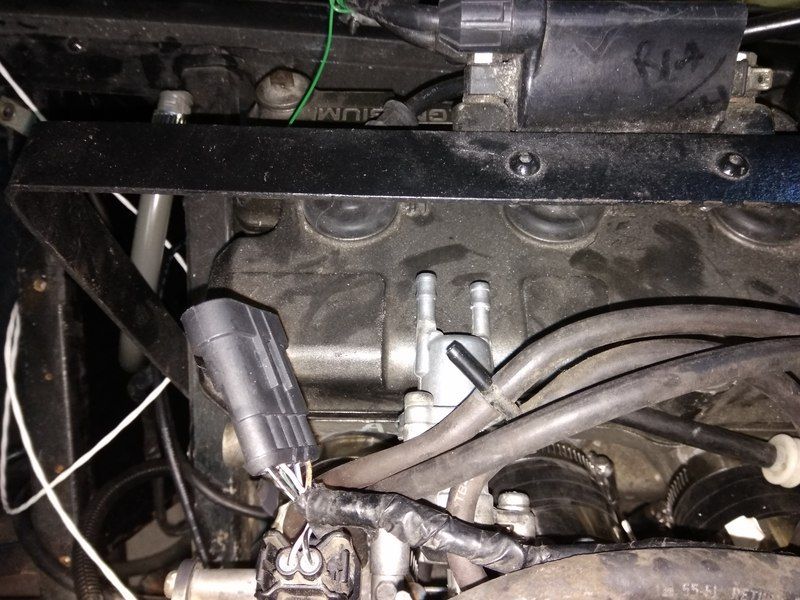
Fitted the ingitor on a piece of cut down aluminium I section and started wiring up.
CosKev3 - 29/12/16 at 11:35 AM
Looking good
Had your work cut out with sorting bodges by the looks of it!
Twisted wires?really?
Murdoc - 7/3/17 at 08:50 PM
Been a while updating this. I have taken fewer pictures but made more progress.
The car looked something like this, decorating supplies are not integral to the exhaust structure.
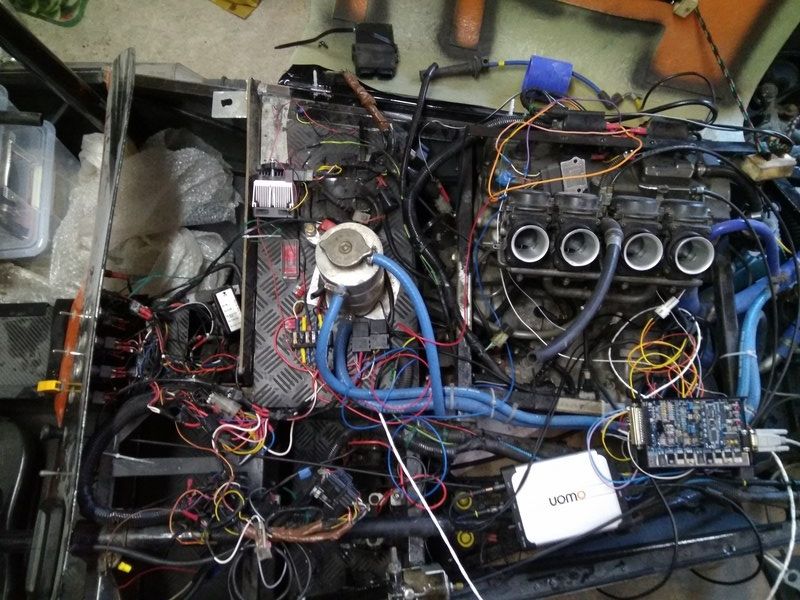
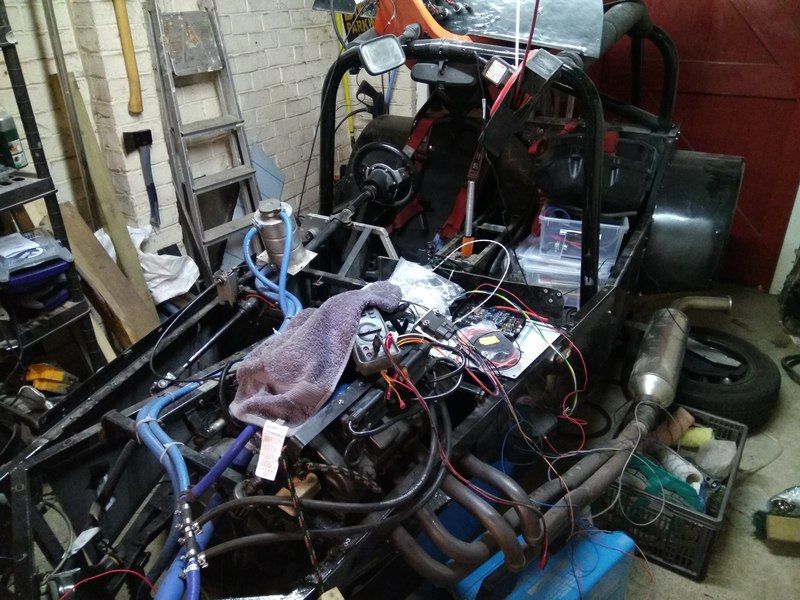
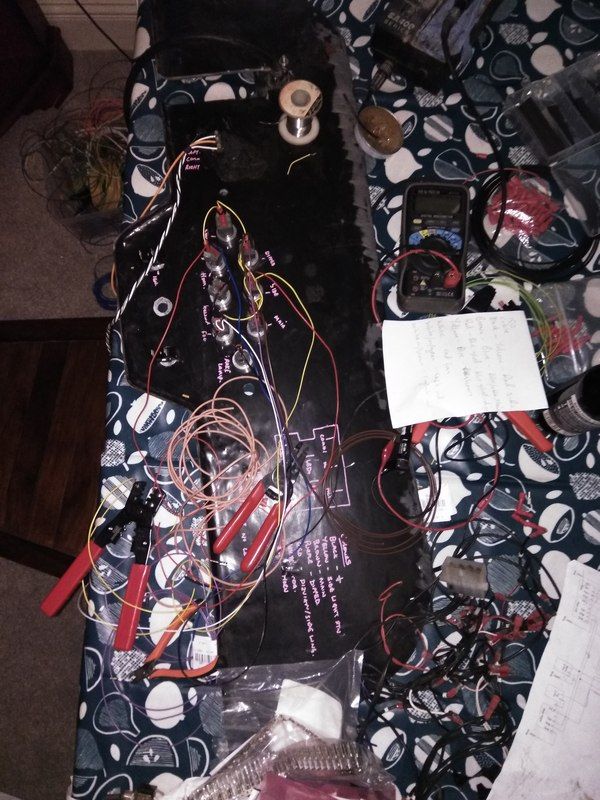
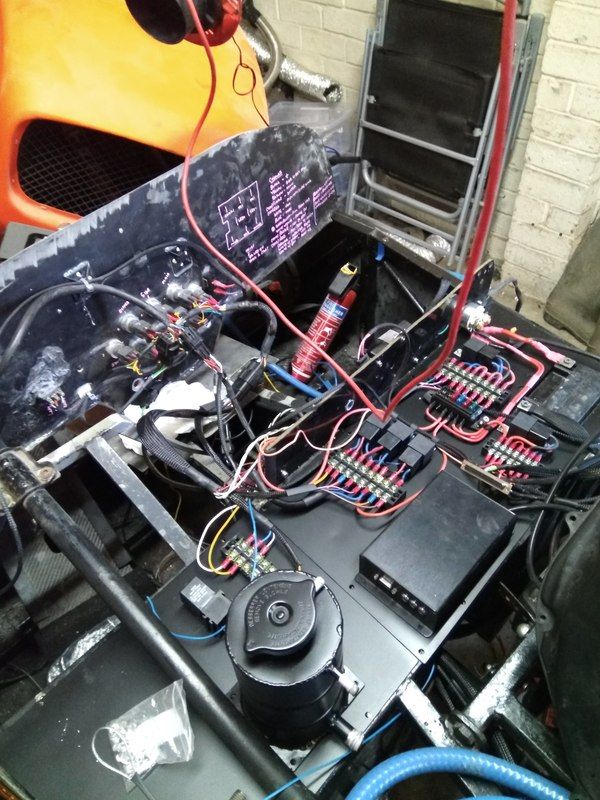
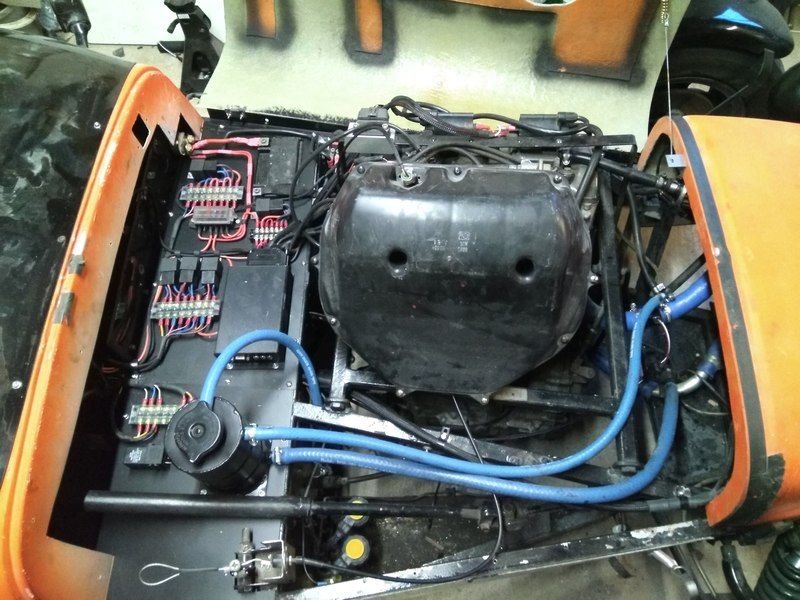
I continued wiring up the relays and fuses, the wiring harness for the engine, the front of the car, the rear and the dash are all separate so can be
removed for rework. The wiring took a very long time with all the connector crimps, braid and heatshrink. I don't have any detailed pictures of
the front and rear harnesses but you can see them in some pictures, it was many hours of cutting and stripping wire in the cold.
Regulator-Rectifier
Dashboard, used molex MX150 connectors for the dash, the digital dash part is an Acewell 6856.
Finished the wiring.
I had a close look at the roll cage, it turns out the welds holding the front part on were actually mostly filler. I scraped around the weld with a
round file, it it a few times with a copper hammer and the joint popped open. I checked the back part and it's fine, the tube is also a different
diameter so probably original. I cut the front cage out and left the roll hoop in.
Also, the bolts in the prop shaft weren't tight, the rear bolts weren't even finger tight. Not sure how I survived driving this thing. All
loctited in now.
Put the car back together
I made a mistake after getting the engine harness complete but not having the radiator fan or front harness. I was tuning the car for idle and
hadn't noticed the coolant temperature rising until it blew the expansion tank cap off. Boiling coolant showered down on the open topped
megasquirt and wiring. It took a dose of brake cleaner and a bucket load of MEK and an oven to get the megasquirt back to life. The coolant got
everywhere and wouldn't evaporate. I'm still mopping it up two months later, the amount of glycol meant it hasn't corroded anything but
it's still a mess.
I have the car booked in for an MOT on Friday but not sure if I will make it, I can't get the idle stable as the wax valve idle arrangement is an
air trap and unreliable, I have ordered a stepper motor so the idle can be controlled by the megasquirt.
Throttle response seems better than the carbs but I haven't driven the car yet, I have a lot of tuning to do before it is drivable, if I can
find someone who is willing I may pay for it to go on a rolling road and tuner professionally. Any recommendations in the midlands?
Banana - 7/3/17 at 09:20 PM
Nice wiring. I like that braided outer stuff, where is that from?
I can't believe how high the airbox/engine sits compared to my MK! Are you going to mod the airbox for a cold air feed?
Murdoc - 7/3/17 at 09:27 PM
quote:Originally posted by Banana
Nice wiring. I like that braided outer stuff, where is that from?
I can't believe how high the airbox/engine sits compared to my MK! Are you going to mod the airbox for a cold air feed?
We use a lot of braid at work and that comes from RS but this stuff I got from Amazon, the quality isn't quite as high but it's still very
good. The FI airbox is much larger than the carb one. I've had to cut a larger hole in the bonnet. The engine is as low as you would really want
it, it's already the lowest part of the car. I can't see the airbox lasting long before I move to a turbo.
CosKev3 - 8/3/17 at 08:23 AM
Dale at Bailey Performance near Telford is the Megasquirt mapping expert
He is a member on here too
Murdoc - 8/3/17 at 08:26 AM
quote:Originally posted by CosKev3
Dale at Bailey Performance near Telford is the Megasquirt mapping expert
He is a member on here too
Thanks, I left him a phone message a couple of days ago but no response. I will give him another call. I'm about 50 miles from Telford so not too
bad to transport the car.
[Edited on 8/3/17 by Murdoc]
Murdoc - 11/6/17 at 08:04 AM
Not updated this for a while. Just tuned myself so far. Engine runs so well on the megasquirt that I have killed my gearbox. Switched to my spare
engine after a light rebuild and that gearbox is sick. I'm​ now fitting a later gearbox which has spiraled somewhat as I have had to
buy a later clutch basket and clutch cover.
I've also started building an aluminium Airbox for the turbo.
Murdoc - 25/9/17 at 03:33 PM
Now with added turbo.
Still plenty to do before it's back on the road.
CosKev3 - 25/9/17 at 04:29 PM
Will help with under bonnet heat hanging it out there!
Have lowered engine compression?
Currently running mine on standard compression before forging the engine over winter,it's currently running 197bhp at 8 psi ,goes very well
Murdoc - 25/9/17 at 04:34 PM
I wasn't planning on lowering the compression. I'm aiming for 200-220bhp. Reading around it seem with these numbers I should be OK as the
engine isn't prone to set. Very happy to be educated though if this is optimistic. I will start off on wastegate pressure, which is ~7psi,
it's a TD04HL-13.
Trying to locate a lockup clutch at the moment.
An intercooler to go around my new civic rad or a top mount. What are you running?
[Edited on 25/9/17 by Murdoc]
CosKev3 - 25/9/17 at 04:43 PM
I'm running a GT2556 with a 4x4 Cosworth cooler.
Looking like I'll need to fit a external wastegate over winter,as on a hard pull I'm seeing 12psi and the megasquirt is cutting the spark .
dmrider_10 - 29/9/17 at 06:02 AM
Sorry Ive read through your posts but cant see, what variety of Blade engine is it? 919?
Murdoc - 29/9/17 at 06:21 AM
It's an 893 with a 919 gearbox and 954 throttle bodies. Frankenblade.
dmrider_10 - 29/9/17 at 07:02 AM
Interesting. We have a carbed 919 in a fisher and id really like to make it injection but in the easiest fashion possible. The "proper" way
would be to get some bodies similar to yours and megaquirt but I did wonder if the ECU from the bike that the throttle bodies were off would run them
on our engine hmmm. Probably a bit of a bodge really. I suppose the question would be how close in spec to our 919 are the first throttle bodied
blades.
Geat thread BTW!
Murdoc - 30/9/17 at 12:28 PM
I don't think it would run, not at least without a custom map and then you may as well use a megasquirt. I've worked out the pit falls with
a blade engine and posted the solutions on the msextra forum. It's a fairly straightforward setup other than that.
It has been almost a year since I last posted. I've been quite busy in that time. The car is back on the road, I've resprayed pearlescent
black which required a lot of (endless!) bodywork.
The turbo is complete, TD04 from an impreza, RX7 intercooler. It's around 10psi at the moment, the car had a few issues on the dyno which I
wasn't there to fix but mostly a boost cut limit left on in the megasquirt, I need to head back for a power run. At 10psi it should be around
200bhp. The car weighs 460kg so it shifts OK.
The intercooler works very well, the intake air is so cold it is below the dew point: Description
The random wire cable tied on is temporary for my 'det cans'
And some terrible youtube videos I took while my brother had a drive:
[Edited on 12/8/18 by Murdoc]
CosKev3 - 12/8/18 at 06:17 PM
You are correct, awful videos!!!
What have you done for oil return to sump?
Murdoc - 12/8/18 at 07:19 PM
I think I need a GoPro
Oil return is just returned to the sump through a barb I added. I had to notch the chassis for clearance and weld up a new drain from the turbo. There
is a good 20cm drop from the turbo to the barb so it drains fine.
CosKev3 - 12/8/18 at 09:33 PM
Ah right tidy
Still struggling with mine blowing oil into the inlet tract of turbo.
I've added a vented sump tank under the oil return and a Mocal scavenge pump, pretty sure the return is not my issue though.
How have you restricted the oil feed to the turbo?
Murdoc - 19/8/18 at 07:08 AM
I'm not running an additional restrictor but the aperture in the TD04 is quite small.