


They are in no real order as I cant get my head round the photo bucket app.
[Edited on 11/11/17 by J666AYP]
Hi all,
I thought it was about time that I started a thread on my little project...
6 months ago I brought a unfinished locost chassis off ebay for Ł150, had a result as the chap threw in some 2nd hand Gaz shocks and assorted other
bits.
I then spent a month or so stripping the rust and painting the frame up while plotting what engine/donor I should use. I was going to use a 1.8 mx5 as
that is what the chassis was built for, but I get bored and buy things without thinking. This led to a late night bid of Ł275 on a Mercedes CLK230
with a unknown gearbox fault (turns out the DMF was shot).
8 hours later I had a 2.3L 4cyl supercharged merc with a manual gearbox and 70k on the clock sitting on the drive! **why did I do that lol**
The last 4 months have been spent making everything fit, or trying to. So far the engine, gearbox, prop, diff and rear shafts are in. I have relocated
the supercharger to the passanger side and started to fab my manifolds.
I also brought some bodywork off a unknown 7 style car and am in the process of modding that to fit.
Pics to follow shortly when photoshop starts working for me.
Jay.
They are in no real order as I cant get my head round the photo bucket app.
[Edited on 11/11/17 by J666AYP]
GOOD WORK, GREAT TO SEE SOMETHING DIFFERENT BEING USED TOO 
Excellent work, like it a lot 
Can I have a go when it's done please?
Thanks gents!
And Scudderfish, no problem.
Jay
Will make some nice noise once it's running for sure 
What's the score with the green miniature roll cage? 
CosKev3,
The original owner brought a section of cage that was chopped off another car (god knows what he thought he was going to do with it).
Anyways I cut the rear hoop off and used it for my rollbar and scrapped the rest.
Jay
Ah I see!
What is the gearing like on those Merc boxes/diffs?
CosKev3,
1th gear ratio:
3,86:1
2th gear ratio:
2,18:1
3th gear ratio:
1,38:1
4th gear ratio:
1,00:1
5th gear ratio:
0,80:1
Final drive:
3,46:1
RPM at 120 km/h (theoretical):
2.800 rpm
Not that any of the above means anything to me 
Looks great, I think I would have struggled to chop up the Mercedes, not like a scruffy old donor.
Mark,
Most of the bits on the merc could be pulled off due to a chronic case of tin worm. She 100% had some dodgey MOT's in the past.
Jay
Keep posting pics
Looking great, 10/10 for going for the challenging install of a different engine, overcoming the engineering challenges has been the most rewarding for me. I’m going to start a post on who has destroyed the best car to borrow its powerplant.... think you are winning so far ;-)
A grinder and paint makes me the welder I ain't!

Craigdiver,
Thanks mate! In all honesty I was expecting alot of negative responce for using something abit different. I have had a look at your thread, shes going
to be fun for sure!
Jay
[Edited on 12/11/17 by J666AYP]
quote:
Originally posted by J666AYP
Craigdiver,
Thanks mate! In all honesty I was expecting alot of negative responce for using something abit different. I have had a look at your thread, shes going to be fun for sure!
Jay
[Edited on 12/11/17 by J666AYP]
I'm not using the standard loom/ECU as its a huge mess of immobilised rubbish. Going to get a loom made up and use a emerald/omex ECU. Just need
to find out what system will support the VVT best.
And they are 197bhp standard, mine should be leaning more towards the 250-260bhp mark when its up and running. For some reason Mercedes like to
restrict their engines out of the factory with rubbish boost hoses and manifolds. Its almost like they want to hold the cars back.
I'm thinking 250bhp should be enough to start with, I can then start to tune it further when I get used to driving the car.
Any idea what they weigh ?
Loving the Merc donor.
The engine or the merc?
The merc was about 1300kgs IIRC
The engine feels about the same as a blacktop zetec.
[Edited on 12/11/17 by J666AYP]
Yeh the engine.
I would say about 100kgs, feels very similar to a 2.0 mondeo blacktop lump.
197hp was a German insurance limit, so a lot of 90s engines were restricted to that level (on paper at least). Like the Audi 2.8 v6, BMW 328i etc.
Aren't forged/ steel bottom end? Maybe with a nice turbo you can hit 350hp.
Ettore,
Thanks for that info about the German restrictions, I had no idea they restricted power. I thought they just limited the top speed.
And turbo conversions are not too difficult on that engine, however I want to keep it as supercharged for now due to the power delivery from the SC. I
much prefer the constant boost from a SC over the lag/spool of a turbo.
Jay
quote:
Originally posted by J666AYP
[Edited on 11/11/17 by J666AYP]
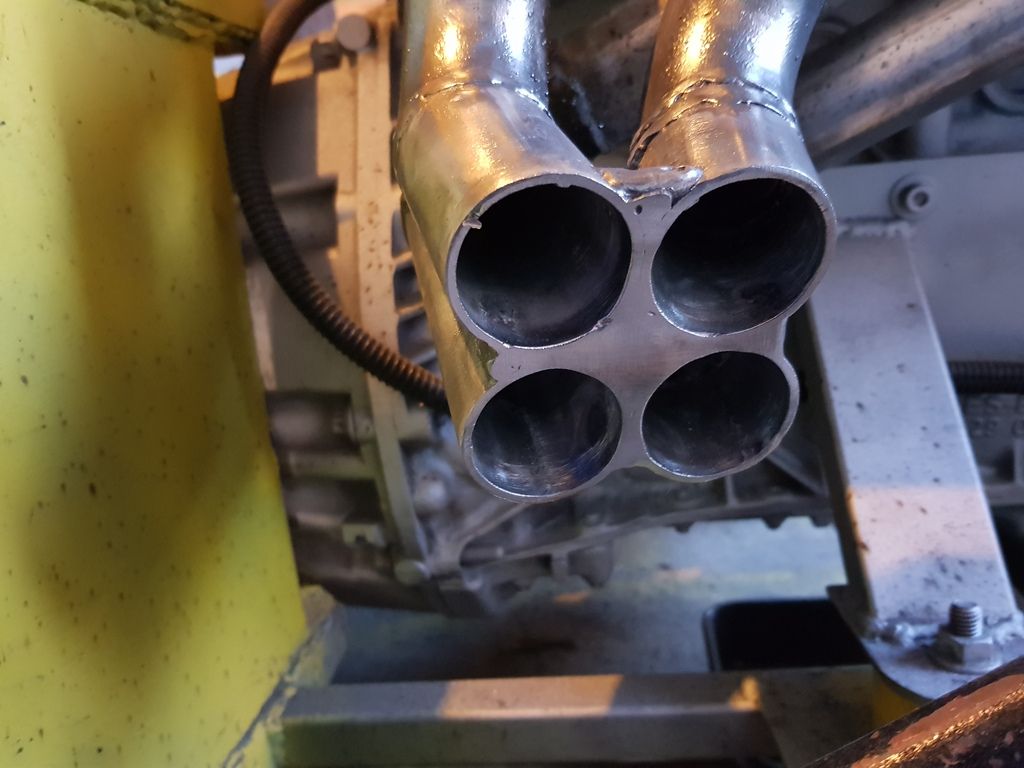
Hi Angel,
The manifold pipes in the pic are 2mm wall thickness, this is just to make sure it does not crack when it heats up/cools (I'm not experienced in
welding so better to do it once than twice). These lead into a 1.6mm wall merge pipe and then out to the 1.6mm exhaust.
Jay
[Edited on 13/11/17 by J666AYP]
Not to porky the. Worth thinking about, thanks.
[Edited on 13/11/17 by big_wasa]
quote:
Originally posted by J666AYP
Craigdiver,
Thanks mate! In all honesty I was expecting alot of negative responce for using something abit different. I have had a look at your thread, shes going to be fun for sure!
Jay
[Edited on 12/11/17 by J666AYP]
Scudderfish,
Very good point well made.
Jay
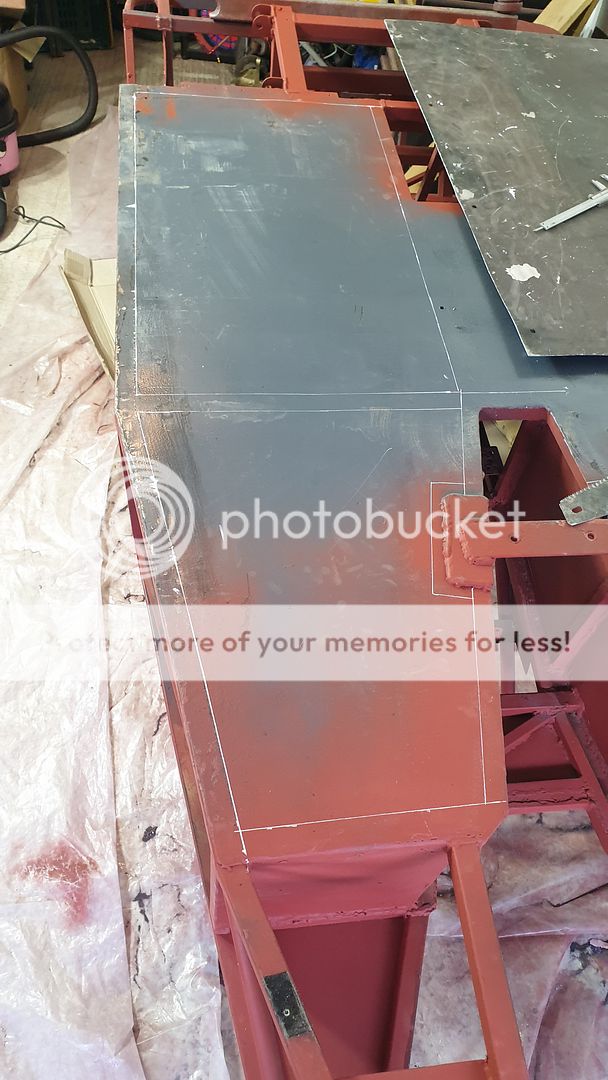
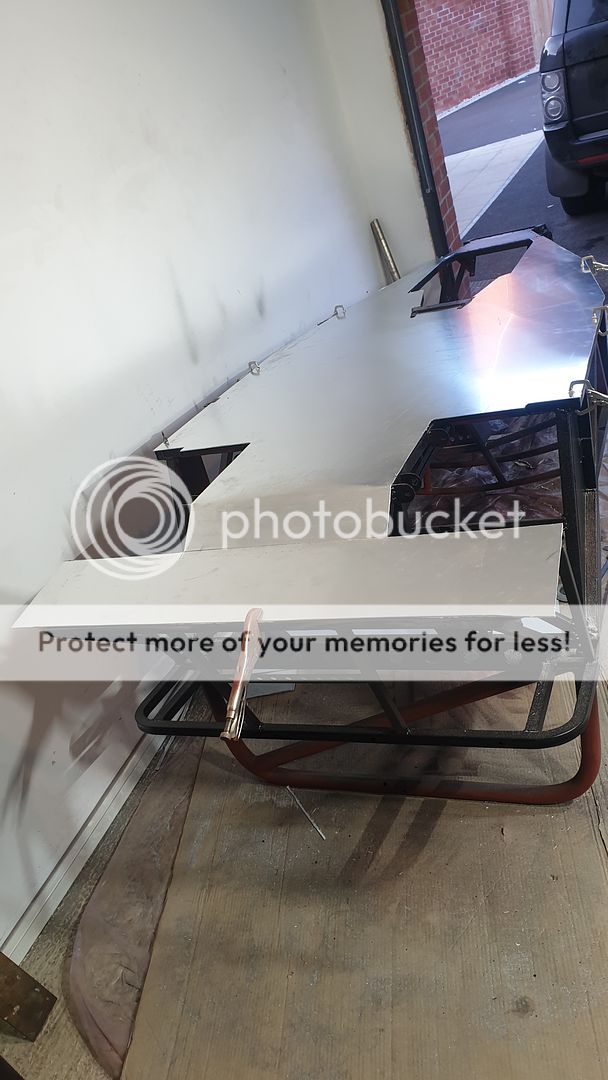
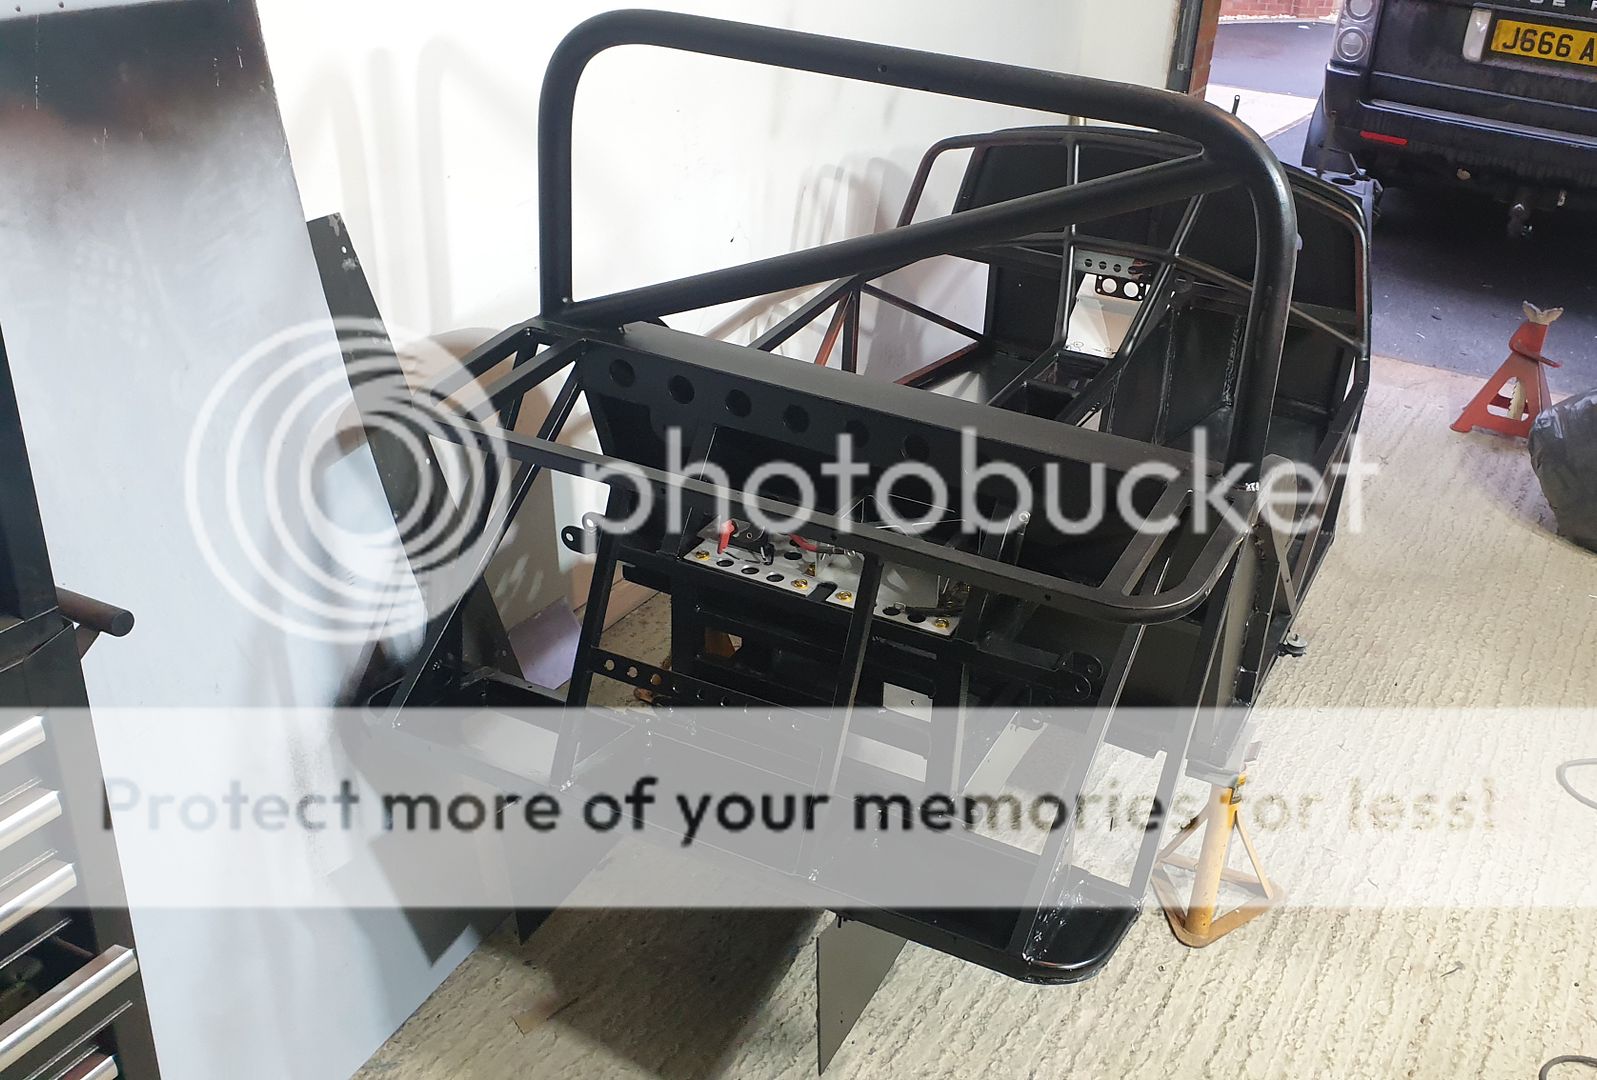
Got bored today so I thought I would do some work on the scuttle that did not fit....
Going to use this to make a fibreglass one.


This could work... Satnav, basic data logging, on the go faul reading and bluetooth connection to the gopro! will still use a normal digi dash for
speed to keep Mr IVA tester happy.


[Edited on 1/12/17 by J666AYP]
Make sure you can read it in direct sunlight.
It has a sort of matt plastic cover over the screen to reduce sun glare, going to recess it abit aswel so it should work.
Plus the sun only comes out for two days on the average UK summer lol.
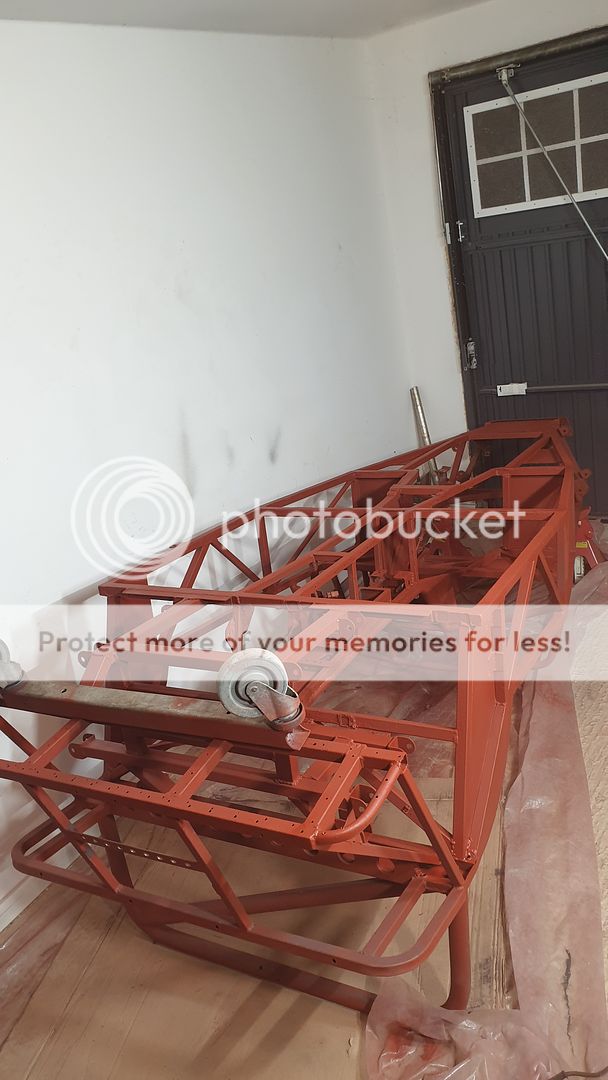
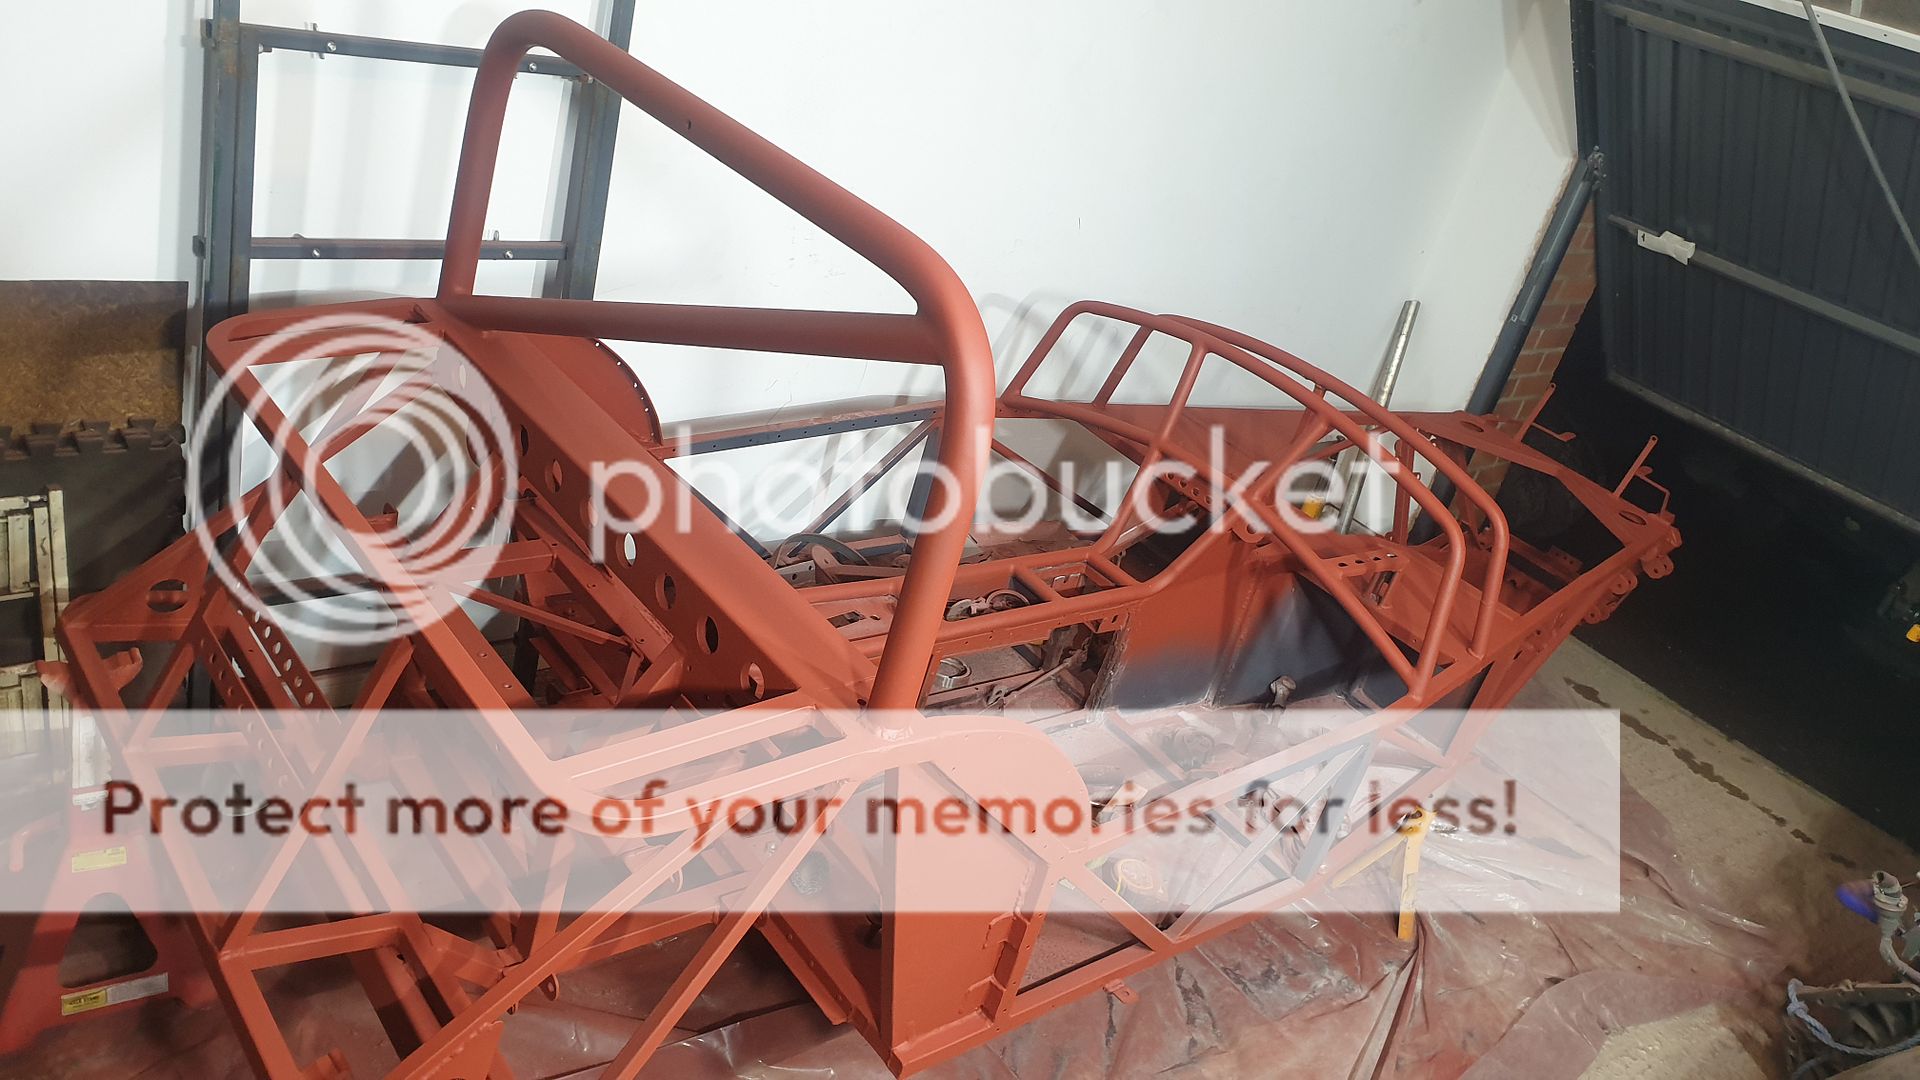
Its been a busy winter at work so not much has been done. I have stitch welded the entire chassis joint by joint and started working out a few other
bits. (welding done the other day after these pics were taken).


Jay
[Edited on 1/4/18 by J666AYP]
Very interested in this build...
Looks like you are hard at work creating a beast of a car here...
How long do reckon this will take to complete, and are you getting it road legal or track car?
Can't wait to see this one progress and see it when completed.
Good luck!
Thanks mate! has been alot of hard work so far.
I'm hoping to have it road legal for summertime 2020, having it done sooner would be nice but im too busy at work to get much time in the garage

Plus trying to hide money from the mrs with a wedding to pay for is proving difficult lol.
Jay
Haha! I hear you with the wedding...
You haven't do too badly money wise up to now though, (with the costs you've advertised,) but its time that's more of an issue
isn't it when building.
Keep the pics coming...
Yeah she seems to think dresses are more important than cars.... I will educate her!
And so far it owes me about 1k all in so not doing too bad.
And tell me about it, as soon as you change one bit that creates three more bits that need to be made or moved must have had that engine out
atleast 10 times by now.
Jay
Todays efforts...


Where is the throttle situated ? The Merc used a big pwm operated bypass to stop any damage caused by shutting the throttle from high boost
I have ditched the standard electronic bypass/recirculation system.
Im using a dumpvalve and redirecting the excess charged air back into the induction system. Pretty basic but a whole lot less agro than trying to run
merc electronic systems off aftermarket management.
Jay
So the throttle is after the blower and intercooler?
quote:
Originally posted by J666AYP
I have ditched the standard electronic bypass/recirculation system.
Im using a dumpvalve and redirecting the excess charged air back into the induction system. Pretty basic but a whole lot less agro than trying to run merc electronic systems off aftermarket management.
Jay
Froggy,
"The electronic valve is there to catch the spike in pressure as the throttle shuts . With the throttle post charger there will be a delay from
boost to vacuum which puts pressure on the bearings in the charger , I ran twin throttles as some mx5 conversions do or use a large diameter bov to
help"
I dont think im on the same wavelength mate....
Even the standard merc setup uses the electric throttle type thing after the charger? As far as I understand it all it does is dump excess boost back
into the airbox to reduce pressure drops? would a DV not do the same thing if routed into the airbox?
Also would it not make sence to mount this after the intercooler so im blowing cold air back into the inlet instead of hot air?
Confused.com
Jay
[Edited on 3/4/18 by J666AYP]
[Edited on 3/4/18 by J666AYP]

It’s a by pass and being electronic it will open before the throttle shuts where a vac operated valve will need enough vac to pull the bypass open . It’s a mechanical pump at the end of the day so pumping against a shut throttle will put load onto the bearings in the charger . You’ll need a valve around the same size as the original
Hmmm okay.... that makes sence. So in theroy a large dump valve could do near enough the same thing with out all of the electrical nightmares as long
as it has the correct spring for the boost levels?
If that idea fails how would one go about rigging a 2nd mechanical throttle to open when needed? or is the only real way round it to go electric?
Jay
Throttle pre charger will stop any issues , the little Mini Cooper bypass valves are only Ł30 and plenty big enough if you run a throttle in front of the charger
Are those mini ones vac operated?
Heres a pic I got off google (sorry if its anyones).
So the flanged end would have a MAP/MAF sensor and then the cone filter?
[IMG]http://i1237.photobucket.com/albums/ff462/jayxr2zetec/ysSv0IY7.jpg[/IM
G]
Jay
[Edited on 3/4/18 by J666AYP]
Ok that image does not seem to work, lets try again....

Froggy,
"Throttle pre charger will stop any issues , the little Mini Cooper bypass valves are only Ł30 and plenty big enough if you run a throttle in
front of the charger "
By that do you mean having the throttle body infront of the supercharger instead of on the inlet manifold?
Or by throttle do you mean have the mini one venting into the front of the charger?
Jay
If you set it up as in the pic but with a big dump valve close to the throttle on the inlet manifold you should be ok . The bypass will allow the column of compressed air a way out but a blow off valve right by the throttle should stop most of the pressure spike as you lift . If you ditch the maf and just run it map/Tps it will save a bit of plumbing as well
Thanks for the input Froggy, better to find these things out now than later.
Jay
Had to change things about slightly....

Well that was not a fun job!


Abit more done... Just waiting on payday so I can get my bypass valve and some other bits.
Ran out of sanding belts so I have not finnished smoothing out the ports yet


Bit of a boring afternoon waiting for pay day. Done abit of port/gasket matching to smooth out the airflow (the man at mercedes that designed this
engine needs a stern word in his ear).
Just need some sanding/polishing bits for the dremmel now to finish it off.


What product are you using to paint your exhaust?
Hi Angel,
Its just some old spray paint to make the scratches/defects show up better for ease of sanding. When the parts are to the standard I want they will be
ceramic coated to keep the temps down.
Jay
Another day of plodding along, on the plus side I have sorted my gearbox mounts. Will be seam welded up when I can turn the chassis over.


Ok steel scuttle it is then...


Been a busy couple of mornings, the bypass valve is now all sorted. Flange plate for inlet is made and ready for welding.

Note to self... next time wear gloves!!!!


Just knocking up some templates for the carbon pannels. BTW does anyone know how to cut carbon sheets without chipping the resin?


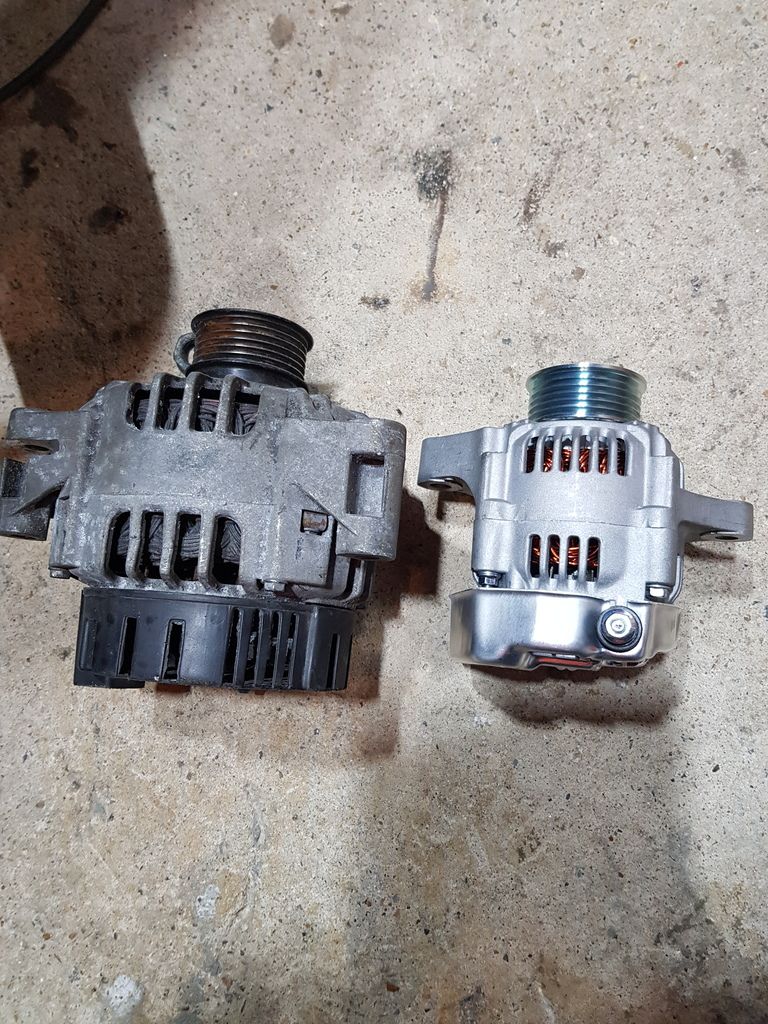
Well got my new alternator all mounted. And started a new inlet manifold because of my schoolboy error on the last one.


[Edited on 3/5/18 by J666AYP]
quote:
Originally posted by J666AYP
Well got my new alternator all mounted. And started a new inlet manifold because of my schoolboy error on the last one.
By any chance you know which car that alternator comes from?
Thaks in advance.
[Edited on 3/5/18 by J666AYP]
Angel,
The altenator is a denso one, Starterman on
this forum sells them (very well priced too).
I could not say what car it is made for in all honesty.
Jay
Abit of slow progress...
Made and welded on the mounts for the side mirrors, finished the altinator mounting, changed the bearings in the supercharger and plated the engine
bay.


Coming on nicely
Centre console/tunnel looks really good like that in bent tube
You realise the side repeaters in the mirrors won't pass IVA?
For cutting fibreglass I used the tungsten carbide (?) jigsaw blades, look like emery paper on a blank jigsaw blade so no teeth to chip the gel coat, worked pretty well.
CosKev3, Why wont they pass? because of the edges not being rounded? (not questioning your knowledge, just want to know what I have missed).
Jay
Ugg10, thanks mate I will take a look into those for sure.
Jay
quote:
Originally posted by J666AYP
CosKev3, Why wont they pass? because of the edges not being rounded? (not questioning your knowledge, just want to know what I have missed).
Jay
Bugger, ok a change of plan is needed then lol.
Cheers mate
Jay
Great project! I have a Merc SC ready for the MX5 engine. I did figure out how to drive the electronic bypass from a signal generator hooked to a vac
sensor, but in the end like a good few others decided that the Mini Vac driven one would be easier.
Just one observation is that a lot of your earlier welds and some of the later ones look "cold" from the pics. Also as if you have not
cleaned back to bare metal. Did you hammer test some of them? MIG can be a bit deceptive in that it looks great but if it has not penetrated it might
as well be Pritt stick. - The ones holding the gearbox on look good though! You can get a much more experienced opinion if you post samples on the
very friendly MIG welding forum.
Miskit, no problem with the welds as most of them have had atleast 2 passes in structural areas.
They are thick and messy but strong mate.
Jay
[Edited on 16/5/18 by J666AYP]
Looks about as much fun as it was :/ on the plus side all of the heavy fab work is nearly done. Just the N/S footwell to plate, rear wishbones,
scuttle and the diff mount to finish and the rest should be bolt on bits. (I hope!)


I love seing your progress. but the welding comment was a constructive one.
Don’t forget the vid of it running
Thanks for the compliment.
I know the weld comment was constructive, it could have been a real saftey issue if the welds were dodgey.
On most thin stuff I do two or more passes to ensure that any defects/holes are burned up and sealed. Makes the welds look lumpy but I would rather
grind back than snap off lol.
Jay
nice project, been a while since i've been here. nice to see new stuff! keep it up!
Gre3D,
Thanks mate. It has been a real nightmare so far, fingers crossed the rest will be easier.
Jay
Did abit more today...
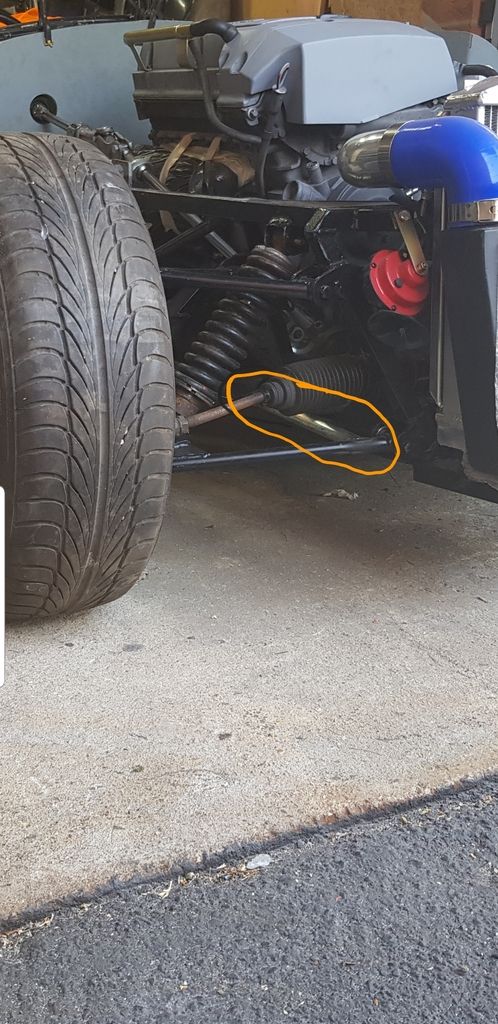
I found a new shape mini steering coloum on ebay for Ł20 with next day postage. I have stripped/trimmed all of the adjustable junk off it. Much
smoother and more robust than the merc donor one.


That fits quite nice! Just needs setting back abit.

Like that mini column, tidy bit of kit!
What's the screen ?
How's the loom on the Merc - split or all in one bit? I am just finishing up the MX5 one, extracted what I needed for the engine to run and
removed 20kg of the rest. However even on a 2002 MX5 on top of the engine stuff it still needs the vehicle speed sensor (I'm not using the
gearbox so had to improvise), clutch sensor, brake sensor, atmospheric pressure sensor. and one exhaust sensor to run properly. I would imagine the
Merc needs all that and more!
EDIT - Sorry just noticed waaay back on page one you said you were going with an aftermarket loom
[Edited on 4/6/18 by miskit]
quote:
Originally posted by J666AYP
Did abit more today...
I found a new shape mini steering coloum on ebay for Ł20 with next day postage. I have stripped/trimmed all of the adjustable junk off it. Much smoother and more robust than the merc donor one.
Gents, sorry about the delayed responce. Things have been manic at work.
The mini coloum is keyed not splined so I had to knock up a bottom section to link it to the rack. Have a 16mm rose joint in the post to finish it
off. Have had to cut/weld a new spline on so I can use the removable boss (nightmare of a thing).
The screen is a old tablet from work, thought it would be nice to have satnav, gps, and real time engine info to hand. Would also be a nice modern
touch to put into it. Torque pro and other similar app's have quite a few cool features to play with.


Has been a quiet couple of weeks in the garage thanks to work trying to ruin my life on the night shift nightmare.
Have started the firewall and heat sheild for the cone filter (still needs a couple of bends and fixing in place).
Have finished the steering coloum and rack so thats one thing off the list.
Have also started to run wires to make up a loom.
Oh and I have made up a little storage tray so im not losing phones every couple of miles


This project looks to be really taking shape now.
Love the updates.
And you have also proved one of my beliefs, 'You can use Uni-Strut for anything'... Marvellous stuff!
Although I have sold mine, the interest is still there...
Ian,
Thanks mate, has been a world of hurt getting to this stage and its almost looking like a car now (yay).
And agreed uni-strut is great stuff, has got me out of a few problems now.
Jay
Abit off topic but I brought this beast to refurb. Should be more than ample for a sandblaster

Disaster struck when changing the fittings on the regulator so I had to get a new one.


Have used my little borescope thing to check the inside of the tank and she seems solid. Now its time for the strip down and paint.
Well that did not take long.


Hi guys.
Been a rubbish few months my end thanks to Carillion going tits up and losing a family member. Have still managed to scrape a few hours in the garage
though.
Have started to make up my loom and done all the main power cables to starter and alternator. The starter is now spinning off the key so I'm
making little steps towards the big picture.
I brought a set of mankey 14" alloys for next to nothing so have been sanding them down as and when I get a hour to myself. I was not happy with
how far the centre caps stuck out so I have turned them down in the lathe and opened the badge holes up to 55mm to fit some funky punisher caps.
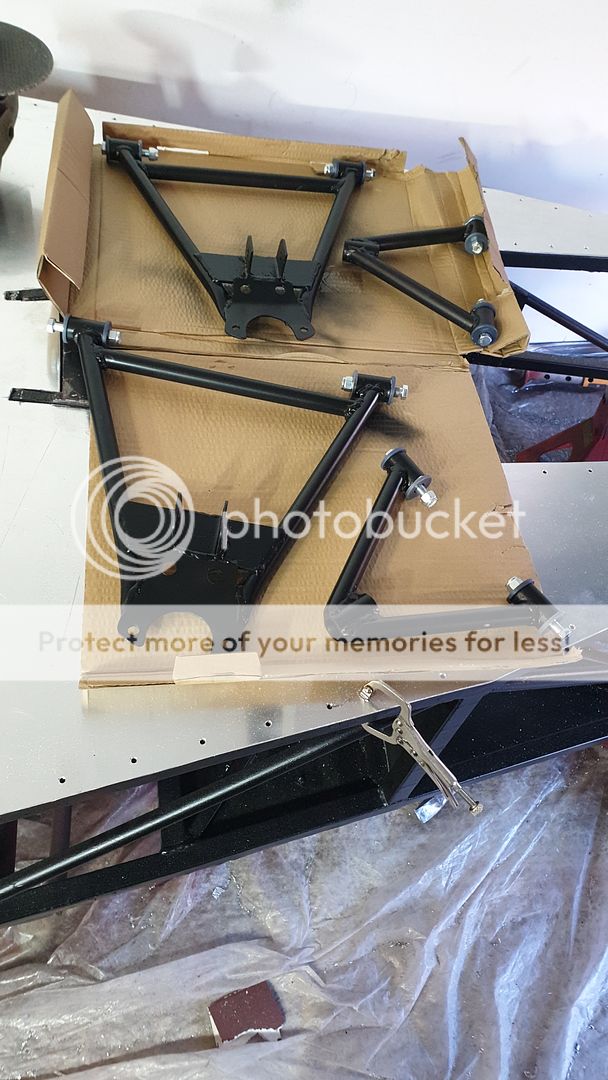
The front wishbones are now polly bushed and ready for paint. So thats one more job done.
I have also brought a motorbike alarm/immobiliser that I'm hard wireing into the loom. Has a vibration sensor so I will probably end up bonding
it under my seat or to the bulkhead.
Oh yeah I have also fitted a catch can, made up a spacer for the removable wheel boss with a built in locating pin to stop the slack. And finished my
diff mounting.
Fingers crossed the next few months will be better all round so I can start to tackle some of the bigger jobs.


ATB
Jay
Looking good. I know it’s difficult to stay focused with all that crap happening but everything will come good in the end.
Cheers Craig. Glad to see yours is coming on in leaps and bounds mate, shes looking very tasty.
Jay
quote:
Originally posted by J666AYP
Cheers Craig. Glad to see yours is coming on in leaps and bounds mate, shes looking very tasty.
Jay
With all that silky smooth 6-pot BMW goodness you wont miss a charger lol.
J.
Abit of progress over the past couple of weeks.
• Have started covering the car loom in braid and routing the wires.
• Knocked up the cowling/cover for the steering column. Found a pipe conector in the local hardware shop, have turned town some alloy and ABS bungs so
its a very tight fit with no screws needed. And it cost me a grand total of Ł0.89p. A lick off paint and it will be spot on.
• PAULD was kind enough to knock up a inlet manifold flange for me, I have cut my tubes up and started knocking up some injector seats on the lathe.
Just need to get over to the welding shop to swap my gas bottle over then I can start throwing some sparks round the garage.
• The main power cables have been swapped for some lighter ones and fixed in place.
• Alarm is fitted and working.
• I have also thought up a great security device for the handbrake (well redneck engineering haha).


Jay
Got some nice little 45mm ID velocity stacks on route from china and started welding up the manifold. Has had two very heavy passes with the welder so
it should never leak.


[Edited on 12/11/18 by J666AYP]
I love the handbrake lock!
quote:
Originally posted by SJ
I love the handbrake lock!
quote:
Originally posted by nick205
quote:
Originally posted by SJ
I love the handbrake lock!
Ditto - nice touch!
Cheers gents.
Angel.... Already on that Idea mate:

They should neaten up the holes in the gaitor.
Jay
Yep that works.


whilst the hand brake lock looks good and functional
it would not pass iva as an immobiliser, because they are not allowed to work on any part of the braking system.
Gremlin1234,
It already has a alarm and immobiliser fitted, this is just a extra bit of security for when its parked up in some of the dodgey areas I visit.
Jay
quote:good, but don't let it be seen at iva ;-)
Originally posted by J666AYP
Gremlin1234,
It already has a alarm and immobiliser fitted, this is just a extra bit of security for when its parked up in some of the dodgey areas I visit.
Jay
Gremlin, those are "inspection holes" in the gaiter wink wink.
Jay
Nice job! I can't wait to start myself!
You might want to think about either triangulating the front lower wishbones, or adding a curved plate to help distribute the bending stress. Particularly with a fairly heavy, powerful engine the design of yours is prone to failure due to the straight edge of the shock mounting plate turning a nice strong triangle into a weak trapezium shape.
MikeRJ,
I have welded this brace into both lower wishbones, will that not be enough? If not I will seam a plate into them.

Jay
Abit more progress on the inlet manifold Mk3.5 Just need the velocity stacks to land on the doorstep now :-/


quote:
Originally posted by J666AYP
MikeRJ,
I have welded this brace into both lower wishbones, will that not be enough? If not I will seam a plate into them.
Jay


Aaah that makes sence, silly me looking at the wide end of the wishbones haha.
Will get some bracing in the narrow end next time the wishbones are off.
Thanks for the input gents.
Todays been a good day! my velocity stacks turned up yay! bit of a bummer that they were too long to keep inside the factory sized body (its a mission
of mine to keep it sleek and subtle). Had to turn them down in the lathe but they fit nice now.
Trial fitting...


Yep that works

Looking good!
quote:
Originally posted by J666AYP
Yep that works
Cheers buddy,
Jay
Just been looking back through some old photos trying to find where a coolant hose goes to and I'm shocked at how far its come along. The time,
effort and ear bashings from the wife are starting to pay off abit I think


Playing with the label maker and some clear heatshrink. Has worked quite well.

What label machine have you got ?
I've got two looms to build and that would add a nice touch.
Cheers
quote:
Originally posted by big_wasa
What label machine have you got ?
I've got two looms to build and that would add a nice touch.
Cheers
Well that was easier than expected


quote:
Originally posted by J666AYP
quote:
Originally posted by big_wasa
What label machine have you got ?
I've got two looms to build and that would add a nice touch.
Cheers
Just a cheapy amazon one mate and some clear heatshrink tube from china. Let me know what you want and I will run some off for you if you want.
Jay
Thats better

Looks really good mate
Hi
how long does the propeller shaft have to be?
quote:
Originally posted by Iomlocosts4
Hi
how long does the propeller shaft have to be?
quote:
Originally posted by Iomlocosts4
Hi
how long does the propeller shaft have to be?
quote:
Originally posted by J666AYP
quote:
Originally posted by Iomlocosts4
Hi
how long does the propeller shaft have to be?
Hi mate, In all honesty I have no idea as yet. The std merc one cant be used due to the length of the sections and the slip joints.
When I take it to the place in town to get the prop made I will forward on the dimensions.
Jay
More slow progress on the electrics.. I now have:
•Working indicators
•Working light feeds all round (need to buy headlamps, rear fog and reverse lamps)
• Working hazard switch and feeds
• Fan wired (need to buy a temp switch)
• Horns wired
• Alarm/immobiliser completed and wired to indicators
• Fuel pump feed
• Ignition switch and light sorted
• Oil temp feed/sensor all done
• 3rd brake light mounted and wired (mega bright, should keep me safe from the school run mum's in 4x4's)
• 99% of loom routed through car
• Working inertia switch
• Common grounds done and dusted
• Power cables fixed to chassis
I have brought some cheapy tail lights as a 'up and running' fix but I quite like them so they may stay. Just need to make up some pods for
them.


I was not happy with the flat pannel in dash so I have changed it abit. I now have a new cubby hole as a bonus.


Abit more progress. Going to brace the diff frame into the harness plate and do abit of triangulation. Also all the rear lights are fitted and
working. Have also started to mock up the bodywork ready for mould making.


Glad to see you are getting on with the back end Jay. If I can help give me a call, I sent you my new Phone number, hope you got it.
quote:
Originally posted by PAULD
Glad to see you are getting on with the back end Jay. If I can help give me a call, I sent you my new Phone number, hope you got it.
A bit of progress, fingers crossed I will have more time to work on it from now on.
Belts finished
Inlet nearly done
Car loom almost finished
Diff blasted
Manifold elbow now 3" not 2.5"
Larger injectors brought
Diff breather reworked
Coolant hoses nearly finished just need a couple of weird elbows


Oh and just for the record sandblasting sucks.
Have been doing some tinkering. Was thinking about potential future issues and how to avoid them... I have already walled off the cone filter from the
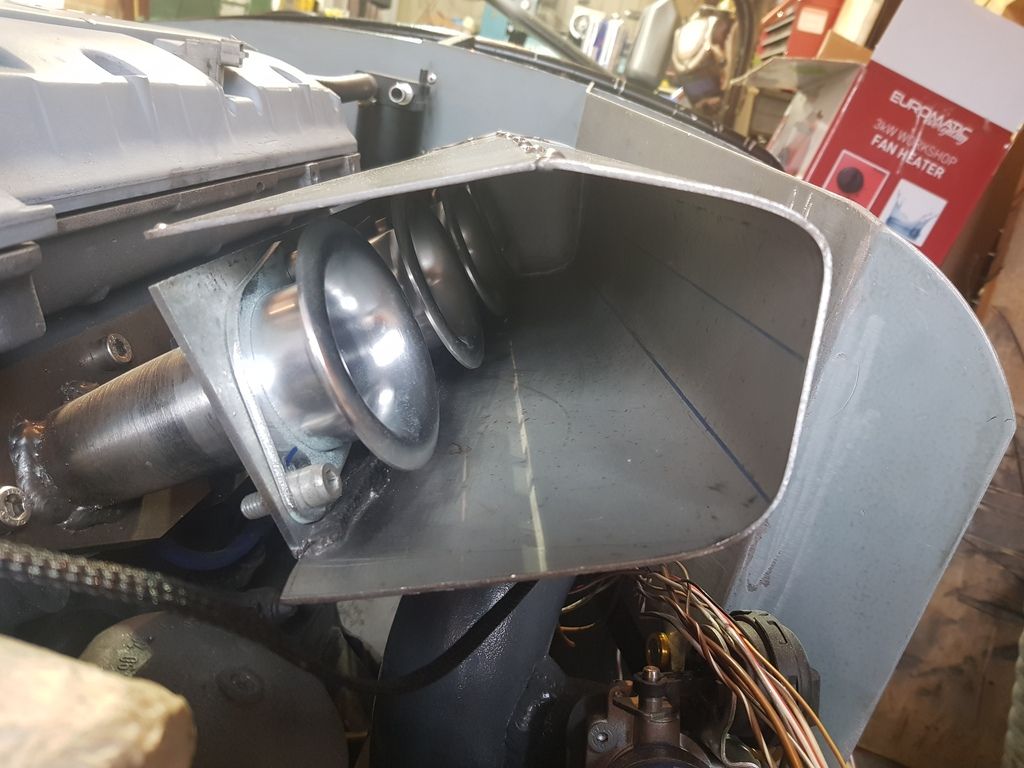
engine bay to reduce intake temps. This got me thinking about airflow (or lack of it) inside the engine bay.
My rad/fan is shrouded on the back side so I thought I would do some ducting. The top half will vent straight out of the nose cone (was very shocked
at just how much air it throws out). It also stops a load of hot air blowing onto my boost pipes and should reduce the parachute effect in the engine
bay.
The bottom half when built will blow through ducting, past the exhaust manifold and out the O/S wing hopefully taking some of the heat away with it.
Anyway still a working progress but you get the idea.


[Edited on 9/8/19 by J666AYP]
Messing round in garage last night


[Edited on 10/8/19 by J666AYP]
Has been a busy couple of weeks!
I had enough of trying to find a way to make the rear diff/suspension mounts up using the existing frame.... so I cut it all out and started again. I
now have a nice level section for mounting from and its rock solid. Just a few welds under the car to finish.


I have also cut down my diff (only for mocking/setting up until I get a professionally made one). Cut ends have been trued up on the lathe, cored with
a smaller ID tube, then been sleeved twice on the outsides (with seaming and turning between sleeves. Was all done on the lathe or jigged and has
minimal run out so not too shabby at all. (Bottom pic not finished, was the only photo I took).


I have also turned down the original uprights (cast steel not iron) so I can use the bearing sleeves for my uprights when I make them.


So now its onto the uprights and rear wishbones.
[Edited on 3/9/19 by J666AYP]
I cant believe you got the prop in the lathe
How will you stop the bearing carrier distorting when you weld it ?
[Edited on 4/9/19 by big_wasa]
quote:
Originally posted by big_wasa
I cant believe you got the prop in the lathe
How will you stop the bearing carrier distorting when you weld it ?
[Edited on 4/9/19 by big_wasa]
Been a busy few weeks! Managed to start building my rear uprights so I can use the Mercedes shafts/Mercedes diff. They still need some bracing but I
ran out of gas for the welder half way through and have not had chance to grab a new bottle as yet. Have decided to use the poly bushes on the diff
end and rose joints on the spinny rubbery end for ease of adjustment. Will get the joints and tube on order when I stock up on gas.


I ditched my original plan for the heater bypass plumbing as I had to knock up a engine block breather that sat right in my way on the N/S. So
it's now routed round the O/S, just need to knock up a couple of brackets to hold the pipe up away from the manifold.
I have also got a inline fan switch that's all plumbed in and wired up.
And I found a smaller variation of the Mercedes fuel rail for a SLK that fits better than the huge CLK item. I have gutted the standard regulators
internals as I am using a adjustable item for the larger injectors/mapping.


I also got fed up of looking at the multicolored interior frame so I have started filling the weld joints and smoothing it all out ready for paint.

I also got the hump with the standard sloppy cable gear selector so I remade it with joints and rods, has a far more positive feel.

Hello mate, looks like lots of hard work has gone into that so far! I may have missed it in the thread, but are you using 1 or 2 throttle bodies?
Is it just me, or are the Photobucket pics all blurred?
quote:
Originally posted by number-1
Hello mate, looks like lots of hard work has gone into that so far! I may have missed it in the thread, but are you using 1 or 2 throttle bodies?
quote:
Originally posted by 40inches
Is it just me, or are the Photobucket pics all blurred?
Hi all,
Have not been up to much apart from work lately, but have managed to get a few bits done on project nightmare.
First of all the bushes I got from the bay-of-E that did not fit have been modified and are now spot on. It seems they were slightly too large to fit
the crush tubes that were also about 7mm to short. So I fired up the lathe and made myown. They now fit like a dream and the bush rotates around the
crush tube.
I finally got fed up enough to turn the car upside down and do all the welding underneath the new rear end and painted it while I was at it. The
shafts and diff have also been blasted and painted.
The standard fuel regulator was a touch anemic so I removed all the internals and fitted a adjustable one, not sure if it's going to be any good
though as its 100% chinesium alloy.
I have also started getting some assorted body pannels for butchering, it seems like the nose and bonnet will need chopping and expanding.
Oh and I got fed up of the rear bulkhead being all dented up so I have swapped that for a sheet of alloy/foam composite type stuff and bonded it
on.
Next will be the seats and fuel system... wish me luck...


J
A lot of thought and design gone into that, well done, will make a nice drive when you have finished, supercharged 2.3 Merc, 190+ bhp nice 😎
quote:
Originally posted by PAUL FISHER
A lot of thought and design gone into that, well done, will make a nice drive when you have finished, supercharged 2.3 Merc, 190+ bhp nice 😎
quote:
Originally posted by J666AYP
quote:
Originally posted by PAUL FISHER
A lot of thought and design gone into that, well done, will make a nice drive when you have finished, supercharged 2.3 Merc, 190+ bhp nice 😎
Thanks mate, cant wait to get her finished.
J
Hi all, back after two house moves, covid and a general lack of time. Now motivated to get the project moving again!
Walked into the garage at the new place and see a sad looking dusty mess sitting there on stands and decided a quick freshen up wouldn't cut the
mustard. So... much to the annoyance of the wife (locost widow) I made a start...
• Stripped the whole thing down to the chassis and finished all the little bits of welding I was putting off
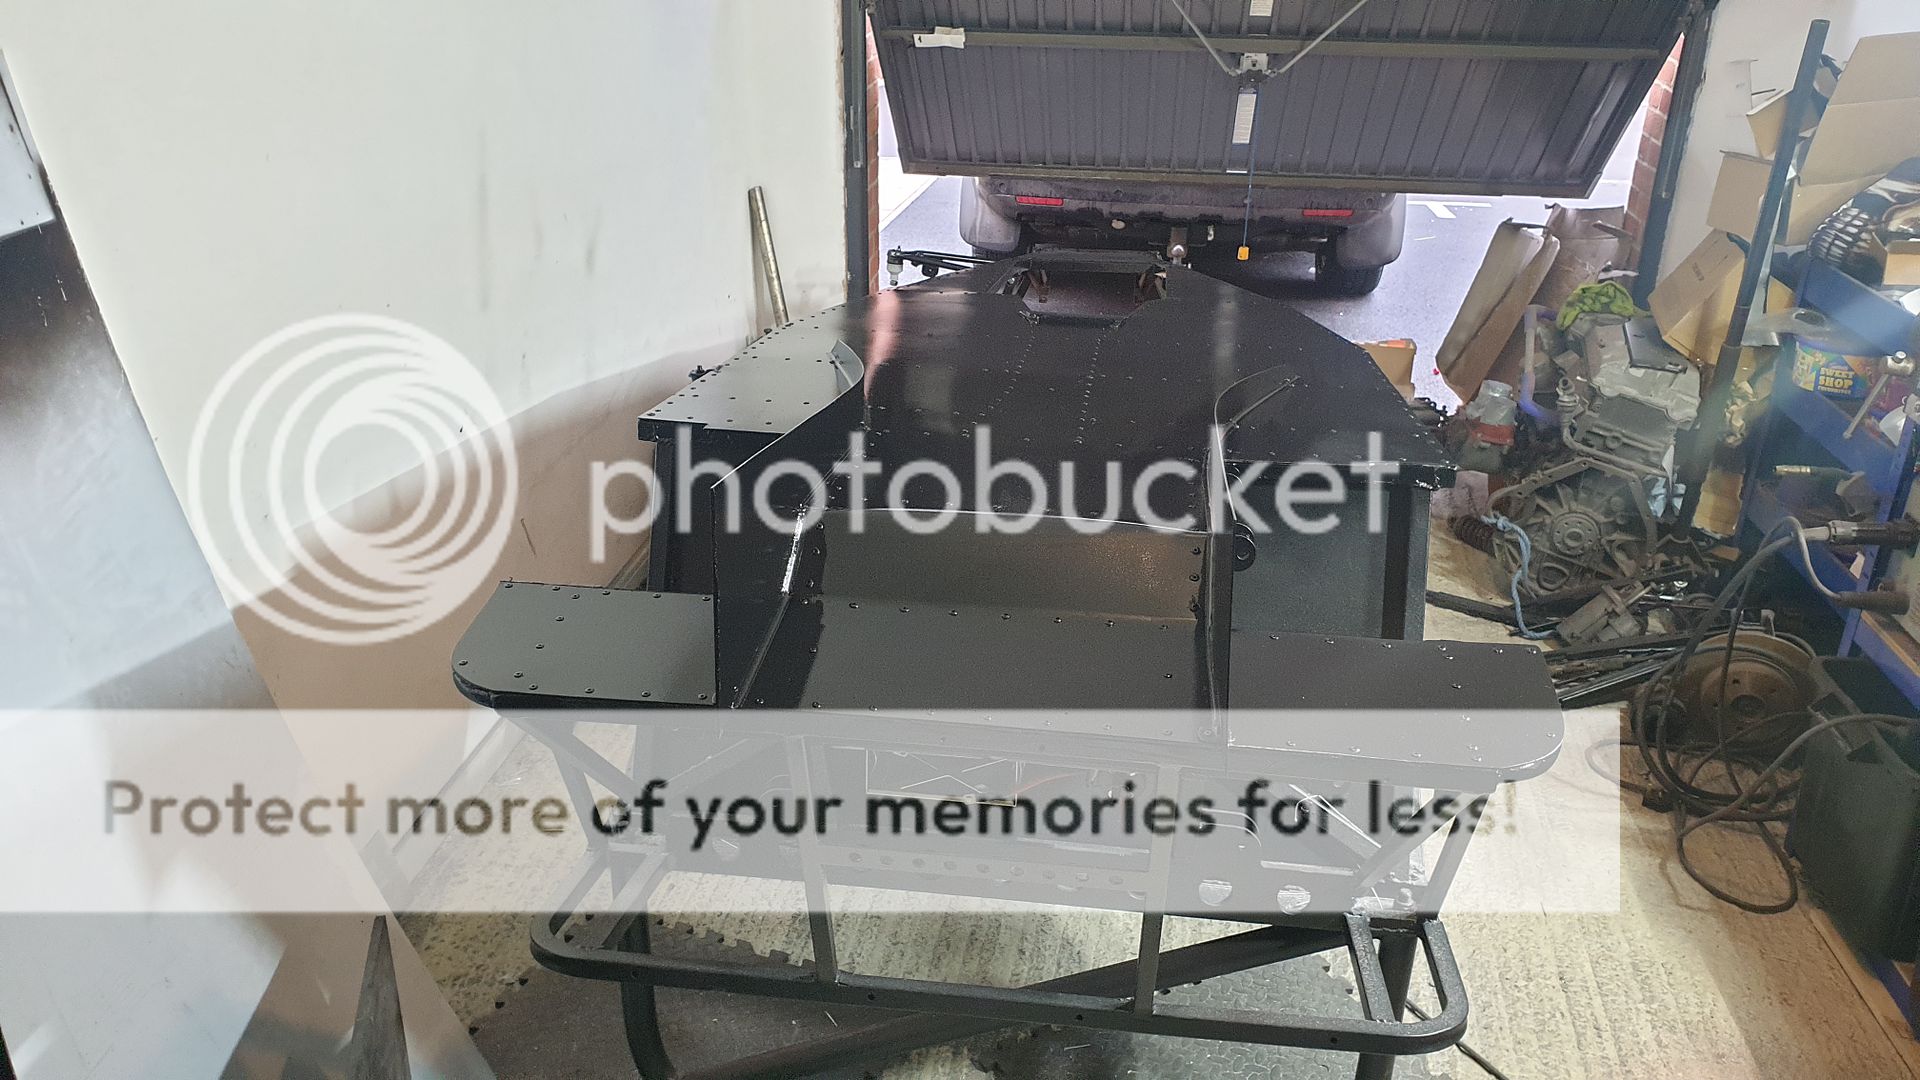
• cut out the steel floor and replaced with 2mm aluminium
• ditched all of the old interior pannels and replaced with aluminium composite board type stuff
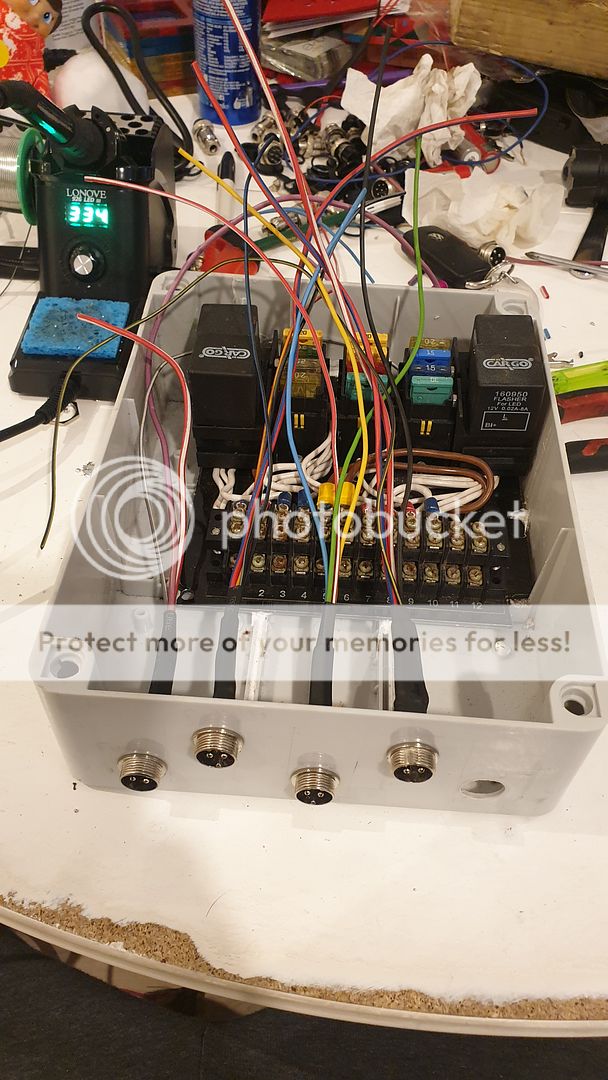
• Completely remade the loom and made it modular so I can remove complete sub looms in one go using aircraft style fittings
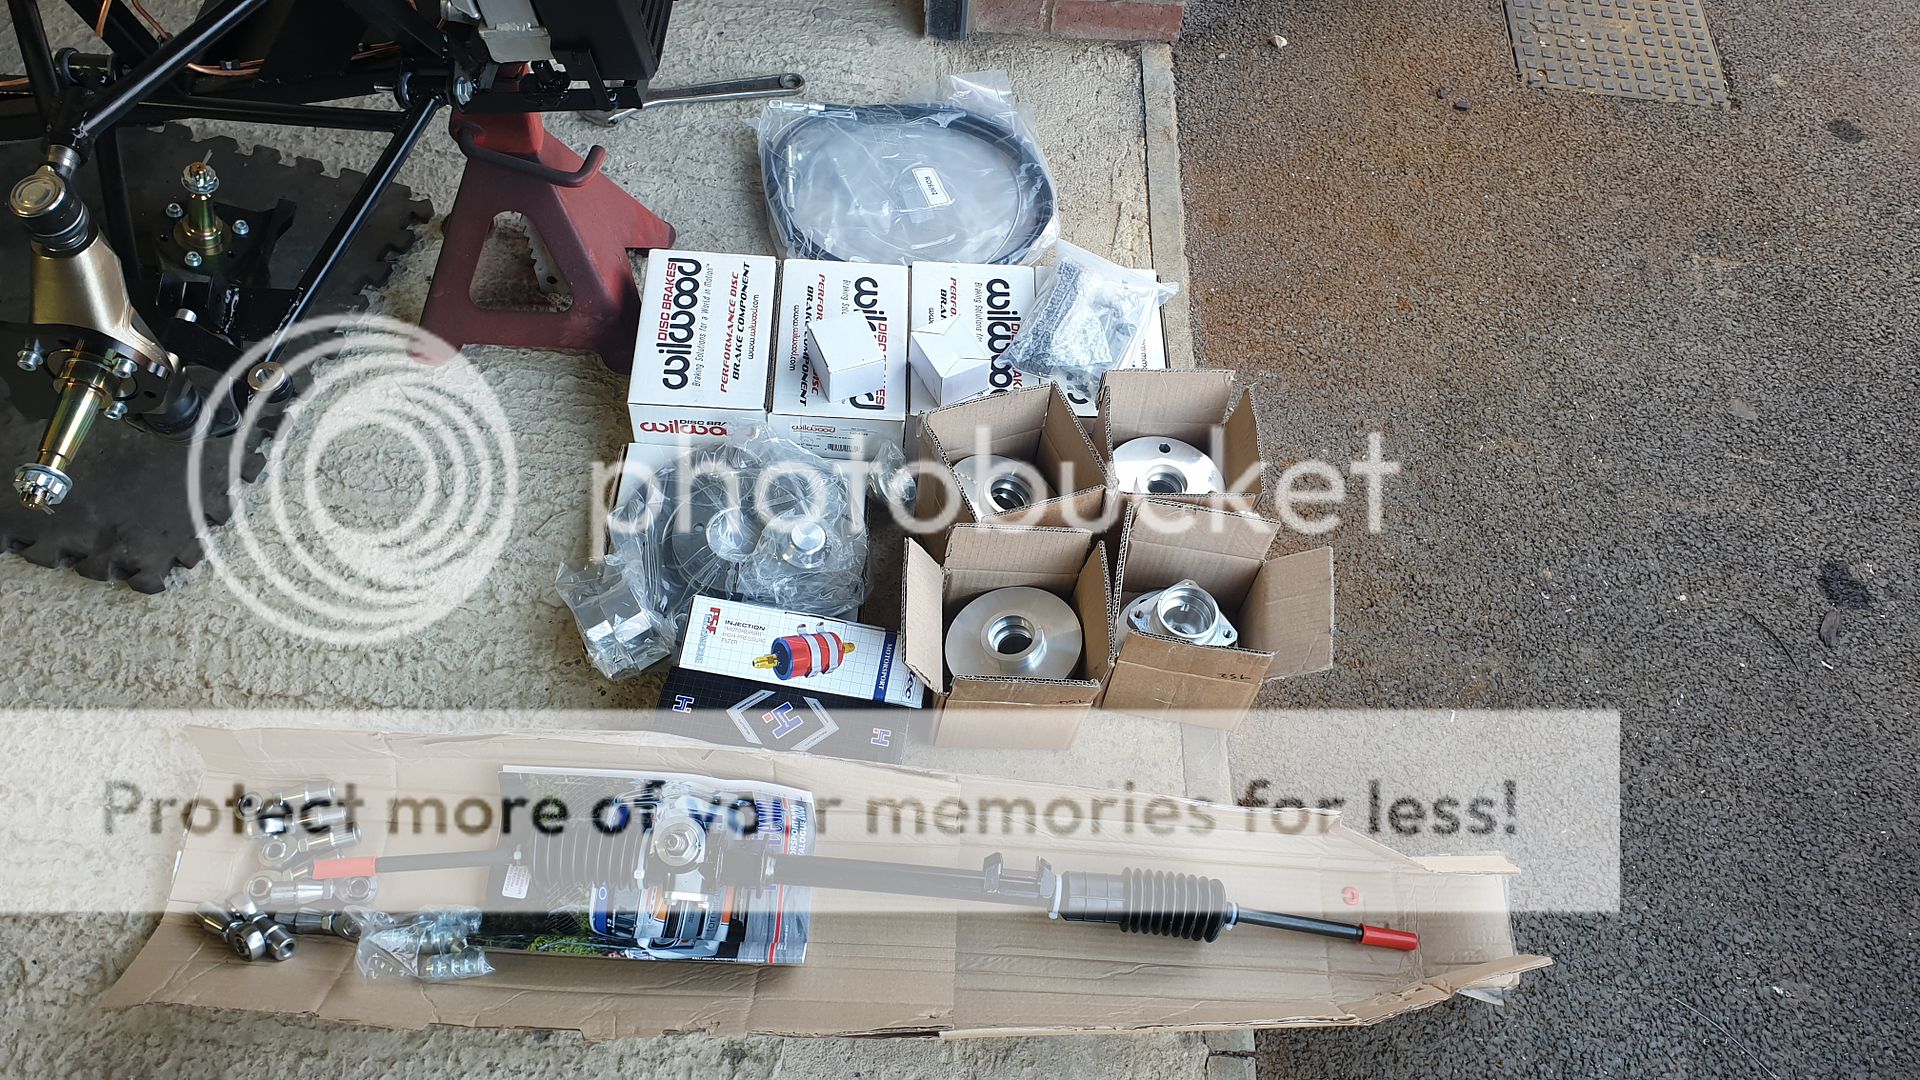
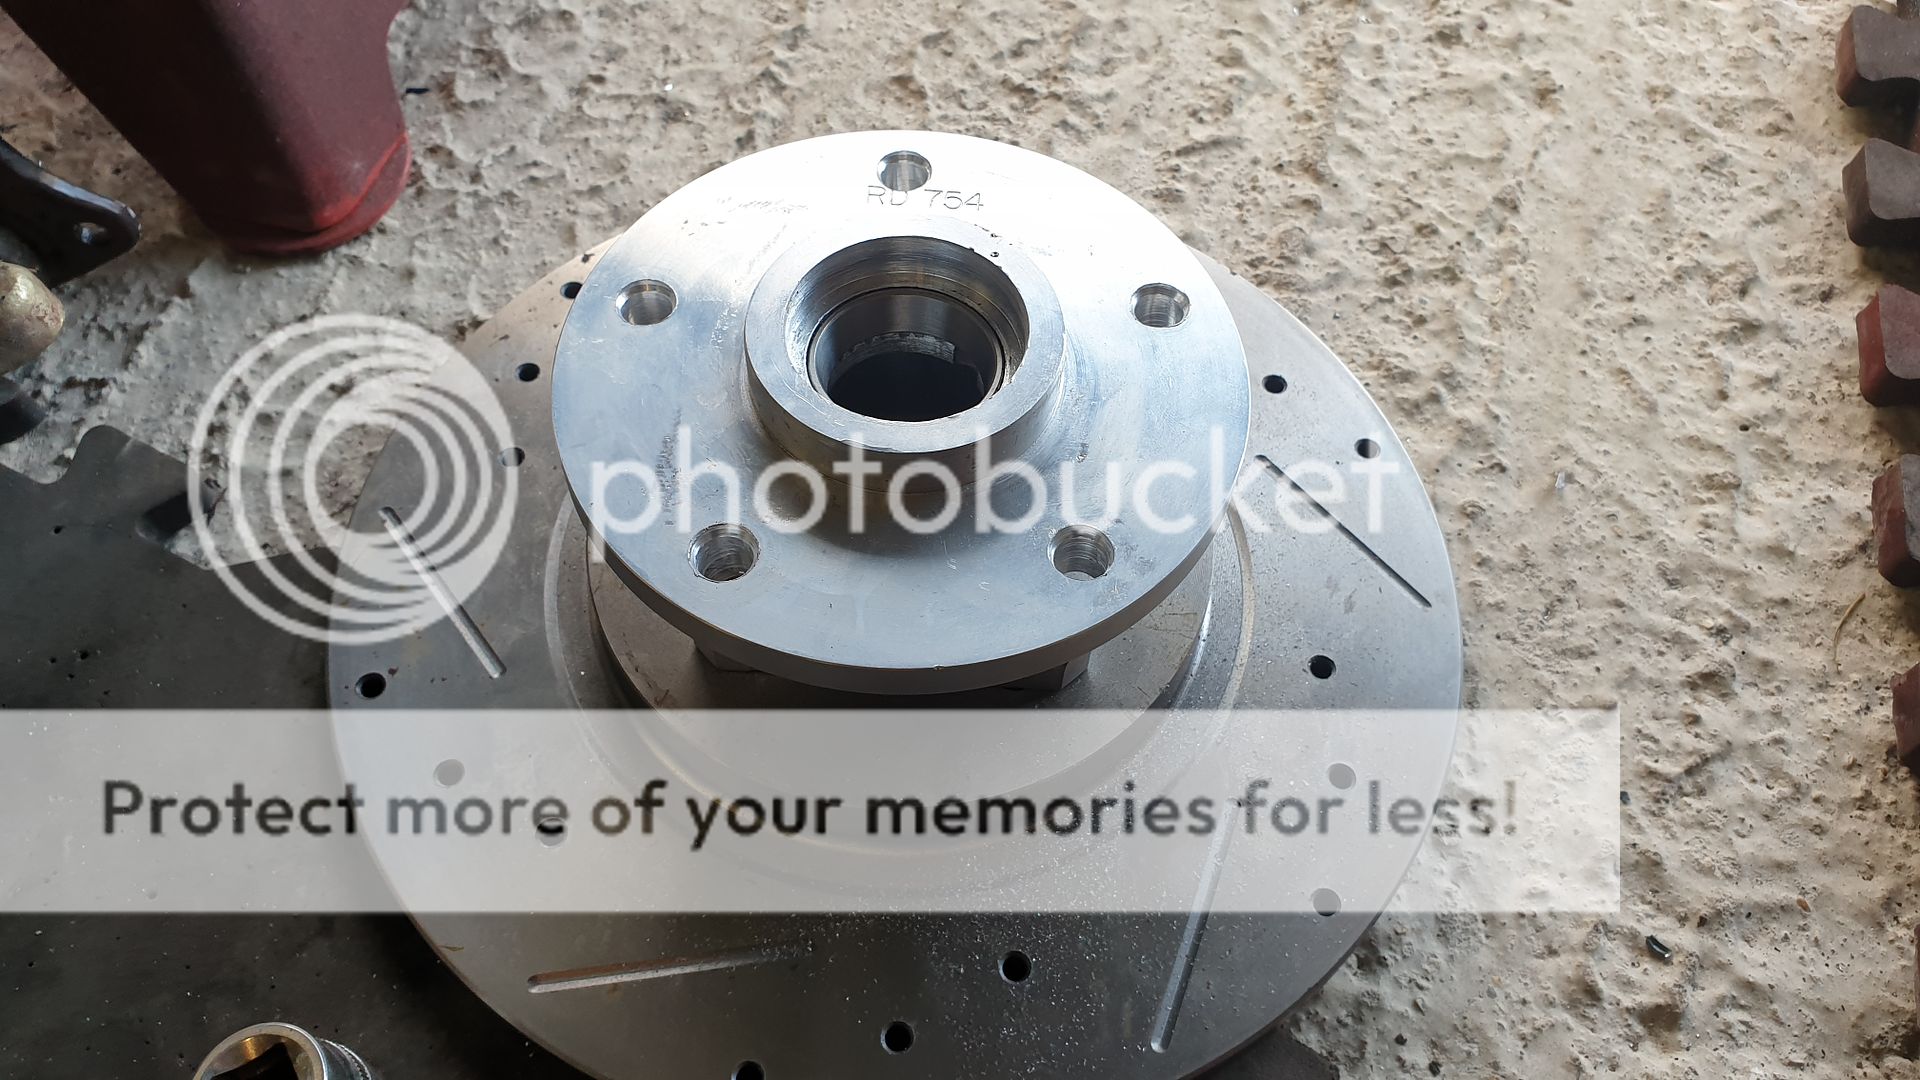
• ordered carbon seats and harnesses
• got a pair of rally design front uprights, willwoods all round, new steering rack, bearings, bushes, ball joints ect ect
• started to wire my dash dials
• run fuel/brake lines and clipped in place
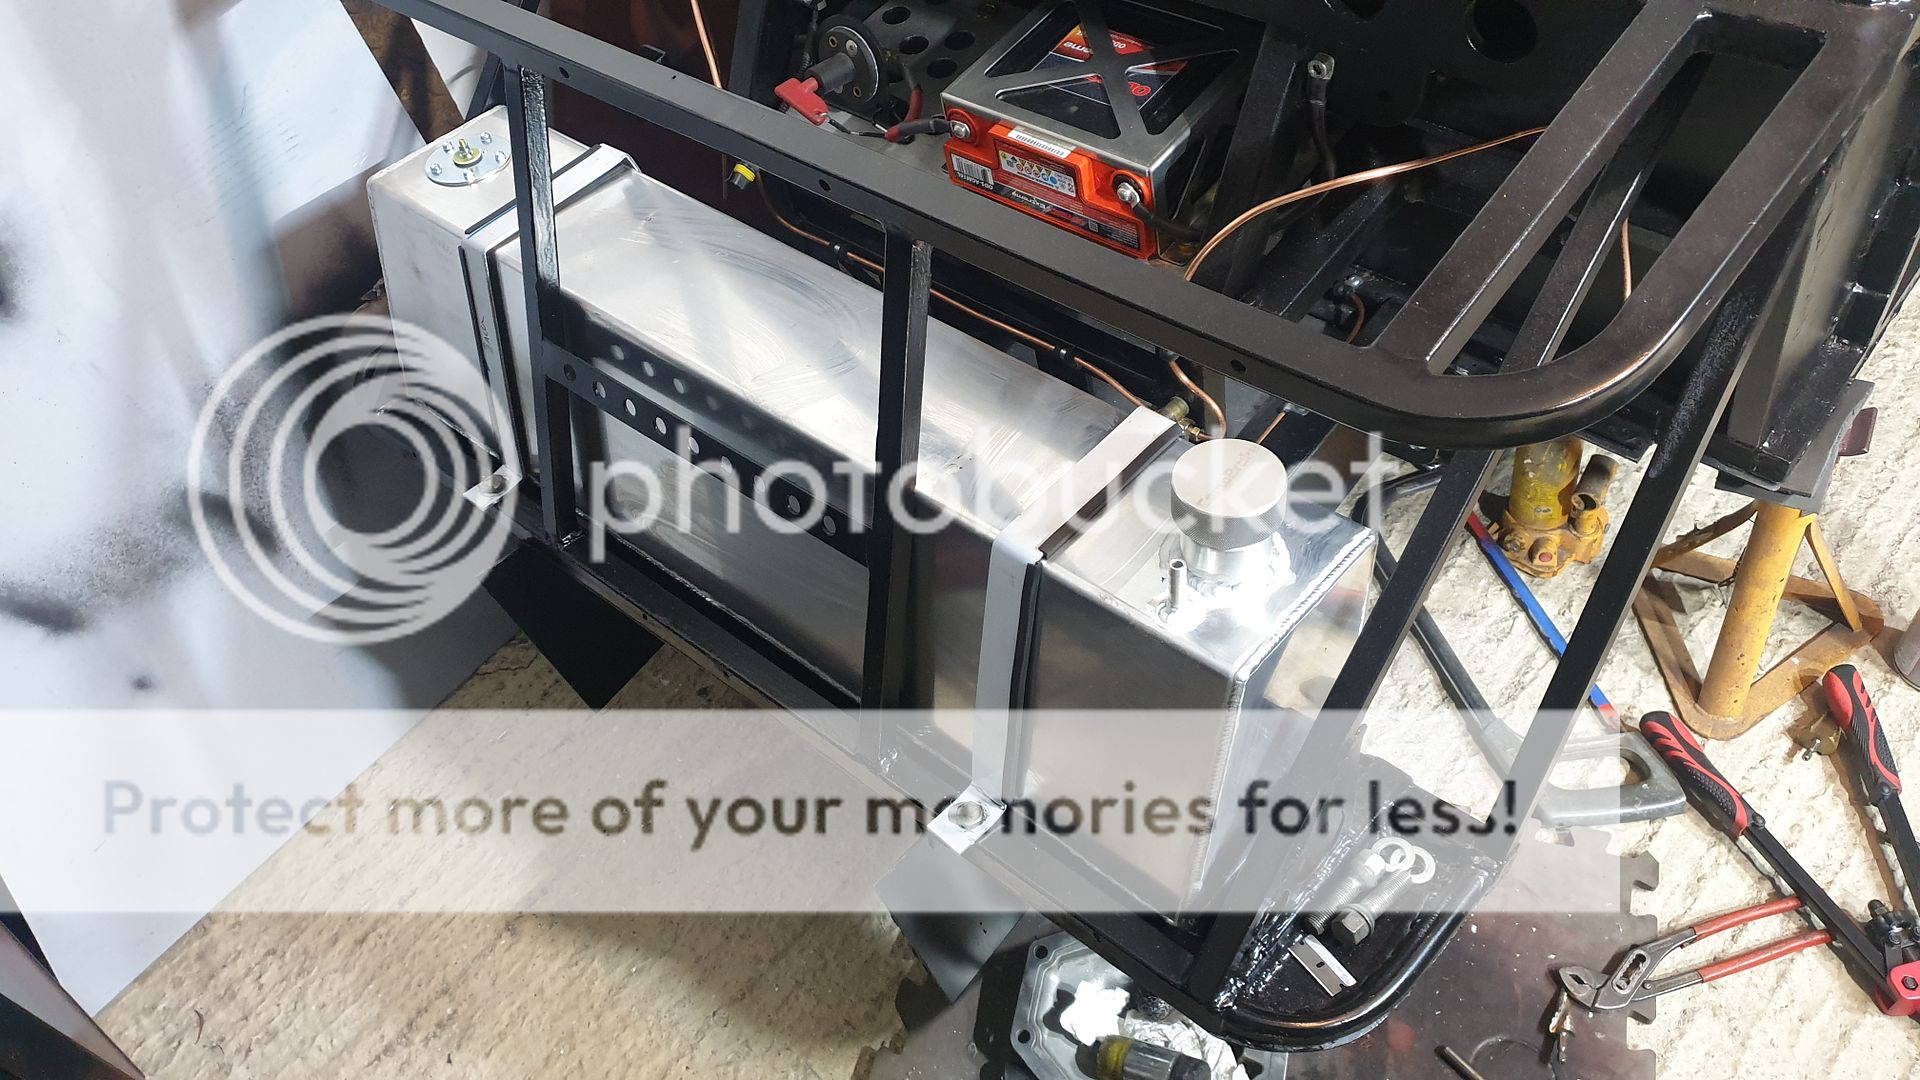
• made a battery shelf/holder up to sit above the diff and fitted a pc680 battery
• have started making my rear wishbones to take the mercedes frankenstein hubs
• fuel pump and fitler plumbed in
• pedal box half squeezed into final position and 3 chamber fluid reservoir fitted
Will update some pics later tonight or tomorrow when I get a quiet half hour at work
.... she will be tested this year....
[Edited on 2/2/23 by J666AYP]
https://hosting.photobucket.com/images/ff462/jayxr2zetec/20221212_192939_sw2cJC5SoPCn8Fu2hGDSoB.jpg
https://hosting.photobucket.com/images/ff462/jayxr2zetec/20230113_130611_qoWviboZLYPNpAVRtUqmqG.jpg
https://hosting.photobucket.com/images/ff462/jayxr2zetec/20230113_174644_stUNHvsL39GcpBPikx81wF.jpg
https://hosting.photobucket.com/images/ff462/jayxr2zetec/20230111_172431.jpg
https://hosting.photobucket.com/images/ff462/jayxr2zetec/20230117_154917.jpg
https://hosting.photobucket.com/images/ff462/jayxr2zetec/20230118_145634_001_tNVSuDD28QQmrfx3nrUHvG.jpg
https://hosting.photobucket.com/images/ff462/jayxr2zetec/20230125_131752_4JHs5HJN88GPQcuFAEuhhV.jpg
https://hosting.photobucket.com/images/ff462/jayxr2zetec/20230125_194351_x5Z2XAL72jWU9gb7exCjVt.jpg
https://hosting.photobucket.com/images/ff462/jayxr2zetec/20230126_164147_f3m2HLRDaECzWP3vVv2juX.jpg
https://hosting.photobucket.com/images/ff462/jayxr2zetec/20230126_164203.jpg
https://hosting.photobucket.com/images/ff462/jayxr2zetec/20230130_121732.jpg
https://hosting.photobucket.com/images/ff462/jayxr2zetec/20230130_183026.jpg
https://hosting.photobucket.com/images/ff462/jayxr2zetec/20230131_144759.jpg
https://hosting.photobucket.com/images/ff462/jayxr2zetec/20230201_175237.jpg
https://hosting.photobucket.com/images/ff462/jayxr2zetec/20230131_144743.jpg
Fingers crossed this works, been ages since I last used photobucket
Well thats strange photobucket seems to have changed and doesn't share the images anymore... anyone care to tell me what I'm doing wrong 🤦‍♂️
If you wrap the img urls in [img ][/img ] tags (without the space) and remove anything after .jpg it should work like the above image
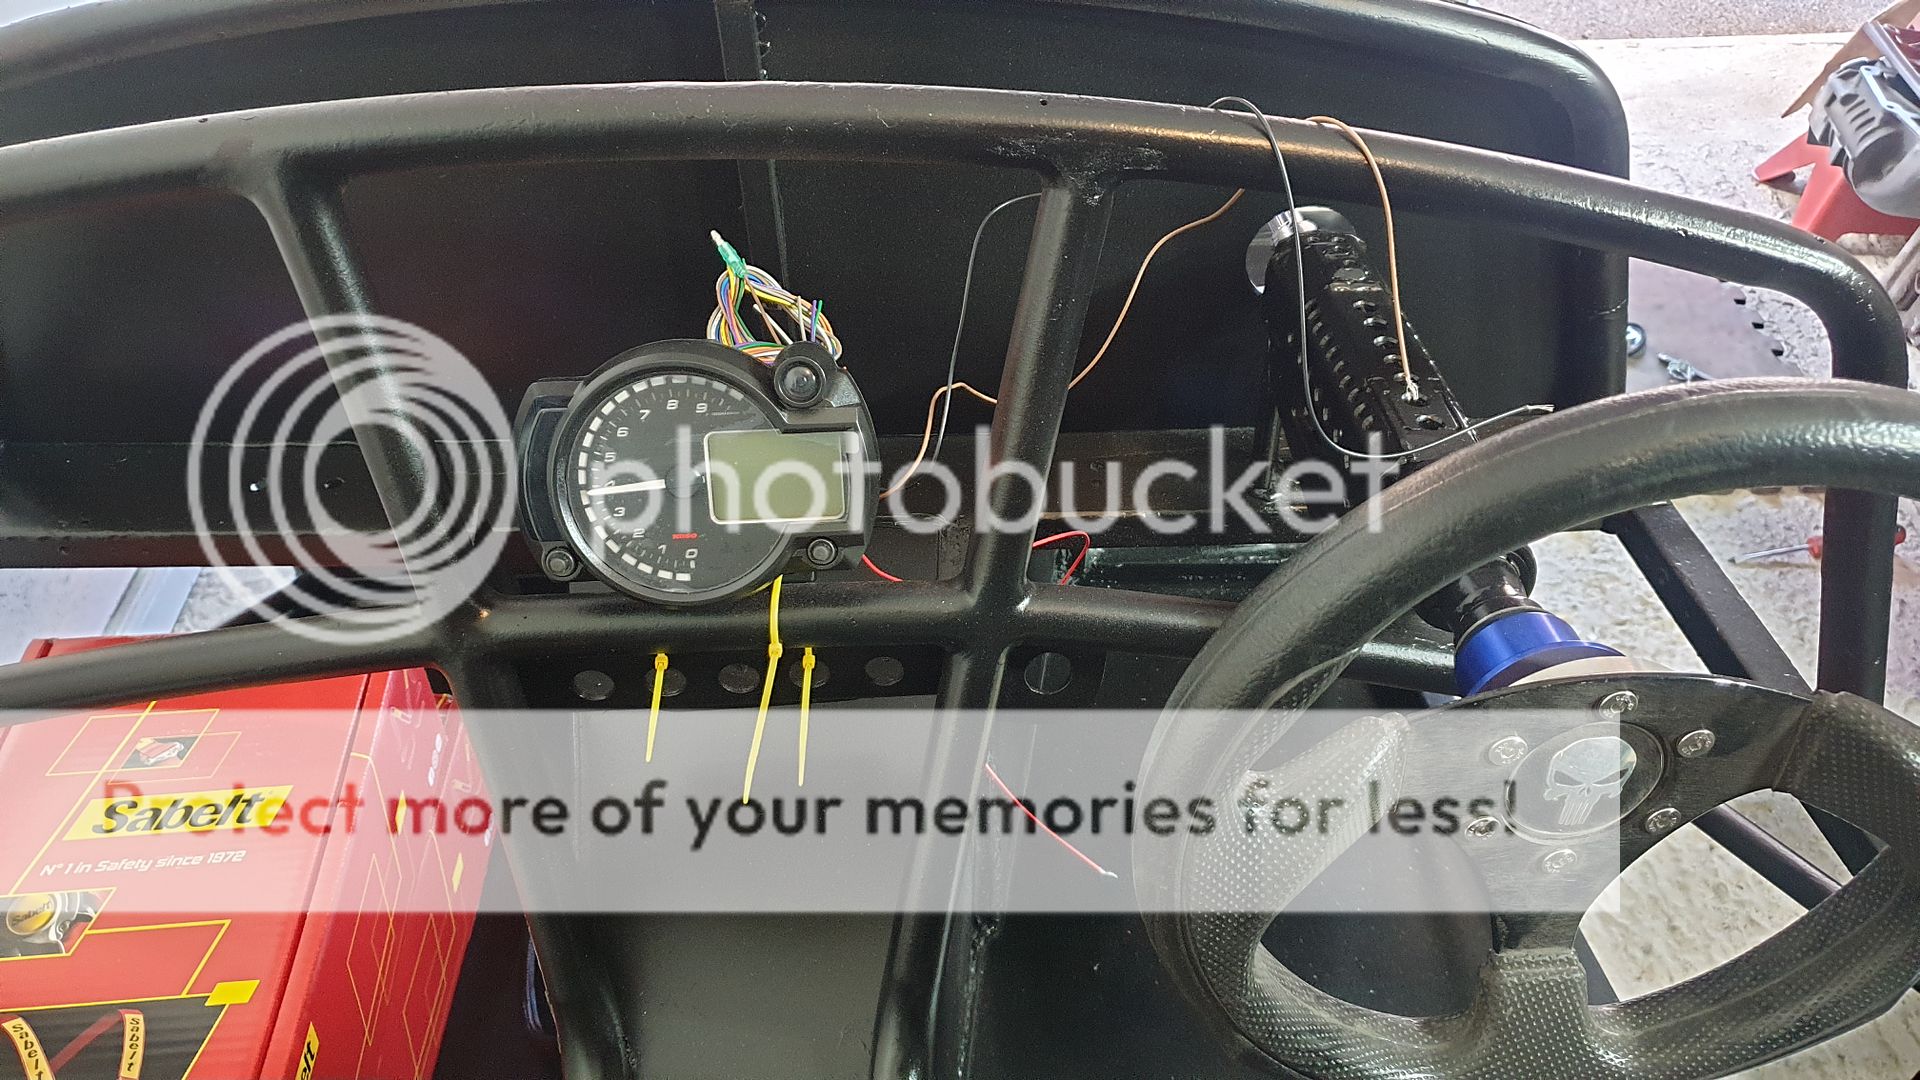
Looking good by the way! And great choice of speedo - I fitted the very same one to my MK last year.
[Edited on 3/2/23 by wrayvon]
[Edited on 3/2/23 by wrayvon]
Perfect, thanks for the advice... this is why I have a teenage daughter to help me with this computer stuff haha. Well here goes...
https://hosting.photobucket.com[/images/ff462/jayxr2zetec/20221212192939sw2cJC5SoPCn8Fu2hGDSoB]
https://hosting.photobucket.com[/images/ff462/jayxr2zetec/20230113130611qoWviboZLYPNpAVRtUqmqG]
https://hosting.photobucket.com[/images/ff462/jayxr2zetec/20230113174644stUNHvsL39GcpBPikx81wF]
https://hosting.photobucket.com[/images/ff462/jayxr2zetec/20230111172431]
https://hosting.photobucket.com[/images/ff462/jayxr2zetec/20230117154917]
https://hosting.photobucket.com[/images/ff462/jayxr2zetec/20230118145634001tNVSuDD28QQmrfx3nrUHvG]
https://hosting.photobucket.com[/images/ff462/jayxr2zetec/202301251317524JHs5HJN88GPQcuFAEuhhV]
https://hosting.photobucket.com[/images/ff462/jayxr2zetec/20230125194351x5Z2XAL72jWU9gb7exCjVt]
https://hosting.photobucket.com[/images/ff462/jayxr2zetec/20230126164147_f3m2HLRDaECzWP3vVv2juX]
https://hosting.photobucket.com[/images/ff462/jayxr2zetec/20230126164203]
https://hosting.photobucket.com[/images/ff462/jayxr2zetec/20230130121732]
https://hosting.photobucket.com[/images/ff462/jayxr2zetec/20230130183026]
https://hosting.photobucket.com[/images/ff462/jayxr2zetec/20230131144759]
https://hosting.photobucket.com[/images/ff462/jayxr2zetec/20230201175237]
https://hosting.photobucket.com[/images/ff462/jayxr2zetec/20230131144743]
Ok I give up
Haha! Allow me:


Absolute legend, thanks for that!
Just for future reference what did I do wrong?
Not 100% sure without seeing... But it looks like you removed too much of the url. It needs to have the extension on the end - .jpg or .png etc.
But yeah, make sure you have the [img.] tag (without the dot) before the url and [/img.] afterwards (again without the dot)
Great update, I thought you had given up, it must be years since I took you out for a spin. Are you still local to me, be good to see your work.
Hi Paul!!
Great to hear from you buddy, hope you are keeping well! And still local-ish, were now in the new build estate between Dunstable and Houghton
Regis.... kettle is always on for you if you are pasing
Jay
Wrayvon,
Thanks buddy one day I will learn about these computer things
Jay
Oh screw it, done with this photobucket rubbish just to upload a few progress photos
Pair of carbon bucket seats fitted, now just need to work out the harness mounts
New aluminium inlet started with velocity stacks and a larger throttle body
New aluminium supercharger manifold started (just needs welding)
Sump shortened by 50mm and baffled. Pick up dipstick shortened accordingly
Engine all painted up and prepped
Rear uprights finished and bearings installed (slk merc)
New gaskets/seals on engine
Sorted the "lifetime" seal on the gearbox that is not available (42mm freeze plug hammered into the hole)
And have saved nearly 50kgs in the past couple of months with more to come
[Edited on 11/3/23 by J666AYP]
[Edited on 11/3/23 by J666AYP]
Ok so someone who shall remain nameless was getting abit too preoccupied with weight saving and picked up a set of scales for the gantry crane (big
facepalm)
Engine dry
Exhaust manifold
Supercharger
Supercharger mounts, brackets and belt
Supercharger top manifold
Alternator and brackets
Coil packs and plugs
Redesigned sump
10mm inlet flange plate
Both engine mounts
138.35 kgs
Chassis
Front wishbones
Front hubs
Front brake disks and calipers
Steering arms, rack, column, quick release and wheel
1x completed rear corner for suspension, brake caliper, brake disk, bearings
Diff (dry)
Gearbox (dry)
Wiring loom
Fuel tank, pump, filter, intertia switch, lines
Pedal box, master cylinder, brake lines, valves and fittings
Hand brake
Gear selector
2x carbon seats
2x 4 point harnesses
Ignition switch
Battery and tray
Diff mounts
Gearbox mounts
Rad (dry)
Intercooler
Horn
Dash dials
3rd brake light (rollbar)
Fuel tank vent
Rear shafts
Alarm
Battery cut off
Seat runners
Switches
Exhaust mount
273 kgs
Plus 4x bare alloys at 22kgs for the four and starter motor at 3.95kgs
= 437.3kgs and still need fluids, completed inlet, the other rear suspension corner, coilovers, body pannels, tyres, flywheel, clutch and lights
🤦‍♂️ shes going to be a fatty
[Edited on 4/5/23 by J666AYP]
[Edited on 4/5/23 by J666AYP]
Bit of a progress update (no photos as I'm sick of arguing with PB).
Plug mould for the body tub is nearly complete, just the bonnet and front wings/pannels left to do.
Suspension and rear wishbones are now all finished.
Rear brake caliper carriers completed.
Handbrake mechanism completed.
Coolant system complete and leak free so far.
Revised inlet manifold is with the welder, more than 3kgs lighter than the steel one.
Tweaked steering column done, 0.7kg lighter than the last attempt.
Revised supercharger top hat with welder, less than 1kg all in.
Revised bypass valve sorted, just waiting on the postman.
Fuel rail/injector bungs fitted with larger injectors.
Cut down sump fitted along with modified pick up, all leak free so far.
Diffuser all finished.
All car wiring nearly finished, just the lights left to go.
Sprinter solid flywheel conversion done (11kg lighter than the std CLK DMF).
Koso dash and sensors all fitted and working.
Harness mounts all completed.
Wheels fitted, went for 15" magnesium 5x112 SLK rims.
R8 coil packs fitted (lighter and more modern than the Merc ones)
Full service on engine/supercharger/diff/gearbox.
General trimming/weight loss throughout.
Now I just need to hide enough pennies from the wife to get the ECU and fibreglass/carbon on order.