Time for another build - Avonflak monkey - 21/2/19 at 01:45 PM
Well, it's been a while and I'm actually back with another build, finally. Egged on a bit by my partner who has always wanted a seven but
didn't know where to start.
Nothing swanky about this one, a back to basics pinto engined Avon. Will probably stick megasquirt on it as a matter of course, but otherwise no
supercharging or silliness. Have I grown up too much?
I might get off to a bit of a slow start as we are in the middle of trying to move house, but nonetheless everyone has to have a project, right?!
[Edited on 21/2/19 by flak monkey]
nick205 - 21/2/19 at 03:53 PM
Good on you and yes everyone should have a project!
Nowt wrong with a Pinto engine IMHO either.
big_wasa - 21/2/19 at 05:05 PM
Unless you have one tucked away, have you seen the price a good pinto is fetching ? Same as the T9’s
I know Tiger really are just around the corner but my money would be on an...
A) Mnr (mx5) B) Gbs Zero (mx5)
Lots of cheap donors and parts
flak monkey - 21/2/19 at 07:06 PM
I know a few people who can help with parts.
I was thinking about going duratec as they are getting cheaper, but once you add up all of the other parts and the emissions stuff for IVA it's
still expensive.
Could still stick an mx5 engine and box in an Avon, no big deal. Already sorted for a Sierra rear end anyway.
melly-g - 21/2/19 at 07:12 PM
I think that's a great choice!
I am a bit biased though.
I changed the pinto for a zetec se last year.
It's good to see you back mate.
dmrider_10 - 22/2/19 at 07:21 AM
Firm advoate for Mx5s (but then I have owned 9 of them....). All the parts are from a sports car, the engine is bullet proof and power is easily
upped. They will pass MOT with no cat if using a megasquirt, super cheap, the original layout of parts is "correct" FRWD
theconrodkid - 22/2/19 at 08:58 AM
having seen the GBS zero, i would go for that, it is a lot more authentic looking...or be radical and go midi ?
Mr Whippy - 22/2/19 at 12:10 PM
quote:Originally posted by dmrider_10
Firm advoate for Mx5s (but then I have owned 9 of them....). All the parts are from a sports car, the engine is bullet proof and power is easily
upped. They will pass MOT with no cat if using a megasquirt, super cheap, the original layout of parts is "correct" FRWD
have to admit an MX5 is the only way I'd go if doing one again and you can pick up a rusty one with good mechanical for utter peanuts
not sure just how many of the parts you can use and maybe get away with keeping the donor reg and avoiding an IVA?
With all my project cars gone and me now with a new tin top that needs nothing other than boring routine maintenance, a huge garage and all the tools,
I have to admit I'm feeling the pull of building a 7 again myself...
Been out of the kit car stuff for so long now, not even sure if there is plans based on MX5 mechanics?
[Edited on 22/2/19 by Mr Whippy]
steve m - 22/2/19 at 07:12 PM
Good to see Sera back on here, and building, as her work on the bikes was amazing
I a little while ago had an urge to build again, but not a 7, as they are every were, infact not one day goes by when im out driving will see a 7, but
I do live in the South east of England
I would, with enough garage space like to attempt a road legal Lemans 60's-70's car not for racing, with a big V8
But sadly, I don't have the garage space, nor the time, so I might make one 3rd scale, I could drive that
steve
Barksavon - 23/2/19 at 07:38 AM
I've got a 1.6 MX5 available as a donor. It's succumbed to the dreaded chassis rail corrosion, also corrosion in the sills.
I was intending to sort it but it's stood for couple of years now and just won't get time to do it.
flak monkey - 23/2/19 at 10:41 AM
I did think about going the MX5 route, but they really aren't that tuneable unless you stick a turbo on them, and that's not what I want to
do.
Besides, I already have a Mk1 MX5 which is getting turboed anyway.
Set on the pinto route, its a nice simple and easy engine to work on and my partner wants to learn, so might as well start basic. Will probably stick
throttle bodies and injection on it because I can.
Ultimately we are looking to build something simple and actually quite old school
I do have it in mind to build something a bit more extreme in the future too, but I am keeping that under wraps
James - 27/2/19 at 12:15 AM
Good to see you back mate! Only just come back myself!
Do you still have the yellow Camaro(?) you were rebuilding?
flak monkey - 27/2/19 at 06:35 AM
quote:Originally posted by James
Good to see you back mate! Only just come back myself!
Do you still have the yellow Camaro(?) you were rebuilding?
Hiya!
Sold the Camaro last year, ended up around 600hp LS swapped. Great fun, but my circumstances changed a lot and it had to go.
flak monkey - 4/3/19 at 01:24 AM
Well, I made a start....
Found a complete Sierra rear sub frame with 7" 3.92 diff etc so went and picked it up on Friday. Now I only have my little M140i I ended up
having to dismantle it at the scrappies to get it in the car...
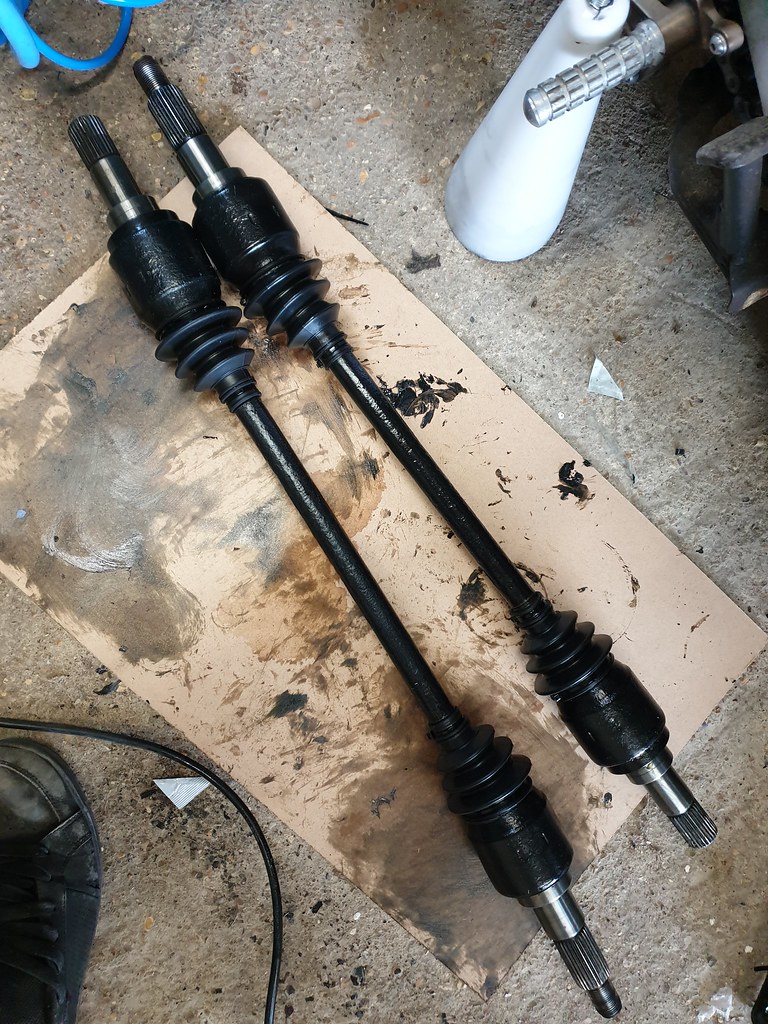
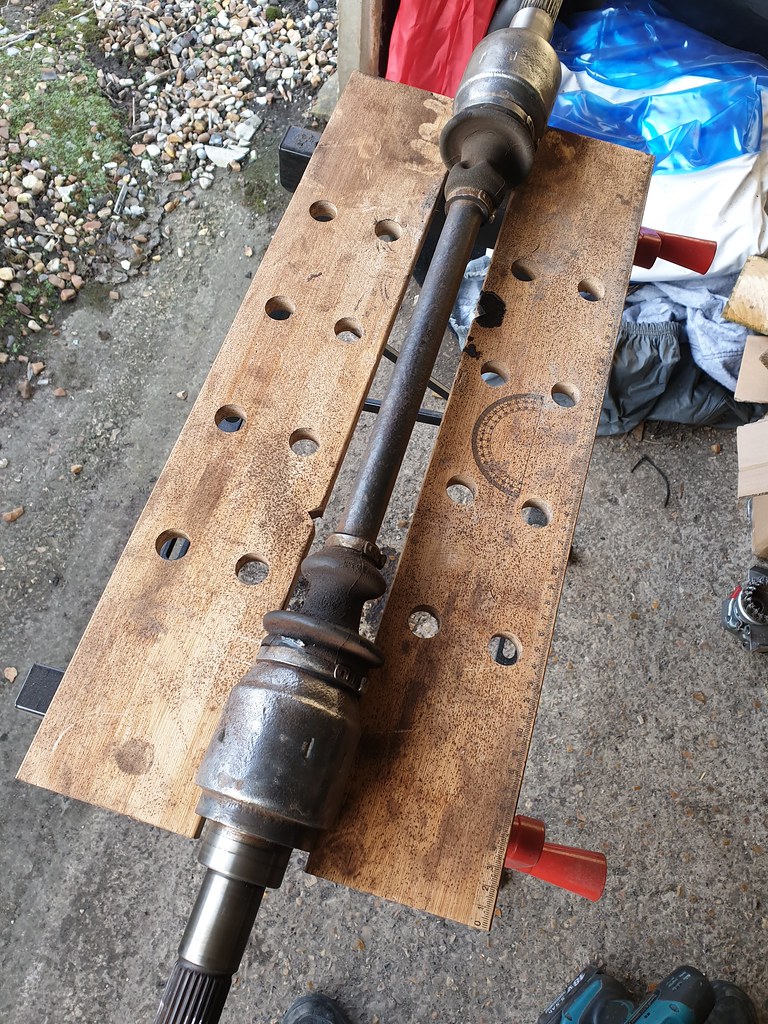
Needs a damn good clean and new boots on the drive shafts. Other than that, it should do!
Had a bit of fun with the grinder to remove the hub nuts, but all of 5 minutes and both were done. It's now completely stripped to it's
component parts waiting to be cleaned up.
Also went and cleared out melly-g's garage of Pinto parts! Many thanks for that
4 heads in various states of repair as well as a short block when I get back to collect it.
flak monkey - 12/3/19 at 09:28 AM
Me and Sophie have been busy... This is Sophie's first time working on anything in this amount of detail - although she has a practical
engineering background she has never rebuilt an engine. So I am quite enjoying having a student!
We are going to pick up our chassis and suspension etc this weekend! Need to clear my garage out as I only have a single one now
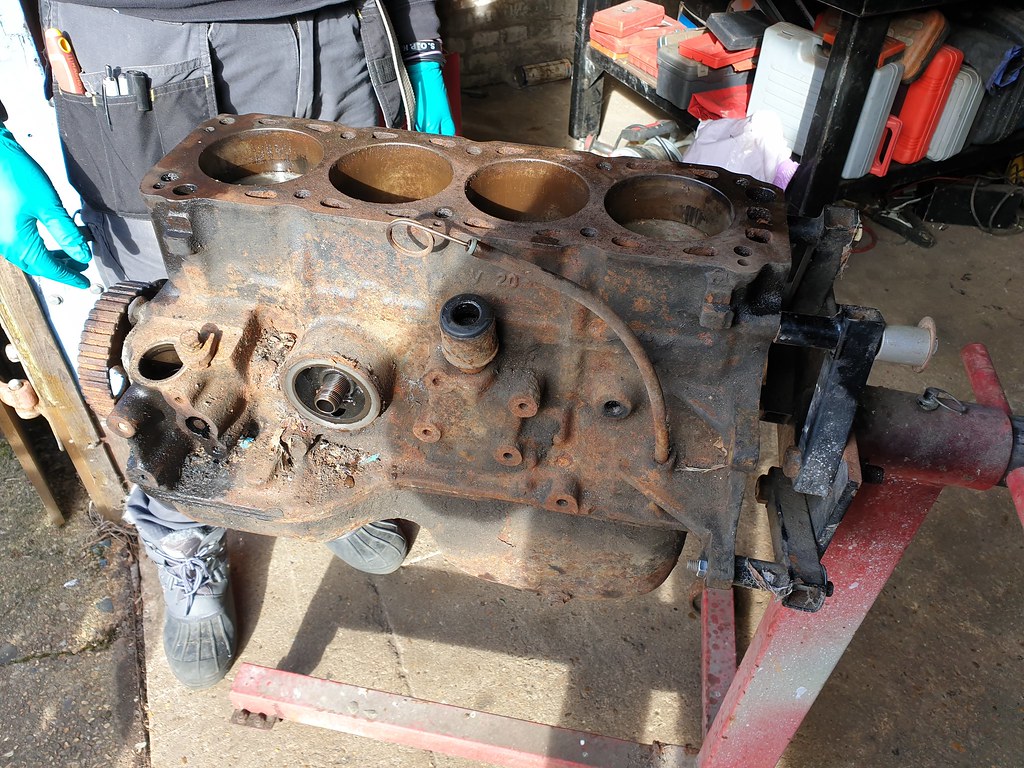
Picked up a couple of pinto short blocks, both in need of machining which isn't a problem. Have stripped down both and have identified enough
parts to build a new short block from the parts without buying anything else too expensive. Although both are not 205 blocks, one of them had later
rods in it anyway and one of them had been bored +0.5mm and the other was at standard. So we are going to get that one bored to +0.5mm and use the
stronger rods and oversize pistons. One has a standard crank in useable condition too, so we have most of what we need.
I'm just waiting for a quote for the machining work (bore and deck skim)
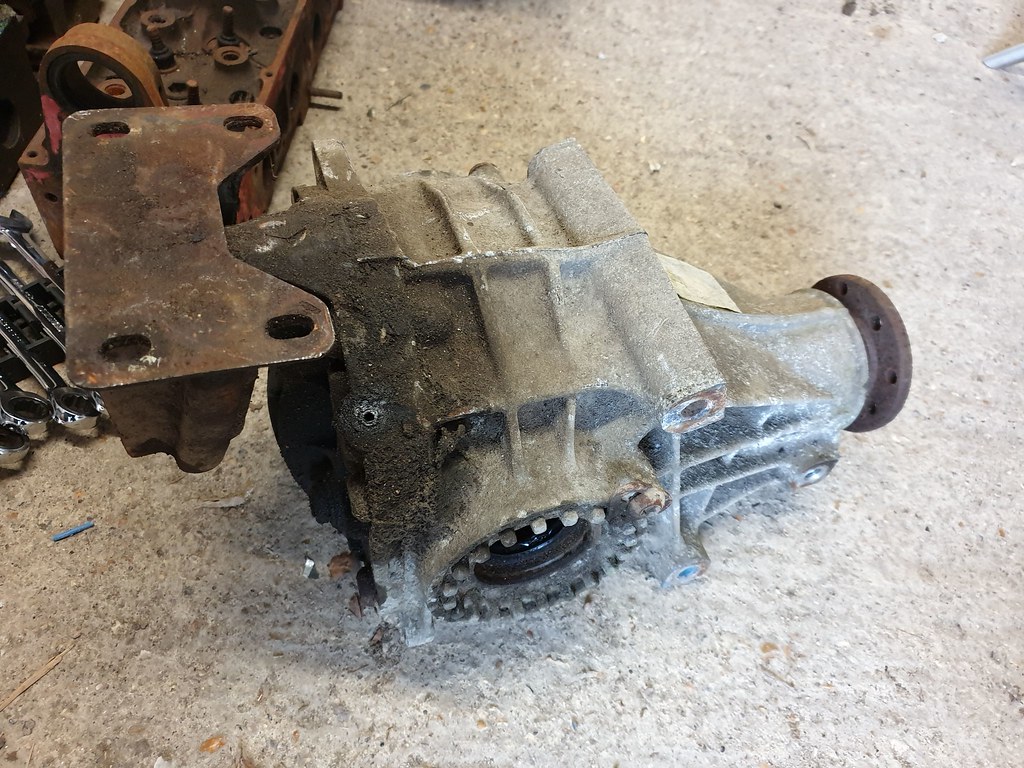
I cleaned up the differential and drive shafts yesterday - ready for a lick of paint and new seals/boots.
02GF74 - 12/3/19 at 07:05 PM
quote:Originally posted by flak monkey
Picked up a couple of pinto short blocks , both in need of machining which isn't a problem.
Ah, that explains it. I was wondering why the axis of Britain had tilted slightly towards Norfolk.
Hello BTW flak monkey - 13/3/19 at 09:28 AM
It's true, the continental plates did shift slightly.
But they can't be that heavy as I managed to lift both of them in and out of the back of my car without much effort... and I'm only a
weakling now
rusty nuts - 13/3/19 at 11:13 AM
quote:Originally posted by flak monkey
It's true, the continental plates did shift slightly.
But they can't be that heavy as I managed to lift both of them in and out of the back of my car without much effort... and I'm only a
weakling now
I use to do things like that. Until I gave myself a double hernia!
Nice to see you back .
Mr Whippy - 13/3/19 at 12:54 PM
I worked with a guy who when I went to collect it lifted a rover V8 out a SD1 with a rope round the engine and over his shoulders! mental sod
I did once carry my stripped down VW flat four up stairs into the garage loft but god it was heavy LOL
[Edited on 13/3/19 by Mr Whippy]
flak monkey - 14/3/19 at 03:26 PM
Shiny....
flak monkey - 15/3/19 at 03:40 PM
Going to collect my chassis and various other bits tomorrow morning - LWB van booked and an early morning I think!
Hopefully quickish progress will follow.
Popped into Tiger at lunchtime (since they are just up the road) and had a chat with Jim - seemed helpful enough, they are certainly busy, workshop is
full. Gave me a copy of his book for my free so can't be too bad. Not that I am planning to need it much!
SJ - 15/3/19 at 09:19 PM
Looking forward to seeing the quality of your work! Makes mine look like a pig's ear.
Stu
Andybarbet - 15/3/19 at 10:07 PM
Looking good so far :-)
I will watch your progress as it appears.
What paint have you used on the diff ? It looks great.
SJ - 15/3/19 at 10:10 PM
quote:
What paint have you used on the diff ? It looks great.
To my point in my earlier post, mine came painted, circa 1990. flak monkey - 16/3/19 at 06:09 PM
quote:Originally posted by Andybarbet
Looking good so far :-)
I will watch your progress as it appears.
What paint have you used on the diff ? It looks great.
Its just wheel silver paint, nothing fancy. Gave it a clean and a coat of etch primer first of course...
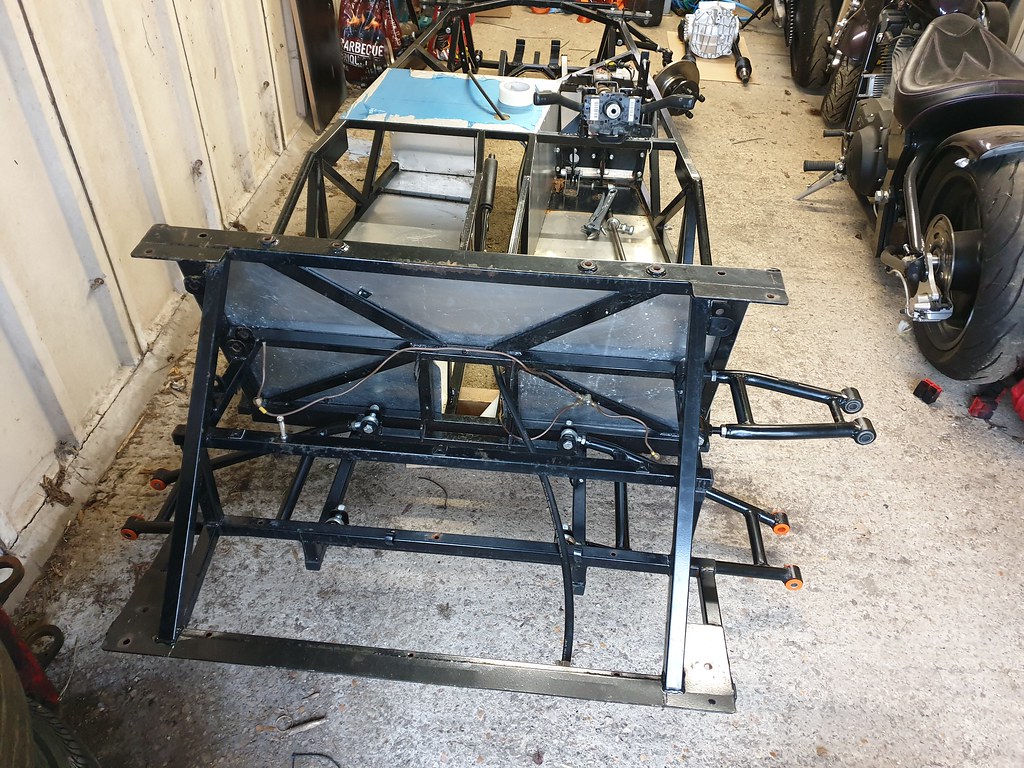
Had a 350 mile round trip today to collect the chassis and various other bits. Hopefully have it rolling by the end of tomorrow. Need to sort out the
fuel line and brake clips, but most of it's OK.
Think it's a Polo/Lupo steering column, need to find some bolts for it.
flak monkey - 17/3/19 at 04:58 PM
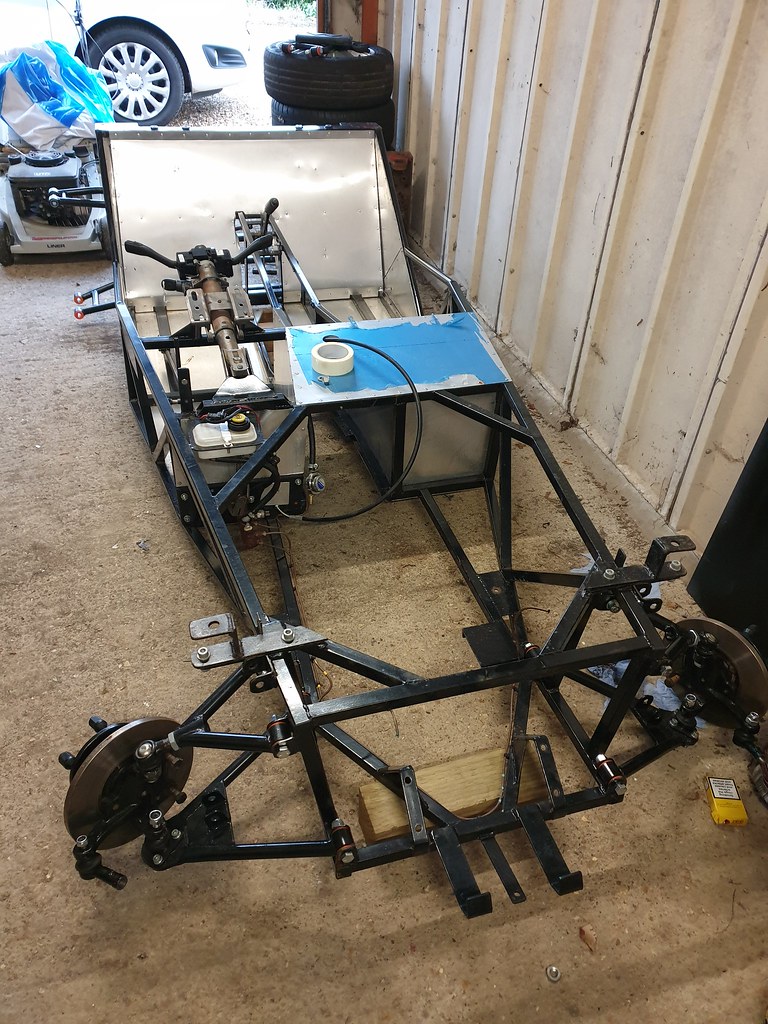
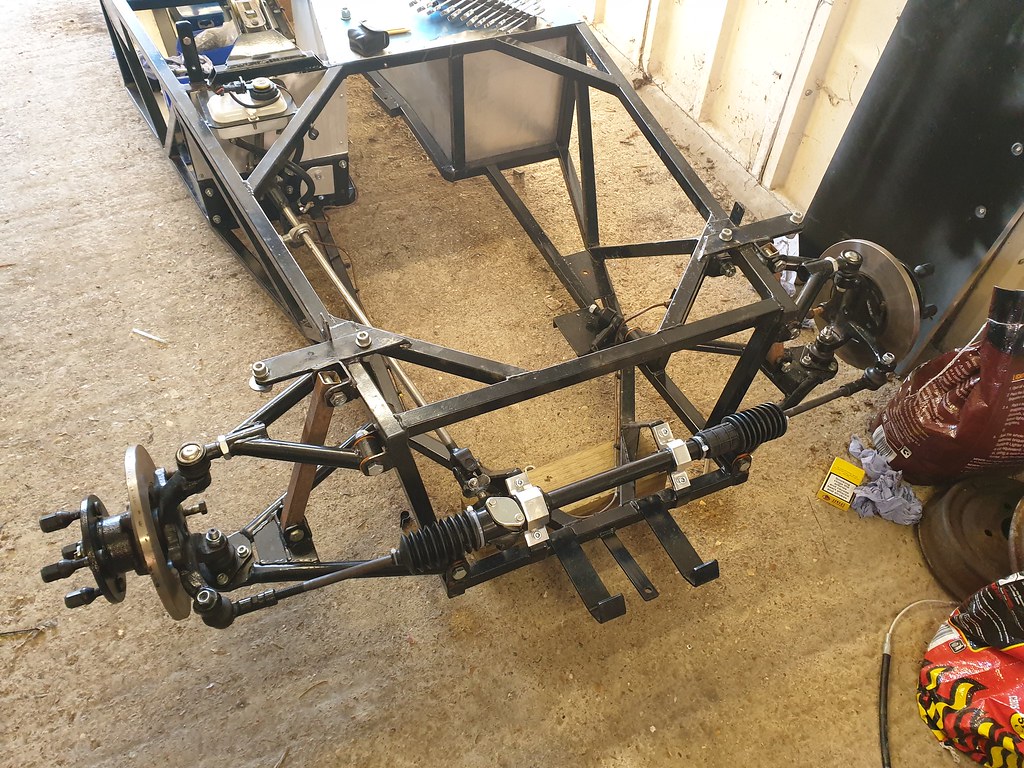
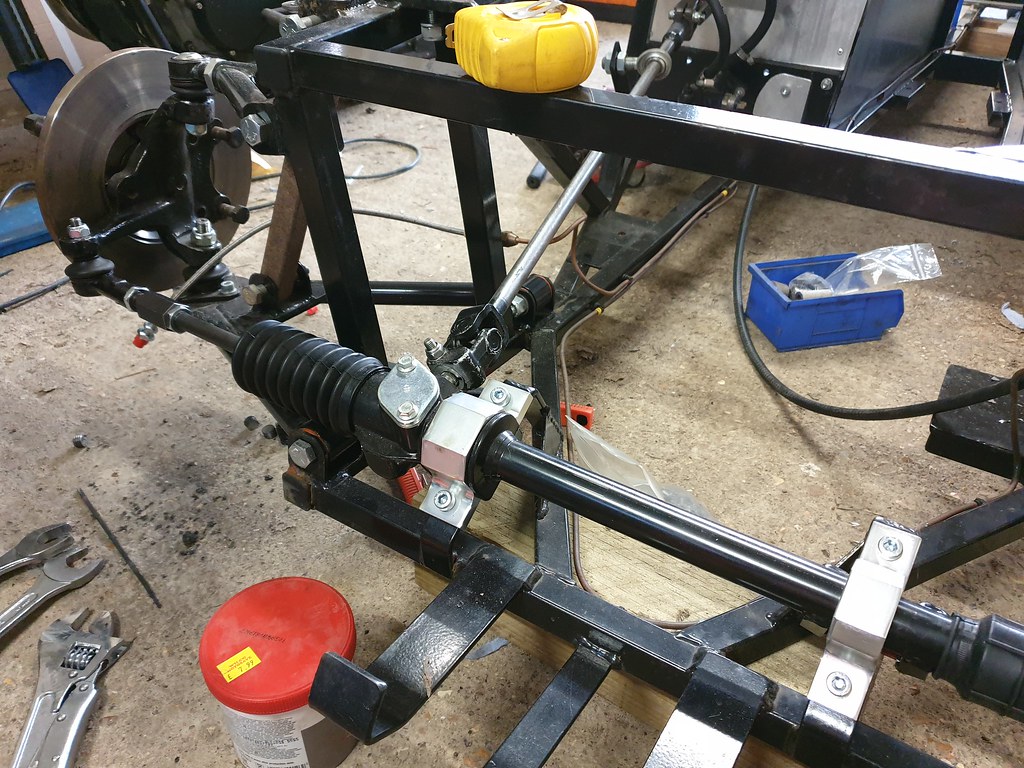
Me and Sophie have had a pretty productive day today. A lot of faffing around to get the suspension on the car and roughly set up. I need to make some
extensions for the rack and modify the standard track rods as the Avon is a stupid width at the front.
Also had to make some spacers for the lower rear wishbones - the book dimension of 80mm for their position appears to be incorrect. We've set
them as far forward as they will go for now.
Much complexity, be interesting to see how it handles as there is a lot of adjustabilty in the back suspension and none in the front. Time will
tell.
Fitted the new 2.9 turn steering rack - had to modify the packers than came with the clamps as even those weren't the right size, nothing is
simple. Column all bolted up easily though.
Removed the master cylinder, cleaned it up and painted it as it was rusty having been fitted bare. Re-routed the rear brake line and fitted proper
p-clips rather than the plastic snap in clips in a couple of places.
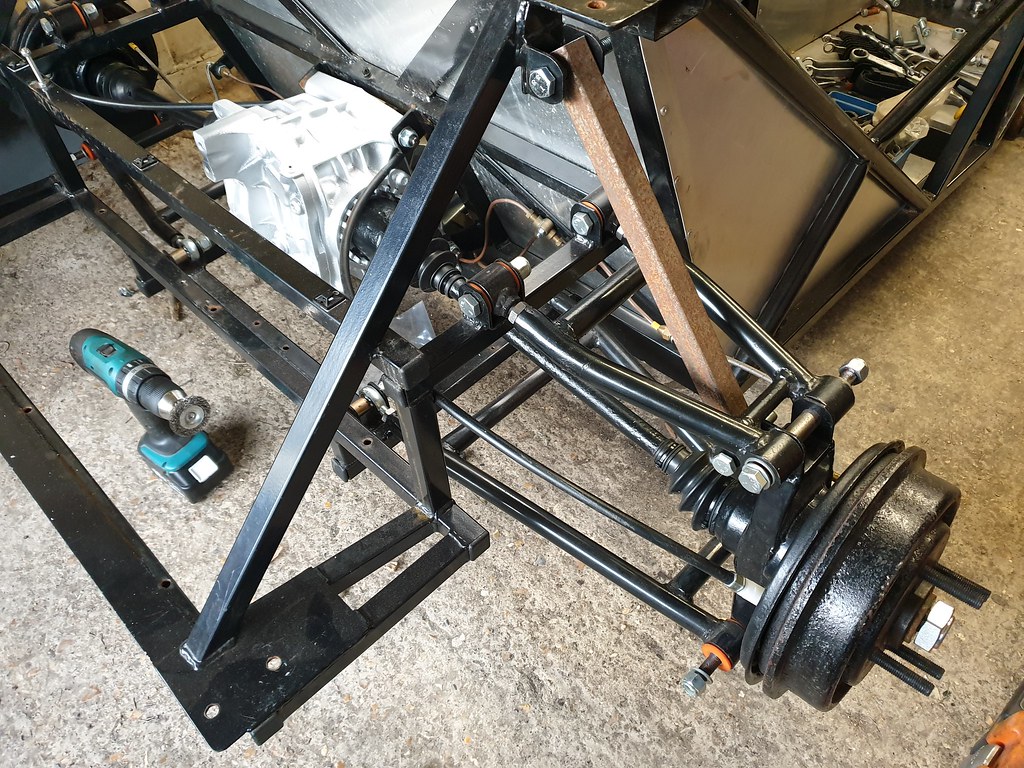
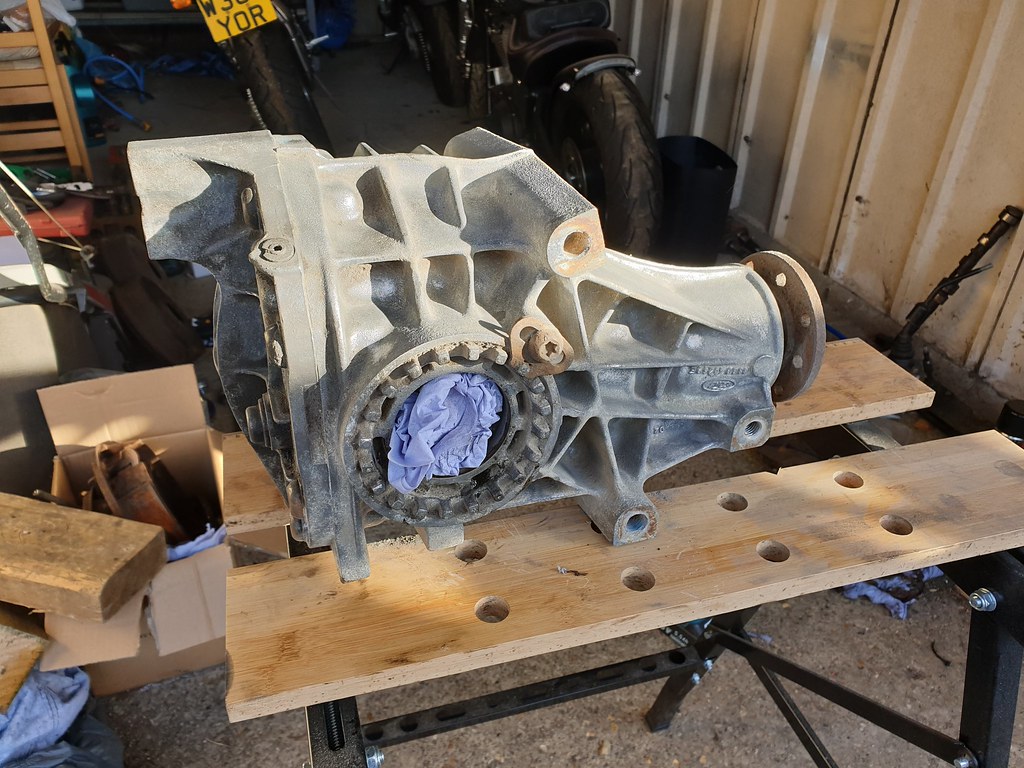
Differential fitted without much drama.
Still a few modifications to do to some of the existing work, but nothing major, mostly tidying up and doing a few things to my own taste.
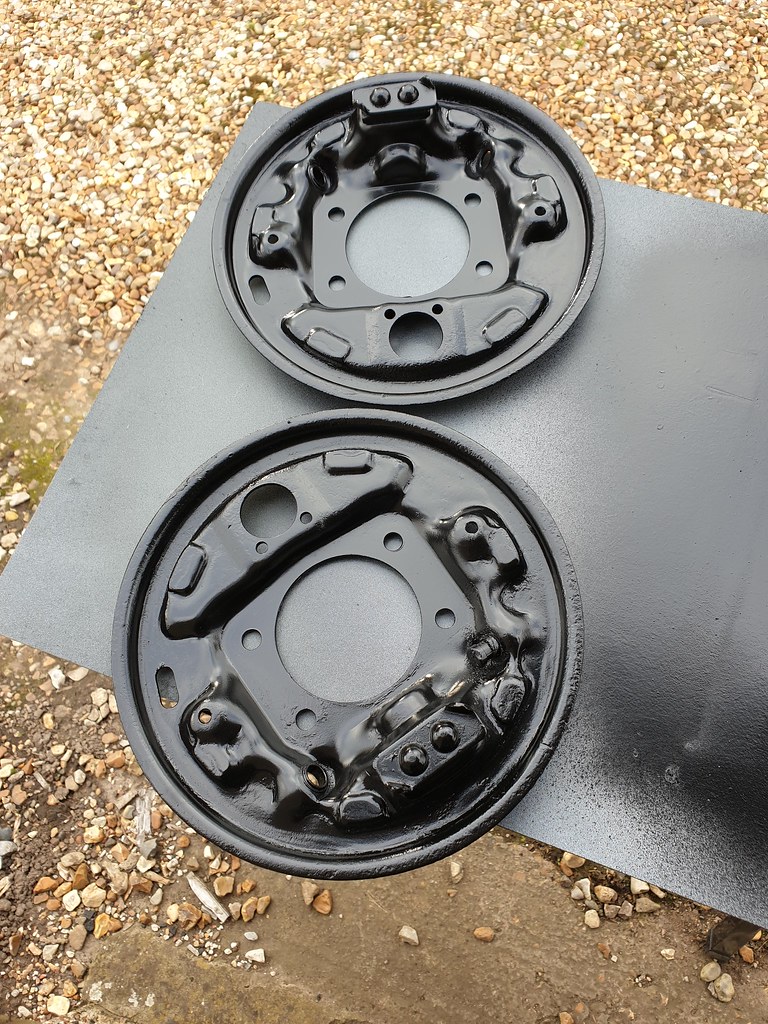
The next thing is to get the rear brake drums and back plates cleaned up and fitted
G13BLocost - 17/3/19 at 06:34 PM
I like this car, it looks dead simple to work on and should be good fun.
How are you finding building the Pinto? I've never dug into an iron block+head engine before.
flak monkey - 17/3/19 at 07:04 PM
quote:Originally posted by G13BLocost
I like this car, it looks dead simple to work on and should be good fun.
How are you finding building the Pinto? I've never dug into an iron block+head engine before.
I've built a few pintos now. Dead easy to work on.
But in all honesty the duratec and chevy engines I've worked with haven't been that bad either.
flak monkey - 22/3/19 at 04:34 PM
Been a busy few evenings cleaning and repainting parts ready to fit. Also went to see the guys at Tiger to pick up brake lines and rack extensions
etc.
Some of the parts that I collected with the kit needed a repaint having been sat around for a while. All simple stuff, but worthwhile at this
stage.
I also got the new CV boots fitted to the drive shafts, the old ones were shot and these stretch ones were fun to fit with the cone. Really messy
job!
This weekend I intend to get the car rolling, although I do need to find a new driveshaft nut for the LH side as both times I have bought one they
have been incorrect
flak monkey - 29/3/19 at 06:52 PM
Lots of stuff happening but I have been a bit tardy taking photos of progress. Need to sort some shocks.
Front end is more or less assembled, rack modified, wheel alignment is done. Have also stripped and repainted the calipers, new pistons and seals to
go in tomorrow.
Rear end is also assembled. Need to torque up the rear hub nuts and adjust the brakes a bit before doing the rear wheel alignment
flak monkey - 8/4/19 at 12:51 PM
I have quite busy, but again a bit bad at taking photos....
The car is actually now on it's wheels - the front wheel alignment is done, and I still need to do the rears, a job for one evening this week
(and a lot of swearing I expect....)
The engine block, rods and new pistons are at the machine shop. Block is being bored and decked, pistons being fitted to the rods (later wide beam
ones). It should be ready for collection next week at some point. At the same time I will be dropping off the cylinder head to be machined for
44.4/38.1 valves and have hardened seats put in. Also skimmed to raise the compression.
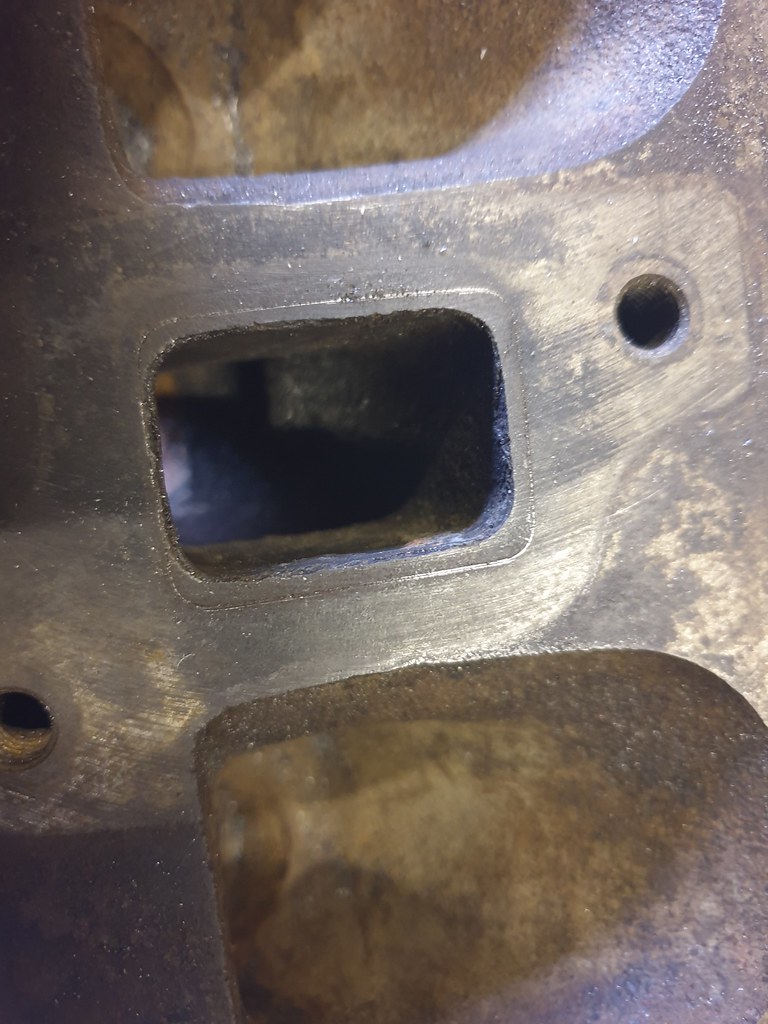
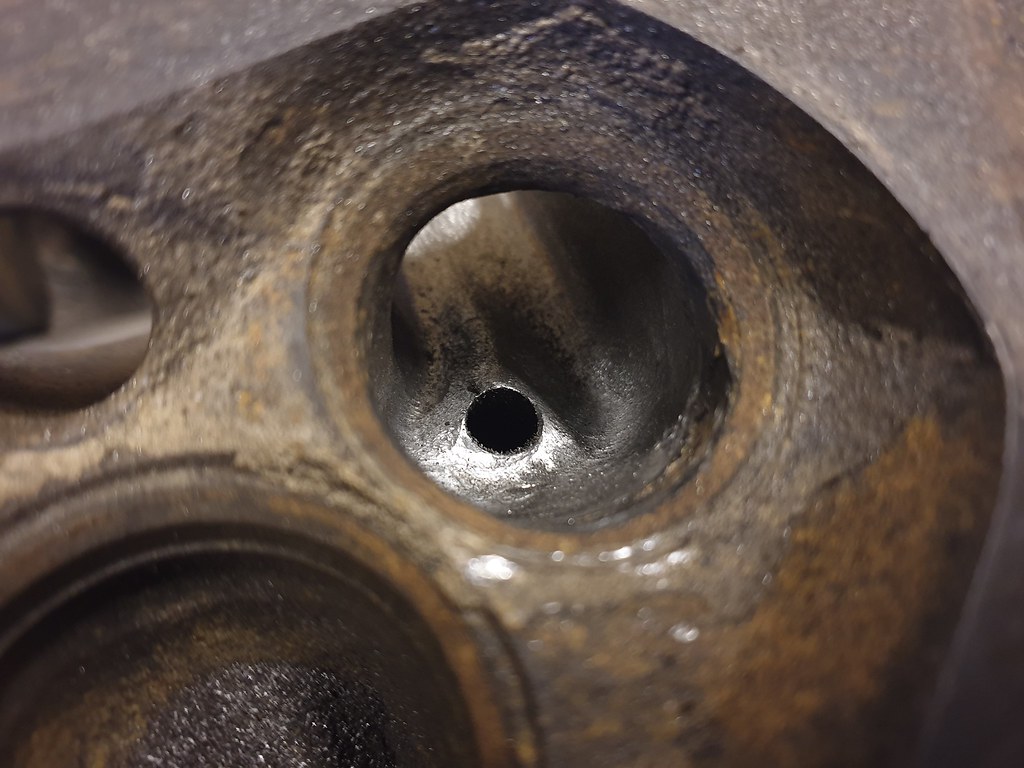
Before dropping it off I decided to get the bulk of the porting done on it. Mainly hogging all the material out of the exhaust ports and cleaning up
the guides. Once it's back then I will do the final tidy up and smoothing work. The 4 exhaust ports are done - took around 3 hours - thankful for
my big 3ph compressor and die grinder.
I have also made a start on modifying the sump and have moved the filler neck on the rocker cover. Those are both going to the blasters later this
week and will then be ready to finish off.
Marking out for porting - 35mm high and 29.5mm wide
Comparison of original and new port sizes
New port - sides are actually parallel - measurements maintained throughout the port - no material removed from port floor
Smoothed guide - length is maintained but the guide is streamlined
flak monkey - 22/4/19 at 06:32 PM
Picked up the block, pistons and rods from the machine shop last week. The block has been bored/honed 0.5mm oversize and the top face machine 0.5mm to
bring the piston crown flush with the deck face. New pistons have been fitted to the later wide beam injection rods too.
Sophie spent today cleaning the outside of the block and painting it, also had the modified rocker cover blasted last week so that got a coat of paint
today too.
All painted with epoxy primer followed by 2k black and clear.
The rocker cover has some finishing touches to complete yet, those will have to wait until next weekend.
I still need to finish the porting work on the head before it's dropped off at the machine shop for big valves and a skim.
flak monkey - 16/5/19 at 06:21 PM
Another long break from updates... still been plodding on with things though.
Fitted new rings to the pistons - after finding out the brand new Hepolite set I bought had a huge gap - just over 2mm - even though its fresh bore
and the rings were packaged for the correct size. Now fitted with Mahle ones which are spot on.
So the rotating assembly is sorted.
Modified the distributor tonight, just need to assemble it. Turned off the main body and modified the shaft. Machined up a cap to press on, just need
to clean it up and assemble it. Will be running megajolt so no need for the dizzy other than as an oil pump.
big_wasa - 16/5/19 at 07:05 PM
Who did you use for your rebore ?
Cheers.
flak monkey - 16/5/19 at 07:28 PM
Cambs rebores.
Nothing wrong with their machining job. The hepolite rings are just junk.
big_wasa - 17/5/19 at 09:22 AM
I only ask as I am planning on forging the bottom end and just curious on local firms.
Looking good - In fact some bits of that engine are looking very similar to mine, only you've done it infinitely faster than me
What are you planning for the carb's and cam on this one ?
your dizzy / oil pump drive looks almost identical to the one that the guys at H&H knocked up for me (I was going to do it myself, but it was part
of deal)
Probably overkill but I'm going to take another old dizzy (hall effect EFI one) and strip it down without the gear on it to make an oil pump
priming tool of some kind...
quote:Originally posted by flak monkey
The rocker cover has some finishing touches to complete yet, those will have to wait until next weekend.
...I was just looking to do the same mod on my rocker just the other day and struggling to find a bit of tube the right size
[Edited on 17/5/2019 by mcerd1]
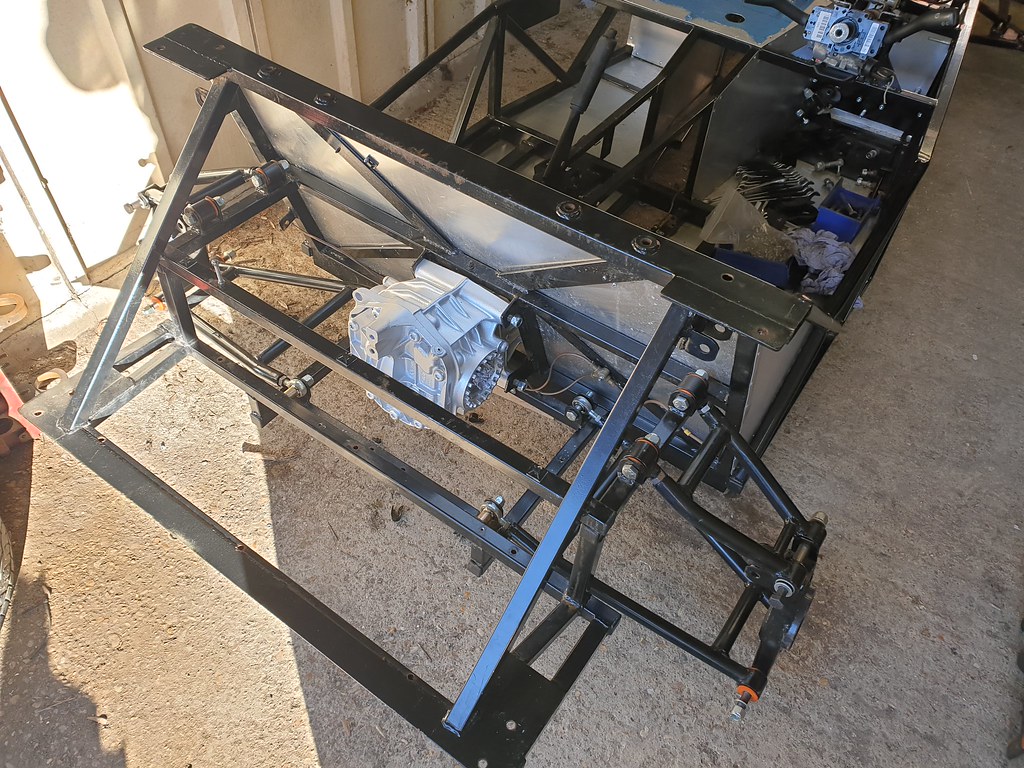
flak monkey - 6/10/19 at 03:07 PM
Been really lax with updates on this - mostly as a lot of things aren't photo worthy, especially in my messy garage....
In short:
The suspension is all fully assembled including wheel alignment and a set of shiny new adjustable Gaz shocks.
Wiring loom made and installed - yet to be tested, but it's all there and mostly tidied up as much as possible prior to fitting the body work.
Dropped in the gearbox and a spare block/head just for mocking things up and checking clearances. Everything looks OK.
Brakes are bled and the handbrake is hooked up.
Next major things are to get the roll bar and fuel tank fitted, along with the fuel pump (R1 to suit the carbs) before finally buying a bodywork
set.
big_wasa - 6/10/19 at 03:20 PM
I’ve got a starter motor left over if you need one.
flak monkey - 7/10/19 at 01:14 PM
quote:Originally posted by big_wasa
I’ve got a starter motor left over if you need one.
That would be very helpful! I'll U2U you....
flak monkey - 13/10/19 at 06:32 PM
Shelled out some cash and bought a new tank and roll bar from Tiger yesterday. Mostly got them fitted today - make some brackets up for the tank. Just
need to get some rose joints for the roll cage stays and paint the tank mounts.
Next job is fuel pump and then will be gettign ready to move house before getting the body set.
flak monkey - 18/10/19 at 04:29 PM
Not been doing much this week - had a lot of stuff on for other people and with work. Had planned to drop the cylinder head in at the machine shop but
didn't have time in the end.
I did however get the brackets for the fuel tank painted and refitted, along with the roll bar stay brackets and rose joints fitted.
Made a mounting plate for the fuel pump, just need to improve the mounting of the pump, but I have a plan for that.
I was also impressed by the wheel cleaner I bought, a bit of a scrub and they came up pretty nice. These wheels are just temporary until I can afford
something lightweight and nice. But these will do for the build and the shakedown miles.
flak monkey - 8/11/19 at 04:23 PM
Slower progress again at the minute - although I seem to have gained a lot of parts.
Replaced the brake master cylinder and reservoir and the leaks are cured there - thankfully!
Got a pair of seats - really nice new GRP ones from eBay and only Ł150 for the pair including delivery - they even fit in the chassis (only 400mm
wide) but I do need to make some mounting brackets for them, which isn't a hardship. Will probably make some pads up for them eventually.
Also dropped the cylinder head off at my friendly machine shop who are fitting hardened exhaust valve seats, cutting all the seats for group 1 valves,
fitting bronze guides and skimming the face. I'm expecting a big bill at the end of it! Once it's back I have a little port tidying to
finish off then the engine can finally be built up.
Found someone selling a complete pinto exhaust with headers, collector and silencer, so that's that sorted. Also managed to snag a Bailey Morris
propshaft of the right length which hasn't seen much action.
I finished wiring the rear of the car too - can't do anything more until I have the bodywork which is getting ordered as soon as we have moved
house in a couple of weeks (because I don't have enough to do already!)
The battery also arrived today, so I will start to check out my wiring over the weekend too
flak monkey - 1/2/20 at 07:01 PM
Finally have a proper workshop back again after moving into our dream house in November.
I had the head away at the machine shop and got it back in December. Skimmed to bring the CR up to 11.5:1, bronze valve guides, seats machined for
group 1 valves and hardened seats for the exhaust valves.
Today I finally got around to finishing off the porting and assembling the head with new stainless waisted stem valves, kent springs etc. Felpro thin
head gasket too.
flak monkey - 2/2/20 at 09:01 PM
Got a little more done today - was hoping to have the engine pretty much complete, but it seems I need some longer ball studs. Other than that, the
valvetrain geometry looks pretty much spot on. Wipe pattern is right in the middle of the pads on the followers.
Since I couldn't finish that I made a bracket to mount the coil on the back of the head.
flak monkey - 9/2/20 at 04:55 PM
Finished the engine assembly this weekend. Degreed the cam and pretty much buttoned everything up.
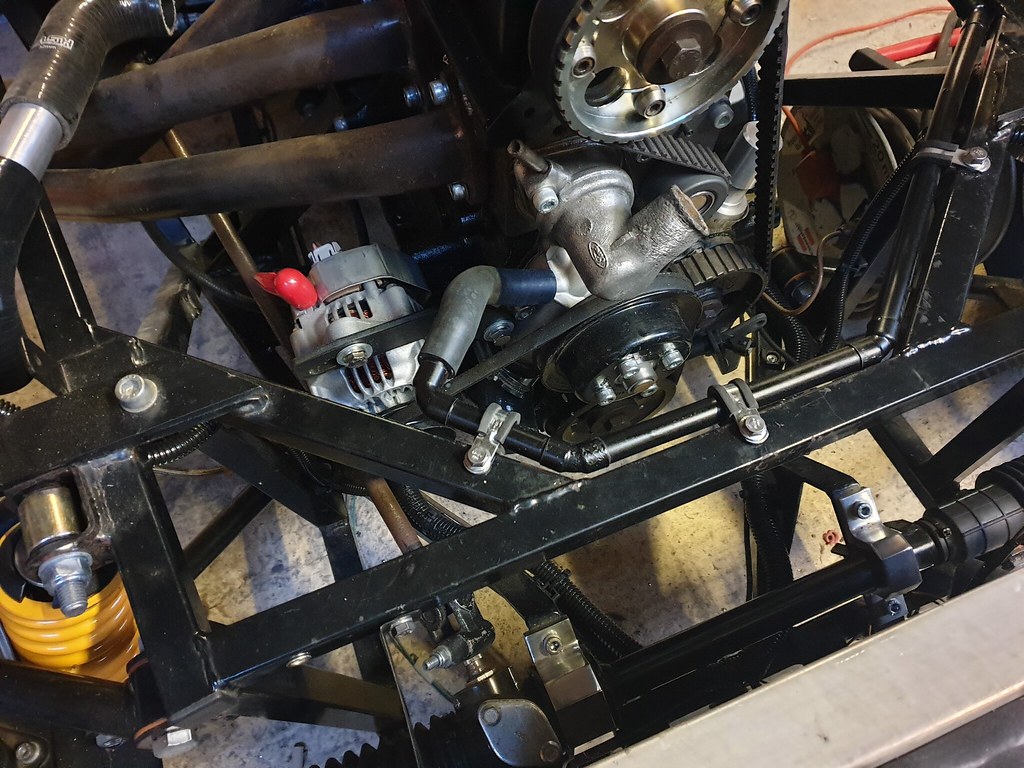
Made some alternator mounts too for the tiny denso alternator.
Just need to get the flywheel skimmed and then the engine and box are ready to go in.
jps - 9/2/20 at 06:12 PM
quote:Originally posted by flak monkey
Is it ok to replace the studs for the manifolds with bolts permanently? The reason I ask is I am using a pinto in my build and have an over rail
exhaust manifold which will need much shorter studs than the original cast manifold. Is a straightforward bolt a suitable alternative?
Great to see the progress btw!
flak monkey - 9/2/20 at 07:49 PM
quote:Originally posted by jps
Is it ok to replace the studs for the manifolds with bolts permanently? The reason I ask is I am using a pinto in my build and have an over rail
exhaust manifold which will need much shorter studs than the original cast manifold. Is a straightforward bolt a suitable alternative?
Great to see the progress btw!
Yep, bolts are fine
jacko - 10/2/20 at 08:03 PM
Hi Mate long time .
I've only just started to come back on this forum after along time
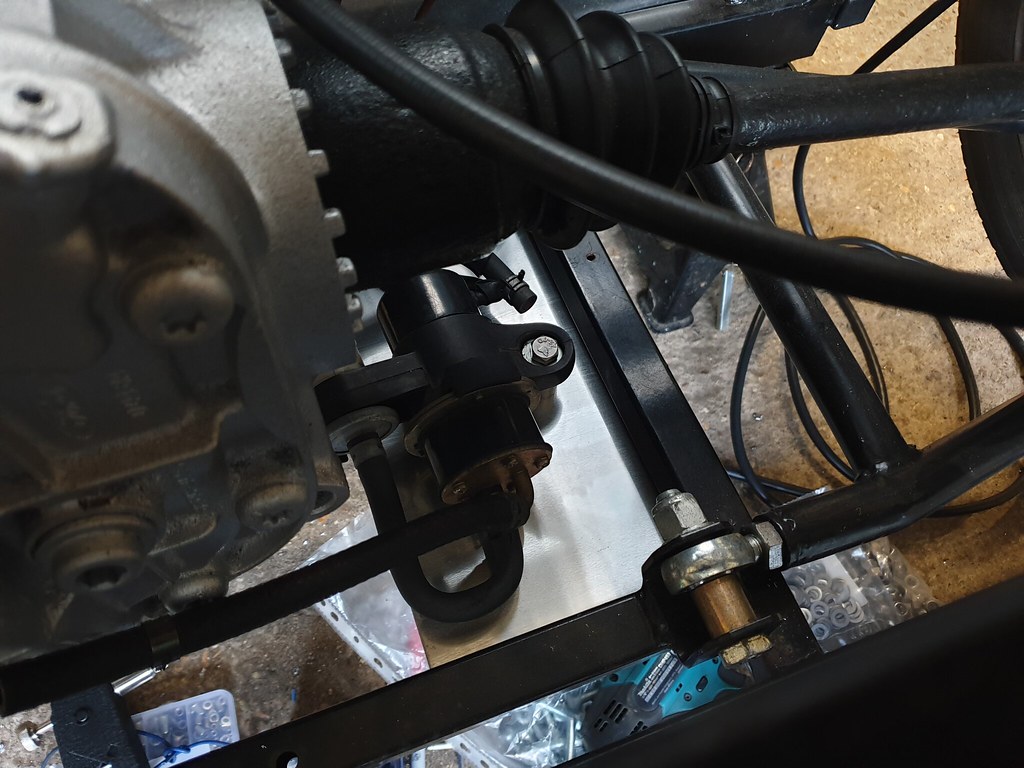
It's good to see a build with a pinto just a little info the engine mounting stabiliser you have in your photo archives is the one I made and it
worked very well and stopped every thing rocking
Jacko
bob - 10/2/20 at 08:18 PM
Nice to see another excellent build diary and photo log, Sera you never seem to disappoint.
Ive been away for a few years too and good to see old friends still putting the hours in, will be nice to see another car finished.
flak monkey - 15/2/20 at 07:07 PM
quote:Originally posted by jacko
Hi Mate long time .
I've only just started to come back on this forum after along time
It's good to see a build with a pinto just a little info the engine mounting stabiliser you have in your photo archives is the one I made and it
worked very well and stopped every thing rocking
Jacko
quote:Originally posted by bob
Nice to see another excellent build diary and photo log, Sera you never seem to disappoint.
Ive been away for a few years too and good to see old friends still putting the hours in, will be nice to see another car finished.
Thanks guys. It's good to have a another project, and something to get stuck into. I wanted to keep this one pretty old school, hence the pinto.
Something basic and fun.
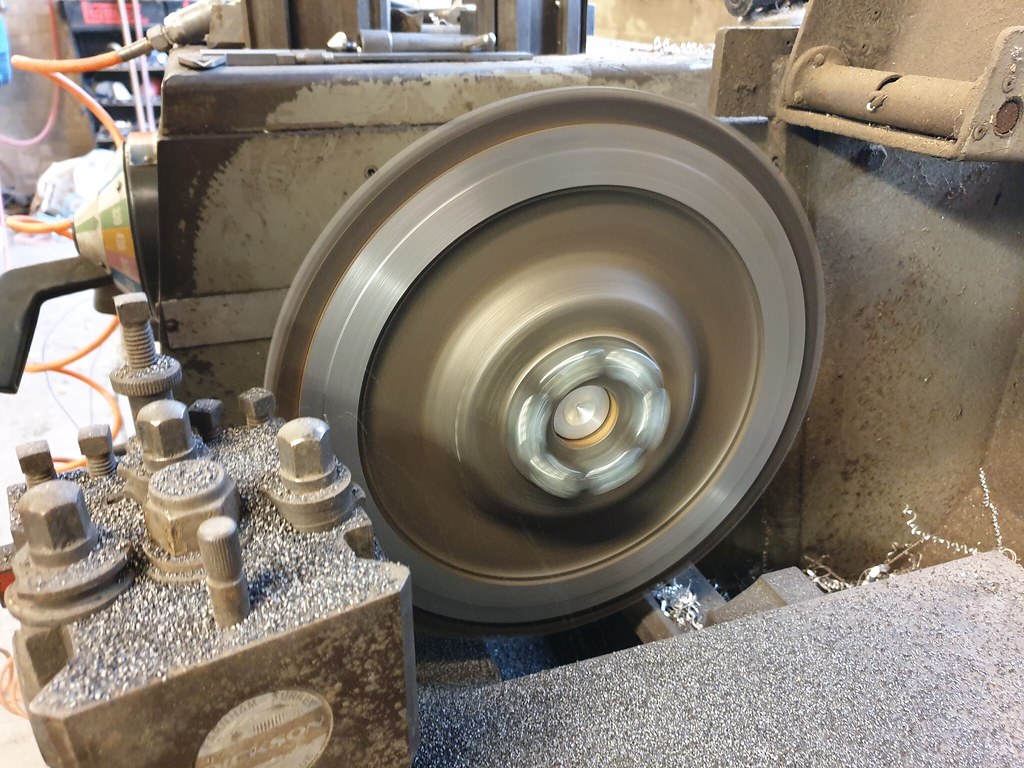
Today I've been on the lathe lightening the flywheel and machining the crank pulley for the trigger wheel.
Flywheel was pretty straightforward. Skimmed 0.5mm off the front to clean it up. Then machined off all the outer weight on the back. Standard stuff
really. Overall thickness is 12mm. Also checked balance and all OK.
SJ - 15/2/20 at 07:50 PM
What does the flywheel weigh?
flak monkey - 15/2/20 at 08:16 PM
quote:Originally posted by SJ
What does the flywheel weigh?
4.5kg
SJ - 15/2/20 at 08:18 PM
That's pretty light. I used a cvh 1.8 fly on my zetec which is 6.5kg standard.
jacko - 15/2/20 at 09:42 PM
Sera
great work keep it up and the engine will rev up nicely at that weight
Graham
flak monkey - 16/2/20 at 04:44 PM
Yeah, should go nicely
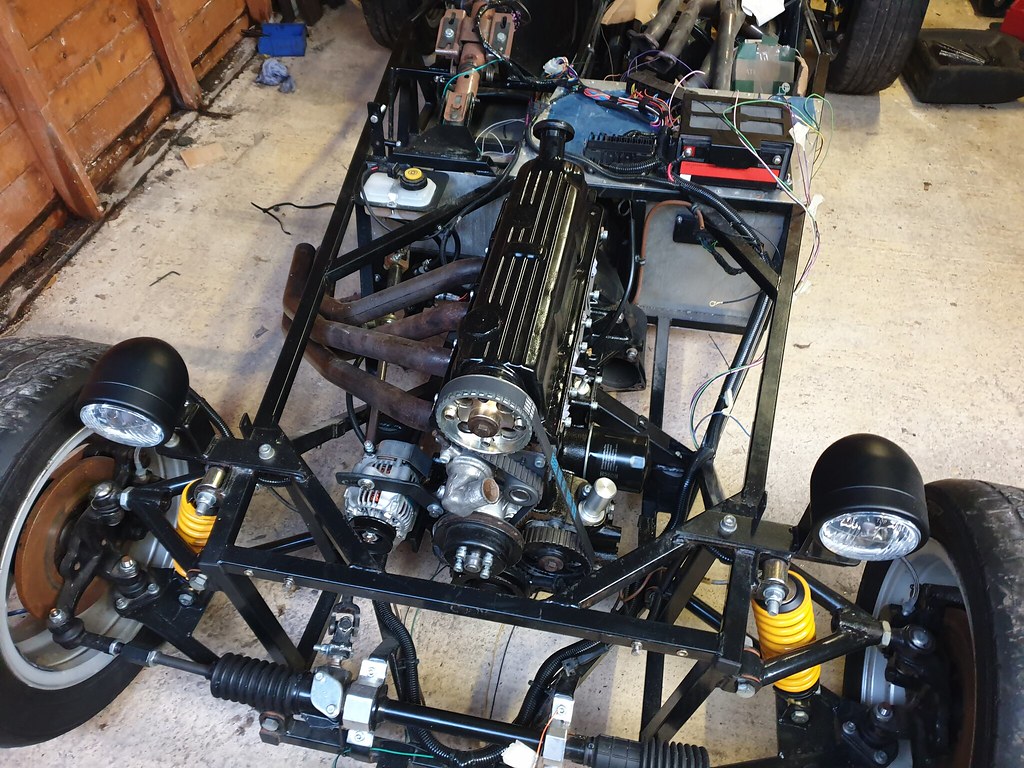
Engine and box are in, finally. Had to chop the extra engine mount off the chassis as it hit the sump. Other than that, simple enough.
flak monkey - 22/2/20 at 06:15 PM
Inlet manifold for the R1 carbs arrived while I was away for work. So that gave me something else to do today. Fitting the filter backplate was fun
since the bolts which had to be removed from the carbs had been fitted with loctite. Nothing a gentle application of a blowtorch didn't fix, but
a pain nonetheless...
Also did a little more wiring and made some brackets for the radiator.
SJ - 22/2/20 at 07:58 PM
It'd be interesting to see if there are any differences between a bike carb set up like yours and one like mine where the carbs are respaced to
match the engine inlets.
flak monkey - 26/2/20 at 05:37 PM
Lots of faffing around in the last few evenings.
Fitted the drivers seat - had to weld some bits of box section in to suit the mounts on the seats, since they are generic ones. Snug fit, but they go
in there....
New starter turned up, so fitted that. A smaller, modern, gear reduction unit which should help crank it over.
Made a pipe up for the water pump to head bypass hose. Need to get some clips, seem to have run out of the correct sized ones. Neater than a bit of
hose cable tied to the chassis I guess.
Tidied up the alternator wiring
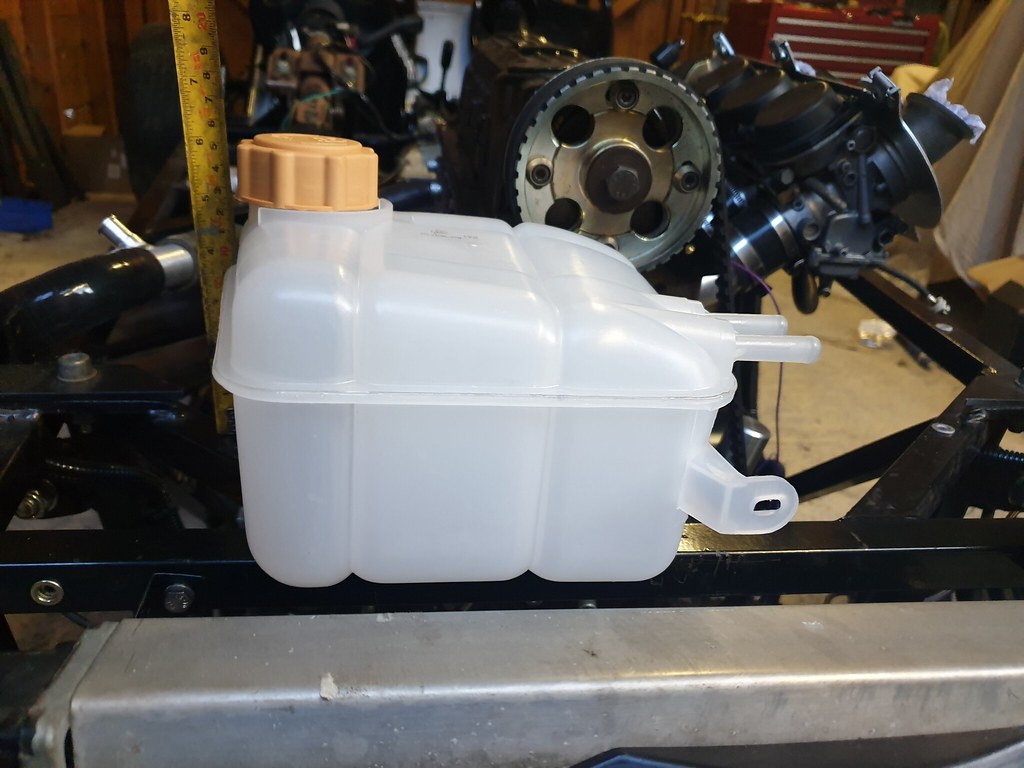
Messing around with positioning for the header tank. Anyone know how much room there is under the back edge of the nose? Wondering if I can fit it at
the front out of the way. Its about 6" tall. If not I'll put it infront of the battery.
Deckman001 - 26/2/20 at 06:25 PM
Lookin good there
Jason
jps - 27/2/20 at 09:02 AM
I'd be intertested to know the radiator plumbing layout you are using, i'm using a Pinto with polo rad. I know there are multiple posts on
here, but it seems there is more than one possible solution!
flak monkey - 27/2/20 at 02:06 PM
quote:Originally posted by jps
I'd be intertested to know the radiator plumbing layout you are using, i'm using a Pinto with polo rad. I know there are multiple posts on
here, but it seems there is more than one possible solution!
Pretty simple:
Water pump to bottom of rad
T'stat housing to top of rad
Header tank teed into bottom hose
T'stat breather to top of header tank
Small outlet on water pump connected to inlet side of head between cyl 2 and 3 - (this is the old heater circuit, flow helps keep the head cooler)
Some people block off the old heater circuit but I find it helps with cooling.
flak monkey - 27/2/20 at 07:25 PM
Faffed about and plumbed most of the rest of the cooling system, made up a throttle cable and some HT leads up since it's hardly a standard
layout....
Take off in the top hose is the highest point of the system so will be connected back to the top of the header tank. The connection in the bottom hose
will be the feed from the header tank.
Hopefully won't be far off firing it up this weekend.
flak monkey - 28/2/20 at 03:08 PM
Getting slowly closer...
Header tank mounted and plumbed. Will find out if its all water tight tomorrow after i have hooked the main filler hose up...
Anyone want to clean my exhaust headers up????!!!! :p:p
[Edited on 28/2/20 by flak monkey]
Memphis - 29/2/20 at 01:48 PM
Very nice. I love old school Pinto engines (and crossflows)
One piece of constructive critisism; that inlet manifold is truly awful. Air doesn't go around sharp corners, and the pattern of airflow through
those inlet runners will SEVERELY restrict your capacity to make power. You'll probably only get half the airflow in CFM that you would with
straight inlet runners and respaced carbs. I know the maker of these manifolds sells hundreds of these things, but that doesn't make them
right!
Cheers Chris
SJ - 29/2/20 at 02:33 PM
I've often wondered about how respaced bike carbs would compare with ones on a manifold like Sera's. Mine are respaced because I was too
tight to buy an expensive manifold and just fitted them in the same way as Mr Kawasaki did. I'm sure mine are far from optimal though as the
inlet tract is very short.
Stu
flak monkey - 29/2/20 at 04:20 PM
quote:Originally posted by Memphis
Very nice. I love old school Pinto engines (and crossflows)
One piece of constructive critisism; that inlet manifold is truly awful. Air doesn't go around sharp corners, and the pattern of airflow through
those inlet runners will SEVERELY restrict your capacity to make power. You'll probably only get half the airflow in CFM that you would with
straight inlet runners and respaced carbs. I know the maker of these manifolds sells hundreds of these things, but that doesn't make them
right!
Cheers Chris
Yep, I know... I'm just getting lazy in my old age. I was going to make a manifold myself, but couldn't be arsed. They are actually well
smoothed off inside since they are made of really thick tube. Not ideal, but like I said, I'm lazy.
I was too tight to shell out on some 45 DCOEs, maybe one day.
Be interesting to see what it makes on a rolling road with the bike carbs and then again with sidedraughts.
[Edited on 29/2/20 by flak monkey]
jacko - 29/2/20 at 04:50 PM
Sera
Take it from me you will have no trouble with the manifold you have if you have a hunt around my archives you will find the carbs and manifold I made
for su carbs and bike carbs
You are doing a great job the only thing I have found different to my build is the water pipe work I had no tee,s in my rad pipes
Top rad to termastat
Bottom rad to water pump i
Inlet manifold to header tank
Small pipe from water pump to tank
Tank top had a blow off top
Again look at my photos
Graham
flak monkey - 29/2/20 at 06:42 PM
quote:Originally posted by jacko
Sera
Take it from me you will have no trouble with the manifold you have if you have a hunt around my archives you will find the carbs and manifold I made
for su carbs and bike carbs
You are doing a great job the only thing I have found different to my build is the water pipe work I had no tee,s in my rad pipes
Top rad to termastat
Bottom rad to water pump i
Inlet manifold to header tank
Small pipe from water pump to tank
Tank top had a blow off top
Again look at my photos
Graham
Cheers Graham - my original pinto was plumbed the same as yours. Was never an issue but it always ran a bit on the hot side, wanted to play around and
see if allowing more flow around the head will keep it cooler. flak monkey - 1/3/20 at 05:37 PM
Done a fair bit of stuff this weekend, and eventually got the car fired up. It's running a base map in the megajolt and I haven't touched
the carb set up or checked the balance, but it's not running too bad.
Started off throwing fuel every where as the o-rings in the float seats had dried out and were allowing fuel past the seat inserts. Whipped the carbs
off and fitted new o-rings. Problem solved.
Ran it at 2-2.5k RPM for 20 mins to bed the cam in and had no over heating, no leaks or any issues, which was some kind of miracle.
Let it cool down a bit and then set the idle speed.
Need to verify the ignition timing and carb mixture and balance and also fit a choke cable. That will have to wait until next weekend now. But overall
pretty happy it's not making any horrible noises and didn't blow up
Vids are off my phone, so sound is probably crap
Memphis - 2/3/20 at 08:28 AM
quote:Originally posted by jacko
Sera
Take it from me you will have no trouble with the manifold you have if you have a hunt around my archives you will find the carbs and manifold I made
for su carbs and bike carbs
You are doing a great job the only thing I have found different to my build is the water pipe work I had no tee,s in my rad pipes
Top rad to termastat
Bottom rad to water pump i
Inlet manifold to header tank
Small pipe from water pump to tank
Tank top had a blow off top
Again look at my photos
Graham
Yes you'll have no trouble with the manifold under normal conditions on the road, but if (when) you come to tune the engine for serious power, it
will be very restrictive.
[Edited on 2/3/20 by Memphis]
[Edited on 2/3/20 by Memphis]
Mr Whippy - 2/3/20 at 12:23 PM
nice
Only thing I spotted and might be worth mentioning... for my JBA roadster I too used a "solid" column omitting the usual rubber shock
absorber disk next the the rack input and I can only assume due to slight chassis flex the column hammered the bejesus out my rack pinion bearing till
it all kind of fell apart after that escapade I refitted the disk and all was well, plus it kind of felt better too
Oh yeah one other thing, and I'm sure your not a stupid as me I replaced the alternator lower bolt (yours looks very shiny so I'm
assuming it's not the original one) with a bolt that was threaded all the way through not thinking very much of it until the thread fatigued,
bolt broke, alternator swung forward and hit the fan which then exploded and took out the radiator... oops
Deckman001 - 2/3/20 at 03:30 PM
Hi Sera,
Have you finished the throttle pedal connection to the carbs? I've got a very nearly identical set up but having never done anything like this
before I'm not too sure whats the best connection method ?
Jason
flak monkey - 2/3/20 at 03:59 PM
quote:Originally posted by Deckman001
Hi Sera,
Have you finished the throttle pedal connection to the carbs? I've got a very nearly identical set up but having never done anything like this
before I'm not too sure whats the best connection method ?
Jason
Hi Jason, yes I used a generic Venhill kit off eBay, about 18 quid I think. Comes with all the fittings you need.
Sera
Deckman001 - 2/3/20 at 04:34 PM
quote:Originally posted by flak monkey
quote:Originally posted by Deckman001
Hi Sera,
Have you finished the throttle pedal connection to the carbs? I've got a very nearly identical set up but having never done anything like this
before I'm not too sure whats the best connection method ?
Jason
Hi Jason, yes I used a generic Venhill kit off eBay, about 18 quid I think. Comes with all the fittings you need.
Sera
Sera, You have U2U
Jason
jacko - 2/3/20 at 07:32 PM
quote:Originally posted by Memphis
Yes you'll have no trouble with the manifold under normal conditions on the road, but if (when) you come to tune the engine for serious power, it
will be very restrictive.
[Edited on 2/3/20 by Memphis]
[Edited on 2/3/20 by Memphis]
Hi Memphis
I'm interested for you to tell me why you think that manifold will not be good
the manifold is like that to miss the distributer
Graham
Memphis - 4/3/20 at 09:43 AM
quote:Originally posted by jacko
quote:Originally posted by Memphis
Yes you'll have no trouble with the manifold under normal conditions on the road, but if (when) you come to tune the engine for serious power, it
will be very restrictive.
[Edited on 2/3/20 by Memphis]
[Edited on 2/3/20 by Memphis]
Hi Memphis
I'm interested for you to tell me why you think that manifold will not be good
the manifold is like that to miss the distributer
Graham
Sharp turns in the manifold create large amounts of turbulence on both sides of the turn, thus restricting the cross sectional area of the inlet
runner to a fraction of the original internal diameter. Airflow doesn't want to go around corners, and would far prefer to slam into the far side
of the inlet runner. Ok on a mild road engine to a point (I suppose) but no good at all on a high performance application.Two sharp turns just
compounds the problem.
I know a certain supplier of bike carbs manifolds sells hundreds of these things, but my heart sinks every time I see one! By far the best solution is
to respace the carbs so you get as straight as possible shot down the inlet port. If you need to change direction, the curve must be as gentle as
possible. Respacing is a faff and quite expensive, which is the main reason people don't do it; generally nothing to do with avoiding
distributors, (and with semi downdraught modern carbs that isn't a problem anyway).
flak monkey - 4/3/20 at 10:21 AM
quote:Originally posted by Memphis
Sharp turns in the manifold create large amounts of turbulence on both sides of the turn, thus restricting the cross sectional area of the inlet
runner to a fraction of the original internal diameter. Airflow doesn't want to go around corners, and would far prefer to slam into the far side
of the inlet runner. Ok on a mild road engine to a point (I suppose) but no good at all on a high performance application.Two sharp turns just
compounds the problem.
I know a certain supplier of bike carbs manifolds sells hundreds of these things, but my heart sinks every time I see one! By far the best solution is
to respace the carbs so you get as straight as possible shot down the inlet port. If you need to change direction, the curve must be as gentle as
possible. Respacing is a faff and quite expensive, which is the main reason people don't do it; generally nothing to do with avoiding
distributors, (and with semi downdraught modern carbs that isn't a problem anyway).
Quite right.... However have you actually looked inside the manifolds at how they are ported and finished off? There arent any 'sharp'
corners inside at all. They are smoothed off nicely.
I agree a straight inlet runner would be preferable. I even have the tools and skills to re-space the carbs accordingly, but like I said... lazy...
Even re-spaced there would have to be a curve in the inlet manifold to position the carbs at the correct angle - would it be better? Yes, but still
not perfect.
It all depends whether you are chasing the last few HP or not. I'm not, so chose to take this route. If it was a race car and I was going for
maximum power I would have fitted throttle bodies to tuned length, straight inlet runners (actually matching the port angle in the head too) but
I'm not. So this will do.
SJ - 4/3/20 at 11:15 AM
quote:
Respacing is a faff and quite expensive, which is the main reason people don't do it
I agree it's a faff but for anyone with access to a lathe it's not expensive at all.
Memphis - 4/3/20 at 12:27 PM
quote:Originally posted by SJ
quote:
Respacing is a faff and quite expensive, which is the main reason people don't do it
I agree it's a faff but for anyone with access to a lathe it's not expensive at all.
Most people don't have access to a lathe, so they pay for it.
SJ - 4/3/20 at 01:09 PM
quote:
quote:
Originally posted by SJ
quote:
Respacing is a faff and quite expensive, which is the main reason people don't do it
I agree it's a faff but for anyone with access to a lathe it's not expensive at all.
Most people don't have access to a lathe, so they pay for it.
All you need is the fuel rail turned. Think mine cost about Ł30.
Rest is some threaded rod, ali tube and bits of steel to extend the throttle tabs. Costs buttons.
jacko - 4/3/20 at 05:33 PM
Sorry if I've opened a tin of worms but as has been said above most of these cars are road cars not race cars and a small bend is not going to
make that much difference
I would like to say the engine I built was / is as far as I know as good as the day I built it
And as I was told years ago you need a bit of turbulence in a manifold to help mix the fuel and air
But of course I may be wrong as I often am lol
Graham
flak monkey - 5/3/20 at 06:51 PM
Drained the oil from the first run and refilled with fresh and a new filter, all looks OK at the minute. Using cheapo 20w50 mineral oil for bed in.
Stripped the carbs off (again) - it would intermittently run on 2 or 3 cylinders, after making certain it wasn't an ignition issue (it
wasn't) it was time to pull the carbs. It was always likely to be fuel as cold starting was a nightmare.
Appeared the idle jets were at least partially blocked. Fired up spot on after refitting. Balanced the carbs and tweaked the idle mixture a little.
Will see how it starts from cold again tomorrow.
Cooling system seems to cope OK, although it's not building pressure. I put it down to the cheap crappy header tank as there are no leaks.
I've already put a genuine Ford cap on it, but it's still not pressurising. The fan and everything seems to work though, so I'll just
get a genuine tank at some point.
Next job is clip the fuel hoses at the back, fit a different oil pressure send that doesn't need a load of adaptors, and tidy up a few cables.
Then its going to have to wait until we can find some money for the bodywork. And I have a bike to get mSVA'd before that can happen!
jacko - 5/3/20 at 07:28 PM
Fantastic work and the pinto sound brings back memories
Graham
SJ - 5/3/20 at 08:24 PM
quote:
Appeared the idle jets were at least partially blocked. Fired up spot on after refitting. Balanced the carbs and tweaked the idle mixture a little.
Will see how it starts from cold again tomorrow
Are you using the choke? Makes a big difference on my zx6 carbs.
Stu
flak monkey - 5/3/20 at 09:09 PM
quote:Originally posted by SJ
Are you using the choke? Makes a big difference on my zx6 carbs.
Stu
Yup. Wasnt working properly before. Nothing a strip down and compressed air couldn't fix it seems....
SJ - 5/3/20 at 09:14 PM
I've been amazed how well bike carbs work. Mine stands for months on end and fires up pretty much on the button.
Are you planning a rolling road setup session? I did mine at home but quite tempted to let Atspeed have a go.
flak monkey - 6/3/20 at 09:14 AM
quote:Originally posted by SJ
I've been amazed how well bike carbs work. Mine stands for months on end and fires up pretty much on the button.
Are you planning a rolling road setup session? I did mine at home but quite tempted to let Atspeed have a go.
I've got a WBO2 to fit - so will see how it goes....
Deckman001 - 6/3/20 at 08:36 PM
Hi,
The bike carbs on my old locost that I've got back and rebuilding since i sold it ten years ago, I drained down the petrol, flushed out the very
yellow liquid it had turned into in the tank, pipes and carbs, refilled the tank with about 5 ltrs and they worked straight away when i got the new
ignition system installed, so all in all I'm sure bike carbs seam fabulous, although my car now has a deep throated bang/pop from the exhaust
occasionally while ticking over? it does make me smile though
Jason
flak monkey - 6/3/20 at 08:40 PM
quote:Originally posted by Deckman001
Hi,
The bike carbs on my old locost that I've got back and rebuilding since i sold it ten years ago, I drained down the petrol, flushed out the very
yellow liquid it had turned into in the tank, pipes and carbs, refilled the tank with about 5 ltrs and they worked straight away when i got the new
ignition system installed, so all in all I'm sure bike carbs seam fabulous, although my car now has a deep throated bang/pop from the exhaust
occasionally while ticking over? it does make me smile though
Jason
Sounds like it's a bit lean.
Would probably benefit from a strip and clean if they have sat with old fuel in
Deckman001 - 7/3/20 at 11:44 AM
quote:Originally posted by flak monkey
quote:Originally posted by Deckman001
Hi,
The bike carbs on my old locost that I've got back and rebuilding since i sold it ten years ago, I drained down the petrol, flushed out the very
yellow liquid it had turned into in the tank, pipes and carbs, refilled the tank with about 5 ltrs and they worked straight away when i got the new
ignition system installed, so all in all I'm sure bike carbs seam fabulous, although my car now has a deep throated bang/pop from the exhaust
occasionally while ticking over? it does make me smile though
Jason
Sounds like it's a bit lean.
Would probably benefit from a strip and clean if they have sat with old fuel in
Yeah sounds about right, I'll keep an eye on the plug colours and asses them before i book the IVA.
Thanks Sera, great advice as usual
Jason
Big T - 16/3/20 at 05:45 PM
Certainly not hanging about with this. Will keep an eye on your progress. Do you have a deadline you’re working to?
jps - 16/9/21 at 10:50 AM
Any update Sera?, I was enjoying watching your progress and just looked back on the thread to remind myself of the Polo rad/pinto piping arrangements…
flak monkey - 16/9/21 at 11:17 AM
quote:Originally posted by jps
Any update Sera?, I was enjoying watching your progress and just looked back on the thread to remind myself of the Polo rad/pinto piping arrangements…
I sold it as a part finished project a couple of months ago. I'd simply run out of bandwidth to do it and it's better that it went to
another person to get it finished.
jps - 16/9/21 at 12:30 PM
quote:Originally posted by flak monkey
I'd simply run out of bandwidth to do it and it's better that it went to another person to get it finished.
A shame - was a good (and motivational) watch to see you roaring through it - but understandable, I know at times in the past my project has felt like
a millstone round my neck!


 mental sod