
Help with AC TIG aluminium pointers please.
AdrianH - 23/11/14 at 11:44 AM
I am burning more holes in thin aluminium then I care to admit. So a couple of questions if I can to the experts on here.
Just trying to weld two pieces of 1.6mm sheet together, what would your initial settings be.
What size tungsten, 1.6mm or 2.4mm, trying 1.6mm at present
What amperage, I have tried from 30 to 60 Amps
What AC balance typical trying around 40% positive
What cap size, I have choice of 5, 6 and 7.
Typically using post gas of around 5 secs and ramp up and down of around 2 to 3 secs. Pure Argon with around 10 lpm flow rate.
Wondering if I need to have some backing with the thin aluminium to stop it dropping away. I am limited to scrap aluminium at the moment to play
with, have thin body panel pieces and some big lumps of bar and block.
R-Tech 161 is the machine
Cheers
Adrian
mark chandler - 23/11/14 at 12:12 PM
Settings sound fine.
It's not clean enough, rub with a scotch bright pad, even marker pen lines with screw up your welding.
Also give the rod a clean before use, I bet you are getting balls of weld as it runs away.
When you strike the arc the ali should go shiney and plastic looking, then dip in the rod, if butt joining you will not even need any filler rod if
the parts are matched perfectly.
To get the nice fish scale look takes technique, if you loiter then they melt into each other.
Do not get hung up on caps, use one that allows you to see the work and the 1.6mm tungsten, I find a slightly off vertical leaning back from the way
of travel suits me best.
[Edited on 23/11/14 by mark chandler]
907 - 23/11/14 at 12:38 PM
A couple of tips to go on with.
Sharpen the tungsten and then turn the amps up and arc up on thick bit of scrap to round off the tip.
Turn amps back down to welding current.
30 to 35 ep is plenty.
When starting, especially tacking, the edges want to melt away from each other so no gap,
no ramp up or soft start. Straight in with the full current and the edges "jump" together.
As my teacher at college once said; "now practice that and come back in 6 months and show me how it's coming on." 
He was a wonderful man.
Paul G
cloudy - 23/11/14 at 12:48 PM
Can you use a pedal? I find it makes life much easier!
owelly - 23/11/14 at 12:54 PM
And if you're using a wire brush, make sure it's a stainless one!!
coozer - 23/11/14 at 01:23 PM
I know a man who can weld ali foil, he's a coded off shore welder so I reckon its down to experience and good skills. Also the machine he has in
the garage is quite impressive.
Practise with the settings and what not to get a good feel of what you need doing.
AdrianH - 23/11/14 at 02:40 PM
I will have a go at grinding the tip, it has gone to a general ball now so could probably do with it.
I will also initially turn off the ramp up/down and give a shot at that. I can reduce the ep to 30 % again so will drop it a little.
Thanks for the replies, If I manage to get anything to stick, I could always post a picture.
Adrian
[Edited on 23-11-14 by AdrianH]
ashg - 23/11/14 at 05:58 PM
get some 2 or 3mm bits of ali to learn on. just put it on 50% turn ramp up off and ramp out on to about 1-2 seconds if you dont have a foot
pedal.
if you dont have a pedal.
put the amps up high, give it a wack to get it started then stop once the two pieces have a tack between them. once you have the join stop welding
turn the amps down and carry on. the ramp out really helps, if you find the weld pool is getting too big the further you get along the weld. you
just take your finger off the button, the welder stays on but starts fading out the amps which lets you get the weld pool back under control, for a
fraction of a second then back on the button and the power builds back up.
if you have a foot pedal then life is 100X better as you can do all the modulation of the current s you go.
the biggest problem with welding ali is not the actual welding its understanding how the material behaves with heat.
its very hard to get heat into ali so to get the weld going you need to put lots of power into it. once its going you need to back the power off.
but there comes a point where the whole piece of ali has heated up later along down the weld so the weld weld pool grows and grows the further you get
down the weld, to combat this you have to continuously back off the ams as you go. without a pedal its hard but if you use the ramp out function on
the welder and just take your finger off the button when its starting to get away from you you can usually pull off a nice weld.
the other point is to be patient.
Talon Motorsport - 23/11/14 at 08:11 PM
What no body has even mentioned here is you could do with a heavy brass backing block to use as a heat sink/soak to stop the material just absorbing
the heat from the weld pool.
AdrianH - 23/11/14 at 09:16 PM
A bit more practice in the workshop and getting further, went out to the largest cup (7) I had and also turned the welder away from the work. The fan
from the welder was blowing into the area, not helping me.
Also found that the regulator would not work down to 8 lpm so had to be around 10 to 12 lpm to stop the gas pulsing!!!. So say 12 lpm and large cup
seems to be a better bet for me on the thin sheet I am playing with, it's 1.5mm thick stuff.
Yes I do find that as I get further in to my play pieces then the wider the weld pool becomes and towards the end of the sheet I can still loose it to
a big hole. So yes I can only think it is the heat in the work piece building up.
I have now placed a 5 mm sheet plate of steel down on the bench, only about 8 inch by 12 inch and I am using that with the sheet laying on it to act
as a heat shield and electrical contact. Lots better then trying to weld in the air.
I do have a foot pedal, but will not migrate to that yet, a small step at a time I think, get my basic controls working then move to another etc.
I can fair use up my filler rods on these practice sessions.
Still on 1.6mm tungsten and seem to be settling for around 50 Amps
Adrian
FASTdan - 24/11/14 at 08:59 AM
If you've got a pedal I'd just start using it - you might have a half hour of frustration (patting your head and rubbing your belly!) but
once it clicks it will make life a million times easier on aluminium. With a pedal, and amps down at probably 80A (thats max of course, you are now in
control with your foot) you can arc up with a small amount of pedal and literally melt nothing away even on 1.6mm material. Once the arc is stable you
can ramp the heat up or down at your pace.
Remember that whilst you are now in control of amps with the pedal, you still need to set max amps according to the work piece - because you get much
greater modulation on the pedal so finer control when the max amps are set roughly correct.
Don't worry about the tungsten being a ball - this is quite normal, a shiney round tip (not bigger than the tungsten dia) is good.
AdrianH - 1/12/14 at 11:37 PM
I am learning a bit more, have gone over to DC Tig on steel for a while, it is cheaper for me, I have more steel around, still managing to balls
things up though.
Still needing to sort out the work area, its a pain standing up over the work!
Thanks all for your help. Trying to find a local trainer, not with much success at the moment.
Thanks all.
Adrian
cloudy - 2/12/14 at 12:00 AM
Have to agree with FASTdan - I wasted hours trying to piddle around with the torch switch for the same reason, start with the basics. For me at least
as soon as I moved to the pedal - everything was so much easier!
PS also found the regulator flow rate readings inaccurate - ended up adding a ball float type flow meter in line
James
[Edited on 2/12/14 by cloudy]
blakep82 - 2/12/14 at 12:58 AM
So, today I spent my 3rd an 4th hour practicing tig on 3mm steel, finding it very difficult, messy, lumpy and full of holes, then I suddenly knocked
several of these out
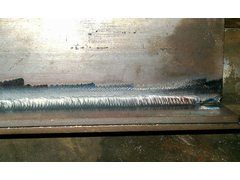
Description
Admittedly quite smug with it, and not much help with your aluminium, but all I can suggest it for me (no pedal in this case, and set to 100a, very
short slope in) things started getting a whole lot better when I got the electrode real close.
I started with the tungsten quite far away, and the arc being wider at a distance was heating the edges, but not right into the corner (its a fillet)
Doing a butt in aluminium, perhaps you are heating too much up? Ie too wide?
Get right in close, tungsten only about 1mm away from the pool, but without touching! When I got that sorted, the aim of the arc made things a whole
lot better
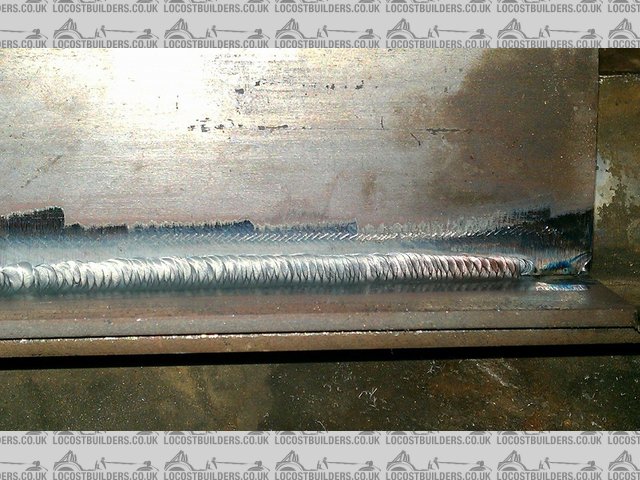
Heres one from one of the other guys
Description
[Edited on 2/12/14 by blakep82]
AdrianH - 2/12/14 at 07:19 PM
I do have an in-line flow meter and also a stick on the end of the gun type, they are within a couple of digits of each other.
If I get chance to go in the workshop/garage tonight I will keep practising.
On steel I keep dipping the tungsten so I am too close. I should be spending more time cleaning up the steel as it is oxidized or has that scale on
it, mig would normally cut through and not be an issue but Tig seems to be a lot less, shall I say aggressive?
I know that cleanliness is all for aluminium, even with the A.C. cleaning action.
I will get there, just depends on how long it takes me.
Thanks for the comments and tips.
Adrian
ashg - 2/12/14 at 08:23 PM
you need the tungsten much closer to the workpiece when welding aluminium compared to steel.
when tig welding, sit down get comfortable and rest your torch arm on something. i find a bit of oak useful as a hand rest when the piece of metal
your welding is also where you need to rest your hand as it doesn't heat up as quick as the metal and is less likely to catch fire than
softwood.
if you have the pedal use the pedal!!!! its what its for.
mark chandler - 2/12/14 at 08:57 PM
As above, do not TIG standing up hoovering over the work, make yourself a bench that you can sit at, rest your arm and be comfortable. Your work rate
and quality will improve immediately.
[Edited on 2/12/14 by mark chandler]
Oddified - 2/12/14 at 09:57 PM
I found with tig welding, clean clean clean the metal, more so with aluminium as it makes all the difference. The better the fit between parts the
easier it is too, and have confidence, once you get the weld pool get going.
I have a different machine and i'm not professing to be an expert, but i'm only in Clitheroe if you need help...
Ian
froggy - 3/12/14 at 02:57 AM
I've got the same machine and getting yourself comfortable and doing a dry run for every run you do so you can get across without altering your
torch is a good idea too . As said elsewhere I have a few lumps of wood to use as a rest on smaller jobs and a strap to hang the torch off when doing
big stuff where you have to stand up so you aren't having the weight of the torch lead to deal with .

I'm self taught but with ally I tend to move the torch in small steps rather than try to continuosly move adding filler with every step to get
the stack of dimes effect . With the pedal its a lot easier but the key for me is getting your torch hand steady and keeping the angle and gap
consistent or you'll be forever dipping the tip into the pool
AdrianH - 3/12/14 at 07:32 AM
Thanks Ian for the offer.
I am working on the work area, but have a lot to clear to get a working area yet. Have the benches but full with a gearbox, two engines an old
Oxford welder and other odds and sods, slowly clearing areas and will get further again weekend.
The torch cable is heavy and have tried placing over the shoulder etc, that’s a neat idea. Sky hooks!
I actually bothered to find out about my gas flow last night, i.e. read the gauges and realised my reg reads lpm and not fpm, so pushing a bit more
gas then I should.
Trying to pick up a steel plate for the top of the bench if I can today.
Cheers
Adrian
mark chandler - 3/12/14 at 09:49 AM
I struggled with those big heavy cables so use a small water cooled torch, they can carry a heavy current in a very small package.
For a water cooler I used an old central heating pump with a gallon reservoir which I bulit into my welding trolley, this does the job perfectly well
for pennies, torch cost maybe Ł50 from China with a box of nozzles etc.
froggy - 3/12/14 at 11:05 AM
I try and set up any job so the join if it's a box etc is facing me so I'm moving the torch toward me with the job propped up so the torch
is vertical if you get me . This way I can see the edges clearly and for me it's easier to see if it's sinking or the pool is spreading as
it heats up and I can see the tip gap a lot easier this way .
AdrianH - 3/12/14 at 10:11 PM
I would not be able to justify another torch at present, so will have to manage with the 26. I did buy a 1000 x 600 mm 6mm thick steel plate for a
small welding bench.
It cost Ł25 and should provide a large heat sink if required. It will sit atop mdf on the bench soon.
What was UN-nerving what the metal guillotine that sliced it, some power in that.
Adrian


