4.3L TVR Rover V8 into a Fisher Furyscudderfish - 12/1/12 at 03:14 PM
I thought I'd start a thread to document my folly, mistakes, and idiotic ideas to forewarn anyone else who thinks this is a good idea. I bought
my car a few years back already fitted with a 3.5 Rover V8. Over time, I ditched the carbs and dizzy and went Megasquirt and EDIS.
At the back of my mind though, it never felt as fast as it looks and sounds. I got it onto some rollers last summer and it was measured at 160bhp. A
perfectly respectable number, but I wanted more! I went fishing for info over at http://www.v8forum.co.uk It boiled down to that to get 210-220 out
of my 3.5, I'd need new heads (Ł1.2k+) and a new cam (Ł150-Ł400). All a bit pricey for me. Whilst glumly browsing that forum, I saw advertised
a 4.3L V8 from an 1992 Griffith. For Ł600. Much nearer my budget!
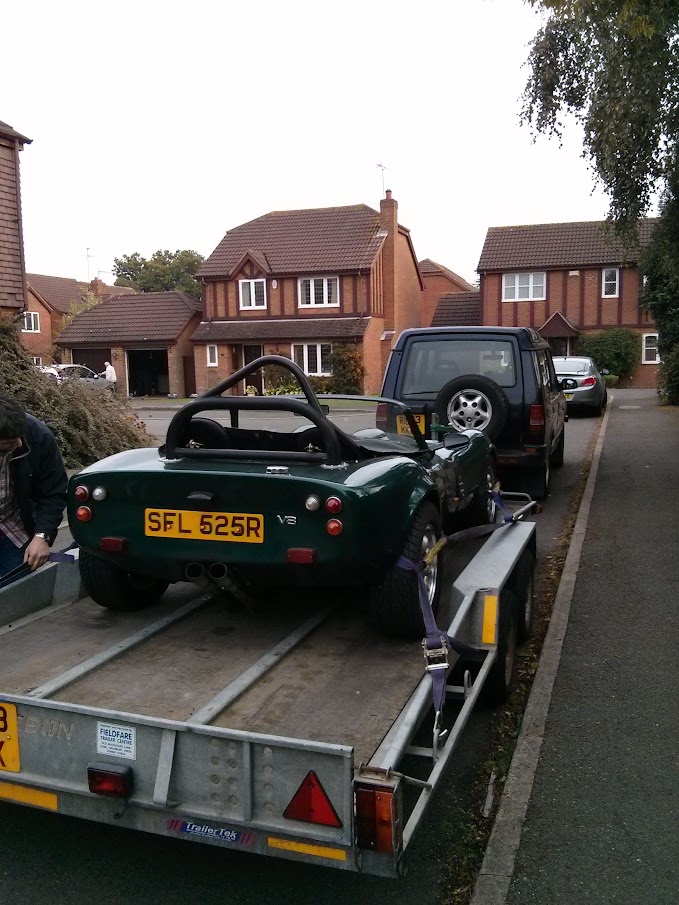
Today after faffing with incompetent pallet shippers, it's sat in my garage.
It needs a new cam, rings, bearings and a bunch of parts from my current engine (alternator, bell housing, inlet manifold etc), but it seems sound. I
may throw in a lightened flywheel whilst I'm at it. I should still end up spending less than upgrading my 3.5.
Now the closest I've come to getting inside an engine before was changing the oil. This is going to be a learning experience, and probably a
comedy of errors. I comfort myself with the idea that if I completely screw up, I've still got the original engine. I'm going to update
this thread as I make progress.
Wish me luck!
tegwin - 12/1/12 at 03:32 PM
Nice project!!! And plenty of space between the cylinder banks for a supercharger!
BigMac - 12/1/12 at 04:24 PM
Will be following this thread with great interest!
I'm sure there's plenty of people on here that would be more than willing to chip in with advice and help if you get stuck!
Good luck with the project!
MakeEverything - 12/1/12 at 07:05 PM
Good effort. It does need a supercharger though!!
Stay away from JB weld too!!!
dlatch - 12/1/12 at 07:10 PM
good luck with the engine swap it should indeed give you some more ponies to play with
scudderfish - 13/1/12 at 09:12 AM
Plan for today is get it up on the engine stand and whip the heads off. I would have got it on the stand yesterday, but all the mounting points are
imperial and I've had to order some in, hopefully turning up at lunch time. I need to get the heads off as I've got conflicting info as to
the size of the pistons and I need to order some new rings. The previous owner threw in a ring compressor tool with the engine, but unfortunately it
got crushed.
Once the heads are off, I'll flip it over, get the sump off and then get the crank and pistons out. Then I'll look at the big pile of parts
and think "what the f*ck am I going to do with that lot!"
Photos to follow.
Irony - 13/1/12 at 09:31 AM
Best of luck with the build mate. I feel for you as my car has a untested engine built by me in it (unstarted as yet). I am worried about all sorts
of things with it.
Hopefully you should see somewhere up to 280bhp with that little beauty. Great engine swap really as literally everything should fit back together
perfectly.
scudderfish - 13/1/12 at 10:38 AM
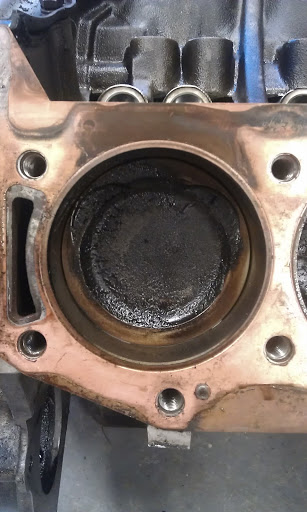
I took the head off, and this is what I found.
Pistons!
The crud on the top is soft, I can push it around with my finger, so I assume (a phrase I'll be using a lot) that it should just clean off.
Surprise number one was that the bore is 94mm, the same as 3.9/4.0/4.2/4.6 engines. I had read elsewhere that the 4.3 used 89mm pistons from a 3.5
and had an unusual crank to up the displacement. I guess you can't trust everything you read on the net
Facing the pistons we have :-
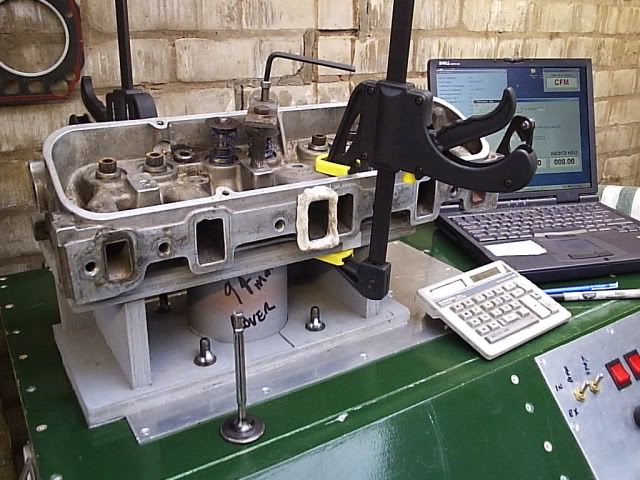
Valves!
Anybody care to interpret the colours of them? Again, more crud to clean. What's the best/easiest/cheapest way to do that without buggering it
up?
It looks like some work as been done porting the head, which is nice.
The engine now looks very lopsided
Chippy - 13/1/12 at 10:47 AM
Looks like a new set of rings are a definate, bit too much oil in the heads. For the cleaning I would suggest using either Gunk or Jizer as after
washing off leaves a thin oily film so things dont go rusty so quickly. HTH Ray
scudderfish - 13/1/12 at 02:58 PM
Well, I've made my first cock up. It turns out I need 3/8 UNC bolts to fit it to the stand, not 5/16. It's staying on the floor until next
week now
The previous owner noted it's thirst for oil so I expected that I would be fitting new rings.
Anyone near Harpenden with a set of 4 3"+ 3/8UNC bolts?
MakeEverything - 13/1/12 at 08:07 PM
Aah mate, nightmare! Looks good though. Some nice soda blasting should clean that up lovely.
scudderfish - 14/1/12 at 06:48 PM
It looks like the engine has suffered from the 14 bolt head problem. Until '95, the heads were held down with 14 bolts, after 95 the four
nearest the exhaust were deleted. They caused a slight distortion which would let a small amount of combustion gases to vent into the central valley.
You can see it clearly on the gasket here :-
The solution is simple though, don't torque down the outer 4 bolts so much!
I got the other head off (looks much the same as it's partner), and the water pump. The water pump has signs of scoring inside, so I may replace
it rather than refurb.
I'm now stumped. I can't get the oil pump off to get at the timing gear without removing the sump, and I can't get that off until
it's off the floor. I'm off to my favourite bolt shop on Monday.
Xtreme Kermit - 14/1/12 at 07:46 PM
Keep it up David!
Looks like great fun!
It's a long time since I saw the inside of a V8. The only advice I would give is to ensure you know where each part came from eg valves, springs,
caps bearing caps, etc so you can get 'em back in the right place.
Also, don't just lay things in a tray on the floor and assume you're not going to kick it all over the shop...
quote:Originally posted by deltron63
Go on , you know you NEED it
+1 scudderfish - 20/1/12 at 06:25 PM
More progress!
My flywheel is looking a little rusty
After a lot of faffing (and incompetence on my part), I finally managed to get hold of some 3/8" threaded rod to make up some fixings to get it
up on my stand :-
I've also made a good start at cleaning the heads
I originally bought some Gunk, but it didn't touch the stuff burnt on. I was browsing Amazon and came across
this stuff and
it worked a treat. Ł1.68 for 750ml is not bad VFM.
All the pistons are now out, and today I planned on getting the crank & cam out. To do that I needed to get the front cover off. To do that, I
needed to get the oil pump cover off. To do that, I needed to get this bolt out.
Unfortunately, my I couldn't get my 5/16" socket on it because of the filter fitting, and my 5/16" spanner had gone AWOL After
visiting a load of places (thanks Richard) and hearing a lot of teeth being sucked, I gave up and assumed I'd have to get one by mail order. I
rang a few places and found one in Hemel Hempstead who not only had one, but pointed out that 8mm is only 2 thou different to 5/16". With a
little persuasion (mainly clearing off the accumulated crap), I got an 8mm spanner on and whipped it off. The cam is now out (and in a very sorry
state), but the crank is still there as the bolts holding it down are soaking in WD40 overnight. Crank out tomorrow.
Irony - 20/1/12 at 06:54 PM
Looks like your having some serious fun with that. What is the flywheel compatible with? The flywheels that use the SD1 bellhousing are not cheap (I
know I bought one from RPI) so I would look at reusing the old one. I am assuming from memory your mating to a LT77 or R380. I think you can get
them skimmed but don't quote me on that. I must admit I have never seen one with as many balancing holes as yours.
This will transform your car - I am quite excited for you!
craig1410 - 20/1/12 at 08:05 PM
Hi,
Looks like good fun. A few suggestions from me:
1. Cleanliness is essential when engine building. Wrap up any parts in clean plastic after removal, especially when they are still covered in oil etc
which will make dirt stick to it. Extremely important to put a big bag over the engine when not working on it and use masking tape to seal up the
bores. Anything you can do to stop dirt getting in is really important.
2. Be very careful with any mating faces such as cylinder heads and block faces. This is an all alloy engine so it's very easy to damage them.
Put the heads down on clean corrugated cardboard, don't leave them face up ready for you to drop a spanner or bolt on them. You would be well
advised to get a minimal skim done on the heads to true them up. Be aware that there is a thin gasket and a composite gasket for the RV8. The
composite is thicker but more reliable so if you are going from the thin one to the composite then you can take more material off the head when
skimming to retain the same comp ratio.
3. There are a number of possible reasons for oil consumption. Don't assume it is the piston rings. If replacing the rings though, ensure that
you get the bores honed with a cross hatch pattern to help 'cut' in the new rings. Otherwise they won't bed in and will seal very
poorly. You *can* do this honing yourself but I'd suggest getting it done professionally. Check bore wear before deciding on a hone versus a
rebore though. Note a rebore will require new pistons so figure out the clearances before ordering new piston rings as you might need larger pistons
too.
4. Check crank journals carefully and get new bearings to suit. When measuring, check from several angles to see if they are actually round. You can
expect the existing bearings to be badly worn. RV8's usually have worn bearings but due to the high flow, low pressure oil system they can
tolerate worn bearings very well.
5. Mark every part for orientation and where it came from and put them all back. Bearing caps are very important, as are piston positions, valves etc.
Take lots of photos as you disassemble too. Store all the parts methodically in bags and tubs etc along with nuts and bolts etc.
6. Get a good book on RV8 rebuilding and read it thoroughly. It's a forgiving engine in many ways but if you build it well it will purr like a
kitten! Worth taking extra care to achieve this. Consider blueprinting techniques as you build. You can gain some extra power for not much effort. See
ISBN 1-884089-26-7 and 1-557-88245-2 and 1-855-20528-9
Have fun!
Jealous!
C.
scudderfish - 21/1/12 at 11:09 AM
This is why I started this thread so people could point out areas I could screw up, or things I had already screwed up On the head gasket front,
this engine actually takes a third route. TVR fitted them with copper gaskets which are supposedly reusable. However as you can see, they are
showing signs of blow by from being 115,000 miles old and 14 bolt heads. I'm going to replace them with new, but it's going to hurt at Ł60
each.
What are the other reasons for oil consumption? I assumed the rings given the amount of burnt oil in the combustion chamber, but I'm not
knowledgeable about details. I'm going to get a local company to hone my cylinders for me and give it a look see.
The crank bearings looked OK to me, no sign of copper to my eye. However the engine came with a new set of bearings anyway so I'll replace them
anyway. I've cocked up on the positioning though as I have no idea which piston is which
Thanks for the book recommendations. I've got the last one, and I've just ordered the second one from Amazon.
I'll post some photos of the camshaft later, I think it's a testament to what these engines will put up with.
scudderfish - 21/1/12 at 12:55 PM
One of these lobes in not like the others....
Xtreme Kermit - 21/1/12 at 09:46 PM
What's the problem scud?
It's got some lumpy bits on it...
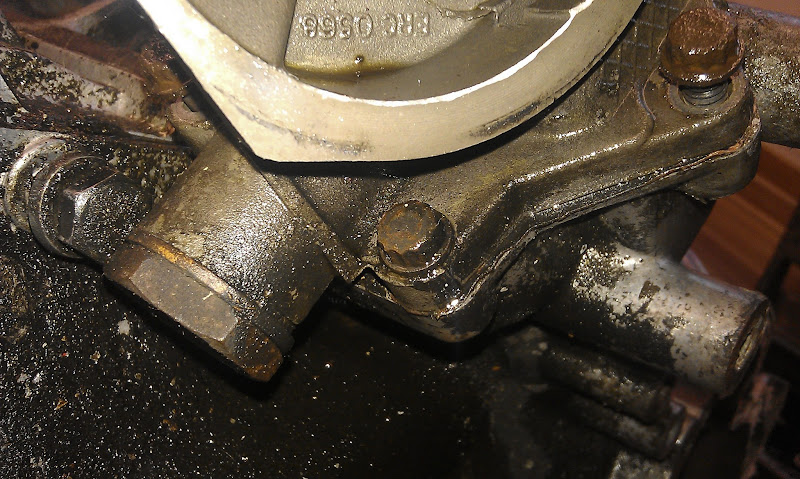
scudderfish - 23/1/12 at 08:23 PM
I'm glad I wasn't planning on reusing the oil filter housing.
Xtreme Kermit - 23/1/12 at 09:09 PM
Something not quite right there
Is that a normal area of wear?
scudderfish - 23/1/12 at 09:12 PM
quote:Originally posted by Xtreme Kermit
Something not quite right there
Is that a normal area of wear?
It's not unexpected, but it's worse than I thought it would be. The part was always going to be junk as it won't fit in my car;
I'll be using the remote housing fitted to my current engine. I just hope that is in better condition.
scudderfish - 30/1/12 at 07:09 PM
I'm a bit stumped. The crank is held down by 10 bolts which are meant to be torqued to something like 70lbft. I've just had a go with a
450Nm (330ish lbft) impact wrench and it didn't budge them
l0rd - 30/1/12 at 07:24 PM
Well you only had a go, what do you expect.
Try it a couple more times
Apply some heat and try again?
gazza285 - 30/1/12 at 07:58 PM
Give them a crack with a hammer first.
scudderfish - 2/2/12 at 03:24 PM
Aha! Got the buggers out!
After a bit of advice from v8forum.co.uk, I strapped the block to my car, stuck a 3ft pole to my 3ft breaker bar and gave it a (very) good heave.
Once one had gone, I was a lot more confident about the rest.
To my untrained eye, the crank bearings look OK to me, but I'm going to replace them anyway.
The block has now gone to Power Units in Hatfield for them to hone the bores and give it a bit of a
wash. Time to start ordering more bits.....
Chippy - 2/2/12 at 04:56 PM
Shell does look fair, but its definately a false economy to not replace the shells when rebuilding an engine, no matter how good they look. IMHO.
Regards Ray
MakeEverything - 2/2/12 at 06:45 PM
Dave, That crank looks brand new! a good buy i think.
Worth checking with power units what "Cleaning" they are going to do. When i spoke to them last, they didnt clean the block, just worked
it. They said " But we do give it a wipe over"... Further questioning identified the wipe over to be of the mating surfaces!
Irony - 6/2/12 at 04:10 PM
Those bearings look okay but I would replace them anyway as they are quite cheap. The trouble with these engines is that you can keep on replacing
parts seemingly forever until you've spent a small fortune. Different people have different opinions on what should be replaced when building.
It depends on your cash pile I suppose.
scudderfish - 6/2/12 at 04:41 PM
A new set of crank bearings came with the engine, so it'd be rude not to replace them. It's getting new valley, oil pump, water pump, and
rocker gaskets and rings. I got a nasty shock with the head gaskets though, a replacement pair is Ł160 and they're not available. The composite
head gasket is 0.14mm larger than the copper one. Tin ones are almost exactly half the thickness of the copper, I could always stack two.....
Irony - 7/2/12 at 10:07 AM
I am sure someone over on the V8 forum can help you with the costly gaskets. It might be a idea to ring V8 Developments, V8 tuner or RPI and ask them
what they would do. I am sure V8 devs or RPI will have the answer.
scudderfish - 9/2/12 at 05:06 PM
I couldn't face the cold today so my block is still at Power Units, I'll get off my arse tomorrow. I do have some good news on the head
gasket front though. I was wrong about the copper gaskets, they are actually the same thickness as a composite one, so I've ordered a pair of
them from V8 Developments along with a few other odds and sods.
scudderfish - 17/2/12 at 12:00 PM
OK, next problem. The external core plugs are rustier than my CSE French. How do I get them out?
Davegtst - 17/2/12 at 12:03 PM
Hammer an old screwdriver through and lever them out.
Success! Local odds & ends shop had a big screwdriver for Ł1.99. Several large smacks and they twisted enough to get some mole grips on and
wiggle them out.
Regards,
Dave
robinj66 - 17/2/12 at 03:16 PM
You're a lucky boy - that look like a nice engine to play with (and TVR have done some of the work for you anyway).
Not sure you will need to lighten the flywheel on that - might be prudent to weigh yours and then get the standard weights from Eg, V8 owners
forum.
The cams in these engines do tend to wear, expecially if the oil no longer has the additives (Inc zinc). That's why a lot of people recommend
stuff like Valvoline 20/50 etc.
If you need things like core plugs etc you should try some of the suppliers previously mentioned - I would also recommend JRV8.
I would buy a workshop manual to get all the torque figures etc - either the early Haynes or one of the other ones available on Ebay etc.
Whatever you choose to do, I'm sure you'll get a great deal of satisfaction im building your own engine. I found the RV8 to be very easy to
work on ( and I'm as cack-handed as they come )
scudderfish - 17/2/12 at 04:29 PM
JRV8 is about the only one I haven't bought something from so far Real Steel didn't have any core plugs in (but they did sell me a very
reasonable set of main studs and head studs), but I found some on ebay.
Here it is with the plugs out, I guess it's been running with red anti freeze
And now with the new plugs in
Xtreme Kermit - 17/2/12 at 10:57 PM
Photo fail Dave?
Edited to say - Aparrently not
[Edited on 17/2/12 by Xtreme Kermit]
scudderfish - 19/2/12 at 02:29 PM
More progress!
Cam in, assisted by Kate. I put the block so that I could drop it in vertically, made it a lot less fraught than getting the old one out.
ARP studs in. I got these (and the head ones) from Real Steel as they were cheaper than the same items from V8 Developments.
And the crank torqued down.
sebastiaan - 19/2/12 at 05:13 PM
Good progress!
It looks a bit dry in there, might be the photo's. I take it you have liberally coated everything with fresh engine oil before bolting the crank
down?
Keep it up, it's going to be one hell of an an egine!
scudderfish - 19/2/12 at 06:33 PM
Yep, there is now a load of kitty litter under the engine stand to soak up all the oil and assembly lube that fell through
SCAR - 19/2/12 at 06:56 PM
Nice thread this, I will follow with interest having just got hold of a 4.6 that was advertised as low mileage (72k). Haven't looked inside yet
but prepared for the horrors that may lie within. Intend to rebuild it if necessary or just dress it up nice and shiney.
scudderfish - 19/2/12 at 08:36 PM
Piston rings fitted. Unfortunately I got 3 piece oil rings for a total of 40 to fit. Maybe 4 cylinder engines do have some advantages after all....
scudderfish - 23/2/12 at 03:48 PM
Pistons are in.
First one was a git, the rings kept popping out of the compressor. Hitting it harder did the trick.
Xtreme Kermit - 23/2/12 at 08:15 PM
Great stuff. Many years since I did some piston rings, and I don't remember it being overly easy...
On a different tack, where are the thrust bearings on the RV8? I seem to remember these being useful things. At least the engine didn't last long
without them
robinj66 - 23/2/12 at 09:57 PM
quote:Originally posted by Xtreme Kermit
Great stuff. Many years since I did some piston rings, and I don't remember it being overly easy...
On a different tack, where are the thrust bearings on the RV8? I seem to remember these being useful things. At least the engine didn't last long
without them
they are on the middle (I think) main bearing. The earlier ones are one-piece and the later ones are in 3 (?) parts
scudderfish - 23/2/12 at 09:59 PM
Yep centre of the 5 bearings has thrust faces on it. You can just see half of them in the photo I posted above on 19/2/12 at 14:29
[Edited on 23/2/12 by scudderfish]
scudderfish - 24/2/12 at 11:16 AM
Cam followers and head studs in.
It was only when I opened the box that I found that 6 of the 20 were longer than the others. I had no idea which were meant to be longer, so I put 10
of one size in, dropped on a head and then noted which ones didn't poke through
I've got the old copper gaskets in place whilst I fiddle with checking lifter preload. They are the same thickness as my new composite gaskets,
but it doesn't matter how often I torque them down. I'll put the composite ones in on final fit.
It's beginning to look like an engine again.
Toprivetguns - 24/2/12 at 12:31 PM
I cant wait for the start-up video ! Great Progress
MakeEverything - 24/2/12 at 02:42 PM
Awesome work Dave.
Did you set the static timing before putting the chain on.
scudderfish - 24/2/12 at 06:18 PM
Yes, although the timing marks don't quite line up. The chain is a bit saggy so I'm probably going to replace it. This is where my
confusion is likely to cost me money as I see the following options, costing between Ł12 and Ł145
It would probably be a good idea to replace both the chain and the sprocket. If yours has nylon teeth then replacement is a must.
Can't remember what cam you're fitting but if it's a high lift job then you might want to splash out the extra on the vernier
adjustable sprocket. Otherwise I would go for the middle one of the options posted
ETA Once your engine is re-assembled, you might also want to check that the timing mark is accurate - find true TDC and don't rely on rover to
have got the timing mark right.
[Edited on 24/2/12 by robinj66]
scudderfish - 26/2/12 at 06:52 PM
Just got a vernier set from eBay for Ł47 Apparently done 28k so I may splash out on a new chain for it, but still considerably cheaper than a new
one.
Regards,
Dave
scudderfish - 2/3/12 at 02:31 PM
Small update, my vernier cam chain set finally arrived, as did the injectors from the ever so generous Froggy. I really need to strip the front end
off my current engine now, which is going to be awkward.
mark chandler - 2/3/12 at 05:03 PM
Tip for others that do not want to buy a vernier cam wheel set, you can carefully file a new keyway in the lower gear to set it up without any
detriment.
We used to do this to advance the cam slightly for additional torque when trialling landrovers, when you look at the cog you can see the keyway
relative to the gear teeth so we used to file additional keyway 1/3 further around slightly more offset to the teeth.
It is also worthwhile drilling two 3/8" holes from the cam valley into the back of the chain area, this allows oil to spill onto the back of the
chain which helps lubricate the the front end.
Especially important when the engine is tilted back to make it fit as this area can stay quite dry.
Regards Mark
[Edited on 2/3/12 by mark chandler]
scudderfish - 4/3/12 at 05:01 PM
I've seen those holes done before, but always from the valley side and I was concerned where they came out. I'm not feeling brave enough to
start drilling new holes in my block yet.
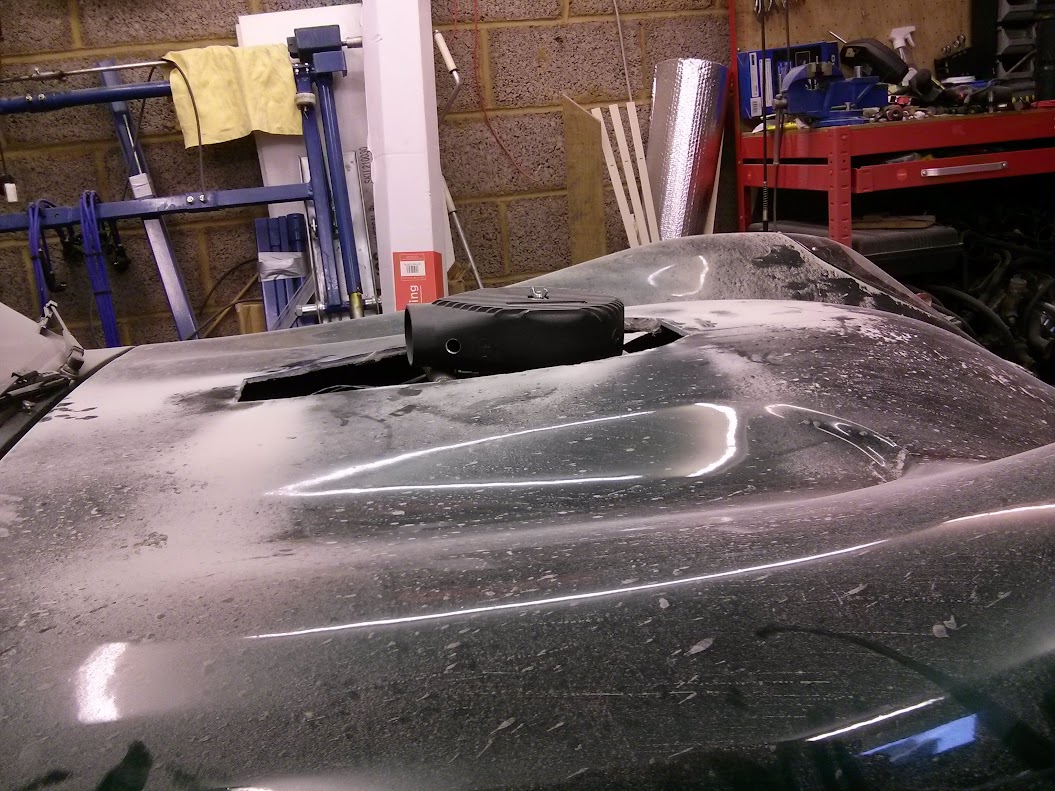
I haven't touched the TVR engine this weekend, I've done a few things to the car. First thing was take the bonnet off :-
I'd had the car up on stands to drain the oil and most of the coolant, but a fair amount of the latter came out when the car came back on
it's wheels.
I got the water pump off, but snapped a bolt. You can see the remains of it top left.
The vanes of this pump are quite different to the one off the TVR engine.
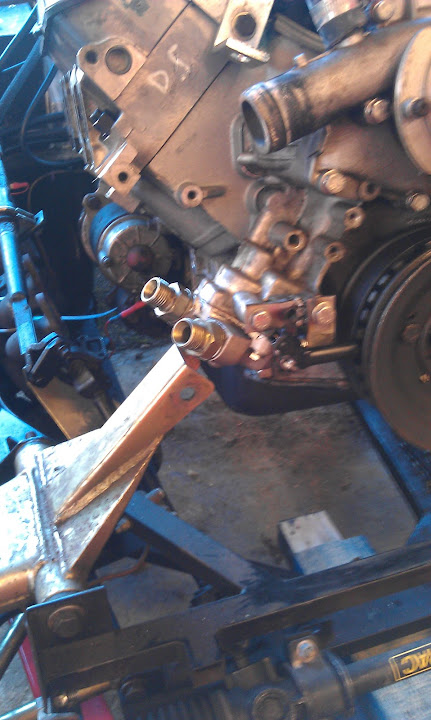
I also got the remote oil housing off.
There is some scoring, but a lot less than the filter housing I took off the TVR engine. My main problem is figuring out how to get the oil pipes
off, those nuts are about 27mm across and I don't have spanners that big.
Xtreme Kermit - 4/3/12 at 07:30 PM
So Dave, I take it from the earlier photo that the TVR water pump is toast. Are you going to use this one?
And, is the remote filter hosing usable as is or is it possible to re-surface it?
scudderfish - 4/3/12 at 08:50 PM
I was planning on not using the TVR water pump anyway as my current one is shorter. Space in my car is somewhat limited, and the current one is
shorter. Over the 30/40 odd years this engine was in production, there were quite a few variations in the front end and whoever built my car seems to
have picked the small bits. The remote housing is usable as is, but if I can figure out how to get the pipes off I'll have a crack at refacing
it. Mark Evans did exactly that in one of the episodes of 'A 4x4 Is Born'. Three episodes of that (all on YouTube) cover a similar strip
and rebuild of a Rover V8.
Regards,
Dave
mark chandler - 4/3/12 at 09:16 PM
I refaced mine, piece of glass with wet and dry on top.
If you can get hold of a landrover 101 cover it has oil cooler lines and takes the filter up the side of the block rather than below. its a much nicer
solution than a remote filter.
regards Mark
[Edited on 4/3/12 by mark chandler]
Xtreme Kermit - 4/3/12 at 09:54 PM
Could you use a pipe wrench on the connections if you haven't got a spanner to fit?
scudderfish - 15/3/12 at 05:09 PM
Not much to report. I got the front cover off my old engine and it is currently soaking in degreaser to get the accumulated crap out of it. I also
bought myself an engine crane as I found one on Amazon for Ł150 which seemed a reasonable price.
Xtreme Kermit - 15/3/12 at 08:38 PM
Nearly time for detling Dave... Time to get a shufty on
Xtreme Kermit - 16/3/12 at 08:39 PM
Hey Dave, Chris on the quantum list is thinking of V8ing his xtreme. What consumption did you get fom the 3.5 on MS before you started the swap?
stevebubs - 16/3/12 at 09:31 PM
quote:Originally posted by scudderfish
[snip]
There is some scoring, but a lot less than the filter housing I took off the TVR engine. My main problem is figuring out how to get the oil pipes
off, those nuts are about 27mm across and I don't have spanners that big.
Ł10 in Halfords...?
scudderfish - 1/4/12 at 09:03 AM
quote:Originally posted by Xtreme Kermit
Hey Dave, Chris on the quantum list is thinking of V8ing his xtreme. What consumption did you get fom the 3.5 on MS before you started the swap?
Oops, sorry I missed this. I got between 16 and 20mpg depending on driving and how much the engine was idling in the garage as I was tinkering. If
fuel consumption is a concern, don't fit a V8! As the joke goes, it can pass anything on the road, except a petrol station.
scudderfish - 1/4/12 at 09:10 AM
Small progress, life has been getting in the way of spannering. I got the front cover off my current engine and set about cleaning it. Whilst the
one that came off the TVR engine was spangly, this one was the definition of filth, thick black crud. I've finally got the vast majority off
apart from in the nooks and crannies that a toothbrush won't reach. I got the broken bolt out eventually (after WD40, heat & mole grips
failed) but welding a nut on. I also got the oil pipes off the remote housing by applying more violence with adjustable spanners and pipe
wrenches.
I was planning on getting most of the engine back together today, but discovered I'm missing a gasket between the block and the timing cover
I don't hold out much hope of my local Halfords stocking it, given that the last time I was in there the youth behind the counter was unaware
that an alternator was a common component of cars. Hi ho, hi ho, it's off to ebay I go....
Xtreme Kermit - 1/4/12 at 09:46 AM
Time for a stand and natter up the pub with the SG7s then...
See you there in an hour!
scudderfish - 1/4/12 at 05:15 PM
Got the heads on and torqued down. That gasket you can see hanging on the engine is the one I thought I didn't have. I found it when I was
hunting for my rocker cover gaskets. Shame I've already ordered a replacement...
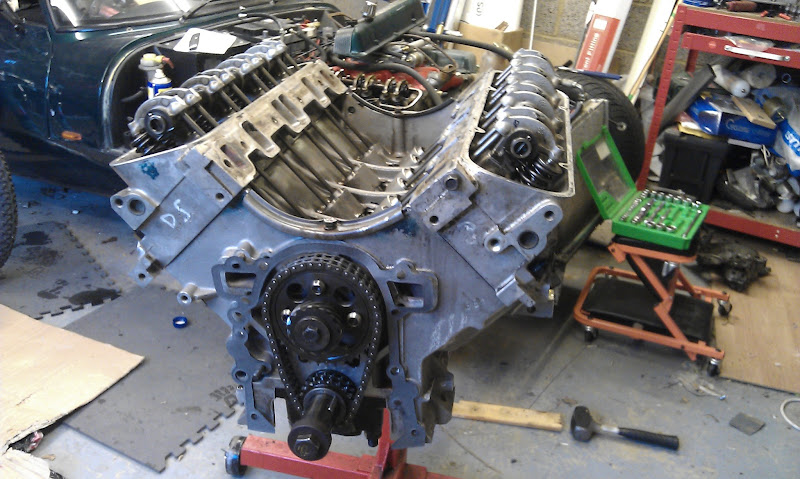
scudderfish - 14/4/12 at 12:06 PM
Activity!
I fitted the oil pump gubbins to the front cover. Kate helped by packing it with vaseline in prep for priming. 8 year old fingers are great for the
little jobs Then the water pump bolted up, and finally I got the front cover on the engine.
This cover and water pump are significantly shorter than the ones I took off, I'll post up a picture of the crank pulleys some time as a
comparison.
I've got my old rocker covers on, but I think with a bit of a tweak I'll be able to get the TVR ones under my bonnet. I'll try and get
the sump on this afternoon so that the engine is oil tight (right way up), and I can finally sweep up the kitty litter.
Regards,
Dave
scudderfish - 14/4/12 at 03:15 PM
Here are the two pulleys, TVR on the left, mine on the right with a trigger wheel
I also got the sump on :-
On reflection, I should have treated the surface rust and painted it, but I didn't actually pay much attention to it until I was dropping it on.
I'll do that the next time I change the oil, I just want to get on with this now as it's been taking too long.
Xtreme Kermit - 14/4/12 at 03:52 PM
Looks like a good day at the office!
MakeEverything - 14/4/12 at 04:25 PM
Excellent. You need to get it in and running in less than 12 hours to beat my record!
scudderfish - 15/4/12 at 01:50 PM
Boo!
Looking closer at one of the heads, one of the threads to hold the inlet manifold on is buggered :-
I'll have to take it off and give it to Power Units again to helicoil. The potentially tricky bit is that the hole is not at 90 degrees to the
face.....
I also made a start at stripping off the crappy flaky paint on my inlet manifold and got this far before realising a face mask would be a _really_
good idea.
MakeEverything - 15/4/12 at 10:18 PM
mate, 30 seconds with a sand blaster would be an ideal solution to remove the paint.... Itll etch it too for re-painting.
Regards the helicoil, what size is it? Dont pay Power units, its soooo easy to do.
scudderfish - 17/5/12 at 11:43 AM
Right a month has gone by and finally a bit more progress. I took the head to Power Units and they put in a threaded insert and then grinded it back
flush to the face of the head. A helicoil wouldn't have worked as well as the hole is not at 90 degrees to the face. I took the inlet manifold
over to Richard's and he did a great job of removing the paint (thanks!) He warned me that the surface would be porous and soak up any loose oil
(it's a RV8, there's going to be a lot of loose oil ) so I gave it a few coats of high temp black paint. It's not going to get that
hot, but it is what I had to hand. I quite like the matte black.
Getting the rocker covers on was a little tricky as the passenger side one fouls on the inlet manifold
Some deft use of the angry grinder got it together though.
scudderfish - 17/5/12 at 11:47 AM
I hit 'post' instead of 'preview', so this should have been part of the last post.
Next task is to get change how the engine fits to the stand. Right now, it's mounted at the rear, but I need to connect it sideways onto the
stand so I can sort out the rear seal, flywheel & clutch.
Irony - 17/5/12 at 12:05 PM
When mounting the gearbox, clutch etc. I knocked up a quick timber frame made from rough sawn 3in x 3in timber. Cheap and it worked.
scudderfish - 24/5/12 at 04:00 PM
D'oh!
I forgot to fit the rear seal on the crank. Jobs for tomorrow - engine over, sump off, loosen rear crank block, seal on, tighten rear crank block,
sump on, right engine, back to where I should have been.
Xtreme Kermit - 24/5/12 at 07:28 PM
Well at least you noticed...
scudderfish - 14/6/12 at 12:19 PM
Slight delay caused by doing my back in (the drugs I got from the doctor were most excellent though) and school holidays. Anyway, enough flannel, I
got the crank seal in, flywheel on and fitted the clutch this morning.
Now to get the crank pulley on. I'm using the one from my current engine and is seems to have an ever so slightly smaller hole Once
that's on, I can fit the crank sensor and then I'm at the point where I need to hoik the old engine out. Scary!
Xtreme Kermit - 14/6/12 at 08:38 PM
Oh it's going to be good
MakeEverything - 15/6/12 at 10:00 AM
Can wait!! hurry up!
shaft - 15/6/12 at 10:28 AM
Looking good there, should be a rocket ship with that in it.
I'm just building a 3.9 up for my Zero ready to transplant come this winter.
Small amounts of progress, I've got the clutch slave cylinder off and tie-wrapped it out of the way on the chassis.
I'm really at the end of my talent now I don't see how I'll be capable of getting the old engine out and the new one in and getting
it to all line up again. I positively hate getting underneath my car, and I'm beginning to dread going into the garage. The fun has gone from
this job. If anyone reading this who is relatively local to Harpenden wants to make some beer tokens by doing the actual swap with/for me, please get
in touch over U2U.
DIY Si - 30/6/12 at 05:33 PM
Which bits do you think you'll find hard? As long as you can get hold of an engine crane, the actual swap shouldn't take long if you and a
mate can get stuck in. If I was closer I'd happily come over and lend a hand. Just disconnect everything, mark all the wiring with masking tape
as you go and you can't go far wrong.
Xtreme Kermit - 30/6/12 at 09:21 PM
Don't loose faith Scud. I'll give you a hand.
Andybarbet - 30/6/12 at 10:06 PM
I would gladly pop down mate, im chocka block working away this week & next weekend but i have an empty diary for the 14th/15th July weekend.
I have pretty much no experience but i do have an engine hoist & am willing to help, maybe we could get a couple of us down ? Three heads are
better than one
scudderfish - 1/7/12 at 08:12 AM
Thanks I was quite down and depressed when I wrote my previous post, I'm feeling better today. I already have a nice & shiny crane
(I've been using this project to justify new & interesting tools), thanks for the offers.
I'm going to have another go today. I have one major stumbling block getting my propshaft disconnected (see my later thread about it), but I
think I've done all I need to do under the car. I've removed the clutch slave cylinder, and this is the gearbox mount
a plate bolted to two chassis rails, and then it looks like the two centre nuts hold rubber bushes between the plate and the gearbox. I've
managed to get them off leaving bare thread. I hope that when I kick and shove the engine that the threaded rods will pop out of the holes.
If this all goes wrong, expect more miserableness. I hope the next post I make on this thread contains a picture of an empty engine bay...... If it
doesn't I'd be extremely grateful of some help as my mood is flipflopping between 'This is a fun project'/'Where did I put
the petrol & matches'
MakeEverything - 1/7/12 at 02:41 PM
Stick with it mate. I had moments like that (this week as well, when i discovered that my fuel tank wont come out without dismantling the
supercharger and exhaust), but it will be worth it in the end.
Failing that, i'll give you Ł50 as an unfinished project?
scudderfish - 1/7/12 at 04:40 PM
OK, no shot of an empty engine bay as it's still in there, but I have got the prop separated. After talking to Richard I was going to pull my
exhaust off and get at the prop from the bottom. However, on closer inspection, this was going to be tricky.
This header won't fit through the hole in the chassis, and getting the steering column out would mean dismantling the dash and upper pedal
box.....
So back to the remote. My problem appeared to be this, to get it off I'd need to get a screwdriver like blade in here.
As I could only see it in a mirror, time for another plan of attack.
Canting it over, I could get a pair of spanners on a prop bolt
Unfortunately the swing was very limited, and I had to keep reversing the non-ring spanner to get it to fit over the nut. It was at this point I also
discovered that it was a fine pitch thread... Oh joy.
But....... Got the first one out!
So all was going well until I got to the final bolt. It appears that you don't need to get a screwdriver like blade somewhere inaccessible, you
just need to lift the rear of the remote up enough and it pops off. Access for the last bolt was significantly better
Finally, all lined up
And the prop separated.
I'm feeling happier about it now that I've made some progress.
DIY Si - 2/7/12 at 08:13 AM
Well done. It's always good to have come away having done something, even if it's not a huge job. Just remember that any big job is merely a
list of smaller jobs, all of which can be tackled one at a time.
sebastiaan - 2/7/12 at 04:55 PM
It seems like you are almost there.
Over the years, I've learnt that it alsmost always pays off to dismantle enough parts for you to easily get at whatever bit you need to work on.
Saved me a lot of skinned knuckles, spilt blood and time as well! So, pull that dash out to get at the manifold would be my advice.
Keep at it!
scudderfish - 7/7/12 at 04:37 PM
Andybarbet - 7/7/12 at 05:05 PM
Success
Well done that man !
scudderfish - 7/7/12 at 05:42 PM
It wasn't easy! It would have been impossible without the load leveller as I had to fiddle the angle of the engine so that it would clear the
front suspension and the top of the transmission tunnel.
Xtreme Kermit - 7/7/12 at 06:10 PM
Top job Dave. You got the bu99er out!
Do you have to take the front back off the new lump to help it fit back in?
scudderfish - 7/7/12 at 06:14 PM
Oh cock, I hadn't thought of that! New engine already has front cover & water pump fitted. They'll probably have to come off.
matt_gsxr - 7/7/12 at 06:15 PM
Well done.
Sunday is going to be busy getting the new one in.
Matt
scudderfish - 7/7/12 at 06:16 PM
Sunday is Wimbledon, GP, torch relay, pub and lunch with friends & family. Maybe next weekend
se7ensport - 8/7/12 at 08:40 AM
Remove the front shocks and possibly the rockers, I had to drop the shocks to get a Duratec in and out of my Stylus which has a near identical front
end. It will make things easier and possibly not need to remove front cover and pump etc...
scudderfish - 8/7/12 at 08:54 AM
Yep, my plan for getting the next one in is to remove the wheels, shocks and chock the front wishbones up to drop the rockers down. Now I've had
a bit of practice I think that will be sufficient to get the new one in with the front cover in place. If not, whipping the rockers off whilst
dangling the engine should be quite easy.
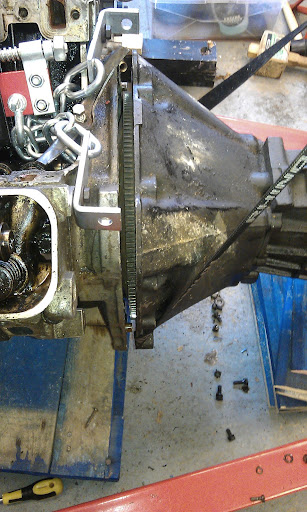
scudderfish - 21/7/12 at 03:06 PM
More filth. I took the valley gasket off the old engine for a nosey and found this:-
Nice bit of wear on the cam and followers there.
So now I have to get this off that
I got the bolts out but it wasn't shifting. I thought I needed to take the starter off and discovered the most awkward bolt so far. It's
an allen head and by the time I took this photo I'd already removed the sump and oil pickup
I couldn't get any swing with the allen key (5/16th inch) so I chopped about an inch off, and put it in a socket. A sort of female to female
adaptor. And with a suitably long piece I got my ratchet on it. I then discovered, the bell housing is also attached by this plate here which covers
the lower part of the flywheel
At this point, I got some help
So now the bellhousing is disconnected from the engine
but I haven't got them apart. I'm probably not applying enough violence....
scudderfish - 22/7/12 at 04:01 PM
Wiggle it, just a little bit.
Xtreme Kermit - 22/7/12 at 05:07 PM
Woohoo!
Cam wear seems a common thing on the RV8. Wonder if they don't get enough oil after a while.
scudderfish - 8/9/12 at 03:31 PM
Right. Finally managed to shuffle the lumps around, but getting the gearbox on is proving to be complete arse. I'm struggling to get the input
shaft correctly aligned with the clutch plate.
This is as far as I've got :-
The input shaft appears to be engaging the with the clutch as I can't turn the gearbox over anymore. However if I try to do the nuts up further,
the bellhousing gets no closer and I fear I'm going to strip a thread in the block or crack the bellhousing
Bugger.
stevebubs - 8/9/12 at 04:25 PM
Undo the bolts and keep wiggling it...my gearbox mounted straight up to my engine first time. Second time it took nearly an hour of wiggling to get
everything aligned..
DIY Si - 8/9/12 at 08:57 PM
If you have a helper, put the box in gear and have someone with a socket and bar wiggle the crank pulley back and forth as you try to slide the box on
fully. Pulling it on with bolts is just asking to pop something.
Otherwise, it really is a case of on/off/on/off/on/off until it goes on just right.
scudderfish - 13/9/12 at 10:49 AM
Success!
A bit of wiggling up and down an it just slid straight on.
Now to put the bugger in the car......
AllWeatherDan - 13/9/12 at 01:28 PM
BRILLIANT!
I have been watching this with baited breath for the big unveil!!
Nearly there.....
Hurry up the suspence is killing me. :-)
Dan
scudderfish - 29/10/12 at 03:06 PM
And so the day began....
I got the car up on some wood so the crane legs would fit underneath it, and took the front shocks out
It starts to go in....
Cock! Is the front cover going to have to come off?
Shaking it around dodged the problem
Houston! The engine has landed!
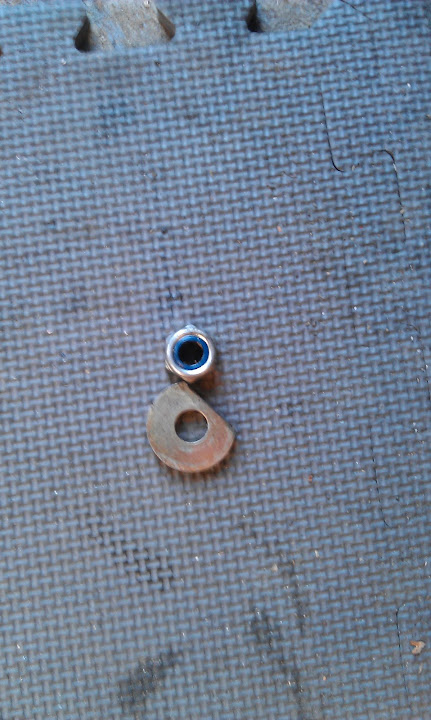
Of course it wasn't that simple. The drivers side engine mount was a complete arse. I had real trouble getting the bolts lined up and in, so I
undid the nut on the underside. Out with it came this particulary thick washer.
Whoever built my car boxed in the bottom of the engine mount so the bolt that protrudes from it is accessed through a socket sized hole in a piece of
sheet. Rattling around in this boxed off section are a couple more washers and I don't have the access to get them lined up with the engine
mount bolt so right now the engine isn't secure on the drivers side. I'll probably drill out the rivets and drop the sheet off, retrieve
the washers and then rivet it back up.
All in all though a good day.
scudderfish - 5/11/12 at 01:24 PM
Well the sheet was larger than I first thought, so I just enlarged the hole enough to get the blockage out and got the washer and nut back on. All I
need to do now it bolt up the gearbox mount and the propshaft and the engine will be officially fitted to the car. Then starts the plumbing and
wiring...........
Xtreme Kermit - 5/11/12 at 09:33 PM
Good effort Dave
Back on the road for Christmas?
scudderfish - 5/11/12 at 10:29 PM
quote:Originally posted by Xtreme Kermit
Good effort Dave
Back on the road for Christmas?
Definitely*
* I'm not specifying which one though....
scudderfish - 3/1/13 at 12:55 PM
When filling the cooling system, always remember to fit temperature sensors to the manifold BEFORE you wee antifreeze all over the garage....
MakeEverything - 3/1/13 at 07:18 PM
Are you planning on starting it up tomorrow? Can i come and watch??
scudderfish - 3/1/13 at 08:10 PM
Off the top of my head my to do is :-
Attach prop
Refit ECU
Remove resistors from injectors
Fit injectors
Fit fuel pipes
Fit oil sensors
Fit temp sensors
Fit new oil filter
Fill with oil
Prime oil pump
Fit distributor
Wire up starter
Bleed clutch
Bleed brakes
Fit alternator
Fit exhaust manifold
Fit steering column
Fit fan
Fit dash
Fit engine crankcase breather
[Edited on 4/1/13 by scudderfish]
Xtreme Kermit - 3/1/13 at 08:50 PM
So, by 3pm then
Furyous - 3/1/13 at 11:10 PM
Blimey! I've been going quicker than you and I've been on the other side of the world for most of the last year. We both started at about
the same time.
scudderfish - 4/1/13 at 10:08 AM
quote:Originally posted by Furyous
Blimey! I've been going quicker than you and I've been on the other side of the world for most of the last year. We both started at about
the same time.
I'm willing to bet you're more competent than me though. Everything takes me so long and motivation can be a struggle. There have been
many times where I just haven't been able to face going into the garage.
Furyous - 5/1/13 at 08:15 PM
quote:Originally posted by scudderfish
I'm willing to bet you're more competent than me though.
I'd be very worried about your car in that case. I didn't know much about engines before I started the swap but I've learnt a lot by
doing it.
To be fair, when I've been back in the UK I've pretty much done nothing other than work on the car. Fingers crossed, it's tomorrow for
me. Still lots to polish off once the engine's going, though.
scudderfish - 11/1/13 at 02:05 PM
Well I've done 12 of the items on that list now (and quite a few that weren't!). It's nice to be making some progress now.
MakeEverything - 13/1/13 at 10:15 AM
quote:Originally posted by scudderfish
Well I've done 12 of the items on that list now (and quite a few that weren't!). It's nice to be making some progress now.
Its satisfying to see the list shrink to nothing isnt it.
Ive still got four or five on mine that i just cant seem to shift. :/
ETA: Whats left now then? Remember, ill come and video the first start for you.
[Edited on 13-1-13, by MakeEverything]
scudderfish - 13/1/13 at 11:34 AM
That is the coolant that came out when I removed my sump plug. Time for petrol and matches I think.
me! - 13/1/13 at 12:17 PM
Whoops! I felt like that several times. I found it best to put it away, have a cup of tea and come back another day when I didn't want to put a
hammer through the windscreen. I'm not familiar with the RV8, hopefully it's something simple someone else can point you to.
scudderfish - 9/3/13 at 06:02 PM
I stepped away from the garage for a while. Since then I've made progress.
I dropped the sump and cleaned out all the coolant. I took the inlet manifold off and binned the valley gasket. I made a number of mistakes going
back quite far in time. I originally forgot to fit the rubber seals that go at each end of the block. When I had put the original valley gasket in I
had used a sealing compound between it and the heads. This made it a pig to get off, and wrecked it. I fitted the end seals, but the valley gasket I
got from my local motor factors was tin, not the coated steel I'd used before. Not wanting to have the grief I had before I decided not to use
any sealant under the new tin valley gasket. This was a big mistake. Steel ones are coated and curved, the tin one was thin and flat. It has a
predisposition to straighten itself out. When I had bolted it all together, it could weep coolant underneath it into the valley. When I took it off
I found small puddles of coolant in the cast webbings and near the cam lifters. I've now replaced the valley gasket with a new coated steel one
and been rather liberal with the hylomar I left the sump off, put some white card under the car and refilled the coolant and left it for a couple
of weeks. No coolant on the card.
Since then I've put the sump back on (pig of a job as I hate being under my car) and filled it with oil. The oil pump is now primed. I've
refitted the inlet manifold and plumbed in the fuel lines. It's still missing spark plugs and an ECU (sat on my desk whilst I do some work on
MSDroid), but the battery is on charge as I intend to turn it over tomorrow to check the starter motor and to see if I've fitted the crank
correctly.
me! - 9/3/13 at 07:56 PM
Good work- nearly time for it to make some noise!
Xtreme Kermit - 9/3/13 at 09:57 PM
I can't wait...
It's a good job you found the water in the sump before the first run Scud!
scudderfish - 9/3/13 at 10:12 PM
TBH, I did it that way round (fill with coolant before fill with oil) just to allow for my ability to cock up. I thought if I did have an internal
leak it'd be easier to deal with without 6 litres of oil sloshing around the garage floor.
Xtreme Kermit - 9/3/13 at 10:22 PM
Like the way you think (subtext, I'll believe you)
Furyous - 10/3/13 at 12:09 AM
I was going to ask about this the other day. Looks like you've overcome some problems, which is always relieving.
scudderfish - 15/3/13 at 01:29 PM
Phew! Just crossed a major psychological barrier I had. I turned the engine over on the starter! I was extremely worried about this as if you refer
to one of my first posts, I had not noted which piston went in which bore and ended up fitting them randomly. As I was fitting them the engine got
quite tight and by the time I got the heads on it was hard to turn over with a regular socket set. My big fear was something was going to jam and
I'd be back to square one. It doesn't spin quite as freely as it used to (I don't have the ECU in so I can't get the exact
cranking RPM, it used to do about 120), but I'm putting that down to new rings in honed bores and the fact it is primarily lubricated with
assembly lubricant which is considerably thicker and stickier than the 20/50 sat in the sump.
The list is now:-
New spark plugs
Make a new spark lead (I broke one)
Find out why my LP pump wasn't feeding fuel through to the engine bay
Wire up speed sensor
Wire up reverse light
Fettle gearchange
Tighten everything
Buy another fire extinguisher
Fit ECU
Bleed brakes and clutch
Push the button
matt_gsxr - 15/3/13 at 02:15 PM
quote:Originally posted by scudderfish
Phew! Just crossed a major psychological barrier I had. I turned the engine over on the starter! I was extremely worried about this as if you refer
to one of my first posts, I had not noted which piston went in which bore and ended up fitting them randomly. As I was fitting them the engine got
quite tight and by the time I got the heads on it was hard to turn over with a regular socket set. My big fear was something was going to jam and
I'd be back to square one. It doesn't spin quite as freely as it used to (I don't have the ECU in so I can't get the exact
cranking RPM, it used to do about 120), but I'm putting that down to new rings in honed bores and the fact it is primarily lubricated with
assembly lubricant which is considerably thicker and stickier than the 20/50 sat in the sump.
The list is now:-
New spark plugs
Make a new spark lead (I broke one)
Find out why my LP pump wasn't feeding fuel through to the engine bay
Wire up speed sensor
Wire up reverse light
Fettle gearchange
Tighten everything
Buy another fire extinguisher
Fit ECU
Bleed brakes and clutch
Push the button
I'd go with: 8, 9, 1, 2, 3, 11
MakeEverything - 1/4/13 at 09:22 AM
Great news mate. I'm around tomorrow and Wednesday if you want a cameraman for the first start.
scudderfish - 1/4/13 at 12:56 PM
quote:Originally posted by MakeEverything
Great news mate. I'm around tomorrow and Wednesday if you want a cameraman for the first start.
I'm at work tomorrow & Wednesday otherwise I'd probably take you up on the offer. Second start will be videoed, first one I'll
have the fire extinguisher in my hand instead of the camera! MakeEverything - 1/4/13 at 02:28 PM
quote:Originally posted by scudderfish
quote:Originally posted by MakeEverything
Great news mate. I'm around tomorrow and Wednesday if you want a cameraman for the first start.
I'm at work tomorrow & Wednesday otherwise I'd probably take you up on the offer. Second start will be videoed, first one I'll
have the fire extinguisher in my hand instead of the camera!
Phone in sick!! MakeEverything - 5/4/13 at 09:16 PM
How did you get on??
scudderfish - 6/4/13 at 10:18 AM
No real progress yet, I'm developing my skills at procrastination! The car is now insured (Ł160 including breakdown cover), but for the agreed
value part they want a bunch of recent photos so I've got to make it look more car like first and get that sorted.
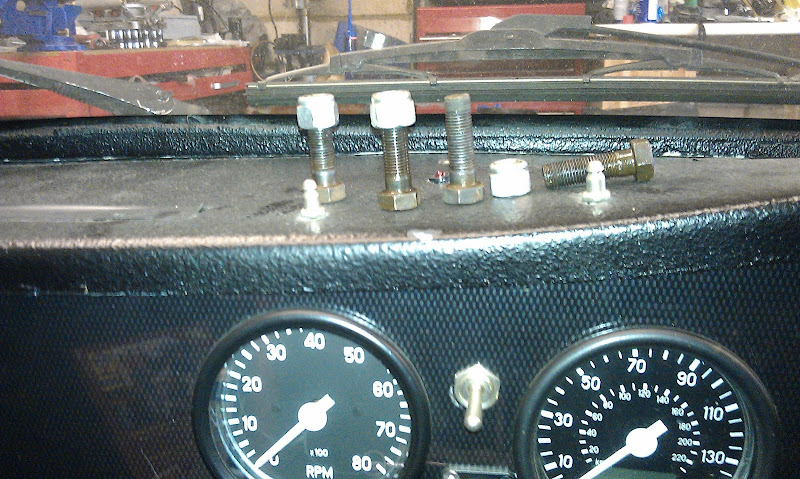
scudderfish - 16/4/13 at 08:32 PM
I took my insurance photos :-
And then tonight I actually attached the bonnet to the car.
The whiteboard is getting empty.
adithorp - 16/4/13 at 08:49 PM
Better get your finger out then... We expect to see it at Stoneleigh!
scudderfish - 16/4/13 at 09:00 PM
quote:Originally posted by adithorp
Better get your finger out then... We expect to see it at Stoneleigh!
I wish I could but I'm giving Stoneleigh a miss this year as I'm off to Thailand for a wedding then (not mine )
Furyous - 17/4/13 at 09:05 PM
*Replace fuel hoses
*Fit megasquirt
*Set camera up
*Start engine!
scudderfish - 28/4/13 at 11:18 AM
It fires, but it doesn't catch.
Positives are :-
1. I didn't need to use the fire extinguisher
2. All the petrol, oil and coolant appeared to stay where it should
3. When it fired, it sounded like all 8 were going at the right time.
Looking at the log, my battery didn't look too healthy, dropping down to 8.2v at one point so that needs to go on charge. Now I think it's
mainly a matter of throwing more fuel in until it is self sustaining.
dave_424 - 28/4/13 at 12:23 PM
Low battery voltage whilst cranking is very normal.
My engine was doing the same thing, it would fire but not run, I just went into the VE table, selected the bins around idle and added 10 to each
number. Got it running.
Dave
scudderfish - 28/4/13 at 02:25 PM
Schoolboy error. I got an MSQ file from Phil @ ExtraEFI (thoroughly nice bloke) for a RV8 running EDIS. I forgot to change it from the standard 8
injectors to my set up which is 4 so I was only putting in half the amount of fuel I needed.
Now for my next problem, the exhaust headers are smoking like a beagle!
It isn't a leak, it's coming from the surface of the headers, and it doesn't smell like exhaust fumes. Any ideas? I suspect it could
just be dirt and WD40 burning off, but it filled my garage after a few seconds so no more playing until I get a chance to wheel the car outside
(probably Thursday).
scudderfish - 28/4/13 at 02:32 PM
Satisfying.
rusty nuts - 28/4/13 at 03:28 PM
Exhaust manifolds smoking on initial start up are pretty normal after any major repairs
scudderfish - 28/4/13 at 04:10 PM
quote:Originally posted by rusty nuts
Exhaust manifolds smoking on initial start up are pretty normal after any major repairs
Good to know It spooked me when I saw it.
DIY Si - 29/4/13 at 06:51 AM
It's even scarier when you wrap trhe manifolds as some of that stuff smokes like buggery when first heated up!
scudderfish - 29/4/13 at 07:52 AM
quote:Originally posted by DIY Si
smokes like buggery
Ouch! Better lubricant needed! HowardB - 29/4/13 at 08:34 AM
That looks awesome,... I bet it sounds amazing too. Can't wait to hear it. Your re-engine has been inspirational, I am playing catch up, and hope
to have an "engine start" video this week!
Bought the petrol this morning,...
DIY Si - 29/4/13 at 10:48 AM
quote:Originally posted by scudderfish
quote:Originally posted by DIY Si
smokes like buggery
Ouch! Better lubricant needed!
So that's where I've been going wrong........ MakeEverything - 30/4/13 at 09:45 AM
Awesome news, and great sound!! When are you coming over??
scudderfish - 2/5/13 at 01:06 PM
A run the engine further until the thermostat opened, and coolant started to come out of the hose where it connects to the inlet manifold. I'm
not entirely surprised as the hose is possibly 29 years old and isn't very flexible. It did leak when I was first filling it with coolant and
the extra temperature/pressure overcame it. After bouncing around Harpenden and St Albans trying to find somewhere where I could buy a new bit (45
degree bend, 38mm ID, about 150mm long) I'm now waiting for an ebay delivery....
scudderfish - 18/5/13 at 02:12 PM
Silicone hose turned up whilst I was in Bangkok. Brakes & clutch now bled, and I've got an MOT booked for 10am Thursday. Now to see if I
can get it in gear (and I haven't royally buggered the clutch) and get it moving under its own power for the first time in a year.......
scudderfish - 18/5/13 at 02:58 PM
How did that get there?
It turns out I didn't ruin the clutch. Gear change is a bit crap, it didn't want to get into all the gear stick forward gears (R, 1, 3, 5)
without a lot of persuasion, but that should be fixable.
[Edited on 18/5/13 by scudderfish]
scudderfish - 27/5/13 at 10:52 AM
MOT didn't happen due to family constraints. It has given me a bit of time to work on the gear change. My problems were two fold. The bushes
holding on the gearstick remote looked to be original 30 year old items and were utterly shot. The gearstick was also fouling on part of a rubber
gaiter in the forward positions which whilst not pushing it out of gear, was encouraging it not to go in. One new set of bushes (and an unbelievable
amount of swearing as the new ones we naturally considerably larger than the flattened old ones) and a rejig of the gaiter and I now have a very nice
gearchange. No MOT this week, but maybe next......
scudderfish - 6/6/13 at 11:07 AM
MOT PASSED! YAY!
Car is knackered! Boo!
This has been an interesting morning. Drove over to my favoured MOT testers at Predator Motorsports (http://predatormotorsport.co.uk/) To get to them
you have to go around a one way system. As I pulled into it, my car suddenly got noisier and a bit rougher. Edged my way around to them and pulled
up. In hitting a bump, a clamp on my exhaust had let go in a joint under my seat. Not an auspicious start. PM just put it up on the ramps and
clamped it up before commencing the test. It went through the test with no problems until it came to the brakes. The tester took it out on the one
way system for a lap. It passed (although he said it was marginal, something to look at), but as he was pulling into the yard he lost drive. With
the clutch down, you can select gears and it feels as if it is going into gear, but when you lift the clutch it sounds like a bag of spanners in a
washing machine. At this point I decided I had exceeded the boundaries of my competency and left it with them to fix.
So my car passed its MOT, but I came home in a taxi.
HowardB - 6/6/13 at 11:36 AM
&
I hope that a) they can fix it and b) do it without too much cost,...
matt_gsxr - 6/6/13 at 12:19 PM
I know the felling, looks like light at the end of the tunnel, turns out to be a gremlin with a candle.
scudderfish - 18/6/13 at 01:25 PM
Yay! Predator called and my car is ready for collection
They seem to think the clutch I fitted was duff and it self destructed. Their opinion is that I should be able to get some money back on it. Now I
need to tax it before I collect it on Thursday.
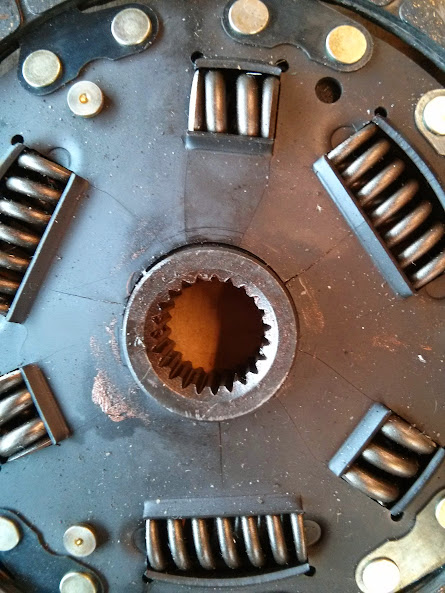
scudderfish - 20/6/13 at 12:06 PM
Home now. The clutch damage doesn't look as spectacular as it sounded, I was expecting a bag of loose shards.
adithorp - 20/6/13 at 12:48 PM
Thinkyou'llfind the plate inside there (that acts aginst the springs) has seperated from the splined hub.Never seen that happen before.
scudderfish - 24/6/13 at 06:57 PM
quote:Originally posted by adithorp
Thinkyou'llfind the plate inside there (that acts aginst the springs) has seperated from the splined hub.Never seen that happen before.
It certainly sounded like that.
Anyway, I got my tax disc in the post today, so my car now officially has insurance, tax and MOT. After all the hassle and heart ache, I've
learnt a lot. Primarily don't do such a bloody stupid thing again! Now for the long list of other things I want to do to the car.....
Regards,
Dave
Furyous - 25/6/13 at 07:06 AM
Well done!
Having pointed out how far behind your were, I now seem to be further back than I was before. In my defence, there's more involved in registering
a car for the road than there is in telling the DVLA about a new engine.
I bet the V8 sounds good. Time to get out and enjoy it!
scudderfish - 27/6/13 at 03:12 PM
And now a little bling. I got a piece of copper plate and plentywahalla knocked up some vinyl stencils for me. The photo doesn't really show
the copper colour very well.
plentywahalla - 27/6/13 at 05:58 PM
That looks the mutts nutts
Glad to be of help.
Richard
me! - 27/6/13 at 06:30 PM
Excellent work... can we have a video of it making lots of noise now please?
scudderfish - 27/6/13 at 06:34 PM
quote:Originally posted by me!
Excellent work... can we have a video of it making lots of noise now please?
I'll see what I can do tomorrow sjmatthews - 27/6/13 at 07:04 PM
quote:Originally posted by me!
Excellent work... can we have a video of it making lots of noise now please?
And make a big black number 11 while you're at it (don't break your new clutch though) scudderfish - 28/6/13 at 02:01 PM
No video today. I started doing one and then noticed a lot of vibration on the alternator belt. It transpired that the three bolts holding the
sandwich that is my crank pulley were loose. Getting the crank pulley off to tighten and threadlock them involves dismantling the suspension......
Never a dull moment.
me! - 28/6/13 at 03:25 PM
quote:Originally posted by scudderfish
No video today. I started doing one and then noticed a lot of vibration on the alternator belt. It transpired that the three bolts holding the
sandwich that is my crank pulley were loose. Getting the crank pulley off to tighten and threadlock them involves dismantling the suspension......
Never a dull moment.
Kit cars ey... who'd have em?
scudderfish - 4/10/13 at 10:43 AM
It's been a while I've been getting some nasty resets on my ECU so my car is off to Bailey Performance to get that sorted and a full
mapping done. Dale drove down earlier in the week and took it away.
scudderfish - 11/10/13 at 12:15 PM
Right, where was I?
Came back from Bailey with a carb hat on. Bonnet doesn't close, but I do have a wide selection of power tools
I did some brutal surgery on the old bonnet scoop, and ended up with this mess to sort out.
theduck - 11/10/13 at 12:55 PM
May be a stupid question, does this enclose the carb or just sit on the inlet? I've always wondered how people enclose the carbs / get linkage
cables in for forced induction applications and this just reminded me of that.
scudderfish - 11/10/13 at 01:00 PM
It's effectively a plenum on top of the carb (or 4 barrel TB in my case). My previous paper filter attempt was strangling the engine, so
I've now got this so I can duct in air from a properly sized filter elsewhere.
Andy S - 11/10/13 at 02:23 PM
What power did it run on rollers?
scudderfish - 11/10/13 at 02:41 PM
quote:Originally posted by Andy S
What power did it run on rollers?
223bhp@5400rpm
253lbft@3290rpm
225lbft@1000rpm
When I had the 3.5 in it, it got rollered at 160bhp, but I always suspected that was inflated by the apparent 50bhp transmission losses. Dale
measured my transmission losses as 16bhp which is far more believable and it means I have approximately twice the power at the wheels now than I did
with the 3.5.
MakeEverything - 19/10/13 at 09:57 AM
quote:Originally posted by scudderfish
quote:Originally posted by Andy S
What power did it run on rollers?
223bhp@5400rpm
253lbft@3290rpm
225lbft@1000rpm
When I had the 3.5 in it, it got rollered at 160bhp, but I always suspected that was inflated by the apparent 50bhp transmission losses. Dale
measured my transmission losses as 16bhp which is far more believable and it means I have approximately twice the power at the wheels now than I did
with the 3.5.
Happy Days. 250 is plenty. Andy S - 19/10/13 at 12:50 PM
Are those at the wheel or at the fly figures ?
scudderfish - 19/10/13 at 02:40 PM
Flywheel, hence the transmission loss estimations.
Andy S - 19/10/13 at 05:25 PM
I think you have a massive restriction in the system somewhere, I suspect the Offy as they strangle 3.5's let alone a 4.3.
To explain this a 3500 Vitesse makes 187BHP providing a BHP/litre of 53.5 ish. As outputs go its pretty lame but its a production two valve pushrod
and still plenty of scope for improvement.
With all the work that your engine has had put into it you are at 52 BHP/Litre - A drop in specific output - not good.
The Vitesse had a volumetric efficiency of 93%
Your engine has a volumetric efficiency of 88%
My engine is a stage 2 standard valve very little porting done 4.0L and it produces 232BHP at 5500 rpm
A volumetric efficiency of - 97%
With the same VE as my stage 2 engine you should be making at least- 250 and to be honest with a decent set of stage 3 heads 100% VE should be easy
and an expected output of 265 BHP @ 5700
No intention to rain on anyone's parade but just highlight that the rustlers have been in your garage and liberated an entire stable of
neddies.
Get saving for some decent inlet and exhaust manifolds
With work Rovers can be made to rev (a comparative term) and a 4.3 with a cam to give output at 6250 rpm and the ability to breath at 100% VE will
produce 293BHP
scudderfish - 19/10/13 at 05:31 PM
I'm more than happy for advice I went with the Offy as it was cheap and it would fit under my bonnet. As I now have a big hole in my bonnet,
I'm less concerned about that. What would you recommend?
quote:Originally posted by Andy S
I think you have a massive restriction in the system somewhere, I suspect the Offy as they strangle 3.5's let alone a 4.3.
To explain this a 3500 Vitesse makes 187BHP providing a BHP/litre of 53.5 ish. As outputs go its pretty lame but its a production two valve pushrod
and still plenty of scope for improvement.
With all the work that your engine has had put into it you are at 52 BHP/Litre - A drop in specific output - not good.
The Vitesse had a volumetric efficiency of 93%
Your engine has a volumetric efficiency of 88%
My engine is a stage 2 standard valve very little porting done 4.0L and it produces 232BHP at 5500 rpm
A volumetric efficiency of - 97%
With the same VE as my stage 2 engine you should be making at least- 250 and to be honest with a decent set of stage 3 heads 100% VE should be easy
and an expected output of 265 BHP @
Just out of interest how did you arrive at a VE of 100% ? Isn't that F1 territory on NA form? Above 100% is common with forced induction but not
with NA.
Point taken about the fury output power, but it does have a great power curve and bags of low down grunt so I expect it will be quick enough, the best
NA rover I did made 374bhp, but was a 5.5L, the rover v8 is always disappointing in its output per CC due to poor breathing.
We did a twin turbo 4.6 that made 514bhp!!!
Andy S - 19/10/13 at 07:36 PM
100% VE is quite usual for N/A and not that hard to achieve
F1 territory 755BHP at 19,250 RPM for 2.4 litre is a VE of 149% so that is where those guys are
Turbo territory for F1 - well
A modern 4 valve per cylinder Duratec - 2000cc and 165BHP at 6000 rpm - is a VE of 126%
Trick is to maintain the VE as you increase capacity and RPM
For turbo's - an old 70's design - aircooled
1,100 BHP @ 8000 rpm 5.3 litre - VE 238%
Goodness knows where the new F1 1.6L Turbo's will be 300 - 400%
Torque is all well and good for a 4x4 but in cars like ours you can have a little too much especially with a short wheelbase. I have 250ftlbs
available at 2000RPM and it leaves more black lines on tarmac than Marc Marquez. Its great fun but its not always the quickest way to make progress.
As for getting the most out of that 4.3L - the Wildcat spider / Harcourt is superb / the best to stick a 4 barrel on - next is the eddy performer with
a little porting. The Offy can be fettled - remove the divider and open up the runners but its designed for the purpose of squeezing a engine under a
stock bonnet not for performance but it can be fettled
That and a set of 1 5/8 headers 1 1/2 min
This is a Wildcat spider and reasonable headers to give an idea of height with a 3" filter - which is the minimum for clearance over the Holley
air horns.
Andy S - 19/10/13 at 08:05 PM
I use an old Superflow rule for the calculation of VE
VE = 5600 x BHP / (RPMxCID) X 100%
Its a handy calc to have in a spreadsheet to give a quick indication if the figures are what you would expect and engine to be providing.
You can check the VE at any engine RPM and then graph the VE against the power and torque curves very useful for understanding where the engine is
starting to struggle - and if read with a flowbench graph for the head you can tell whats lagging.
BaileyPerformance - 19/10/13 at 08:47 PM
Humm..... Not sure your calculation is 100% correct, as i understand it 100% VE would be a complete cylinder charge - meaning the cylinder pressure is
at atmospheric before the compression stroke. Greater than 100% VE can only be achieved by ram charging and exhaust scavenging packing more air into
the cylinders, increasing the cylinder pressure above atmospheric. 120% VE would be a brilliant engine!
If you boosted an engine to 1 bar (assuming the engine was already at 100% VE) you would have achieved close to 200%.
The thing with a rover is that they do not breath very well, even a really well built 4.6 with a decent cam and induction will struggle to make
300bhp, the more you stretch the capacity the less gains per CC you get - all that seems to happen is the torque output goes up.
The only way to really make them go is fit wildcat heads with a decent cam.
As for fitting a rover into a light weight car, I agree bags of torque is not required but all you need to do Is fit a higher final drive to make use
of the grunt, this is often better and nicer to drive than a lower geared 16v screamer.
Andy S - 19/10/13 at 10:05 PM
The calc is an old Superflow calculation and even though its not totally correct in establishing the actual "true" VE for a engine - what it
is good at is providing a measure of that efficiency as a comparison. Same as any work on a Dyno or a Flowbench - it's all about comparisons.
So call it an indication of VE rather than the actual VE
It is probably better to use a BMEP calculation as an accurate measure of an engines potential but this is quick an easy calculation to make a gauge
on whether an engine is doing what it should.
Anyway using that old Superflow measure of VE a really good Rover gets to around 110%
BaileyPerformance - 19/10/13 at 10:28 PM
quote:Originally posted by Andy S
The calc is an old Superflow calculation and even though its not totally correct in establishing the actual "true" VE for a engine - what it
is good at is providing a measure of that efficiency as a comparison. Same as any work on a Dyno or a Flowbench - it's all about comparisons.
So call it an indication of VE rather than the actual VE
It is probably better to use a BMEP calculation as an accurate measure of an engines potential but this is quick an easy calculation to make a gauge
on whether an engine is doing what it should.
Anyway using that old Superflow measure of VE a really good Rover gets to around 110%
Agreed, the actual number is not that important, it's the improvements on it that matter.
I look for bhp per litre, bench mark been 100bhp/litre.
4.3 making 220bhp would have a VE of 51%
A 3.5 making 180bhp would also be 51%
So, to get a 4.3 rover to match a good 2.0 zetec it would be making 430bhp, no chance using rover heads!
BaileyPerformance - 19/10/13 at 10:43 PM
Just a further comment about rover v8 quoted power outputs, a good stock high compression on carbs will make 140bhp, 3.5 Efi 150bhp, 3.9 Efi
160bhp.
For example we had a stock p5 rover 3.5 (10.5cr) on the dyno recently, sweat engine, made 105bhp at the wheels (auto) max transmission loss 40bhp. I
think these engines where rated at 180bhp.
Generally speaking the stock motor does not make its rated power output, this goes for a lot if British cars, the worst if the lot been old jaguars,
4.2L E type rated at 265bhp struggle to make 200bhp.
The only manufacturer to be accurate with the printed power is Ford, normally within 5bhp of what it's supposed to be.
Praise the Ford!!! :-)
scudderfish - 20/10/13 at 07:31 AM
The way I see it, my car scares the crap out of me as it is. In Rolls Royce terminology, power levels are 'sufficient'. If I ever get
bored with it, there appear to be some mods I can make to get more power out of it, but right now keeping it facing the way I want to travel is enough
for me
Andy S - 20/10/13 at 12:55 PM
The P6 10.5 was rated at the OLD SAE power rating - that excluded all the power to run the water pump, oil pump, etc. and the engine frictional losses
- The head had smaller valves and was generally less powerful than the SD1 by a good few BHP.
A good SD1 would make its rated 155 and they do regularly on a set of rollers even with a few miles under the belt - the Vittesse seldom make the 190
they are rated at (apart from the TP versions which maybe where that number came from) but most make around 175.
After all the work and effort the OP has put into the installation I just felt it worth pointing out that there is a restriction in the system as its
well down on where it should be. The torque being produced will make it monstrously quick and the 3rd and 4th gear accelerations will be monumental if
has a beneficial axle ratio.
I will freely admit that asking for the power figure was a leading question having seen it was fitted with a Offy manifold as I have only ever seen
them rob an engine of horsepower. Seeing as he could potential add 30+BHP for a Ł200 manifold (Ł7 per horsepower) and a decent increase in torque as
well it seemed the right thing to do to stick my head above the parapit.
If climbing this far up the mountain it seems a shame to stop short of the summit. And would be a pity to change the bonnet around a lame manifold
only to find the one that really works does not fit and you have to cur holes again. Now prizes for guessing how I know.
Nice project - great cars - I am IVA' ing my lightweight Duratec Fury at the start of November. And collecting all the right parts for a 4.5L V8
build.
The only other advice for making the RV8 and epic engine is a lightweight fltwheel - cant remember what you are using but a lightweight steel one is
worth its weight and transform the way the engine reacts to the throttle.
BaileyPerformance - 20/10/13 at 01:12 PM
quote:Originally posted by Andy S
The P6 10.5 was rated at the OLD SAE power rating - that excluded all the power to run the water pump, oil pump, etc. and the engine frictional losses
- The head had smaller valves and was generally less powerful than the SD1 by a good few BHP.
A good SD1 would make its rated 155 and they do regularly on a set of rollers even with a few miles under the belt - the Vittesse seldom make the 190
they are rated at (apart from the TP versions which maybe where that number came from) but most make around 175.
After all the work and effort the OP has put into the installation I just felt it worth pointing out that there is a restriction in the system as its
well down on where it should be. The torque being produced will make it monstrously quick and the 3rd and 4th gear accelerations will be monumental if
has a beneficial axle ratio.
I will freely admit that asking for the power figure was a leading question having seen it was fitted with a Offy manifold as I have only ever seen
them rob an engine of horsepower. Seeing as he could potential add 30+BHP for a Ł200 manifold (Ł7 per horsepower) and a decent increase in torque as
well it seemed the right thing to do to stick my head above the parapit.
If climbing this far up the mountain it seems a shame to stop short of the summit. And would be a pity to change the bonnet around a lame manifold
only to find the one that really works does not fit and you have to cur holes again. Now prizes for guessing how I know.
Nice project - great cars - I am IVA' ing my lightweight Duratec Fury at the start of November. And collecting all the right parts for a 4.5L V8
build.
The only other advice for making the RV8 and epic engine is a lightweight fltwheel - cant remember what you are using but a lightweight steel one is
worth its weight and transform the way the engine reacts to the throttle.
Agree with all the above :-)
a better manifold may help top end power, as for throttle response the thing revs up like a chainsaw as it is, the down side of a light flywheel is
added engine braking - not always a good thing in a light car.
i'm been nosy now, but why build a 4.5L? why not just use a 4.6L bottom end? Mine was Ł1400 fully assembled and top hat linered from V8
developments.
Andy S - 20/10/13 at 02:20 PM
quote:Originally posted by BaileyPerformance
Agree with all the above :-)
a better manifold may help top end power, as for throttle response the thing revs up like a chainsaw as it is, the down side of a light flywheel is
added engine braking - not always a good thing in a light car.
i'm been nosy now, but why build a 4.5L? why not just use a 4.6L bottom end? Mine was Ł1400 fully assembled and top hat linered from V8
developments.
Sounds like it may have a lightweight already - I have a half weight steel fly in mine and its mad - indeed the revs drop as quick as they rise - and
it can catch you out if you dont have a good pedal set up and a nice progressive clutch. I guess the OP would need to get an handle on heel toe to get
around that one - That's a bonus with also having bikes you just learn to match things to keep in the seat especially with Ducati's - not
sure I have seen a slipper for an RV8.
4.5L .... I got given a brand new small journal stroked crank and it would rude not to use it scudderfish - 20/10/13 at 02:27 PM
The flywheel is whatever TVR used, which I guess is whatever they got from Range Rover. Don't worry about putting your head up, as I've
said a number of times on this thread, I really didn't know what I was doing and will happily hold my hand up to probably getting several things
wrong and any advice on how to make things less wrong is always welcome.
So for the time when I think the risk of the car killing me is not enough, what Ł200 manifold should I be looking for?
Andy S - 20/10/13 at 02:43 PM
The Eddelbrock Performer is a good compromise and you should get one for around the Ł200 mark
You will only get a Harcourt S/H - The Wildcat (which is what I use) is rare and expensive. - The Eddy's come up regularly. Plenty of people want
the Offy 360 as they know no better or cannot be cutting holes in thier classic and are prepared to a) get the work done to make it flow or b) its on
a 3.5 and 225 from a 3.5 is bloody good going - so you could probably sell it and it would only cost you the difference.
quote:Originally posted by scudderfish
The flywheel is whatever TVR used, which I guess is whatever they got from Range Rover. Don't worry about putting your head up, as I've
said a number of times on this thread, I really didn't know what I was doing and will happily hold my hand up to probably getting several things
wrong and any advice on how to make things less wrong is always welcome.
So for the time when I think the risk of the car killing me is not enough, what Ł200 manifold should I be looking for?
scudderfish - 20/10/13 at 04:55 PM
Aha! I've just figured out who you are on the V8 forum
Andy S - 20/10/13 at 06:57 PM
All the clues are there
BaileyPerformance - 20/10/13 at 07:22 PM
I noticed you are not far away from me, do you do cylinder head development? and/or engine building professionally?
Andy S - 20/10/13 at 08:51 PM
Just an enthusiastic amateur just work on stuff for myself and a few mates.
quote:Originally posted by BaileyPerformance
I noticed you are not far away from me, do you do cylinder head development? and/or engine building professionally?
scudderfish - 31/10/13 at 11:32 AM
Right more photos!
This is where my air box is going to end up. Not ideal, but I'll be able to feed cold air into the general area through a vent in the bonnet
side.
The next problem was getting the bonnet to shut. It initially fouled on the air temp sensor, so I took that out and thought I'd worry about it
later
After a lot of trimming, I got a suitable shape to work around the air feed pipe. I'll have to enlarge this a bit to allow for engine
movement.
It shuts!
However, I'm left with a big nasty hole that needs sorting out.
The hole is this shape currently as I cut out the original bulge, which was just too long, too wide, but too shallow. I'm now going to post a
lot of numpty questions about working with filler and fibreglass.....
CNHSS1 - 31/10/13 at 11:40 AM
Andy S
another Shropshire local here :-)
re the Ginetta, is it the ex-John/Paul Edwards hillclimb car? any pics of your G15?
Andy S - 31/10/13 at 02:06 PM
Will drop you a U2U
quote:Originally posted by CNHSS1
Andy S
another Shropshire local here :-)
re the Ginetta, is it the ex-John/Paul Edwards hillclimb car? any pics of your G15?