nickm
|
| posted on 7/12/14 at 08:34 PM |

|
|
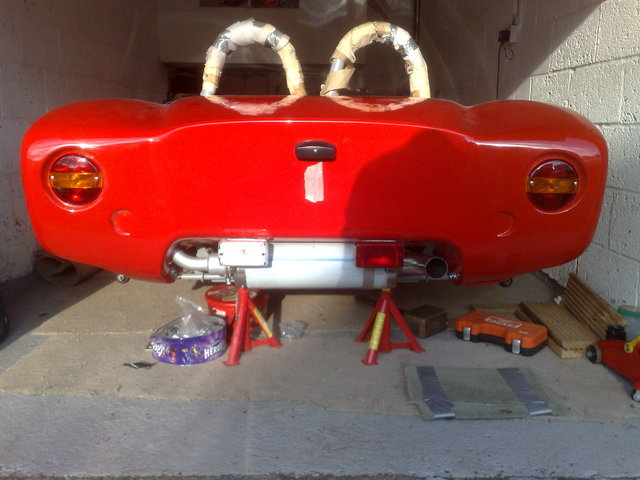
J15 Bodywork/Exhaust
Hi Fellas
Was having a good day today got the "boot on" at the rear pivot points and thought i would celebrate with the flask, enroute to the flask
lift the boot to make sure all is okay and it lifts one inch as its catching on the exhaust tail pipe !!!!
First thoughts were to leave the garage, aggression and logical thought dont go together !!! the solution could be trim the end pipe by a couple of
inches and reattach but then i may end up with a sooty black mark on the fibreglass for ever as it will be recessed under the lip ? or look at these
"flexible" exhaust joiners (how flexible) but then i will have a tailpipe that moves about or falls off !! unless i rivet it ?
Any advice ?
Thanks
Nick M
|
|
|
|
|
theprisioner
|
| posted on 7/12/14 at 10:34 PM |
|
|
If it is any consolation I had a lot of faffing with mine too. It should exit (IMO) at the same level as the bottom bar. see:
http://sylvabuild.blogspot.co.uk/2013/03/mirrors-exhaust-and-wheels.html
If it comes out there it still wont open more than a foot to let you dip the oil and check the water level but then that's all you need it for.
If I take the tail pipe off which is easily removable then I can open all the way.
I hope this helps, we need more of these car on the road! I believe I am the only one in Scotland.
http://sylvabuild.blogspot.com/
http://austin7special.blogspot.co.uk/
|
|
|
Kdempsie
|
| posted on 8/12/14 at 12:37 AM |
|
|
The Prisoner,
Don't worry you are not alone, a gentlemen from Aberdeen has recently got his IVA'd and I will hopefully have mine on the road in March
2015(ish). Still not too close to you as I am in Aberdeen too.
Keith.
|
|
|
Paul AS
|
| posted on 8/12/14 at 11:19 AM |
|
|
Hi Nick,
Have a look at my photo archive and see if theres any thing useful in there. My Boot opens about 15 inches which is more than enough access for day to
day stuff.
I have also made to easily removable with a multi connector for the electrics and 5 easily accessable bolts.
Only takes about 10 minutes to take the whole thing off.
If youre up our way youre welcome to come and have a look.
Paul
|
|
|
monkeyarms
|
| posted on 8/12/14 at 01:06 PM |
|
|
I had this problem too. My rear clam only opens about 4 or 5 inches "just" enough to check oil and water (needs a funnel to top up
though)
I made my exhaust as low as the chassis and trimmed around the can, so the exhaust tip is the stopping point
But I too have a multiplug and 4 M6s and the clam is off
Description
|
|
|
theprisioner
|
| posted on 8/12/14 at 01:28 PM |
|
|
Does that mean we (Scots J15ers)could all meet at the Fennel in Inverurie one Sunday in the summer?
http://sylvabuild.blogspot.com/
http://austin7special.blogspot.co.uk/
|
|
|
Jenko
|
| posted on 8/12/14 at 07:56 PM |
|
|
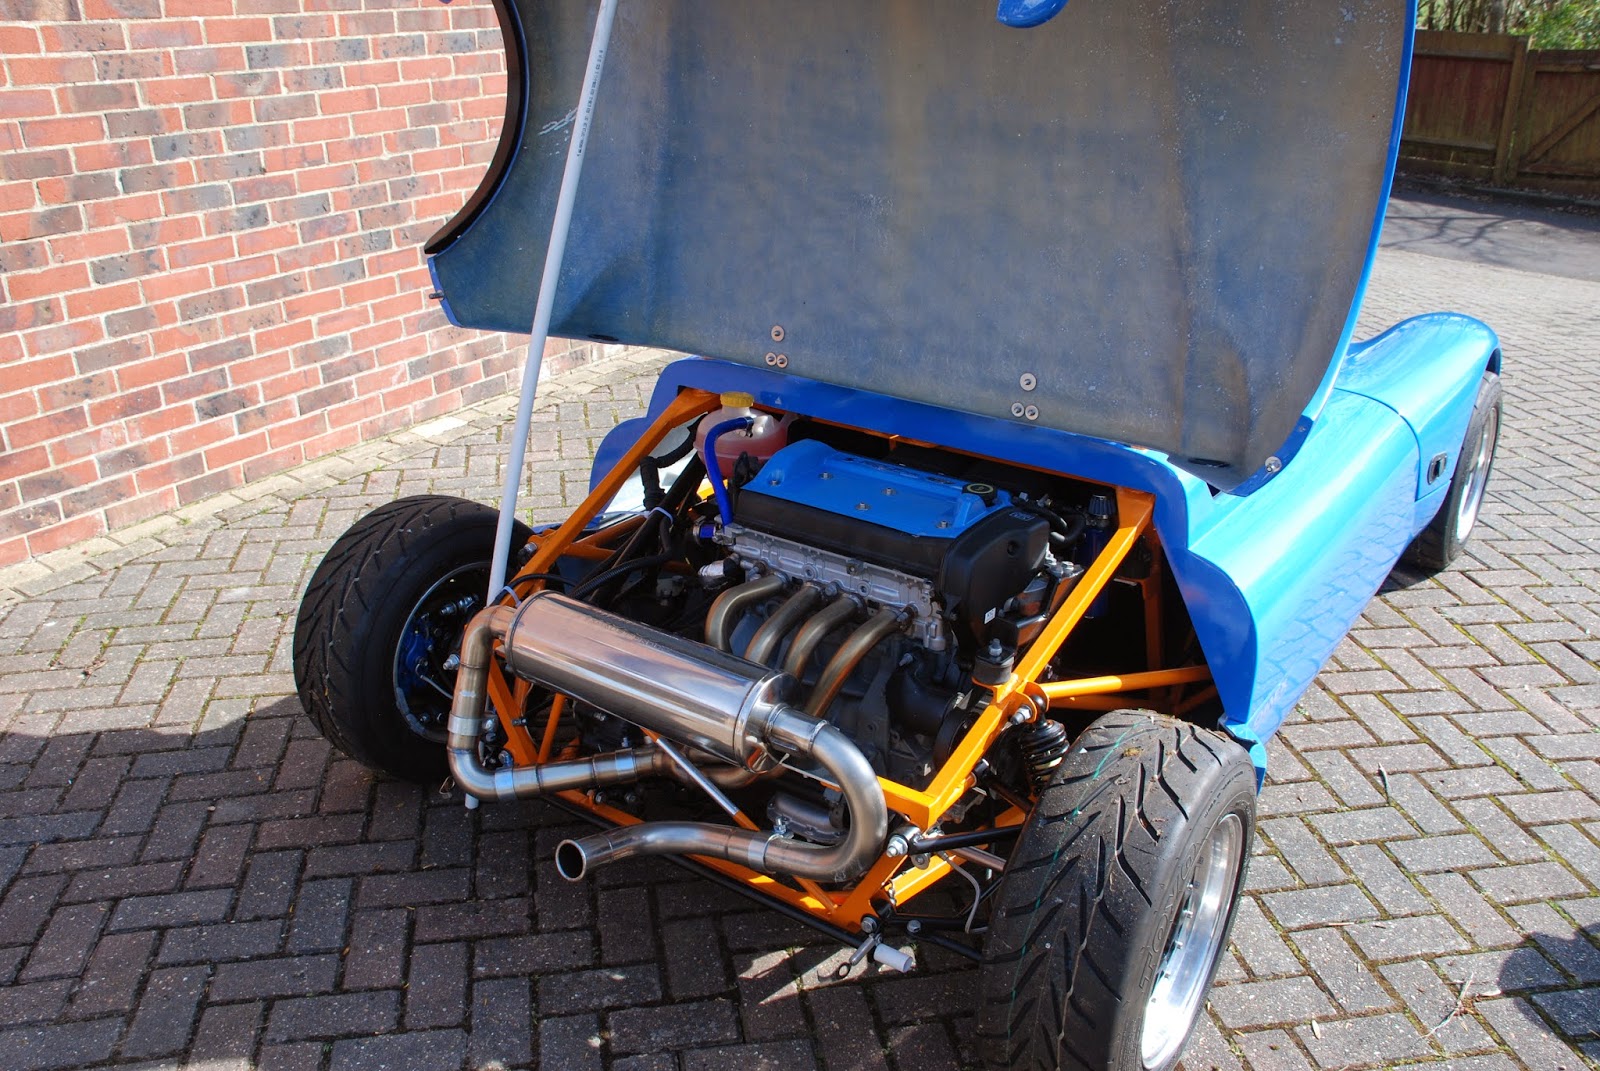
I can't fully see the logic behind them hinging rearwards....for me(who spends half my life tinkering in the engine bay), it was never an
option. Not suggesting my way is any better than Han the others, but does give as much access to the engine bay as you will ever need.
Of course, to do it this way does need the exhaust positioned higher.
MY BLOG - http://westfieldv8.blogspot.co.uk/
|
|
|
nickm
|
| posted on 8/12/14 at 07:57 PM |
|
|
Thanks
Will have a think on this one, i have the cat that sits on the top rail so it is only the tail pipe which comes straight out in line with the length
of the car at a 45 degree angle so if i could cut back and reapply the tail i could possibly get away with a rear that opens to near vertical.
Was thinking of the IVA compliant locks black plastic covered type behind the headrests and possibly bonnet pins in the wheel arch/3 way panel join to
cover up those panel gaps.
Thanks
Nick M
|
|
|
Kdempsie
|
| posted on 8/12/14 at 09:03 PM |
|
|
Fennel breakfast sounds good, I better get out to the garage!
|
|
|
stevebubs
|
| posted on 8/12/14 at 11:28 PM |
|
|
Don't know much about the J15 hinge mechanism but what about a couple of small gas rams that just push the bodywork back a couple of inches
before pivoting?
|
|
|
nickm
|
| posted on 21/12/14 at 08:45 PM |
|
|
Thanks
Finally had a chance to have a real look at it today and i think i may get away with cutting it where the pipe runs parallel to the hinge bar then cut
a couple of tabs and reattach with the tail pipe pointing downwards just seems such a shame to cut up and clamp that stainless pipe !
I have been cursing access to the engine throughout the whole build before i even put the boot on so i see the way forward to be some wheel ramps as
this is the only access point to the engine that i havent tried yet as i never feel 100% sure of axle stands (not when brute force is needed).
Hopefully get some days on it over xmas.
Nick M
|
|
|
ChrisJ15
|
| posted on 18/4/15 at 07:26 AM |
|
|
Hi Nick,
How did you resolve this in the end? I've been round and round in circles with this for ages now and have run out of other jobs to do so have to
get it sorted!
I originally was going for the Sylva solution but using Dzus for the four bolts on the hinge so the whole thing could come off quickly. Apperently
they arent strong in shear though.
I looked at using articulated car boot hinges with gas rams to hinge the clam forward and up but that all got a bit complicated.
I know Jenko and his front hinged solution above gives great access but I'm going for a retro look and have sourced some mini boot hinges but
they are slightly canted to allow for the curve of the mini boot and that gives another set of problems.
The yellow J15 on JPSC forum has got around most of the problems by having the exhaust exit halfway up the clam itself but that doesnt fit in with my
retro look.
Regards,
Chris
|
|
|
nickm
|
| posted on 20/4/15 at 06:20 PM |
|
|
Hi Chris
It was solved with the angle grinder !!
At the moment i have cut off the tail pipe and that is as far as ive got, my intention is to refit the removed bit with no upward angle on it, if that
doesnt work on its own i will shorten the very end of the tail pipe so keeping it more "tucked in" as well. I may even look around and see
if i could buy an endpiece with a 45 degree angle built in ?
Are you nearly finished yet ?
Nick M
|
|
|
ChrisJ15
|
| posted on 20/4/15 at 08:23 PM |
|
|
Hi Nick,
In a word No!
I've made some progress lately though. Wiring seemed to take forever but thats all done bar the lights at either end.
Im onto the bigger bits like bodywork but seem to be stuck in groundhog day with rear clam.
The original hinge design is so tempting as I could do it in no time at all but I dont want problems with the exhaust.
Will carry on head scratching until I run out of other bits to do!
Hope to be finished this year even if not IVAed.
How's yours coming on?
Regards,
Chris
|
|
|
nickm
|
| posted on 22/4/15 at 06:54 PM |
|
|
Hi Chris
Nearly there it is just getting the time to really get stuck into it. If i gave it to someone to finish like a garage it would be done in 40hrs, but
it is enjoyable honest ! just spent the last 2 weekends making an ali box for all the fuses/relays etc, makes it look nice and tidy but not really
required for function !!! hence the slow build.
Bonnet to go on yet and the boot and side panels need a tidy up gap wise but once i do it i think it will be presentable, the beauty with f/glass is
you can coerce into shape.
Pretty sure the boots gonna end up with a pattern of holes in it around the cat to let the heat out and some form of ducting hole on the front of the
bonnet near your shoulders on the outside to get some cold air in for induction and to help the cat.
Handbrake cables i will just try to run around the shocks by using ali brackets on the engine/gearbox and the cables elasticity, to hold them at the
other end i was thinking of a cut above each hole to slot the cable thru and then another bar with an identical slot in the bottem and hole fastened
to it with a centre bolt on the chassis bracket, may have to get the other end made up yet.
If i still had my garage attached to the house it would be finished by now.
Hopefully be able to get some extra done with the light nights
I always remember before i built my Tiger asking an old fella in the workshop how long it would take me to build and his reply was "the longer
it takes the better it will be" ...... Thats my excuse anyway.
Nick M
|
|
|
ChrisJ15
|
| posted on 9/5/15 at 07:58 AM |
|
|
Hi Nick,
Here's my fuse/relay box. Quite pleased with that bit.
https://lh3.googleusercontent.com/-anr9PPZzgQc/VU26IgyJHsI/AAAAAAAAAAw/raz374lFN5I/s912/SDC11680.JPG
The rear caliper was another period of inense head scratching! I inverted the VAG caliper internals to get a more favourable run of the handbrake
cable without introducing bleeding issues. That was fun!
These are some of the ideas for the clam. First was mini hinges. Looked really 'period' and would be even more so painted body colour but
'handed' nature didnt really work. Note the rear clam 'mock up' in carboard!
https://lh3.googleusercontent.com/-zPuJFGyBAmQ/VU26C8wzjzI/AAAAAAAAAAo/0I74c2HsKTc/s912/SDC11698.JPG
This is an articulated hinge I designed that would work in terms of how the clam would open. It would be glassed into the underside of the clam so
nothing showing externally. Have some 10mm x 5mm Aluminium bar but concerned how robust it would be in the open position. Figured on some gas structs
which would attach towards the rear of the clam to take the weight, unlike car boot/bonnet ones which have the strut nearer the hinge.
https://lh3.googleusercontent.com/-oA7UKx5ctLc/VU26U6jSq5I/AAAAAAAAAA4/pQeGJBAb2-E/s912/SDC11686.JPG
Also thought about having the exhaust exit halfway up the clam like Richard's yellow J15 but put a panel of mesh around it. That way the
original clam hinge system could be used which would be the easiest. Seems most people are adding some ventilation into the rear clam anyhow.
Current thinking is to go with stainless hinges at the front as per Paul's J15 and may paint these same colour as car too. However that may
change tomorrow!
Chris
[Edited on 9/5/15 by ChrisJ15]
[Edited on 9/5/15 by ChrisJ15]
|
|
|
nickm
|
| posted on 9/5/15 at 07:16 PM |
|
|
Hi Chris
Like the fuse box very neat tucked away, it is one of my little annoyances that i didnt lay the loom out with more length to the drivers side like
you, i ended up building a housing between scuttle and fuel tank with a lid.
The rear is fitted on the original hinge and will be pulled tight with IVA proof fasteners at the top but might need additional fasteners down at the
bottom as well, just considering at the moment whether to use the back of the headrest mounts to help support the fasteners.
I am getting to the stage where i am thinking just get it on the road and improve it later
Nick M
|
|
|
ChrisJ15
|
| posted on 10/5/15 at 10:16 AM |
|
|
Just had yet another thought with rear clam! Quite like this one though. Rather crude mock up below shows the concept. You have to look at the picture
at a distance and squint a bit to get the effect! Open up rear with mesh the same colour as gel coat.
That way you get:
1) Ventilation
2) Simple clam hinge as JP designed it
3) Easier exhaust
Bit of a leap of faith to start chopping up the clam though!

Chris
[Edited on 10/5/15 by ChrisJ15]
|
|
|
nickm
|
| posted on 10/5/15 at 07:26 PM |
|
|
Hi Chris
That must be an old phot that is at JPs house and the "original" name before he had to change it !
I can see mine having quite a bit of cutting out like that especially above the cat and at the rear like that.
Tried fitting my handbrake cables today but the drivers side is not quite long enough sods law
will have to search e-bay for the longest Toledo/VW one i can find.
Nick M
|
|
|
ChrisJ15
|
| posted on 17/5/15 at 09:10 AM |
|
|
Hi Nick,
I am fully hinged now (as opposed to being unhinged before).
Standard JP rear hinge has been done. Clam is quite twisted though and will need pulling straight. The front lower section in front of the nearside
wing is way out of line and the rear doesnt want to close flush with the tub.
Looking at catch options now. Is see from the JPSC forum that Richard's yellow one used bear claw catches which I like the idea of as theres
nothing on show on the outside but I'm not sure if that will sort the alignment issues.
How are you planning to do yours?
Chris
|
|
|
nickm
|
| posted on 17/5/15 at 07:11 PM |
|
|
Hi Chris
Got IVA proof bonnet catches on top with the rubber covers.
Looking down onto it it is quite well aligned and the panel gap is quite good but when i go to the continius curve of the wheel arch the
"boot" is out by a lot with the side sill, i may have to pull the cockpit further forward. This will be a huge pain but it should be just
a matter of enlarging the fibreglass holes as they are covered by large stainless washers so out of sight. The boot can be coerced/clamped but for the
arch rim that is the only solution.
Fitted handbrake cables today using spare holes in g/box and engine block, Home made ali brackets with rubber floor mat to grip the cable and force it
into the run i wanted works ok, but still to sort the mechanic of the "pull" but i have 2 threaded ends thru the chassis bracket so
looking good. N/S run back over the g/box past the rear rail mount and runs parallel to the gearshift to bracket, going back over the g/box kept it
tight and high away from the driveshaft, going back kept away fm spring shock. O/S similar but homemade bracket into engine block below alternator
kept it high away from shock and followed the engine block to the front part of the gear selector into chassis bracket.
May be i will be on the road this year !
Nick M
|
|
|
Jenko
|
| posted on 19/5/15 at 04:30 PM |
|
|
Gents, Don't forget the bodywork 'settles' overtime, so if you have your front and rear clams on, then best advise is to try and
align them by any means to hold them as close to their intended position as possible.....Obviously this doesn't help fore and aft movement, but
if the clams are 'splayed' out, they will get better once in position....especially if in a nice hot place :-)
MY BLOG - http://westfieldv8.blogspot.co.uk/
|
|
|
nickm
|
| posted on 19/5/15 at 06:58 PM |
|
|
Hi Jenko
Thats why mine is a bit to wide (but clampable) as its sat in the garage unattached for to long - sagging. I had thought about a bonnet pin type
device inside but it will probably be another IVA proof catch.
The wheel arch rim can be solved by shoving forward only as i cant cut or build up the misaligned curve.
Feel like im actually getting somewhere at last.
Nick M
|
|
|
ChrisJ15
|
| posted on 23/5/15 at 08:01 AM |
|
|
Just 'aligned' mine with nylon tye down straps. There's some serious mis-aligment going on!
The offside area where rear clam meets tub and sill lines up nicely but god knows whats goin on on the other side.
It looks like the tub is too high because if you line up the clam the lower section in front of the wheel sits about 10mm too high!
I cant see how dropping the tub down will help as it will simply move the sill away from theclam again.
I do like Aerocatches though, they are very nice things. Just wish I could align my bodywork enough to find somewhere to mount them.
|
|
|
nickm
|
| posted on 24/5/15 at 06:20 PM |
|
|
Hi Chris
My original thought was to push the cockpit fwd but after doing some measuring i realised it was pretty square/symmetrical, so did some more measuring
and one side is about 10mm further fwd on the bottom sills than the other but that difference will increase when i get the wheel arch to line up !!
not get smaller.
It should be a reasonable job just turning/extending the 6mm hole into a slot on the floor overhang and top rail (all out of sight) but i will check
with the bonnet before cutting.
Think the bottom line is nobody is ever going to measure bits apart from me but plenty of people will see it so the most important thing is for it to
look right.
Might get to do some work on it tomorrow.
Nick M
|
|
|


