joneh
|
| posted on 27/1/21 at 05:08 PM |

|
|
Polo Radiator mounting VW302
Evening all,
I've just acquired a new radiator, the VW302. eBay
linky Hopefully in the image you can see it has four lug / plastic holes on each side, I assume for mounting, however none of the
holes have threads.
Is this normal, if so, did you just tap the plastic, if not, how did you attach yours?
I've done a search and seen a few images where it appears these lugs have been screwed into.
|
|
|
|
|
big_wasa
|
| posted on 27/1/21 at 05:41 PM |
|
|
Yep tapped them m6 for the top 2.
I used the locating dowels into grommets on the bottom which held the weight.
|
|
|
02GF74
|
| posted on 27/1/21 at 05:44 PM |
|
|
My guess it fits using big self-tapper screws. Plastic isn't great for fine and shallow threads as found on bolts.
Re ^^^^^ on the production line I can't see Herr Heinz tapping a thread but just whizz in a self taper as t's quicker = cheaper.
[Edited on 27/1/21 by 02GF74]
|
|
|
Simon
|
| posted on 27/1/21 at 06:41 PM |
|
|
This is what I did at the bottom, then had something at top to stop it falling over.
[img]
 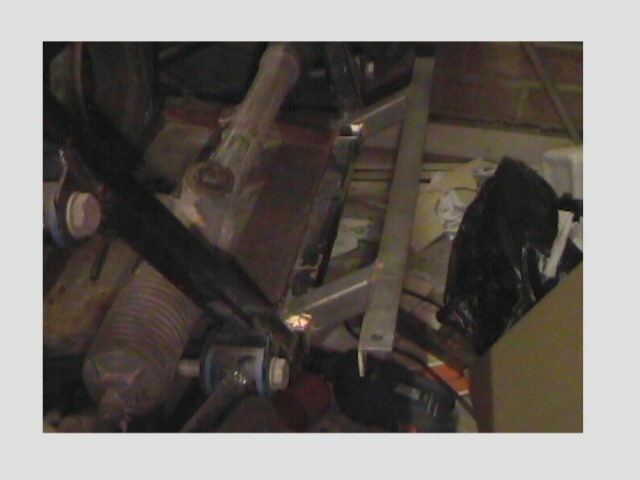
Lower radiator mounting
[/img]
|
|
|
joneh
|
| posted on 27/1/21 at 06:44 PM |
|
|
Awesome. Will make up something to take the weight and tap the mounting.
I thought about screws but it's not solid plastic, so self tapping screws would need to be m6 to fit the holes. The holes are fairly shallow so
it would need to be flat bottomed bolts to get enough thread in there.
|
|
|
jelly head
|
| posted on 27/1/21 at 06:45 PM |
|
|
The plastic on mine was "soft" enough where i could just wind the bolts in and they cut their own threads
|
|
|
adithorp
|
| posted on 27/1/21 at 07:14 PM |
|
|
quote:
Originally posted by jelly head
The plastic on mine was "soft" enough where i could just wind the bolts in and they cut their own threads
Same here on my current one, though on my original rad I used self tapping screws (trimmed to length/ points) so both methods work.
"A witty saying proves nothing" Voltaire
http://jpsc.org.uk/forum/
|
|
|
obfripper
|
| posted on 27/1/21 at 07:44 PM |
|
|
I tapped mine m6 and screwed in rubber bobbins to attach to the body, the previous escort rad had cracked several times from being solid mounted.
https://www.dropbox.com/s/glrxlqwnuh2xrhn/20161203_193552.jpg?dl=0
The factory use was self tappers for the blower fan mounts (and a/c condenser round the front) , the original rad mounts were the lugs at the bottom
and a metal strap into slots at the top.
Dave
|
|
|
joneh
|
| posted on 27/1/21 at 08:02 PM |
|
|
quote:
Originally posted by obfripper
I tapped mine m6 and screwed in rubber bobbins to attach to the body, the previous escort rad had cracked several times from being solid mounted.
https://www.dropbox.com/s/glrxlqwnuh2xrhn/20161203_193552.jpg?dl=0
The factory use was self tappers for the blower fan mounts (and a/c condenser round the front) , the original rad mounts were the lugs at the bottom
and a metal strap into slots at the top.
Dave
Thanks, that's interesting. Think I'll make use of the lugs at the bottom to take the weight, then screw / bolt the fan on the front.
[Edited on 27/1/21 by joneh]
|
|
|
big_wasa
|
| posted on 27/1/21 at 08:26 PM |
|
|
Did mine like Simons above.
|
|
|
ianhurley20
|
| posted on 28/1/21 at 09:13 AM |
|
|
I used some M6 self tapping hex head bolts that came from the MX5 strip down somewhere with home made butyl rubber washers from a pond liner to give
the mount a little flex, worked well and even survived hitting a tree (the rest of the car didn't though) 
|
|
|
pmc_3
|
| posted on 28/1/21 at 10:34 AM |
|
|
I just used some like these I had kicking about
VW Hex self tapping bolt Worked a treat. Used them one side for the mounts and the
other side to mount the fan.
[Edited on 28/1/21 by pmc_3]
|
|
|
nick205
|
| posted on 28/1/21 at 01:56 PM |
|
|
Sames as Simon, welded a bracket on to support it from below (used the two locating pegs on the radiator) and the some Ally strips and self-tappers
into the top two plastic lugs to stop it tipping forwards/backwards. Worked jsut fine for 3k miles for me an several k miles for the next owner.

|
|
|
James
|
| posted on 28/1/21 at 06:21 PM |
|
|
I managed to fit a Golf rad in. It's maybe 50mm wider but I believe the same design as the Polo otherwise.
I used the 2 pins to take the weight and the 4 mounts to hold the fan.
 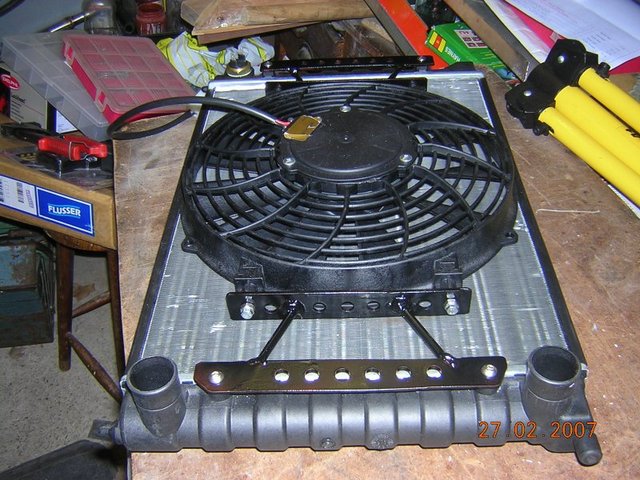
Golf rad and fan mounts 2
Cheers,
James
------------------------------------------------------------------------------------------------------------
"The fight is won or lost far away from witnesses, behind the lines, in the gym and out there on the road, long before I dance under those lights."
- Muhammad Ali
|
|
|