I thought it was about time I posted a diary of my engine conversion on my MK Indy. Finished and IVA’d the car in October last year and enjoyed a few
months of running after making and fitting a full cage post IVA. MK Indy RB968
Intention is to use this thread to record the conversion. I have made some videos and put on Youtube with photos on Flickr but wanted to write it up
as well.
I bought the Indy as a part started project, basically a rolling chassis which already included a Kawasaki ZX9R of B3/4 vintage. Initial testing and
IVA setup was fine and the bike engine went well but took a bit of getting used to the noise, the frenetic experience, gearchange etc. This year
however the gearbox started to become temperamental, there was a vibration at certain revs that was driving me up the wall and the lack of proper
reverse eventually meant I didn’t enjoy or use the car as much as I wanted to. I got the car originally to do some fast road driving and track days
but didn’t trust the engine/gearbox enough to go on a track day. It was time to change something.....
Initial idea was keep it simple and go for an MX5 engine and box, Megasquirt and changes to go to fuel injected from carbs. Then I saw clairetoo’s V6
/MX5 combo and the idea stuck.
I knew others had done V6’s in locosts and the all alloy low weight of the KLDE and decent power output with an easily sourced MX5 gearbox plus the
bonus of the Triumph throttle body setup for noise, look etc. had me hooked.
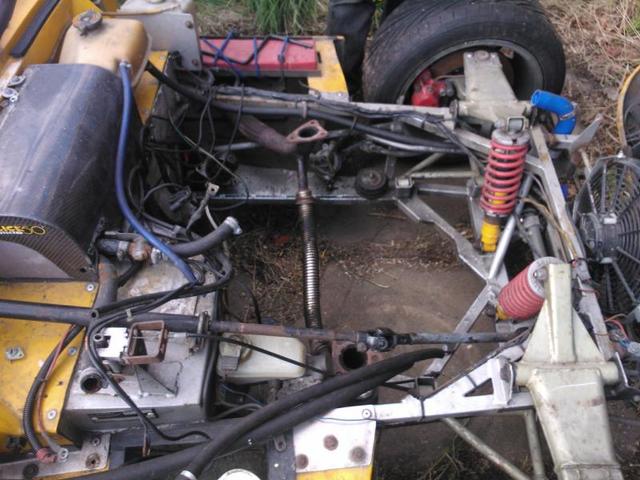
So in July I sourced a 71k mile KLDE from a Ford Probe, pulled the ZX9, exhaust, prop and started looking to test fit the engine. Description
Keeping track of the weight difference from the beginning the ZX9 engine wet with cradle weighed in just under 80Kgs. Description
and the KL weighed in dry without ancillaries at 112kgs Description
Once we had made a few minor adjustments to get the gearbox to sit far enough back and high enough in the tunnel we could test fit the engine and it
just fit. Description Description RB gearbox test fit Description
Rich
rb968 - 14/10/12 at 11:28 PM
I had already contacted Claire to ask a fair few questions so now was time to order one of her great adapter kits.
Using the KL flywheel but a Mazda MX5 215mm clutch and MK1 gearbox it works a treat. KL MX5 adapter RB
The KL starter mounts from the gearbox side which means cutting a section of bellhousing away. Starter fitting RB
There are a few other minor mods mainly shaving bits of the inside of the bellhousing as the flywheel is set back further than normal with this
adapter so touches in a couple of spots.
The obvious issue with this setup is the starter fouls the passenger footwell so out with the cutting disc ! Footwell Mod RB
It was a bit close for comfort as the starter only just clears the bottom chassis rail but it fits and and whlst the tail of the gearbox is higher
than the tunnel top its only 1 inches so can disappear under the gaitor.
The tunnel mods included cutting and moving the horizontal cross member back a couple of inches and relocating the vertical rail as well. I also had
to mod the top right rail as the MX5 gearbox whilst not large has a cover for the spring loader on the right hand side and this fouled the rail. I cut
a section out and welded in a solid bar rather than box section. Tunnel mods RB
Rich
rb968 - 14/10/12 at 11:41 PM
I ordered a propshaft rom Dunnings and Fairbank and have to say they were a pleasure to deal with and a fair bit cheaper than Bailey Morris. New DandF prop
I also cheated and bought some stainless manifolds off eBay for the Probe V6. These were never going to be any good as they were as the engine is
normally transverse in front wheel drive format but it gave me the flanges, 3-1 collectors and lambda bungs.
It was a bit sould destroying hacking them up and I think I bit off more than I could chew as my MIG welding of stainless was wee poor but they
worked out ok. Started with the nearside as there was more room.
Tape is a lot easier than welding ! Manifold Fab RB
The offside was harder as I had to clear the steering column , chassis rail and got a bit close to the brake master cylinder. Exhaust offside RB
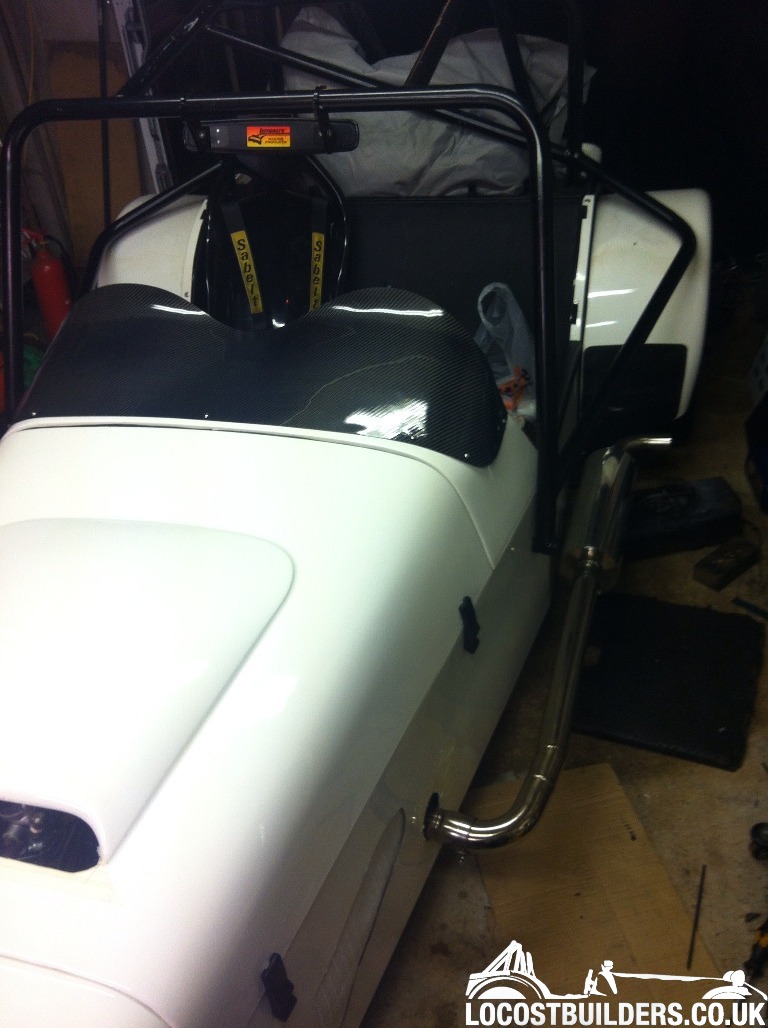
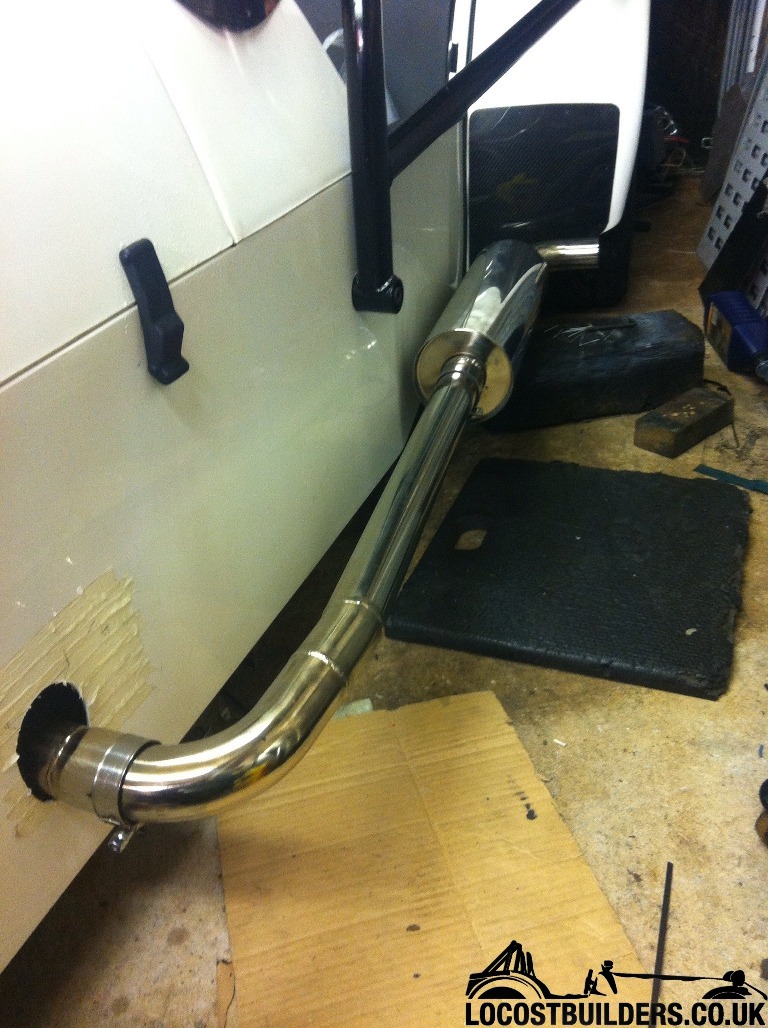
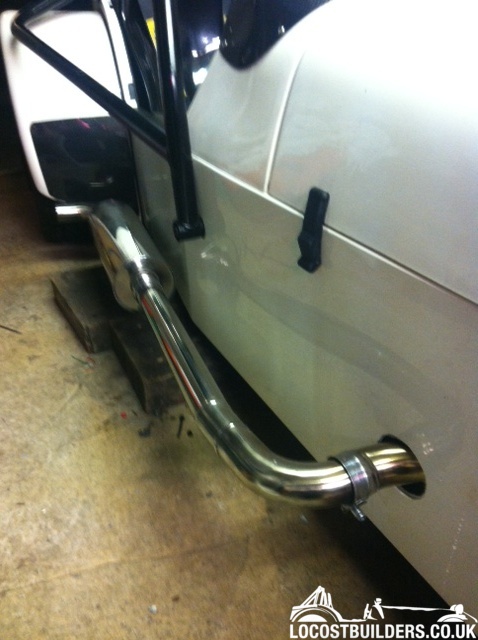
Anyway they worked out OK. Time will tell if they are totally gas tight. Cue a load of stainless exhaust bits bought from Exhaust Uk on eBay. I went
with 2" pipes each side and 2 16" x 5" silencer each side. Exhaust complete RB
These were tig welded (I do not want my crappy welds on the outside!) and then I polished the lot on my bench grinder.
The right angle turn through the fibreglass is a bit tight so I will be adding some heat matting inside to protect the bodywork and the brake master
cylinder.
Rich
www.youtube.com/rb968
RK - 15/10/12 at 12:47 AM
That's really coming along. I'm just finishing some body work before I go try out my new SR20DET, from the old CA18DET. Had to hack the crap
out of the nosecone and bonnet, but apart from some painting, I'm done. Of course, it's raining all week here. It is at least 20 to 30 HP
more than the old engine, and makes the brakes seem weak. You might want to consider checking your brakes as part of your makeover.
James - 15/10/12 at 10:56 PM
Going to be following this with great interest- keep us updated!
Cheers,
James
rb968 - 17/10/12 at 10:21 PM
Another update to just about catchup with where I currently stand with this conversion.
I bought a 40 Amp Denso alternator so looked to make a mount and a way to adjuster the belt. With no ancillaries I decided to run a single belt from
the front pulley of the crank pulley and drive both water pump and alternator. This meant spacing the water pump pulley. Luckily we have machine shop
at work who made me a 28mm spacer.
I modded an adjuster from the rods used for my ZX9 gearchange. Seemed to do the job. Since the photo was taken I have remade the brackets out of 3mm
steel to stop any flexing.
I test fitted the engine to ensure the alternator cleared the chassis brace and to test fit the new prop. Trial fit KL RB
This revealed a(nother) ballsup as the tunnel chassis member I moved was now exactly where the joint on the prop was and guess what.......it just
touched when rotated.....so later that was cut and moved and welded back and re-painted RB new prop test fit cockup
While we were at it we test fit the starter again and tried turning the engine over on the starter for the first time in the car. Its been turned over
by hand and briefly on the garage floor but this is the first time with everything bolted together.
Cue the chuckle brothers (my Dad and Uncle) in charge of jump leads. Dad with his head in the footwell and my Uncle next to the clattery Xantia
neither of whom could hear the other.....this was the 3rd attempt.....
Success! no horrendous noises, and the belts went round.
When the engine came back out I installed the trigger wheel and made a bracket for the VR sensor. Both from trigger-wheels.com where I also bought a
Microsquirt and EDIS kit as I am copying Claire's alpha-n EDIS setup to keep it simple.
Made an inferior version of her coilpack mount as well which sits above the bellhousing. Coilpack mount RB
Early on it was obvious the bellhousing and clutch release arm were very close to the drivers footwell bulkhead. We had to remove the old clutch
master cylinder to get the gearbox in place so it was time to think of a solution. I was going to look at a vertical mount cylinder but these were
pricey so I had a look at the MX5 and saw it has the pedal mounted above . eBay visit later and I had a complete MX5 pedal and master cylinder. Cut
the pedal up as it was miles to long and mounted it as high as possible in the footwell and drill holes for the pushrod and mounts. RB gearbox clutch arm
All pretty tight but it will work. Going to make up a custom clutch hose to the standard MX5 slave cylinder and rod. RB clutch master cylinder MX5
So thats about up to date. Been tarting bits up and spending a small fortune on eBay. Got a intake manifold temp sensor, Claire is ordering me a set
of Magnecor plug leads and sending me a set of her throttle bodies.
Spent 20 minutes in Halfords finding a smaller M20 thread oil filter as the full size one hits the chassis rail....new one is off a Nissan Note!
Hopeful it will mean I don't need to run a remote filter. Small oil filter KLDE
Got a couple of days off work to start wiring....oh joy.
Rich
FASTdan - 18/10/12 at 06:49 AM
Nice thread, good to read about something different :-)
Proby - 18/10/12 at 07:06 AM
Excellent thread, nice informative read with great pictures......
zilspeed - 18/10/12 at 08:59 AM
quote:Originally posted by Proby
Excellent thread, nice informative read with great pictures......
+1.
Great to see.
Also great to see someone going for it.
rb968 - 18/10/12 at 09:33 AM
Cheers guys.
Hopefully I can make it work. Can't wait to get it started. Throttle body setup should be with me by the weekend thanks to Claire so hoping for
some itb porn and making some great progress.
Rich
zilspeed - 18/10/12 at 01:01 PM
quote:Originally posted by rb968
Cheers guys.
Hopefully I can make it work. Can't wait to get it started. Throttle body setup should be with me by the weekend thanks to Claire so hoping for
some itb porn and making some great progress.
Rich
Vee engines with downdraft throttles side by side will always look fantastic.
rb968 - 18/10/12 at 05:39 PM
Making an air box might be fun though.... Might be bit tight for space!
But the best thing about it? One BEC has seen the light of reason and converted to CEC!
If God meant cars to have bike engines, He wouldn't have called them CARS!
Keep up the good work, that man!
clairetoo - 19/10/12 at 07:37 AM
Looking good
One small , but important point though - I see you are running the alternator belt on the front (larger) part of the bottom pulley - this could well
cause a problem , since you will find yourself spinning the alternator well beyond its limits , probably as high as 20000 RPM..........
PS throttle bodies are in the post
rb968 - 19/10/12 at 09:48 AM
Good point Claire. I did change the standard alternator pulley from a larger v belt pulley to this ribbed belt pulley. But I won't pretend I had
worked out the difference compared to the main pulley size.
I guess I may need a bigger alternator pulley if it is over spinning.
Rich
rb968 - 19/10/12 at 09:51 AM
quote:Originally posted by stevegough
Excellent, informative, concise, well-written, visual thread.
Unusual engine fitment in a kit, too.
But the best thing about it? One BEC has seen the light of reason and converted to CEC!
If God meant cars to have bike engines, He wouldn't have called them CARS!
Keep up the good work, that man!
Cheers Steve. I know it's a bit different but weight wise I hope it's lighter than a Pinto or even a zetec and type 9.
But a bit more interesting.
I was waiting for some stick about giving up up on the bike engine but in this case it just wasn't for me.
Rich
rb968 - 19/10/12 at 07:02 PM
Right I measured my pulleys today.
Double check my figures....
Main crank pulley front pulley is 140mm dia, alternator pullley is 58mm so 1:2.42 ratio.
At 7500rpm crank speed the alternator would be turning at 18150rpm
The rear section of the crank pulley...which I guess is what the alternator on a Ford Probe normally runs of is 120mm so thats 1:2.07 ration i.e. 7500
rpm = 15525 rpm alternator speed.
Claire, what size pulley is the std alternator fitted to the KL?
Rich
clairetoo - 19/10/12 at 08:28 PM
I dont have the measurements to hand , but on both my Fury and Mx5 I've used the same dia as the smaller part of the pulley , and just to be safe
made slightly larger alternator pullies ( I set the rev limiter to 8000 since peak power should be at around 7300......)
Dont forget the max revs on a stock Ford Probe/Mx6 is (Ithink) less than 7000 .
I can make you a set of suitable pulleys - just as soon as I get the use of both of my hands
DIY Si - 21/10/12 at 09:25 PM
Looking good. It's nice to see Claire's influence and that of the KL spreading!
I'm doing very much the same thing for my Sprite, but with tarty red cam covers!
Are you going to get yours rolling roaded once done? And what ECU are you going with? I'm going the full sequential route with mine, which
isn't really needed, but I wanted to anyway!!
[Edited on 21/10/12 by DIY Si]
rb968 - 21/10/12 at 09:45 PM
Very nice!
I am using a Microsquirt and EDIS trying to keep it simple as Claire seems to have done very successfully. This is my first venture into a custom ecu
so really I want to get it running and use it.
I am hoping to get some good base settings from Claire and then yes I fancy getting it rolling road setup somewhere as much to make it safe and
reliable as to get more power. I think it will have plenty!
Rich
athoirs - 21/10/12 at 10:35 PM
[img][/img]
Rover KV6 300+ HP ...
rb968 - 21/10/12 at 11:39 PM
Nice trumpets!
DIY Si - 22/10/12 at 08:11 AM
Thinking about trumpets, have you had much thought about the air box/filters yet? I know Claire has her CF air box sealing against the bonnet, but I
would prefer to avoid going that way if possible. But equally, space is limited and it does save a bit of room. I've been toying with the idea of
a separate filter for each bank but haven't looked into it much yet due to an impending house move.
rb968 - 22/10/12 at 08:28 AM
Yeah, its going to be interesting I suspect. I haven't got my hands on the throttle bodies yet but clearance under the bonnet is going to be
tight.
My current thought is to make a smallish airbox fed via a cone filter from the rear but with a lid unlike Claires.
With my limited fabrication skills I will probably have a go with some aluminium and see what it works out like.
I have thought about individual filters or as you suggest 2 filters doing a bank each. I even started looking at if you could buy sheets of filter
foam so if desperate I could make my own. Kind of like 2 small pipercross style filters. After all they are basically a frame, a piece of mesh to give
the shape and some foam so can't be that hard !
I'll keep you posted once I receive the throttle bodies, hopefully today!
Rich
clairetoo - 22/10/12 at 08:46 AM
I do have a mold for an airbox which may be usefull - theres no inlet on it , and it would need modding above the rear linkage , but if you can use it
I can knock one up (as soon as I get some resin..........I normally `borrow' that from work but I'm not there at the moment )
I've bunged in a complaint at Citylink - the `bodies were due for delivery on Friday
This is a slightly cut-down one on a Fury I did .
[Edited on 22/10/12 by clairetoo]
rb968 - 22/10/12 at 02:42 PM
Claire,
That looks like it would work for me. Add it to the list........ ;-)
Cheers
Rich
zilspeed - 27/10/12 at 08:42 AM
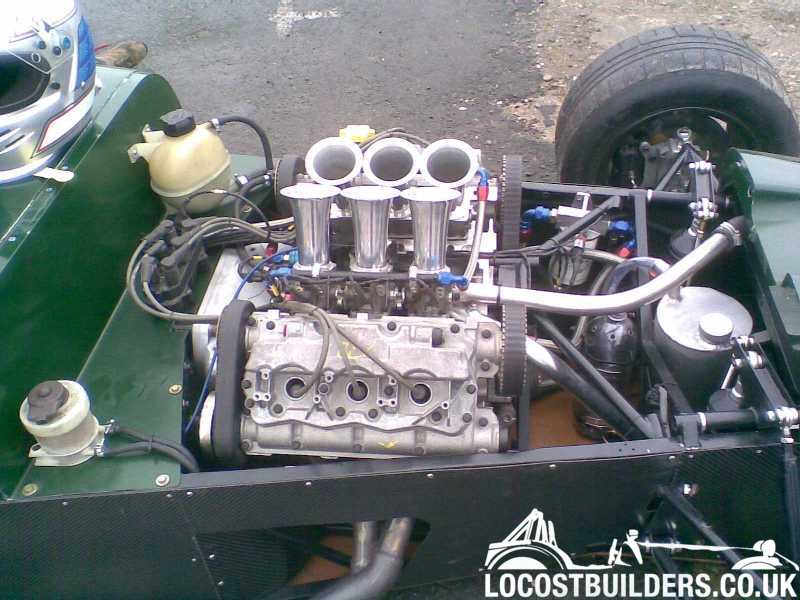
quote:Originally posted by athoirs
[img][/img]
Rover KV6 300+ HP ...
Andy
I think that's the first pic I've seen of the Mutch / Jolly car which gives a proper view of the engine installation.
Love that the engine is set low and well behind the front axle line.
This has been one of my favourite drivetrains in combo with the funky gearbox.
Nick DV - 27/10/12 at 09:05 AM
quote:Originally posted by zilspeed
quote:Originally posted by athoirs
[img][/img]
Rover KV6 300+ HP ...
Andy
I think that's the first pic I've seen of the Mutch / Jolly car which gives a proper view of the engine installation.
Love that the engine is set low and well behind the front axle line.
This has been one of my favourite drivetrains in combo with the funky gearbox.
[Edited on 27/10/12 by Nick DV]
rb968 - 28/10/12 at 06:28 PM
Another update (plenty of photos as usual).
Sitting watching the GP highlights after a day in the garage. Bloody miserable weather though.
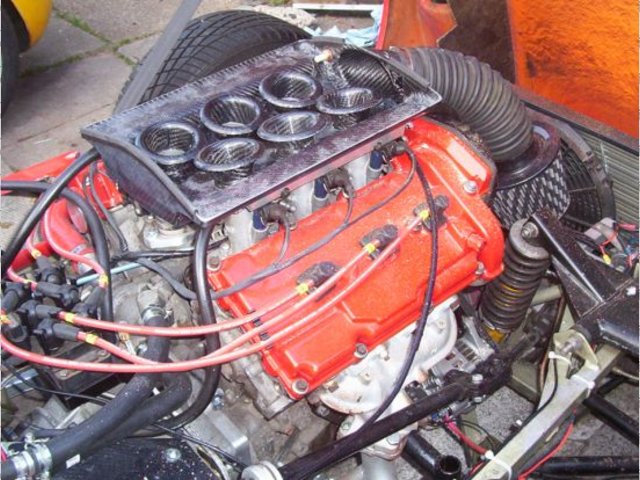
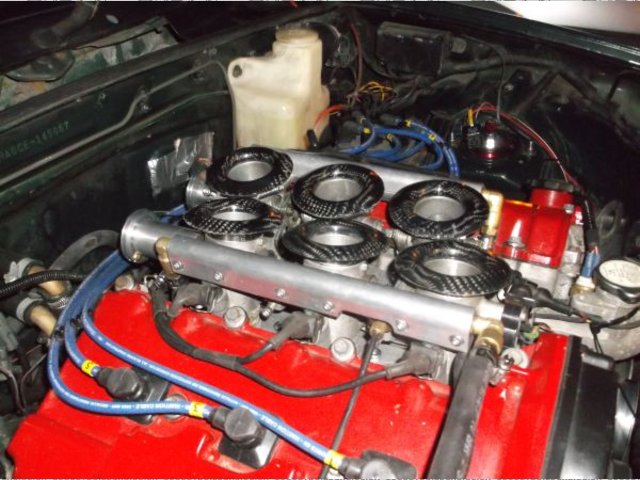
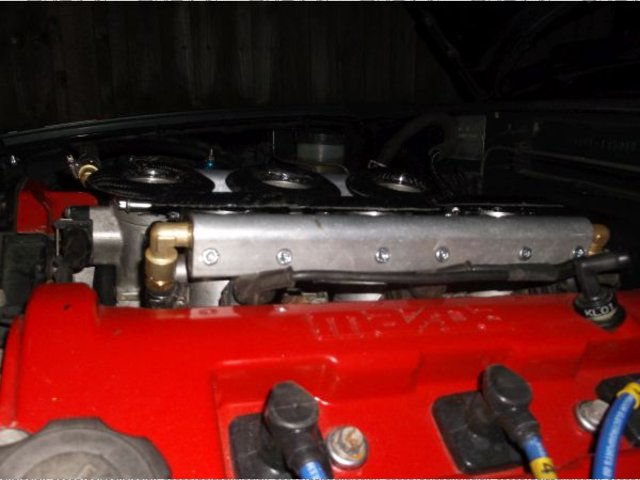
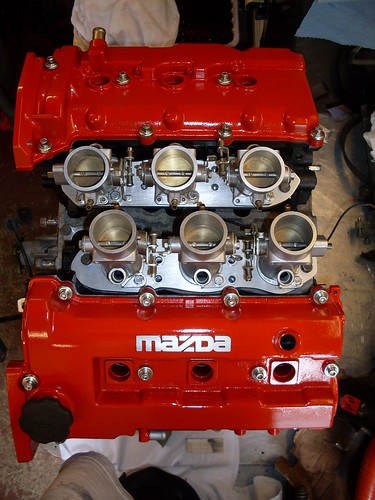
Claire managed to get my throttle bodies to me. These are 2 lots of Triumph triple 595 bodies on custom alloy manifolds, spaced to the KLDE ports and
with Claire's own linkage. Claire uses Vauxhall 2.5 v6 injectors on custom fuel rails.
No offence to Claire intended but they had the patina of use.....and quite a lot of orange sealant so I spent an hour cleaning them up a bit. Cleaned ITBs RB Cleaned itbs 2 RB
I have also started wiring in my Microsquirt and EDIS.....well to be honest so far I have been trying to extract the motorbike Ignitor unit and
fusebox and replace with additional fuses and relays.
Wiring Micrososquirt RB
Luckily the Microsquirt docs online are really clear and so once I have pulled all the crap out I no longer need it should be pretty straightforward.
Bit limited with what I could do or test until the engine was in so.......
Sunday's job was to get my 2 assistants in and a couple of little jobs like torquing the crank pulley bolt and resealing and fitting the sump
were done. Clutch slave cylinder was fitted to the gearbox and the gearbox filler plug loosened so we can fill it once in and it was time to drop the
engine and box in......hopefully for the last time.
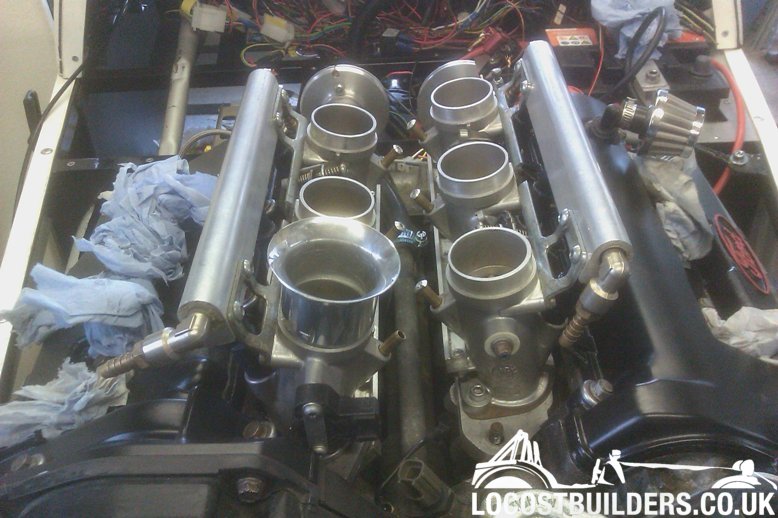
All looking good eh? They look great. Slight issue in that the bonnet clashes with the fuel rail on cylinder 1. This is the furthest forward and
basically hits the flat of the bonnet in front of the scoop. So it looks like I will need to cut away the bonnet in front of the scoop and make a
larger mesh cover. Always knew clearance was going to be tight. Shame as the rearwards itbs have loads of room above them where the scoop is.
I suspect I may have to run individual filters as opposed to an airbox unless I mod the bonnet massively. I am sure this will look and sound fantastic
but not sure of the downsides? Thoughts welcome.
Fitted the manifolds and checked clearance on the steering column. TIGHT! Manifold clearance RB1
Quick shot of the tunnel. Prop fitted and clear of everything Woohoo!. You cans see how high the gearstick sits but I am not concerned about this. A
decent gaitor will cover that. Tunnel final engine fitted RB
So a busy week next week getting it all wired and plumbed in. No doubt a few more issues to sort but the clutch is working. Made a custom hose up and
in case I haven't mentioned it, am using an MX5 clutch pedal assembly, master and slave cylinders. We jacked the car up and check it is releasing
ok. Good pressure and feel so fingers crossed.
Rich
clairetoo - 29/10/12 at 08:26 AM
quote:
No offence to Claire intended but they had the patina of use.....and quite a lot of orange sealant so I spent an hour cleaning them up a bit.
I dont really do polish , me
I see you have put a filter on the PCV valve........that'll be a bit redundant since nothing will come out or go into that , I'll have to
see about turning up a blanking plug .
Looking good now though - I'll chase up the plug leads today rb968 - 29/10/12 at 01:43 PM
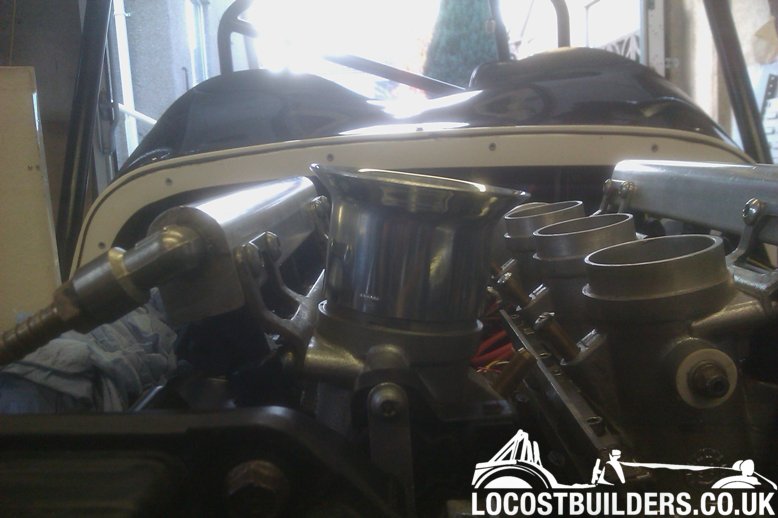
The other day whilst trawling eBay I looked at some really cheap intake trumpets and decided with Claire's hand out of action (she was making me
a set of carbon ones) I would order one to test fit.
It turned up today. Its aluminium, no taper Ł2.50 delivered!!! Ok no rolled edge but beggars can't be choosers.
Nipped up to the garage on my lunch hour and cut it down to 40mm and its a perfect tap on fit over the turned down throttle body.
I still need to mod the bonnet obviously and take about 30 mm out in front of the scoop to clear the trumpet, fuel rail and outlet.
I am thinking it might be easier to fasten an individual filter to the aluminium than a carbon trumpet but I guess they are pretty strong?
Rich
[Edited on 29/10/12 by rb968]
clairetoo - 29/10/12 at 02:13 PM
The thing with individual filters is - they are a power killer , plus you will need to raise the bulge about three inches to clear them.......
I've just ordered some resin and carbon , I think I can do a bit of molding with 1 1/2 hands
rb968 - 29/10/12 at 03:11 PM
Yeah I know. I was thinking more along the lines of a glorified mesh filter rather than a filter sock.
I will hack the bonnet in front of the scoop and see how it looks above all 6 bodies first
Carbon ones would look good Claire
I think I am struggling for airbox space and don't really fancy hacking the bonnet to bits!
Rich
clairetoo - 29/10/12 at 03:19 PM
It looks from the pictures like you have a good inch above the rails - thats about what I have on my Fury , so plenty of space for an airbox
rb968 - 29/10/12 at 03:34 PM
Oh well in that case.........that sounds like plan A.
DIY Si - 29/10/12 at 06:37 PM
Those are almost the same trumpets I have for mine! The only difference is I wanted mine to be sliding fit to the inner edge of the bodies once
they're cut back a little to leave a lip for them to seat against. I don't like the idea of having the exposed lip like you do, although it
is a much easier option!
The other thing to remember with an airbox is that ideally it would be at least the diameter of the trumpets above them. But this is often easier to
achieve than with filters.
PS, any chance of a view of the bottom of the adaptor plate? Curious to see if all the extra work I've put into mine is worth it or not......
rb968 - 17/2/13 at 07:56 PM
Finally got to move the Indy back outside and see if it moves under its own V6 powered steam!
Not much of a video, but another milestone.
Rich
rb968 - 22/2/13 at 12:13 PM
Quick update:
Exhausts are now finished with new mounts. First attempts weren't strong enough so new ones are belt and braces strong!
Exhausts worked out pretty well and pretty cheap. Drivers side is VERY close to the fibreglass. It has discoloured slightly so I have added more heat
protection and wrap to the joint that is nearly touching.
They are now assembled and sealed hopefully won't leak too much.
Replaced my Koso RX1N with some new Koso gauges as 15k revs is overkill even for the KL engine! Bit disappointed the rev counter is considerably
smaller than the speedo for a matching gauge but its my fault for reading the dimensions wrong from the website.
Due to the weird holes I cut for the RX1N I made a small ally plate, covered it in black vinyl and mounted the clocks into it. Covers most of the
holes. Went for these because the rev counter has a water temp gauge built in and the Speedo has the same warning lights for indicators, main beam etc
as the old RX1N plus fuel gauge and uses all the same existing speed and temp sensors.
Just got the tunnel top to recover in vinyl and I need to make a cover for the gearbox gearstick tail that sticks up through the tunnel.
Getting there......
Rich
[Edited on 22/2/13 by rb968]
[Edited on 22/2/13 by rb968]
[Edited on 22/2/13 by rb968]
silky16v - 22/2/13 at 02:03 PM
Good read this, have you planned where you are having your car Mapped?
I'm in cumbria also and shall be in the next week or 2 taking mine to EFI parts for mapping EFI Parts
rb968 - 22/2/13 at 04:53 PM
Good question........
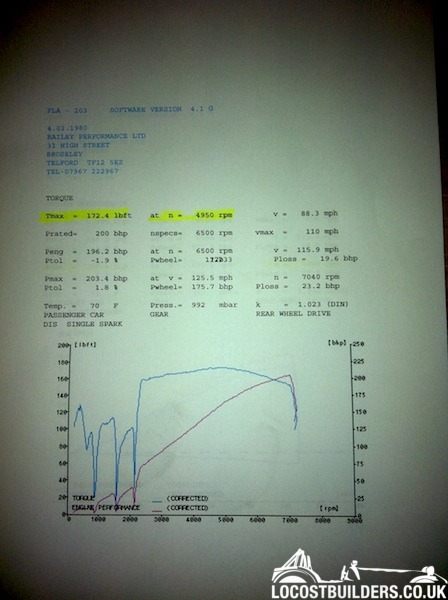
I had heard good things about Dale at Bailey Performance from others on here so he was a candidate as its on Microsquirt.
Not see EFIParts , have you used them before or had the recommended ? Is yours Megasquirt ECU or Omex /AEM?
I was going to post soon looking for recommendations in the North West. I have a trailer so don't mind dragging it a few miles to the right
place.
Rich
rb968 - 24/2/13 at 10:49 PM
New mirrors fitted. These were a bit of a punt they would be long enough to be visible past the front cage legs but the passenger side just about
works. Might put a 15 mm spacer under the fixing to help it out.
Made a small cover out of some thin steel for the gearbox tail that now sits proud of the tunnel top. It ain't quite as pretty as I envisaged but
will do the trick for now. Mk2 version may be needed! Gearstick surround rb2
I've been following your thread, your project looks very nice, near identical to what I want to do. When you get a chance of driving on the road,
you'll need to do a video to hear that gorgeous engine! What diff are you running?
Kevin
quote:Originally posted by rb968
Interior update.
Installed the recovered tunnel top and gearstick surround and attached the new leather mx5 gaitor I bought off eBay.
Cheers Kevin, getting much nearer now. Interior is all back together, seats and harnesses back in.
Even more tie wraps still needed to tidy wiring behind the scuttle and dash.
Oh I can assure you there will be video once its on the road!
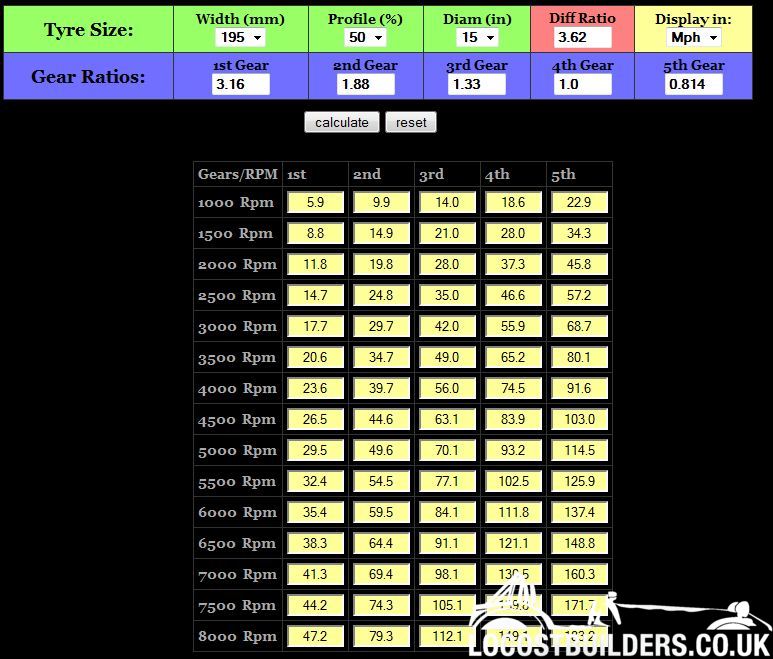
Running an open Sierra 3.62 diff. Did the online calcs which came out as below:
Which I don't think look too bad. 75 in 2nd could be interesting ! 80 mph in 5th is 3500rpm so not horrendous.
Can't wait to drive it. I am seriously considering loading it on the trailer and taking it to get tuned on a rolling road though. however I would
like to drive it first and autotune a bit just to shake down any minor leaks etc so as not to embarrass myself on a rolling road with bits dropping
off!
Rich
rb968 - 7/3/13 at 11:36 PM
I have adjusted my ride height slightly now the suspension has settled with the KL in place and with an un-chopped sump I have a sump clearance of
about 85mm. Sump height rb98
I suspect I might have to chop the sump at some stage but hoping this will be ok while I get it running.
Great result but loads of niggly things to sort out now that Dale found. Plus the VR sensor packed up right at the end of the day so I have ordered a
replacement. Just need the DVLA to pull their finger out and send my V5 back so I can tax it !
Rich
DIY Si - 25/4/13 at 07:52 AM
Well done that man.
rb968 - 25/4/13 at 05:31 PM
Cheers mate. New crank sensor from Ford fitted yesterday....fired straight up. Phew!
Can't wait to drive it. Come on DVLA
Rich
rb968 - 2/5/13 at 07:25 PM
Been to Preston today to sort out my tax disc after the DVLA lost my V5C. Thought it rude not to take the car out for my first drive tonight as the
weather is nice.
LOUD! Loads of torque. Sliding around in 2nd with a small amount of throttle at low speed. Clutch and gearbox feel great. Engine sounds brilliant and
plenty of pops and bangs. Kids on the estate where I keep it were loving it!
I know no video and it never happened. Will sort something out on Monday if we have decent bank holiday. Off to buy a GoPro.
Bloody chuffed to bits. Might have to borrow a sound meter before any trackday action though!
Thank you Dale at Bailey Performance, thank you Clairetoo.
Rich
clairetoo - 2/5/13 at 08:13 PM
I found fresh T1R's almost sorted the sliding around........
So glad to hear this is on the road - now get out there and spread the V6 message
Dangle_kt - 2/5/13 at 08:56 PM
Excellent work! Enjoy the weekend!
rb968 - 7/5/13 at 10:34 PM
A little taste of the noise. Bloody GoPro videos are massive so had to compress it a lot.
Rich
rb968 - 7/5/13 at 10:34 PM
rb968 - 8/5/13 at 10:04 PM
DIY Si - 10/5/13 at 12:28 PM
How close to the redline are you getting in those vids? And did you reset it to 8K?
rb968 - 10/5/13 at 05:13 PM
Haven't changed the rev limiter yet so it's still at 7300 rpm. Think I got to 6500 ish on one.
maccmike - 10/5/13 at 05:35 PM
sounds great. don't like the van overtake though
pmc_3 - 10/5/13 at 05:53 PM
Sounds awesome!
DIY Si - 11/5/13 at 04:12 PM
quote:Originally posted by rb968
Haven't changed the rev limiter yet so it's still at 7300 rpm. Think I got to 6500 ish on one.
Any chance of a vid with running it to the redline? I'm curious to see what it sounds like, as my exhaust will probably have a slightly different
configuration.
rb968 - 11/5/13 at 04:25 PM
No problem....soon as we get some nice weather here in sunny Cumbria. Tomorrow looks promising.
I recorded those with the skeleton back on will try and get some flyby video as well from the outside see how loud it is from the roadside when my
ears aren't 3 feet from the exhaust tip!
Rich
DIY Si - 13/5/13 at 10:57 AM
I know what you mean. It was a revelation when someone filmed my Indy Bird for the first time. I was really surprised at just how different it sounded
from the outside and with no helmet on.
rb968 - 13/5/13 at 06:20 PM
Have borrowed a calibrated sound level meter from our HSE bloke at work to see how loud it really is. Of course it's throwing it down and I
realised I had broken a front spring on my Mondeo today on the way to work! Bugger.
Come on the summer! Or even spring?
Rich
rb968 - 14/5/13 at 11:04 PM
I think I need some quieter silencers. Was hoping to book Croft on the 25th May.
Any recommendations? I did fancy some from Paul Gooderham, as I know he used to be on here. Any other repackables I should look at?
God I hate listening to myself!
Rich
RK - 14/5/13 at 11:30 PM
That is brutal, not to mention disappointing! Just remember, that they tend to measure from behind, and sound dissipates and diminishes exponentially
with distance. In other words, a little bit farther away, makes for a very different reading.
clairetoo - 15/5/13 at 06:04 AM
Do you have a balance pipe ? I run a small pipe just after the collectors from side to side , which will lower the tone a lot (and improve the sound
from the drivers seat , much better than hearing half a V6)
Dont know if it makes it any quieter , but it may help ?
rb968 - 15/5/13 at 07:11 AM
No I don't have a pipe linking the banks. Not sure how I could do it.
I think the simple answer is bigger or better silencers. Doing it on the cheap with universal silencer got me in the road but the pair cost less than
one decent repackable.
Rich
DIY Si - 15/5/13 at 10:07 AM
This is something I'm unsure of with my build. I'm currently planning on running a pair of large bike cans on my, but with a X piece about
18" back from the end of the collectors so I've not idea what so ever as to how it will sound.
You could put a cross pipe in as Claire does, but since you're manifolds point away from the engine, as opposed to down the side of it as
Claire's and mine will, fitting side pipe will be a PITA as it'll have to run round the engine some how, and I'm not sure if it'll
be worth the effort involved. Bigger silencers will certainly do it, as having seen a Caterham R500, I was surprised at just how big the can was.
KFC - 19/7/13 at 04:34 PM
quote:Originally posted by rb968
I think I need some quieter silencers. Was hoping to book Croft on the 25th May.
Any recommendations? I did fancy some from Paul Gooderham, as I know he used to be on here. Any other repackables I should look at?
God I hate listening to myself!
Rich
I hate my own voice as well.. Ha ha ha.
I wonder if the pulses of the exhaust are fighting each other with the un equal length pipes of the manifold? I will be starting mine this year once
the garage is sorted, same set up as you but with some little changes. I did wonder when you built them if the exhaust would run right, it's so
tight in there and you've made a good job with it, it's just something I thought might be a problem.
clairetoo - 19/7/13 at 04:47 PM
I still think a balance pipe will `soften' the sound a lot - I know it made a massive difference to mine . I ran it through the gap between the
sump and gearbox (where the Mx6 / Probe has it)
Heres mine minus the engine........
Also - we may have accidentally found a much shorter stater motor from a 323 - about 30mm shorter !
[Edited on 19/7/13 by clairetoo]
KFC - 12/8/13 at 01:23 AM
quote:Originally posted by rb968
MK Indy engine conversion ZX9R to Mazda KLDE V6.
I thought it was about time I posted a diary of my engine conversion on my MK Indy. Finished and IVA’d the car in October last year and enjoyed a few
months of running after making and fitting a full cage post IVA. MK Indy RB968
Intention is to use this thread to record the conversion. I have made some videos and put on Youtube with photos on Flickr but wanted to write it up
as well.
I bought the Indy as a part started project, basically a rolling chassis which already included a Kawasaki ZX9R of B3/4 vintage. Initial testing and
IVA setup was fine and the bike engine went well but took a bit of getting used to the noise, the frenetic experience, gearchange etc. This year
however the gearbox started to become temperamental, there was a vibration at certain revs that was driving me up the wall and the lack of proper
reverse eventually meant I didn’t enjoy or use the car as much as I wanted to. I got the car originally to do some fast road driving and track days
but didn’t trust the engine/gearbox enough to go on a track day. It was time to change something.....
Initial idea was keep it simple and go for an MX5 engine and box, Megasquirt and changes to go to fuel injected from carbs. Then I saw clairetoo’s V6
/MX5 combo and the idea stuck.
I knew others had done V6’s in locosts and the all alloy low weight of the KLDE and decent power output with an easily sourced MX5 gearbox plus the
bonus of the Triumph throttle body setup for noise, look etc. had me hooked.
So in July I sourced a 71k mile KLDE from a Ford Probe, pulled the ZX9, exhaust, prop and started looking to test fit the engine. Description
Keeping track of the weight difference from the beginning the ZX9 engine wet with cradle weighed in just under 80Kgs. Description
and the KL weighed in dry without ancillaries at 112kgs Description
Once we had made a few minor adjustments to get the gearbox to sit far enough back and high enough in the tunnel we could test fit the engine and it
just fit. Description Description RB gearbox test fit Description
Rich
Hey Rich,
I will be building a car like yours, I'm driving around in a old MX6 with the 2.5L V6 just as a run about till I strip it.
So what I want to know is... The "Haynes Sports Car" is what I know as a Locost and a near copy to a Caterham. With yours being a MY Indy, I
wondered how different the front of the chassis is to accommodate the V6. I hope it's not smaller than yours??
Would you mind taking some measurements for me please? If it's smaller or exactly the same, I'm thinking about widening the chassis a bit
for the exhaust manifold but that means a lot of modding of the bodywork which I'd like to keep it standard sizes. I was just a bit concerned
about the tight space for the exhaust.
Across the front at the smallest gap near the front of the heads and at the back of the engine area where your coil pack is.
I edited a photo but this won't allow me to post it.. KFC - 25/2/14 at 10:30 AM
quote:Originally posted by rb968
Another update to just about catchup with where I currently stand with this conversion.
I bought a 40 Amp Denso alternator so looked to make a mount and a way to adjuster the belt. With no ancillaries I decided to run a single belt from
the front pulley of the crank pulley and drive both water pump and alternator. This meant spacing the water pump pulley. Luckily we have machine shop
at work who made me a 28mm spacer.
I modded an adjuster from the rods used for my ZX9 gearchange. Seemed to do the job. Since the photo was taken I have remade the brackets out of 3mm
steel to stop any flexing.
I test fitted the engine to ensure the alternator cleared the chassis brace and to test fit the new prop. Trial fit KL RB
This revealed a(nother) ballsup as the tunnel chassis member I moved was now exactly where the joint on the prop was and guess what.......it just
touched when rotated.....so later that was cut and moved and welded back and re-painted RB new prop test fit cockup
While we were at it we test fit the starter again and tried turning the engine over on the starter for the first time in the car. Its been turned over
by hand and briefly on the garage floor but this is the first time with everything bolted together.
Cue the chuckle brothers (my Dad and Uncle) in charge of jump leads. Dad with his head in the footwell and my Uncle next to the clattery Xantia
neither of whom could hear the other.....this was the 3rd attempt.....
Success! no horrendous noises, and the belts went round.
When the engine came back out I installed the trigger wheel and made a bracket for the VR sensor. Both from trigger-wheels.com where I also bought a
Microsquirt and EDIS kit as I am copying Claire's alpha-n EDIS setup to keep it simple.
Made an inferior version of her coilpack mount as well which sits above the bellhousing. Coilpack mount RB
Early on it was obvious the bellhousing and clutch release arm were very close to the drivers footwell bulkhead. We had to remove the old clutch
master cylinder to get the gearbox in place so it was time to think of a solution. I was going to look at a vertical mount cylinder but these were
pricey so I had a look at the MX5 and saw it has the pedal mounted above . eBay visit later and I had a complete MX5 pedal and master cylinder. Cut
the pedal up as it was miles to long and mounted it as high as possible in the footwell and drill holes for the pushrod and mounts. RB gearbox clutch arm
All pretty tight but it will work. Going to make up a custom clutch hose to the standard MX5 slave cylinder and rod. RB clutch master cylinder MX5
So thats about up to date. Been tarting bits up and spending a small fortune on eBay. Got a intake manifold temp sensor, Claire is ordering me a set
of Magnecor plug leads and sending me a set of her throttle bodies.
Spent 20 minutes in Halfords finding a smaller M20 thread oil filter as the full size one hits the chassis rail....new one is off a Nissan Note!
Hopeful it will mean I don't need to run a remote filter. Small oil filter KLDE
Got a couple of days off work to start wiring....oh joy.
Rich
Hey,
I'd like to know where you got your ecu from? I understand that you are using vauxhall injectors and the triumph 595 throttle bodies. I've
got a spare KLDE 2.5L that I'm going to rebuild and put it in a RX8. I'll worry about the dash electronics later, I have a mate that's
an avionics engineer and he rekons it won't be too difficult to get the canbus electronics to work with a stand alone ecu.
mcerd1 - 25/2/14 at 11:46 AM
quote:Originally posted by rb968
...I am using a Microsquirt and EDIS trying to keep it simple as Claire seems to have done very successfully. This is my first venture into a
custom ecu so really I want to get it running and use it. ...
Thanks for that Rich, I should have been more detailed. I didn't know what EDIS stood for so what controls the injectors? Is the ecu for the
injection programmable? Have a cold running map? I need to be able to run the engine all year around as it will be my commuter.
I'm running a MX6 2.5L V6 on LPG, it's a new AEB system that I fitted myself and it's brilliant! To convert in terms that people relate
to, what I actually spend on LPG and petrol because it uses petrol to start and change over once it reaches 30c. On the motorway I get 55MPG and hard
driving I get 42MPG.
So.... To have the lovely sound of a V6 with diesel economy has driven me to this choice. rb968 - 25/2/14 at 11:15 PM
Edis6 is a Ford coil pack dead simple setup run off 2 wires. Injectors re un from the microsquirt ecu.
Rich
Ugg10 - 10/3/14 at 12:28 PM
Hi rb968
Great build. Just read through this thread for the umpteenth time as it is time for me to change direction on my MX6 KL engine build. For some time I
have been trying to convert it to Bike carbs with little success so the ECU/ITB route it is now. Having read up on this and Clairtoo's
conversions and a few others, I think the missing info I have at the moment is the particular injectors that I will need to source.
So, please can you let me know what injectors you have used (Vauxhall Omega v6?) and whether they fit directly into the Triumph TB ports without any
changes/machining ?
Many thanks in advance.
Edit - also, what did you do with the Dizzy, remove it totally, take the cap off and cap the rest ??
[Edited on 10/3/14 by Ugg10]
[Edited on 10/3/14 by Ugg10]
DIY Si - 11/3/14 at 01:03 PM
There's a couple of options for the dizzy. The simplest is to just unplug it and leave it in place. You could get a bung machined and fit that if
you remove it totally, cut it down to use it as a cover plate or it is possible to use it as a cam sensor.
I'll be using mine as a cam sensor to see how well it works when going to a fully sequential system.
Ugg10 - 11/3/14 at 01:14 PM
DIY Si - many thanks, will leave it in place if it is not hurting anything and will still give me tacho read out with the stock dash before I covert
that to an ETB Digidash 2 Lite. Later I will probably remove rotor and cut down the cover and make up a blanking plate to stick to the front of that
maybe.
Do you have pics/blog of your sprite build , and any comments on what injectors to use ?
Thanks
[Edited on 11/3/14 by Ugg10]
KFC - 29/7/14 at 10:03 PM
Hey Claire,
I know you've just got back but you know me, keen to get going. Ive been doing some measuring and about to put my spare V6 in my RX8 with a mock
up adapter plate I've made. It's going to be tight but it's going in. One issue could be is, room under the bonnet, I will have 14cm
left from the top of the heads to the inside of the bonnet. What's the height on this set up you have? As in, from the top of the heads at the
back of the engine to the top of the trumpets/airbox tray?
Cheers
Kev
quote:Originally posted by clairetoo
I do have a mold for an airbox which may be usefull - theres no inlet on it , and it would need modding above the rear linkage , but if you can use it
I can knock one up (as soon as I get some resin..........I normally `borrow' that from work but I'm not there at the moment )
I've bunged in a complaint at Citylink - the `bodies were due for delivery on Friday
This is a slightly cut-down one on a Fury I did .
[Edited on 22/10/12 by clairetoo]
clairetoo - 29/7/14 at 10:12 PM
I've done some super-short trumpets and lowered the fuel rails with pico injectors - all done to make more space under the bonnet.........
KFC - 29/7/14 at 10:52 PM
It looks like I might have a bit more room? I measured 20" from the underside of the bonnet to the centre of the input shaft.
quote:Originally posted by clairetoo
I've done some super-short trumpets and lowered the fuel rails with pico injectors - all done to make more space under the bonnet.........


 [/img]