TheGecko
|
| posted on 28/1/08 at 09:42 AM |

|
|
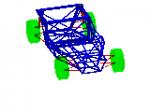
The Gecko Project
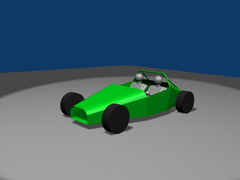
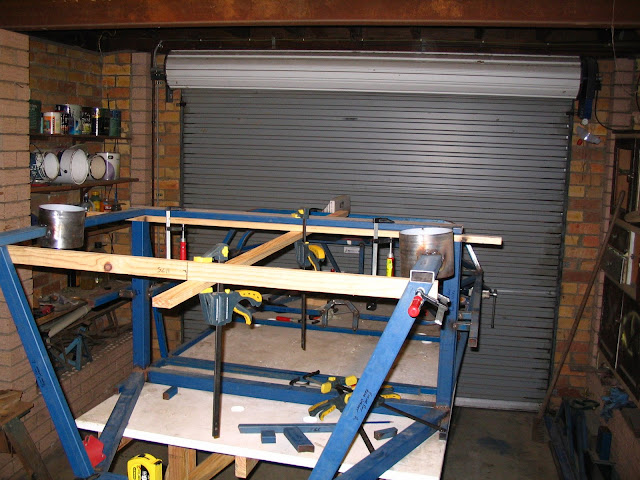
After a long hiatus due to family and health issues I've finally been making some visible progress on the Mk2 chassis (Mk1 got cut into bits,
the longer of which are becoming braces in Mk2  ) )
It's still going slowly but it is progress. Some pics are in my Picasa gallery
(linky) which also gives some sense of the design to put the photos in some context.
The last 4 photos are new today.
It's still a long (long, long) way from being finished but I feel more confident that I might finish it before I retire
Dominic
|
|
|
|
|
Ivan
|
| posted on 28/1/08 at 10:15 AM |
|
|
I like what you're doing. Keep us informed of progress.
Was there any specific reason for the double top rail or is it just for side intrusion?
|
|
|
nitram38
|
| posted on 28/1/08 at 10:26 AM |
|
|
quote:
Originally posted by Ivan
I like what you're doing. Keep us informed of progress.
Was there any specific reason for the double top rail or is it just for side intrusion?
Might be for a right hand shift?
|
|
|
TheGecko
|
| posted on 28/1/08 at 10:26 AM |
|
|
quote:
Originally posted by Ivan
Was there any specific reason for the double top rail or is it just for side intrusion?
The double top rail has been included in every version of my design, originally with the dual goals of torsion and beaming strength and some side
impact. The strength issue is important because I don't have a structural tunnel like a Locost. Strength is also the driver behind the
"portal frame" dashboard ring which the double rail design lends itself to very easily.
A side effect of the double rails is that the waistline of the body is outboard of the floor plan by 75mm. This gives a visual break which reduces
apparent slab sidedness that could otherwise arise with a mid-engine clubman shape.
As yet another side effect it should also give me more elbow room with side-screens fitted.
Edited to add reply to Nitrams question: No, the gear shift will be central. There'll be a small non-structural tunnel to carry water pipes
and the gear shift cables.
Dominic
[Edited on 28/1/2008 by TheGecko]
|
|
|
Ivan
|
| posted on 28/1/08 at 10:38 AM |
|
|
Makes sense given that there is no real tunnel - thanks
|
|
|
RazMan
|
| posted on 28/1/08 at 12:49 PM |
|
|
I am going to follow your project with great interest - looks really good so far.
Cheers,
Raz
When thinking outside the box doesn't work any more, it's time to build a new box
|
|
|
sgraber
|
| posted on 28/1/08 at 04:45 PM |
|
|
I am very happy to hear that the Gecko project is back on track!
More power to the Middies!

Graber
|
|
|
Fred W B
|
| posted on 28/1/08 at 06:44 PM |
|
|
As above.......
Great to see you making progress.
Cheers
Fred W B
You can do it quickly. You can do it cheap. You can do it right. Pick any two.
|
|
|
kb58
|
| posted on 28/1/08 at 08:53 PM |
|
|
I'm working along similar lines and want to also use high side tubes. My concern is that in even a mild side impact, the driver's head
will whip sideways and smack the very tubes designed to protect. I'm still working this out.
Mid-engine Locost - http://www.midlana.com
And the book - http://www.lulu.com/shop/kurt-bilinski/midlana/paperback/product-21330662.html
Kimini - a tube-frame, carbon shell, Honda Prelude VTEC mid-engine Mini: http://www.kimini.com
And its book -
http://www.lulu.com/shop/kurt-bilinski/kimini-how-to-design-and-build-a-mid-engine-sports-car-from-scratch/paperback/product-4858803.html
|
|
|
Anman
|
| posted on 28/1/08 at 09:54 PM |
|
|
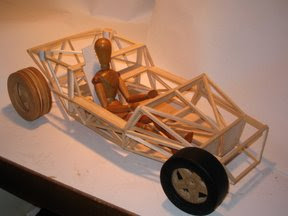
Nice desing. Pretty much along the same lines as my design...
Rescued attachment bodyGroen.jpg
|
|
|
Geoff011
|
| posted on 29/1/08 at 10:35 AM |
|
|
Looking good Dominic! Keep at it!
|
|
|
TheGecko
|
| posted on 21/7/08 at 11:40 AM |
|
|
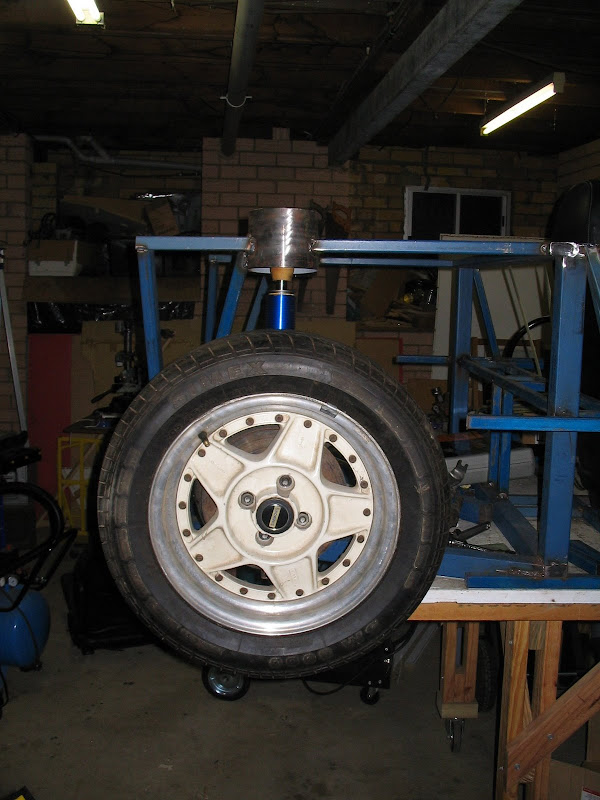
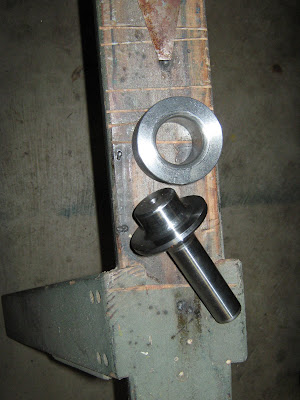
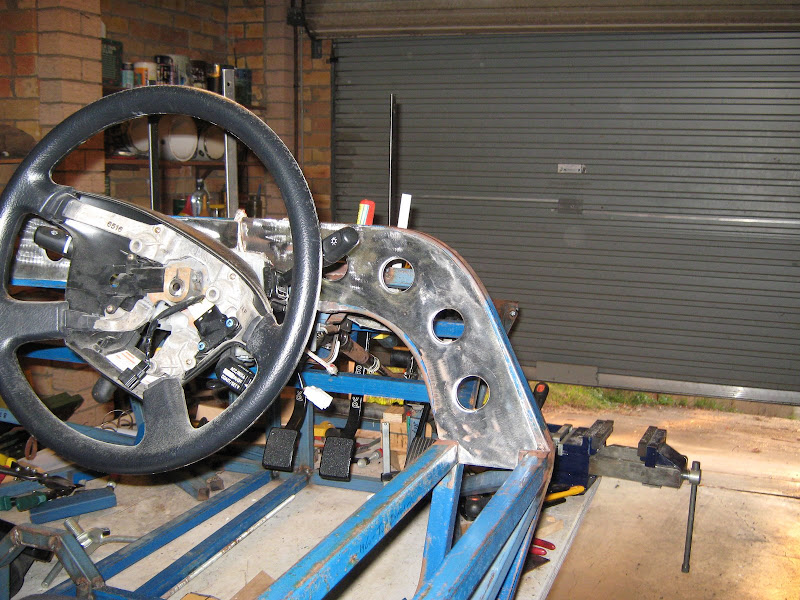
Wow, doesn't 6 months go past in a rush! Good thing I haven't set myself a deadline, I'd just be upset at myself. Since the last
update I've added some more tubes to the chassis and done quite a bit a fiddling with steering column positions relative to seats etc. The main
activity has been finally choosing and buying the Koni 8611-1257 double-adjustable strut inserts for the rear suspension. With them finally pinned
down, I could finish the layout of the strut tops and give the dimensions to my machinist friend for the manufacture of the spherical bearing plates
with integral camber adjusters. The alloy bits need to go to the anodisers yet but it's still worth a look at his work Here's all the
components of one assembly, including the spherical bearing and its retainer circlip, plus the pair of top hat bushes and retainer nut, all custom
made to suit.
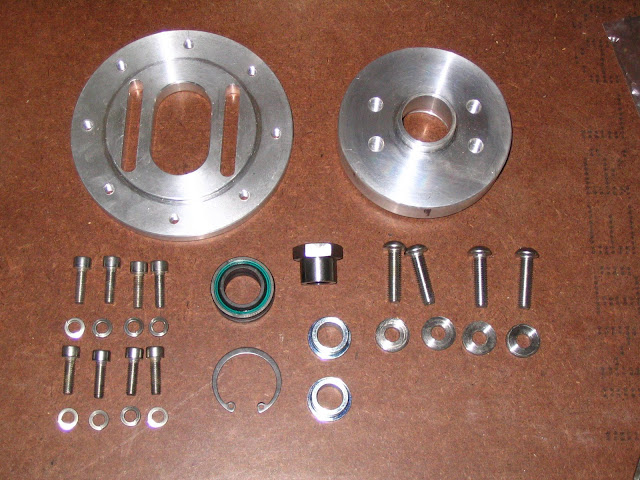
And here's one assembled and in the strut tube which will be welded into the chassis.

This is the original AE101 Corolla housings with the big factory spring seats ground off:

And here they are back from having ~40mm taken out of the length and a piece of seamless welded on as a joiner and lip for the threaded sleeve:

And just to finish them off, a quick squirt of paint. Shows how close to tolerances Paul works - a few coats of paint and one of the sleeves is now a
firm press fit rather than slip on.

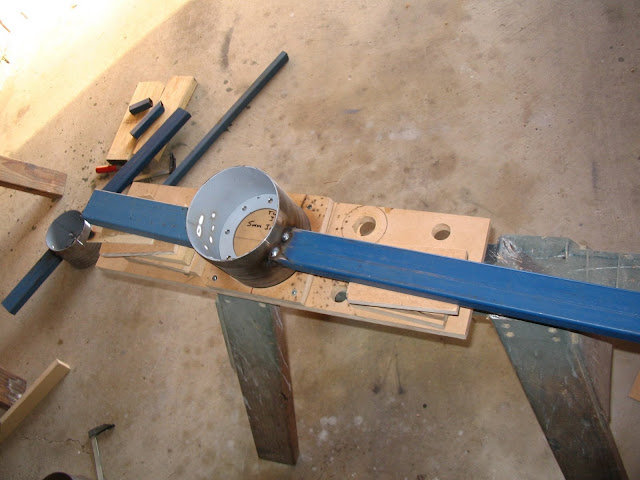
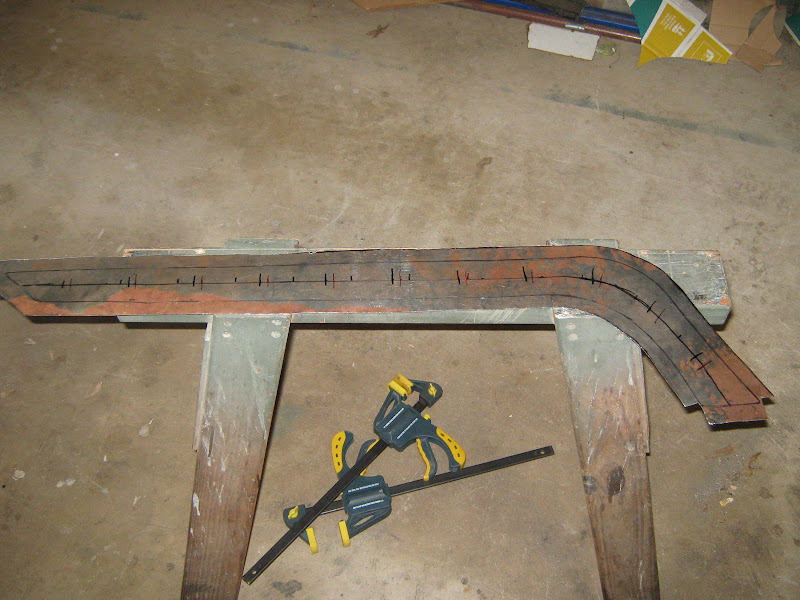
Over the weekend I finished the jig I'd been fiddling and fussing over to hold the strut tubes and the engine bay top rails all in the proper
alignment for welding. Complicated by the fact that the strut tubes are installed at a 5.3 degree angle to the rails to allow maximum travel on the
strut top bearing. Here's one side in the jig after tacking:
and the two sides finished:
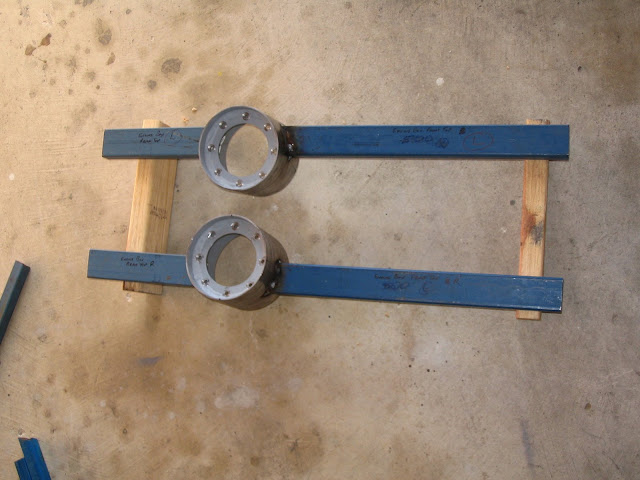
Tonight I jigged everything together with bits of timber and lots of F-clamps (clubman builders can never have too many F-clamps ) and checked the
alignment of it all prior to welding.
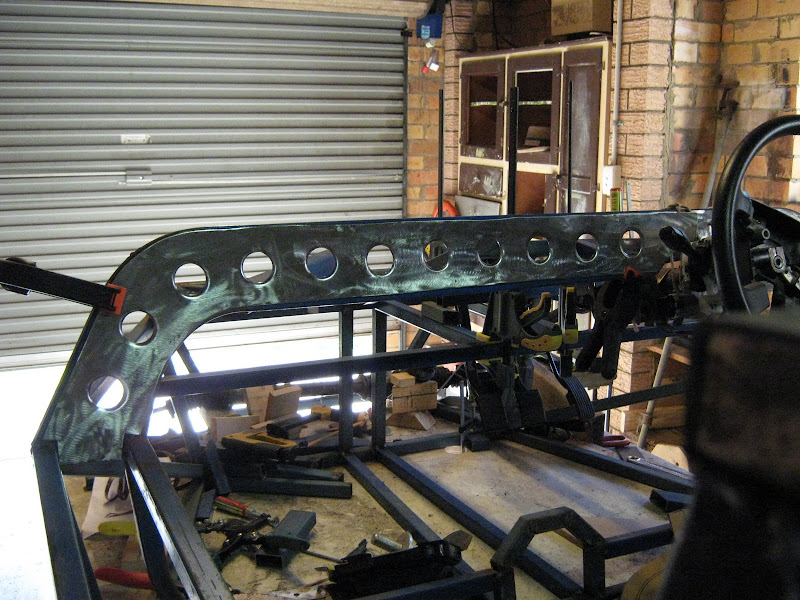
And here it is with them welded in and some "masking tape CAD" to show where the two braces go in each side of the bay. I'll cut
and weld them tomorrow night (all things being equal).
A little every night if I can and I may get this done yet 
Oh, and I have a blog at http://diysportscar.blogspot.com/ which I'll try to keep
updated now (unlike the past)
Dominic
[Edited on 21/7/2008 by TheGecko]
[Edited on 21/7/2008 by TheGecko]
|
|
|
sgraber
|
| posted on 21/7/08 at 06:25 PM |
|
|
Oh yesss! This is very exciting Dominic to see those rear suspension pieces come together. I look forward to the day that you have this thing sitting
on the ground on it's own suspension. That is a real milestone!
Steve Graber
http://www.grabercars.com/
"Quickness through lightness"
|
|
|
Geoff011
|
| posted on 21/7/08 at 09:54 PM |
|
|
Looking good Dominic! Keep at it!
|
|
|
Alan B
|
| posted on 21/7/08 at 11:55 PM |
|
|
I like the adjustable strut top....should work well.
Alan
|
|
|
TheGecko
|
| posted on 8/3/09 at 01:44 PM |
|
|
As always, no updates for quite a while. I'll combine a couple of sets of updates together here.
I swung the engine in for a little visit to its future home:

I got the rear suspension struts together and hung a wheel on the chassis:
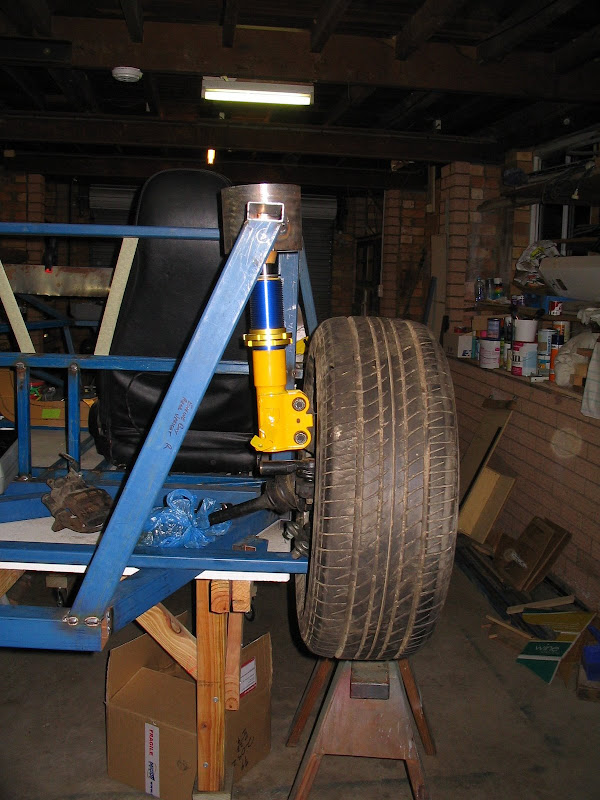 
And, the clever hands of a machinist friend made me a nice little tool to put flared edges on the lightening holes in my dash webs.
 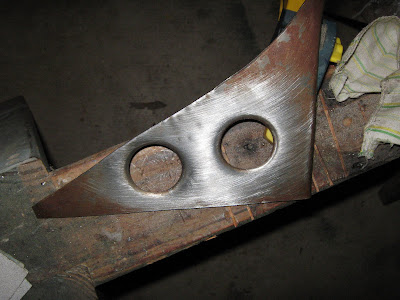
These are the two stiffening webs to go on the scuttle bulkhead ring. 1mm steel, 35mm lightening holes flanged with the tool shown above.
Had a few stabs at the spacing first:
Then cut the holes and flanged them (after giving the whole thing a going over with a flap wheel in the Angry Grinder to clean off the rust etc):
Did the little one that sits the other side of the column as well. Only 4 holes in it:
Now I need to make the two webs for the bottom half of the bulkhead but they are (or should be) symmetrical so hopefully that'll go a bit
quicker.
More in the next post,
Dominic
|
|
|
TheGecko
|
| posted on 8/3/09 at 01:47 PM |
|
|
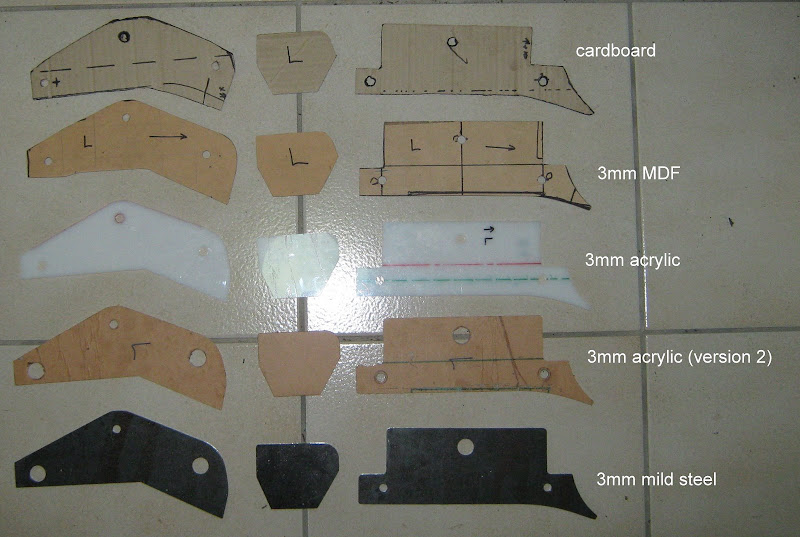
The Parable of the Plates
In the month of February an angel visited Dominic, giving to him several shining metal plates. And great was the beauty of these plates for they had
been cut not by human hands but by the artificers of Sea-En-Sea. And Dominic did gaze upon the plates and knew that they were good for they had been
made to The Plan.
Six were the plates in number but only three in shape for they had been made in pairs. And clear from their shape was their destiny. This destiny was
to be permanently joined to the Bay of the Engine, thence to work tirelessly at support and bracing.
And Dominic held the plates to the chassis, even though it still remains partial and unformed as it has been, and will be, eternally. And the plates
did fit - verily, so close was the fit that he did exclaim, saying "That's pretty snug. You couldn't get a fanny hair in that
gap". And great was his pleasure at this fitting.
And then he didst say to himself "Bugger, how am I going to drill 16mm holes in alignment when the tubes are already welded into the
chassis". And his disappointment at this poor planning was much. But, familiar with pain and struggle in the service of the revered Clubman, he
didst regather himself and cogitated for some time. And this cogitation was helped by the application of soothing waters bearing the Holy names
Shiraz and Cabernet Sauvignon. And the cogitation did bear fruit and he awakened saying "The bloody plate can be it's own drill
guide".
So he did clamp the plates firmly and many were the checkings of alignment. And then applied to them did he the 16mm holesaw and great was his fear,
saying aloud, "If I f*ck this up, there'll be all kinds of trouble". But the soothing waters had steadied his hand and the drill
ran true. And at last the holes were complete and wide was the distribution of coolant from the drilling.
And he rested from this labour, saying "Now I just need to weld the crush tubes, and then the plates, then finish the rest of the rear brace,
and the other set of side tubes, and the pedal box brackets, and the other column mount, and......". So great was this list of incomplete
things that he was rendered insensible and thus did his wife find him, staring at the wall and muttering. And she didst guide him away and render
more soothing waters until he did sleep.
Seriously (?!), a mate CNC cut these plates from my MDF templates and, after a couple of test iterations in acrylic, the steel ones are now lined up
ready for welding. My friendly machinist made me some nice little crush tubes and the whole shebang will give me a very solid but removable back edge
for the engine bay. And, if I ever stop working 60+ hours a week, I might actually find time to weld it all together.
Dominic
|
|
|
cheapracer
|
| posted on 9/3/09 at 05:23 AM |
|
|
i do the strut tops a different way Dominic, I make up some suspension bushes using 32mm tube (fitted with suspension bushes) that i weld to some
fanges I make with an internal thread for the strut insert as per the picture...
I simply use some typical shock mounting brackets and overdrill the strut to upright mounting holes for camber adjustment.
Rescued attachment strut top.JPG
It's coming....
|
|
|
TheGecko
|
| posted on 9/3/09 at 07:10 AM |
|
|
quote:
Originally posted by cheapracer
i do the strut tops a different way Dominic, I make up some suspension bushes using 32mm tube (fitted with suspension bushes) that i weld to some
fanges I make with an internal thread for the strut insert as per the picture...
I simply use some typical shock mounting brackets and overdrill the strut to upright mounting holes for camber adjustment.
I had thought of a similar arrangement but the 2-way adjustable Koni inserts I'm using have the bump adjustment poking out of the threaded end
of the strut, so that put an end to that idea. I toyed with the idea of offsetting the mount from the strut shaft but ended up going the way I have,
partly because I have access to a friendly, competent machinist to make shiny parts for me
Dominic
|
|
|
GRRR
|
| posted on 9/3/09 at 08:53 PM |
|
|
Impressive work going on there! Quick and probably daft question on those struts, when the car is sitting on the ground, the strut body will push
against the spring via the threaded sleeve; is the threaded sleeve welded on or is it that bit of larger diameter seamless butting up against it?
|
|
|
TheGecko
|
| posted on 9/3/09 at 10:47 PM |
|
|
The threaded sleeves are universal aftermarket ones for conversion of struts to adjustable coils. They're alloy so, no, they aren't
welded to the steel body - they bear on the larger diameter piece (which is also there to join the strut tube where it had ~50mm of length
removed).
Dominic
|
|
|
TheGecko
|
| posted on 4/5/09 at 07:41 AM |
|
|
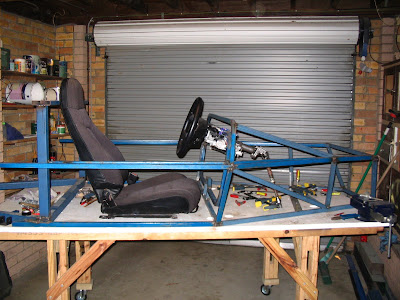
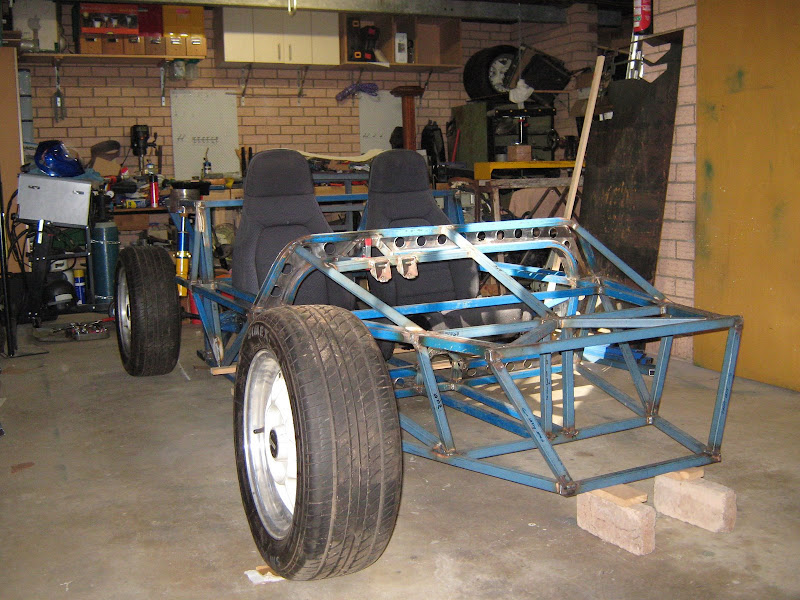
My welder friend is pushing me to make progress so he came over yesterday and we got a lot of welding done on the chassis. After he'd left I
was cleaning up and decide to pull the chassis off the build board onto the floor and prop it up at ride height for a look see. Definitely starting
to resemble a car now
There's still quite a bit to do but some things I'd held off finishing until internal corners were welded can now be done. Plus, we
didn't flip the chassis over so there's still all the underneath joints to do. Anyway, any progress is still progress.
Dominic
|
|
|
cheapracer
|
| posted on 7/5/09 at 03:21 PM |
|
|
Great feeling when you can actually see something for the first time!
Well done Mate ;-)
It's coming....
|
|
|
TheGecko
|
| posted on 23/4/10 at 12:24 PM |
|
|
Scary! - nearly 12 months since my last update 
Work has been eating me alive for the last year, to the point of asking (demanding!) that I cancel my leave last year in favour of a project with
impossible delivery dates. Leave was canceled and then the project got deferred anyway 
So, we finally got to take some leave and we're just coming to the end of 6 weeks off (back to work Tuesday ). First two weeks spent out of
town having a proper holiday together. Next two weeks mostly spent running to-and-fro with family matters (a seriously ill father). By week five,
energy levels were rising enough to consider work so some of the crap in workshop was reorganised (meaning, I moved it from one pile into another) and
I tried to get the chassis out to work on.
Job one was replace the castor wheel I'd broken off the build table when I shoved it in the corner. That means, drag chassis off board onto
floor [took the opportunity to put the chassis on the scales and pleasantly surprised to see ~85kg], then drag build board off base onto another piece
of floor, then flip base upside down onto build board and drill the screw holes for the castor to the right depth this time. Standing looking at the
caster, getting measurements, SWMBO enters workshop and sees me in flip-flops(*note) - says "Are you putting your safety boots on?".
"Yes dear, once I actually start working on things". Put castor down, only to have it overbalance, and fall from bench height onto big toe
nail  Cue mixture of concern and pissing-herself -laughter from SWMBO as I roll on floor clutching toe! Cue mixture of concern and pissing-herself -laughter from SWMBO as I roll on floor clutching toe!
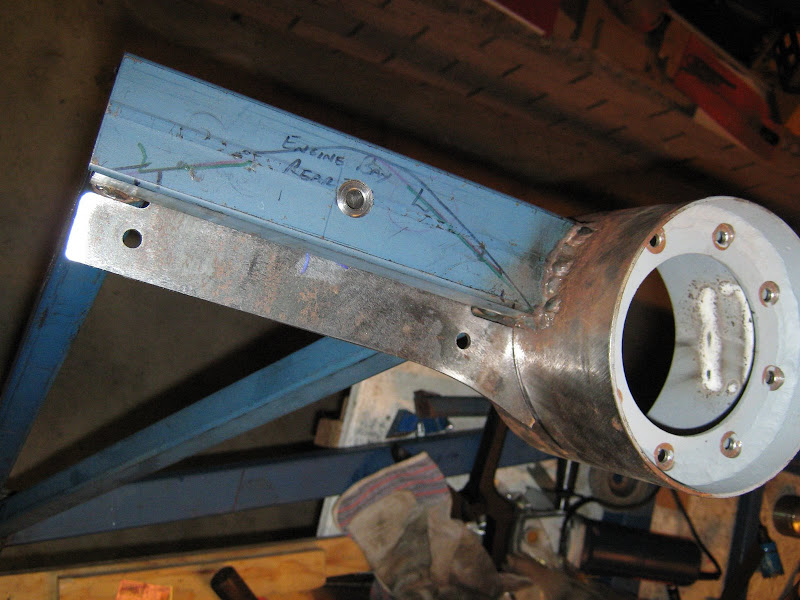
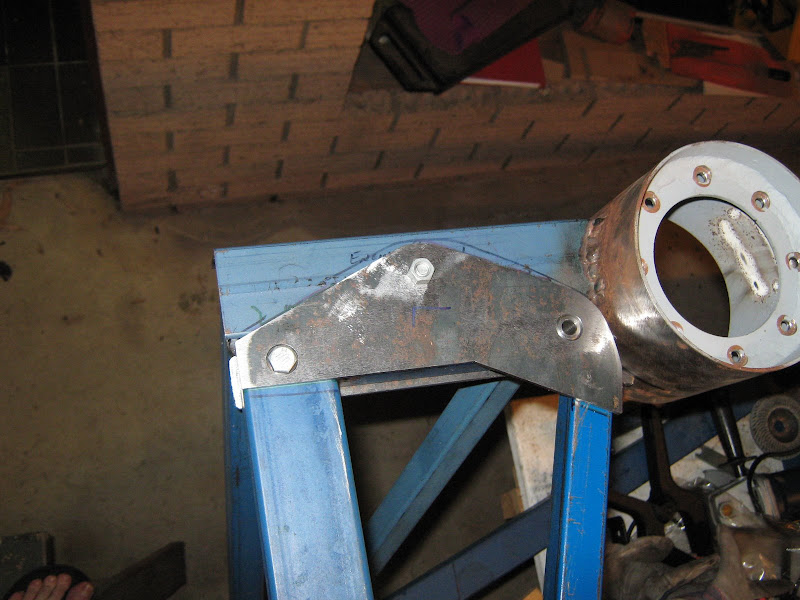
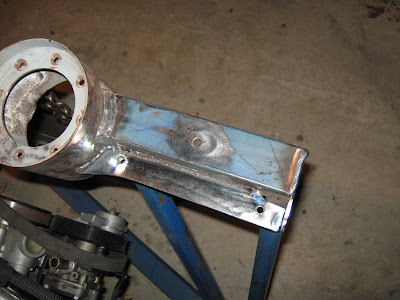
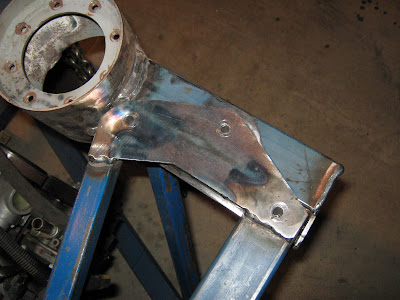
Anyway, self harm aside, while the chassis was on the floor, I propped it up ride height and finally finished the removable rear engine bay brace.
This means I can swing the engine in and finalise engine mounts etc. And here's a picture
Engine bay from behind with the brace in
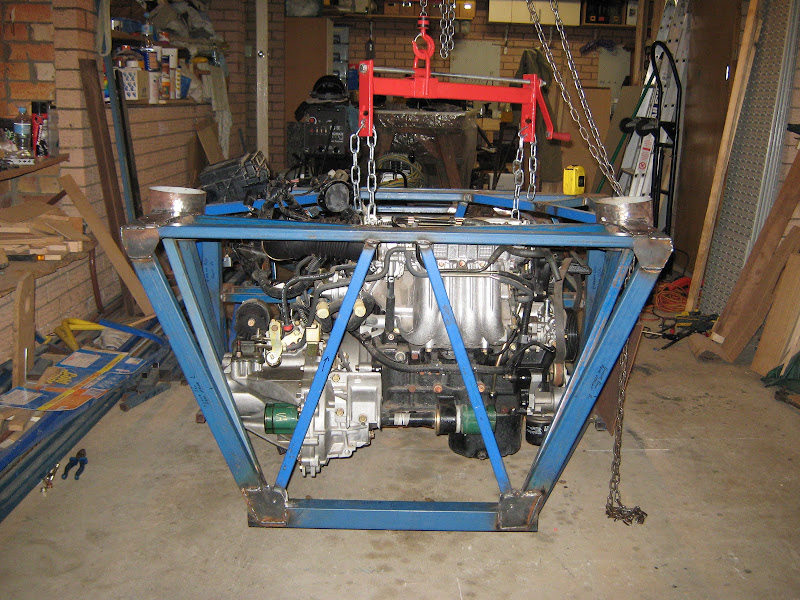
And with the brace removed, showing ease of access
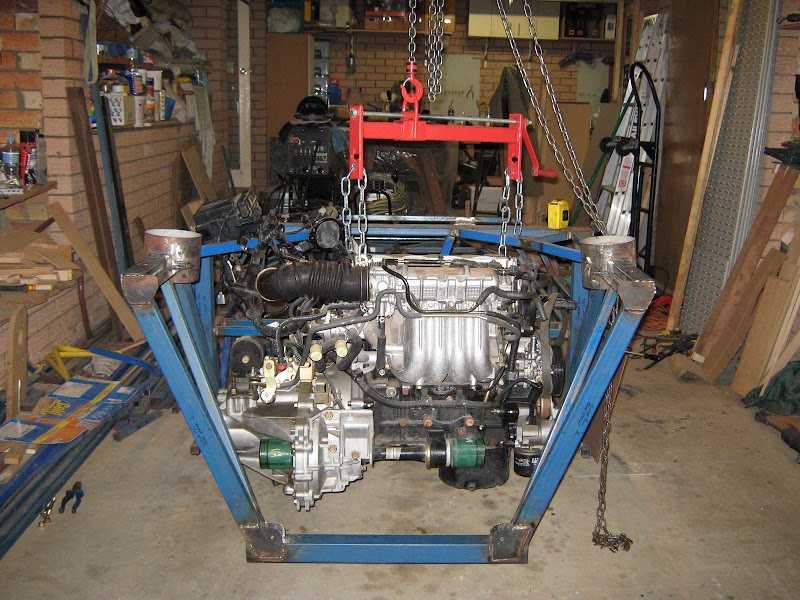
The welded in mounting plate also gussets the strut tube. A "matching" plate is welded to the top of the brace.
On the subject of engine mounts - I'm interested in opinions one way or the other regarding reusing the OEM Mitsubishi mounts versus the
"universal" type machinery mounts that most people seem to use. Given that they're acting as both engine and gearbox mounts
I'm wondering if the universal ones are appropriate or not? Answers on the back of a $50 note to the undersigned 
Anyway, any progress is good so, onward and upward.
Dominic
(*note - In Australian English I would say "thongs" - I'm hoping flip-flops is correct British English)
|
|
|
RazMan
|
| posted on 23/4/10 at 01:04 PM |
|
|
Nice to see that you are making some more progress Dominic.
p.s. English for thong = something like Borat Mankini
Cheers,
Raz
When thinking outside the box doesn't work any more, it's time to build a new box
|
|
|