marco
|
| posted on 28/9/11 at 09:32 PM |

|
|
Bolt on drive shaft CV joint woes :(
You know when you set of with good intensions and then it never goes to plan  . .
Well i had one split cv boot so i thought I'd change them all as the rest were looking quite perished and probably had never been changed from
new as they still had ford stamped on the old ones.
After getting the shafts off the car and both CV ends off the shafts I thought it a good idea to part the joint and bearings and thoroughly clean the
old grease off all went to plan until I put them back together. I figuerd out how to do that bit but after reassembling one shaft the CV joints are
solid, i cannot swivel it or move the hub part backwards or forwards?
I've pulled the freshly greased CV apart again and I think the problem is that some of the 6 gaps in the inner basket(if thats whats its called)
will not allow a bearing to pass through them.
I seem to remember reading somewhere on an old thread that someone filed these slightly before reassembly is that the right thing to do in this case?
|
|
|
|
|
NigeEss
|
| posted on 28/9/11 at 09:46 PM |
|
|
Wouldn't have thought so. If it came apart without filing then it should go
back together without. It'll be a certain angle and position needed.
Time is an illusion. Lunchtime doubly so.................Douglas Adams.
|
|
|
jollygreengiant
|
| posted on 28/9/11 at 10:03 PM |
|
|
First time I did it it took a little while to work out what went wrong. The answer was that I had got the relative position between the inner cage and
outer housing wrong it could be rotation (relative) OR, that the inner cage is the wrong way round (inner and outer faces reversed) OR, a combination
of both (if that makes sense). All you can do is take them apart and start again.
Basically although they look like they go in anyway, they don't. You should NEVER need to do any 'filing'.
HTH
JGG
[Edited on 28/9/11 by jollygreengiant]
Beware of the Goldfish in the tulip mines. The ONLY defence against them is smoking peanut butter sandwiches.
|
|
|
marco
|
| posted on 28/9/11 at 10:26 PM |
|
|
Ok, so even though the bearings are a little stiff to push through the cage this isn't the actual problem. I didn't notice the cage has a
front and reverse?.
|
|
|
ashg
|
| posted on 28/9/11 at 10:33 PM |
|
|
look on you tube there are loads of vids showing how to put them back together correctly.
Anything With Tits or Wheels Will cost you MONEY!!
Haynes Roadster (Finished)
Exocet (Finished & Sold)
New Project (Started)
|
|
|
Mad Dave
|
| posted on 29/9/11 at 06:00 AM |
|
|
I did exactly the same as you. Disassemble and flip the inner part around and reassemble
The grooves in the outer and inner parts should be opposite like this <> and not like this >>. I hope that makes sense
Dave
|
|
|
adithorp
|
| posted on 29/9/11 at 07:19 AM |
|
|
quote:
Originally posted by Mad Dave
I did exactly the same as you. Disassemble and flip the inner part around and reassemble
The grooves in the outer and inner parts should be opposite like this <> and not like this >>. I hope that makes sense
Dave
Thats ^^^ your problem. They go together the opposite way to how you would think. They also come apart a lot easier than they re-assemble!... and you
need three hands to do it!
"A witty saying proves nothing" Voltaire
http://jpsc.org.uk/forum/
|
|
|
marco
|
| posted on 29/9/11 at 11:36 AM |
|
|
when back to it this morning and had them done in 10mins thanks everyone. 
|
|
|
mcerd1
|
| posted on 29/9/11 at 12:10 PM |
|
|
also bare in mind the orientation of the CV's on the shaft is important when your re-assembling them
Bolt-On Driveshaft Assembly
-
|
|
|
marco
|
| posted on 29/9/11 at 09:28 PM |
|
|
quote:
Originally posted by mcerd1
also bare in mind the orientation of the CV's on the shaft is important when your re-assembling them
Bolt-On Driveshaft Assembly
You lost me now?
|
|
|
mouse
|
| posted on 30/9/11 at 08:18 AM |
|
|
quote:
Originally posted by marco
quote:
Originally posted by mcerd1
also bare in mind the orientation of the CV's on the shaft is important when your re-assembling them
Bolt-On Driveshaft Assembly
You lost me now?
me too
|
|
|
DH2
|
| posted on 30/9/11 at 10:43 AM |
|
|
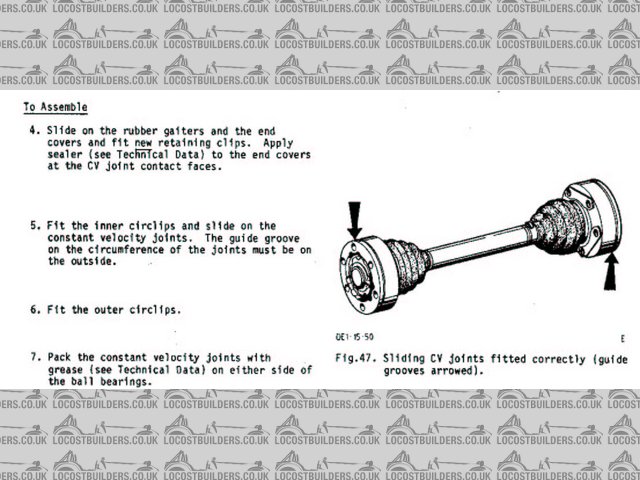
As it says in the wording, and the arrows in the diagram point to, "the guide groove on the circumference of the joints must be on the
outside".
DH2
|
|
|
marco
|
| posted on 30/9/11 at 11:41 AM |
|
|
quote:
Originally posted by DH2
As it says in the wording, and the arrows in the diagram point to, "the guide groove on the circumference of the joints must be on the
outside".
DH2
I see, don't think thats going to be possible then with mine they will only go back on one way ,see pics below
Also are these the same as mine, if so I'm going to replace this one that has a good bit of wear.
FORD SIERRA/SAPPHIRE REAR CV JOINT (100mm) (NEW) 82>'93 | eBay


[Edited on 30/9/11 by marco]
|
|
|
mcerd1
|
| posted on 30/9/11 at 12:00 PM |
|
|
^^ thats the right way round in your pics  (they should both look exactly like that) (they should both look exactly like that)
I'll take a couple of pics later to make it clearer
[Edited on 30/9/2011 by mcerd1]
-
|
|
|
mouse
|
| posted on 30/9/11 at 02:42 PM |
|
|
quote:
Originally posted by mcerd1
^^ thats the right way round in your pics (they should both look exactly like that)
I'll take a couple of pics later to make it clearer
[Edited on 30/9/2011 by mcerd1]
ah now i get it
|
|
|
jollygreengiant
|
| posted on 30/9/11 at 05:44 PM |
|
|
The metal cover on the end that carries the CV boot just taps off. Its only the bolts the actually hold it onto the main case.
(Just in case you were not aware.)
Beware of the Goldfish in the tulip mines. The ONLY defence against them is smoking peanut butter sandwiches.
|
|
|
marco
|
| posted on 30/9/11 at 08:39 PM |
|
|
quote:
Originally posted by jollygreengiant
The metal cover on the end that carries the CV boot just taps off. Its only the bolts the actually hold it onto the main case.
(Just in case you were not aware.)
I wasn't, thanks. That explains why I thought the new ones were different to mine lol...
|
|
|