Avoneer
|
| posted on 27/8/05 at 03:08 PM |

|
|
Front shock mounts
Right, anyone really know what they're doing with these?
The bottom shock mounts already came on my ARA bones.
Where's the best place for the top ones?
Under the chassis rail, on the outside of the chassis rail, inside face of the chassis rail or above the chassis rail.
The mount will be made from two lugs as a pose to a bracket and will be welded either on the flats of the chassis rail or on the corners.
I get most shock travel if the lugs are welded on the inside of the chassis rail (and the shock going under the top chassis rail) or with the lugs on
top of the chassis rail (with the shock going over the top chassis rail).
Another option would be to cut off the lower bracket and make a "bolt on" one that would utilize the two big bolts that hold my Cortina
ball joint on. This would bring the lower mounting right next to the lower ball joint which can only be a good thing, but the bracket legs would be
approximately 60mm ID apart.
If I mount them as per the book with the upper shock brackets on the bottom of the chassis rail, I am only left with about 1" travel of the
shock at normal ride height.
Any ideas anyone?
Cheers,
Pat...
P.S. Standard Locost chassis and bone dimensions with 13" fully open shocks.
No trees were killed in the sending of this message.
However a large number of electrons were terribly inconvenienced.
|
|
|
|
|
jonbeedle
|
| posted on 27/8/05 at 05:16 PM |
|
|
Most people put them on the outside.
Cheers
Jon
"Everyone is entitled to an opinion however stupid!"
|
|
|
Triton
|
| posted on 27/8/05 at 08:14 PM |
|
|
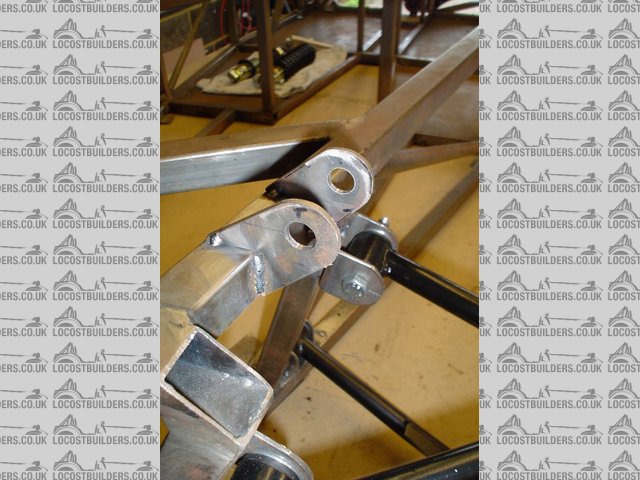
Create a headlight bracket in same area as top wishbone bracket like this picture
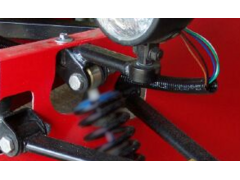 
Rescued attachment top shock mount 2.png
|
|
|
Triton
|
| posted on 27/8/05 at 08:16 PM |
|
|
My idea used on two makes of kit so copy it with pleasure Pat.
|
|
|
Triton
|
| posted on 27/8/05 at 08:17 PM |
|
|
They are not those normal u brackets, but two plates to take up that very same problem you are talking about then angle towards centre line of shock/
lower bracket
|
|
|
David Jenkins
|
| posted on 27/8/05 at 08:29 PM |
|
|
Mine are fitted on the outside. I was worried about the tortional stresses on the chassis member so I fitted a brace across the top to transfer the
load.
David
|
|
|
Avoneer
|
| posted on 27/8/05 at 09:25 PM |
|
|
Thanks Triton (again).
If I mount as per the pic, I'll only get 1" possible travel on the shock, unless I mod the bottom bracket as mentioned above.
Pat...
No trees were killed in the sending of this message.
However a large number of electrons were terribly inconvenienced.
|
|
|
Triton
|
| posted on 27/8/05 at 09:30 PM |
|
|
Make the top brackets/plates longer as per the picture....i have one somwhere i will measure it for you if you like......But Bike GP to watch first
|
|
|
JoelP
|
| posted on 27/8/05 at 09:30 PM |
|
|
what about a shorter spring, or is it the shock bump stop thats too short?
|
|
|
Triton
|
| posted on 27/8/05 at 09:33 PM |
|
|
What about a mounting point lower down?.... bit of 1" x 1" rhs between the two uprights butted up to top rails?
|
|
|
Triton
|
| posted on 27/8/05 at 09:36 PM |
|
|
Sounds like the shocks are too long to me unless i read it wrong.....what is the open length eye to eye?.......spring length?
|
|
|
Avoneer
|
| posted on 27/8/05 at 09:52 PM |
|
|
Shocks are 13" fully open.
When fully open, it holds the lower bone just above the point where it hits the chassis.
Have I done this wrong and bought the wrong length shocks?
Can I have the bracket "lugs" like your pic Triton, but pointing 45degrees up instead of down?
Headlight is mounted more foward like on the Stuart Taylor Chassis so this won't get in the way.
And I have a cunning idea to hide it all the brackets including the wishbone one to get through SVA.
Cheers,
Pat...
No trees were killed in the sending of this message.
However a large number of electrons were terribly inconvenienced.
|
|
|
Avoneer
|
| posted on 27/8/05 at 10:41 PM |
|
|
Hang on a minute......mmmmmm.....thinking........(don't laugh)........
Maybe I've been setting the lower wishbone too high (with a jack) in the wrong place for "normal" ride height.
So...
If I measure the distance from the floor to the bottom bone when fully up ie, hitting the chassis (no shock attached).
And measure the distance from the floor to the bottom bone when fully down ie, hitting the chassis (no shock attached).
Find the mid point and set the lower bone at this height - which should be "normal" ride height in my thinking.
If I then find the mid point of the shock (between fully open and fuly closed) and bolt it to the bottom bone.
Then weld the two lugs (to mount the top shock eye) in place at the top wherever they fall - which just happens to be slightly above the centre line
of the top chassis rail.
Does this sound the right way of doing it as this way, with the bones in there midway position, so will the shock, allowing the most movement up and
down for my bones and shocks.
How's that?
Pat...
No trees were killed in the sending of this message.
However a large number of electrons were terribly inconvenienced.
|
|
|
JoelP
|
| posted on 27/8/05 at 10:54 PM |
|
|
hi pat.
what do you mean by the bone being fully up or down and 'touching the chassis'? is the upright fitted?
When i did mine, i let the bone droop until the lower balljoint ran out of travel. I then lifted it half an inch and wegded it there. I then bolted
the shocker to the bone, swung it in towards the chassis, and fixed the top end wherever it fell.
Doing it your way, i think you arent allowing for any compression of the spring as you drop the car off the jack.
My way, you are effectively using the shocker limit to prevent the balljoint fouling in droop, and provided you have sufficient travel, it wont foul
in bounce (mine has about 3 or 4 inches of total travel).
As it happens, when my car was first dropped off the jack, the lower bone ended up parallel to the ground, which i believe is ideal.
|
|
|
Avoneer
|
| posted on 27/8/05 at 10:58 PM |
|
|
Hi Joel,
Sorry, got all excited and didn't describe it very well.
Top and bottom bone are fitted as is the Cortina upright.
Sounds like I did it like you and the bones were stopped in their tracks by the ball joints "locking".
If I do it with the bottom bone 1/2" above the locking position, the shock will be on the bump stop long before the bones run out of upward
travel - and my shocks are longer than yours!
Pat...
No trees were killed in the sending of this message.
However a large number of electrons were terribly inconvenienced.
|
|
|
Triton
|
| posted on 27/8/05 at 11:15 PM |
|
|
Easy way to check.....take spring off .........set shock at mid point of travel.......fix it to lower bone then lift up the bone and see where the top
eye meets up with the the chassis.....this will be somewhere near the ride heightish.....glue the brackets on where the top eye says they want to
be....with spring on the lower bone will be almost smacking the chassis....but with some weight to get it sitting at ride heightish it will be
tickety booo.....
But don't take my word for it mate, it's late and i am still knackered from a marathon Cornwall and back in a day drive on Tuesday
|
|
|
Avoneer
|
| posted on 27/8/05 at 11:31 PM |
|
|
Hi Mark,
Just tried that, but as I lift up the bottom bone, the shock can still pivot on the bottom mounting and the top mounting bracket is happy either under
the chassis rail or on the side of the chassis rail - is this right and all that is altering is the angle that the shock will be at?
Pat...
No trees were killed in the sending of this message.
However a large number of electrons were terribly inconvenienced.
|
|
|
NS Dev
|
| posted on 28/8/05 at 09:45 AM |
|
|
Are you using bookish dimensions?
If so, I thought the front shocks were 12" open length?
Mine certainly are.
cheers
Nat
|
|
|
GaryM
|
| posted on 28/8/05 at 10:13 AM |
|
|
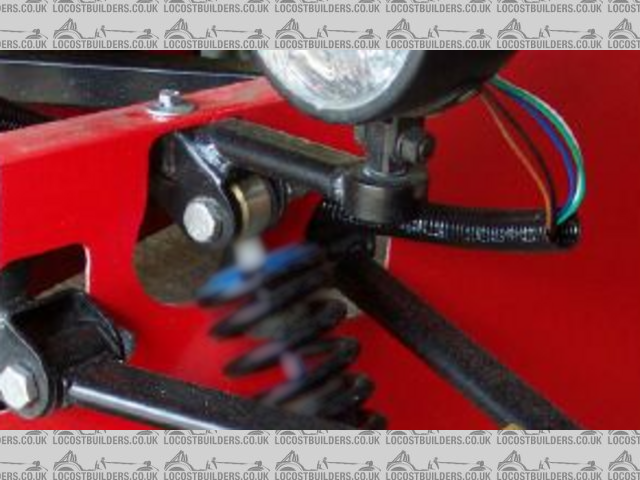
I'm currently using 13" dampers and book dimensions.
I calculated that 13" inch dampers give a better range of suspension travel than 12" dampers but to accomodate the extra length you need to
position the upper mount outside and above the top chassis rail (see picture).
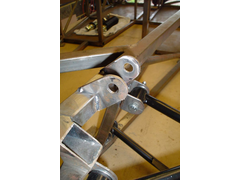 
Top Shock Mount
However there are a couple of drawbacks.
1. Some cutting of the nosecone will be necessary.
2. Compare your suspension travel (in bump) with your sump ground clearance!!!
|
|
|
JoelP
|
| posted on 28/8/05 at 01:47 PM |
|
|
quote:
Originally posted by Avoneer
If I do it with the bottom bone 1/2" above the locking position, the shock will be on the bump stop long before the bones run out of upward
travel - and my shocks are longer than yours!
as far as i can work out, isnt it preferable that it hits the bump stop before it fouls the ball joints? With a spring on, you only need a few inches
of upward travel from ride height, maybe 3 to be safe. (3" vertical at the wheel, not 3" of shocker movement.)
Gary, i have no doubts that you top mounts are more than adequatly strong to take the load, but they would be a lot stronger if they were mounted
underneath the top bar. This might not be relevant in locost weight terms, but combine that with cutting the nose cone, and i would personally try to
make them fit underneath the top bar rather than above it. 
|
|
|
GaryM
|
| posted on 28/8/05 at 02:54 PM |
|
|
Joel
I found if I wanted level bottom wishbones at normal ride height AND decent suspension travel in bump (i.e. 2.75" - 3" then I needed
13" dampers and the top damper mounts positioned where you see them. then I needed
13" dampers and the top damper mounts positioned where you see them.
When I tried them under under the top chassis rail with 12" dampers I only got little more than 2" of bump travel.
|
|
|


%20(WinCE).JPG)