burgessj
|
| posted on 26/7/03 at 03:17 PM |

|
|
Need help with plans....please
I'm at an early stage of constructing my chassis, and not making any progress.
I've cut it up and started over again..twice now.
There's some measurements in the plans that just don't add up. Am I right to assume that my frame should measure correctly...to the
millimetre ?
The two measurements causing me most trouble are pieces C and Q. Both supposed to be 823mm (book and mcsorley the same)
I cannot get these pieces to fit, unless I cut the to 830mm. All the external measurements of my frame are correct..
Has anyone had the same trouble as me?
Am I trying to be too precise ?
If I sound depressed....that's because I am!

[Edited on 26/7/03 by burgessj]
JohnB
|
|
|
|
|
Jon Ison
|
| posted on 26/7/03 at 05:46 PM |
|
|
don't be depress'd............
cut them to 830mm n weld em in......
use the book as a guide, not gospel, once youv'e got as far have you have with the chassis all the tubes need measuring as to whats req'd
rather than what the "book" says it should be..........
|
|
|
Mix
|
| posted on 26/7/03 at 05:58 PM |
|
|
Just been out and checked mine, C & Q are both 830mm at the rear, hadn't noticed the discrepancy before as once I had laid out the outer
rails I just made the rest to fit. As you'll realise as you go on there are several mistakes in the book, I suggest you have a good read through
the chassis and running gear sections of this forum where these problems have been covered in the past.
Mick
|
|
|
steve m
|
| posted on 26/7/03 at 08:52 PM |
|
|
when you see all of the built car's
mine included, you will see all of the "discrepancies"
every car is a work of art and completley
different to the next one
something I was told after I built my car was "measure twice, cut once"
very wise words. that would have saved
hacksaw blades, tears. blood and arms
I would make the part fit the hole, and dismiss the book measurements
as there are several errors
|
|
|
burgessj
|
| posted on 26/7/03 at 09:51 PM |
|
|
Thanks all...
I'll have those top rails on in no time..
I suppose it's most important to make sure that the frame is true, so I don't get handling problems.
Appreciate your help
JohnB
|
|
|
leto
|
| posted on 26/7/03 at 10:19 PM |
|
|
I make my living out of designing welded structures. If I was to hand out a drawing of something that was over 2m long, 1m wide and 0,5m high, made
out of 60 segments of pipe, welded together and ask it to be right within 1mm....actualy it is a little hard imagining what might happen but it is not
a good career move. A professional welder would probably say it is impossible, a amateur don't know that, so he do it any way.
A production car is within 10mm, if it's good. I think you can do better than that without much effort. It is your car, you can do what ever you
feel is right and/or convenient.
|
|
|
craig1410
|
| posted on 27/7/03 at 06:17 PM |
|
|
Leto,
I agree with you 100% (again) but would add that the most important thing in my view when it comes to accuracy is to try to measure everything from a
common datum point or line. DON'T measure things incrementaly as each error will most likely add to the overall discrepancy.
Establish your base lines (usually a centreline and a front or back line) and work every key measurement from these. Don't add the difference
between sections together or you will tot up a good few mm of error over the full length of the chassis for sure.
This is why the building board with accurate centreline is vital and you should take some time to mark this out with some of the more important
dimensions before even lifting a hacksaw. Get the longest steel ruler you can (see my website for details - I got mine at Focus Do It All and it is
40" long) and use this ruler to mark your centreline after marking some dots using a taught piece of fine nylon string stretched down the centre
of the board. Also use the biggest set square you can find (again Focus - 24" x 18" roofing square) and use it to mark all the critical
lateral lines before starting. I'd recommend using varnish to seal these key lines in before you get the board dirty as I had to remark my board
half way through my build and I was worried about not getting the same accuracy 2nd time around.
Once you have marked all your base rail lines then check that the appropriate diagonals are equal and thus the drawing is square. You may wish to also
draw in some of the upper rail positions so that you can use a plumb line later to position them. If you do then just make sure the base is 100% level
as a plumb line only measures plumb to the earth not necessarily plumb to your base board...
As for practical accuracy, I have got my longest diagonal (LC to O) within 1 or 2 mm. It was slightly better before fully welding it but I am pleased
with 1-2mm to be honest and it is certainly "good enough"
HTH,
Craig.
|
|
|
leto
|
| posted on 27/7/03 at 07:35 PM |
|
|
Small addition to Craig's post.
Don't trust your roller to be straight or your square to be square, check them!
Also check that all your measuring tools agree.
|
|
|
craig1410
|
| posted on 27/7/03 at 09:27 PM |
|
|
Quite right!
Actually when I got my roofing square from Focus Do-It-All it was slightly bent and I got it for 1/2 price. I then took it home and straightened it
and it was good as new. The bend was only minor anyway and didn't leave any residual damage once I had straightened it.
I did have a problem with my small set square which had a 1mm offset in the measuring scale on the inside of the square. It was really annoying until
I realised where all my errors were coming from. Luckily the errors meant that I cut things too long and just had to file them back farther but it was
annoying none the less and illustrates your point well. I now measure everything with my trusty 40" stainless steel rule and just use the set
square's for checking angles are square.
I'd also recommend that everyone should buy a digital vernier caliper and a simple low cost micrometer. The vernier in particular is
indespensible when checking all sorts of diameters and depths. I bought mine from screwfix and although it is only plastic, as long as you don't
damage the jaws it is perfectly good and the fact that it is digital and reads in millimeters and inches is a boon! I often use it to convert
dimensions too! It only cost me £19 (screwfix.com Part number 10216) and the micrometer was about another £12 (part number 10963)
HTH,
Craig.
|
|
|
burgessj
|
| posted on 27/7/03 at 10:05 PM |
|
|
Thanks again for your help. At least now I won't waste so much time checking and re-checking. Particularly annoying were the top rails J1 and
J2, which are 1476mm in the book. They just wouldn't fit, an I checked all my work over and over again, until I found that the mcsorley plans
show them as 1467mm, which matched up with mine!
I'm working to within the kind of tolerances youre all talking about so hopefully I'll be OK. I want to fit a ready made roll cage at
some point, so I need to be as close as possible. Although I'm sure I will have some scope to get it to fit.
JohnB
|
|
|
Hornet
|
| posted on 28/7/03 at 07:08 AM |
|
|
John. as you are at very early stage.. you need to make a decision now on your front suspension. the book is wrong, it shows the brackets approx 25mm
to far forward for correct castor. There are 3 solutions
1. Go ahead with book dimensions and gusset brackets onto LA/LB,
2. Make J1 and J2 25mm shorter than book to give good contact for brackets, or
3. Make different shapped wishbones from standard.
The choice is yours.... at least you are aware now..... 
|
|
|
burgessj
|
 posted on 28/7/03 at 11:31 AM posted on 28/7/03 at 11:31 AM |
|
|
Hornet..
Thanks for that. I think I'll modify the frame to accomodate the wishbones rather than the other way around.
Presumably shortening J1 and J2 means
that Assembly LA,B,C,D has to be re-made to keep the overall height at 13" because it will be canted backward a bit further.
At least I know now...thanks
JohnB
|
|
|
leto
|
| posted on 28/7/03 at 01:06 PM |
|
|
Hornet/
Addition to your list:
4. Leave it as it is.
Quite a few are driving around with the wrong (2.7°) castor, but it don't seem to cause much trouble (any firsthand experiance reports will be
much appreciated). Point of zero castor is reach with the rear wheels off the ground.
5. Move the top brackets 5mm to the rear. Will give 4° castor. No sweat, good enough for r&b.
Moving 25 mm will give a castor of 9.4° or is my trigonometry failing me?
Happy building!
Leif
|
|
|
Simon
|
| posted on 28/7/03 at 01:37 PM |
|
|
John,
Further to the comments above about castor, if you are using Cortina uprights, the above comments will need to be taken into consideration.
However, if you are using Sierra uprights, you will need an upright adaptor, usually a turned ally insert with a hole reamed for the upper
balljoint.
These inserts are available with the hole offset allowing quite a wide range of castor/camber angle adjustment.
See pic in my photo archive.
ATB
Simon
|
|
|
Hornet
|
| posted on 28/7/03 at 02:43 PM |
|
|
Leto...
Your No4 is the same as my No1.
and no your Trig is not wrong, it is not the brackets you move 25mm back... it is j1 and j2 to allow the correct castor with the brackets being
placed centrally on LA and LB. I assume you have seen brackets hanging off LA and LB with the addition of gussets on the standard chassis?
Burgessj... yes when manufacturing the front end, you keep the same height, but increase the lean back of LA and LB
In the end.... you do what you like..... its your own build

|
|
|
leto
|
| posted on 28/7/03 at 04:14 PM |
|
|
quote:
Originally posted by Hornet
Leto...
Your No4 is the same as my No1.
Sorry, I misunderstood you a little 
quote:
and no your Trig is not wrong, it is not the brackets you move 25mm back... it is j1 and j2 to allow the correct castor with the brackets
being placed centrally on LA and LB.
OK, one final:
To get 5,3° castor, top brackets have to be moved 10mm towards rear.
quote:
I assume you have seen brackets hanging off LA and LB with the addition of gussets on the standard chassis?
Oh, yes and far worse.
quote:
In the end.... you do what you like..... its your own build
I fully agree, and it would be wrong not to warn builders how you think are about to make a mistake, just like you did.
Happy building!
Leif
|
|
|
burgessj
|
| posted on 28/7/03 at 06:09 PM |
|
|
Thanks for that..
I think I'll leave the front end tack welded until I've sorted the suspension out!
Anyone got any recommendations about wishbones ie.make your own, buy from MK or Luego
JohnB
|
|
|
Mark Allanson
|
| posted on 28/7/03 at 07:24 PM |
|
|
making my own wishbones took 4 full days, including making the jigs, making the plate sections, bending the steel, welding up and preparing for paint
- how valuable is your time?
The cost for the wishbones was about £10 all in disregarding time taken
Up to you, I did it because I wanted to keep my brackets central so my upper wishbones had to be bespoke to give the castor angle. I am really pleased
with the result
|
|
|
mranlet
|
| posted on 28/7/03 at 08:08 PM |
|
|
I got some wishbones off of eBay... It just so happened that they were attached to metalistic bushings, spindles, some disc brakes, and one 5-lug
x100mm hub each....
Oh yeah, and they were from a wrecked Yamaha ATV and sold for $150 (75 pounds?). They're not the exact same length or width or thickness as
ones from Ron's book, but they are meant to accomodate coilovers and are made of aluminum.
Through the power of math, I was able to determine that the maximum shock force that they would be subjected to on the road wouldn't come close
to the maximum shock force that the average ATV would see in everyday use (besides, the coilovers take most of the force anyway).
I figure that I can make between $400 and $500 at work (something like 200-250 pounds) for four days, and the frustration of troubleshooting
suspension parts is time that could be spent doing other things, like driving...
I will still need to modify these parts a little, but for $150 I've got myself a good jump at a front suspension.
::IMPORTANT NOTE::
I've designed my own frame rather than going with the guide, which gives me the freedom to do this - unless you get some very specific
descriptions from sellers, you would be hard pressed to find components that will fit precisely.
IMO, the price of pre-fabbed pieces is worth the savings in time and effort. Also, if you don't trust your trig, don't take the risk.
-MR
BTW - what is the conversion rate of dollars to pounds?
|
|
|
Rorty
|
| posted on 29/7/03 at 04:32 AM |
|
|
mranlet:
quote:
Through the power of math, I was able to determine that the maximum shock force that they would be subjected to on the road wouldn't come close
to the maximum shock force that the average ATV would see in everyday use (besides, the coilovers take most of the force anyway).
Wrong on two counts.
- Your figures seem to be back to front. The wishbones will see far greater loads mounted to the car than on the ATV.
- The coilovers don't take "most of the force", the bottom outer ball joint does, and if it's only an ATV item, it'll
probably fail.
I haven't been here for a couple of days, so please excuse me if I go back a few posts, regarding setting out and overall accuracy.
- There's quite a bit on my web site about setting out, which applies to any type of vehicle, on or off-road.
- To avoid large amounts of distortion, tack the entire assembly together first to prevent the dreaded warping. There's no reason why you
can't obtain less than 1mm of misalignment.
Ultimately though, the car's handling will only be as accurate as the points the suspension is attached to (asuming the wishbones, at least, are
accurate!).
You could build a asymmetrical chassis, but as long as the car's footprint is symetrical, all should be well.

Cheers, Rorty.
"Faster than a speeding Pullet".
PLEASE DON'T U2U ME IF YOU WANT A QUICK RESPONSE. TRY EMAILING ME INSTEAD!
|
|
|
Hornet
|
| posted on 29/7/03 at 07:18 AM |
|
|
Nice 1 Leto..
I have some pics and a rough sketch on this subject from earlier posts with Mark Allanson.
You can check them out in photo section.
Hope we are not confusing you Burjess?
As you can see , there are many ways to end up with the same/similar result.
I chose a modified chassis with standard wishbones so that at any time i need a replacement then they are staight from the shelf. In addition I did
not feel a gusseted bracket was ideal.
Have fun...

|
|
|
davef
|
| posted on 29/7/03 at 12:01 PM |
|
|
Hi all just to clear things up once again more so for burgessj you do NOT move the suspension brackets back at all, you lean the front frame la &
lb further back to facillitate a better weld position for the front top bracket, just take an inch out of the top rails and thats it sorted. cheers
davef.
|
|
|
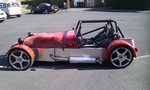
davef
|
| posted on 29/7/03 at 12:19 PM |
|
|
Hi all forgot to mention car finished check photo in archive, ps burgessj check photo 7140806 re top brkts. cheers davef.
|
|
|
James
|
| posted on 29/7/03 at 12:40 PM |
|
|
quote:
Originally posted by davef
Hi all forgot to mention car finished check photo in archive, ps burgessj check photo 7140806 re top brkts. cheers davef.
Looks really good- nice one!
James
|
|
|
burgessj
|
| posted on 29/7/03 at 12:44 PM |
|
|
Yeah thanks Dave..
I've only tacked it together so far. Should be easy enough to adjust the L assembly when I come to fit the wishbones...
Sounds like I'm going to find these little 'anomalies' at various stages of the chassis build.
JohnB
|
|
|