Avoneer
|
| posted on 17/12/03 at 10:00 PM |

|
|
Dash Radi Help
Hi,
Just finished my lovely flat plywood dash.
Someone please give me a clue as how to add a lovely 19mm radius to the bottom edge - someone must have done it!
Cheers,
Pat...
No trees were killed in the sending of this message.
However a large number of electrons were terribly inconvenienced.
|
|
|
|
|
givemethebighammer
|
| posted on 17/12/03 at 10:23 PM |
|
|
I was thinking of gluing several more layers of ply on the bottom edge of the dash then radiusing the bottom edge to 19mm with a rasp / file /
sandpaper.
See attached
|
|
|
Avoneer
|
| posted on 17/12/03 at 10:36 PM |
|
|
Cheers mate.
I like the bits of ply and rasp idea though as the bottom edge of my dash has a few curves. Brilliant idea - bloody simple as well.
I was coming up with a thousand difficult ways of achieving the same radi! (apart from this one) (doh).
Pat...
[Edited on 17/12/03 by Avoneer]
No trees were killed in the sending of this message.
However a large number of electrons were terribly inconvenienced.
|
|
|
wicket
|
| posted on 18/12/03 at 10:03 PM |
|
|
Made the dash from 10mm MDF with bottom edge built up with 2 pieces of 19mm radius wood quadrant glued to the bottom edge. Couple of pitures in the
photo archive.
Eventually covering with expanded vinyl from Woolies.
|
|
|
Simon
|
| posted on 19/12/03 at 09:58 AM |
|
|
Pat,
Have you thought of making it in fibreglass.
I've made all my panels in the same way without using moulds.
For the dash, I marked out the shape I wanted, and for the areas where the radius goes, cut a slot in the MDF base (with a jigsaw). Into the slot I
pit sltrips of aluminium (easy to bend) and with a wooden former, and plaster (of paris) formed the radius.
Then lay us f/glass. Remove a day or two later, sand and paint/cover
ATB
Simon
PS - for details on using f/glass see Steve Gusterson's site www.locostbuilder.co.uk - very helpful
[Edited on 19/12/03 by Simon]
|
|
|
David Jenkins
|
| posted on 19/12/03 at 10:19 AM |
|
|
I ended up making a soft edge for my dash - this means that the radius only needs to be greater than 5mm, instead of 19mm.
I can post details, if interested...
David
|
|
|
Spyderman
|
| posted on 19/12/03 at 05:38 PM |
|
|
For those using MDF or Ply you could use a Router for the radius.
I'm sure you must know someone with one.
At a push you could always buy the router bit and use it in a bench mounted drill, or a pillar drill.
Spyderman
|
|
|
RoadkillUK
|
| posted on 19/12/03 at 06:40 PM |
|
|
Spyderman, that's what I did.
I made the dash with 10mm MDF then glued another piece of 10mm MDF about 2" wide along the bottom of the dash at the back, then routed the front
edge, then covered the front with foam and vinyl.
Of course there are a couple of pics of the finished item on my website but I don't think any of them show the radius.
Roadkill - Lee
www.bradford7.co.uk
Latest Picture (14 Sept 2014)
|
|
|
Avoneer
|
| posted on 21/12/03 at 11:52 AM |
|
|
As my dash has curves along the bottom edge (to clear legs) it all becomes a little complicated. I have the bottom edge about 20mm thick with some ply
and am ready to radius the edge - just think it will be bloody hard work with a rasp. I have a router, but can't find a "rounding over"
bit anywhere to give me 19mm radius. I have a chamfer bit that would start me off, but still looks like a load of work - anyone have any easy
solutions???
[Edited on 21/12/03 by Avoneer]
 
Rescued attachment DSCF0070.JPG
No trees were killed in the sending of this message.
However a large number of electrons were terribly inconvenienced.
|
|
|
Northy
|
| posted on 21/12/03 at 12:05 PM |
|
|
Attack it with a B&D Powerfile, or the rotozip?
Cheers
Graham
Website under construction. Help greatfully received as I don't really know what I'm doing! 
"If a man says something in the woods and there are no women there, is he still wrong?"
Built 2L 8 Valve Vx Powered Avon
|
|
|
Mix
|
| posted on 22/12/03 at 10:05 AM |
|
|
Avoneer
Trend supply a 19mm rounding over bit in either 12mm or 0.5 in shaft diameter, at £45:95 + vat pt. no. 46/17.
Axminster Power Tool supply a CMT cutter pt. no. 838990 with 0.5 in shaft for £33:29 inc vat.
These prices are a bit steep for a one off application. However as one of my other interests is woodworking I will be buying one in the near future
and will be happy to assist anybody with their dash radius.
Mick
|
|
|
Chris Leonard
|
| posted on 22/12/03 at 11:15 AM |
|
|
I made my dash out of UPVC - a bit of soffit we had left over when replacing the ones on the house. For the radius I used a piece of pipe lagging,
glued on, with the vinyl covering it
|
|
|
Avoneer
|
| posted on 7/1/04 at 10:14 PM |
|
|
Hi Guys,
Pogression:
2 layers of 19mm MDF, cut to required shape and bottom edge rounded off with a rasp - not to hard with MDF. Covered with cling film. 2 Layers of CSM,
2 days later "cracked" from wood and trimmed to fit. Tis only a prototype and my second go ever at fibreglassing. Will be good with 3 layers
of CSM and covered in thin vinyl.
Cheers for all the help,
Pat...
Rescued attachment Dash1.jpg
No trees were killed in the sending of this message.
However a large number of electrons were terribly inconvenienced.
|
|
|
Avoneer
|
| posted on 7/1/04 at 10:15 PM |
|
|
You can't really appreciate the full 19mm curve from the pic, but I can - he he he.
Rescued attachment Dash2.jpg
No trees were killed in the sending of this message.
However a large number of electrons were terribly inconvenienced.
|
|
|
Northy
|
| posted on 7/1/04 at 10:33 PM |
|
|
Looking good
How much were they? 
Graham
Website under construction. Help greatfully received as I don't really know what I'm doing!
"If a man says something in the woods and there are no women there, is he still wrong?"
Built 2L 8 Valve Vx Powered Avon
|
|
|
Avoneer
|
| posted on 7/1/04 at 10:44 PM |
|
|
Hi G,
Pics don't do it justice.
Ordering some more resin etc. next week (pay day). Will swap a 3 layer dash blank for a copy of those vids (no, not those dirty ones, the other
ones!).
Cheers
Pat...
No trees were killed in the sending of this message.
However a large number of electrons were terribly inconvenienced.
|
|
|
Northy
|
| posted on 7/1/04 at 10:52 PM |
|
|
Done (you have been! )
I'll get the wife on the case
Cheers
Graham
Website under construction. Help greatfully received as I don't really know what I'm doing!
"If a man says something in the woods and there are no women there, is he still wrong?"
Built 2L 8 Valve Vx Powered Avon
|
|
|
Nick Davison
|
| posted on 23/2/04 at 04:31 PM |
|
|
This probably a bit late but when you lay up the dash place a piece of melamine on the face and clamp it down with G clamps. When I is released, and
it will release without release agent or wax, it will leave a nice smooth surface. Now just replace the glass mat with carbon!
Nick
|
|
|
britishtrident
|
| posted on 6/3/04 at 03:09 PM |
|
|
Use a "spokeshave" --- as originally originally used for making the spokes for artillery style wagon wheels.
It is a small 2 handed planning tool which you draw towards you --- gives terrific control and allows you to make edge radi and outside and
(gentle) inside curves.
|
|
|
britishtrident
|
| posted on 12/3/04 at 08:12 PM |
|
|
If vinyl convering the dash its easy to rubber "D" section intended for going round boat hulls.
|
|
|
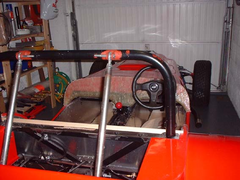
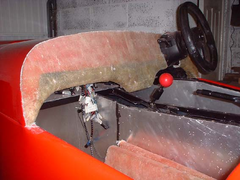
tr
|
| posted on 14/3/04 at 10:42 AM |
|
|
Just to hijak the topic...
I'm at a similar point in my build now and I'm unsire as to how I'm required to radius the dash..

How far round does the radius have to go? is it as A in the above picture or B? Can't see the point in following the radius right up the back as
in A.
I'm using a fibreglass dash from MK, I've already backed it with ply to mkae it a bit stiffer, and I was thinking along the lines of
building the bottom up with more ply and sanding it down the radius as someone else has suggested on here. Then a friend of mine came up with the idea
of using some plastic pipe, cut and slotted over the bottom of the dash, as in the picture below.

Would that be SVA happy? I wasn't to sure because of the angle the pipe meets the dash.
Cheers
Tom
|
|
|
Fifer
|
| posted on 22/3/04 at 01:41 PM |
|
|
Good pictures TR, I'm using a carbon dash with 10 mm U section rubber moulding on bottom edge, seems the way to go as the 19 mm doesnt come into
play if the material is soft and has 5 mm curve (I think !)

|
|
|
GO
|
| posted on 22/3/04 at 02:36 PM |
|
|
fifer, does the 5mm radius come in to play if the whole dash is padded, or will just the bottom edge being pliant be enough?
|
|
|
Fifer
|
| posted on 22/3/04 at 02:53 PM |
|
|
Dont have my manual at hand here but the way I see it is the 19mm radius means the material it's made of wont mater. But if the bottom edge has
"soft" material (like rubber / foam) the radius is 5 mm.
The face of the dash material is irrelivant as long as the projections are within spec (i.e. the 2.5 mm radius rule or where protrusion is less than
5mm from face)
All from memory so probably b***cks. There are so many ways to interprit the manual eh !, does my head in to be honest
|
|
|


%20(WinCE).JPG)