Slimy38
|
| posted on 11/4/23 at 11:49 AM |

|
|
Another 'how to fix bodywork' question
I got my bodywork trial fitted on the weekend (it's only been nearly two years since I last worked on the car!, Covid and new house really
hasn't helped).

It fits reasonably well, although I think having it in storage has left it a little twisted. Once I'd clamped it down I could see what outriggers
I would need to build. I've got this sort of thing going on for the rear and sides;

(This is only for positioning on the rear, the final solution will be triangulated as per the Haynes book)
My question is how to fix the bodywork to the outriggers? I did initially think about rivetting, but then thought the rivets would just pull through
the fibreglass. Then I thought about washers or some other load bearer, then the rivets would be getting a bit long.
Then I wondered about Sikaflex or Tiger Seal. I know the stuff is strong, but I'm conscious that to get clean lines on the outside, I'm
attaching the fibreglass to the bottom of the outriggers rather than having it rest on the top. Is an adhesive strong enough in such a
'pull' situation? Is it good enough for fibreglass to metal?
All three outriggers (sides and one rear) are about two foot long and regardless of what fixing I go for it would be for the entire length of the
support. I will also be doing something behind the seats and under the bulkhead to keep things rigid (still undecided about how to do that though).
|
|
|
|
|
HowardB
|
| posted on 11/4/23 at 12:14 PM |
|
|
Sikaflex will stick like anything, poor surface prep will spoil the bond.
High thermal cycling will impact bond longevity and would then suggest a mechanical fastening solution.
Sikaflex is good enough for bonding truck bodies and coach panels together and will last for many years.
Others will be along with direct experience with specific brands and methods, I have used Sikaflex in a previous commercial role.
Howard
Fisher Fury was 2000 Zetec - now a 1600 (it Lives again  and goes zoom) and goes zoom)
|
|
|
Slimy38
|
| posted on 11/4/23 at 12:29 PM |
|
|
quote:
Originally posted by HowardB
High thermal cycling will impact bond longevity and would then suggest a mechanical fastening solution.
Thanks for the response. Just to call this particular one out, what is meant by high thermal cycling? There's no exposure to engine or exhaust
temperatures, I'm guessing direct sunlight is probably the biggest source.
|
|
|
pewe
|
| posted on 11/4/23 at 02:50 PM |
|
|
You can buy flange pop rivets specifically designed for use with GRP i.e. have mushroom heads.
I would probably use those plus Silaflex or Tiger seal to stop flex and water ingress.
See.rivetting grp to metal
BOL
|
|
|
Slimy38
|
| posted on 11/4/23 at 03:05 PM |
|
|
quote:
Originally posted by pewe
You can buy flange pop rivets specifically designed for use with GRP i.e. have mushroom heads.
I would probably use those plus Silaflex or Tiger seal to stop flex and water ingress.
See.rivetting grp to metal
BOL
I did find that video, but it's the wrong way round for me? I would be inserting the pop rivet from underneath, it would go through fibreglass
first then into metal. But I did like the way he used washers, I'd just have to do the same from the other direction.
|
|
|
pewe
|
| posted on 11/4/23 at 03:14 PM |
|
|
There are also peel and blind rivets as used on caravan bodies. I think those are the other way round on your application - might be worth a look?
[Edited on 11/4/23 by pewe]
|
|
|
snapper
|
| posted on 11/4/23 at 06:56 PM |
|
|
I would inclined to bond something on the the shell with captive nuts so you could bolt the shell to the chassis which would give you the ability to
remove the body if required
I eat to survive
I drink to forget
I breath to pi55 my ex wife off (and now my ex partner)
|
|
|
Slimy38
|
| posted on 11/4/23 at 08:10 PM |
|
|
quote:
Originally posted by snapper
I would inclined to bond something on the the shell with captive nuts so you could bolt the shell to the chassis which would give you the ability to
remove the body if required
You're actually one question ahead, I was going to ask about that next! The way things line up I will have to weld the triangulated parts on
to the car, but I agree that there should be a removable connection. Captive nuts sound like a good idea, although I've not really had much joy
with captive nuts in exposed environments. Then again, I'm not sure whether I'd be able to get to both sides of a fixing if I don't use
a captive portion.
|
|
|
Mr Whippy
|
| posted on 12/4/23 at 06:39 AM |
|
|
Look at the pics I'd be inclined to build a proper spaceframe extension to the chassis to give you a workable and strong boot. It would sort the
body flex, give you a boot that your not worried about breaking and a good extra crumple zone if the worst was to happen. It even looks like you could
have a full size spare wheel well without loosing boot space. Probably only looking at 20-30kgs in metal for a huge improvement. I'd also suggest
locating the petrol tank above the diff for safety as that's dead space anyway.
|
|
|
JAG
|
| posted on 12/4/23 at 07:00 AM |
|
|
May be you could use something like the 'Big Head' fasteners. Bond them into the fibreglass panel and bolt through the Steel?
[Edited on 12/4/23 by JAG]
Justin
Who is this super hero? Sarge? ...No.
Rosemary, the telephone operator? ...No.
Penry, the mild-mannered janitor? ...Could be!
|
|
|
Slimy38
|
| posted on 12/4/23 at 08:01 AM |
|
|
quote:
Originally posted by Mr Whippy
Look at the pics I'd be inclined to build a proper spaceframe extension to the chassis to give you a workable and strong boot. It would sort the
body flex, give you a boot that your not worried about breaking and a good extra crumple zone if the worst was to happen. It even looks like you could
have a full size spare wheel well without loosing boot space. Probably only looking at 20-30kgs in metal for a huge improvement. I'd also suggest
locating the petrol tank above the diff for safety as that's dead space anyway.
I did look at the fuel tank positioning while I was there. Here is the tank strapped in the default 'locost' position;

I really didn't like it here. The fuel filler had too far to go, it was very intrusive into the boot and most importantly I felt the swirl pot
(underneath the tank) was very vulnerable.
I then moved it up above the diff;

It tucked in really nicely in the gap, the filler is a lot shorter and the swirl pot is in a safe place. It can then sit on top of the frame that will
also be supporting the bodywork.
You are right about filling in the boot though, the initial picture was just for positioning the first bar but I'm planning on a full boot. There
will be diagonals coming down from the roll bar mounts, supports for the bodywork all round the boot rim (if nothing else I need some strength for the
boot lid hinges). I'm not sure about a workable crumple zone although everything will be triangulated by default.
|
|
|
Slimy38
|
| posted on 12/4/23 at 08:07 AM |
|
|
quote:
Originally posted by JAG
May be you could use something like the 'Big Head' fasteners. Bond them into the fibreglass panel and bolt through the Steel?
[Edited on 12/4/23 by JAG]
Hmm, that's an interesting idea, I'll have to look into that. The threaded stud version in particular looks very effective, I'd just
need to figure out how to make it attach to the outriggers.
|
|
|
loggyboy
|
| posted on 12/4/23 at 09:09 AM |
|
|
quote:
Originally posted by JAG
May be you could use something like the 'Big Head' fasteners. Bond them into the fibreglass panel and bolt through the Steel?
Beat me too it, these would be my choice. 1x every 20cm or so with some decent resin bond should last and be nicely secure. Id add some brackets out
of flat sheet or angles that could be bent and fettled to suit curve of grp and also allow you to add a slot gap to adjust the body to the right
position, as bonding in the right position and then drilling holes in the chassis might lead to misalignment.
[Edited on 12-4-23 by loggyboy]
Mistral Motorsport
|
|
|
nickm
|
| posted on 12/4/23 at 06:34 PM |
|
|
Hi
I have a J15 with full bodywork i just bolted it so i could take it off if necessary.
My outriggers are where most of the bolts are located onto a thick aliminium rail with each outrigger having removable internal panels to allow me
access to wiring throttle, cables etc as well as the cockpit mounting bolts, could store a few bits and bobs in there as well.
Although my cockpit is 3 piece with a lower side connecting the oversize ali floor with the top of the outrigger and a one piece tub forming the upper
side, dash top and rear bulkhead all bolted.
Nick M
|
|
|
HowardB
|
| posted on 12/4/23 at 08:37 PM |
|
|
quote:
Originally posted by Slimy38
quote:
Originally posted by HowardB
High thermal cycling will impact bond longevity and would then suggest a mechanical fastening solution.
Thanks for the response. Just to call this particular one out, what is meant by high thermal cycling? There's no exposure to engine or exhaust
temperatures, I'm guessing direct sunlight is probably the biggest source.
sunlight would be ok - high thermal cycling would be for something like a Fury sidepod where the exhaust sits inside the bodywork.
I have brakets bonded to the underside of my bonnet - so in the engine bay temp - without issue.
HTH
Howard
Fisher Fury was 2000 Zetec - now a 1600 (it Lives again and goes zoom)
|
|
|
Slimy38
|
| posted on 13/4/23 at 08:56 AM |
|
|
quote:
Originally posted by nickm
Hi
I have a J15 with full bodywork i just bolted it so i could take it off if necessary.
My outriggers are where most of the bolts are located onto a thick aliminium rail with each outrigger having removable internal panels to allow me
access to wiring throttle, cables etc as well as the cockpit mounting bolts, could store a few bits and bobs in there as well.
Although my cockpit is 3 piece with a lower side connecting the oversize ali floor with the top of the outrigger and a one piece tub forming the upper
side, dash top and rear bulkhead all bolted.
Nick M
That's great information, thanks. Out of interest, what size bolts are used, and how many do you reckon are used for each piece? I think
I'll end up with three bolts per side and maybe four on the back, but I wasn't sure what size bolts would be appropriate. If I look at the
permitted loads of 8.8 bolts (as an example) I could get away with M5 bolts but my brain just doesn't see how a 5mm wide bolt could do the job!
|
|
|
Slimy38
|
| posted on 13/4/23 at 08:59 AM |
|
|
quote:
Originally posted by HowardB
sunlight would be ok - high thermal cycling would be for something like a Fury sidepod where the exhaust sits inside the bodywork.
That's great, thanks for the response. I was wondering whether I could squeeze in an exhaust down one side so I might have to think about what to
do there. The other option is to have the exhaust sat underneath or to the side of the boot.
|
|
|
nickm
|
| posted on 13/4/23 at 06:21 PM |
|
|
Hi
Sure i used 6mm bolts and nylocs.
The fibreglass on a J15 is just dressing really its a Sylva Riot near as dammit under the skin. The lower halfs sit on top of the extended floor which
projects approx 2" beyond the chassis side and the tops hook over the rail, a thick ali rail The top half and both bottoms were lined up and
fixed to the rail simeltaneously. With the Sylva the bottom halfs have a real curve on them so they cant be seen the interior ones are hidden by
switch panels etc
Your outriggers will be the impact protection in case of a side on smack.
You will probably find that the Sylva Furys are exactly the same design/technique because once the designer found something that works they would
stick with it.
There use to be a couple of build blogs if you can find them
Good luck
Nick M
|
|
|
Partofthechaos
|
| posted on 11/10/23 at 10:00 AM |
|
|
quote:
Originally posted by JAG
May be you could use something like the 'Big Head' fasteners. Bond them into the fibreglass panel and bolt through the Steel?
[Edited on 12/4/23 by JAG]
Slight thread resurection and hijack, but I thought it beneficial to continue this thread rather than start another.
I am thinking about making some bonet catches for my car that are more converntional than the standard se7ern ones to make them hidden rather than
having the IVA black lumps on each side. Partly me being a tart, partly trying to get to where I want to end up from the start. If I didnt end up
with holes in the bodywork I would put the standard ones on first and change later, but then I would have the holes to deal with.
So I am thinking of something like 4 of these on the indside of the bonet: https://www.carbuilder.com/uk/mini-in-line-bear-claw-latch-door-75mm with a
cable release to a latch under the dash.
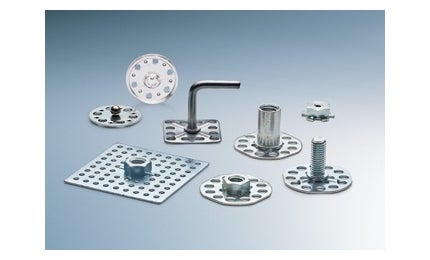
The bit that relates to this thread is that I would then need 4 points bonded to the inside of the bonet to avoid having external fastenings,
something like the ones in the picture.
I am aware that I am making this dificult (story of my life!  ), the main thing I am not sure on currently is if it is reasonable to expect 4 bonded
points to securely hold the bonet on, or will it realistically need something bolted thorugh the fibreglass? If I have to bolt though then it is
probably just worth going for the normal clamps in the first place. Normal clamps would be much easier, but where is the fun in that? ), the main thing I am not sure on currently is if it is reasonable to expect 4 bonded
points to securely hold the bonet on, or will it realistically need something bolted thorugh the fibreglass? If I have to bolt though then it is
probably just worth going for the normal clamps in the first place. Normal clamps would be much easier, but where is the fun in that?
|
|
|
Slimy38
|
| posted on 11/10/23 at 02:19 PM |
|
|
quote:
Originally posted by Partofthechaos
Slight thread resurection and hijack, but I thought it beneficial to continue this thread rather than start another.
I am thinking about making some bonet catches for my car that are more converntional than the standard se7ern ones to make them hidden rather than
having the IVA black lumps on each side. Partly me being a tart, partly trying to get to where I want to end up from the start. If I didnt end up
with holes in the bodywork I would put the standard ones on first and change later, but then I would have the holes to deal with.
So I am thinking of something like 4 of these on the indside of the bonet: https://www.carbuilder.com/uk/mini-in-line-bear-claw-latch-door-75mm with a
cable release to a latch under the dash.
The bit that relates to this thread is that I would then need 4 points bonded to the inside of the bonet to avoid having external fastenings,
something like the ones in the picture.
I am aware that I am making this dificult (story of my life! ), the main thing I am not sure on currently is if it is reasonable to expect 4 bonded
points to securely hold the bonet on, or will it realistically need something bolted thorugh the fibreglass? If I have to bolt though then it is
probably just worth going for the normal clamps in the first place. Normal clamps would be much easier, but where is the fun in that?
Interesting approach, I definitely approve of the thread hijack!
As a variation, have you thought about a hinged bonnet? One of the things I picked up on earlier on is the inconvenience of a completely removable
bonnet, horror stories about them cracking or blowing away when off the car, etc. If you hinge it, then you're basically doing what (nearly)
every tin top around the world does with their bonnet.
By the way, thank you for the link, I might actually pinch your idea! The front bottom lip of my bonnet will be fixed with hinges, but I was trying
to figure out a clean rear edge solution. Your solution looks to be a clean IVA friendly route.
|
|
|
Partofthechaos
|
| posted on 13/10/23 at 07:56 AM |
|
|
Thank you! That gives me the confidence that I am not making things unnecessarily complicated (like I do normally).
I like the idea of a hinged bonet, on the bulkhead maybe? My bulkhead shelf thing is getting a bit crowded though. I like the idea of it being
attached and there is no reason why the hinges couldnt be removable pins so that it could be taken off if necessary.
Do you think that bonding the fittings to the inside of the bonet will be strong enough or would it need a bolt through the fibreglass?
|
|
|
Slimy38
|
| posted on 13/10/23 at 09:50 AM |
|
|
quote:
Originally posted by Partofthechaos
Thank you! That gives me the confidence that I am not making things unnecessarily complicated (like I do normally).
I like the idea of a hinged bonet, on the bulkhead maybe? My bulkhead shelf thing is getting a bit crowded though. I like the idea of it being
attached and there is no reason why the hinges couldnt be removable pins so that it could be taken off if necessary.
Do you think that bonding the fittings to the inside of the bonet will be strong enough or would it need a bolt through the fibreglass?
Aye, when I talk about hinging my bonnet it will basically be almost like a suspension arm fixing, a u shaped bracket with a tube and a bolt through
them both. Two minutes with a spanner and it can come off completely.
I don't see a bolt through the fibreglass being any stronger than bonding to the surface, what I do expect is that surface area comes into play.
In my case it'll be a steel bar that will be bonded to the bodywork (so lots of surface for gluing), then the fixing will come off that. The bar
has a secondary effect of stiffening the body, and I would expect the same to help your bonnet.
|
|
|
Partofthechaos
|
| posted on 13/10/23 at 06:16 PM |
|
|
That makes sense. The next hurdle is whether the sides of the front of the bonet would clear the nose close as it goes up. Side hinged would have
less of an issue, not sure if this would be useful or not though.
|
|
|
Slimy38
|
| posted on 13/10/23 at 08:28 PM |
|
|
quote:
Originally posted by Partofthechaos
That makes sense. The next hurdle is whether the sides of the front of the bonet would clear the nose close as it goes up. Side hinged would have
less of an issue, not sure if this would be useful or not though.
It wouldn't need that much clearance, depending on how tight the bonnet is against the nose cone it might just work? Or at most you might need to
curve the leading edge of the bonnet.
You could always have the nosecone hinged at the bottom, bond the bonnet to the nose cone and have the whole thing come up...
Have a look here at an example;
https://alfadax.com/content/during/05/bonnet_clutch.htm
Or if you're feeling particularly adventurous, follow Fozzie's lead;
https://www.locostbuilders.co.uk/forum/viewthread.php?tid=203042
[Edited on 13-10-23 by Slimy38]
|
|
|
Partofthechaos
|
| posted on 14/10/23 at 06:04 AM |
|
|
Ah yes, I'd forgotten that Alfadax did that. I have spent ages on his website, but not recently. I need to do some revision. I hadn't seen
Fozzie's car before, not sure my skills are up to thst though! Some more food for thought.
|
|
|