nick205
|
 posted on 17/5/05 at 08:50 AM posted on 17/5/05 at 08:50 AM |

|
|
joining wires ?
I've tried anumber of ways of joining two wires together, including soldering (+heatshrink) and crimped butt connectors. Both work OK, but I
can't help feeling there may be a better/neater solution...
Anyone else got a neat trick for doing this?
Cheers - Nick
|
|
|
|
|
flak monkey
|
| posted on 17/5/05 at 08:57 AM |
|
|
Soldering and heatshrink is the proper way to do it, short of replacing the whole run of wire.
David 
Sera
http://www.motosera.com
|
|
|
JonBowden
|
| posted on 17/5/05 at 10:03 AM |
|
|
As a variation on soldering and crimping :
Buy some thin brass tube from a model shop. It should have an inner diameter just big enough to allow the wire to be slid in.
Cut this into lengths about 15mm - 20 mm.
Strip your wires by half the length of the brass tubes
Insert wires into both ends then solder and cover with heatshrink
Jon
|
|
|
Hellfire
|
| posted on 17/5/05 at 04:37 PM |
|
|
Solder then heatshrink... perfect!

|
|
|
chrisf
|
| posted on 17/5/05 at 07:18 PM |
|
|
What about multiple wires? For example, there are places where I have one wire that I need to connect two or three wires to. How do I properly make
this connection? I have a time-based signal/hazard box that has one output for the left and right side flashers. Sine I have one flasher in the front
and two in the rear, this means that I will need to connect at least two wires to the single flasher output. Any ideas?
--Thanks, Chris
|
|
|
rusty nuts
|
| posted on 17/5/05 at 08:31 PM |
|
|
solder then heatshrink, use the largest soldering iron you can get especiallywhen soldering mutiple wires.
|
|
|
clbarclay
|
| posted on 17/5/05 at 08:40 PM |
|
|
Chris, Joint the 2 wires to another short wire and have a connector for the flasher unit on the short wire.
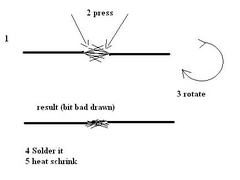
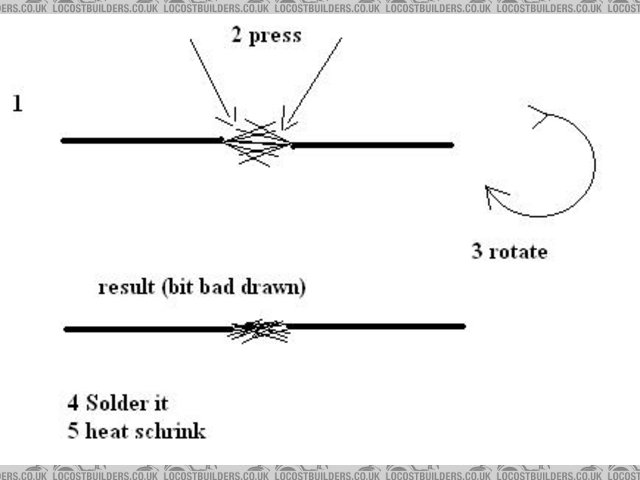
For soldiering 3 or more wires together the diagram below should give you an idea, in short have multiple wires going in one or both ends of the
heatshrink.
 
Rescued attachment soldering wire.JPG
|
|
|
ReMan
|
| posted on 17/5/05 at 09:15 PM |
|
|
http://www.vehicle-wiring-products.co.uk/VWPweb2000/terms-pre/photo/rhss.jpg
These are lovely, but expensive
www.plusnine.co.uk
|
|
|
tks
|
| posted on 17/5/05 at 11:27 PM |
|
|
tube??
nahh
just peel of 1cm of the isolation..
put over the heatschrink material..
and join the 2 in front of each other
and then with your 2 hands..grab the outside of the cm and turn it (each in another direction..)
the you will see that they have joined eacht other very beautifully (will make a pic some time)
then solder it with good solder material soow it fills it self up..
then at least when the solder is cool put over the schrink..
and heat it up a bit..
i bet it is a tighter solution than the tube one..
regards,
TKS
will post a pic soon..
for joining many wires..same trick..
just peel the wire for example if you need to join 3 cable to 1
then put one on the end..
then step 4cm of the end and peel the cable a bit of..
rotate the cable soow the 'hairs' are straight the put the other 1cm pelled thrue it rotate the 'tree' one rotate the other (sow
they eat each other up..)
and bend it in the direction you want solder it.. and place the heat schrink..
(best thing to use 3ones 2 smalle ones 2 big one..) the smaller ones are where you bend them (to fill up room a bit) the bigger ones goes on top of
all..
see sketch..
Rescued attachment cable.JPG
The above comments are always meant to be from the above persons perspective.
|
|
|
vintagebuilder
|
| posted on 18/5/05 at 11:53 AM |
|
|
Nick,
I've just bought some gizzmos but not tried them yet!!. I was told they are called Scotch Connectors and are like a small sleeve which is
hinged, you put in the cables, close up the connector ,then push in with pliers two small blades which cut the insulation and make the connection at
the same time.
Hope this helps.
David
|
|
|
flak monkey
|
| posted on 18/5/05 at 12:25 PM |
|
|
Scotch connectors have been around ages and work well when adding in new wires (often used when fitting towbars to production cars). You do need to be
careful that you dont pull on the wires though, otherwise the connector acts as a wire stripper...
I have used them several times, the last time when putting in a permanent feed for a freinds car stereo. I havent had any problems with them.
David
[Edited on 18/5/05 by flak monkey]
Sera
http://www.motosera.com
|
|
|
vintagebuilder
|
| posted on 18/5/05 at 12:32 PM |
|
|
Nick,
Just had a look on Vehicle Wiring Products web site. The gizzmos are called Tap Connectors.
David
|
|
|
mad4x4
|
| posted on 19/5/05 at 08:54 AM |
|
|
I wouldn't use "Scotch locks"/"scotch connectors" for building a loom in a Kit car looks very unproffessional go for
the solder and heatshrink root.
Don;t get me wrong "scotch locks" have a time and a place. That is connecting a feed for a radio or wiring a towbar but thats about it.
Scot's do it better in Kilts.
MK INDY's Don't Self Centre Regardless of MK Setting !
|
|
|
omega 24 v6
|
| posted on 19/5/05 at 11:32 AM |
|
|
DON'T use scotchlocks in an outside enviroment in the wet and salty roads they wont last 3 months before needing attn. use heat shrink splices
and sleeving as everyone says. Its the industry standard these days.
|
|
|
paulf
|
| posted on 19/5/05 at 07:33 PM |
|
|
I cut up a few looms to make mine and they were all made this way .I did mine the same and found a small butane blowlamp of the type filled with
lighter gas ideal for soldering them and heat shrinking.I then wrapped the completed loom with the non sticky PVC tape and used self amalgamting tape
to seal the ends.
Paul.
quote:
Originally posted by omega 24 v6
DON'T use scotchlocks in an outside enviroment in the wet and salty roads they wont last 3 months before needing attn. use heat shrink splices
and sleeving as everyone says. Its the industry standard these days.
|
|
|
DarrenW
|
| posted on 20/5/05 at 09:31 AM |
|
|
Ditto ref scotchloks. Nice idea but bloody awful in practice. I stopped using them after getting all sorts of problems.
Solder and heatshrink gives reliable connection, good current flow and is cheap. This si my preferred method after bad experiances years ago.
The connectors Reman refers to are also extremely good. Not only do the solder and heatshrink in one go but they also have a glue / seal compound in
each end. Almost impossible to pull apart (Wurth also sell them).
|
|
|


.jpg)


.jpg)