
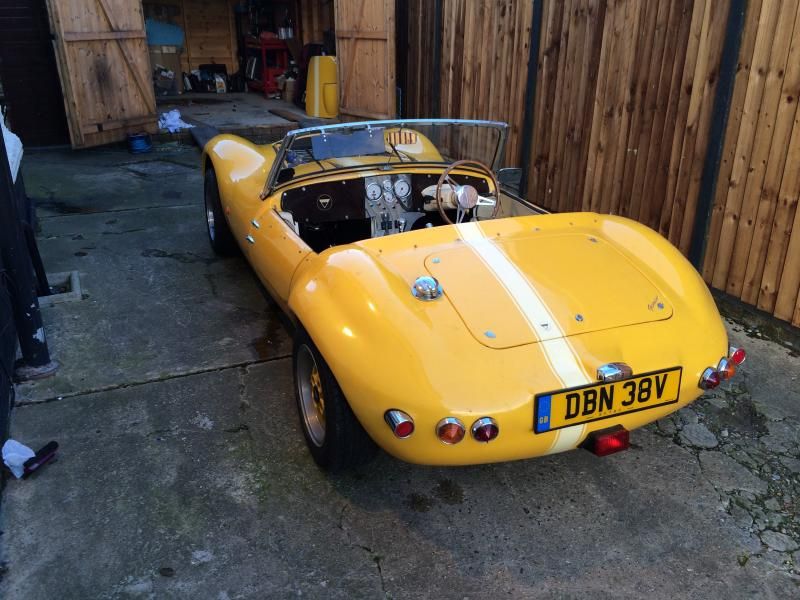
New Project! - Autotune Gemini
Norfolkluegojnr - 1/5/14 at 07:58 PM
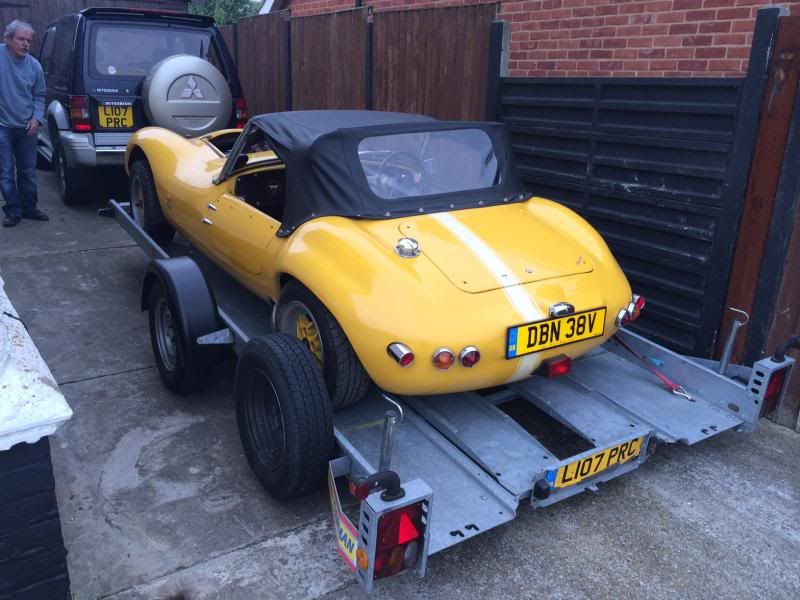
I'm back baby!
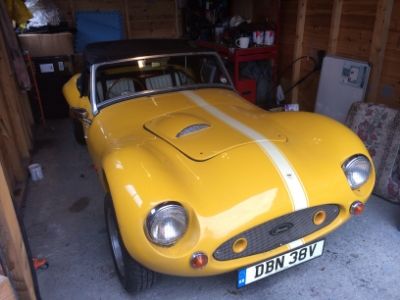
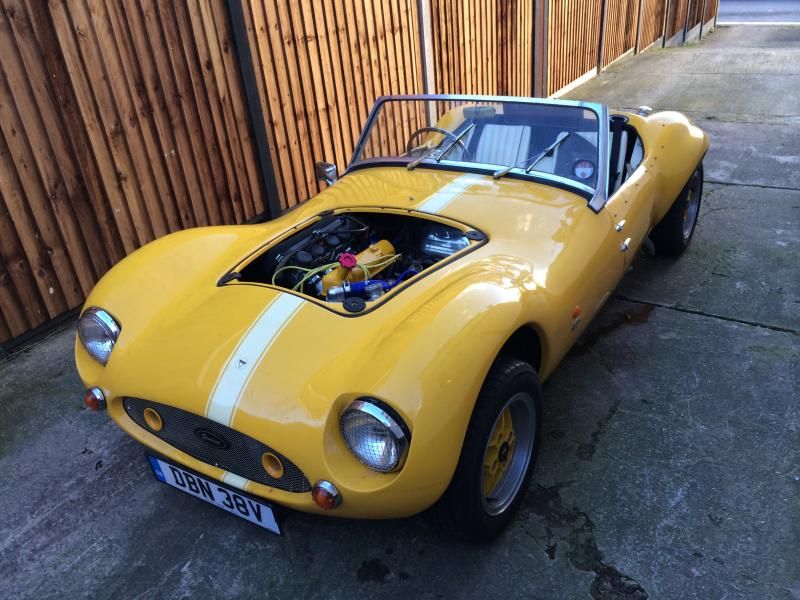
Never been so sad as the day I said goodbye to my striker (Q609 ACF where are you?) so after the Mini Turbo, and a lovely (and still here) MX5, I
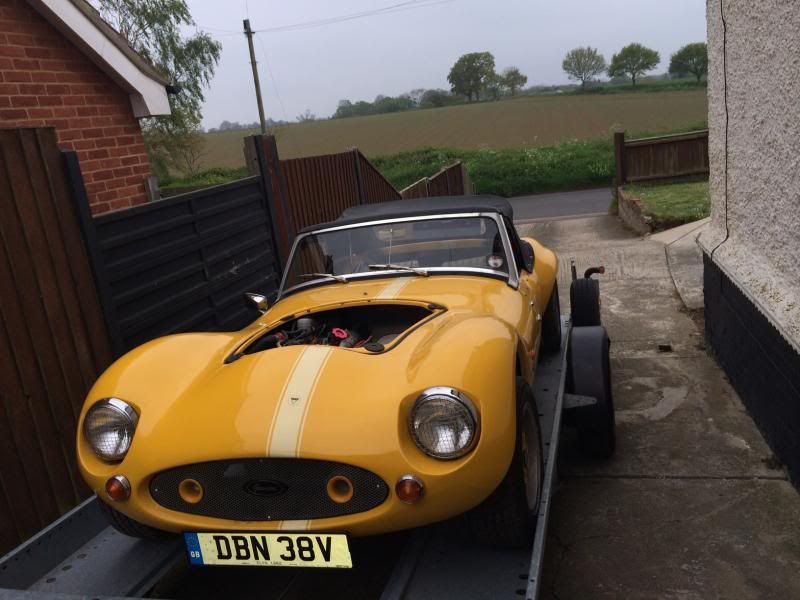
picked up my new project this evening:
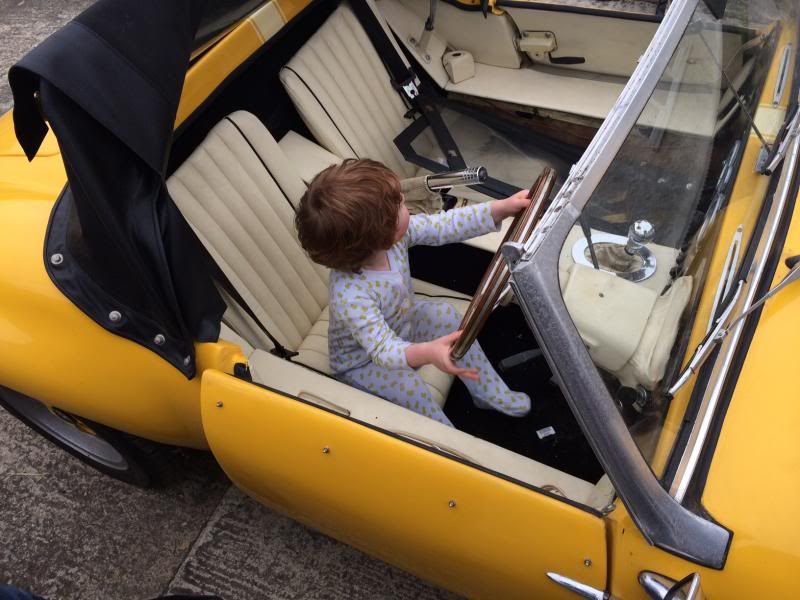
Even Norfolkluegojnr jnr seems to like it. In fact he cried when I took him out to put it away!
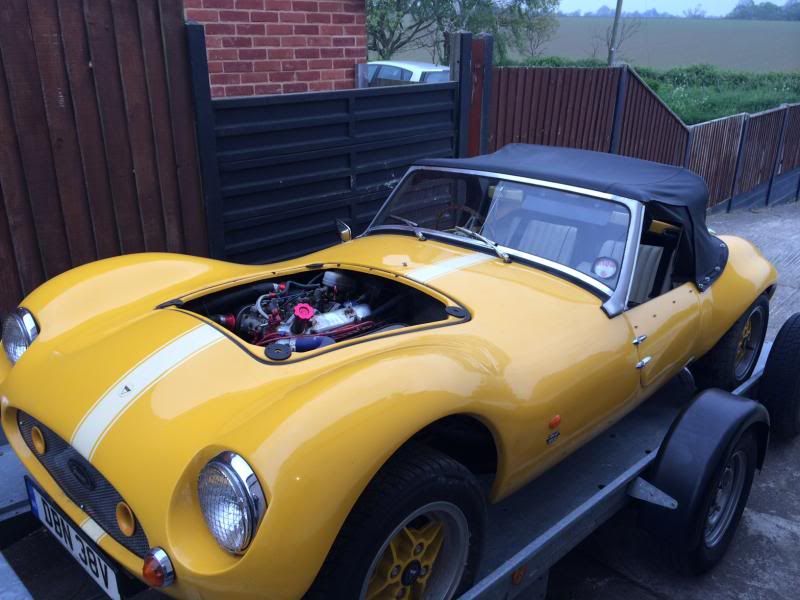
Its currently running a 1600 Crossflow, with a stage 3 head & twin 40's. I'll upload some more pics when its light again, but suffice to
say I'm super chuffed!
It hasnt been on the road since 2008, so a few bits and pieces will need refreshing, but its in surprisingly good nick.
BUild/refresh thread to come. So please to be back in the fold!

TheGiantTribble - 1/5/14 at 08:20 PM
Thank goodness someone bought it, it was looking like I was going have to choose between biding on it
(at least I think it was the one on ebay) and sleeping in the shed. The Mrs very unhappy when she saw me looking at it.
It looks great and can't wait to see more pictures as you rebuild her.
Norfolkluegojnr - 1/5/14 at 08:24 PM
Yes, it was the one on ebay - hidden under a dirty tarp.
I was pleasantly surprised at whats left to do, and throughly looking forward to it!
Also of course pleased to keep you on SWMBO's good side......

TimC - 1/5/14 at 08:49 PM
Welcome to the club! Great to see another one getting some TLC.
bob - 1/5/14 at 09:13 PM
Great car, one of our regulars at Newlands has rebuilt one with a brand new blacktop Zetec on Jenvy's it absolutely flys and looks fantastic.
sjmatthews - 1/5/14 at 09:22 PM
Love it! 
Norfolkluegojnr - 2/5/14 at 06:31 AM
Thanks for the comments guys. More pics and details to come at the weekend.
Norfolkluegojnr - 4/5/14 at 09:27 PM
Got it running! sounds a bit agricultural on my phone, but you get thie idea....
Linky
Update on things to do:
New Battery
New thermostat, housing & gasket
Full Service
Pads, discs, caliper check etc
lots of rubbing down and painting of chassis members
Interior strip clean and refit
Biggest job on the list seems to be moving the brake master reservoir - the original builder seems not to have considered refilling or bleeding when
fitting it, as its touching the body of the car, and the cap cant be removed!
Any suggestions on how to move it without removing the body? Pics to follow....
Norfolkluegojnr - 8/5/14 at 09:53 PM
Bit more progress, and some pics for you.
Well, it was my birthday on tuesday, and the wife kindly bought be the following:
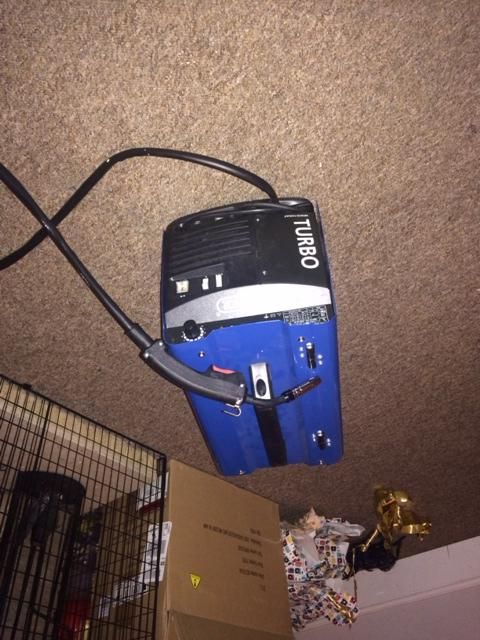
Which may well come in handy! Need to learn how to use it first though.
So, I havent had a huge amount of time, but I have started to make a list of what isnt working currently, and to do that, I've been poking about
a fair bit.
Firstly, wheels off to see whats hiding:
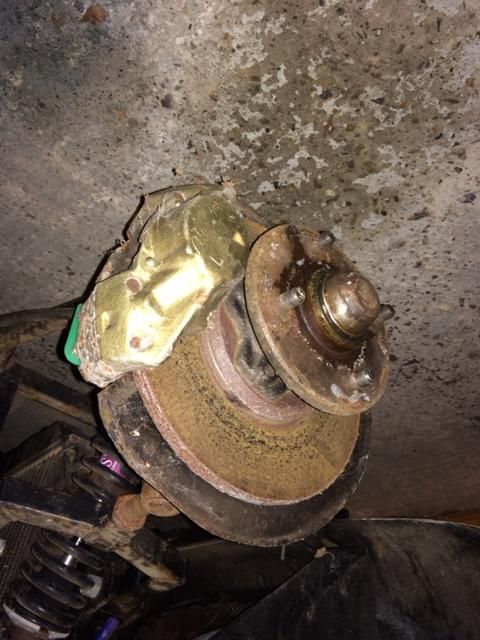
Not looking to bad. Correct me if I'm wrong, this is a Mk2 Escort hub? if so what is the caliper? Bottom ball joint is perished, so that'll
need replacing, other wise looking ok apart from some surface rust.
Drums on the rear, but i ran out of time to take them off for a look. That'll be tomorrow.
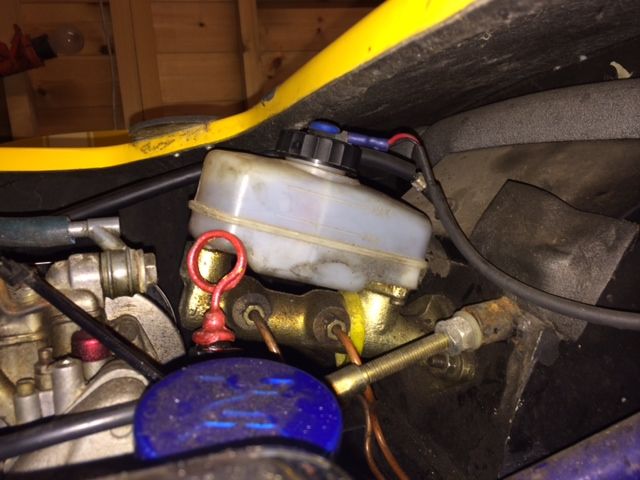
brake master cylinder and reservoir are touching the body, meaning the cap cant be removed. If I loosen it off, I can get the cap off, but not
exactly ideal. Should I replace with a remote option? if so what size/type am I looking at here?
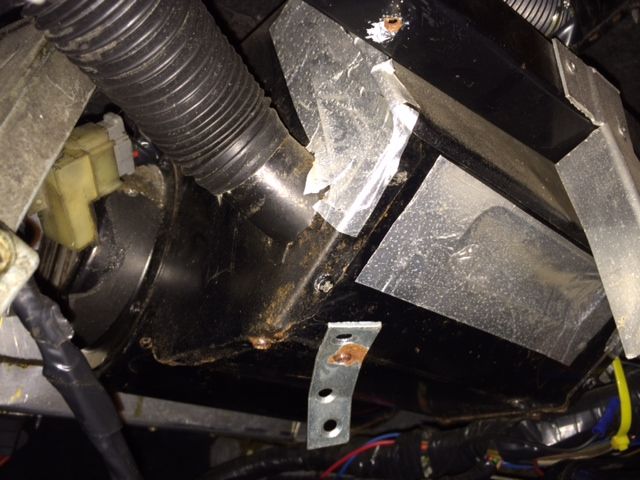
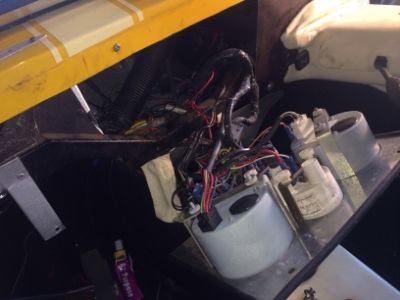
Heater not currently working. ANy idea what this is?
Multimeter is shot, so could check if its getting power, but is it easier to replace it with an electric option?
Finally, a surprise in the boot!
Longer update to come when I've done a bit more.
TimC - 8/5/14 at 10:18 PM
Uprights and hub are Cortina 3/4/5. Caliper is M16.
Ugg10 - 9/5/14 at 07:22 AM
Heater looks like it could be off a mini often used in kits of this age. Nice project all the best.
Irony - 9/5/14 at 08:31 AM
That looks like it could be a lovely car. Sort of project I am probably going to do next when garage space allows!
Norfolkluegojnr - 31/5/14 at 08:38 PM
Thought I'd put an update of progress....
Last few weeks have been slow going due to going on holiday and various work commitments, but I was given a hall pass for today, so got to work.
First up was trying to fix the heater which as far as I could see, was the only mechanical issue for the MOT:
First the switch was checked for power, and immediately highlighted the problem - it wasnt plugged in so plugging in and turning on revealed a
working heater!
Only issue was it was somewhat asthmatic. A bit of fiddling revealed it had two settings, and it was stuck between the two. A screw driver and a fine
adjustment tool (hammer) quickly solved that.
Job jobbed.
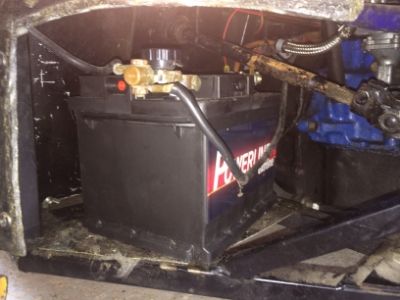
Onto the dodgy starting. New battery fitted and strapped down (located nicely behind the drivers footwell) the bad earth was chased and replaced, and
a security cut off fitted.
Engine now turns over beautifully and starts on the button. Managed to nearly asphyxiate in the garage as I was so please it was running beatifully.
Alternator also checked and kicking out a good 14v.
Next job was to break off the locking wheel nuts as the key was long lost. I went for the 'wrong size socket + big hammer' method which
worked really well along with my electric impact wrench. great bit of kit if you dont have air tools.
This gave me the opportunity to inspect all the brakes, which are is remarkable condition. Rear drums have been refurbed recently, just need a lick
off paint. Front calipers are refurb units, and the pads are new. Discs only suffering from surface rust meant there was little more to do here.
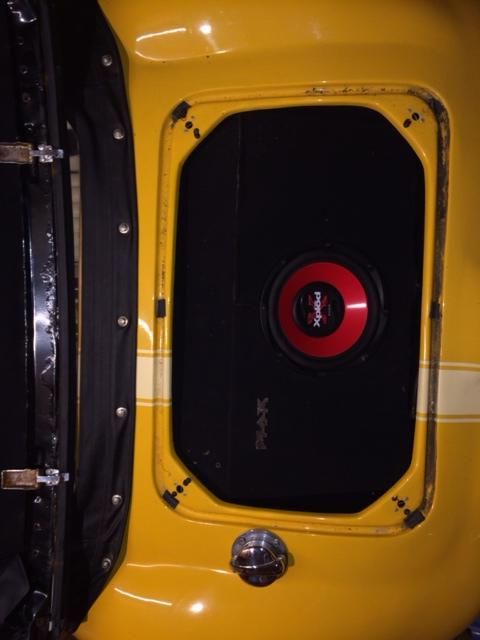
Onto the boot and bonnet fixings and stripping the audio out:
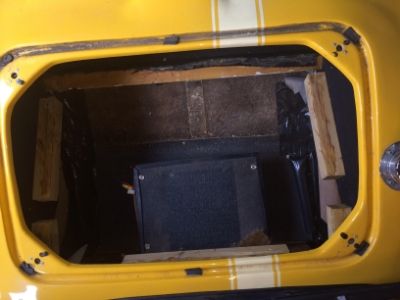
After removing the bizarre sub woofer and amp, I also removed the box that it was built in. Above was what was behind it - a respectable boot!
There is a handy hatch to access diff and handbrake adjuster, but this was as far as I got here. I'll remove the timber, and re carpet the boot
when I get time. There is plenty of space for tools etc, so very pleased with that.
A few more small jobs were completed - replacing a piece of fuel hose, refit carpet in the passengers footwell, refit dash, and give the interior a
hoover.
I also managed to bleed the brakes on the MX5 which is now ready for its MOT, and may well be up for sale soon.
So whats left to do?
New Wipers
4 x Wheel nuts to replace the shoddy locking nuts
full service
new thermostat
replace both steering gators as perished
replace ball joints - two showing wear
Otherwise, Gem (finally decided on the name) will be ready for MOT! Obligatory tidy and looking good pic:
[Edited on 31/5/14 by Norfolkluegojnr]
Gemini - 1/6/14 at 07:15 PM
You probably dont need to worry about a heater,my exhaust keeps me warm!!
How is your exhaust, mine gets very hot and i keep cutting additional cooling vents to try sort it.
With respect to the master cylinder,keep it as is or maybe change resivoir to remote ones. as long as the cap can come off and you can check levels it
would be fine as long as the body is not putting any pressure on it.
[Edited on 1/6/14 by Gemini]
Norfolkluegojnr - 1/6/14 at 08:45 PM
quote:
Originally posted by Gemini
You probably dont need to worry about a heater,my exhaust keeps me warm!!
How is your exhaust, mine gets very hot and i keep cutting additional cooling vents to try sort it.
With respect to the master cylinder,keep it as is or maybe change resivoir to remote ones. as long as the cap can come off and you can check levels it
would be fine as long as the body is not putting any pressure on it.
[Edited on 1/6/14 by Gemini]
More about passing MOT than actually heating! Demister needed I believe, so now repaired.
Exhaust wise I can't really comment yet as I haven't had it running for any length of time. Where is in better hot? In the side pod?
Master cylinder is a head scratcher. It's only fillable with the cylinder loosened, not exactly ideal. Once MOT is passed, I'll reassess
over winter I think.
Gemini - 3/6/14 at 09:27 AM
Let me know about demister as i haven't got fitted to mine, I still need to fit the windscreen washers as well before my first MOT.(3 years since
first registration) Didnt have windscreen previously.
I dont recall them testing demister on my eagle jeep. i have never tried it either but it went through MOT ok in April.
Hi yes in the pod is the issue. i am running two bike exhausts though so not sure if this is the issue.
[Edited on 3/6/14 by Gemini]
Norfolkluegojnr - 3/6/14 at 09:40 AM
quote:
Originally posted by Gemini
Let me know about demister as i haven't got fitted to mine, I still need to fit the windscreen washers as well before my first MOT.(3 years since
first registration) Didnt have windscreen previously.
I dont recall them testing demister on my eagle jeep. i have never tried it either but it went through MOT ok in April.
Hi yes in the pod is the issue. i am running two bike exhausts though so not sure if this is the issue.
[Edited on 3/6/14 by Gemini]
i could be wrong on the demister - its probably depends how friendly the tester is too. You can get simple plug in 12v ones - Car Builder Solutions do
one for about �20.
are you running two bike exhaust side by side? that'd be pretty tight I guess. is the exhaust wrapped?
Gemini - 3/6/14 at 11:32 AM
Hi
No both are in line to keep the noise down a bit. One is a very short stubby can about 1 foot long. the pipes are wrapped but not the boxes as they
are carbon fibre and dont seem to get hot.
It does produce a nice sound though!
Norfolkluegojnr - 23/6/14 at 08:49 PM
So managed to make a bit more progress over the last few days.
Ball joints and rod ends needed replacing on both sides, so I had fun with the ball joint separator:
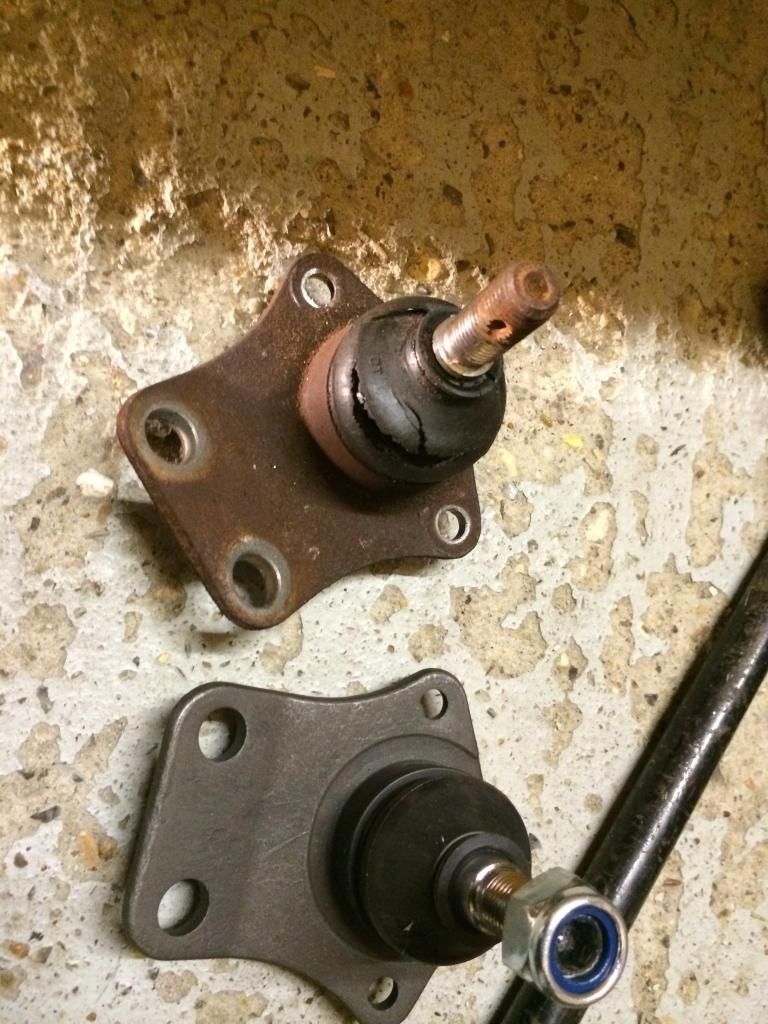
Old and new ball joints show the extent of the issue.
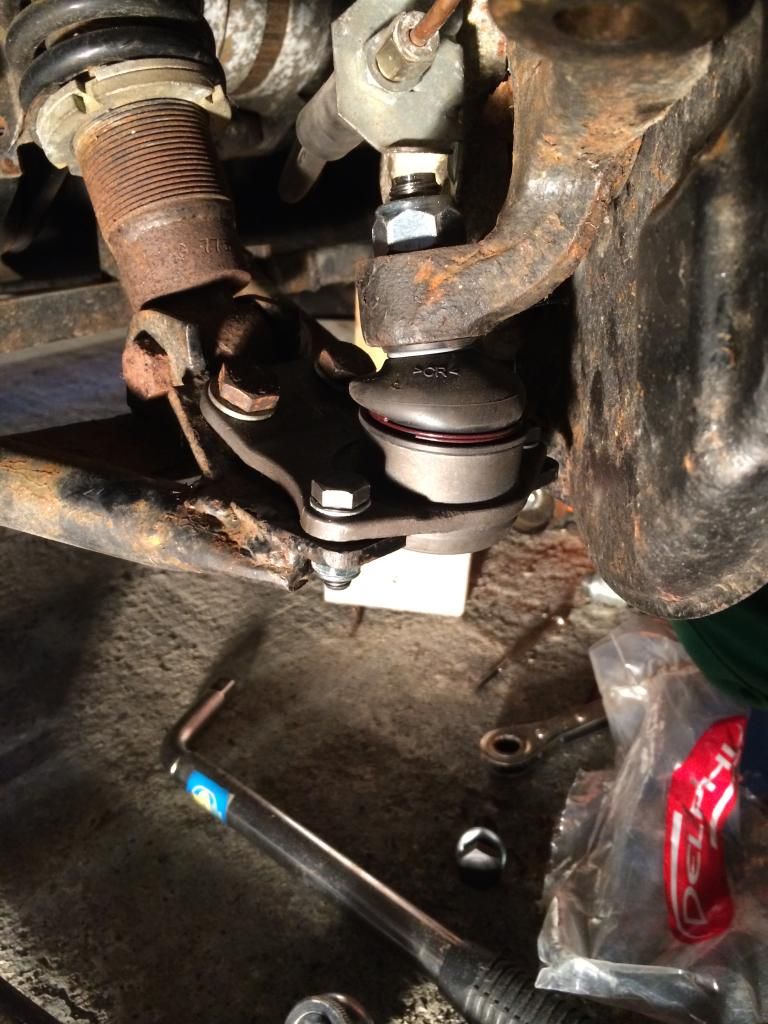
shiny new joint in place.
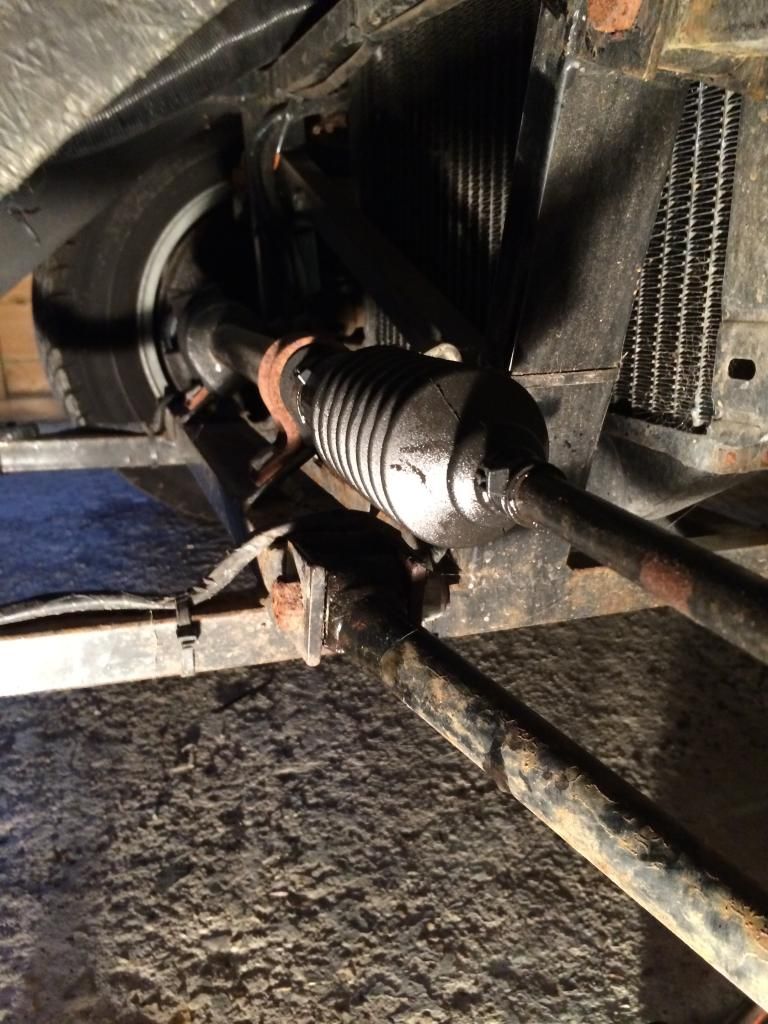
Whilst the rod end is off, I replaced the steering gators for good measure.
Which was a good idea as it turned out
No pics of the rod ends, but managed to get some the same length so the tracking will be ok till i can get to the MOT centre.
I also changed the thermostat which was knackered, and started polishing up the brightwork. No pics, but
i'll do some before and after shots soon.
Ran out of time today - need to finish the other side tomorrow, then its just wipers and I should be ready for MOT!!
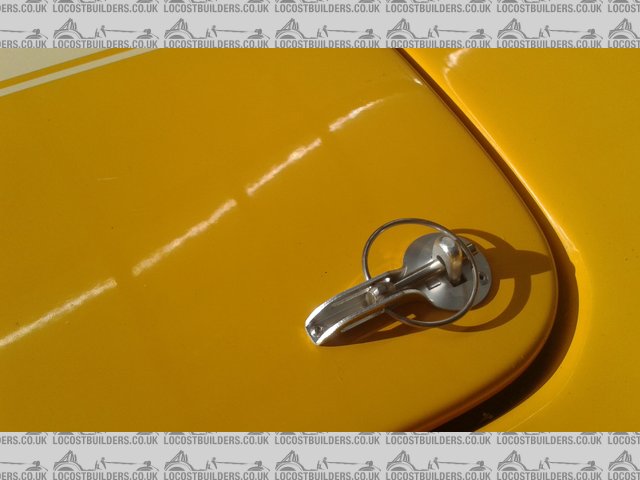
Bonus pic before I closed the door:

Gemini - 24/6/14 at 08:19 AM
Hi
Am not sure where you got your ball joints from but i had aproblem with one set i bought.
Check that the suspension travel is limited by the shock. i found that the ball joint was limiting travel on the first set i had,i was worried that
this could have been catestrophic as they not designed to take that sort of load.
Dave
Norfolkluegojnr - 24/6/14 at 08:41 AM
I picked them up from a local motor factors, quality seems good.
I'll keep an eye on it though, sounds like you could have had a nasty accident. How did you pick up on it in the end?
Gemini - 24/6/14 at 09:15 AM
it looked a bit odd when fitted and i had to take the shock off to paint the springs and noticed wish bone didnt drop lower when the shock was
removed(shock wasnt fully wxtended either). Luckily some one else i know was building one at the same time so asked what his looked like.
Norfolkluegojnr - 24/6/14 at 09:25 AM
quote:
Originally posted by Gemini
it looked a bit odd when fitted and i had to take the shock off to paint the springs and noticed wish bone didnt drop lower when the shock was
removed(shock wasnt fully wxtended either). Luckily some one else i know was building one at the same time so asked what his looked like.
Thanks. I'll keep my eyes peeled.
Norfolkluegojnr - 10/7/14 at 08:55 PM
So a quick update, I've been a bit lazy and havent got much done, but had a splurge tonight.
After finishing all four balljoints which wasn't as bad as expected, I replaced the thermostat and ran the car up to temp. Seems to be running
quite well, but getting very hot.
So, whipped off the hoses to flush the rad through - no issues there. Dirty, but free flowing. So I tried to run water through the block, but it
simply filled up. With the water pump still in place, should it flush through? or do I need to remove the water pump to do this?
I've going to replace the old rad with a Polo one, and fit a electric fan as currently it only has the old viscous fan (have a spare left over
from the mini) but should I change the water pump at the same time?
I ordered a replacement thermostat housing which is suitable shiny :
Kind of puts the rest off the engine bay to shame though.
SO! Car is now ready for MOT! Booked in for monday. Wish me luck, I'll report back onceive passed/failed.
TimC - 11/7/14 at 06:54 AM
Just a heads-up for anyone who might fancy joining our gang, there's a Gemini on eBay at the moment:
It's on eBay and is nothing to do with me!
Norfolkluegojnr - 11/7/14 at 08:03 AM
quote:
Originally posted by TimC
Just a heads-up for anyone who might fancy joining our gang, there's a Gemini on eBay at the moment:
It's on eBay and is nothing to do with me!
Yes I saw that. Looks decent from the pics, but could do with a few more!
Norfolkluegojnr - 20/8/14 at 09:16 AM
Thought it was time for a quick update - i've had various threads running with various issues, but I haven't updated the build thread in a
while.
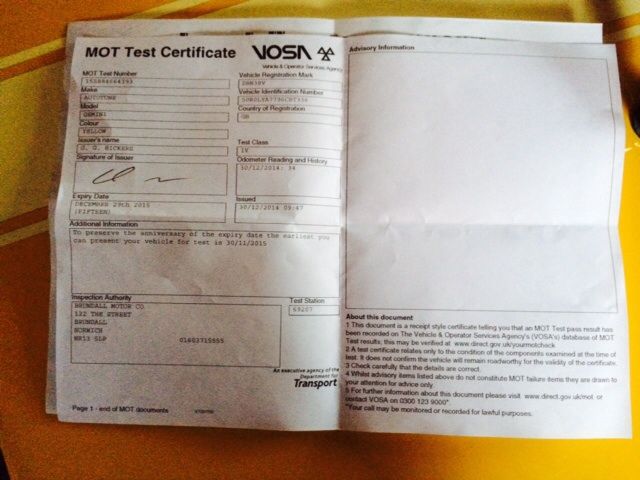
So, after the above, I took the car for its first MOT. First dissapointment was it was running very rough, misfiring, sounding like its running on
three or two cylinders.
Managed to limp to the test centre, and only failed on a sticky rear drum! More on that later.
Once back home, I set about figuring what was causing the rough running. Firstly, checked the timing - all ok there. 10deg at idle, advancing to
roughly 36 at 4k.
So, new leads, points, coil, cap, rotor arm and plugs fitted, and gap set. BritishTrident kindly pointed out I had the wrong points in the dizzy:
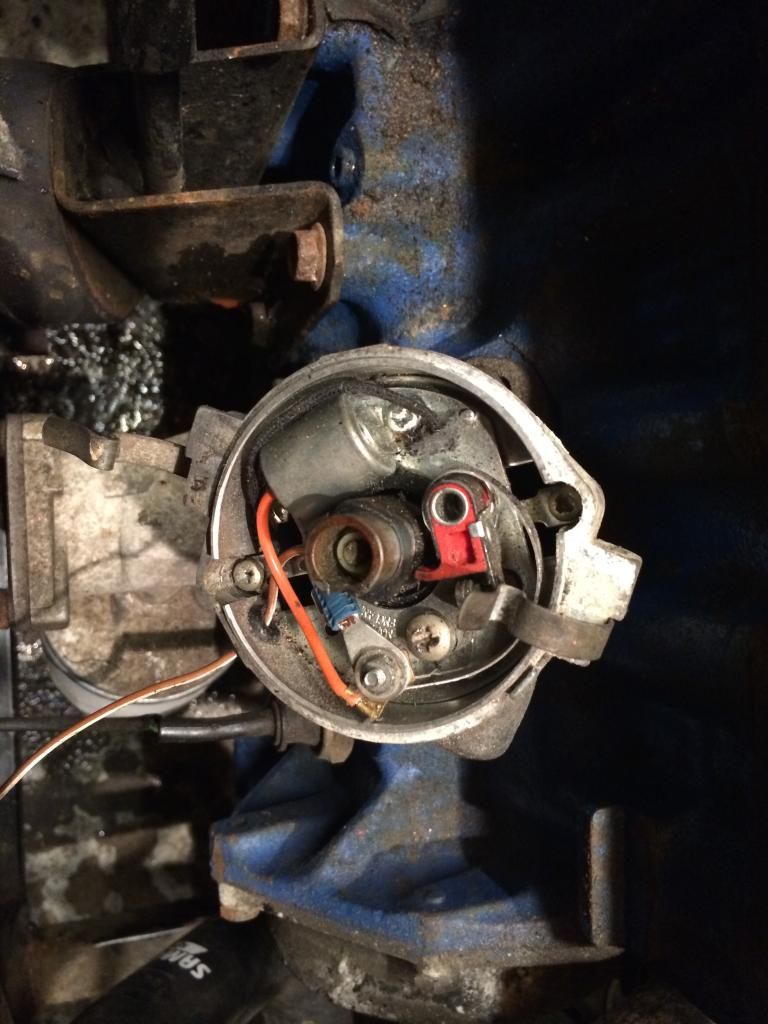
New ones now in, but forgot to take a pic.
After all electrical updates, there was no difference to the running at all. Well at least it ruled that out!
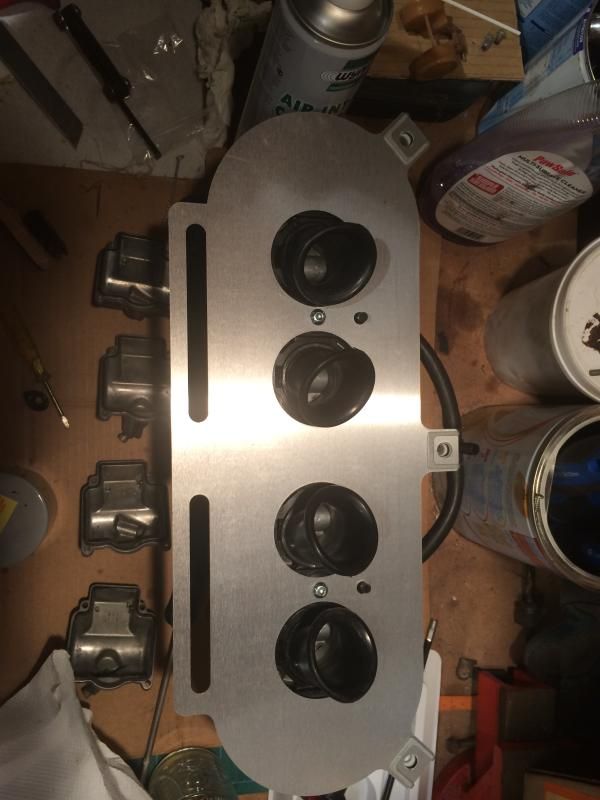
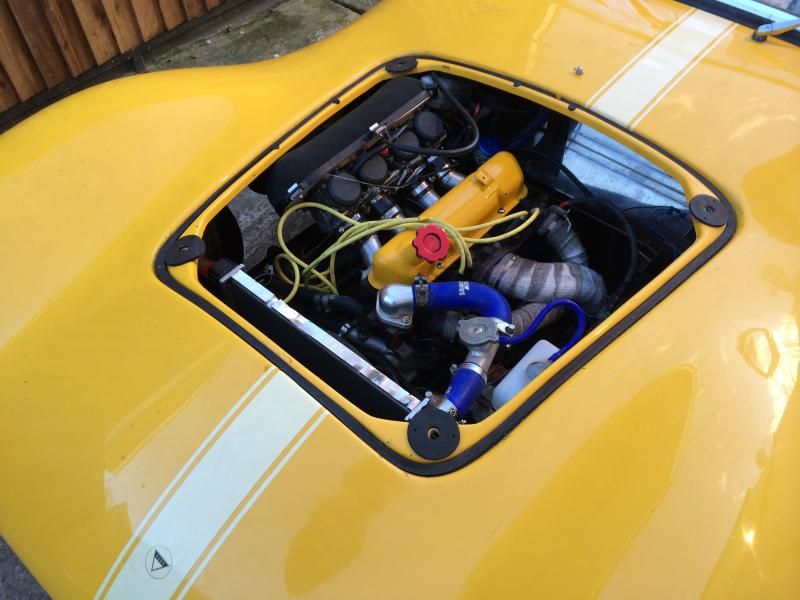
Being fairly sure now the issue was fuel related, I set about checking my Dellorto 40 twin carbs. I immediately decided they are made using
witchcraft, and that a change to bike carbs was in order.
In reality, I'm sure the Dellortos would offer a great option, but they are just too complex and expensive for me to service. They'll be up
for sale soon.
So, a quick email to Fastdan of Danstengineering, and this landed on my doorstep:
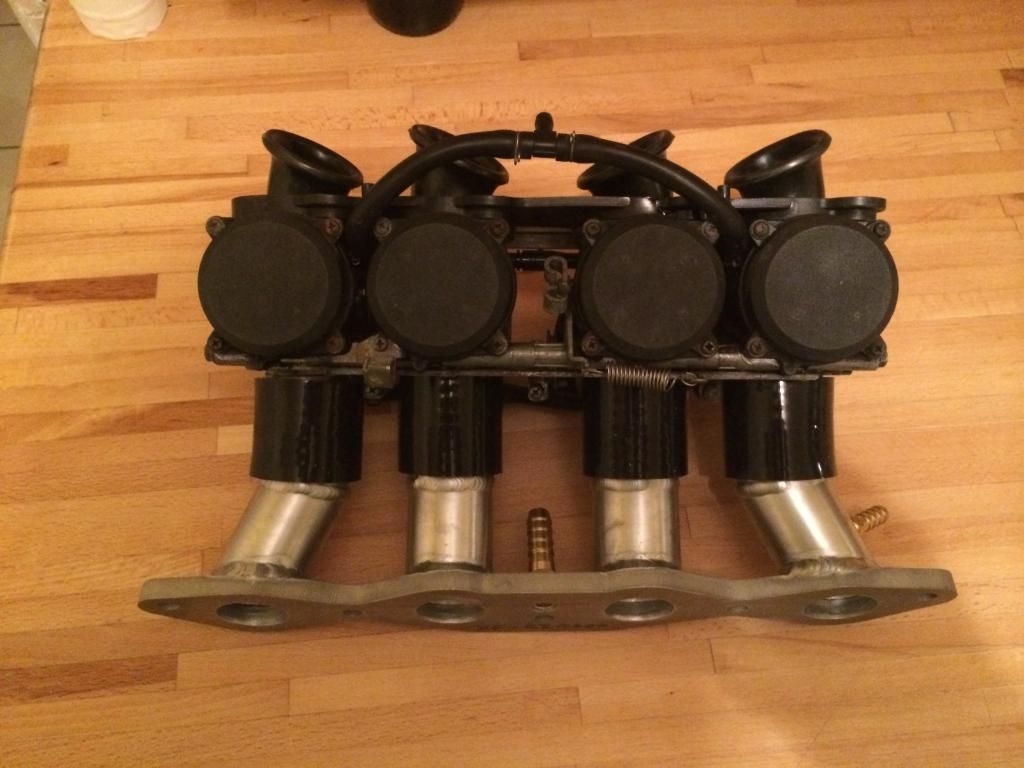
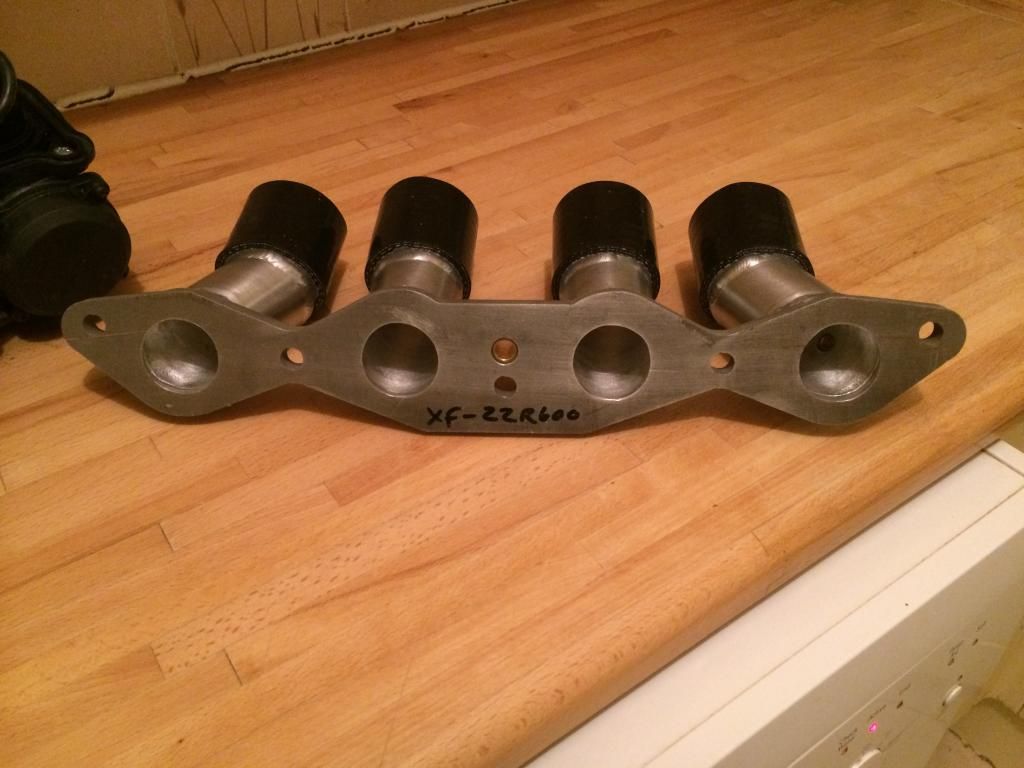

Very pleased with the service and price, and I'd be happy to recommend Dan to anyone else requiring bike carbs and manifolds.
Dan recommended using ZZR600 carbs, as the spacing is similar to the ports on a crossflow, so I went with his wisdom. Starting with 150 main jets, I
expect I may need smaller, but I�d rather overfuel to begin with than risk running lean.
Firstly then, to take off the float bowls and change the jets:
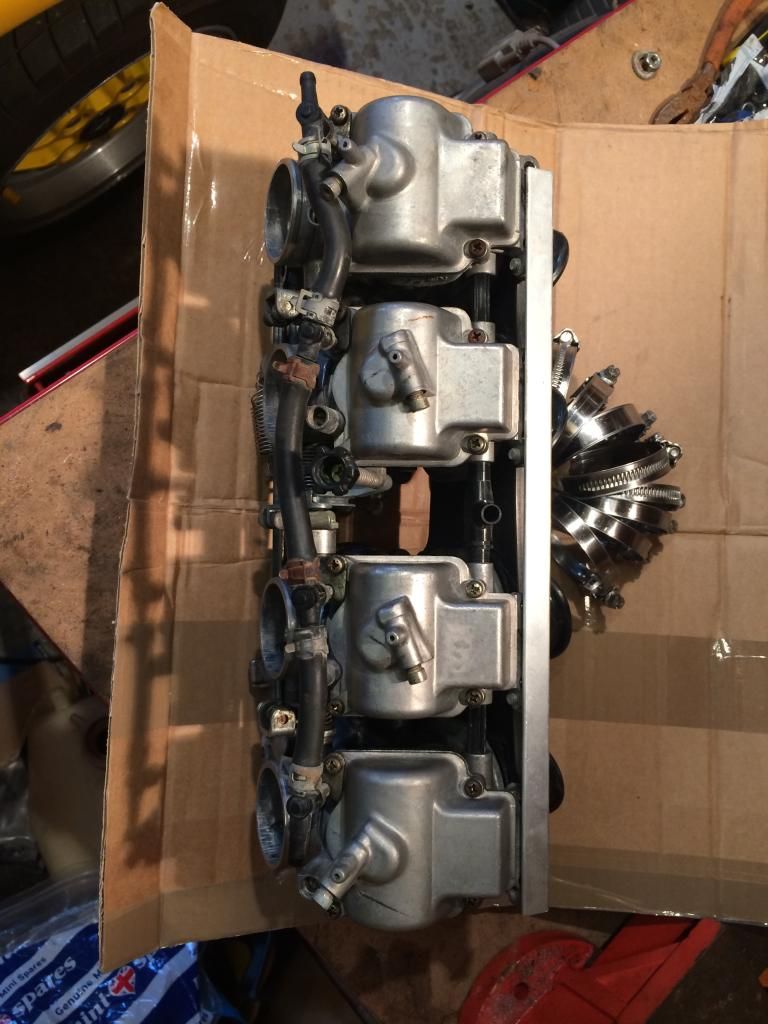
Current ones in there were 142, so may well be useful. Carefully cleaned and put away.
Time to get the manifold on then:
As you can see, fits perfectly, and leaves plenty of room for the carbs:
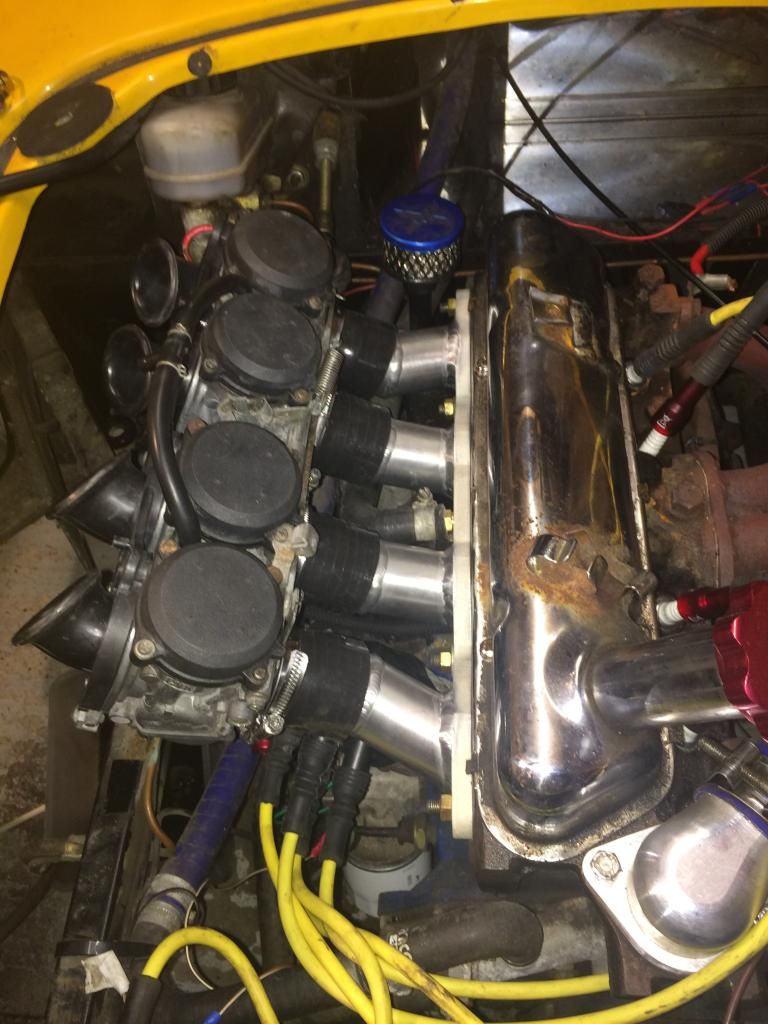
Started fitting the throttle cable and cold start cable, but ran out of time.
More updates to follow shortly, but pleased with last nights progress.
Dick Axtell - 20/8/14 at 11:08 AM
Hi. Been following your progress with interest. Do your bike carbs simply hang off the manifold headers, or have you fitted a separate support brkt?
Norfolkluegojnr - 20/8/14 at 11:14 AM
quote:
Originally posted by Dick Axtell
Hi. Been following your progress with interest. Do your bike carbs simply hang off the manifold headers, or have you fitted a separate support brkt?
they just hang off, but its not as bad as it sounds!
the proper fluoro lined hoses are very thick and quite stiff. With decent clamps, they are very secure.
Equally, the carbs weigh less than half that of the Dellorto's, so really no issue at all. A tried and tested method!
Dick Axtell - 20/8/14 at 12:46 PM
Thanks for confirming that!
Norfolkluegojnr - 24/9/14 at 10:29 PM
update pics. Will do a write up tomorrow:

Norfolkluegojnr - 25/9/14 at 07:35 PM
So, after a busy summer, including visiting Monza for the F1 weekend, i'm back on the trail.
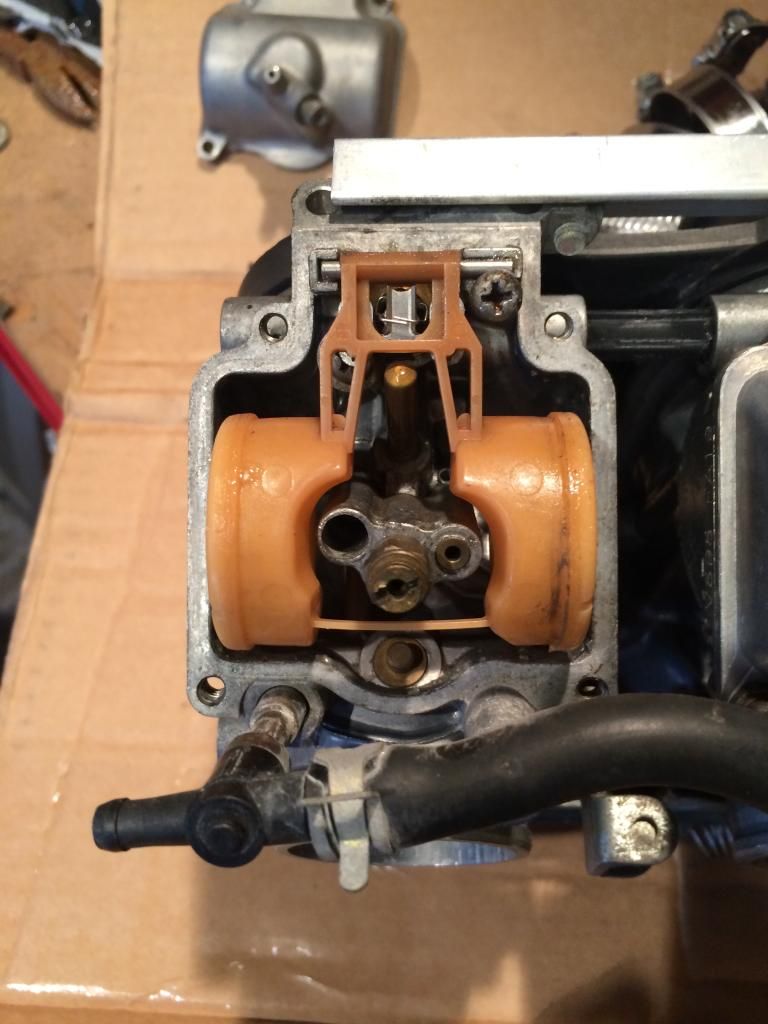
I've been trying to get the carbs to run and having an absolute nightmare. I balanced the carbs up, set the idle screws to 3 turns out, and it
fired up nicely - shortly after it seemed to be rocking and stumbling. After diagnosing no ignition using a colour tune, i took the carbs off, cleaned
the jets and refitted - fired up lovely.
This cycle continued four or five times with a different pilot jet getting blocked each time. So, this week I took the carbs off, and stripped them
down completely and cleaned with Wynns. I've replaced the fuel pipe and added another filter.
I've bought replacement jets, which havent arrived yet, but as soon as they do it should just be a case of reassembling, and balancing again.
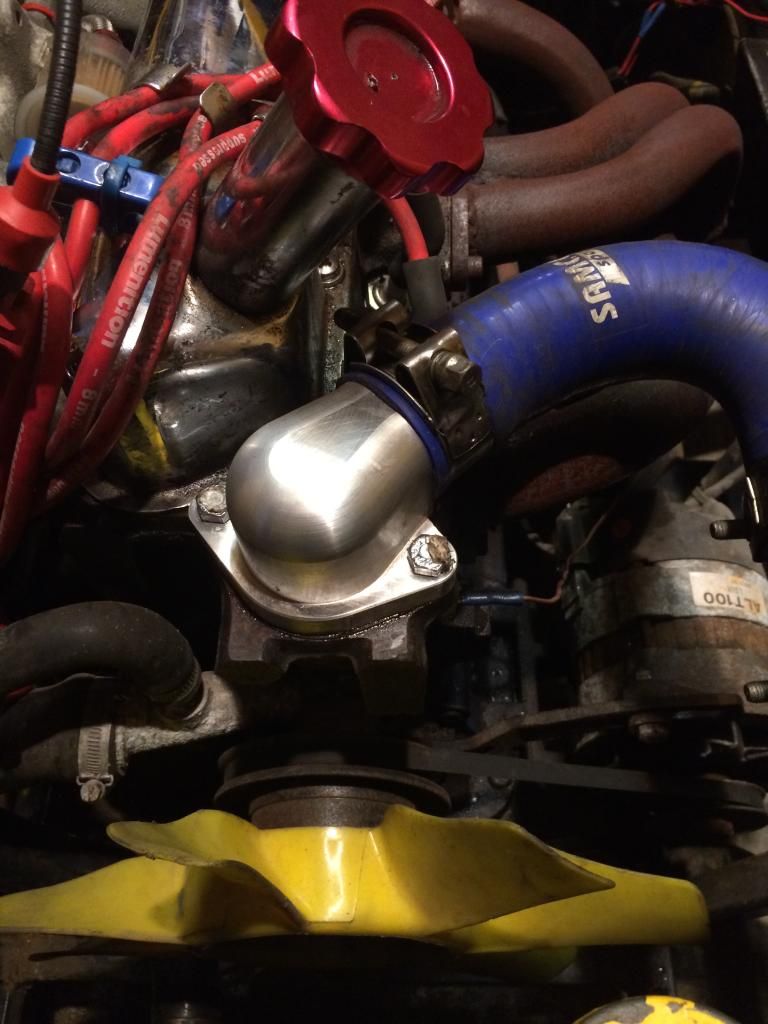
Fingers crossed all.
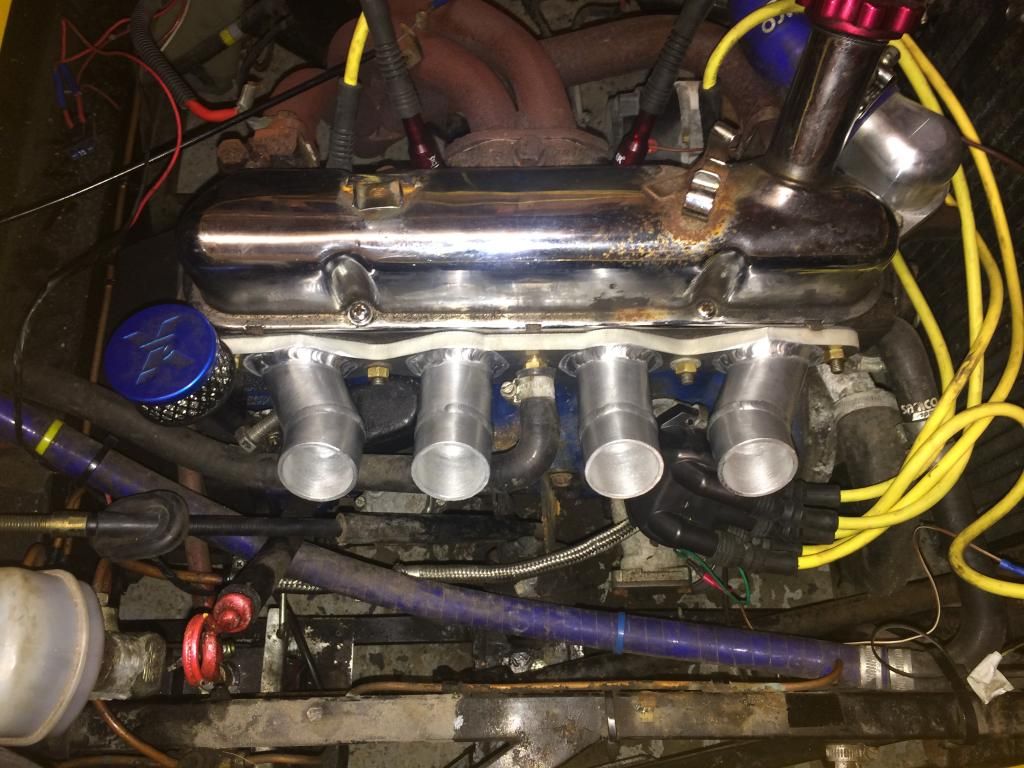
I the meantime, I've painted the rocker cover, and wrapped the exhaust. Next up is replacing the radiator and fitting the elec fan. Then,
I'll be fitting a wideband to assist with tuning.
Aiming to be on the road and reliable for next years shows!
TimC - 9/12/14 at 09:47 PM
Any updates?
Norfolkluegojnr - 10/12/14 at 10:04 PM
Sorry, life getting in the way of cars. Must see to that.
SO the jets arrived and I rebuilt the carbs, being careful to dissasemble completely, and reassemble with having cleaned every component as best I
could in the garage. All back together and on the car.
A few frustrating days fiddling with balancing and it seems to be running fairly well. on tick over it was getting very hot so it was time to replace
the rad. on removing the pipework and radiator, it appears that the pump was barely working with both heater pipes completely blocked, ad the main
feed to the rad only just getting any water through it.
New pump ordered and fitted from Burton, and its on with the polo rad install, kindly donated by another locost member. I used the fan switch from a
fiat panda (87-92 temp range) and a SPAL fan I had on the shelf. All fitted and run up to temp - working lovely. I also too the time to fit an
expansion tank to help, and an inline filler from CBS.
Also too the time here to tidy up wiring, wrap the manifold and re-site the horn. Also fair bit of rubbing down and painting to tidy up some of the
rusty parts. I then fitted the sausage filter which need a small amount of modification, refitted the fuel lines and throttle cable, and fitted an
extra return spring for the throttle to give it some more feel.
Finally was sorting the sticking handbrake. Very simply, the rod which connects the hub to the cable was pressed against a chassis member, leading it
to stick on. A simply fix was to drill an additional hole in the level arm, and to refit the rod a little higher up, so as to kill the rubbing. God
knows how it passed an MOT previously like this.
Sorry for lack of pics, i'll take some more this weekend.
So, that brings us up to date I think, Still needs tuning which I'll arrange with Bailey shortly, but a quick run around on a private road and it
seems to be working rather well:
 [/URL]
lots more to do, but hopefully will be usable for summer now!
Angel Acevedo - 12/12/14 at 12:36 PM
quote:
Originally posted by Norfolkluegojnr
quote:
Originally posted by Gemini
You probably dont need to worry about a heater,my exhaust keeps me warm!!
How is your exhaust, mine gets very hot and i keep cutting additional cooling vents to try sort it.
With respect to the master cylinder,keep it as is or maybe change resivoir to remote ones. as long as the cap can come off and you can check levels it
would be fine as long as the body is not putting any pressure on it.
[Edited on 1/6/14 by Gemini]
More about passing MOT than actually heating! Demister needed I believe, so now repaired.
Exhaust wise I can't really comment yet as I haven't had it running for any length of time. Where is in better hot? In the side pod?
Master cylinder is a head scratcher. It's only fillable with the cylinder loosened, not exactly ideal. Once MOT is passed, I'll reassess
over winter I think.
Couldn't you alter installation angle?
This may need altering pedal angle/travel..
HTH
AA
alfas - 16/12/14 at 10:50 PM
i remember on my gemini the postition of the master was much more forward...easy to fill..even the angle was a bit steep.(similar yours)
but a big disadvantage: due to the position of the master it was impossible fitting double sidedraughts, even bike-carbs was impossible.
another roblem on mine: rear suspension was a bit a problem: on full rebound the axle was hitting the chassis...more or less the shock was end of
stroke and in the same time the axle tube was slightly touching the chassis
[Edited on 16/12/14 by alfas]
Norfolkluegojnr - 29/12/14 at 06:21 PM
Quick update - I've put the Gemini in for MOT tomorrow morning, so wish me luck!
Aim is to have the car tuned in Jan/Feb so I'm ready for summer. Considering a potential zetec install next year, but that can wait for now.
Hoping the MoT goes ok, amd I can get some miles on the old girl.
TimC - 29/12/14 at 09:39 PM
Good Luck!
HowardB - 29/12/14 at 09:41 PM
Good luck
alfas - 29/12/14 at 09:51 PM
by the way: is there any gemini for sale?
talkingcars - 30/12/14 at 12:59 AM
Good luck with the MOT.
I think the demister is required for the IVA test, not the MOT.
I noticed the other day that Maplin sell little 12v ceramic demisters for �12.
I also think the heater box is from a mini. A lot of modern cars have the fan and heater matrix off set with just a distrabution box in the centre of
the dash.
I was going to say that you could undo the bolts holding on the master cylinder to access the resivour (sp) but you've already sussed that. You
could go for a set up lke the MGF where the brake servo and master are offset to the other side, as if the car was designed as a left hand drive.
Norfolkluegojnr - 30/12/14 at 10:40 PM
Bloody frozen, but VERY happy..........
talkingcars - 31/12/14 at 06:45 PM
Nice one - get it taxed and use it - LOL.
Dick Axtell - 1/1/15 at 12:01 PM
quote:
Originally posted by Norfolkluegojnr
Sorry, life getting in the way of cars. Must see to that.
Doesn't it just??
quote:
SO the jets arrived and I rebuilt the carbs, being careful to dissasemble completely, and reassemble with having cleaned every component as
best I could in the garage. All back together and on the car.
Having noted that your bike carbs look very similar to mine, can you tell me (i) where you obtained your replacement jets, (ii) what size are they,
and (iii) lastly how was the new jet size determined??
Thanks in advance.
Norfolkluegojnr - 2/1/15 at 09:02 AM
quote:
Originally posted by Dick Axtell
quote:
Originally posted by Norfolkluegojnr
Sorry, life getting in the way of cars. Must see to that.
Doesn't it just??
quote:
SO the jets arrived and I rebuilt the carbs, being careful to dissasemble completely, and reassemble with having cleaned every component as
best I could in the garage. All back together and on the car.
Having noted that your bike carbs look very similar to mine, can you tell me (i) where you obtained your replacement jets, (ii) what size are they,
and (iii) lastly how was the new jet size determined??
Thanks in advance.
I bought the jets from FASTdan when I bought the carbs and the manifold - link
I have also bought bits from this guy on ebay, he's super fast and great at responding. is in Holland though!
link
Size wise, they are 150's, which Dan reccomended as a good starting point. On initial run down the road they seem ok, but until I get a lambda
plugged in I won't know for sure. it revs cleanly through the range, so cant be to far out.
if you need any help let me know, I've taken them apart quite a few times now!
Dick Axtell - 2/1/15 at 09:45 AM
Thanks very much for these tips.
Dick Axtell - 8/9/15 at 02:35 PM
Maybe you can help on this irritating TPS matter, as you have the same bike carbs -
http://www.locostbuilders.co.uk/viewthread.php?tid=200174.
Just realised my assumption here. With your Xflow, are you using a TPS on your set-up?
rgb247 - 11/8/16 at 09:00 PM
Hello all.
I've just bought this Gemini from 'Norfolkluegojnr' so rather than start a new thread i thought i'd continue with this one.
So far the standard oil, water, fan belt change. Went for 20W50 oil as that seems to be recommended for modified xflow engines. Now have a small pile
of parts accumulated ready to go on this weekend. Will post as I fit them.
rgb247 - 12/8/16 at 07:54 PM
Couple of jobs done. New pin clips from Sparco to hold the bonnet down instead of the frustrating screws. And new starter motor, apparently uprated
50% on the original. The old starter was quite grotty and slow to turn over when i tried to do a compression test. This one is noticeably more
powerful.
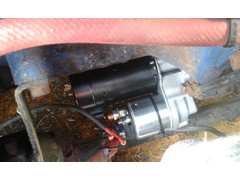
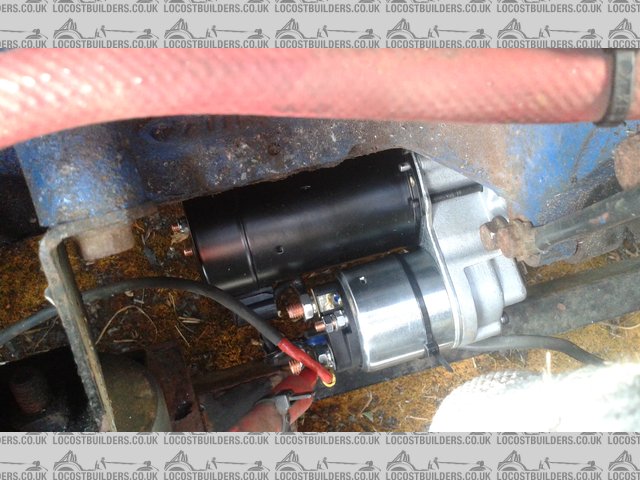
Starter motor from aapoldham

Bonnet clips from Sparco
Stopped tonight by the engine mounts. I can get the bolts to the mounts undone but not the rubber isolator itself, just twisting not coming off.
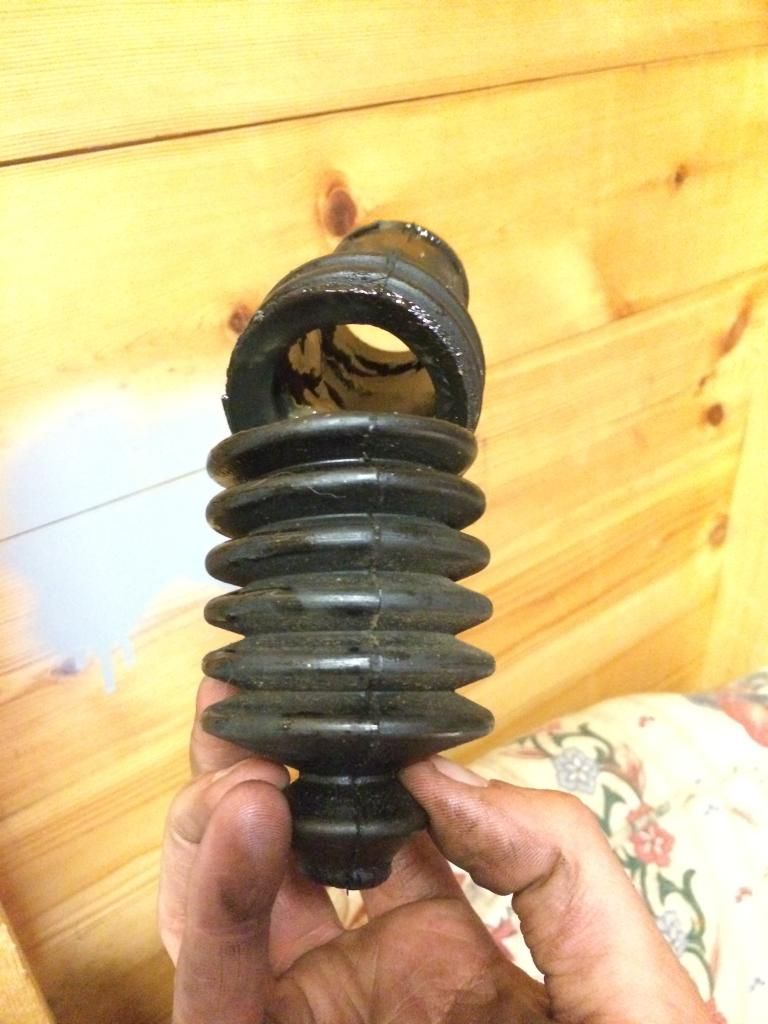
rgb247 - 15/9/16 at 09:26 PM
Quick update. Measured the clearance at the bottom of the sump at 5.5cm which isn't great with a couple of speed bumps between me and work. After
changing the engine mounts i've got enough to clear them just need to get under the car again to measure it for an exact number. Any higher and
the oil filler cap and air filter hit the bonnet so it'll have to do.
Old clearance
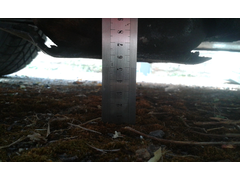
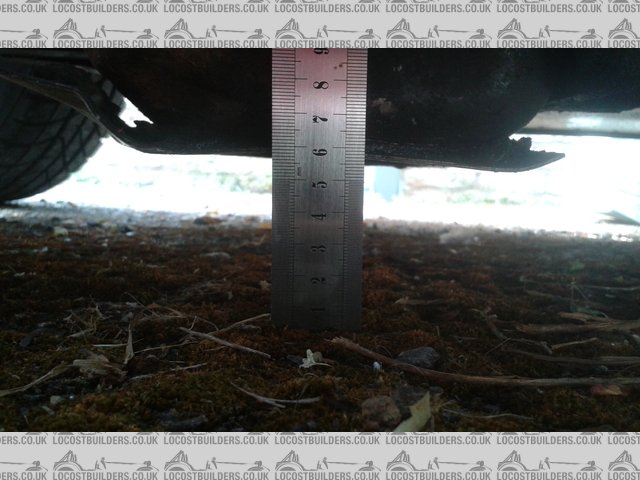
Oid Clearance
Next big job was rewiring. After melting another fuse it was time to sort it out. I got a new part loom and fuse box with plenty of circuits and set
about getting my head around the old one. It was an old Escort MK2 fuse box but along the way a electric fan, fuel pump and extra gauges had all been
put on the same circuit as the coil and a few other things... starting to see why i was going though fuses like petrol. Old box out, new box in
putting everything onto its own circuit and adding relays for the fan and fuel pump.
New fuse box & loom

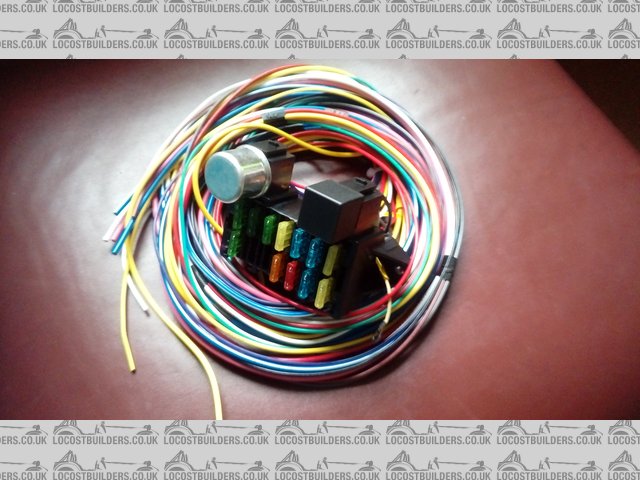
New loom
Taken it out a few days this week and it's not missed a beat. While i'm in an electrical mood it's time to try and get the speedo
working, plan is to get a passenger with a multimeter to check i'm getting a signal from the sender. If i can get my current gauge working
i'm contemplating a new dash layout. Some nice brushed steel is my favourite at the moment.


