loggyboy
|
| posted on 6/7/12 at 01:08 PM |

|
|
quote:
Originally posted by Dopdog
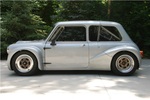
are you going to paint the sides?
Sides are likely to receive some vinyl, notsure if that will be textured, matt, gloss or Dinoc carbon at this time.
Mistral Motorsport
|
|
|
|
|
loggyboy
|
| posted on 6/7/12 at 01:32 PM |
|
|
Still trying to work out what combination of shafts, hubs and brakes Im going to use. The donor came with 9" drums and push in shafts. I want to
do a full refurb on the shafts but its near impossible to get the parts for pushin CVs. Ive picked up a set of bolt on shafts, but still hunting for a
decent priced set of disc hubs and carriers to match.
Ive had spacers made up for the drum backplates so they dont catch on the uprights/wishbones, but it seems these make it impossive to fit bolt on
shafts as the driveflanges are too wide to fit through the uprights with the spacers in place!
At this rate I will end up going with discs, but im really keen to retain drums.
So in the mean time I pushed on with getting the engine in place, so made up the mounts (could have bought Raw ones for about £60 but fancied doing
some fabrication myself!)
So after carefully ensuring clearance for gearbox and bonnet height, these are the mounts:


First time Ive oven baked the the powdercoat (used the heatgun before as items were too big for the oven), gives a much more durable finish when
theyve been baked properly!

Making these up gave me a chance to try out a very basic tube notcher idea I had:

Needed some tweaking to stop the hole saw from biting and jumping over the tube:

But result was adequate:

Mistral Motorsport
|
|
|
loggyboy
|
| posted on 12/7/12 at 04:27 PM |
|
|
Reloated the handbrake -
After trying to tap bolt hole into the tunnel side, which failed, then an attempt to rivut which also failed, I decided to just weld a but in
place!


Just need to sort out some cables now... i sence an ebay trawl!
Mistral Motorsport
|
|
|
Dopdog
|
| posted on 12/7/12 at 07:29 PM |
|
|
how far off centre did your engine end up? good thread and some very neat work, like the front brake lines.
|
|
|
loggyboy
|
| posted on 12/7/12 at 07:56 PM |
|
|
Crank pretty much lines up with the near side lower coilover mount. Its as far left as it can go without catching on the bonnet. (about 1cm
clearance). Wanted it as far left as I could to bull the bellhousing/selector cover away from the side of the tunnel. Height wise its almost level,
slightly sloped forward, again to avoid clashing with bonnet.
Mistral Motorsport
|
|
|
loggyboy
|
| posted on 2/8/12 at 10:16 AM |
|
|
The build has been geting a little 'bitty' over past few months with me jumping from one job to another.
I have now sourced a full set of bolt on driveshafts, hubs, and a 3.62 LSD (thanks Chippy), which sadly has not revealed any definitive answer to how
I can achieve drums and bolt on shafts! Some 8" drums might be the solution to avoid the need for the spacers. If not I will need to widen the
hole in the spacers AND the uprights. (or just go with discs!)
Some more pictures of the engine in place, also trial fitted the throttle bodies.
Getting it in there:


Standard 2 stage sump is still fitted at the moment, I have the CVH one front the Donor so may well modify that rather than hacking around with the
alloy 2 stage one.

Its tight for space under the Airfilters, I have rotated one so its stepped slightly to avoid the column.
I might look for a sausage filter instead to give more room as the steering column could do with being angled up slightly from where it is now as its
close to touching the pedal pivot bar as it pass through the pedal box.


Far from essential stuff, but its always nice to get distracted sorting out the more interesting things way before they need to be:
Nose cone, bonnet and skuttle loosly fitted.

The mounting template is for an ETB Digidash2, but im unsure if that will be the dash I go for yet. I just wanted to see if it would go in behind the
wheel and still be viewable, I dont have a wheel, but pretty sure it should be quite easy unless I go for a tiny diameter wheel.

P-Clips holding the wiring ducting in place

Mistral Motorsport
|
|
|
maccmike
|
| posted on 2/8/12 at 10:37 AM |
|
|
looks really well that mate
|
|
|
R1_striker
|
| posted on 7/8/12 at 08:18 PM |
|
|
just a quick couple of points, nothing serious.
Isnt your wiring going to get in the way of your rad top hose? all of the top hoses ive seen come over the top edge of the chassis
Also with your hand brake being where it is, is there enough room to get a cable between the chassis and the diff and whats it going to pull on and
pivit on. Will be interested to see hows this works out for future reference
Engine looks at home in there with the bodies on will sound very nice
small tax, small insurance, huge laughs 
|
|
|
loggyboy
|
| posted on 7/8/12 at 08:54 PM |
|
|
Rad hose sits about 30-40mm over the chassis rail.
Handbrake cable is a defo a WIP, my plan is to get an single cable from the handbrake, over the top of the diff, there is roof, then add a bracket and
a split behind the diff and loop to each of the calipers. Im going to investigate a few options for different types of handbrake mechanisms.
Sure hope the engine sounds good
Mistral Motorsport
|
|
|
loggyboy
|
| posted on 15/9/12 at 11:58 PM |
|
|
Moved on to the sump this afternoon.
Decided to modify the Zetec 2 stage sump, rather than the CVH one.
I decided there was no need to make it any shorter than the front edge of the bellhousing.


Will also need to cut away some of the alloy upper half too.
The line I chose sits about 50mm below the chassis rail, which is about half way up the longest part of the sump.
So by spinning the lower edge off and placing it back on the rear half, I should retain most of the lost volume, and keep the existing drain plug, it
will just be on the otherside.
What I forgot to do was measure how much water I could brim the existing sump with to compare, so if anyone has standard lower sump handy, let me know
how much it takes and il measure mine.


A simple flat plate cut out to in fill the area left.

and welded in place

Was really pleased with welding around the new plate, and the neatest welds are pretty much leak free.
I filled it with water to test:

Sadly the messier welds on the upper areas and around the drain plug plate are leaking. I will grind them down and reweld tomorrow and do another
water test.

Mistral Motorsport
|
|
|
loggyboy
|
| posted on 2/10/12 at 01:03 AM |
|
|
Rewelded a few areas and did some more water tests, each time revealing smaller and less severe leaks. After a few more test and rewelds it seems I
have a water tight sump. Once powdercoated i would hope it should be a pefect seal.
Still need to find out how much volume the standard sump is!
Moved on to the pedal box cover:

Sealed with some 3mm Neoprene rubber tape. Tapped the bolt holes directly in to the frame as rivnuts seemed a little over kill and only had about 13mm
of frame, meaning big holes for rivnuts, or small bolts, so tapping M5s seemed the better route.

Mistral Motorsport
|
|
|
loggyboy
|
| posted on 13/10/12 at 09:30 PM |
|
|
Finalised the radiator location and mounts today.


Made up some adjustment brackets to allow for tweeks when the nose is finally mounted.


Mistral Motorsport
|
|
|
loggyboy
|
| posted on 21/10/12 at 12:01 PM |
|
|
Powdercoated the sump, the propcatchers, the clutch pedal and the steering knuckles:


Clutch had to be cut and shut from the Raw standard item as it clashed with the bias bar (which wasnt great considering it was all ordered and Raw
supplied.
Mistral Motorsport
|
|
|
loggyboy
|
| posted on 5/11/12 at 12:05 PM |
|
|
Continued the sump mods, moving on to the alloy part:


That was straightforward, but also had to clear area for the starter, which became more complicated.
The wide standard 1.8 CVH startmotor is a little to fat to clear without removing part of the mounting face of the sump, which im not prepared to do.
General concensus is that there are slimmer replacements for this starter, so I will need to get one of those. Id budgeted for a new starter anyway, I
was just hoping to try it out with the free donor one.


Also met a fellow member on Saturday, Mike (Mkeats02) whose also building a Striker. He came by for a good chat, which led me to get very little done,
but i didnt care as was a great chance to swap ideas and compare notes! Cheers Mike!
Mistral Motorsport
|
|
|
loggyboy
|
| posted on 19/8/13 at 08:35 AM |
|
|
I cant believe its been 9 months since my last update on this. Sadly, not only is it 9 months without an update, its 9 months with very little work
done. However, I did make some good progress this weekend.
Started out by picking up a cheap manifold kit from a chap putting a Zetec in an Elan. I think its an pepperperformance ebay job, which are about
£110, I managed to get this for £40, and it looks like it came with more pipes than the ebay kits.
Quality is - shall we say - basic? but it will get the car running and on the road at which point I may replace it with something better quality.
I had messed around on sketchup getting ideas for how I could route it, but its never as easy to get it spot on, so as the kit had preformed radiuses,
most of it was trial and (fortunately not much) error.


No on the look out for a cheap Bike Can and a lambda boss, lets see if i can do the whole exhaust system for under £80.
[Edited on 19-8-13 by loggyboy]
Mistral Motorsport
|
|
|
loggyboy
|
| posted on 19/8/13 at 08:50 AM |
|
|
Also got my shortened shafts back from Raw a few weeks back, they came with a thin coat of paint on them which wasnt gonna last so I stripped them
back to bare metal ready for coating.

I also prepared the carriers, hubs & stubs.
Right one is coated with a rust treatment, left has been wire'brushed' (on a drill bit!)


All masked up ready for powdercoat. I used standard masking tape, some brown tape and some freezer bags.
the latter 2 of which I knew had a good chance of melting, but I thought why not try it and clean up the mess after.

Fortunately the plastic bags just hardened and slipped off the ends, the brown tape melted and but any that didnt end up in the oven peeled off fine
and just left some residue, as did the masking tape.


Mistral Motorsport
|
|
|
loggyboy
|
| posted on 28/8/13 at 11:05 AM |
|
|
Ordered some new bearings (twice as the I ordered the wrong size first time! - see the for sale section for some cheap bearings to suit non-abs disk
brake sierras!).
All carefully pressed in using the old shells as protection.

Paper is just there to keep the old shell alligned with the one its pressing on.

Also using the old shell to tap the grease ring home without damaging it.

and all assembled:

and installed

Should be on its wheels in no time!
Mistral Motorsport
|
|
|
loggyboy
|
| posted on 3/9/13 at 08:43 AM |
|
|
After getting the car on its wheels for the first time It allowed me to turn it round so I can work on the engine side without having to open the
garage, handy as the cars likely to be in this position till Christmas.

Engine back out,

Which meant I could get it on the stand and swap the standard rod bolts for ARPs:


And then on to the sump pick up, which needed to be shortened to suit the slimline sump.
I managed to source a Focus metal pickup to replace the plastic blacktop item.


As the sump is already finished, its hard for me to work out how much needs to be cut off the pickup, so i made up a simple template


It was getting late so I cut the pipe in 2 and marked it up so I can finish it later this week. I was surprised how thick the pipe was, its 19mm
diameter and must be 2mm thick wall, so whilst I was thinking of brazing it, it might be quite easy to weld it back together.
Mistral Motorsport
|
|
|
loggyboy
|
| posted on 4/9/13 at 10:39 PM |
|
|
Trimmed the pick up and welded it with no issues.
I dont really like the 90degree angle, I would much prefer a curve, but it would be hard to fabricate and I cant see the angle causing any huge
concerns.

A word of warning, when welding move flamable objects out of the vicinity! I left the garage to speak to wife shortly after a quick tack weld, came
back 2 mins later and that lovely blue towel was alight - its now a chard mess, luckily i noticed before it took the garage down. It did melt the edge
of my nice bosch drill, and I also gave myself two nice large blisters on my palm and one on my thumb from trying to move the drill away from the
flames,and grabing the towel off the bench to the garden where i soaked it.
After nursing the blisters for 24 hours I was back on to finish the job.


I also added a fairly simple baffle to the sump.
I was going to make a horizontal one, which seems the norm on other sumps (raceline etc), however the windage tray is only 1cm above the line of this
sum, so my feeling is that it will do a reasonable job, this one should stop the oil surging to the back of the sump under acceleration as the pick up
is towards the front.

Mistral Motorsport
|
|
|
loggyboy
|
| posted on 1/10/13 at 01:08 PM |
|
|
I managed to pick up a cheap new alternator so moved on to getting the brackets made up for that.
First design:


This left the alternator quite high and as its upper mount at 180degrees it wasnt going to be easy to get the adjuster routed.
2nd design made it sit a little lower and further out, allowing me to rotate the alternator further.


Then moved on to the adjuster. The weber manifold has a machined face to allow fitting of a bracket, so it just needed it to worm its way out, past
the belt cover, miss the TPS and still allow a suitable angle for the adjuster bracket so sit!


Nearly there on that, now, final design to be completed next weekend when I will crack on with another powder coating session.
[Edited on 1-10-13 by loggyboy]
Mistral Motorsport
|
|
|