craig1410
|
 posted on 26/1/04 at 01:13 AM posted on 26/1/04 at 01:13 AM |

|
|
Exhaust sizing for Rover V8 - Any ideas?
Hi,
I'm almost at the stage of building an exhaust for my Rover V8 powered beast and need some advice.
Is it possible to get a Rover V8 engine silenced to 101db for SVA without strangling it to the point where is splutters to a halt? If so then what
sort of exhaust spec should I be looking for? I intend to use standard cast iron manifolds but need everything from there back to the silencer.
I'm not bothered about stainless steel, mild is fine, although I'll probably need a stainless heat shield. What size of pipes will I need
and does anyone know of any SVA friendly silencers which would be suitable for a ~200BHP V8.
Thanks in advance,
Craig.
ps. Should I include some sort of flexible joint between engine and silencer?
|
|
|
|
|
Julian B
|
| posted on 26/1/04 at 08:07 AM |
|
|
Dax do some fantastic SVA Complient silencers but they include the downpipes. If you are trying to get 200bhp from the V8 perhaps using the original
manifolds might inhibit that.
|
|
|
Julian B
|
| posted on 26/1/04 at 08:09 AM |
|
|
Dax do some fantastic SVA Complient silencers but they include the downpipes. If you are trying to get 200bhp from the V8 perhaps using the original
manifolds might inhibit that.
|
|
|
craig1410
|
| posted on 26/1/04 at 09:13 AM |
|
|
Julian,
Thanks I'll take a look at Dax and see if anything could be adapted.
The standard SD1 manifolds are pretty good by all accounts and can withstand anything up to about 190BHP or so without posing much restriction. After
that they are a bit restrictive. My figure of 200BHP is to allow for future growth as I have a standard engine at present which will produce around
170BHP with a K&N filter and decent exhaust system.
Anyone tried the cherry bomp or jetex systems? What about the repackable silencers which Demon Tweeks sell?
Cheers,
Craig.
|
|
|
Cussed
|
| posted on 26/1/04 at 09:38 AM |
|
|
Luego Viento
Hello
Luego produce a Viento kit designed to take the Rover V8. They sell individual components so should be able to sort you out with the silencer
parts you need.
If I recall correctly, when the magazine 'Which Kit?' drove the Rover V8 viento they said it had been modified to around 200bhp and the
only comment they made on the exhaust is that it would be nice if it could have been a little louder! This suggests that it was well within the SVA
levels.
I'm sure Luego would be able to sort you out, or at least give you some helpful pointers. They're nice chaps.
Eddie
|
|
|
mackie
|
| posted on 26/1/04 at 09:49 AM |
|
|
I read the website of one guy who made a very nice V8 locost and he used Transit 2.5TD exhaust back sections either side. I have no idea if they are
good performance wise but may be a locost source of suitable silencers, assuming they silence enough. They also have bent tail pipes ofcourse.
Scrapped washing machine drums may prove a useful source of heatshield material too (I think that tip is in the book actually) 
Dax stuff is fairly scarey money, like £2000 for a complete SS V8 exhaust system, Luego do one for £1000 and a custom chrome kit is about £300 I
think, but you have to weld that up yourself.
|
|
|
Simon
|
| posted on 26/1/04 at 10:03 AM |
|
|
Craig,
I bought 1 metre of 5" diam tube (cut in half - £30 delivered), 1 metre of perforated tubing (again cut in two - £12.00 ish), some wadding (need
a load more (got vol of cyl calc wrong! - £23.00))) and a couple of cheap (£4.50 each) chrome tail pipes (for the shape, rather than finish). Also two
inch dia tube -I had lying around.
Anyway, the two inch tube runs down the side of engine compartment, and was cut (at correct angle) at chassis bend (rear of scuttle). Perforated tube
welded to this tube. I cut two 5" dia discs from 4mm plate, with 2" holes in, one was slid down the perf tube to the join and welded in
place. The 5" tube was was to this disc. The chrome trim was welded to the other 5" plate, and is a removable end cap.
Back to your point about noise - wifey thinks it much quieter, and it's still only been started in garage (confined space!)
My bike started in garage seems loud, and that's only about 78db (I think).
I'm hoping it'll be ok. IIRC 101db is b****y loud If not, plan B.
As for Dax, I think their system is about £2000. Yeah right!
Anyway, this probably didn't help much!
I've attached a doodle of my cans.
ATB
Simon
PS - Mackie - this chap:
http://web.ukonline.co.uk/darrenclark/Locost.htm
[Edited on 26/1/04 by Simon]
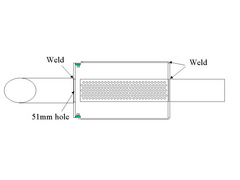 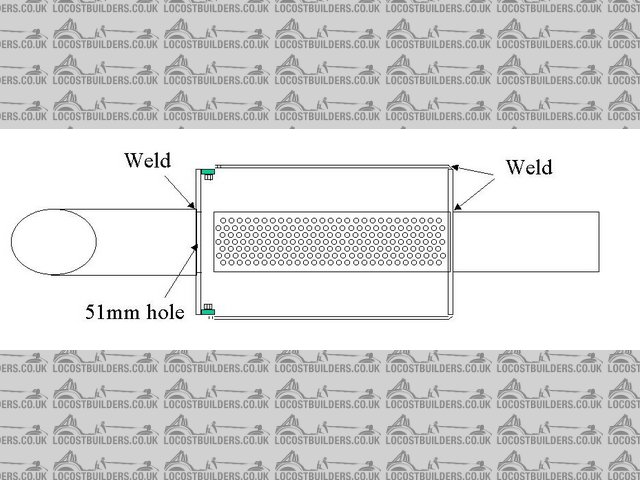
Rescued attachment silencer1.jpg
|
|
|
mackie
|
| posted on 26/1/04 at 10:17 AM |
|
|
That's pretty neat Simon. We could well end up doing something like that ourselves, but I may well investigate the transit units and see if they
are unrestrictive enough, though being able to add and remove wadding could be fun, especially post SVA for that unique nascar soundtrack 
(There was a completely awesome sounding (and looking) 3.9 RV8 Healey replica at Donny last year, if we can get even 70% of that sound I was be
superbly happy - it shamed all the cobras I heard running)
Not sure what we are going to do about manifolds yet. We do have the cast iron ones from the vitesse which should work fine but we want 8 pipes
sprouting from under the bonnet really, which unfortunately means lots of work or lots of money.
Simon, do you have plans for your approach?
|
|
|
stephen_gusterson
|
| posted on 26/1/04 at 10:38 AM |
|
|
on my car I have used two (one each side for each half of the V) ford granada back boxes from a 2.4 / 2.9 model of approx 1987.
you can buy these from a motor factor that sells sections for about 35 - 40 quid.
they are round and look just like a locost typical silencer. They are straight thro, like a cherry bomb, or glass pack - which is what simon is
describing.
fitted to my 2.4 engine, they are really very quiet - even tho they are straight thro. at 3,000 rpm in my garage they sound like a normal car.
atb
steve
[Edited on 26/1/04 by stephen_gusterson]
|
|
|
Simon
|
| posted on 26/1/04 at 11:16 AM |
|
|
Mackie,
Thanks for +ive comments - always good to get
I think the Transit silencers or what Steve is suggesting would be perfectly ok as far as restriction is concerned - 2 (one each side) x 2.5 litre
diesel (5 litres) s/be fine on a 3.5.
I did have all the pipes coming through bonnet, but decided it was bit Mad Max (nowt wrong with that, just wanted to be a bit more subtle!). The
manifolds are SD1. The o/s one I cut off the flange and shortened manifold by about three inches then reattached flange. If you do this, take car
where you cut as there is a recess in flange - and you'll want to keep it!
The rest was just a case of making it fit - see pics. Only plans I had were - where I wanted system to exit bodywork, keeping the 4-2-1 arrangement,
the max space available (heightwise) allowing an inch of clearance under pipes for engine movement. All bends I already had - see old exh pics - just
reused them.
As far sound, yeah agree entirely. We're allowed 101db - I intend to be around 100.5db
ATB
Simon
|
|
|
mackie
|
| posted on 26/1/04 at 12:15 PM |
|
|
Simon,
the arrangement with your steering column and OS manifold looks a bit tight!
Otherwise that looks like quite a neat setup. I suppose it adds a little more mystery to the car even if it's unmistakably a V8 from the noise
If only you could just have 8 short pipes sticking out the bonnet
|
|
|
craig1410
|
| posted on 26/1/04 at 01:06 PM |
|
|
Thanks Guys, I'll read this again when I get home as I'm pretty busy at work just now.
Simon, thanks for the detail on your exhaust setup, I see that Demon Tweeks make all the bits I need although their mandrel bends are a bit pricey! Do
you think I could get away with normal crushed bends but use a slightly bigger pipe diameter to avoid restriction? Did you use mandrel bends or normal
ones?
Finally, Simon, do you have more detail on the flange cutting. You mentioned that we should be careful to avoid losing the recess? Is this obvious
when we look at it or is further detail beneficial?
Thanks again to all who responded.
Craig.
ps. £2000 for an exhaust!!!! You must be kidding right? That would be reasonable (still a bit £££) for a one-off custom made jobbie but not for repeat
runs...
|
|
|
Simon
|
| posted on 26/1/04 at 02:09 PM |
|
|
Mackie,
'tis a bit but there's quite a bit of material I'm gonna remove from manifold - which should give me another 1/2" to 3/4".
If that doesn't give me enough clearance, then the column support starts to get a hacking or the engine gets a stabiliser bar
Craig,
Demon T parts quite expensive (£32.00 + del + VAT - call it 50 quid)) IIRC for a metre of 5" tube. Custom Chrome (who I also think are a bit
steep) £30 delivered!
As for flange, I've done a quick doodle - which may help, but yeah, it should be fairly obvious. Have you got the two "twin" tubes that
take gases from manifold to system. If so split that, and you'll find a male/female connection (with replacable copper? sealing rings) - manifold
is the female part - which is the area you have to be careful with. So to speak
All the bends I've used were the "cheap" ones - with deformation inside. I'm not worrying about that. Still think it'll
breathe quite well!
ATB
Simon
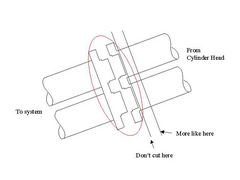 
Rescued attachment Ex flange.jpg
|
|
|
craig1410
|
| posted on 31/1/04 at 03:34 PM |
|
|
Simon,
I've been looking into this exhaust silencer lark and I have a quick question:
Do you think that your silencers are long enough? I ask because I was looking at the Luego Viento V8 which is for sale on the Luego website and it has
bloody great 32" long silencers on each side. These appear to be 5" diameter like yours. I got the dimensions from a side-on photo of the
car on the website using the 17" alloy wheels and the 2620mm wheelbase as references.
You said that you used a 1 meter long piece of 5" tubing cut in half (hence 0.5m each side). Was it perhaps 1meter AFTER cutting it in half? I
was thinking of getting a 5' length and cutting it in half which would give 30" each side but the amount of wadding required could make it
quite expensive for a silencer this size. How much wadding do you in fact need?
I'd appreciate your comments on this.
Cheers,
Craig.
|
|
|
craig1410
|
| posted on 5/4/04 at 11:25 PM |
|
|
Well I've gone and bought a pair of silencers from Demon-Tweeks of all people. They are described as Jetex Turbex and are 5" casing with
3" bore and 625mm long (casing length) with flanges at each end. They cost £57.77 each. I'll post some photo's in the next few
days.
Does anyone know where I can get a pipe diameter converter so that I can convert my 2" exhaust main pipe to fit the 3" bore of the
silencer?
Cheers,
Craig.
|
|
|
blueshift
|
| posted on 6/4/04 at 08:51 AM |
|
|
Not sure why I didn't spot this topic before..
Out of interest simon, how did you reattach the cut+shut manifold? They're cast iron iirc so I'm curious if you welded them and how.
|
|
|
craig1410
|
| posted on 6/4/04 at 09:16 AM |
|
|
Blueshift,
I asked the same question of Simon and IIRC he got some big heavy duty welder to do the job. I cut a section out of my manifold last night and I can
confirm that it is 1/4" thick wall and is a quite hard work to cut never mind weld... I think I will bevel the edges and then just tack it
together before taking it to a professional to be welded fully. I've actually asked Mark Allanson how he would recommend carrying out the weld
and I'll let you know what he says. I'll also post some pictures of the section I cut out along with dims. Remind me if I forget...
Cheers,
Craig.
|
|
|
Simon
|
| posted on 6/4/04 at 09:55 PM |
|
|
Hi Craig,
I reckon you've done the best thing -buying - saves a lot of agro!
Blueshift
Craig quite correct - my Dad's business has a couple of 350 - 400 amp welders, so I used them. Unfortunately the one I used was the one with a
foot pedal amp control so I've no idea how much power I was using
ATB
Simon
|
|
|
Mark Allanson
|
| posted on 6/4/04 at 10:05 PM |
|
|
".. I think I will bevel the edges and then just tack it together before taking it to a professional to be welded fully."
Come on, don't wimp out on me now!!
If you can keep you head, whilst all others around you are losing theirs, you are not fully aware of the situation
|
|
|
Mark Allanson
|
| posted on 6/4/04 at 10:08 PM |
|
|
quote:Your mig will be fine, you need to bevel the edges of the manifold at about 50 degrees except for the last mm which you leave at 90.
lay down 3 tack welds at full power about 8mm long around the circumference, leaving a 1mm gap between the two halves,file the tacks so they have
nice slopes at either end warm the manifold with a blowlamp EVENLY until it is far too hot to handle, but not glowing red!
Run a 'root' weld into the gap (INTO is the important bit here) so the base of the bevels fuse together, you are not looking for weld
build-up, just a good continuous fusion. Now you fill in the bevels. pick a good starting point, run the weld forward following the root for about
15mm, run it back to the left side of the bevel and pause the torch until the weld pool swells to JUST creeps over the bevel crown, pass straight
across to the right bevel and do the same. Once the weld pool has swelled there too, run forward along the root another 15mm and repeat. Basically you
are welding in triangles moving along 15mm on the completion of each triangle, If you have to stop the process, file back the bit where you stopped,
restart the weld until the filed area has been covered and carry on. Let the manifold cool slowly, I wrap them in loft insulation and put tham in a
wooden box for about 2 hours.
The amps you have to use will be about 20A for every 1mm of casting thickness excluding the root. So if the casting is 6mm thick, you need 20x5
=100A. If the casting is above this, run 2 more roots parallel and on top of the existing one, this should give another 3mm depth to the root so you
could have a casting thicknes of 9mm and still use 100A. Remember to keep the heat in the casting while you are welding, the weld itself should
maintain the heat, but if you stop for any length of time, just top it up with the blowlamp.
Dead easy!! All the above applies to cast steel, NOT cast iron, if it is iron, you use a vey similar process, but use the arc welder with monel
metal rods at slightly higher amps than the mig.
Happy Welding
ATB
Mark
If you can keep you head, whilst all others around you are losing theirs, you are not fully aware of the situation
|
|
|
craig1410
|
| posted on 6/4/04 at 10:24 PM |
|
|
Mark,
"Don't wimp out on me now!"
Yes that was before you answered my query and I didn't expect you to recommend that I proceed with a measly 120Amp welder!
I will give it a go and depending on how badly it goes I might post some piccies. 
Thanks again for the advice,
Craig.
[Edited on 6/4/2004 by craig1410]
|
|
|
Mark Allanson
|
| posted on 6/4/04 at 10:32 PM |
|
|
It is always a good idea to plan an important weld before you start, do a dry run first to make sure you can 'twist yer wrist' far enough
on the radii. I forgot to mention, always start the weld midway between the tacks so you run over them 'hot'
If you can keep you head, whilst all others around you are losing theirs, you are not fully aware of the situation
|
|
|
craig1410
|
| posted on 6/4/04 at 10:39 PM |
|
|
Mark,
I'm not sure I'm getting this movement in triangles bit, can you please clarify this a little bit.
Let's say I start to the right of the root and move straight forward for 15mm. Do I then go diagonally back and to the left so that I am
adjacent to my starting position but on the other side of the bevel and then move forwards again to the point adjacent to where I was before I just
moved diagonally? Then do I cross to the right again and move forwards another 15mm etc etc.
So the steps would be forwards, diagonal back left, forwards, right, forward, diagonal back right etc etc.
Cheers,
Craig.
ps. Got the bit about running over tacks 'hot'. Sounds sensible.
[Edited on 6/4/2004 by craig1410]
|
|
|
Mark Allanson
|
| posted on 6/4/04 at 10:48 PM |
|
|
Run forward along the root, pass back and left to the bevel crown and pause, across at 90 degrees to the root to the opposite bevel crown, pause,
forward diagonally and along the root again, but carry it on another 15mm, and repeat as Jane Fonda said
If you can keep you head, whilst all others around you are losing theirs, you are not fully aware of the situation
|
|
|
craig1410
|
| posted on 6/4/04 at 11:08 PM |
|
|
Mark,
Okay, I get what you are saying now but I must admit it is not a pattern I would have expected. I guess it might make more sense once I see what
happens in practice. Presumably you do get a continuous weld and balance the 15mm length with the time you pause to ensure that you don't leave
gaps?
Anyway I'll give it a try in the next few evenings.
Cheers,
Craig.
|
|
|