flak monkey
|
| posted on 6/3/10 at 07:44 PM |

|
|
quote:
Originally posted by Tim 45
David, looking good!
Just reading through some of your posts you keep mentioning you want around 300bhp/300Nm....
What have you done to your gearbox to rate it to that sort of power? I was under the impression that the heaviest duty "off the shelf"
kits were rated to 280bhp/250 Nm(bgh) and 250bhp (quaife)...
With the power that you're getting, I wouldnt have thought the type 9 box is capable in any configuration of the power you're after....
Caterham use their own custom built box, and i'm assuming that had to be uprated for their X330 concept...
I find that given a gearbox upgrade is needed on an install this powerful brings in an added cost that has no real option of DIY...and hence the idea
that an install such as yours can be done on the cheap, is slightly misleading...
Sorry Tim, missed this one for some reason...
I have fitted a heavy duty BGH box to mine. Which is rated to 200lbft, their top of the range will handle 250lbft (340Nm) which is more than enough. I
know of more than one person running 300+bhp on turbo cars with bog standard type 9s and they hold up amazingly well. The lightweight of the locosts
seem to help and I dont intend to drag race or do regular track days, or fit slicks so with the amount of force the box is seeing it should be just
fine.
The other option would have been to fit a T5 from the outset, but I went too far down the line with the T9 to go for the T5 now unless I have major
problems.
The quaife sequential box that caterham use has had no end of problems and are a rediculous price.
To be honest I am more worried about trashing the diff than the gearbox 
Sera
http://www.motosera.com
|
|
|
|
|
beaver34
|
| posted on 6/3/10 at 08:16 PM |
|
|
box should be fine i would think, naff all weight anyway, what rear diff is it?
|
|
|
flak monkey
|
| posted on 7/3/10 at 08:04 PM |
|
|
quote:
Originally posted by beaver34
box should be fine i would think, naff all weight anyway, what rear diff is it?
Standard Sierra 3.62 7" LSD in the back
Not much progress at the moment, connecting up the last of the ancilaries.
Spent all afternoon trying to decide how to mount the rad fan, then gave up and fitted it using the through the rad ties. Thankfully it seems to work
from the switch properly, just need to see if it auto switches from the MS.
Not many jobs left before the start up.
Sera
http://www.motosera.com
|
|
|
flak monkey
|
| posted on 12/3/10 at 09:00 PM |
|
|
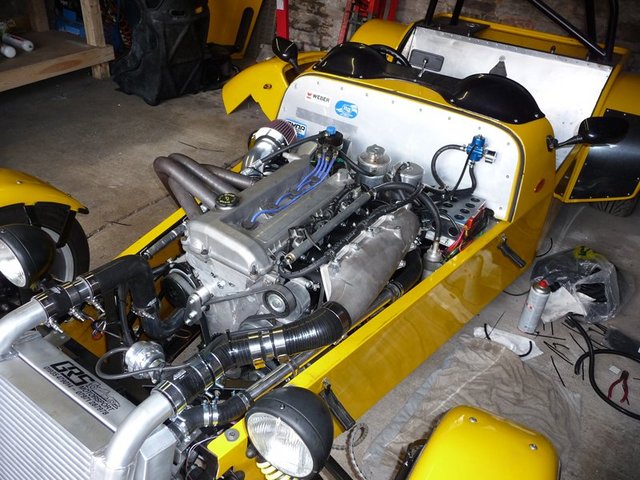
If everything goes to plan I am going to try and get the car started tomorrow.
Got much of the to do list done just a few odd things to finish off: running the fuel return line after temp mounting the FPR somewhere out of the
way.
This is the current state of things, got the supercharger oil lines in last night and a few other odds tidied up, still need to clip in the hoses
though:
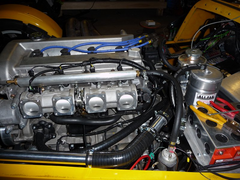 
 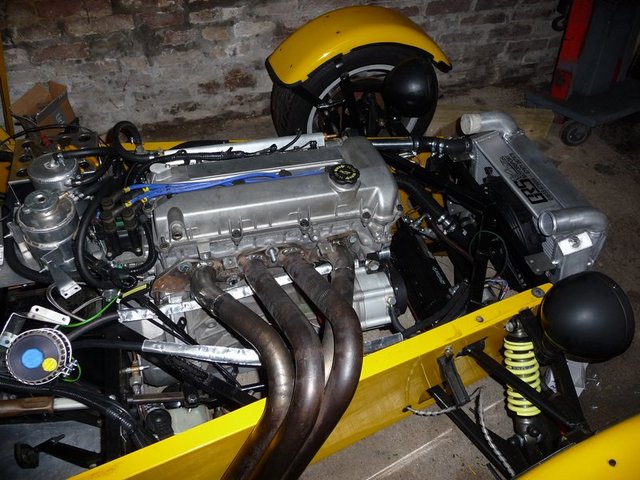
Cranked the engine over for the first time tonight, seem to be getting good oil pressure (40psi on cranking) and after puzzling for 10 mins as to why
I didnt have a stable cranking signal I remembered that I hadnt adjusted the VR sensor pots in the ECU, now all sorted.
Oncce the fuel lines are finished I can pump fuel around and check for leaks then give it a crank and see what happens.....
Sera
http://www.motosera.com
|
|
|
eddie99
|
| posted on 12/3/10 at 09:06 PM |
|
|
Looks excellent, can't wait to see the first start up video posted tomorrow evening
http://www.elitemotorsporteng.co.uk/
Twitter: @Elitemotoreng
Facebook: http://www.facebook.com/pages/Elite-Motorsport-Engineering/153409081394323
|
NOTE:This user is registered as a LocostBuilders trader and may offer commercial services to other users
|
Madinventions
|
| posted on 12/3/10 at 11:22 PM |
|
|
Fingers crossed...
I bet it fires up first time!

Mojo build diary: http://www.madinventions.co.uk
Solo music project: Syrrenfor http://www.reverbnation.com/syrrenfor
View my band website:
http://www.shadowlight.org.uk
http://www.eastangliankitcars.co.uk/
|
|
|
iscmatt
|
| posted on 13/3/10 at 12:34 AM |
|
|
wahey, i cant wait for the video! fingers crossed for you!
|
|
|
sebastiaan
|
| posted on 13/3/10 at 08:22 AM |
|
|
Good stuff!
Would it be possible to fit a simple (ali?) heatshield below the exhaust manifold? I see you've sleeved a number of hoses (looks like they are
the oil supply hoses from the reservoir to the S/C?), but some more heat protection might be usefull. Last thing you want is hot oil meeting a hot
manifold. That'd be game over for the car....
Something like a horizontal plate just below the primaries would do.
|
|
|
scootz
|
| posted on 13/3/10 at 01:09 PM |
|
|
Looking good!
It's Evolution Baby!
|
|
|
flak monkey
|
| posted on 20/3/10 at 08:47 PM |
|
|
I better keep this thread up to date with all the latest so its referenced. Not going to repeat anything but...
Engine fired up first time with no major problems other than a very high idle. Some videos etc can be found here:
http://www.youtube.com/watch?v=xpQ2BYMFO7s
http://www.youtube.com/watch?v=j5T9Cj8Q0EQ
This then led to a week of trying to find out what was causing the high idle. No Vac leaks could be identified anywhere, the whole assembly was
removed, checked and reassembled several times with no improvement.
http://www.locostbuilders.co.uk/viewthread.php?tid=131856
http://locostbuilders.co.uk/viewthread.php?tid=131973
http://locostbuilders.co.uk/viewthread.php?tid=132212&page=1
I spoke to several knowledgeable people during the week, including several experienced in setting up Roller Barrel throttle bodies and the general
consensus was the same - high idle is a common problem with rollers and seems more apparent on some engines than others. Theres not really a fix to
it, and its something you just have to live with if you have it.
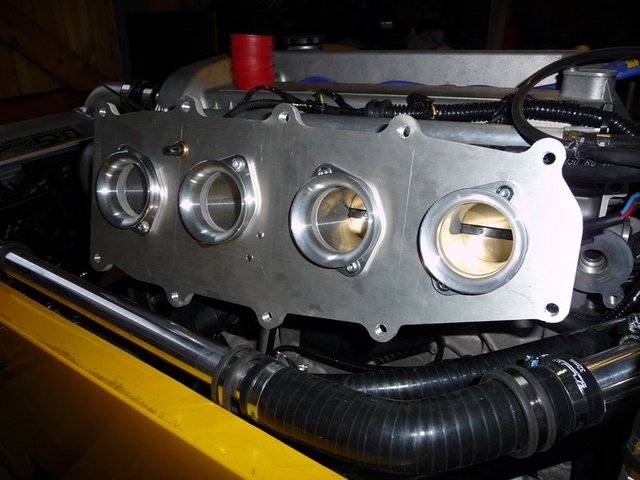
I made the decision to switch to Jenvey DTH throttle bodies to solve the problem and thankfully it did. It idles much better and I found Raceline to
be incredibly helpful and genuinely interested in the project.
Some piccies of the Jenveys
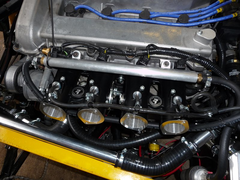 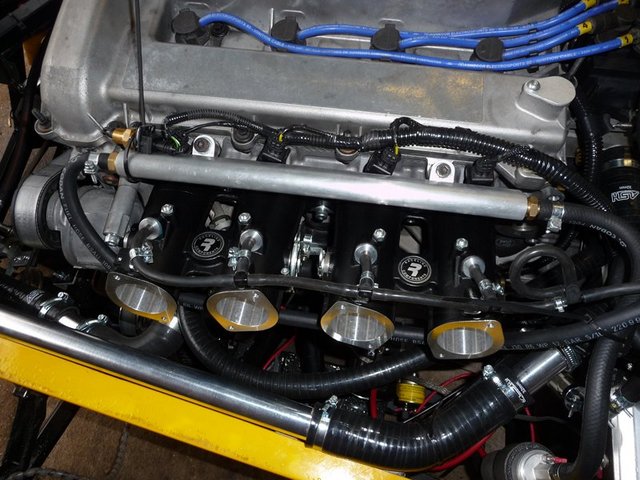
Jenveys 1
And made a set of MAP take offs to fit in the injector ports. Sealed with Hylomar and then clamped in with some fabricated brackets. They have been
painted now and are drying overnight before final fitting tomorrow morning.
 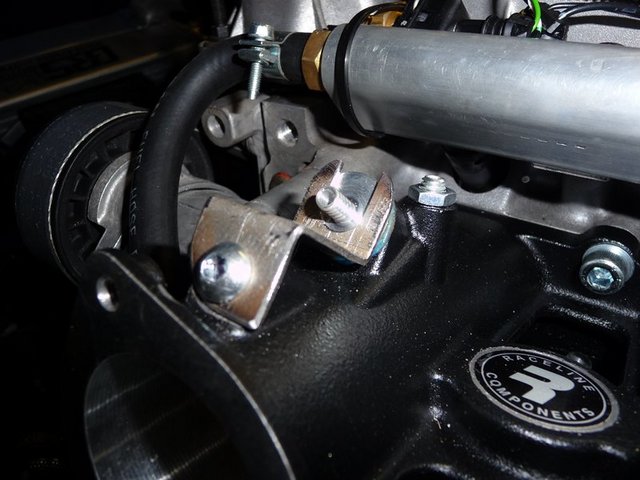
Jenvey MAP mod 1
Sera
http://www.motosera.com
|
|
|
goaty
|
| posted on 20/3/10 at 11:05 PM |
|
|
look very smart, do like the map take offs
|
|
|
flak monkey
|
| posted on 27/3/10 at 08:16 PM |
|
|
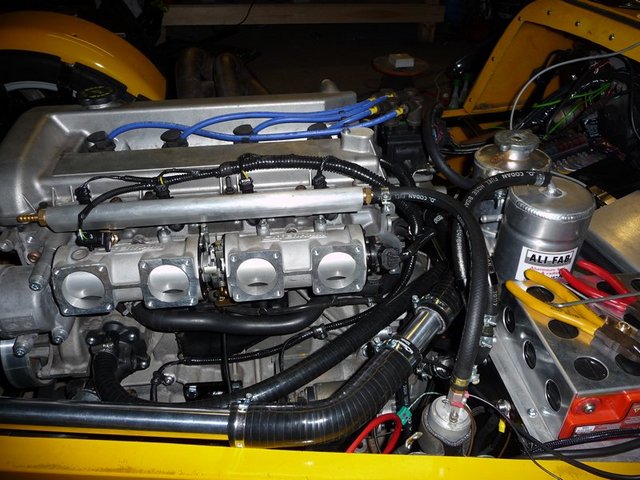
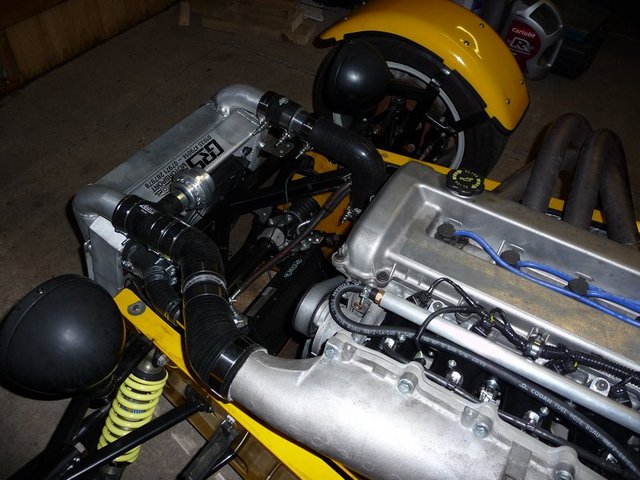
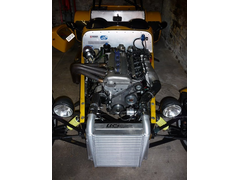
Nearly there...
Fitted up the plenum backplate yesterday. Many thanks to Boggle the rapid turn around on the cutting!
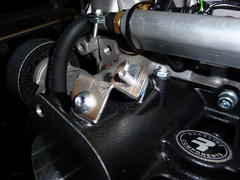
That allowed me to get a bracket made up for the throttle cable which bolts to the back of the plate.
This morning got it all fitted up, albeit temporarily as it has to come off to change the starter as it seems to randomly decide not to engage about
50% of the time  Another is on order and will hopefully arrive during the week. Another is on order and will hopefully arrive during the week.
 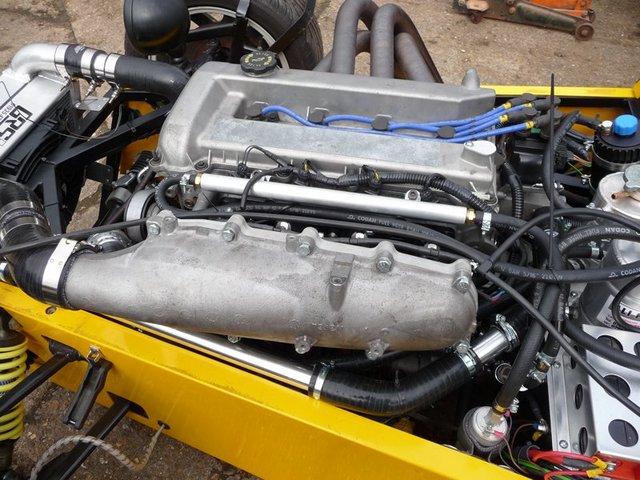
Plenum fitted 1
Plenum fitted 2
Plenum fitted 4
You can see that I am going to have to have a substantial hole in the side of the bonnet now in order to clear the plenum pipework. Nevermind, its a
price worth paying to get a smoother running engine.
The other main job for today was making the idler stiffening plate for the 2 small idlers either side of the supercharger. Because they are only on M6
bolts and seemed to flex quite considerably with a bit of force by hand I decided to link them together then bolt them back to the block using the M8
bolt which is between them.
I know the plate is a little overkill on the thickness, but its what was laying around....
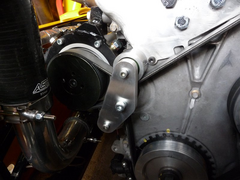 
Idler stiffening plate 1
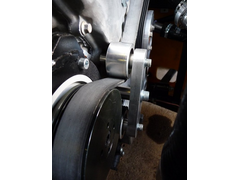 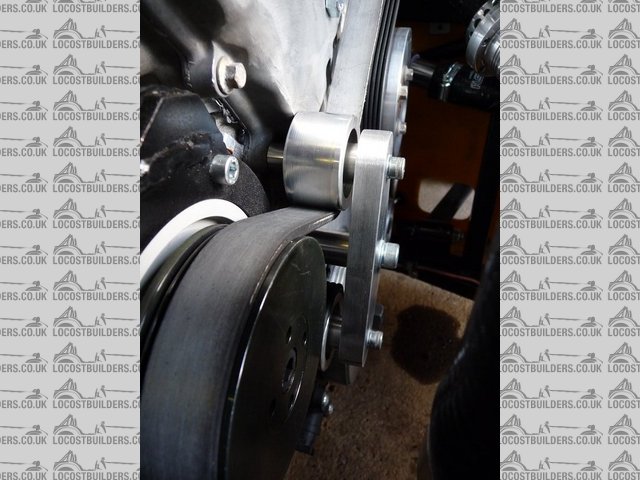
Idler stiffening plate 2
Hopefully that will keep it all in check
Final job of the day was to re-attach the front wings. Something I have been putting off for a while.
Getting there
Insurance docs came through today so hoping to get tax sorted next week and get back on the road for next weekend....
Be prepared for the bad weather to ensue!
Last jobs are some tidying up of pipes and cabling. Moving the dump valve to the outlet of the intercooler and blanking off the oulet on the plenum
(its too close to the top hose now). Finishing a few odd bits of wiring and putting more P-clips down (though I ran out of cable ties today!
Tragic!). I also have to find an airfilter to fit a bit better than the one I currenty have....
Finally, I took another short vid today with it running with everything connected up properly. Forgot to turn wind cut off on the camera though so
the sounds all screwed up again....
http://www.youtube.com/watch?v=Jg3CLG9Z3Dc
Sera
http://www.motosera.com
|
|
|
westy turbo
|
| posted on 28/3/10 at 06:27 AM |
|
|
Had the same issue on my westie as far as the inlet-bonnet and had to alter the angle 2 times to sorted out..dont worrie if it sticks out a bit,mad
max look your set up looks ace! your set up looks ace!
thats before

[Edited on 28/3/10 by westy turbo]
[Edited on 28/3/10 by westy turbo]
[Edited on 28/3/10 by westy turbo]
[Edited on 28/3/10 by westy turbo]
|
|
|
westy turbo
|
| posted on 28/3/10 at 07:00 AM |
|
|
and thats the after

|
|
|
flak monkey
|
| posted on 28/3/10 at 08:08 AM |
|
|
Yep the intention now is to leave it as is, then later in the year have a bulge made to cover it all up which is stuck on from the inside of the
nose/bonnet
David
Sera
http://www.motosera.com
|
|
|
goaty
|
| posted on 28/3/10 at 11:21 AM |
|
|
Dave,
that is awesome, cant believe how it all fits in, minor for the plenum though. I love it, the brace on the idlers looks perfect too, bet our over the
moon now
|
|
|
Xtreme Kermit
|
| posted on 29/3/10 at 07:05 PM |
|
|
looks fantastic!
What are you using for an injection map?
|
|
|
flak monkey
|
| posted on 29/3/10 at 07:17 PM |
|
|
Injection map is one I made myself, followed the theory on ignition timing which will hopefully get it somewhere close.
Need to get driving it now though so I can get it set up to a reasonable level before the 200mile round trip to Stoneleigh
Sera
http://www.motosera.com
|
|
|
Stuart_B
|
| posted on 30/3/10 at 05:27 PM |
|
|
nice one david.
it runs lovely from the sound.
stuart
black mk indy, 1.6pinto on cbr600 bike carb's.
|
|
|
flak monkey
|
| posted on 30/3/10 at 07:42 PM |
|
|
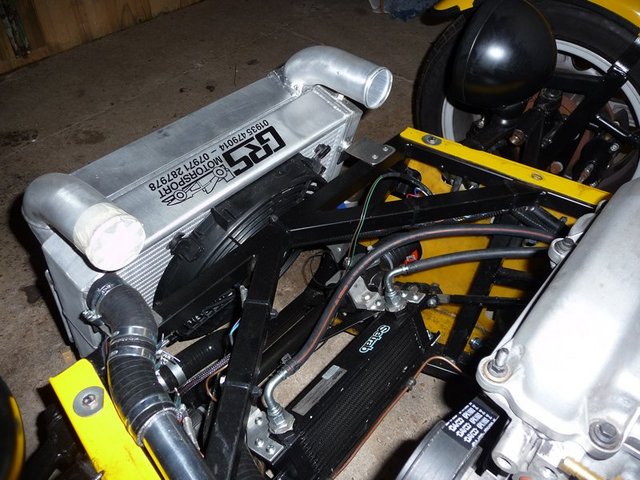
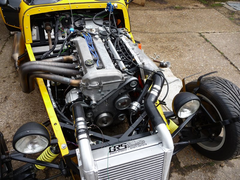
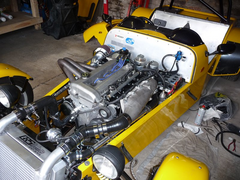
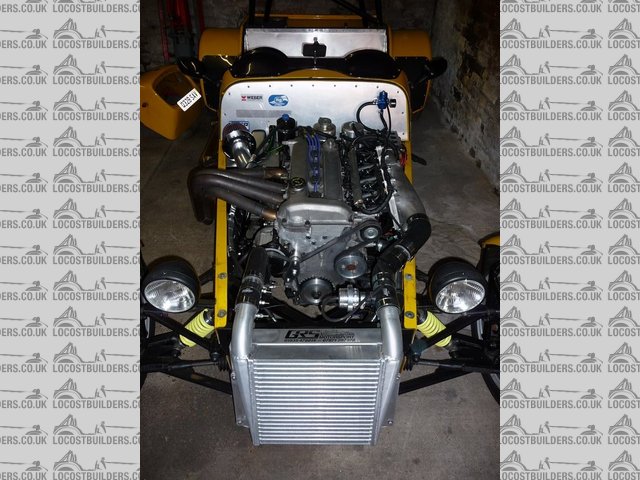
Coming on. Got the last of the bits through today.
Replaced the starter as the orginal didnt engage 70% of the time and was annoying. Replaced with a low milage Fiesta ST one and all seems to be good
now.
Getting this fitted allowed me to get the plenum all fitted up finally. Its been on and off a few times, but now (hopefully) its on to stay....
The trumpets are very short - around 15mm from the backplate face.
Plenum plate fitted final
After that, the final fitting of the intercooler hoses and dump valve. I have since run the vac line to the valve properly... I had to move the dump
valve from the plenum as there is just not enough room to get a pipe on the take off due to the position of the top hose. If I had run it under the
chassis at the front it would have been ok.
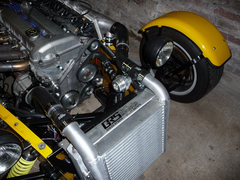 
Final intercooler hoses 1
Final intercooler hoses 2
All runs ok, still need to get warm up enrichments sorted as its a little lean when cold.
Next job is to get the interior panels back as I now have the bolts for the propshaft. Shouldnt take to long to get it all back in order. Top tunnel
panel needs modifying for new gearstick position amongst a few other things
Sera
http://www.motosera.com
|
|
|
goaty
|
| posted on 31/3/10 at 04:44 PM |
|
|
lol, just found them as you replied, they do make it look very nice.
you really cant be far away froma drive now surely....
|
|
|
flak monkey
|
| posted on 31/3/10 at 04:46 PM |
|
|
Should be out for a drive this weekend if I can get tax sorted and the weather is reasonable
Sera
http://www.motosera.com
|
|
|
flak monkey
|
| posted on 2/4/10 at 07:13 PM |
|
|
Another busy day today.
First job was getting the air filter fitted. Piped to the back of the supercharger using aluminium tubes and silicone hose, then mounted on top of the
drivers footwell. Planning to put vents in the side of the bonnet anyway, so hopefully will get enough cold air in there.
Still have to wrap the exhaust, which is a job I keep putting off as its a messy job!
Next finished cable tying all the loose cables and pipes behind the scuttle, then modified the firewall and got it refitted.
Had some worrying blue smoke when the engine was running earlier, accompanied with some oil leaking around cyl 4 exhaust port which was rather
strange. Been fine ever since though (been running for an hour or so since without a problem). So will have to keep an eye on that...
Seem to have got the cold start nearly sorted too. Flooded the engine when trying to start first thing this morning so it was only running on 2
cylinders. Seems to be much better now.
Nearly finished 1
Nearly finished 2
 
Nearly finished 3
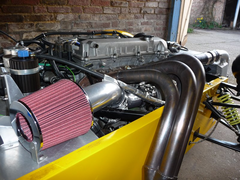 
Filter fitted 3
[Edited on 2/4/10 by flak monkey]
Sera
http://www.motosera.com
|
|
|
flak monkey
|
| posted on 2/4/10 at 07:41 PM |
|
|
And finally a video with decent sound....
http://www.youtube.com/watch?v=nRt-oz8gI04
Sera
http://www.motosera.com
|
|
|
boggle
|
| posted on 3/4/10 at 02:51 PM |
|
|
looking good mate...
that plenium back plate looks nice
just because you are a character, doesnt mean you have character....
for all your bespoke parts, ali welding, waterjet, laser, folding, turning, milling, composite work, spraying, anodising and cad drawing....
u2u me for details
|
PLEASE NOTE: This user is a trader who has not signed up for the LocostBuilders registration scheme. If this post is advertising a commercial product or service, please report it by clicking here.
|


.jpg)