flak monkey
|
| posted on 19/5/09 at 04:14 PM |

|
|
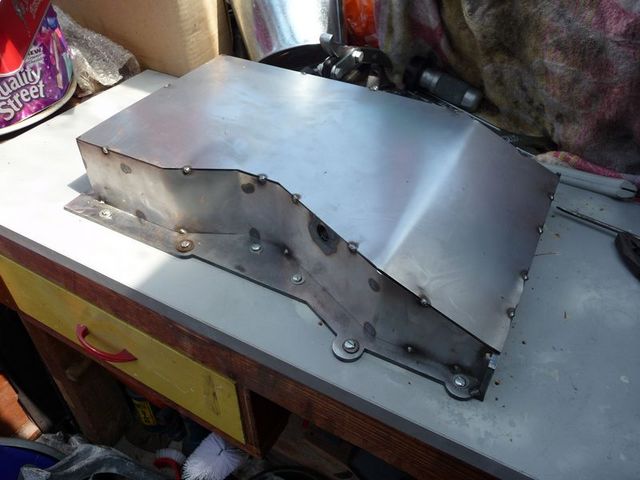
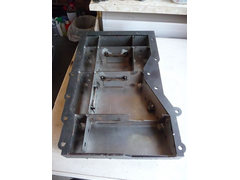
Sump design now complete and will shortly be sent off for laser cutting!
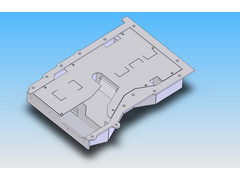 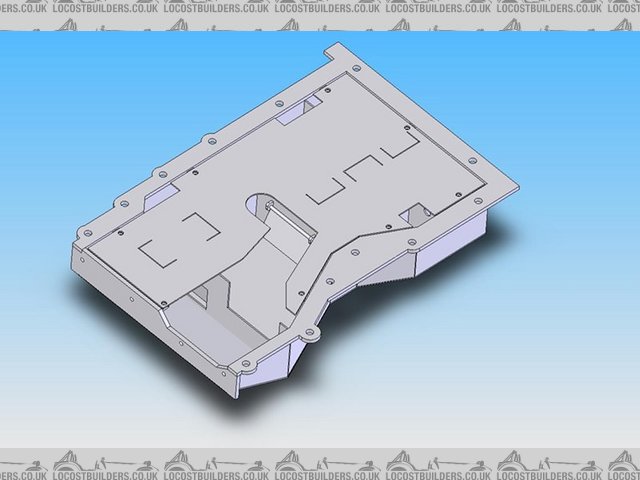
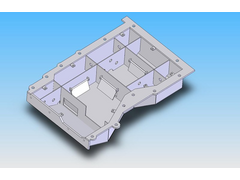 
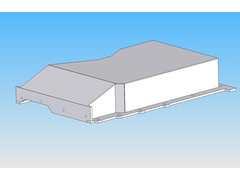 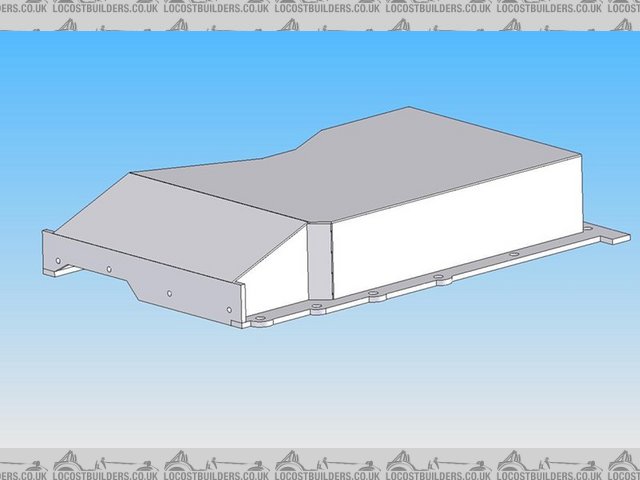
Fingers crossed it all fits together! 
Sera
http://www.motosera.com
|
|
|
|
|
Adam R.
|
| posted on 24/5/09 at 07:32 PM |
|
|
i`m building also with duratec but with mx5 gearbox
and I have idea, if duratec block are the same as 2.0 mazda mx5 `05 and up so we can use stock mx5 oil pan
|
|
|
flak monkey
|
| posted on 24/5/09 at 07:53 PM |
|
|
quote:
Originally posted by Adam R.
i`m building also with duratec but with mx5 gearbox
and I have idea, if duratec block are the same as 2.0 mazda mx5 `05 and up so we can use stock mx5 oil pan
Possibly, if the bellhousing is level with the bottom of the sump.
With the aluminium bellhousing for the type9 box it is designed to give more ground clearance, meaning you can make the sump about a 25mm shorter.
David
Sera
http://www.motosera.com
|
|
|
flak monkey
|
| posted on 7/6/09 at 02:05 PM |
|
|
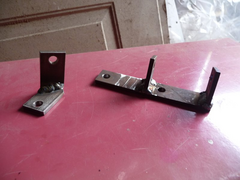
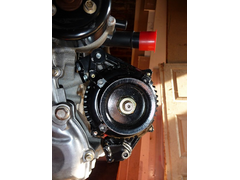
Today I have been working on getting the alternator fitted up (amongst other things! )
Mounts fabricated from 5mm steel, they need a bit of trimming up then painting and fitting permanently. I might drill some lightening holes in the
lower mount too.
They position the alternator within about 3mm of the block.
Total cost for alternator and mounts was £20, which I think you will agree is better than over £300....
Alternator mounts
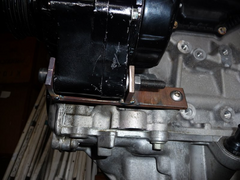 
Alternator mounts
Alternator mounts
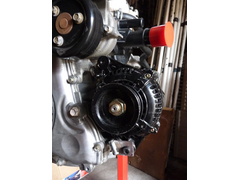 
Alternator fitted
The next jobs are to get the new fuel rail milled (job for work this week) and hopefull I will be welding up the sump next weekend if all goes to
plan!
On the sump front, kits to build your own sump will be available to weld up yourself for the princely sum of ~£70+P&P. Obviously mine is the
prototype, so there may be some design tweaks before they go on sale, but they will be available very soon
David
[Edited on 7/6/09 by flak monkey]
Sera
http://www.motosera.com
|
|
|
goaty
|
| posted on 7/6/09 at 02:41 PM |
|
|
i would def be interested in a sump kit 
|
|
|
flak monkey
|
| posted on 7/6/09 at 02:45 PM |
|
|
I'll post more about them when everything is finalised
Sera
http://www.motosera.com
|
|
|
flak monkey
|
| posted on 12/6/09 at 07:29 PM |
|
|
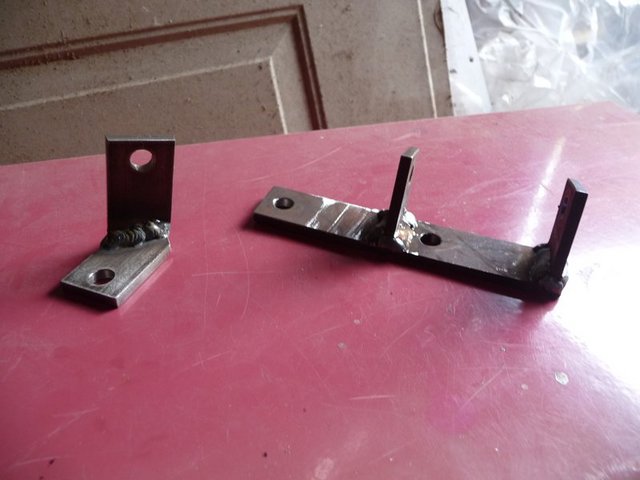
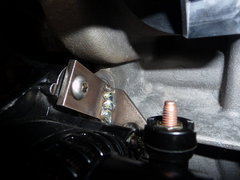
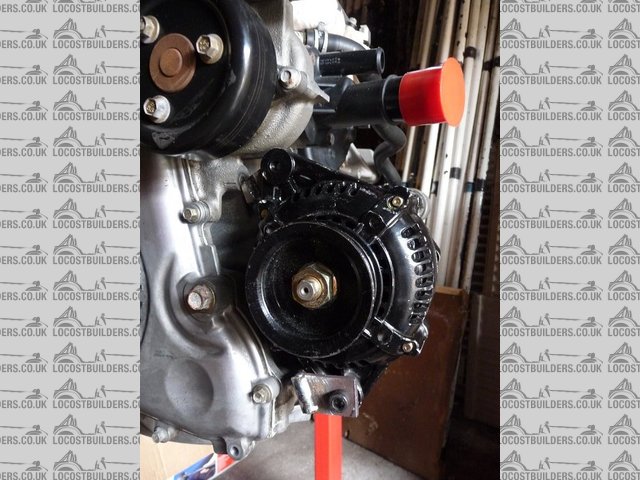
Finished the alternator brackets off today and fitted them up finally
 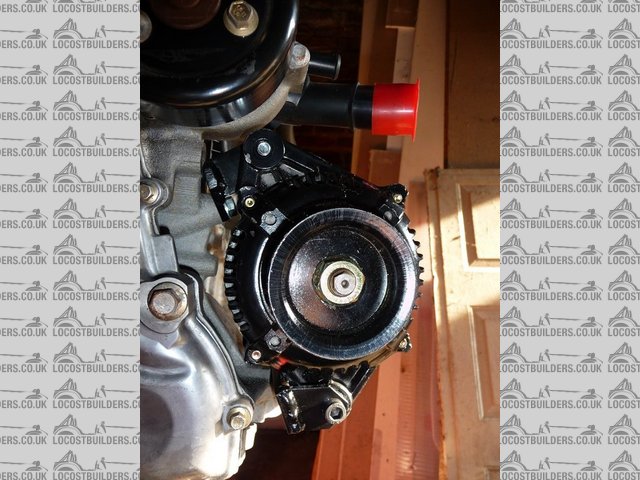
Alternator mounts finished
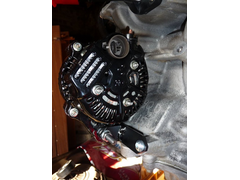 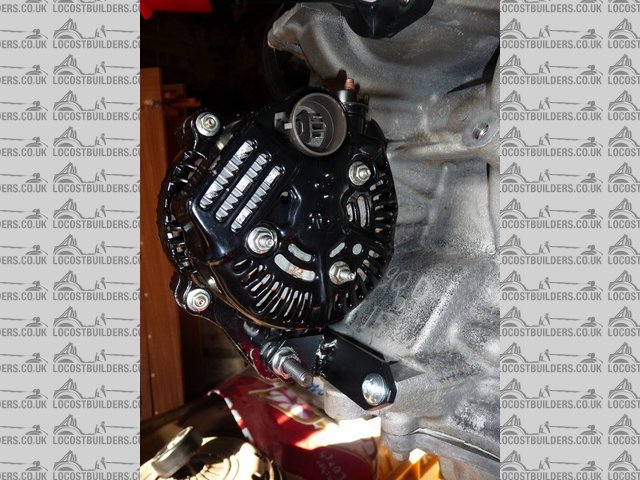
Alternator mounts finished
will measure up for the belt tomorrow.
Unfortunately the laser cutting has been delayed so won't be welding the sump up tomorrow 
Will pobably spend the time stripping one of my diffs and driveshafts down instead.
David
Sera
http://www.motosera.com
|
|
|
Benzine
|
| posted on 12/6/09 at 08:31 PM |
|
|
Looks good! How did you go about alligning the pulleys? Straight edge + lots of measuring? frickin' lasers? It's something I'll have
to do soon so I'm curious ^_^
The mental gymnastics a landlord will employ to justify immoral actions is clinically fascinating. Just because something is legal doesn't make
it moral.

|
|
|
flak monkey
|
| posted on 12/6/09 at 08:46 PM |
|
|
The pulleys were aligned using a piece of box section held on the crank pulley by my able assitant while I marked out the alternator brackets and then
tacked them together. Got it right within about 0.25mm which is good enough.
Took a bit of fiddling but got it right in the end.
The measurement from the front of the pulleys to the root of the first vee was the same on both which made the alignment much simpler.
Sera
http://www.motosera.com
|
|
|
Benzine
|
| posted on 12/6/09 at 09:25 PM |
|
|
Cool thanks, my crank pulley has a big lip around it so I'll be able to clamp some box section on to it
The mental gymnastics a landlord will employ to justify immoral actions is clinically fascinating. Just because something is legal doesn't make
it moral.
|
|
|
mangogrooveworkshop
|
| posted on 21/6/09 at 12:12 PM |
|
|
http://k80rum.co.uk/default.aspx
super charger upgrade?
|
|
|
flak monkey
|
| posted on 21/6/09 at 02:25 PM |
|
|
quote:
Originally posted by mangogrooveworkshop
http://k80rum.co.uk/default.aspx
super charger upgrade?
Aye, seen that and plan to make that leap next winter if funds allow.
Sera
http://www.motosera.com
|
|
|
flak monkey
|
| posted on 21/6/09 at 02:52 PM |
|
|
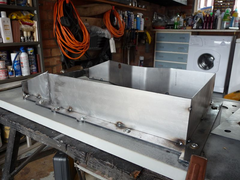
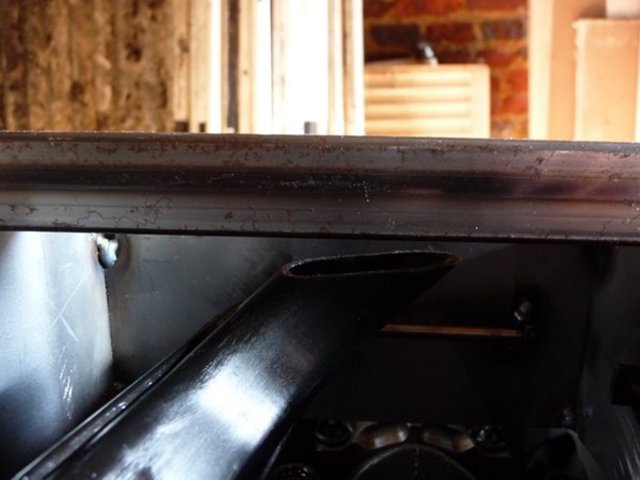
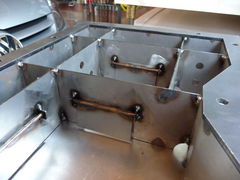
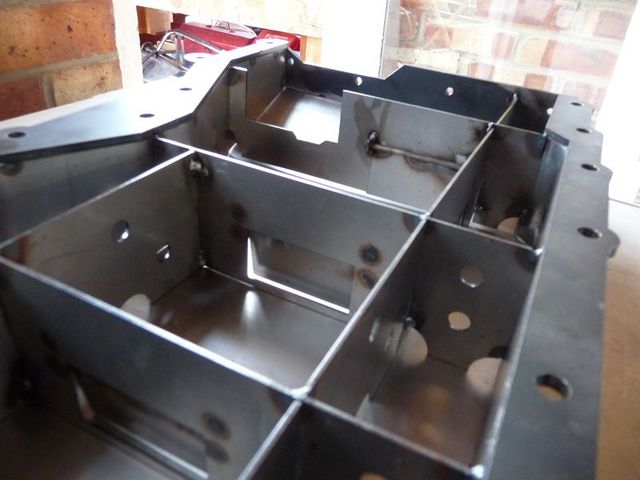
The parts for the sump arrived on Friday morning, which has meant that inbetween visiting Newark yesterday and all the other usual weekend stuff I
have managed to make a start on getting it welded together.
Check fitted the flanges on friday and all seem to line up well, which was a great relief!
Also spent friday afternoon making all the flap valves and welding them all in (they can be seen in the pics below) and getting them all to operate
smootly.
A slight modification is required to a couple of the baffle lengths and the two sides (a little too generous with the bend allowances, but this will
be rectified in the design now)
Screwed the flange down to a nice thick bit of block board and welded on the end plate which bolts to the front cover of the engine.
The sides were then bent by clamping down to a bench, sandwiched between 2 bits of wood. Allowed for nice clean bends. And I was quite chuffed with
the result considering I was too impatient to wait until tomorrow to bend them on the machine at work tomorrow!
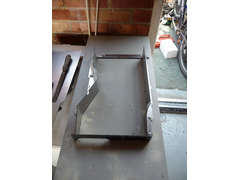 
Sump build
Sump build 3
After that the sides were tacked into position, and then the back followed. Nice and easy so far. And having everything laser cut was a joy as it
meant everything fitted together just as expected.
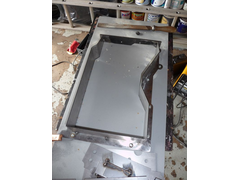 
Sump build 2
 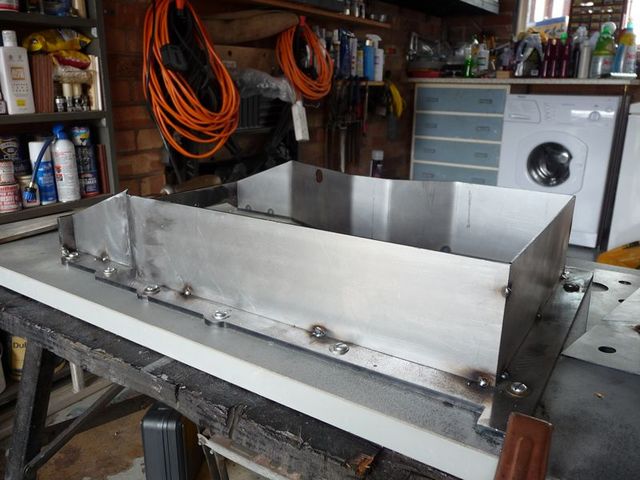
Sump build 4
The next step was to weld in the baffles. As I mentioned above I had already spent friday fixing in the flap valve parts. The rest is quite easy as I
had slots cut in the baffles so they literally slot together.
Sump build 5
Sump build 6
The next job is to bend the bottom plate to fit and to decide where the dipstick is going to be fitted so I can drill the hole in the side of the sump
for it. I think this will end up toward the back of the sump, and I will be retaining the std mondeo dipstick and tube.
Drain plug fits in the hole in the side which you can see in the pics. Need an M14 nut with one side ground down to suit then a std pinto drain plug
and sealing washer can be used.
All in all its going quite well....I think.....
David
Sera
http://www.motosera.com
|
|
|
goaty
|
| posted on 21/6/09 at 03:11 PM |
|
|
quote:
Originally posted by mangogrooveworkshop
http://k80rum.co.uk/default.aspx
super charger upgrade?
That is the perfect link, exactly what i am building at the mo, very helpful thank you.
|
|
|
flak monkey
|
| posted on 25/6/09 at 05:30 PM |
|
|
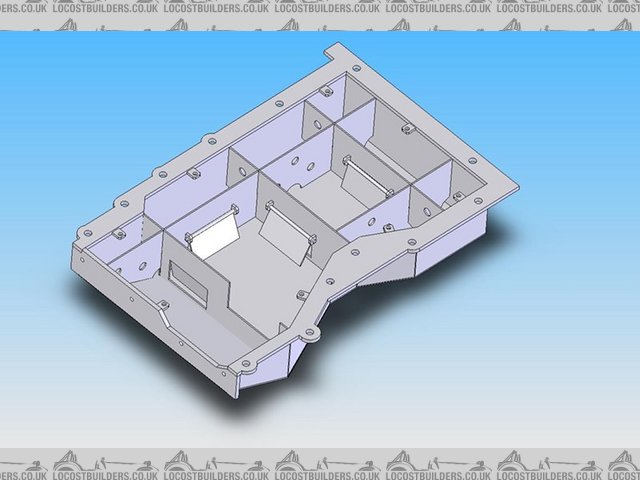
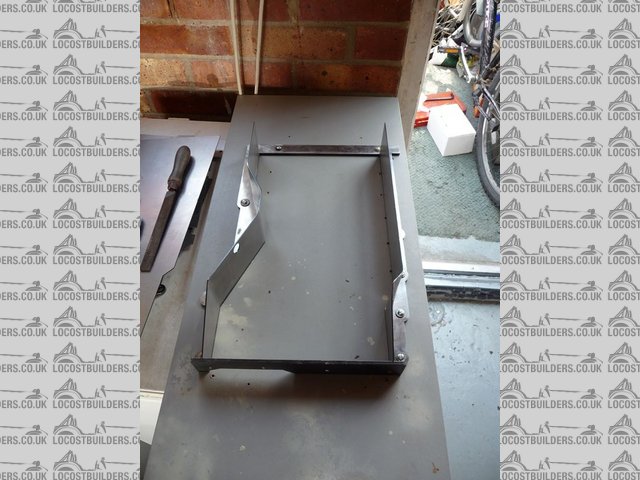
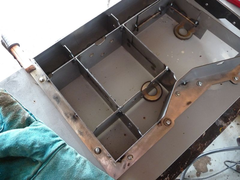
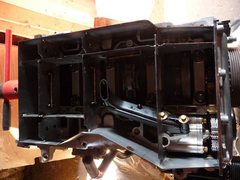
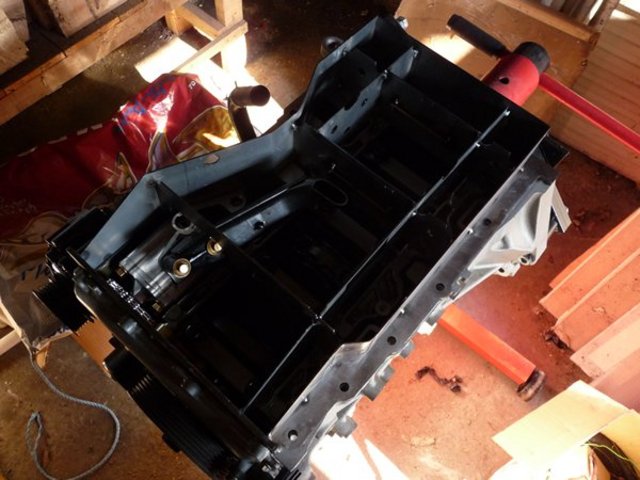
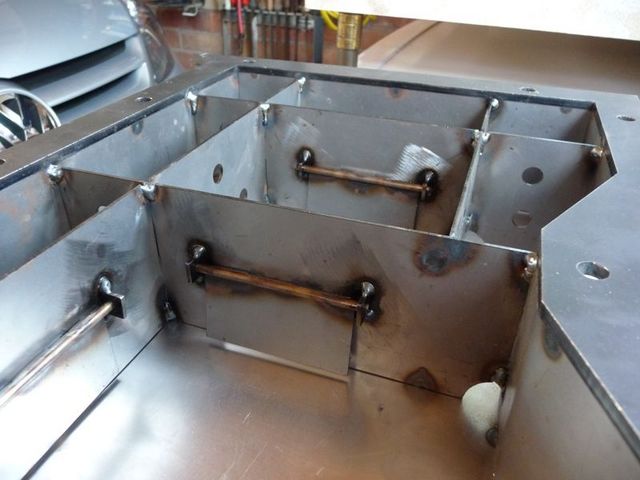
More progress on the sump construction.
Everything other than the bottom is tacked on now. There is still the windage tray fitting to work out as well.
May have got a bit carried away with shortening the pickup pipe though, what do you think? The pipe angle is the same as the mondeo std i.e the end is
angled to the bottom of the sump. The closest end is within 5mm of the bottom and the other end is 9mm away. Too far or will it be ok?
It will be submerged in a total of 70mm of oil when the oil level is at max.
Sump build 7
Sump build 8
Sump build 9
Sera
http://www.motosera.com
|
|
|
Stuart_B
|
| posted on 25/6/09 at 07:28 PM |
|
|
this is a good progress, so doe sthe engine need to be moved back 3inchs?
just as me and my dad want to convert my kit car from a 1.6 pinto to a 2.0duratec engine during the winter.
as well the sump desing, i would love to beable to do that on a coumputer.lol so if i did do the conversion at the moment it is just talk between me
and dad, and mum saying, maybe.lol would i you send me the drawing so i can get it made?
as well does the exhaust ports look simlar to a pinto one?
and could i get bike carbs running mejafolt instead of throttle boddies and megasquirt?
sorry for all the questions david.
thanks
stuart
black mk indy, 1.6pinto on cbr600 bike carb's.
|
|
|
flak monkey
|
| posted on 25/6/09 at 07:39 PM |
|
|
Hi Stuart,
Engine doesnt need to be moved back, but its worth it if you can. The reason you can is that you need to use a hydraulic clutch which means there is
no release arm to fit into the transmission tunnel.
The sump will be available as a kit from 3GE components soon. I just need to finish my prototype off and tweak a couple of bits on the design.
Pinto exhaust can be modded to fit the duratec yes. Port spacing very similar.
You could run it on bike carbs, but I wouldnt expect to see the power you can get from a big set of inection throttle bodies. SBD got 175bhp on 48DCOE
carbs and 198bhp on 48mm throttle bodies.
David
PS havent you added me on MSN?
Sera
http://www.motosera.com
|
|
|
Stuart_B
|
| posted on 25/6/09 at 07:54 PM |
|
|
hi david, thanks for the info, so woth geeting bike throttle bodies then, with those figures, how hard is it to set up, as i am not very good, manily
never done any of that before.lol
yes edd, gave me you msn, just aint on it anit the moment, so throught i would ask on here.
i will pseak to you soon on msn, more stupid questions.lol
thanks
stuart
black mk indy, 1.6pinto on cbr600 bike carb's.
|
|
|
flak monkey
|
| posted on 28/6/09 at 02:19 PM |
|
|
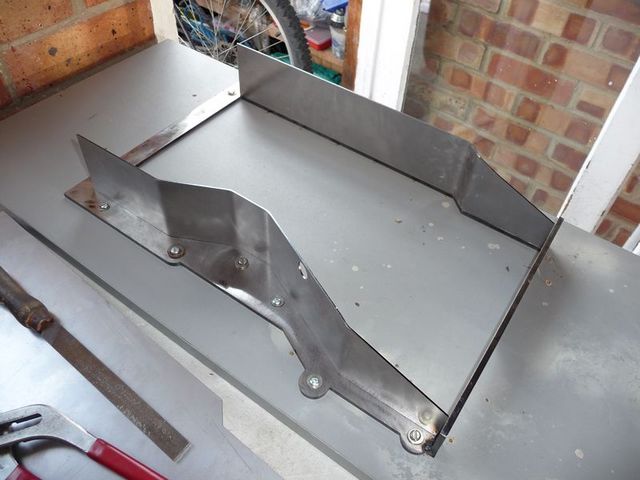
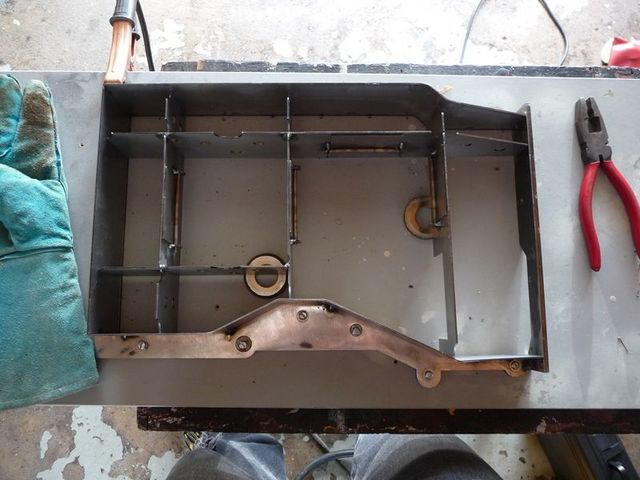
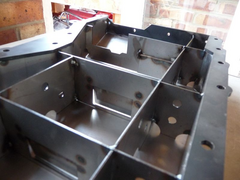
More sump progress and piccies.
Also decided to get another pick up pipe and have cut it so its parallel with the bottom of the sump, and 5mm clear.
Final job before getting it all TIG'd up is to decide on the position of the dipstick and get the tube welded on. Think its going to go exhaust
side as there is less in the way! 
Sump build 11
Sump build 12
Sump build 13
Sump build 14
Also finished off the fuel rail, all bar some spacers for the bolts which I'll make this week. And test fitted the laser cut inlet manifold
flange which fits beautifully. I designed it so I could cut away the small lips on the bottom of the inlet ports on the head. What looks like a lip in
the pics is'nt its just where the ali is shiney where I filed it away.
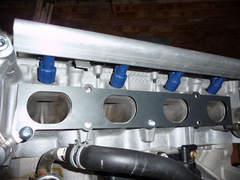 
Inlet manifold plate test fit
The tube has arrived for the manifold too. Was a bit tricky to find (48mm OD (1 7/8" ) but got some in the end. Three of the inlet tracts will be
straight (cyls 2-4) and cyl 1 will have a slight angle as the TPS sensor interfered with the belt tensioner otherwise. The trickiest bits going to be
making the angled runner nice and smooth and belend into the odd shaped inlet ports. ) but got some in the end. Three of the inlet tracts will be
straight (cyls 2-4) and cyl 1 will have a slight angle as the TPS sensor interfered with the belt tensioner otherwise. The trickiest bits going to be
making the angled runner nice and smooth and belend into the odd shaped inlet ports.
Oh well, another challenge which I am sure can be overcome....
David
Sera
http://www.motosera.com
|
|
|
Stuart_B
|
| posted on 28/6/09 at 05:07 PM |
|
|
that is looking good, so in the sump, are thoses flaps to let oil float freely around, then stop it lossing oil in hard turns?
stuart
black mk indy, 1.6pinto on cbr600 bike carb's.
|
|
|
flak monkey
|
| posted on 28/6/09 at 05:29 PM |
|
|
The idea of the flaps is to allow oil to flow around freely under normal circumstances and then under hard acceleration/braking/cornering they will
retain the oil in the pick up area.
There are small notches in the baffles too to allow oil to flow around slowly too.
There is also a windage tray to stop oil sloshing up the sides of the block in the corners.
Basically its all about slowing the surge of oil down but it still needs to flow around under normal circumstances.
Sera
http://www.motosera.com
|
|
|
goaty
|
| posted on 23/7/09 at 07:48 PM |
|
|
hey flak,
any news on the sump progress??
|
|
|
flak monkey
|
| posted on 23/7/09 at 07:54 PM |
|
|
Yeah, it all fits, just waiting for it to be finish welded by a friend who'll make a better job of it than me.
Will get the finished laser cutting drawings off to the cutters this week too. A few slight tweaks were needed, but nothing major!
Not been able to get in the garage for a while, been busy with other things unfortunately.
David
Sera
http://www.motosera.com
|
|
|
goaty
|
| posted on 24/7/09 at 05:53 PM |
|
|
cool, is it ali or steel??
cant wait to see it done, am hoping to get one for mine too
|
|
|
flak monkey
|
| posted on 24/7/09 at 07:56 PM |
|
|
quote:
Originally posted by goaty
cool, is it ali or steel??
cant wait to see it done, am hoping to get one for mine too
It is steel, but there is no reason you couldnt have one cut in ali, would have to get a price for it though.
Only reason I did it in steel is I dont have access to aluminium welding equipment
Sera
http://www.motosera.com
|
|
|


.jpg)


