Irony
|
| posted on 11/2/10 at 11:47 PM |

|
|
Rover V8 Rebuild Thread. Wet Disaster!
Continuing with my 'I know naff about cars or engines but I am going to build anyway' kit car build. This is going to be my engine strip
down and rebuild thread.
All advice on the below is very very welcome and absolutely essential because without you guys I wouldn't be able to do this.
As my previous thread states there is oddness in the bores of my 3.5lr Rover V8 having twirled a cable tie down there and pulling out brown goo.
Heres the strip down.
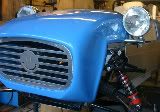
This first image is of the complete engine - I know you all know what it looks like but I am telling a story.
Description
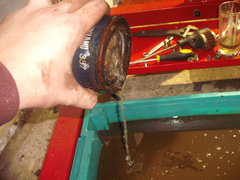
First thing I did was to pull the drain plug and my oh my a gallon of water poured out followed my mud coloured oil. Poured out for ages.
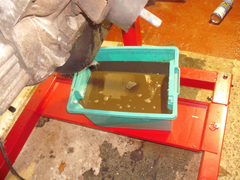 
Description
Even I know that this is bad. Next the filter, more water
[img]
Description
[/img]
With the Offen and the Holley off, that left the valley gasket to come off. It didn't want to come off but I mostly saved if for reference at a
later date.
[img]
Description
[/img]
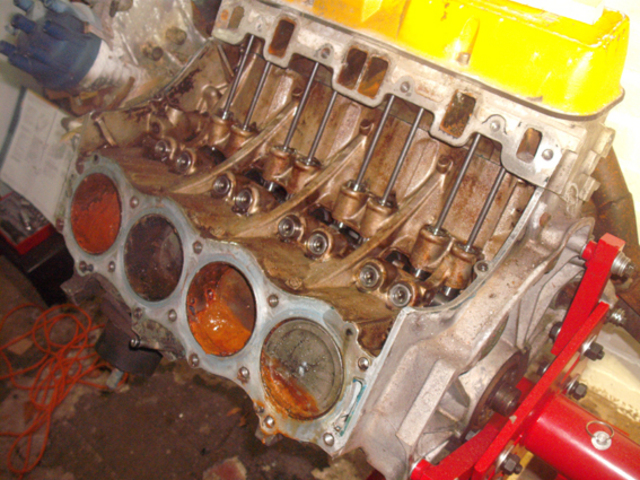
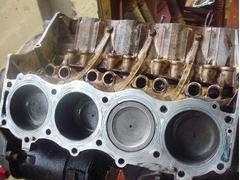
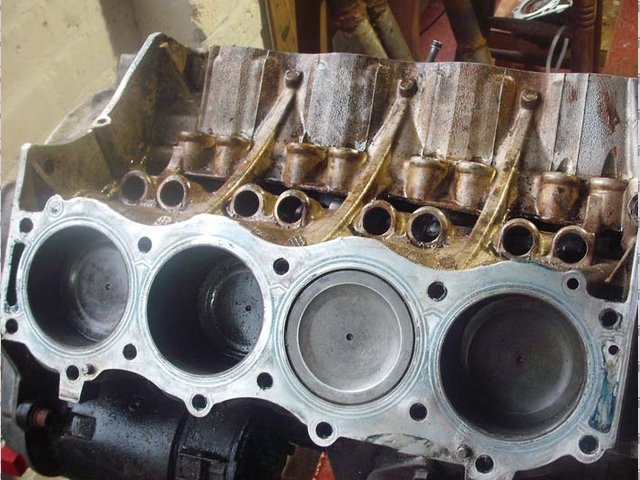
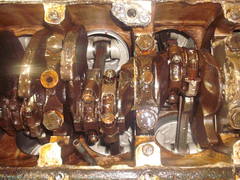
The rods, cam and followers look in brilliant condidtion, new in fact. I was completely shocked by this. It looks like its hardly been used. Also
notice the thick ribbing in the valley going from one side to another. The very early 3.5 engines had thin ribbing according to my books.
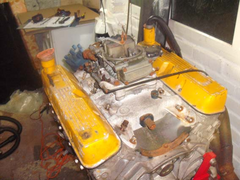
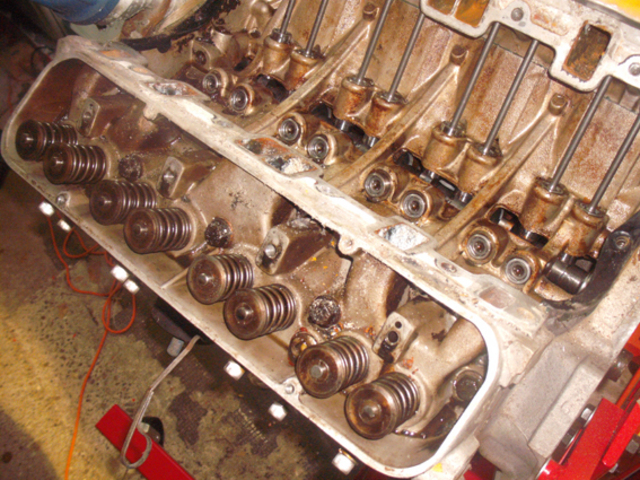
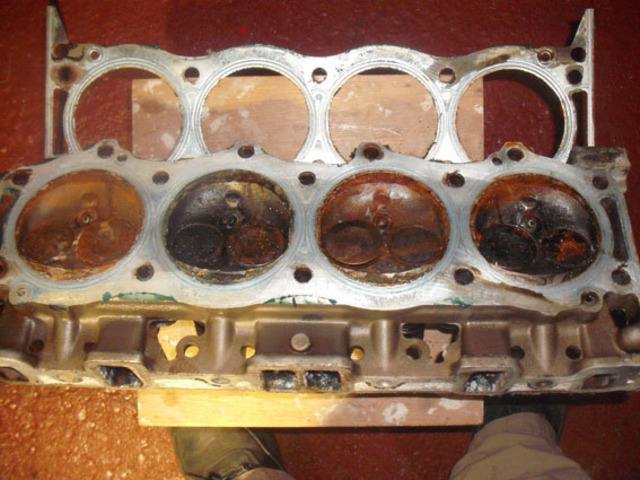
After taking the valve train off in one piece and keeping everything in good order it was time for the heads. Sigh.
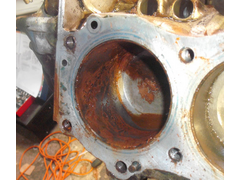
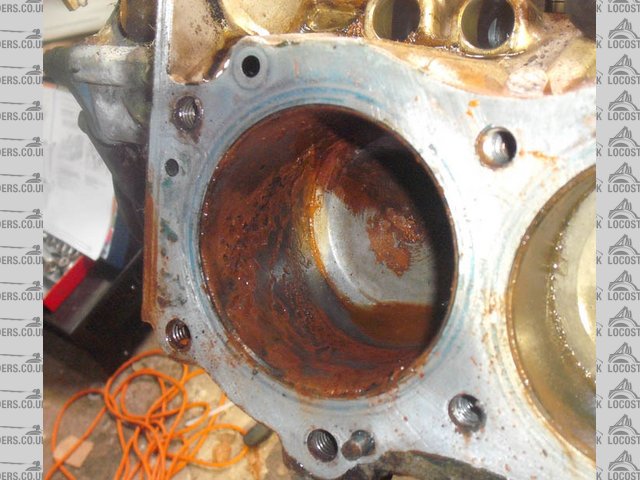
Description
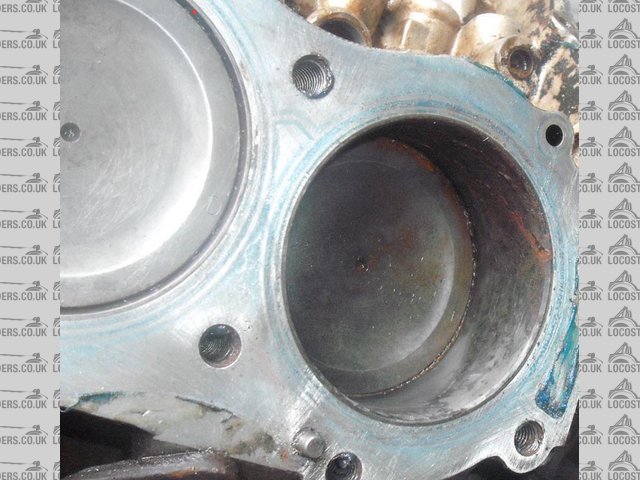
There is caked water and rust in there, the walls of the bores are corroded to hell, its full of goo and sludge. There is no sign of a gasket leak
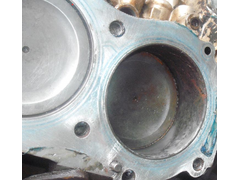
anywhere though or signs of overheats. Also no ridges on the good bores, no signs of wear.
The underside of the heads look kinda okay though. They look rusted in the photo but its just stained. They would clean up I think. But I am not a
expert.
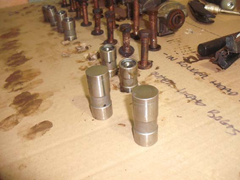
Description
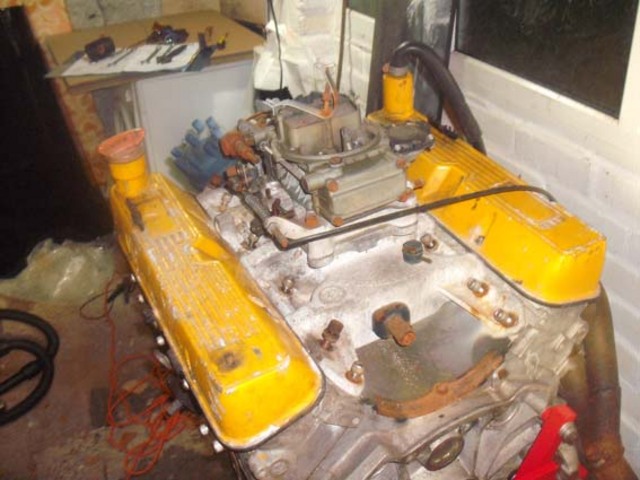
The followers came out as easy as wink and they are barely marked let alone worn. The cam looks to be the same.
Its getting late now so I decided to finish my evening with the joy of removing the sump
[img]
Description
[/img]
[img]
 
Description
[/img]
Please can you guys advise me what to do with this. I have another 3.5 lr V8 that is also of unknown quality. Could these seemingly good condition
parts be used on that, or is that a bad idea. What are my options on this block? Please give me your thoughts.
Thanks for the replies in advance
[Edited on 12/2/10 by Irony]
|
|
|
|
|
prawnabie
|
| posted on 11/2/10 at 11:50 PM |
|
|
You need to find out where the water was getting into the oil before you carry on id say
|
|
|
blakep82
|
| posted on 11/2/10 at 11:53 PM |
|
|

not cool
________________________
IVA manual link http://www.businesslink.gov.uk/bdotg/action/detail?type=RESOURCES&itemId=1081997083
don't write OT on a new thread title, you're creating the topic, everything you write is very much ON topic!
|
|
|
hillbillyracer
|
| posted on 12/2/10 at 12:04 AM |
|
|
I've no personal experience of these engines but for the money they can be picked up for I think you need to be looking for another one, &
indeed you have another to play with!
The rust will have played havoc with the piston rings & bores & the water is everywhere, if it had just stood outside & got water in then
it would be in the ports, bores & sump. Water in the oil filter suggests it has been run with water in or been so full of water that it's
just got everywhere. Neither is good!
I've stripped, cleaned & reassembled an engine in similar condition bore-wise & made it run having fitted no new parts apart from one
oil control ring (snapped it trying to free it) & manifold gaskets but it was a real minimum spent & there were no alternative engines
available.
|
|
|
Canada EH!
|
 posted on 12/2/10 at 02:22 AM posted on 12/2/10 at 02:22 AM |
|
|
Ok, before you forget, mark were each lifter, pushrod, and rocker came from.
Same with the pistons and rods, keep them together until you start machining the block. Make sure you mark each rod and cap by number (best to use a
number punch) Same thing with the main caps.
Now clean the block, have a machine shop check the bores to see if they can safely be bored for larger pistons.
If the bores can be saved, next line bore the main bearings and have the rods checked for straight.
These engines were the first Ali American engines so they were over built.
The crank main caps and connecting rods need to go back were they came from.
With the amount of water in the engine I would replace the pistons, cam and lifters. American cams come in kits that way, old lifters on new came
will destroy it, same for old cam new lifters.
As far as the water, have the machine shop check the surface of the block and heads for warpage, if it's minimal a light resurfaceing of both
items will bring them back and you pick up a little compression.
Last, when you mill the heads or block of a V8 you also need to take an amount of metal off the intake manifold so it will sit back in the valley.
Sorry this is being so long, but you asked.
|
|
|
02GF74
|
| posted on 12/2/10 at 07:48 AM |
|
|
whne you say muddy, do you really mean muddy or just brown coloured?
put that lovely sludge in the sump between your fingers - can you feel any grit?
muddy would mean the engine was in an offroader, e.g. land rover but I suspect the latter and would guess that it was stood outside.
are the bores pitted or just surface rust?
also look at journals on crank and camshaft lobes - same question there.
pitted means recon - look into that but as ^^^, 3.5 v8 are two a penny.
remember cost will be 2x since you have 2x cylinders.
check out paddocks and craddocks (land rover spares) for cheap v8 parts.
note that cheap in this case can me cheap and nasty too.
also rimmer bothers for v8 spares.
you will learn from the taking apart plus you look like you have usuable followers so it hasn't been a waste of time.
[Edited on 12/2/10 by 02GF74]
|
|
|
mookaloid
|
| posted on 12/2/10 at 08:47 AM |
|
|
that looks like scrap to me - you could probably get it going but it will cost loads more than another good second hand engine.
cheers
Mark
"That thing you're thinking - it wont be that."

|
|
|
Irony
|
| posted on 12/2/10 at 09:15 AM |
|
|
The bores look totally shagged to be honest - well at least one of them is.
Like people said above - looks like a rebore but I shall have to look into costs. Second hand V8's are quite cheap, I shall have to get some
prices as well.
|
|
|
marcjagman
|
| posted on 12/2/10 at 09:17 AM |
|
|
It could have been left outside and water got in through the valves that were open
|
|
|
boggle
|
| posted on 12/2/10 at 09:23 AM |
|
|
60 squid for one in our scrappy next door, but you have to remove it yourself...
just because you are a character, doesnt mean you have character....
for all your bespoke parts, ali welding, waterjet, laser, folding, turning, milling, composite work, spraying, anodising and cad drawing....
u2u me for details
|
PLEASE NOTE: This user is a trader who has not signed up for the LocostBuilders registration scheme. If this post is advertising a commercial product or service, please report it by clicking here.
|
l0rd
|
| posted on 12/2/10 at 09:39 AM |
|
|
Atm, i would get another engine and keep this as a project.
Me thinks as a B-turbo conversion with bike carbs
|
|
|
Irony
|
| posted on 12/2/10 at 11:00 AM |
|
|
quote:
Originally posted by l0rd
Atm, i would get another engine and keep this as a project.
Me thinks as a B-turbo conversion with bike carbs
Great idea!!! But as this is my first kitcar (will be, hopefully!!) and my first rear wheel drive I don't really need to much power lest I bin
it pulling out of the drive.
|
|
|
NS Dev
|
| posted on 12/2/10 at 11:03 AM |
|
|
Use that one for spares and get another.
The cams and followers are usually the worst bits, so still useful for spares as yours look good in the pics
In terms of keeping the bits together.....if you use the followers and cam in another engine, get yourself a nice flat pieece of glass, stick some 800
grit wet and dry paper to it with WD40 and carefully linish the faces of the followers to remove any marks and leave an even finish, then it
doesn't matter which cam lobe they go on, they are effectively new.
Retro RWD is the way forward...........automotive fabrication, car restoration, sheetmetal work, engine conversion
retro car restoration and tuning
|
|
|
mangogrooveworkshop
|
| posted on 12/2/10 at 01:30 PM |
|
|
I would take it off your hands and just use the block and pistons.......giving all the rest of the parts.....mmmmm Table
|
|
|
D Beddows
|
| posted on 12/2/10 at 01:40 PM |
|
|
Get another engine without a doubt - BUT don't bin this one, I always like to have a spare engine on hand if I'm building one because you
have double the number of parts to choose from for one thing!
Take this one apart, learn how everything fits together (and discover all the awkward bits you might break when it actually matters!) - clean
everything up and the next one will be a breeze, you'll have loads of spares and much more experience - simples 
|
|
|
blakep82
|
| posted on 12/2/10 at 01:47 PM |
|
|
yep, take it all apart, but it all back together (without buying any new bearings etc for it) and if you don't have any spare bits left over,
you've done a good job 
________________________
IVA manual link http://www.businesslink.gov.uk/bdotg/action/detail?type=RESOURCES&itemId=1081997083
don't write OT on a new thread title, you're creating the topic, everything you write is very much ON topic!
|
|
|
Canada EH!
|
| posted on 12/2/10 at 02:48 PM |
|
|
I forgot something, on the back of GM engines just above the rear cam bearing there are two welch plugs (like the ones on the side of the block but
smaller) these are the oil galleries for the lifter lubrication, pop them out and use a rifle bore brush to get the gunk out.
Normally when we rebuild cast iron engines we soak them in a caustic soda hot bath for a day then clean with water pressure and compressed air, you
can't do that with and Ali block.
|
|
|
Angel Acevedo
|
| posted on 12/2/10 at 07:41 PM |
|
|
LAB Rebuild
I downloaded this for my use.
Moderators, please remove if against copyrights....
(It has the source at the bottomm of each page.
HTH.
AA
Beware of what you wish.. for it may come true....
|
|
|
Paul (Notts)
|
| posted on 12/2/10 at 08:04 PM |
|
|
My first thoughts looking at it are ...
its been outside for a long time and water has enetered via the holly carb which wa left open. then down the inlet manifold into the bores and then
dripped down into the sump, almost looks like limescale has formed as its dripped down over a period of time.
Valley and followers look clean so V good
strip ( label) clean and examine it. At least you will learn how to rebuild one. Between this and another engine you will have a good one.
Dont write this one of yet. RV8 will take a lot. If the block has not cracked the bores may clean up with a rub and hone. - every thing else including
the heads will clean.
Paul
If you dont have a RV8 workshop manual I can post one on disc.
ps this was mine at the start - now 180BHP at wheels with 200BHP planned for this year.
 
Rescued attachment engine 019.jpg

|
|
|
Irony
|
| posted on 12/2/10 at 08:16 PM |
|
|
I am not writing it off just yet, at the very very least its a great learning process for me. I am bagging, writing notes, taking photos etc etc as I
go along.
I would agree with the theory about it being left in the weather except for the water in the oil pump and the fact that a lot of horrible creamy oil
came out. Like it's been whisked up, like mayo. Does water oil combo do that if left standing. I will see some sort of damage if it has been
driven into water I think. Tonight and tomorrow morning will tell.
Thanks for the offer of the Manuals but I think I have them all. I have all the workshop and overhaul manuals and a couple of boxwrench DVD's
which are awesome.
|
|
|
Paul (Notts)
|
| posted on 12/2/10 at 08:21 PM |
|
|
If the engine has been turned over by hand then the water will end up in the filter ect. any movement will have mixed the oil and water.
If it ran with water in then there will be totally worn bearings and the followres cam will be badly worn which they dont look. Rocker shafts would
also be badly worn.
edit
mine had worn main bearings any way, nice shiny copper colour coming through.
[Edited on 12/2/10 by Paul (Notts)]
|
|
|
Irony
|
| posted on 15/2/10 at 12:34 AM |
|
|
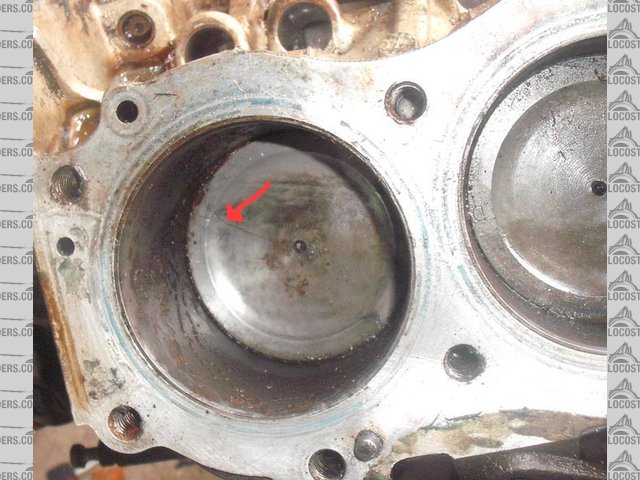
Continuing with the strip down. Here are some updated pics of how far I have gotten over the weekend. Things look a lot pleasanter since I have
gotten rid of all the goo and muck.
I did however notice a worrying crack on one of the pistons. Well it might not be a crack just a score on the piston top.
Description
Description
Description
Description
Description
See the worrying crack/score marked by the red arrow.
The one bore is quite badly covered in surfaced rust and I am not sure what to do about it at the moment. However my brother is visiting this week
and he knows engines inside out blindfolded so hopefully he'll be able to inspect it first hand.
As always advice greatly appreciated!
|
|
|
Andy S
|
| posted on 15/2/10 at 10:48 PM |
|
|
Before you get too far down the road with that engine whats the block reference and whats the CR stamped on it? its a particularly odd looking block
casting.
Personally - bin it start with at least a 3.9
Andrew
|
|
|
Irony
|
| posted on 16/2/10 at 12:08 AM |
|
|
its 9.35:1 can't remember the engine number but its some thing like 17D0000000B
|
|
|
Andy S
|
| posted on 16/2/10 at 05:41 PM |
|
|
80's 3.5 - Cut your losses now - have a play and consider it a learning tool but a running 3.9 from 95ish will set you back no more than the
gaskets etc. on that 3.5 and is a far better proposition and provide more power by CC and better heads.
The Holley if a list 8007 is a good enough carb and the Offy's are ok as long as its not revving.
It may well clean up OK but gaskets bearings rings hone etc are all going to add up and you would be better off spending it on a bigger engine to
start with.
Andrew
|
|
|