Locost Project Threaddaveb666 - 7/6/13 at 09:59 AM
As I've owned my Locost for a few weeks now I thought it was probably about time I put a project/diary thread up as a record of what I get up
to.
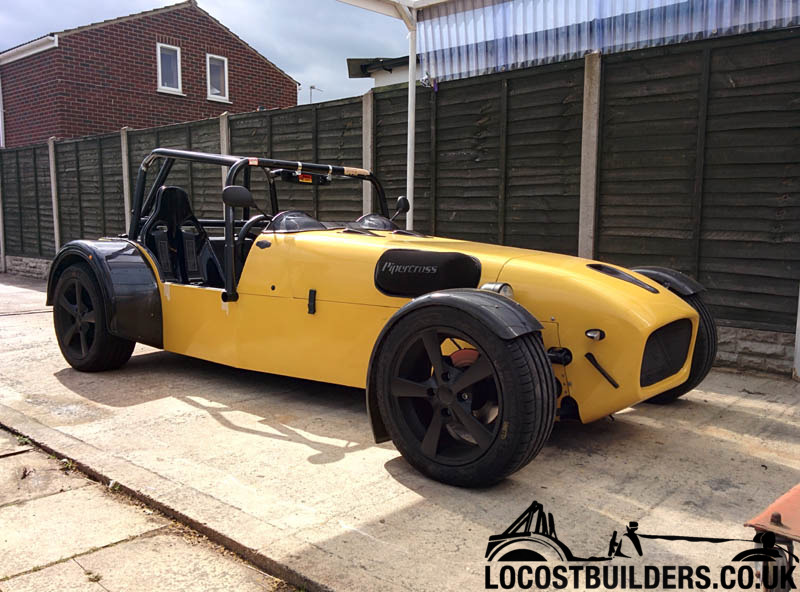
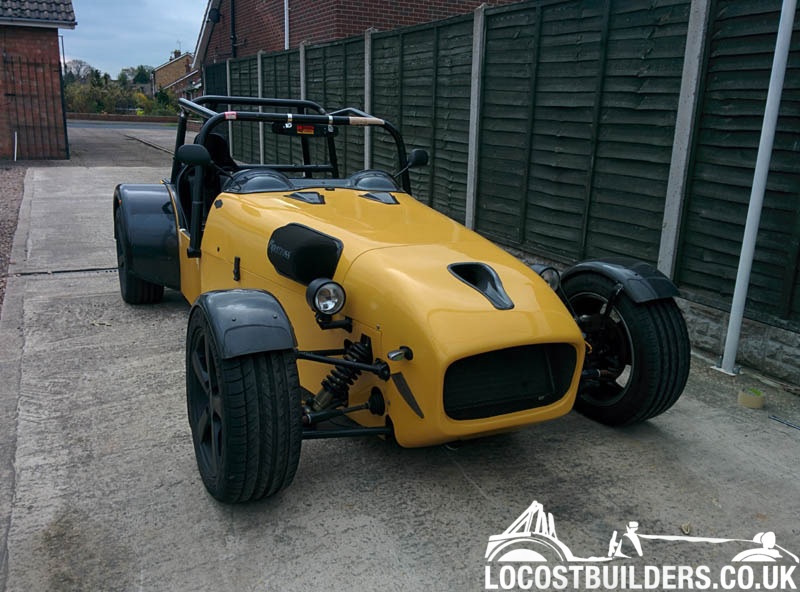
Firstly, this won't be a 'build' thread. The car was 99.9% complete when purchased from "big_wasa" and pretty much just
needed to be put through an IVA to get road-ready.
Apologies for picture quality, most are taken on my mobile
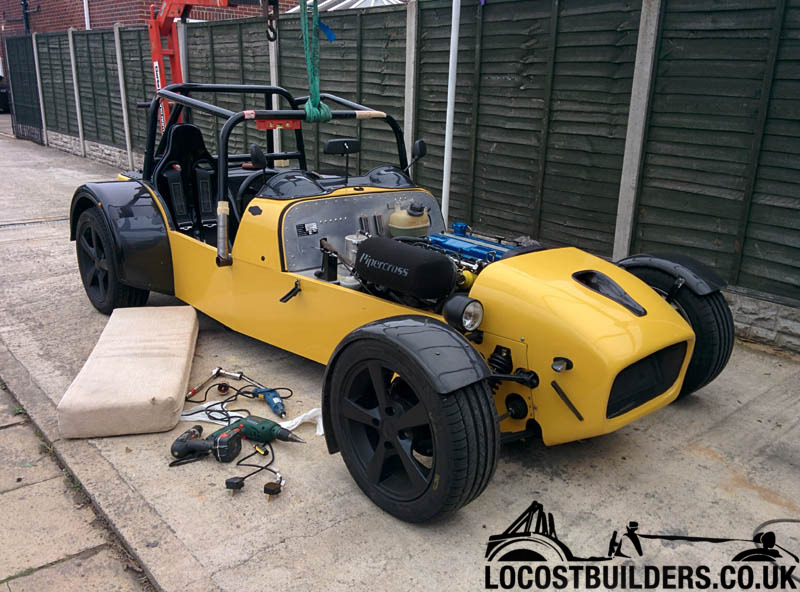
Spec from the advert:
2.0 Zetec rebuilt pre aug 95 with letter from ford.
fuel injected
Scholar sump
Scholar lightened flywheel
Dunnel alternator kit
Mt75 gearbox
Fisher stainless exhaust manifold
Capri atlas axle
Cortina fronts
Gaz shocks
D&F prop
Cai dials
Obp pedal box
Obp fuel tank
Obp catch tank
Mk2 escort steering rack Quick ratio 2.9:1
Front wish bones 4" wider than stock to match the atlas rear axle
Sierra column
Momo 10" caterham steering wheel
Gts fiberglass
Descent 15" alloys pug offset
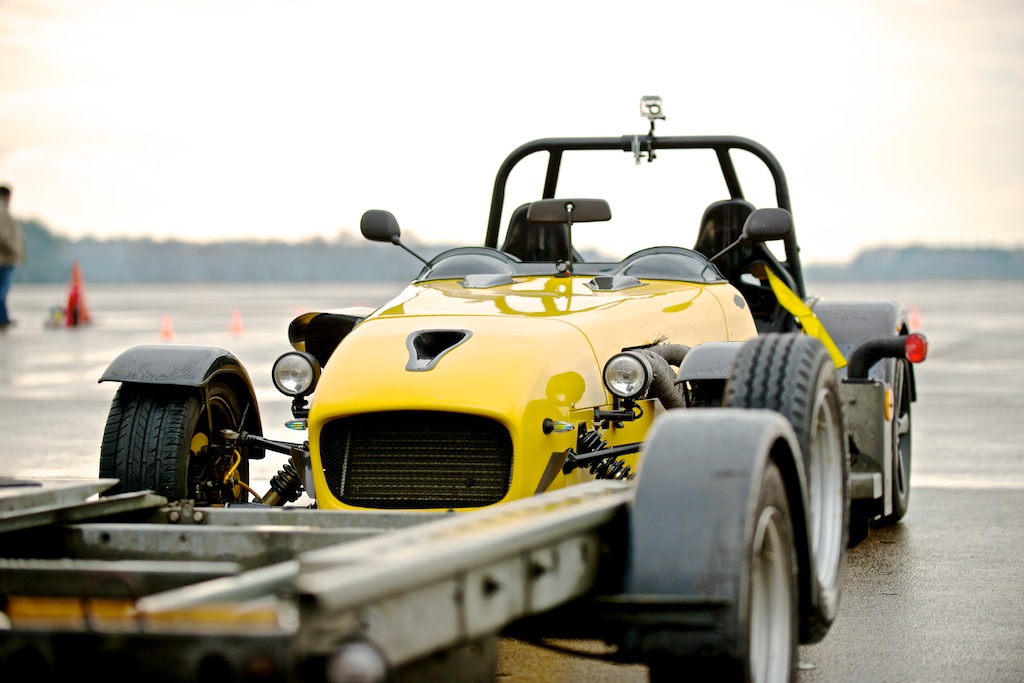
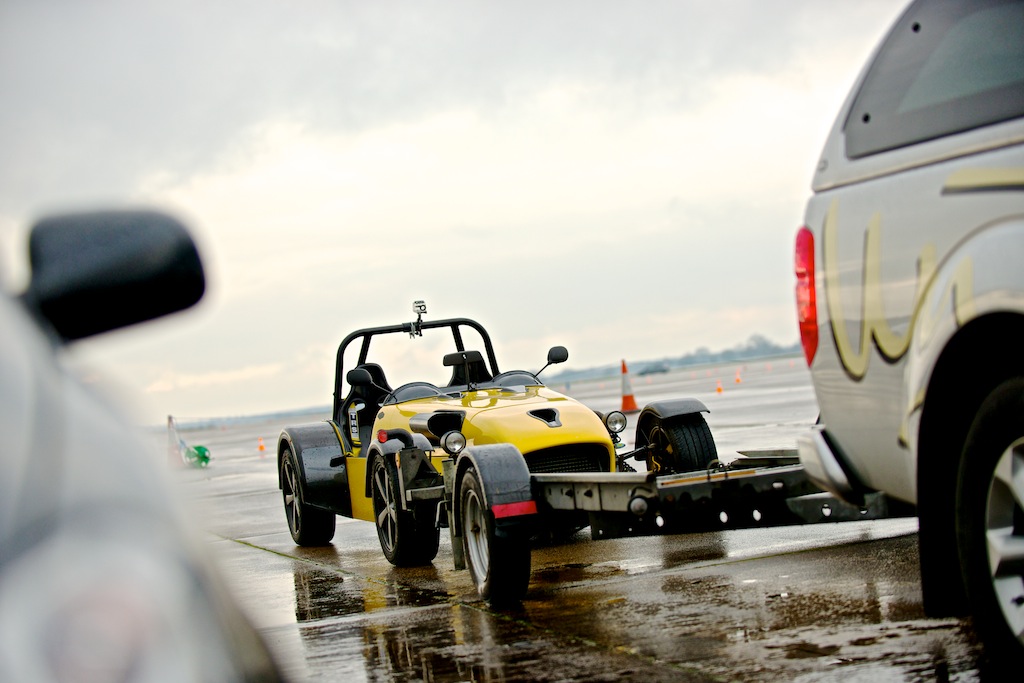
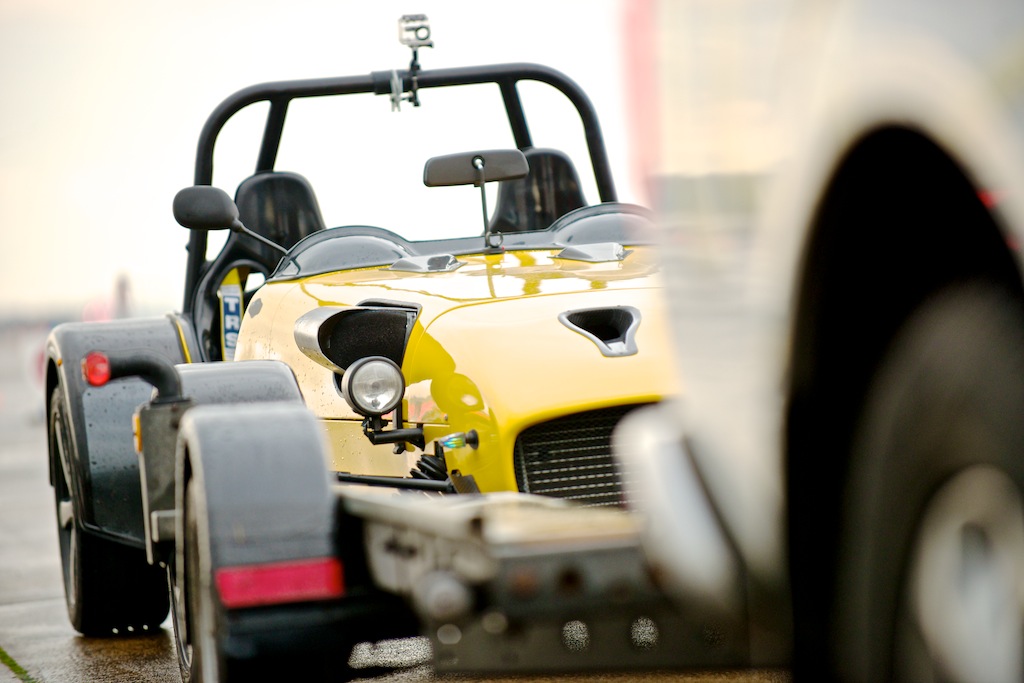
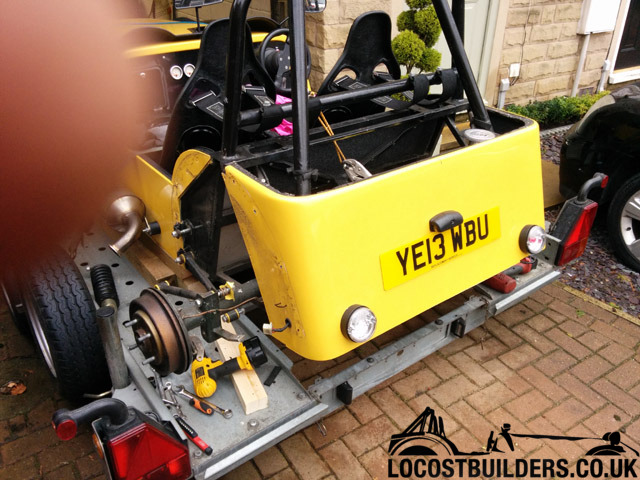
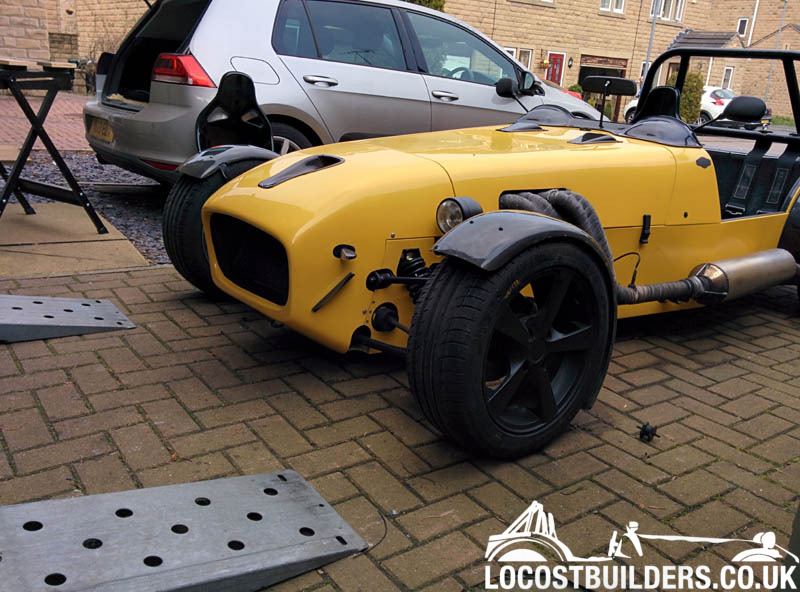
So after agreeing a deal with Warren, I left got the car transported back home. Warren told me a bout a few little IVA jobs that would need doing, so
whilst the IVA application paperwork was winging its way to VOSA, I took the usual 'pre-IVA' pics for people to look for things that may
need sorting.
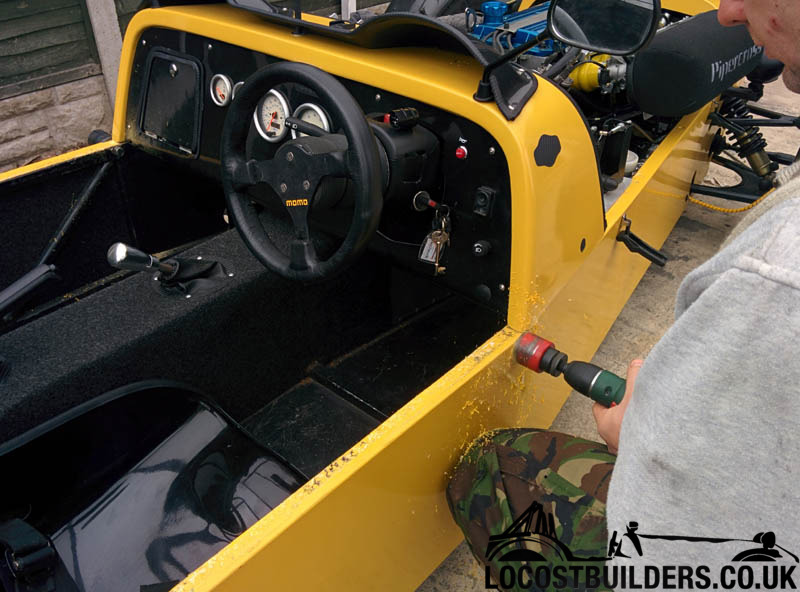
Breather pipe from the rocker cover to the catch tank needed purchasing and fitting Description
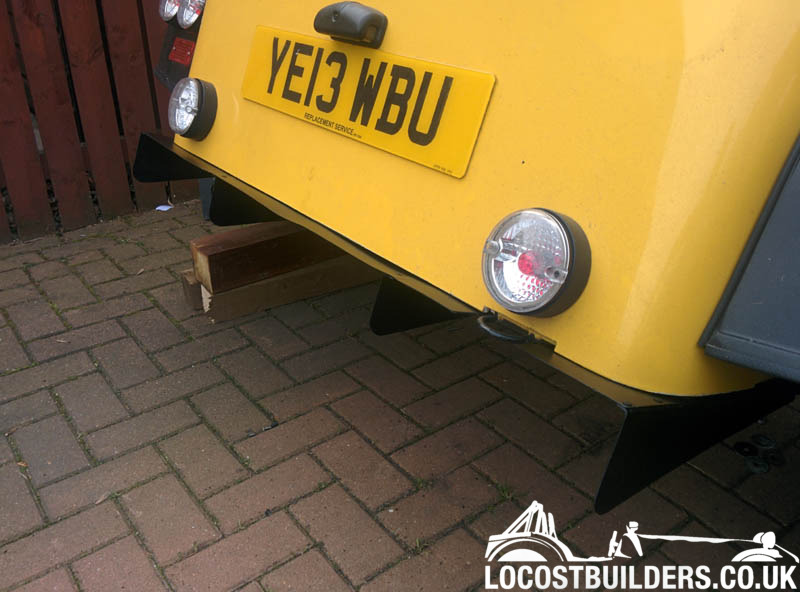
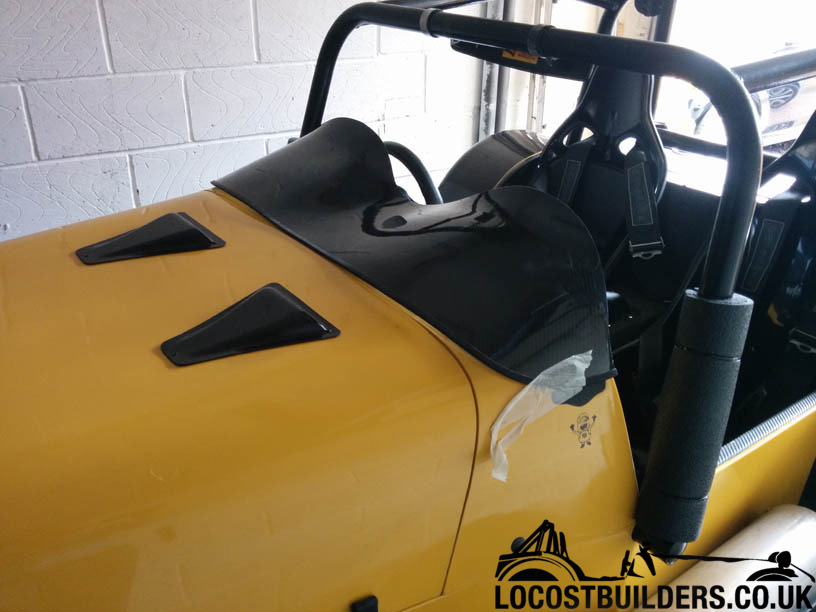
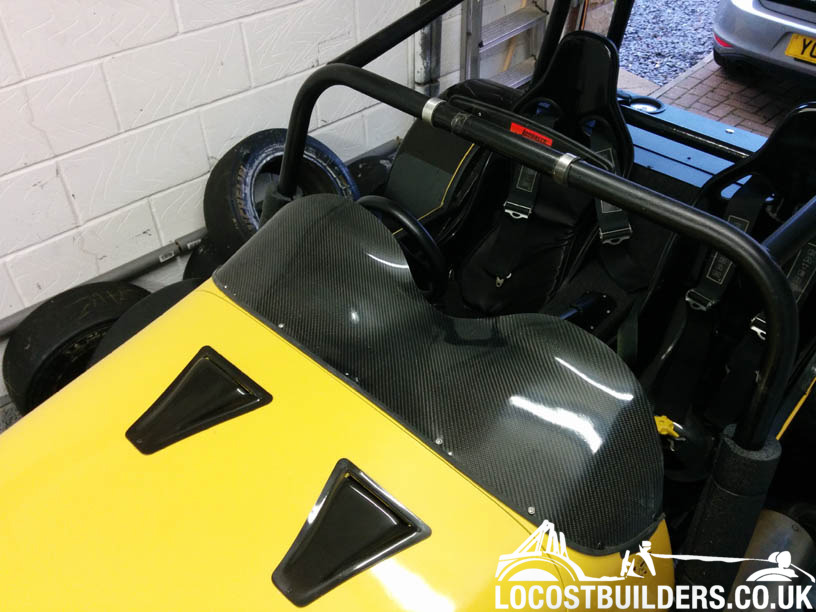
It was suggested that it would be prudent to put some sort of threshold cover on for the IVA, and to prevent scratches in future. I purchased some
Cope Moulding #11 from Click Metal and cut it to length. I wasn't keen on the bare metal though so wrapped it in 3M carbon fibre sheet.
I then phoned VOSA to chase my application, as it was over a week since I had paid. I was told that they are 3 weeks behind so my test date will be at
least 6 weeks away! :- So I decided to start tinkering as I had time to spare.
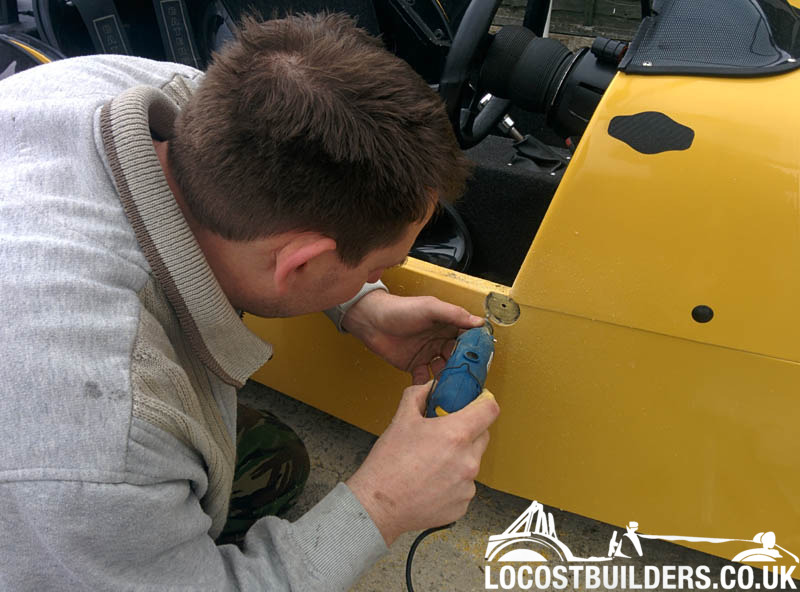
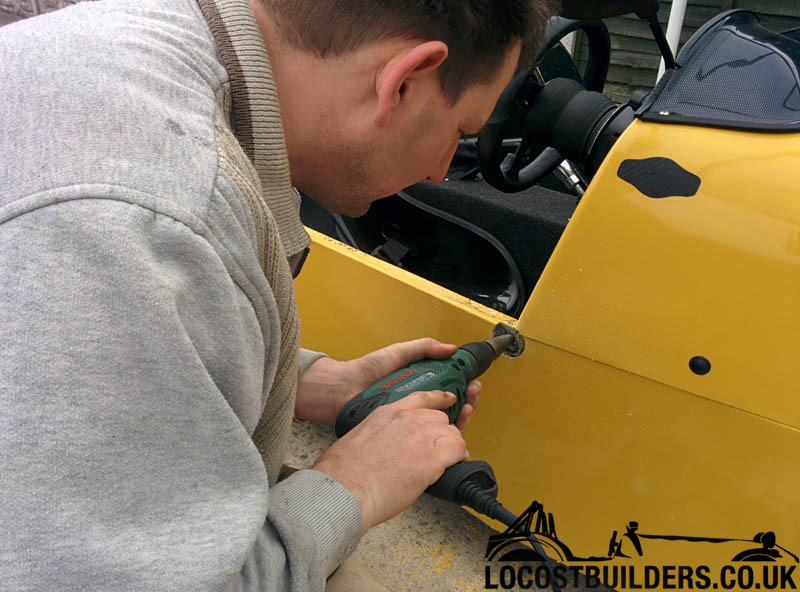
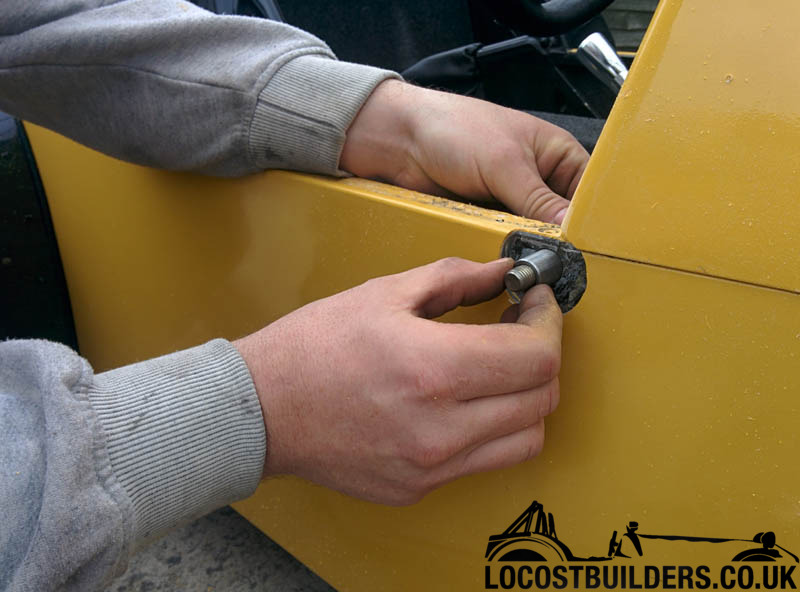
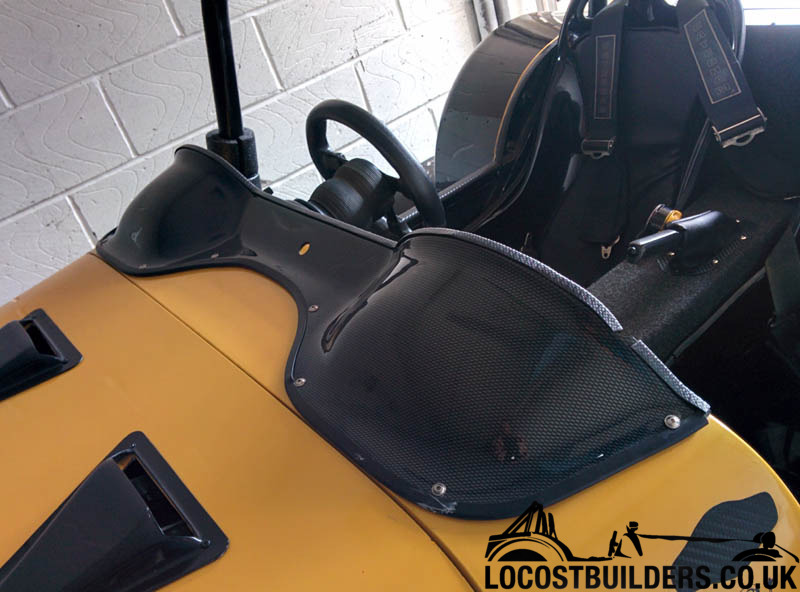
First job I wanted to do was to paint the mesh in the nose-cone as it was bare metal and starting to look a bit shabby.
While painting the cone, I decided it would be a good idea to carbon wrap the indicator brackets, so removed them from the nose-cone and
dismantled: Description
That's where I got to last night, will update the next bits.
Ben_Copeland - 7/6/13 at 11:33 AM
Looking good, be careful or you'll end up with the engine in bits upgrading stuff ;-)
coozer - 7/6/13 at 11:45 AM
Too much stuff in the skip! Apart from that looking good.
big_wasa - 7/6/13 at 01:51 PM
You not painted them light brackets yet Talking of lights did you find out why the O/s side one was on the slosh ?
daveb666 - 7/6/13 at 01:59 PM
quote:Originally posted by big_wasa
You not painted them light brackets yet Talking of lights did you find out why the O/s side one was on the slosh ?
Nope - the mounting screw was still in tight in the hole! Tried to open the springs that holds the glass in place but couldn't get it to budge
and was worried I'd end up smashing the glass, so I drilled a new hole in the lense cover and rotated it round into the correct place
@coozer; the skip is for the guy doing work on my house so not my concern lol
daveb666 - 25/6/13 at 10:00 AM
Got in, did the emissions test- failed. (Weird, water temp on 90 and car was very warm)
Gary (tester) said to let the car warm up some more. (Car fan come and on and off a couple of times it was that warm!)
Waited...waited...waited
Retested.... failed.
Asked Gary why it said "CAT" on his testing machine, and after a quick discussion it was agreed the car should be tested without a CAT on it
(1993 engine), oops.
Gary played around with the machine and 2 minutes later I got a pass straight away. Phew, on to the next bit!
Moved up on to the ramp up and turned the car off. Up and down we go and Gary looked under the car, around the front wheels etc. Light test all done
with some minor adjustments on the headlamps as expected.
Gary asked me to move the car forward and...it wouldn't start! Wondered if it was the battery, but turned over nice and fast! Waited 5 minutes,
same thing. BOLLOX!
Gary said he'd complete as much of the test as he could so I'd hopefully fall under the 3hr (�300!) re-test category.
I went back to the waiting room to sulk. 55 minutes later Gary waves me into the testing area,
"I've managed to get the car started so we'll carry on!!!"
Back to the waiting room I go, and another 90 minutes (2.5hrs in total) later Gary brings back the sheet of paper to the office, with the FAIL
information:
I am very annoyed with the seats failing as they where bought just for the iva after the introduction of the rear head rest.
They where bought from Midland wheels
And the baby cub has been fitted to hundreds of cars and gone through iva ?
Mirrors, guessed they where marginal on the edges.
Bias bar, Its funny how different vosa centres enforce the rules. Its a good job your nice and slim to get in there with the drill.
All in all a very good fail and I am very pleased for you
I would see if the hot start thing does it again. But I have got a few ideas.
daveb666 - 16/7/13 at 07:58 AM
So, new Mirrors ordered from Furore Products (top service Russ - highly recommended!)
Didn't want to make anyMORE obvious holes in the bodywork so fitted them through the edge of the aeroscreen; that way if I change at a later date
the edge trim will cover the hole I've made.
(edge trim still needed adjusting in this picture!)
Not sure I really like the look of the mirrors to be honest, but if it passes the IVA then that doesn't matter for the moment.
Needed some new seats so went for GRPs. After a previous post about the quality of some KAD seats I'd decided to buy them, but they didn't
have them in stock so I had to go for some more expensive ones from http://www.kitspares.co.uk/
The finish is probably the same as the KAD ones (same supplier probably) but they feel very solid. The guys at Kit Spares were great as well and the
seats arrived as told, 20 hours after ordering.
So, on to fitting my new seats. Eventually the drivers will be mounted on runners so the wife can have a drive, but for the moment I just banged it on
some bobbin mounts to get it level, and absorb some vibration
..and then realise you've not got enough black rivets
Dominator headlights going on next.
daveb666 - 22/7/13 at 06:03 PM
Had some more time this afternoon to look at the hot-start issue. I was speaking to a Ford Mechanic about what he thought the problem was, and he
seemed to think that it was fuel vaporisation due to the fuel pump being located in the engine bay.
So this afternoon I let the car idle and warmed up to around 95 (just before fan kicks) and kept my hands on the floor pumps. They were cool,
certainly not warm.
I let the car carry on running and then the fan kicked in; due to where the fan is, and where the engine sites all the hot air that the fan sucks
through from the rad heads straight down the inlet side of the engine - right on to the fuel pump. It felt like a hair dryer on the pump/filter.
By the time the fan had gone off the pump/filter were red hot; I guess that's the problem then!
Pump/Filter after some heat resistant wrap was added on to it: Description
Ran the car up again and let the fan come on and off and the pump was nice and cool still, hopefully that'll have sorted it.
big_wasa - 22/7/13 at 06:09 PM
gets some vents cut in the bonnet to let the air out.
daveb666 - 26/7/13 at 07:12 AM
I wanted to replace my 'friendly' front indicators every since I saw some motorbike ones on a stunning white MK at Newark. I'd already
bought them and was just waiting to get through the IVA procedure before fitting.
Yes I know they're little but loads of cars have these and they are, surprisingly bright.
Whilst fitting these, I'd noticed that the induction kit was right behind the radiator, which can't help with cool air so, after spying a
discount Carbon NACA duct I set to work fitting it.
(All likelihood is this will be redundant once the TBs go on but I like the look of it, and any cool air in to the engine bay can't be a bad
thing)
You want some vents at the back of the bonnet to let the hot air out.
Have you took them head light spacers out yet ?
daveb666 - 26/7/13 at 11:32 AM
Yeh i know; can't decide on the design yet though and was itching to get this vent in
Headlight spacers? The headlights are coming off next week to be replaced with black Dominator ones to hopefully 'harden' up the front of
the car a bit.
loggyboy - 26/7/13 at 11:38 AM
quote:Originally posted by daveb666
Pump/Filter after some heat resistant wrap was added on to it: Description
Assuming the pump generates its own heat wont this be insulating it? Surely the wrap should be on a small sheet of metal thats between the pump and
the other heat sources?
big_wasa - 26/7/13 at 11:40 AM
Yeh the headlights are jacked up on spacers to meet the min height for iva.
daveb666 - 26/7/13 at 11:44 AM
oic. The dominators are going to be mounted straight to the 25mm tube (hence my question earlier in the week) so the spacer mount at the end will be
chopped off
daveb666 - 31/7/13 at 07:42 AM
So on Monday I passed my DVLA inspection - now just a waiting game for the paperwork.
I bought some Dominator headlights a few weeks ago as I wanted to replace the chrome ones to give the car a slightly harder look.
The original headlights come with an open gromett, which I don't really like Description
So I replaced that with a full 38mm gromett from Ebay and punctured a hole in it. Description
No 'fitting' pictures, so on to the first completed install; Description
I queried how to route the cable yesterday, and decided to go through the end of the 25mm pipe with a wrapped cable (this will be replaced once my
black silicone hose arrives) Description
Really happy with how the car looks now - just want to drive the bloody thing!!
daveb666 - 31/7/13 at 01:42 PM
quote:Originally posted by loggyboy
quote:Originally posted by daveb666
Pump/Filter after some heat resistant wrap was added on to it: Description
Assuming the pump generates its own heat wont this be insulating it? Surely the wrap should be on a small sheet of metal thats between the pump and
the other heat sources?
Sorry loggy, only just seen this. Fuel pumps are self-cooling due to the fuel going through them. These were only getting warm because of the heat
from the fan.
daveb666 - 20/8/13 at 07:00 AM
Spoke to Carbon Copies and got a couple of rear vents for the bonnet:
Then I broke it - the starter motor seized, it wouldn't start and I couldn't jump it. I had to call my Dad to tow me to his house. I then
removed the starter motor, and drove home.
The starter motor was a Lucas (LRS707). For those of you that may need one of these in future, a company called Wood Autos in Huddersfield stocks a
smaller, lighter replacement: Description
The part number for your reference is STR50041 and it costs about �60.
Unfortunately, me driving home without the wires to the starter connected overloaded the alternator, so today I need to get a new regulator for that.
daveb666 - 2/9/13 at 07:49 AM
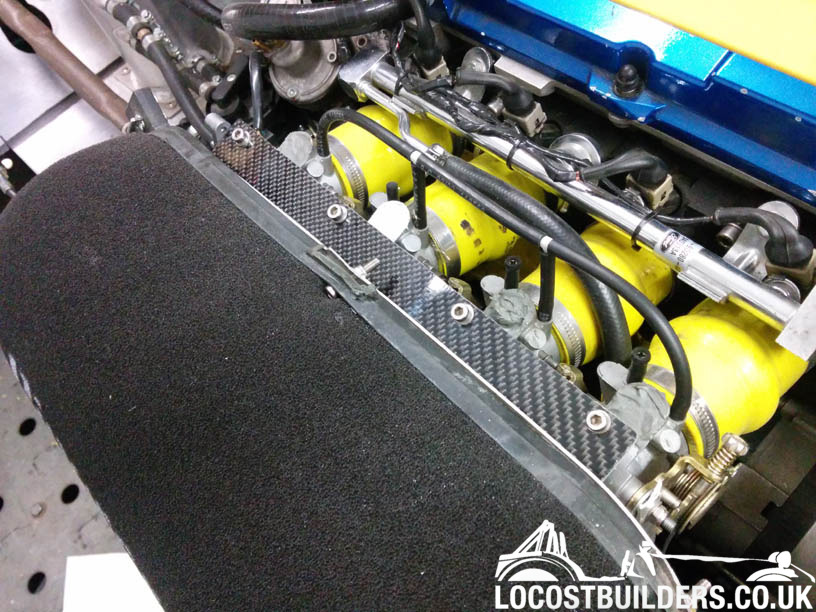
Because I needed to remove the alternator anyway, and to do this easily meant taking off the inlet, I decided to start fitting my GSXR throttle
bodies.
In this picture the throttle bodies have been spaced to match the ST170 inlet, at this point I'm filling the 2nd butterfly holes in the bodies
and filing back. Description Description
The induction kit was suffering from massive heatsoak, so I heatwrapped an old airbox and did a direct feed straight into the box from the carbon
scoop on the bonnet, hugely improved the performance of the car.
I then pulled all the engine loom through into the car, dropped the dash, smiled at the general tidyness and skill of big_wasa's wiring
abilities, and then gave up for the day. Description
Very nice!! How did you qualify for a "new" -- 13 -- reg.?? And only 3 weeks after making your application, to DVLA?
I passed IVA test exactly 1 week after you. Application via local DVLA, but still processed thru Swansea. We're now into September, and still
nothing. Have had to get MK to verify chassis newness, (well, it was when I bought it!), and VIN, and pass that on to DVLA. Still waiting!! daveb666 - 2/9/13 at 10:01 AM
Dick, check my IVA thread for contact numbers of the dept you need to ring at the DVLA. Direct nrs, I also wrote a complaint to the Chief exec of the
dvla which seemed to speed things up.
yellowcab - 3/10/13 at 02:30 PM
Great thread Dave - keep the updates coming, surprised I had missed this
Loving the subtle changes you're making to an already lovely looking car.
daveb666 - 29/10/13 at 09:23 AM
Unfortunately an issue with my phone meant I lost loads of photos so this is more of a textual update than anything and quite dis-jointed.
Following on from last time. I managed to complete the fitting of the GSXR tbs and borrowed a trailer and truck to take the car to Noble Motorsport
for mapping.
The car produced 168bhp/142lbft and drives beautifully. The mapper said if I had ARPs fitted that it's likely I could squeeze a bit more out of
the car, and of course rev it a lot higher but that's maybe a job for winter.
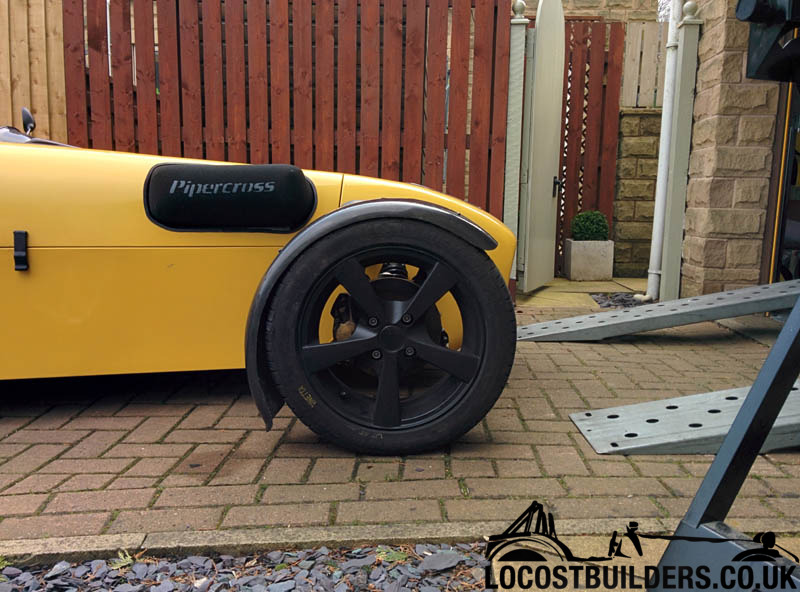
I never really liked the bling of the aftermarket wheels that were fitted to the car so set about painting them satin black; I really like the new
look that this has given the car; certainly feels more purposeful to me. Description Description Description
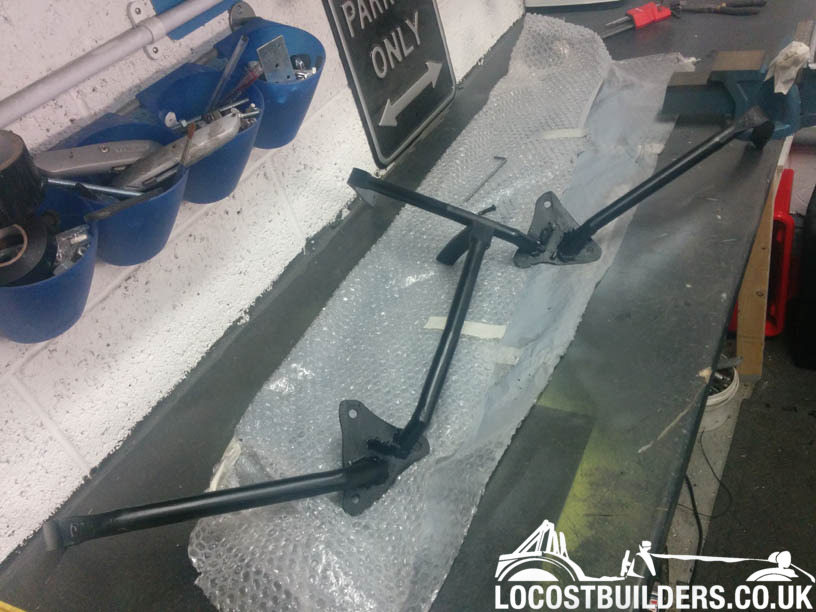
I snapped the front arch stay a few weeks ago, and as I'm waiting on some new lovely carbon arches arriving did a PROPER bodge so that I can
still drive the car (I don't have a welder). Description Description
I've never felt comfortable when sitting in the car, and after taking a seat in the "yellowcab" busa we did some measurement
comparisons to see where the differences were. The most notably variation was that the steering wheel was higher in the "yellowcab" than my
own car, so I set about modifying the column to raise it up to the 22" as per the busa.
The dash hole looks a bit out of place now, but I'm a lot more comfortable driving the car. Maybe I'll consider a carbon-dash over winter if
funds allow, but it will do for the moment Description
I'm also replacing the gear/handbrake gaitors and re-covering all the transmission tunnel over winter. That's currently a WIP in the photo
above!
I also wanted to do some videos so bought a second hand Replay XD camera. Description
I've got plans over winter; although notably a lot is to do with giving the car some storage - I'm adding a glovebox, tunnel pockets, seat
covers and boot-box.
So NickVenom and I had a run over to Sherburn for a brew last Saturday and had a little blast on the way back:
yellowcab - 21/11/13 at 11:15 AM
Nice video Dave, keep them coming.
It'll be good to see the stance of your car after you alter the rake later with it's new tyres on.
Do you tax it all year round?
yellowcab - 21/11/13 at 11:16 AM
Oh and it'll be handy to see some close up shots of your glovebox, and how you made the boxing that sits behind the dash, and how it's
secured
daveb666 - 22/11/13 at 09:02 AM
lol, thanks Olly. It's kinda lonely in here.
Nevertheless...
The tyres that came with my car, although un-used weren't the best. big_wasa had always intended on upgrading the wheels to 13" along with
decent tyres. I haven't got the funds just now to replace the wheels but I do have a friend that participates in a race-series throughout the
year. The control tyre for this race series is a Michelin PS3 which has to be new before each race. Therefore I have access to these tyres, in
15" flavour that have done 15-20 laps of a race circuit, so are for the most part brand new.
Can you guess which race series it is? Description
I've always intended on making a boot for the car so with the colder weather coming in set about dismantling the rear panel of the car. Description Description
Didn't get any further last night as I wanted to watch something on TV, will carry on with it over the coming week and hopefully get it finished
off fairly quickly.
I've bought some hinges from a mini to use on the lid (ala. "40inches" setup and hopefully, budget allowing, intend on fitting a
carbon fibre lid and top panel.
Ben_Copeland - 22/11/13 at 02:06 PM
Not been getting any emails from this so I've missed it all!!
Looking good. Finally new tyres hope they stop them wheels spinning up at ever opportunaty.
yellowcab - 22/11/13 at 04:01 PM
Good update Dave - love seen different aspects of your car.
I guess big_wasa never wanted your original bootlid to come off whilst driving for the amount of rivets hold it on
Interesting to see 'inside' the boot of a live axel setup, you seem to have bags of room, so your boot should be pretty big size - lucky you
- having mocked up mine tonight, it almost hardly seems worth doing, I will carry on mind, just seems everso shallow
daveb666 - 22/11/13 at 04:50 PM
Thanks Ol.
I can just fit two helmet in the boot space, so that is my ultimate aim!
yellowcab - 22/11/13 at 04:58 PM
Well that is good, my boot box will be no where near deep enough (even over the diff) to house a helmet
Ben_Copeland - 24/11/13 at 08:37 AM
Let's see some updates then!! How's the boot box coming on ?
Mines about 10mm too shallow for a helmet
daveb666 - 3/12/13 at 01:43 PM
So whilst I was in the middle of my boot box I decided to make a glovebox for storing err, gloves.
Glovebox itself lined with interior carpet Description
The remainder of the lights will be done once my new carbon arches arrive.
So, back on to the bootbox. I'm using a mixture of metal sheet and acrylic to keep it lightweight but easy to work with. Description Description Description
And most importantly it will hold TWO helmets! Description
Watched over by my ever faithful garage dog Description
and that is where I left it. I need something to cover the axle/diff and then I also need to buy something to cover the fuel hose and I don't
like the square that I've currently got in place.
It'll then all be taken out, built up, re-fitted and carpetted. Then I'm on to making the lid!
Comments/criticism welcome as always.
[Edited on 3/12/13 by daveb666]
40inches - 3/12/13 at 04:29 PM
Ah! The garage dog, can't build a car without one
Nice upgrades Dave, well jell you getting lids inside the boot, mine is about 20mm too shallow
Ben_Copeland - 3/12/13 at 04:49 PM
Top notch well done Davy boy.
Got some work to do on mine tonight hopefully if I get home in time
yellowcab - 3/12/13 at 04:56 PM
Good work Dave - liking the glovebox idea, every little bit of dry storage helps on these cars huh
Have you fitted your carbon gaiter rings yet?
daveb666 - 3/12/13 at 05:26 PM
quote:Originally posted by yellowcab
Good work Dave - liking the glovebox idea, every little bit of dry storage helps on these cars huh
Have you fitted your carbon gaiter rings yet?
Nope, can't fit the new gaiter rings until the wife makes me some new gaitors but I can't fit those until I've fitted the
transmission tunnel carpet and rear bulkhead carpet... but I can't do that until I've finished the boot box lol
yellowcab - 3/12/13 at 05:38 PM
Everyone loves a chain list of modifications
daveb666 - 16/12/13 at 11:19 AM
Further progress with the bootlid (the Duck tape was just there until the sealant set)
Looking good Dave, much more practical now, good job!
daveb666 - 31/12/13 at 05:19 PM
As it was Christmas I decided to treat myself to a trailer, got for a good price complete with ratchet straps and it fits perfectly in my garage with
room to spare:
With the presents all unwrapped I snuck in to the garage to finish off my bootbox.
I've made the lid from some cheapy wood from the off-cuts bin at BnQ. It only cost �1.80 so not the end of the world if it warps etc, I'd
love to replace with carbon some day but for the moment I'll make do with it being wrapped in this carbon-look material. Description Description
I've added IVA-compliant catches to each side, an aluminium latch to the front and a key lock to the rear for security. It's all topped off
with a rubber seal around the edge to hopefully keep the water out as much as possible. Description Description
I still need to get some edge-trim for the petrol cap surround but apart from that it's officially done.
With the rear all done I moved on to the interior. I couldn't get on with the bare metal/rivet interior and after seeing "40inches" car
decided I wanted mine to be more 'comfortable'. I've added some carpet to the rear bulkhead and centre tunnel. It looks and feels so
much more car-like (and expensive to be honest!). Again, didn't cost more than a tenner so I won't be too upset if it needs replacing this
time next year.
Did you get your new harnesses sorted or you gonna wait for the seats?
daveb666 - 2/1/14 at 01:46 PM
Hi Ben,
haven't done anything with the new harnesses yet as I'll have to refit them when I get the new seats anyway so might as well wait. I pick
them up on Sunday so should have a good update early next week
daveb666 - 11/1/14 at 04:55 PM
Winter mods all complete (including new rear lights) so went out for a little jaunt.
My god these things are dangerous on greasy roads.
[Edited on 11/1/14 by daveb666]
yellowcab - 11/1/14 at 05:08 PM
Lovely Dave - how are your new seats?
Steering looks nice and high, as you wanted
I spy your bullet cam on the car, looking forward to seeing the footage
daveb666 - 11/1/14 at 05:21 PM
You only spy the holder Olly, no camera. I'd have got in big trouble today, I spent more time looking sideways than forwards.
S'very dangerous in these conditions so it won't be coming out for a while. I even put the cover back on when it went in the garage!
yellowcab - 11/1/14 at 05:53 PM
LOL thought that might be the case, reminds me of Mallory Park when it had rained I bet
Ben_Copeland - 11/1/14 at 05:54 PM
Looking good mate. What size wheels have you got on it, they look a little big? What pressure are you running in them?
yellowcab - 11/1/14 at 05:58 PM
Just an observation, you seem to have static positive camber in your rear wheels, which I've mentioned before but always put it down to camera
angle... but it's clear as day on this photo.
I know you're on an axel, so might be worth looking into shimming it, to give you better straight line and corner stability
daveb666 - 21/1/14 at 12:18 PM
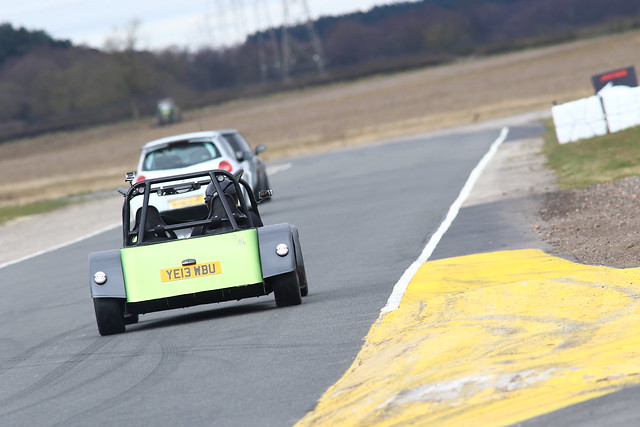
Booked a last minute trackday in my Locost this weekend at Elvington airfield. It was meant as more of a shake-down than anything as it's the
first time the car has really been driven in anger since it was completed.
There was torrential rain in the morning sessions which was, quite frankly, awful and meant I had to go to the local Asda at dinnertime to buy some
dry clothes!
This was my first ever track day in this car so don't be too harsh on the driving style
One thing I did notice was that I was shifting at 6k instead of 7k; I couldn't see the rev counter - so I'll be fitting a shift-light over
the weekend.
[Edited on 21/1/14 by daveb666]
Ian Jones - 21/1/14 at 03:59 PM
looks like you had a good time!!
daveb666 - 23/1/14 at 10:47 AM
Really really enjoyed it Ian; the weather initially put a damper on things (no pun intended) but after a few laps you can't get any wetter so it
stopped being an issue.
yellowcab - 23/1/14 at 11:46 AM
Stick a few of your fave pics up then!
yellowcab - 23/1/14 at 09:09 PM
Here a few of mine that capture the essence of a rather moist day out...
yellowcab - 23/1/14 at 09:12 PM
And a couple of your car in general as this is your build diary
daveb666 - 28/1/14 at 02:56 PM
Great photos Olly. Thanks again for coming.
daveb666 - 12/2/14 at 09:00 AM
When I booked the Elvington trackday I was made aware of the relatively low drive-by sound test. Not wanting to trip this sound meter, I created an
'induction noise' shield for my TBs.
It looks very rough and ready but did the job on the day and didn't affect performance either.
So, further Ollys very wet photos above; this was the state of the car when I arrived at Elvington:
...and this was the state of the car the following weekend
So after giving the car it's first proper bath since I bought it nearly 10 months ago I got on with the 'post-trackday' mods.
First up, I noticed I was changing gear at 6k and not the 7k limiter. I ordered an LED cluster from Maplins (�5.89) and fitted it under my
aeroscreen;
Added the necessary shift-light pin-out from the MBE ECU plug
made some tweaks in the Easimap MBE software
..and I now have a working shift-light
As the track day went on I was conscious that my oil was getting too hot. I didn't know because I had a temperature gauge but the engine was
noticeably 'tappy'. When I got home (and the car had cooled down) the noise had gone so I know it was the excessive oil temperatures that
had been reached.
Now I know zetecs need 'high oil temperatures' to work, which is great, and I know I could buy more expensive oil but, IMO, the oil I use
got too hot, therefore I need a cooler to bring it back down to suitable temperatures.
Unfortunately the lack of space between my oil filter and steering column meant that I was unable to fit a sandwich plate so I had to first get a
remote filter kit, which then branched off to my oil cooler.
I offered up the remote filter plate and oil cooler to where I hoped it would go:
and then fitted the remote sandwich plate:
close up of the remote filter setup
I then got some pipes made up, cobbled together some brackets and this is the result:
I always wanted some wider harnesses with the aero-style bucket to increase the speed at which I can get in and out of the car. 'yellowcab'
replaced his so I swooped in and purchased his old ones. I didn't want the colour red in my car though so whipped out the rattle cans for a bit
of colour-coding.
I did fit the passenger side but forgot to take any photos
daveb666 - 28/2/14 at 07:22 PM
Did another trackday at Blyton, broke it; but that's for another day.
A few photos from the day -
daveb666 - 4/3/14 at 01:21 PM
So I decided to take the plunge and get an LSD for the car. The LSD will be fitted by a professional, after reading enough posts about LSD's
locking up and people almost dying I decided to opt for the safer, but more expensive option.
Arches off
Grimy That'll be the trackday at Elvington that did that then!
I took loads of reference photos so I have a record of how everything went together!
Garage dog interested as usual
Had to dismantle my boot box which was depressing
Got everything off and dragged the trailer out of the garage to pull out the axle (with the help of a mate)
[Excuse the thumb on the lense]
And out....
I drop it off this evening and get it back next week. Very excited.
big_wasa - 4/3/14 at 05:22 PM
Clamping that braided hose with mole grips is a No NO You will be wanting a new one from Russ.
daveb666 - 4/3/14 at 05:27 PM
How come?
yellowcab - 4/3/14 at 06:08 PM
The PTFE line inside gets damaged should only ever clamp rubber hoses, braided are not to be clamped, ever
daveb666 - 7/4/14 at 07:58 AM
Wow, a while since I was last in this thread!
So, my axle came back with the lovely LSD all fitted. No pictures of the refitting as I just cracked on with it. But the axle is all back in with no
issues.
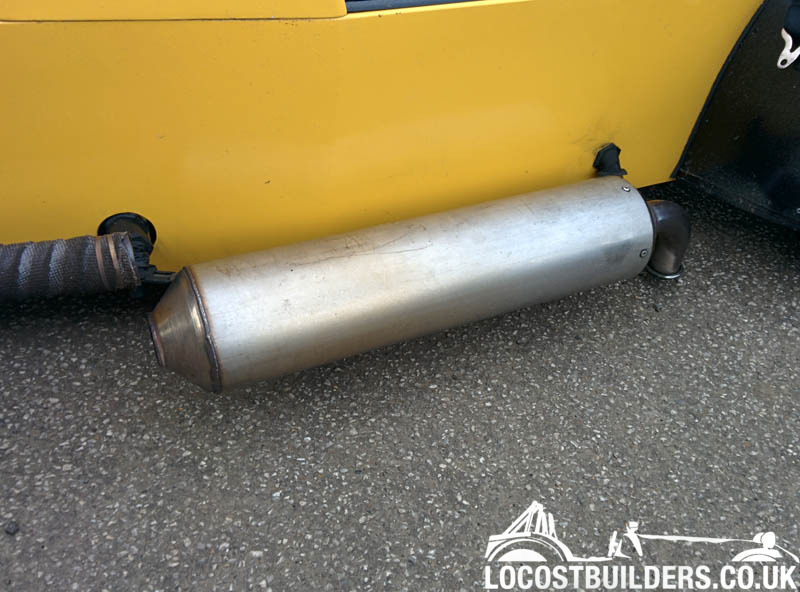
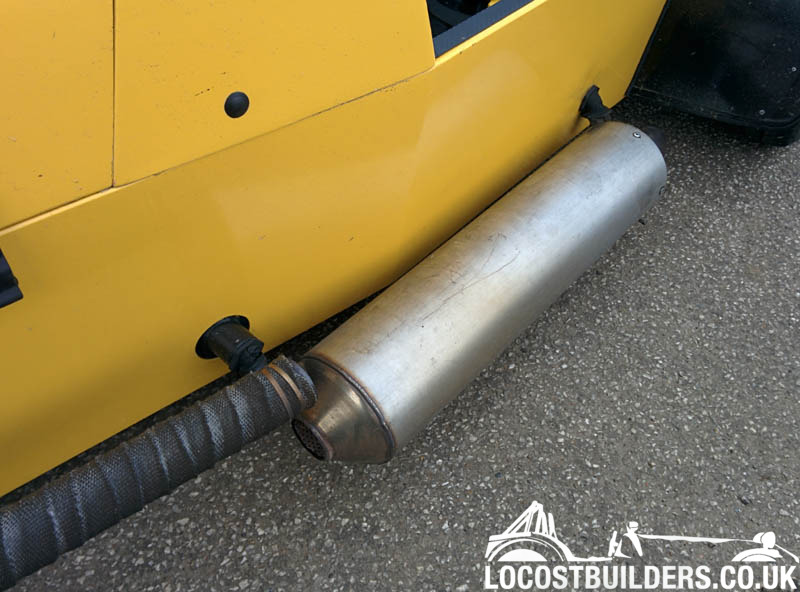
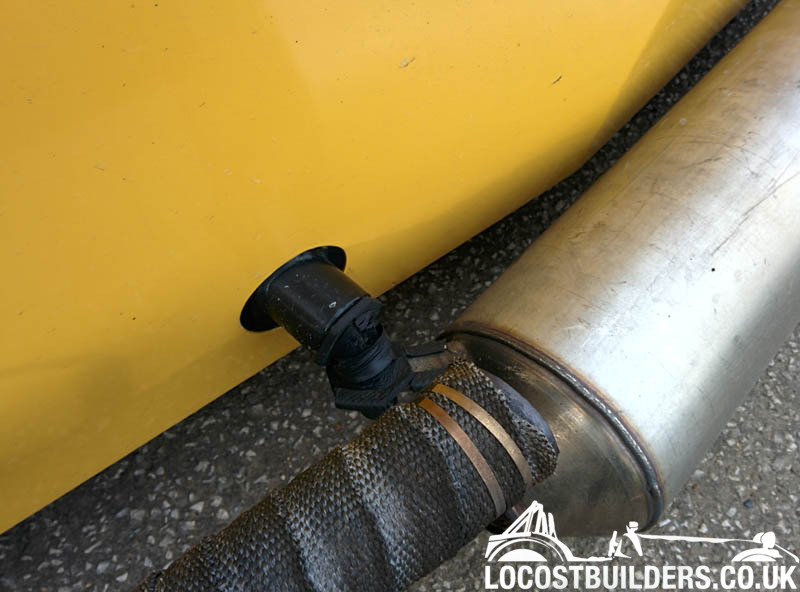
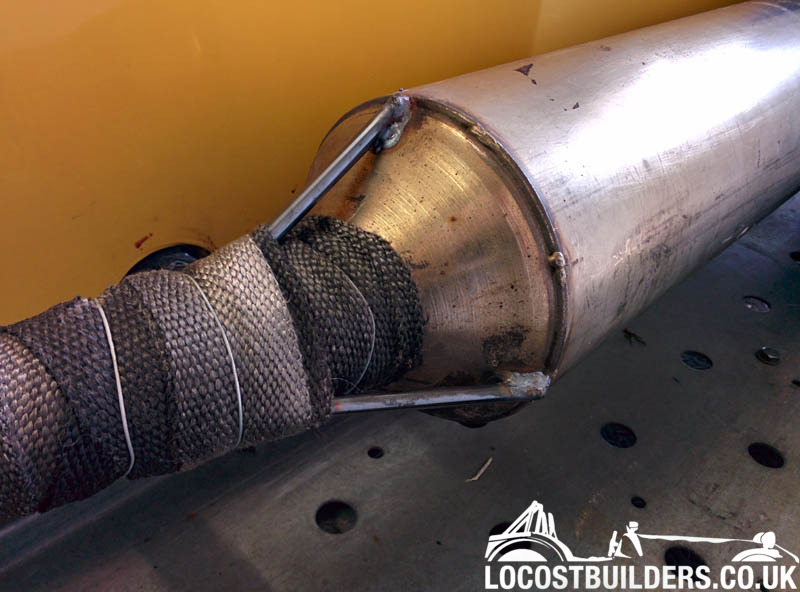
At my last trackday at Blyton I had an issue; the fkin exhaust snapped off
and the weld snapped where it joins the manifold:
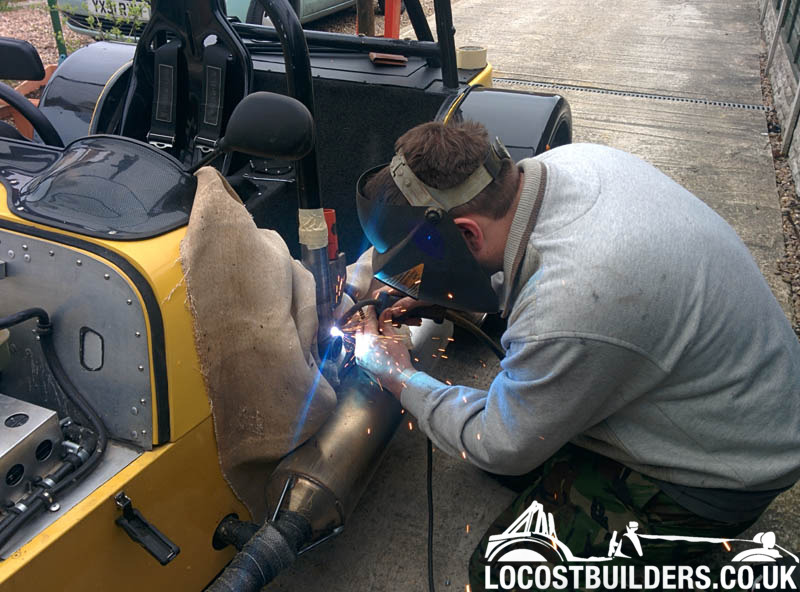
That put an end to my trackday so I needed to get the system all off for re-welding. A mate re-welded it for me and added some extra support
brackets.
It's not the prettiest thing but if it does the job then I'm not bothered.
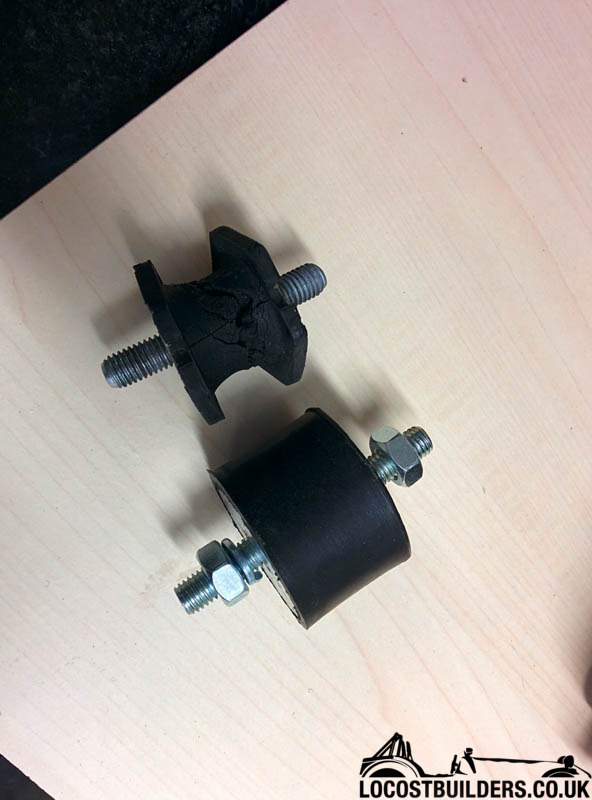
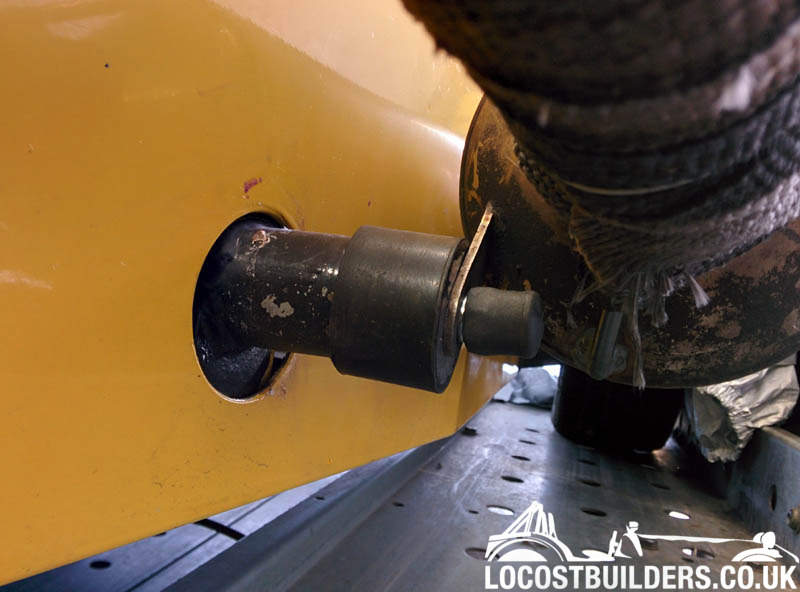
I also replaced the bobbin exhaust mounts for some stronger items to prevent future failures
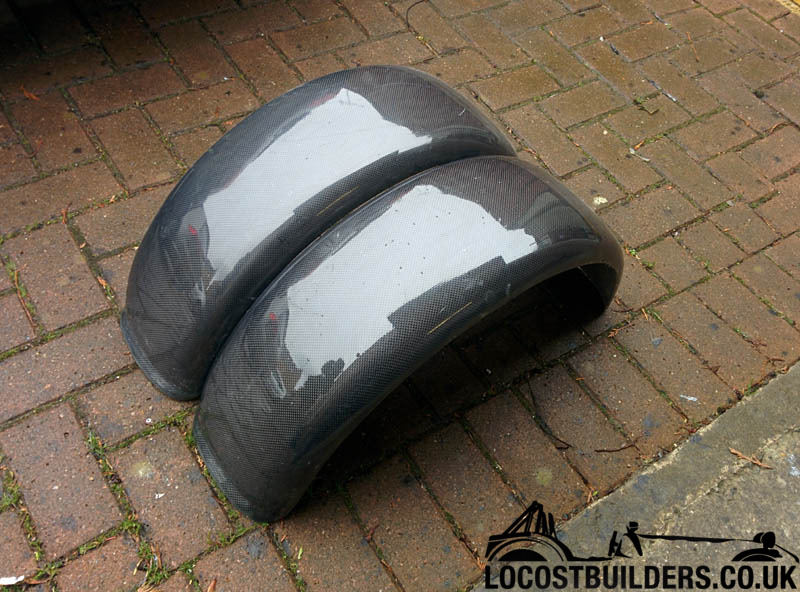
Then we move on to my new cycle wings. The cycle wings that came with the car were quite heavy and did not help in anyway to prevent stones/water
being fired up at me.
I was meant to be getting a set of carbon wings from a supplier on here in exchange for some commercial photography that I did for them - I did the
work but never received the wings (lesson learnt I guess) so had to find some more.
I contacted a composite supplier in Huddersfield and lucky for me, on the shelf, they had some carbon-kevlar wrap around arches! A price was agreed
upon and the arches were brought home.
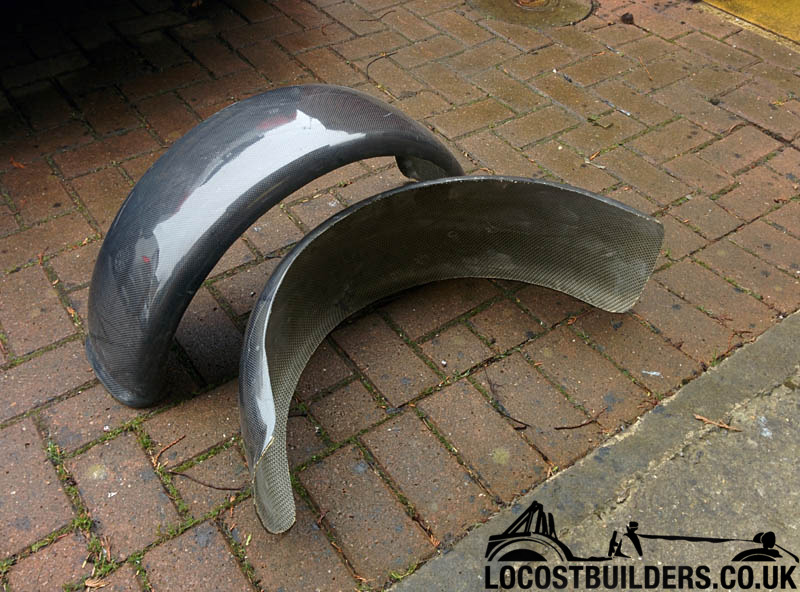
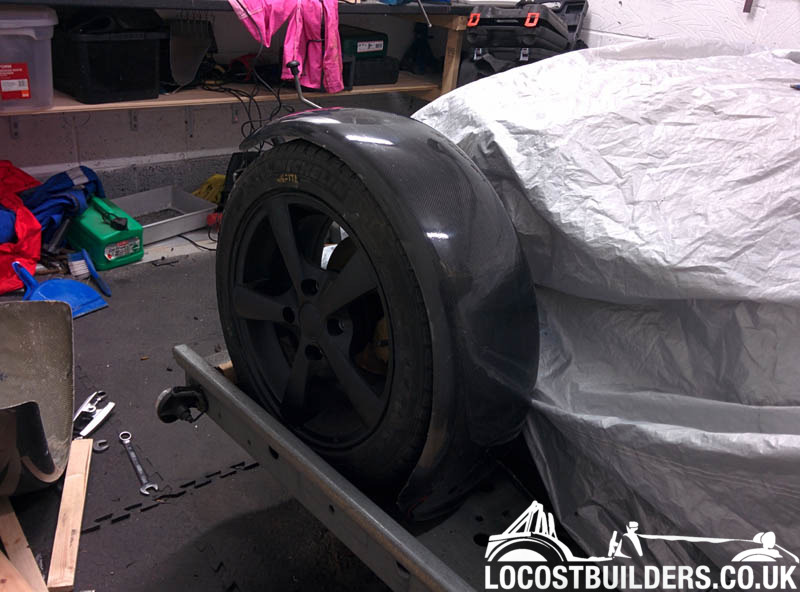
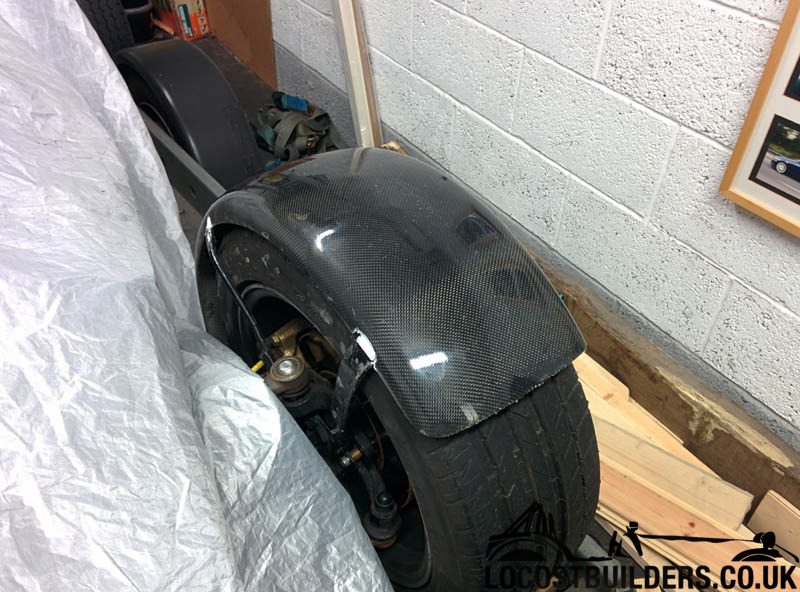
I removed the old wings, re-bent the supports and mounted them with sickaflex and bolts to hopefully prevent them snapping off in the future.
All finished and fitted
Now, I know they're too low at the back. I have been out for a little drive but they didn't actually catch so I'll have to see how I
get on with them. I can't move them forward on the mounts due to the way I've had to cut a notch in the arch so worst-case means I'll
have to cut off the return at the bottom to give me an extra inch of clearance. We'll see how we get on.
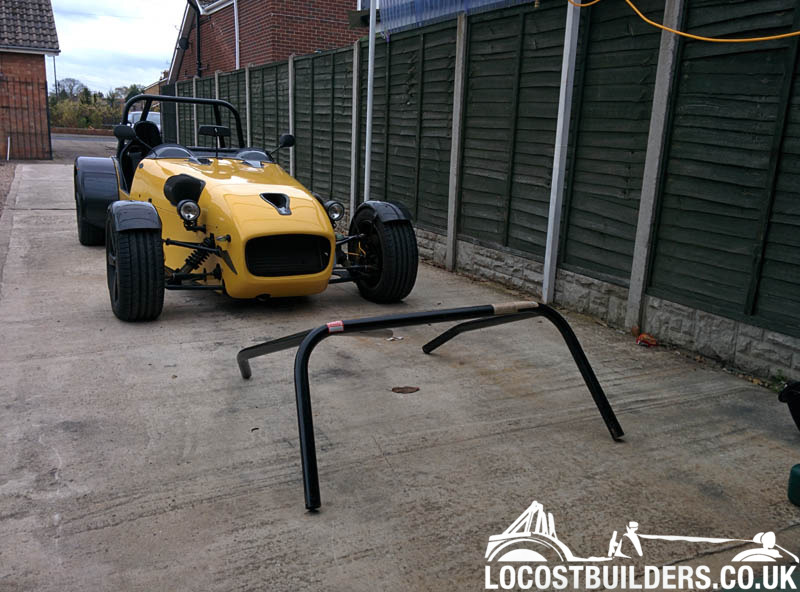
Next up, it was my birthday this week and Mark Chandler was giving away! the front-hoop for his old roll-cage. I'm always a sucker for free
stuff so made the 8 hour, 450mile round-trip to Tadley to collect it.
It's an almost perfect fit (cage is just rested on in the photos)
That's getting fitted properly next weekend.
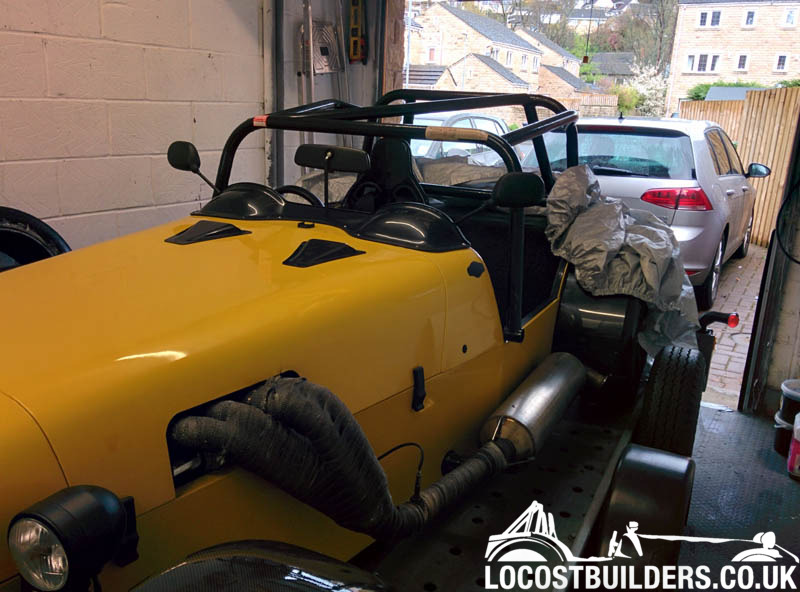
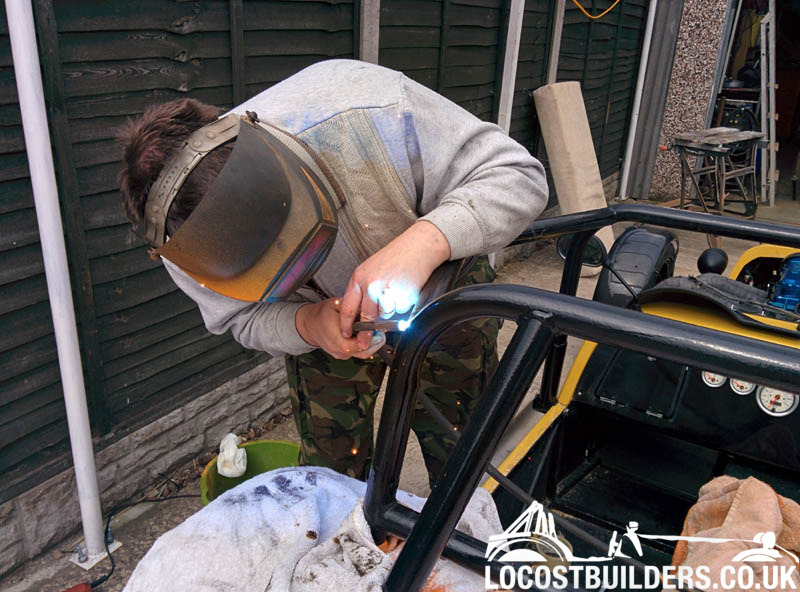
daveb666 - 14/4/14 at 07:31 AM
I went over to Steve Bell's this Saturday so that he could fit my roll cage for me.
Before
We decided to bolt he cage through the top triangulation point of the chassis on the edge of the cockpit (as we'd both seen numerous times
before).
Hole-Sawd
Tidied Up
Increase the hole for the bolt
Steve had machined a sleeve earlier in the day to ensure the chassis doesn't get crushed
Supported with an engine crane to get the correct position
Tacking the legs in place
Welding the rear bars onto the original roll-bar
WIP
And done
There were un-painted bits in this photo and the threshold-cover sealant was still drying (hence the masking tape) but the fit and job is
excellent.
Really can't thank Steve enough
yellowcab - 15/4/14 at 10:44 PM
Looking the business now Dave very smart in deed!
daveb666 - 23/4/14 at 09:17 AM
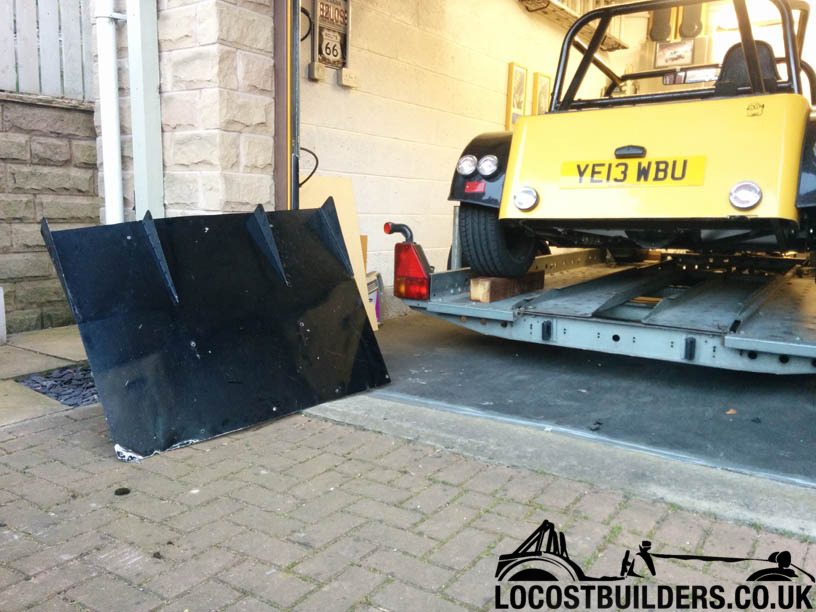
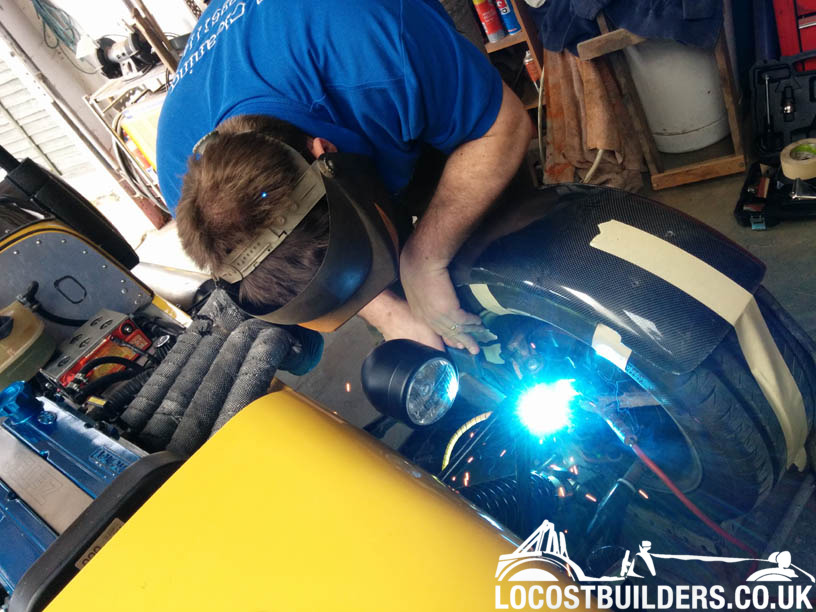
Olly was kind enough to give me his old rear diffuser, so last weekend I set about fitting it.
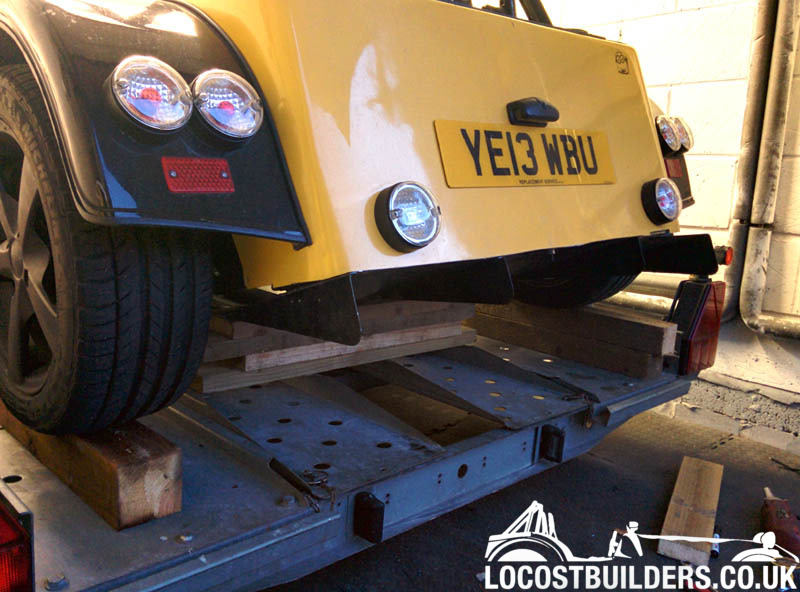
Off the car
Offered up with wood for the fit
Moved off the trailer to make fitting easier!
Flat floor, hole chopped for diff room
and finished
Probably won't make much difference to the 'aero' but should reduce and parachuting that I may have had at the rear.
I just love the way it looks now anyway
yellowcab - 23/4/14 at 08:08 PM
Certainly a far cry from when you bought it - looks much harder, with stacks more road presence.
Might come as a shock - but I love the look of it too
DannyScarbro - 13/5/14 at 10:20 AM
Just spent some time reading through the build thread Dave, you have done a great job.
Looks twice the car and I'm sure will be quite the weapon on track!
It's amazing how similar our builds are!
Dan
daveb666 - 13/5/14 at 01:28 PM
Thanks Dan, it's nice to see the thread does actually get read!
I've done a few bits since the last update -
Fitted high level brake lights
I have fitted two but forgot to take a picture of the completed article
Upgraded the headlight bulbs to LED ones (they are actually more white than blue)
I bought a new aeroscreen at Stoneleigh from Aerodynamx
Old one:
Removed
New one offered up in place
New one fitted
From behind
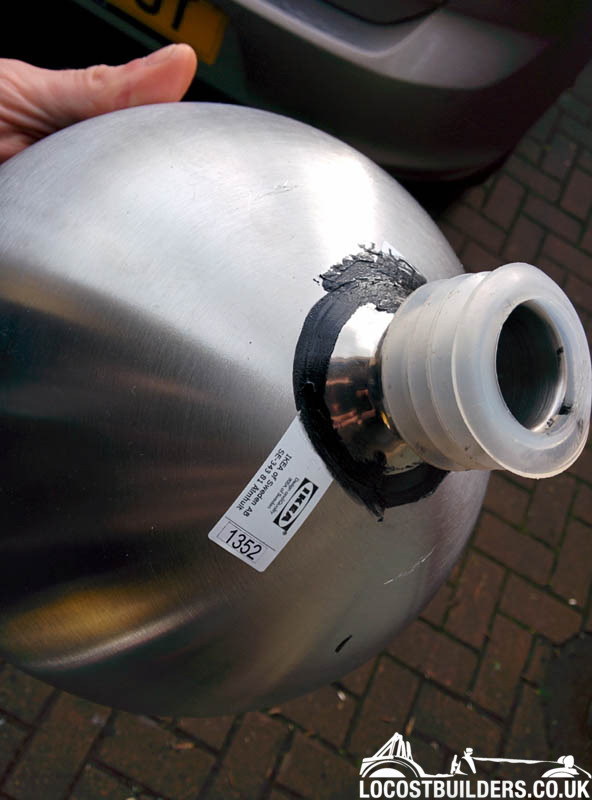
Needed a filler to empty jerry cans in at trackdays so constructed this using Ikea parts
Then I needed some new wing stays making so went to Steve Bell for help
I'm just on with painting them at the moment, will post some updated photos when it's finished.
Steves, nearly completed car;
Oh, I also had a race with a C63 AMG the other night, on a roll from 20-120mph. There was nothing in it...the cars couldn't have been more
perfectly matched. On noseying at the specs the base AMG has 457bhp so has a power to weight of approx 264bhp per ton; assuming our cars had a
similiar power to weight that means, based on the Mercs figures that my car weighs around 650kg. Time to get it on the weighing scales I think
DannyScarbro - 13/5/14 at 08:35 PM
Me and my brother have had many discussions over the last few months,
My seven has 190bhp and weighs 562kg. Rolling roaded and weigh bridge.
This giving it a power to weight of circa 340bhp per tonne.
However we think that when you get upto some bigger power figures it's not quite so clear cut;
Mine was a little quicker than a stripped and carbon clad m3 at blyton but my M135 is nearly as quick as the kit car although having a power to weight
of circa 220!
Dan
daveb666 - 14/5/14 at 07:31 AM
I suppose when you get to bigger power figures it's all about traction and how much power you can actually hold around the corners? Thankfully I
don't really have that issue, yet
I finished off my wing stays last night, all painted and fitted and sikaflex'd on:
I'd also ordered a sheet or carbon to try and have a go at making some pretty side wind deflectors, but ordered 2mm which is just waay too thick
so I had to find something to use it for:
daveb666 - 27/6/14 at 09:53 AM
The car was originally fitted with a 2.0 zetec flywheel which had been lightened by Scholar engines; reducing the weight from around 10kg to 7.5kg.
A friend who races a Ginetta G40 had an old engine going begging, a deal was done and I acquired the Ginetta race flywheel from that engine. The
Ginetta G40's use a crate-blacktop 1.8 zetec engine, standard apart from a Raceline sump, race flywheel and bespoke camshafts.
The new flywheel weighs 3.75kg but the clutch setup will be a bit mix and match.
To make sure I get the right bits I took a visit to Calder Clutch in Brighouse, West Yorkshire who suggested the best way to progress would be to take
my old flywheel, clutch and release bearing setup down to them and they will build me a suitable replacement kit for the new flywheel.
That meant taking the engine out;
First few bits off
Wheeled into the garage and under the crane (Excuse the mess!)
and out
Took me just over 2 hours to remove it all. To say I was by myself and half an hour of that was arsing about with trailers and shifting cars around
I'm quite happy with that.
This dinnertime I'll be taking all the old bits to Calder so I can pick up the relevant new bits.
I also interestingly found that my old clutch wasn't really working properly -
It appears as though either it was the wrong friction plate, or the Scholar flywheel wasn't flush - eitherway it meant I probably had less than
30% of the actual friction plate touching the flywheel - I always thought I had clutch-slip but this being my first RWD car I just dismissed it as the
tyres spinning.
Nevermind - but adds to the reasoning for taking it all apart anyway!
daveb666 - 30/6/14 at 08:10 AM
Another update, does anyone read this? lol
Today was set to get the car back together.
Bolts all organised
Old flywheel and clutch, around 12.5kg
New flywheel and clutch - 7.5kg. A decent 5kg saving!
New flywheel and clutch on the engine
Ready to go in
Engine all in
All done and finished
First impressions are good, it revs soon much faster and sounds like a racecar with a bit of heel and toe around the twisties.
Looking forward to getting out during the week for a blast, hope the weather warms up a bit!
40inches - 30/6/14 at 09:45 AM
Did you find the reason for the small clutch contact area?
daveb666 - 30/6/14 at 10:12 AM
Nope, although I haven't checked. Will offer a rule up to the old flywheel and if its warped I'll get it skimmed before I sell it on.:-)
daveb666 - 3/7/14 at 08:51 AM
I thought it was about time I got the car setup properly so am booked into ProComp on 28th July
Really can't wait - aside from now knowing the current setup of the car, I've never even had the car tracked since buying it a year ago so
I'm hoping that some big improvements will be made
daveb666 - 3/7/14 at 08:53 AM
Also did a video of a little run about in Leeds (pre flywheel fitting) - it also shows my breaking it in the end
[Edited on 3/7/14 by daveb666]
[Edited on 3/7/14 by daveb666]
daveb666 - 29/7/14 at 01:58 PM
Since getting through the IVA test in August 2013 the car had always needed setting up properly. I'd just ticked over the 1,000 mile marker on
the car so decided that now would be as good a time as any to get everything pointing in the right direction.
I chose to take my car to Procomp Motorsport in Birmingham. Father and son team, Ivan and Matt, have worked in the kit-car industry for many years and
compete in the Locost Race series; racing their own car and providing support for many other racers.
I feel I should point out that, as the name of the car suggests (Locost) that this was never a big-budget build by the creator of my car. The front
wishbones are 'static' and made to a spec, the chassis is home-made (box section welded together by a chap in Lincolnshire in his garage)
and most significantly the car runs a big, heavy Atlas rear axle as opposed to having the independent rear suspension of the factory-built cars.
(There is an argument that live-axle cars are better on tracks than IRS but we'll save that for a later date).
After the car was loaded up on to the trailer I made the 200 mile round-trip to Procomp. Upon arriving the car is wheeled into the garage and all 4
shock absorbers are removed. They are then put on a shock-dyno and measured for rebound and compression on each 'click' setting for
consistency.
My car runs GAZ Gold shock absorbers which is not expensive suspension by any stretch of the imagination. The shock dyno, aside from highlighting any
physical issues with the shocks, also checks the pairing of the adjustment i.e. That 4 clicks on the LF shock is the same stiffness as 4 clicks on the
RF shock.
Once all 4 shock absorbers had been put through their paces on the dyno, each spring was then tested for lb-age on a press.
Once all the suspension is built back up they move on to the height and then corner-weighting of the car.
The end results, without me in the car were:
They then move on to the camber, castor and toe adjustments - however as noted already most of mine is fixed so it was more of a case of adjusting
what we can and checking to make sure none of the other readings are massively out.
Although I have a solid rear beam, there are many cases of these distorting when extra mounting brackets are welded on. In my case, due to having the
larger, Atlas rear axle instead of the English axle, mine was within a couple of mm of being straight.
Once the settings have been checked and OK'd, the car is then corner-weighted against incase any of the adjustments have altered anything.
After that, there's some complex testing in order to assess the best shock absorber stiffness setting
The end result can be seen below:
The guys started at 10am and I didn't leave until gone 7pm, and all for a fixed price.
My car was found to have no dangerous, or worrying issues however a couple of points were noted:
1 - We ran out of camber adjustment on the RF so ideally the wishbones needs a few mm shaving off in order to obtain another turn.
2 - The RF wishbone has less castor than the LF but not enough to cause me any issues on the road.
3 - My rear springs are 160lb and ideally could do with being around 120lb due to the weight of the rear axle. (one for the shopping list)
My car isn't an out and out track car and spends most of it's time on the road, I also live in Yorkshire and, despite what the roads looked
like on the Tour-De-France route we probably have some of the worst-maintained roads in the UK.
I didn't get chance to get behind the wheel of the car yesterday so have no comparisons to make yet, I just wanted to document my day whilst it
was still fresh in my mind.
yellowcab - 29/7/14 at 05:29 PM
Great writeup Dave - looking forward to hearing how it handles now
daveb666 - 6/8/14 at 03:05 PM
Anyway, since the suspension was setup I still haven't er, driven it. Life has got in the way, or something like that.
Despite just 10 posts ago saying that I didn't like the power delivery of a turbo'd engine, I have decided to go to the dark-side.
Shortly, I will be fitting a CA18DET engine into the car. These engines were originally from an S13 200SX. (My aim was to fit an SR20DET from the
S14/S14a 200sx but aside from being a bit trickier on the wiring, a bit heavier than the CA18DET, they are ridiculously priced). (IMO)
So, after doing some top-class Internet snooping, Googling and forum searching I actually found the donor parts through a friend that does
drifting.
A shopping list was given, an offer list given back, some money changed hands and a few days later my donor bits arrived:
- Engine Loom
- Dead Engine with bigger turbo
- Rebuilt Engine
- Gearbox
- Spare manifold and turbo (Standard)
- Spare manifold and turbo (unknown)
- Huge box of spares...
When completed and working the engine will be running Stage 2 which will consist of uprated fuel pump (255 litres per hour), more boost (14psi),
3" downpipe, hard induction pipes, FMIC and a stage 2 chip. It should hopefully produce around 250-270bhp which should take me to around
450bhp/ton (or the same as an MP12C).
The engines:
The engine with the red camcover was the dead one, so that needed stripping so I can take the working bits off it and re-claim some space in the
garage.
Think there is something missing?
This is the bigger turbo compared to the normal T25 that 'should' be on a CA18DET
The dead engine had a nearly new 6-plate paddle clutch on, but the flywheel has obviously taken some hammer and could do with a skim, or
replacement.
...and that's where I'm up to at the moment. I know this should be a Winter project but I'm itching to get this lot thrown in and
working so I aim to collect parts quickly over the next few weeks with the aim being to fit the engine and box early September.
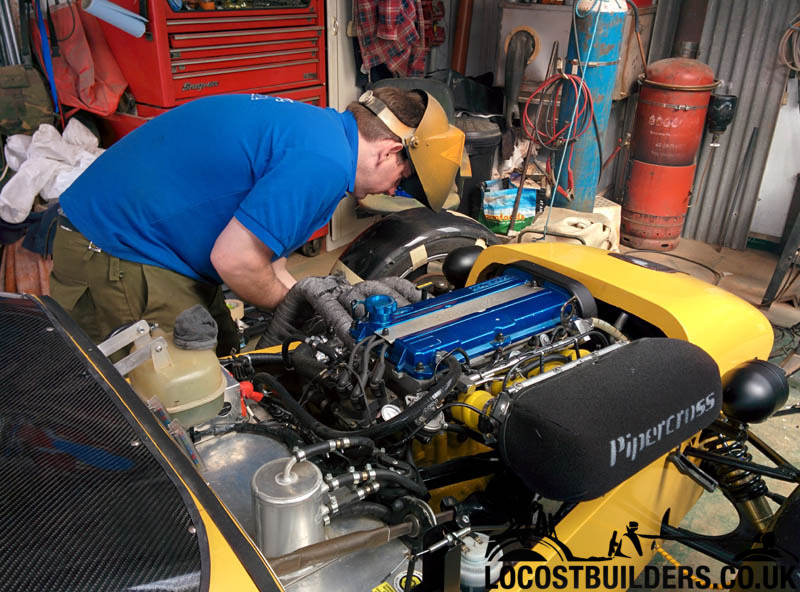
daveb666 - 9/9/14 at 09:08 AM
I've spent the last few weeks amassing a pile of parts and doing a minor rebuild on the new engine.
255 litre per hour fuel pump
Tim Boost gauge
Gearbox jetwashed and de-greased
6 plate paddle clutch
Flywheel skimmed
My spares pile is growing rapidly!
Engine block all painted up
Old vs New Alternator
HKS Mushroom Filter
New Intercooler, 2.75" Outlets
..it just fits inside the nose-cone
New alloy radiator - from a civic!
Turbo Blanket to keep under-bonnet temps down
Engine taken over to my mates house to get cleaned up inside (work horse VW Golf LOL)
Rebuild time
Before and After (eewww)
New alternator brackets made up, and alternator side swapped for more clearance
All timed up!
My current engine and gearbox is coming out this weekend and all the new bits are going in from Monday onwards, I'm just a little bit excited
now!
I've had a busy couple of weeks -
So I took the engine out:
New engine ready for it's new home
Cut some bits off
Fitted the new alloy racing radiator
Fitted the intercooler
Engine Mounts mocked up
First Test Fit
Modifying some chassis rails
Back in For the Last Time
Plenty of Room (sort of)
Ummm, not as subtle as I first hoped! haha
Then brought the car back home and began with the joyous task of hose fitting.
First trial fit -
Had to trim the nose-cone abit
Then started on a test-run of the wiring
That's where I'm up to, I've written a big job list today so know what's left to do.
My boost controller also arrived yesterday so once it's working I can get that thrown on and get a map put it that should take it to a safe
260-270bhp, as, when I opened my ECU I found this inside
HUGE HUGE thanks to Steve Bell for all the work getting the new lump in
daveb666 - 22/9/14 at 08:41 AM
Hello ? Not sure if anyone reads this anymore, I'll stop the updates if not LOL
Hello
Made lots of progress. Whilst I have tried to do the job properly first time there are a number of improvements I already know I want to make -
notably in relation to the way the coolant pipes run - these will be getting sorted once I know there are no issues that I've yet to discover!
Does everyone hate wiring or is it just me?
Did some final hose fitting
Even though at this stage the car wasn't running yet, I decided to take it to get an exhaust made. Yep it's short and yes it will be
incredibly loud. I will be having a silencer that I can put on as and when necessary but I've always wanted a turbo car with no silencer so now I
have the chance I'm not missing out on the opportunity!
All done, just needed to tidy the engine bay wiring up at this stage
I then needed to chop my bonnet up to allow it to fit properly. I know this looks a tw@. The inlet is being shortened so that no cut is needed and the
bonnet will be replaced next month.
Test drive this evening!
ctwv50 - 22/9/14 at 09:01 AM
I'm keeping an eye on this project as it's a pretty mental re-build. Be good to see how it turns out.
big_wasa - 22/9/14 at 11:44 AM
quote:Originally posted by daveb666
Hello ? Not sure if anyone reads this anymore, I'll stop the updates if not LOL
Bugger of, I dont really use face book. wylliezx9r - 22/9/14 at 11:59 AM
I'm watching too. Good work !
daveb666 - 23/9/14 at 09:24 AM
Well, it works.
It is nothing short of epic, I can't believe it's only on standard boost
Sorry, I've let you down - couldn't deal with the noise of just the 'downpipe'. It wasn't the sheer volume of the thing, it
was how awful it sounded on idle; almost tractor like and echoy.
I went back to Clark Customs in Barnsley and we fitted a fairly small backbox and pipe. It's still a 3" system and can if needs be, come off
for some loud holliganism if I ever feel the need.
Jason Clark, my mate that did the exhaust and downpipe is also a pro-drifter so I offered him the key to see how my car would perform. I think
it's safe to say he was fairly happy with it
I have got a few niggles with the car that I need to sort:
- Clutch biting point is too high and needs altering some-how
- Clutch pedal needs a 'clutch-stop' on the bulkhead
- Had a water leak (this is now sorted)
- Need my new inlet making so that I can get my new bonnet on
- Side panels need flairing to let out the heat - it was getting really warm yesterday
- Swirl pot needs some heatshield adding to it; it was that warm yesterday that it was actually boiling in the pot!!
Now turned up to the boost to a bar, oh and then broke it again. haha
daveb666 - 10/12/14 at 09:46 AM
It's been a while since my last update - the car has probably spent more time off the road than on it unfortunately. I've had a very very
bad run with alternators dying on me - I've been through 4 so far. The first couple of times were probably my own fault but the latter I'm
blaming on part failure.
Just to prove it did actually get driven -
I've finally fitted a gizzmo boost controller to the car and it's running just over 1 bar of boost, so should equate to around 270-280bhp,
or around 450bhp per ton.
The car was suffering from serious heat issues - this was down to me routing the coolant pipes on the rear of the block incorrectly This has now
been resolved and the car really seems to manage the heat a lot better. I also wrapped the downpipe with exhaust wrap which make a huge difference to
under-bonnet temperatures.
I've replaced my remote gear-shifter solution with an extended linkage straight from the box. The other one worked well but was a bit too tight
for my driving style and kept causing me to miss gears. The new extended linkage is from a VW campervan and cost just �12 from eBay The tunnel
panel and carpet will be getting changed over winter.
I still needed to resolve the issue of the inlet sticking out the top of the bonnet, so I went back to my fabricator (Clark Customs in Barnsley) to
have the standard inlet shortened and adjusted accordingly.
Inlet Off
Before and After
Fitted to the car again
The new bonnet was fitted but the cambelt cover still sticks out, there's nothing I can do about this so bought a carbon scoop to sit over this.
I intend to fully cut out the bonnet underneath the scoop - this will give additional air into the bonnet which will hit the coils and keep them cool.
(CA18 coils on modified engines have a habit of over-heating)
Over Winter I've decided the car will be getting a colour change, most likely to green. I realised that 8 lights on the back of the car looked
ridiculous so I'm changing that as well. The inner fog and reverse lights have been removed. The reverse has gone in the bin and won't be
returning. The fog will be replaced by a tiny rain-light.
The 2 lights on each arch will be replaced by a 'hamburger' style clear LED light, thereby reducing the number of lights on the rear of the
car from 8 to 5.
Whilst in the bodyshop the arches will be resprayed in a metallic black to tie in with the carbon-kevlar shimmer of the front arches.
A fairly boring update but there'll be lots of change over the Winter break.
daveb666 - 18/2/15 at 11:42 AM
Hello, back after a 2 month break.
I've slowly been putting the car back together, there should be hundreds of photos from the hours I've put in but alas, there are just a
handful.
I finished the bonnet by cutting in some rear holes to allow hot air to escape at the rear to hopefully prevent future heat-soak issues.
I also smoothed the holes where my previous rear lights were
Then went grocery shopping
When I got home, I was stripping the car ready for the paint shop when I noted this. Not ideal obviously but thankfully just a reinforcing bracket and
not the actual bracket itself (I had wondered why it was creaking abit when setting off). [This has since been re-welded by a good mate]
I stripped everything off the car ready for paint;
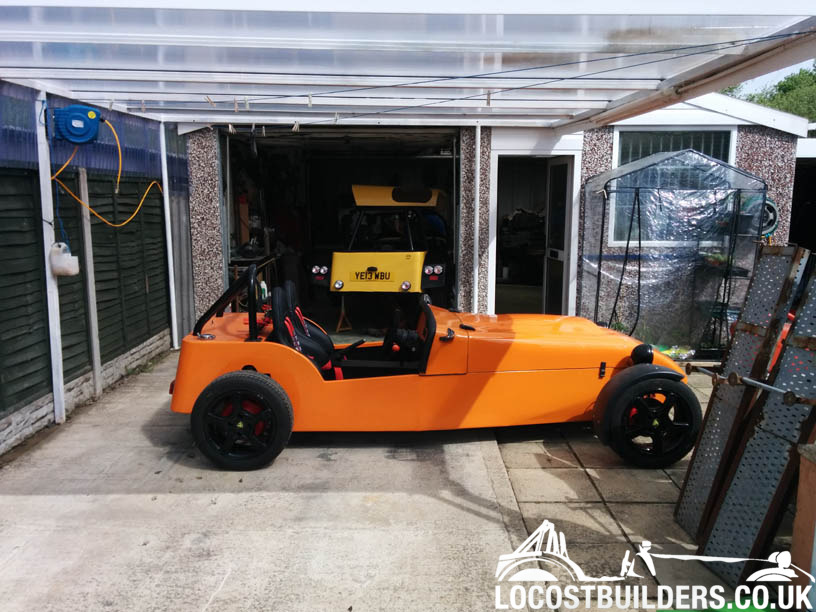
The car then went for paint and came back looking absolutely stunning VW Viper Green with a matt-lacquer
Since it came back I've started re-fitting some bits - new nose-cone scoop in CF, need rear arch guards in CF, new interior carpets.
I've now I've moved on to the new dashboard in of course, CF.
..and that takes me to current day. Still lots to do till it gets back on the road but I will get there ready for the nice weather
[Edited on 18/2/15 by daveb666]
wilkingj - 20/2/15 at 12:35 PM
Its looking good... and YES... we are reading and following this.
Posting build pictures, not only lets people know what you are doing, it also gives them ideas, and enthuses others to get on with their builds or
modifications.
So keep it coming.
Geoff
Ex Viento Owner, and still regretting it!
Even thinking of selling the Harley now!
theduck - 20/2/15 at 01:39 PM
Looking good! Love all the work you have done to this.
dubzter - 20/2/15 at 09:01 PM
awesome build and amazing new colour, keep the posts coming
daveb666 - 1/4/15 at 10:00 AM
Update time!
6 weeks since the last one and loads happening
Dash has been finished, and includes a new battery switch for security and safety.
The car went to RS Tuning to have the Gizzmo boost controller setup. It was running a bit lean at high-end (needed a bigger fuel filter - now fitted)
so boost was set to around 15psi and the car made 262bhp (Flywheel).
Went for a run with out with my mate Matthew Morton
I really love the new colour, the pearl looks stunning in the sunshine.
Booked in on a last minute trackday at Teeside -
Need to get used to the new car a lot more; I'd nailed heel/toe in the zetec but the new pedal layout and engine means it drives a lot
differently to when it had the Zetec in it [still learning], and I need some new rubber. These PE2 tyres are great but they just can't deal with
the power I'm trying to put down. My semi-slicks get fitted this evening, hopefully that will make the car a bit easier to drive.
daveb666 - 6/4/15 at 06:20 PM
Lots of feedback as always
After my successful evening at Teeside I did a trackway on Sunday at Blyton park. The car performed brilliantly all day and I was still on the track
at 5pm when the chequered flag came out
A few photos below, videos to follow.
big_wasa - 6/4/15 at 06:29 PM
The wife didn't recognise it
Ben_Copeland - 6/4/15 at 06:58 PM
How much fuel did you get through?
daveb666 - 6/4/15 at 07:03 PM
quote:Originally posted by Ben_Copeland
How much fuel did you get through?
55 litres, not sure how many laps I did but I had nearly 2 hours of 'on track' time. FYI, a stock hatch saxo next to me did 2hr15mins of
track time and did nearly 80 litres!!
Warren - hope you still like it big_wasa - 6/4/15 at 07:08 PM
quote:Originally posted by daveb666Warren - hope you still like it
Looks good in green and it's great to see it used as intended and not just a garage queen. Pick up my next toy this week......
daveb666 - 15/4/15 at 09:21 AM
A few videos from the Blyton trackday -
Me letting an S/C Ariel Atom past and thinking I could keep up! ha.
The same lap on-board the Ariel Atom
Me chasing a 250bhp K20 powered Lotus Cup Elise. Top owner and good fun. I was faster in the straights, he was quicker in the corners; damn those wide
tyres and race-prepped cars :-
...and finally a spectator was looking to build a Locost so asked for a few laps as a passenger, I was more than happy to oblige.
With (my first) little one on the way at the end of May I've booked one last trackday before she arrives so I'm heading back over to Blyton
this Saturday for a final blast before parent-hood commences. With a great weather forecast I'm hoping to find the team to play with the
suspension and tyre pressures a bit more
daveb666 - 17/8/15 at 12:36 PM
Well, I've been chasing Ariel Atoms', again :-) and I actually 'kept up' with one this time -
I urgently need to upgrade the brakes, I was having major issues slowing down..
I think the speed the three of us come back this chap says it all though, such good fun (fast forward to 30 seconds!!)
Since that trackday in May a fair bit has happened -
The week after the trackday at Blyton my turbo let go in a big-way, thankfully nothing went engine side so it was a simple choice to decide what spec
to replace it with.
I took off the original turbo (surprisingly easy even though it's a tight fit) and took it to a local turbo place. Thankfully the shell of my
turbo was in good nick. This meant that I could get my original one repaired and then upgraded. I went for the option of having the turbine upgraded
with a billet aluminium version (should spool faster), 360 degree thrust bearing and staggered oil-seal.
The result looks lovely
I went out for a few drives with local kit car clubs -
Somewhere in Derbyshire
Squires Cafe, Sherburn
Then on 1st June 2015 I became a Dad, saying hello to my beautiful daughter Rowan Mae. Garage and car time was rightfully slim on the ground but over
the last few weeks I've started sorting a few niggles out.
I always suffered badly from heat-soak, to the point that on hard pulls in 4th gear the car would misfire. With a bit of headscratching and some
visits to the local silicone hose shop I sought to fit my air filter outside of the engine bay.
I replaced the cheap filter I had with an Apexi Mushroom filter. The performance difference from moving the filter is huge, I'd have never
thought it would have made that much difference. The noise outside is also increased
I went out for a drive on the moors to see how the noise sounded from the outside of the car...
[Edited on 17/8/15 by daveb666]
big_wasa - 17/8/15 at 03:43 PM
Congrats, I thought it had been a while since an update
[Edited on 17/8/15 by big_wasa]
daveb666 - 10/9/15 at 09:28 AM
I've always had trouble slowing the car down at 3 figure speeds. Surprisingly, even though the car only weighs 600kg the Cortina brakes just
aren't enough to slow the car down adequately.
I've had my eyes open for some Wilwood 4 pots for a while and a suitable second-hand set came up for sale.
Grubby, but they'll look better all cleaned up
Before and after discs - 247mm solid to 285mm vented
I probably dont need vented discs so when these are done I may go for 285 solids as the discs alone weigh 9kg each, which isn't ideal for
un-sprung weight.
The setup was originally from an RS turbo, so I had to get the bore of the discs made bigger by just 0.2mm to fit over my hub.
Test fit onto a spare hub
Things are VERY VERY tight
A quick skim on the hub arms with a grinder I think before they get fitted. The kit came with Wilwood 'race pads', whatever they are.
They're about half-worn I'll stick them in for the moment to get the discs all scrubbed in and see how they perform. I'll go for
DS2500s or 1.11's in the New Year I think.
The setup will get fitted next week when my mate has some free time at his garage; the calipers will have a fixed copper pipe going to a fixing on the
back of my upright and unfortunately I don't have the tools for copper piping so need assistance with this.
There was a car show held locally so I took my green-bogey along.
It received some great interest, children, adults and elders all showed a good interest in the car. I also managed to fit my BeeR rev-limiter to make
bangs and flames...because I love bangs and flames
[Edited on 10/9/15 by daveb666]
daveb666 - 21/12/15 at 03:11 PM
Had huge huge issues getting the brakes fitted which has resulted in me replacing all the seals and pistons in the calipers, the brake pads, my pedal
box, brake fluid reservoir and master cylinders.
I'll document this up all later on this month probably.
I've also acquired a z32 AFM, stage 3 ECU and larger injectors which should take the car to 310bhp+ (hopefully!).
Really looking forward to the New Year.
TheHighlander123 - 5/3/16 at 11:19 PM
Brilliant thread mate.
I'm on the hunt for a kit car myself now
big_wasa - 6/3/16 at 09:05 AM
The brake res was said to be from an e type jag
mike2704 - 6/3/16 at 10:15 AM
Hi enjoyed this thread enormously not very often you see such detail any more recent updates
cheers Mike
daveb666 - 7/3/16 at 09:51 AM
I can honestly say that fitting these 4 pots has been the worst 'car-job' I've ever had.
Even after refurbishing the calipers the brakes still kept sticking on, so I decided to replace every thing in the braking system.
The original pedal box had been butchered to fit the hydraulic clutch (it was previously cable) so I called up OBP and ordered their 'eco'
pedal box
This came with 3 master cylinders; .7, .625 and .7
As my clutch was perfect, one of the .7's were sold on. The new .7 and .625 were fitted in place of the originals. I went to Clear Motorsport in
Preston to have the work done, as quite frankly I was at my wits end with it all.
It took ages to go through the system and get everything bled and by the time I was due to leave the heavens had opened. I had a small drive around
the workshop and everything seemed OK.
Then it was on to fitting some carbon vented side panels; the car never overheats but does get extremely hot under the bonnet as you'd expect. I
managed to stumble upon a Westfield carbon side panel for a bargain price. As a Yorkshireman, I'm keen to make the most of my money so cut it in
half so I could have a vent on each side
The car was a mess after all the cutting the grinding so needed a quick clean. Snowfoam to the rescue!
I then bought some road-tax and went for a drive....and the brakes stuck on. again
I went back home, ordered 2 more MC's (Wilwood this time) and dragged the car back up to Clear Motorsport. We replaced both MC's - it turns
out the ones OBP sent me were knackered. Absolutely rubbish!
The weather was kinder to me this time so I covered a few miles around the Clear Motorsport workshop - I didn't realise I'd bought sintered
pads - so now I get sparks from the disc under hard braking.
The finished brakes -
To get some miles on the car and I went out and gave it some abuse, including practicing '11s' - a new one for me; more practice definitely
needed.
I'm pleased to say the car is working great, and I'm looking forward to my first trackday of the year at Blyton on March 18th.
Other things; I needed some storage on my trailer for my ratchet straps. Old Ammo boxes (�18 from eBay) work brilliantly; metal and lockable!
Mash - 12/4/16 at 03:02 PM
quote:Originally posted by daveb666
Then we move on to my new cycle wings. The cycle wings that came with the car were quite heavy and did not help in anyway to prevent stones/water
being fired up at me.
I was meant to be getting a set of carbon wings from a supplier on here in exchange for some commercial photography that I did for them - I did the
work but never received the wings (lesson learnt I guess) so had to find some more.
I contacted a composite supplier in Huddersfield and lucky for me, on the shelf, they had some carbon-kevlar wrap around arches! A price was agreed
upon and the arches were brought home.
I removed the old wings, re-bent the supports and mounted them with sickaflex and bolts to hopefully prevent them snapping off in the future.
All finished and fitted
Now, I know they're too low at the back. I have been out for a little drive but they didn't actually catch so I'll have to see how I
get on with them. I can't move them forward on the mounts due to the way I've had to cut a notch in the arch so worst-case means I'll
have to cut off the return at the bottom to give me an extra inch of clearance. We'll see how we get on.
Arches look really good Mate (excellent thread too) where did you get them, and were they mega expensive?
daveb666 - 15/4/16 at 12:15 PM
The arches came from a local composite manufacturer, unfortunately they're no longer trading
I went on my first trackday of the year and the car performed impeccably. The only fault the whole day was a boost hose popping off; for some reason
the car is now pulling 1.5bar (rather than the 1.18bar target of the Gizzmo controller), I guess the hose clamp couldn't take it.
I can honestly say nothing came past me all day, the car was absolutely flying.
The most interesting video from a spectator point of view is the compilation of slides, skills etc etc https://youtu.be/_7D8rbSrMsg
However, no car is ever fast enough, right?
So it was time to fit the stage 3 bits:
New injectors (left from an R33 skyline, right the original ca18det)
Swopping over the management chips from one ECU to the other:
Next on the list is to swop the AFM for a larger version from a Nissan 300zx. This should be completed this weekend and then we turn the key and off
we go. The chip should command around 300bhp (flywheel) but I'm never confident with off the shelf stuff so I've booked in for a proper
remap (ign and fuel tables) on May 9th where this is potential, assuming the engine can take it, to push past the 330bhp barrier.
[Edited on 15/4/16 by daveb666]
daveb666 - 10/5/16 at 02:20 PM
Hello
The image below shows the comparison between the standard ca18det afm and the z32 afm
As you can see the z32 is significantly larger, allowing greater airflow into the turbo. The Z32 has an 80mm centre as opposed to the 45mm centre of
the ca18det one!
After that, it was time to get the mapping done -
I chose to take the car to RS Tuning in Leeds; I've used them for years and Paul Murray (the mapper), really knows his stuff. He shows the same
passion and interest whether he's working on a �100k rs6 with 650bhp (the car running when I turned up LOL) to a cheapy home-made kitcar.
Paul ran the car up with the stage 3 chip fitted and it made just 10bhp over the previous figures. I then set about removing the ECU so that Paul
could install an emulator to carry out the live mapping. An hour later and we'd reached the magic 300bhp figure -
I asked how much additional boost I was running; None was the response! After a brief discussion it was agreed, due to my er, driving style, that it
would be safer to retain the original boost setting and stick with the current power rather than trying to chase figures and risk stressing an engine
of unknown age and specification.
As you can see from the graph above, peak power is between 6500-7000rpm so it drives almost like an N/A car - ideal in a 7-style motor.
On Sunday I made the most of the hot weather, and promptly broke down, 3 times!
Unfortunately the number of cars around Huddersfield ringroad meant I was stuck in a lot of start-stop traffic which my 20+year old ignition coils
didn't agree with. They kept over heating causing the car to cut out - time to upgrade this area of the car then!
I've ordered a VAG conversion harness and Audi r8 ignition coils - the coils (aside from being new) are longer meaning they don't have any
heat transfer from the cylinder head, and are known to perform well on high-power/race car situations so they should be fine for my little go-kart.
I have a few videos during the re-mapping and run out (including over 20 people stopping when I was broken down to see if I needed water/tools etc!) -
owning a kitcar really does help you make friends, ha.
daveb666 - 11/5/16 at 06:50 AM
Mapping session video -
daveb666 - 23/5/16 at 12:57 PM
Seriously, does anyone even read this? LOL
Back again!
So, although I'd upgraded the car to my target of 300bhp I'd also gained a new fault - the coils were overheating causing huge misfires and
eventually leaving me stranded in the middle of road junctions.
On with the upgrades then!
First up, fix the ropey looking accelerator cable that, at some point, was sure to leave me crying at the side of the road somewhere (more than normal
no doubt!)
Old One
New One
Ahh that's better, now I'll sleep easier.
Proper upgrade time;
CA18DET engines are, at their youngest, 19 years old. Spare parts are abit thin on the ground and any spare parts you can find are normally knackered.
You can still get CA18DET coils at the dealer but they are verrry expensive and will offer no real performance benefit.
There are various options in terms of upgrading CA18dET ignition coils; VAG, LS1 or aftermarket Bosch to name a few. As I'm no auto-electrician,
I went with option one - VAG coils; R8 coils to be precise
There is a chap on the Driftworks/SXOC/CA18 FB groups that offers an aftermarket plug-and-play loom for the CA engine, for use with R8 coils, the
quality is second to none.
Here it is alongside the R8 coils;
The R8 coils themselves also oooze quality; although in this instance I've gone for aftermarket NGK ones as they apparently last longer then the
R8 Bosch ones (Time will tell I guess?)
The R8 coils were from OpieOils and cost just �105 delivered.
Here you can see the R8 coil against the original CA18 coils -
You can see that the CA18 coils bolt to a metal rail on the CA cylinder head, the heat from the head rises up and heats up the coil; eventually this
causes a misfire as the coil breaksdown. The R8 coil is twice as high and aside from where it sits onto the plug has no direct contact with the head.
This alternate design, coupled with the 'newness' and quality of the R8 coils should hopefully fix any previous problems I had in this
regard.
Onto the fitting -
Before (yes, messy, needs a clean - built to be used not to be polished etc)
During
Rather than have the coils floating about, I drilled the original spark-plug cover and used that as a mounting template
Coils In
And Finished
Simply plug and play, turn the key solution.
I can't say they've improved anything as when I rolled the car out on to the drive yesterday the heavens opened
There's a video here of me testing the car before the coil started playing up, post 300 bhp remap -
Ben_Copeland - 23/5/16 at 01:17 PM
I still read, they are lonnnngggg coils!
David Jenkins - 23/5/16 at 02:01 PM
quote:Originally posted by daveb666
There's a video here of me testing the car before the coil started playing up, post 300 bhp remap -
Looks like fun - but I would advise you to cover up the speedo before you play silly beggars through villages, etc. Or move your camera so the
instruments can't be seen. I could see your speedo well enough to make a fair guess of your speeds (I have an identical speedo).
The police have been known to look at on-line videos and issue summonses (or strongly-worded cautions, as a minimum).
Sorry to sound like a miserable old fart, but I'd hate to see you prosecuted for a little harmless playtime...
daveb666 - 23/5/16 at 02:45 PM
I appreciate the comment re the speeds but a prosecution based on my videos in relation to speed would never stick.
Numbers aren't clear, no way to possibly verify it's even accurate if you could see them, no evidence of who is/was driving.
big_wasa - 23/5/16 at 03:26 PM
Wow double the power it was born with and somthing like four times what uncle Ron planned on
daveb666 - 8/7/16 at 12:39 PM
me again
So following the 300bhp mapping and upgrading of the coils I had a bit of maintenance to do. With the new z32 afm, the air filter wouldn't sit
where it did before so I went to Slide Motorsport to have custom hard-pipe fabricated.
This took something like 4 hours and is made up of over 25 individual 'slices' to get the angle correct. The pipe size goes from 3" to
2" over the course of the bend.
It worked perfectly and gives an entirely different turbo-stall sound now that the pipe isn't compressing under boost.
I went shopping -
and then booked my second trackday of the year at Blyton again.
I also bought a cheeky private numberplate
With the more hp came less traction, so my hand went in my pocket and I bought some new Nankang AR-1 semi-slick tyres. This is a photo of them side by
side with my previous ones -
The difference is huge. They are so sticky.
Videos from the trackday -
Me getting absolutely destroyed by a 300bhp, 400kg kitcar
Me vs a 400bhp Turbo Reliant Kitten
Overtake Compilation
Oh, the mapper put a bit of 'pop and bang' into my map, which produces stunning flames. I really like flames.
The temperatures of the car at the track did still keep creeping up, so I installed a 'post-turbo' water cooler in the side panel -
I also swapped out my aluminium rear diffuser for a carbon fibre one, saving me nearly 3kg.
Last month I booked on at Anglesey and shared a garage with a car-friend
Some videos -
Me vs Cayman S
Compilation of Sliding
The videos and day at Anglesey highlighted something. I have major, major traction issues. That's going to be pretty obvious given the power and
weight but there's something a miss somewhere. The next job is to do some checks on the chassis, with the possibility of altering the axle
mounts. Swapping the Capri LSD for a "proper one", and altering the spring-poundage to something that is more suitable.
There's always things to do, but I wouldn't have it any other way
Oh, in other news I killed a bird with the car
Andy D - 8/7/16 at 04:28 PM
Far too much power!
daveb666 - 9/7/16 at 02:05 PM
Agreed
daveb666 - 24/12/16 at 08:20 PM
Long overdue update - most updates are now on instagram (locost_turbo) if any of you are on there.
Videos on my YouTube channel as always...
Anyway...
I had a YouTube feature by a chap called MonkyLondon; loads of fun. You may enjoy it, you may not. A few photos and a link to his feature below -
i had some new rear shocks fitted by Procomp to try and improve traction - Custom valved Protect..
I cut up the front end bit to get more air in!
Bought some new wheels..
Bought and modified some carbon fibre rear arches
I did a trackday at Croft, managed 8 laps before I broke it I did however manage to get past a GT3rs which I was fairly happy about!
Made a carbon fibre bootlid
Ruined some tyres -
Did plenty of miles on the road...
...and finally some proper mods. Boost pipes replaced with all stainless ones to reduce hose clips and therefore the risk of leaks. Coolant hoses
replaced and improved. Oil cooler moved somewhere more practical too.
daveb666 - 12/6/17 at 07:08 PM
All sat tight ready for the bi-annual update? OK then
After the last trackway I decided it would be a good idea to change the clutch and flywheel. The flywheel was replaced for a 5kg, down 8kg from the
factory 13kg one!! Great weight saving and great improvement on acceleration.
I also replaced the clutch at the same time.
It's a good job I decided to take it out...this could have been very nasty indeed.
I then broke the clutch in, the only way I know how
I did a trackway at Blyton to get the year started
Managed a 1.11 around Blyton, more than happy with that.
Made a car friend and went to the East-coast
Time for some improvements; I'm all about the carbon fibre this season -
Interior done (unless I trip over some CF seats somewhere...)
Now lets look at that mess under the bonnet;
big_wasa - 12/6/17 at 08:03 PM
You missed out some of the rivets.
daveb666 - 12/6/17 at 08:05 PM
quote:Originally posted by big_wasa
You missed out some of the rivets.
was easier to use a wood chisel and a hammer daveb666 - 11/9/17 at 08:08 PM
Ultimate weight saving with a carbon fibre VIN plate -
I was having major problems with over-heating still. I spoke to numerous companies that make bespoke stuff but was told to simply replace the
'copy' chinese radiator I had for a proper one. Out came the wallet
The old rad was replaced for a slightly thinner (but crucially lighter!) Mishimoto version. Temps are hugely reduced, I genuinely can't believe
the difference.
More carbon weight saving in the form of a carbon-fibre coil-pack cover
I then decided to rip the car apart during the 'warmest' weeks we had over Summer. The reason; carbon fibre side panels. Partially weight
saving..partially to save me money when the car gets its new colour. More on that later..
The old side panels were fibre glass so it was a mixture of wood chisels, dreamers and grinders to get it all off.
I decided to 'do it properly' which meant all the front suspension came off.
I had vented side panels before; this time I upgraded them to 'fins' to give further cooling.
Finished!!!
Replaced the headlights for something brighter, smaller and again lighter!
Then went out for a drive with my buddy. He has a Hayabusa powered 'MK' kit car. We did some comparative roll-racing. My car goes past his
like it's standing still; I genuinely thought he'd put the brakes on and given up as I went past!
I'm at the last car-show of the year this weekend and then all the panels that are currently green are coming off to go to the local bodyshop for
a new colour. This will be totally different to the current/previous ones.
daveb666 - 25/9/17 at 07:41 PM
The car made it's trip the most pointless show ever. It was a local Gala/Country Fair that had a stand of Classic and Sportscars. The organisers
for some reason stuck the cars in the corner of the field miles away from footfall and the public.
The outcome of that meant I was home by 1pm so decided to tear the car apart ready for the bodyshop.
Scuttle and bonnet vents off
Rear panel removed (this took so long!)
Panels loaded into the daily for paint. Holes to fill all marked up
Time to paint the cage whilst I've no panels to worry about. Nothing lairy, but I am swopping from matt black to a gloss black to tie in with the
new paint and the carbon side panels.
...and this is just one of the potential new additions. A big rear wing. Currently just thrown on the cage as a test-fit but the end-game is to have
custom CNC brackets off the rear bars. I have a friend in SA that competes in their TimeAttack and the rear wing made a big difference to his traction
in high-speed corners; something I really struggle with.
The Jury is still out on whether or not it will actually go on. But my other on-going project is a big front spoiler/splitter to match from a Formula
3 car. As with the rear one; I'm still not 100% on how I'll progress with this yet.
daveb666 - 2/10/17 at 07:55 PM
This weeks update -
The roll cage is all finished in gloss black
I'm never far from 'For Sale' boards on a variety of forums.
Last week I found a reasonably priced steering wheel to replace the Momo Caterham one that I already had.
The old steering wheel was 260mm whilst the new one is 240mm, so a fair bit smaller. (and crucially lighter, ha)
and all fitted into the shell of my car
Good news from the bodyshop - the panels are all prepped and ready for paint -
Now a step-back in time.
This is the development of my front 'aero' - still very much a WIP. Still very much a learning curve for me. Whether or not it will work,
make me faster or slower, or just fall off is all up in the air. It may not even make it onto the car, we will see.
No idea where the front spoiler is from; I suspect some entry level 'formula' racing? Jazzy graphics that's for sure.
Removing the graphics and marking it up
VERY rough idea for a bracket
Original mounting brackets on the wing removed and new ones made. I just needed to make some holes for them
Something like that -
New bracket plates mounted. Sikaflex always comes in handy. Along with some fixings underneath that have been ground off. They aren't going
anywhere!
That's as far as that's got at the moment.
Whilst waiting for my body panels to come back I thought I'd give the car a check over. Around a month ago I smashed the sump pan on a spirited
drive over Holme Moss. I knew I'd hit the floor but, as it wasn't leaking I didn't really worry about it.
On jacking up the car the sump had clearly taken a big hit -
Not ideal - decided it best to take the sump off and find a replacement.
On taking the sump off I found -
Urgh.
Doesn't look better on your finger either!
Best take a look at the bearings then -
Clearly worn but not that bad. Original as they have a 1989 date-stamp on them!
I've examined some of the other oil-ways, checked the filter etc and there is no other gunk or mess anywhere. I'm fairly convinced (or
should that be have convinced myself) that the gunk and mess was in the sump was all dislodged when I smashed it. I also noticed the pickup mesh was
damaged and dented so was obviously resting on the base of the sump itself.
I've ordered some replacement bearings (Clevite) and will of course flush out the engine, change the filter and replace all the necessary
gaskets. I'm not one to spend money un-necessarily being a Yorkshireman and I'd love an excuse to actually rip it out and rebuild it with
uprated parts but until it ACTUALLY breaks SWMBO says that's not an option
big_wasa - 2/10/17 at 08:24 PM
Hope non of that has gone through the turbo.
daveb666 - 3/10/17 at 07:09 AM
Seems to be ok...
daveb666 - 14/10/17 at 05:15 PM
The bits are back from the bodyshop
So happy.
The colour is Yas Marina Blue (New m3/m4 colour)- it changes colour in every photo I take. It's such a great colour.
Just after the spraying
Collected in the daily
Rear panel bonded on and held with multiple 'clamps' (looks like the car has a nappy on!)
Scoop going back in the bonnet. Mesh to follow on the holes at the back
Scuttle panel back on
Carbon fibre aero-screen back on
Nose-cone in the boot of the daily to fit the NACA duct
Bonnet and nose-cone offered up on the car (see what I mean about the colour changing!)
Hoping to finish off building it all back up tomorrow, then it's just the engine I need to worry about it.
Angel Acevedo - 25/10/17 at 01:21 AM
I missed your previous pictures so this is a little bit late...
The square corners in your bonnet may lead to premature cracking.
I sincerely hope I�m wrong.
AA
daveb666 - 25/10/17 at 10:52 AM
Been like that two years now with no problems...
big_wasa - 25/11/17 at 09:51 PM
Looking fresh for next season
daveb666 - 8/1/18 at 09:07 PM
Wing on. Car built Up. Engine back together.
Job done (yeah right!)
big_wasa - 8/1/18 at 09:19 PM
I do like the blue
ReMan - 9/1/18 at 12:24 AM
quote:Originally posted by big_wasa
I do like the blue
Some left overs from the roller door? obfripper - 11/2/18 at 08:59 PM
Quick question- where did your nosecone air scoop come from?
Cheers,
Dave
daveb666 - 15/2/18 at 10:25 AM
Carbonfibre company that no longer exists unfortunately
daveb666 - 18/6/18 at 07:48 PM
I can't believe it's almost 6 months since I last updated this thread. I'd love to say it's been an amazing 6 months of tyre
shredding antics, track-days, sprints and road-trips but alas it's been half a year of utter crap due to mechanical issues..
Read on...
I finally saved some pennies over Christmas and got the all important Quaife LSD I'd always wanted.
Out came the Ford Capri 2.0 axle and off it went to a chap in Sheffield to have swopped. A bargain at �75
That was fitted nicely back into the car. Bolts all checked and off we went to the local watering hole.
The difference from the Ford 'LSD' is quite simply phenomenal. Where before I span through the gears the car now hunts out even the smallest
bits of traction and when struggling, instead of simply spinning up the wheel 'tramps' as it fights for grip. A serious serious improvement
to the car.
I went to a coffee and cake meet at GBS cars in South Yorkshire
Finally replaced my old and crusty 'caterham' harnesses with some wider Titon Motorsport ones
Went out for some more spirited drives
Now back to the upgrades for a moment. You may recall the large front spoiler from previous posts. I mocked up some cardboard templates of brackets
and a friend at a local engineering firm made me some CNC versions
Quickly offered up on the car
There was far too much side to side movement so I added some wire bracing and also made my own end-plates from carbon fibre.
Cleaned it and went out for some more drives
It was at this stage things took a turn for the worst...
...you can see the dark clouds rolling in.
Since putting the engine in I've always had a strange rattle. The rattle went away when the engine warmed up which implied there was no issue
with the shells. I swopped them out anyway for ACL ones but the noise remained. I ignored it, for a bit but then noticed the engine was breathing a
lot! To the point where people were pointing at it in traffic!
So, before the engine stained the country roads of Yorkshire I decided to take the head off for a nosey.
Pulled out the magnetic sump-plug to find this -
not ideal!
Shells had done just 35 miles and look 'ok'
Cylinders a bit of a mess
I decided at this point there was no going back so out came the pistons..with there rings in pieces
3 and 4 were gone. 4 being the worst
Note the varying fuel spray marks on the pistons which shows the fuelling in each cylinder is different -
My engine spread across my workbench
Engine out
At this point I wasn't sure what to do. I'd priced up forged rebuilds and new management (c.�2k) and even a normal rebuild (�1k) when I
stumbled across a second-hand engine for sale for the right price.
On my way brick from London I called off the M1 and threw it in the back of the daily
..and back at home
The GTiR injectors had to be cleaned; no brainer decision. Off they went to a local cleaner who reported all were 'ok' but one was
'bad'. After cleaning all were 'good' and had matched spray patterns and quality. I also replaced both my fuel filters too.
A few days later the new engine was in the car
Noticed a burnt through vacuum hose going to my boost controller solenoid which I promptly replaced
All back together (just 11 days off the road!)
..and mostly importantly working well
The old engine was clearly dying as the new one felt like a monster in comparison... until on it's second outing to Wakefield the temperature
rose suddenly and water burst out of the expansion tank.
I limped to a lay-by, let the car cool down, topped up the water and then cruised home slowly.
Deciding that the new engine probably had a manky water-pump and galleries I flushed it all out and replaced the water-pump. (old on the left
obviously!)
Coolant refreshed and engine timed up again I plodded around the local area for a test drive. No issues forthcoming so I headed for the local
hillclimb - 'Holme Moss'.
Holme Moss is a 524metre high hill between Yorkshire and Derbyshire with a windy road all the way to the top. A national speed limit of course so
speeds of up to *cough*60mph are achievable
I got less than a third of the way up the hill when I saw the temp sore past 100deg and smoke come out of the bonnet. I pulled over and saw
smoke-machine style effect coming from my exhaust. That'd be the head gasket then
Turned round, rested in a layby and called a mate to tow me home.
Sooo...off with the head again -
Clearly a blown gasket between the waterways around cylinder 4 (the one furthest from the
pump)
The spark plugs show a huge variance in colour and from the image indicate 1 & 3 are running very lean
I've no idea what the actual problem is. The tune hasn't changed. The fuel quality hasn't changed. Dunno, out of ideas.
I took the cylinder head to a local form which has now been pressure tested and skimmed and I've also ordered a thicker Cometic head-gasket to
fit.
The plan is to get it all back together and get it back to my tuner for some runs on the rolling road to check it all over before I melt something
else.
IF, if this engine can get me through the rest of Summer then I am committed to a forged build with proper aftermarket management and a target of
400bhp+ over Winter. If it doesn't, then it's likely to be the end of the road for me and the car.
big_wasa - 18/6/18 at 08:38 PM
Quote If it doesn't, then it's likely to be the end of the road for me and the car. quote
I am sure the love will return.you would have to fix it to sell it anyway.
daveb666 - 16/9/19 at 09:34 AM
Are you sitting comfortably? Then I shall begin.
It�s been 14 months since I last updated this thread and to say it�s been one hell of a journey is an understatement.
Following the replacement cylinder head and thicker head gasket in my last post, I suffered further problems. Whilst re-fitting the camcovers I
dropped a bolt into the cylinder ?
The head had to come off again to get it. In my haste of refitting I put the head gasket on the wrong way round! I didn�t notice and ran the engine.
Oil couldn�t get from the block to the cylinder and bang. The cams seized and the cambelt snapped. One dead engine.
Not to be put off, I threw all my spare parts together and finally, finally got the car running. But alas, the eBay engine was a bag of nails and
smoked (and clearly had lots of metal floating around in it). I made the decision to do a forged build.
Over the next 3 months I amassed my pile of parts; APR rod bolts, ACL race bearings, cometic head gasket, carillo forged pistons and maxspeeding
rods.
I also bought a new turbo (gt2860rs) along with a tubular manifold. I acquired another cylinder head which I sent off to local specialist AL
Developments to be improved and checked over.
With money (somehow) still in my bank, I invested in proper aftermarket management. My loom was old, maybe 30 years, so I wanted something that would
work well but came with a new loom.
After many many hours of research I plumped for MaxxEcu. It�s a largely unheard of system in the UK but its features largely outweigh those of Link,
especially for the what it cost � sub �800 WITH a loom.
I entrusted the making of the loom with a company near Leicester that will rename nameless. The engine build was entrusted to a good friend from
Kent.
Fast forward to early January and I had a new loom, ECU and a built engine. The engine was built-up in my garage and then fitted to my car over the
period of a few days..
I didn�t want to go through the process of running the engine in on the road. It was Winter, I have no roof or windscreen and didn�t want to risk
breaking down somewhere.
The chap that sold me the ECU and loom offered to run in and map the engine for me at his mates rolling road.
Early April I�m all booked in and trailer the car down to �StreetRacers� so we could borrow the rolling road. The run-in commenced around midday and
we completed around mid-afternoon. Injectors were swopped for 1000cc ones and then proper mapping commenced.
During mapping, I noticed the car was breathing quite heavily but apparently the guy knew what he was doing so I kept quiet.
Mapping stopped around 11.30pm. The car apparently made 299bhp (although I have no evidence of that) but would not respond to increased boost levels.
Boost increase was attempted up to 1.6bar but the power remained the same.
I was told that the poor intercooler design and pipe routing was to blame. We did a quick test drive on the road and the car had huge amounts of lag,
but when boost came in shot went well.
I went back home and was told to get the intercooler fixed and then come back for further mapping.
Over the next few weeks I continued to use the car, fairly hard.
I broke down on two occasions. On the first, it appeared as though my lift pump was not powerful enough to keep up with the new fuel demands. My swirl
pot was ending up empty. A high-powered lift pump was purchased and installed.
The second time, an oil cooler hose split leaving me stranded and required further assistance to get home from a friend.
The car then went over to Clark Custom Fabrication in Barnsley to have the intercooler pipes modified; which at the very least made a good visual
improvement!
It should be noted at no point did the car suddenly loose power or feel any different to my midnight drive immediately after mapping.
At this point, I just wanted the car done and working so went to my regular tuner in Leeds � RS Tuning.
Once on the rollers, Paul attempted to do a power run and immediately stopped. I was told it was knocking [DET]. He took 4 degrees out across the map.
He tried again. Still knocking [DET]. He took another 4 degrees out and just about managed a full pull.
The fuel and ignition maps looked like a mountain range. Paul tidied up the fuel and ignition maps before a figure of 255bhp was produced. Something
wasn�t right.
We pulled the timing cover and found that the timing had jumped 3 teeth on each cam. Mapping was halted and I was sent off to replace the entire
timing belt setup.
I replaced the belt and pulleys but the car still breathed and had smoke emitting from the exhaust. I decided to take off the cylinder head.
On doing so, it was apparent that the head gasket had gone and cylinder 4 had some bore damage. All 4 pistons had evidence of DET marks.
I pulled out piston 4 and it looked like this. Basically scrap from sustained DET. Pistons 1,2 and 3 were all the same.
The pistons went in the bin along the head gasket, bearings and block.
I spoke to the original tuner, who blamed the new intercooler pipework for the cause DET and of course the slipped timing. I drove the car daily since
it was originally mapped and I know it never felt any different. At this stage, I think the timing jumped whilst it was on the rollers whilst it was
being run in and the DET was never noticed.
Of course I have no proof of this so just need to take this one on the chin.
After a few days moping about I picked myself and started ordering parts; pistons, head gasket, gasket set and bearings.
My spare block went to the engine builders and was machined and another friend gratefully came to my house and built the engine up for me.
The engine was fitted, run up to temp and the oil dropped. New running in oil was fitted and I took the car back to my regular tuner; RS Tuning in
Leeds.
A coil pack died during mapping, so a trip to GSF fixed that. Around lunchtime we ended up with 307bhp @ 6,500rpm @ 1bar of boost. The original
standard engine made 298bhp @ 7,500rpm @ 1.1bar of boost. So I�m making more power, at less rpm and less boost.
Throughout the mid-range I have an increased of between 30-40bhp across the board so a huge improvement in that regard.
There was a problem though, the engine was getting hot on boost and wouldn�t cool down. I was told to have a look at the cooling problem, swop the oil
out again and get some road miles on it. Then return to finish the mapping.
The cooling issues was found to be a lack of thermostat. I�d removed this from the eBay engine and simply never refitted it as I stupidly thought an
engine without a stat would run cooler but apparently this isn�t the case.
I�ve dropped the oil again and been out for my first drive which I�m pleased to say went very well.
Over the next few weeks, my plan is to get out in the car as much as possible before heading back over to Leeds to get the mapping finished and see
what she can make. Based on other engines with a similar specification I�m hoping for somewhere in the region of 330-340bhp but it is of course not
just about chasing numbers.
daveb666 - 20/1/20 at 09:25 AM
[quote=dave2007bc]Remember how I said the car was complete, well apparently the car didn't agree.
I had some awesome drives over the last month or so. The car is really really motoring
Unfortunately when I returned from my last drive there was blue smoke coming out of the exhaust
I did a compression test, the results were all OK so it was fairly obvious the turbo oil seals had gone.
I set about taking the turbo off.
Once off, it was fairly clear the seals had gone. There was also significant movement in the shaft itself.
I took the turbo to Venom Turbos in Leeds. This company specialises in rebuilding ball-bearing turbos. The damage to the turbo was fairly severe and
would have resulted in a bill of almost a grand.
I therefore chose to buy the most appropriate replacement 'off the shelf', for a bit more money. The Garrett GTX2867r GenII. This turbo has
the potential to do 450bhp if I really push it!
New turbo arrived -
...and fitted.
I did a video on my YouTube channel of fitting removing the old turbo and replacing it with a new one. https://youtu.be/hItjmUsdG6o
That's where I am currently. I need to get some road miles on the car before heading back over to Leeds for mapping.
If I can get to 435bhp that would take the car to 700bhp/ton which is more than a Koenigsegg CCX :beer:


 Talking of lights did you find out why the O/s side one was on the slosh ?