
scratch build Body for '60s clubmans car
Mistron - 10/10/13 at 07:52 PM
Hello folks,
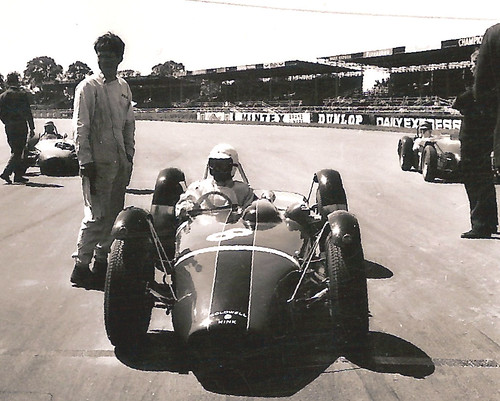
Now, this will be nowhere near as exciting or impressive as the Lola T70 spyder build, but I have been making some progress on the body of my mystery
'60s car
Photos of it as I bought it and as it stands can be found here: http://www.flickr.com/photos/44645707@N00/sets/72157632087827009/
I have got the main body sections drawn out at 1:1 on MDF in styling tape, and will start constructing the bonnet / nose section at the weekend.
Would there be interest in me documenting the process on here, if only to demonstrate the many pitfalls to others ?!?
I should say, I used to be a GRP pattern maker, but I'm doing this project in a domestic single garage, so progress will not be quick..... and
history shows that I'll probably sell it before it's finished!
Anyway, if anyone is interested I'll happily document parts of the process.
Al
[Edited on 10/10/13 by Mistron]
adithorp - 10/10/13 at 08:01 PM
I'd like to see it. Don't think I'd ever have the time to attempt it myself but I'd like to know how.
cs3tcr - 11/10/13 at 02:18 AM
Yes please post your progress. The website you did for your last project was very cool, pity you sold that car on before finishing it.
Rod
Mistron - 12/10/13 at 06:32 PM
Good progress today!
More photos of the process added to the Flickr set in the first post.
Next stage will be to get it all glued and then add foam to the drivers side of the bonnet / scuttle and then I can start to transfer sections over to
the engine side, from which I can start to work on the bonnet bulge etc.
The Bonnet / nose /scuttle will be one moulding, so the 'dash' isn't actually part of the buck, but is just included at this stage to
echeck sight lines for gagues etc.
Might get back onto it later in the week
Al
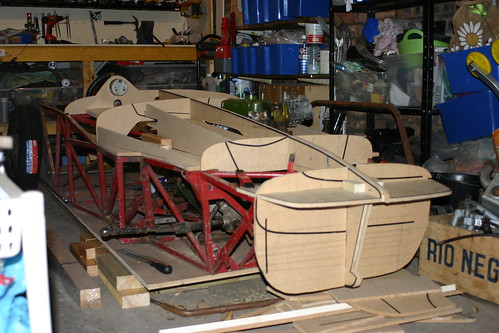
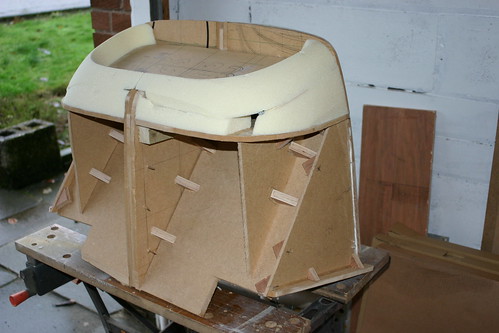
Mistron - 17/10/13 at 10:35 PM
nearly done......
Well, not quite, but I've started to block in the main shapes on one side, which I'll then take sections through acorss the car at key
points so it's (hopefully) symetrical.
Took a bit too much out with the rasp in places, but I'll just make the skim of filler a bit thicker to compensate....... Big sweeping surfaces
are tricky with the rasp - I should have used 80 grit paper on a board, but I didn't have any and I was keen to crack on, so my own fault, and an
easy fix.
Instrument bulge / screen cowl next, then onto the nose cone (though it will all be part of the same panel......
Al
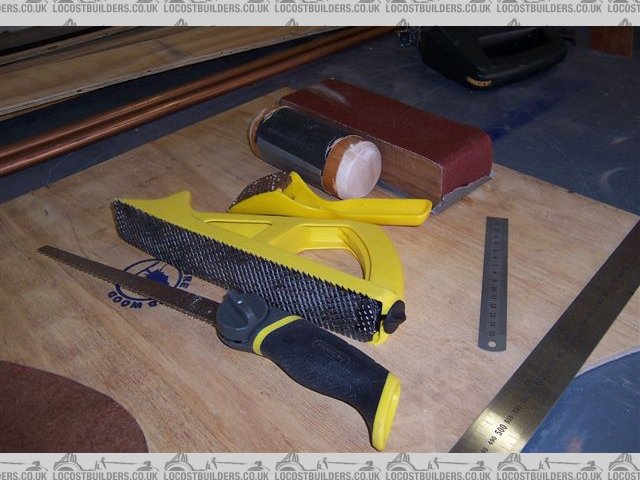
Fred W B - 19/10/13 at 01:10 PM
Looking great Al, I'm also keen to follow your progress.
You can see some of the tools I used to shape foam in the picture below.
Cheers
Fred W B
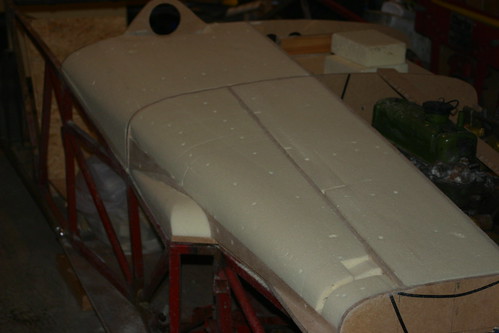
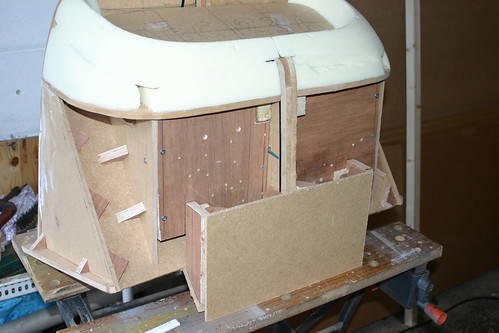
Mistron - 19/10/13 at 10:10 PM
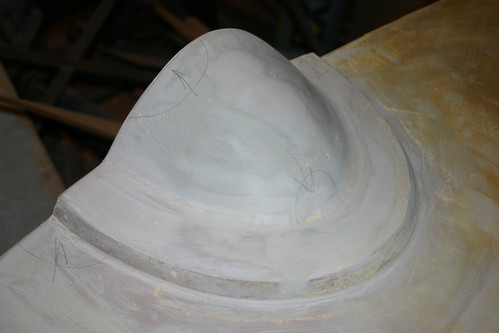
Bit of pfogress tonight - refined the footwell bulge as it looks too 'clumpy', and made a start on the instrument bulge / screen cowl.
Tracing paper screen template is a bit droopy, but you get the idea.
It needs a fair bit of finishing, especially the transition step from the bonnet surface up to the cowl, where the screen will mount, as it is really
tricky to get all the lines flowing parallel as it runs over the curves.
Still, it's all progress!
Next I'll either start building up the other side, or work out how I'm going to do the nose section - it's part of the moulding, but
I'll need to be able to et the buck off the chassis, so it needs to be removable, I think......

Oh, and Fred, our tool kits are very similar! not very 'high tech' is it?
Al
T66 - 20/10/13 at 09:11 AM
Keep the pictures coming, and the instructions.....looking good !
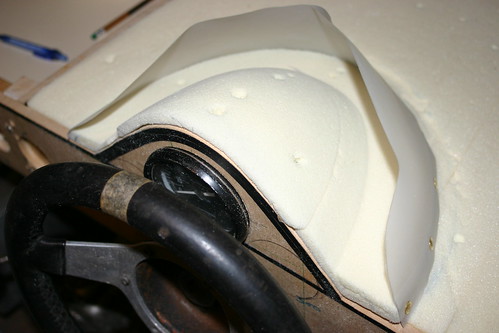
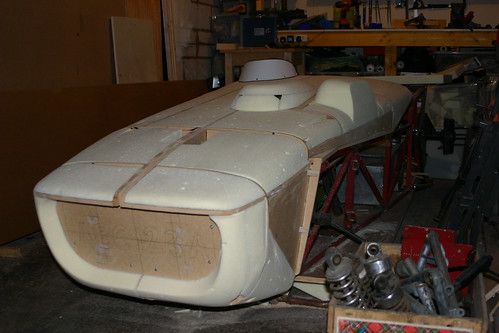
Mistron - 25/10/13 at 10:47 PM
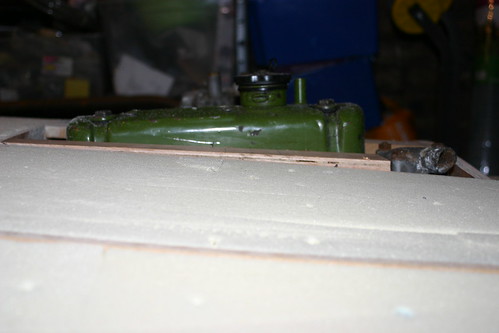
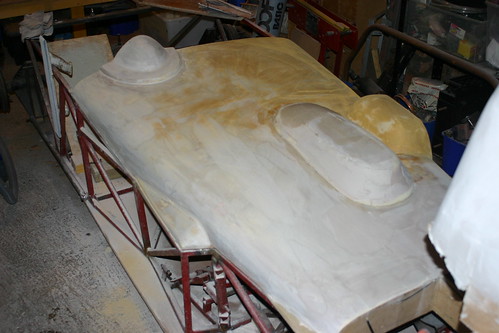
A bit more progress tonight - glued and screwed in a couple of more intermediate sections then infilled with foam.
Getting closer int around the engine. I will have to try a ew possible carb set ups on so I make sure I leave enough space for the main options so I
can chop and change without cutting up my bonnet.
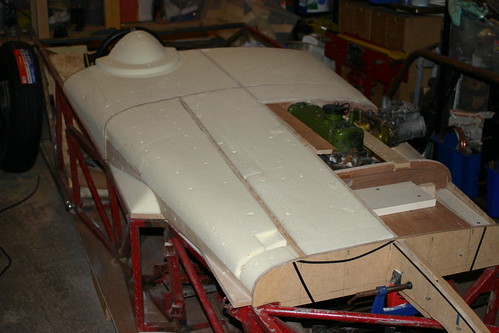

You can start to see how much of a bulge will be needed over the rocker cover and carbs

The last one shows just how 'rough and ready' the construction can get before you cover it in foam
Hope to get the top surface as far forward as the nose done over the weekend (unless I discover I have pressing domestic tasks!)
Al
Slimy38 - 26/10/13 at 08:09 AM
What are you planning for the wheel area? The bonnet drop off on the sides suggests open wheel, but then you have a picture of a mistral which is
fully enclosed?
Mistron - 26/10/13 at 09:21 AM
ah, yes. I forgot to move the Mistral pic - I did consider fitting one of the new Mistral shells, but then decided to go with a traditional clubmans
body, echoing that fitted to the Coldwell I stupidly sold, but with a nicer screen
Volvorsport - 26/10/13 at 10:26 AM
is this the same on uphillracers ?
Mistron - 26/10/13 at 10:46 AM
yes, I had a for sale advert on there, on the off chance.....
TheGiantTribble - 26/10/13 at 10:55 AM
Looking good.
Do you have a special technique when cutting/marking out the plywood formers, for making the curves both left and right symmetrical?
Mistron - 26/10/13 at 12:28 PM
I use stylists drafting tape - basically thin black Masking tape which is flexible and you can lift and re-apply if you aren't happy with the
line, and I draw each section on a 100mm x 100mm grid from the centre line of the car. (You can also use this tape do do full size drawings of
vehicles - check youtube videos of 'Tape drawing'
By tracing the line from the drawing board onto tracing sheet you can then use carbon paper to transfer it onto the MDF and ensure perfect symetry.
The grid helps with this as well.
Once traced with carbon paper I tend to re do the line in Tape onto the MDF to check it looks ok when mirrored (often it doesn't) and ajust it as
necessary. It also gives a strong line to follow through the bandsaw.
You can see the whole process on this page from one of my previous projects (sadly sold before completion)
http://myweb.tiscali.co.uk/racecar/pandora/body.htm
Al
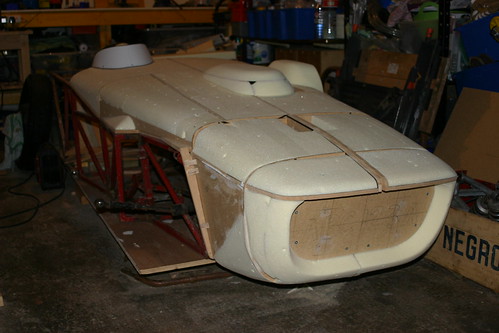
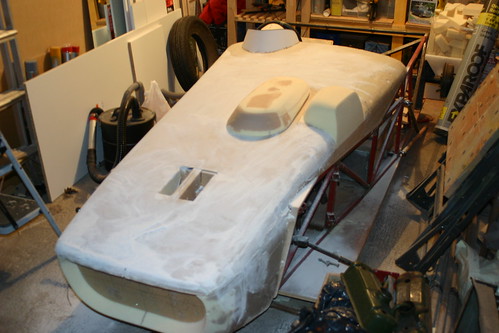
Mistron - 1/11/13 at 11:05 PM
Got a chance to spend a couple of hours on it tonight - what people with kids do on a Friday night instead of going to the Pub!?!
Anyway, finished blocking in most of the upper surface and took it to a rough shape. The gap in the surface of the nose cone is just to give access to
assembly bolts so I can take off the nose section to form the inlet at a more comfortable height.
Next will be to start building up the nose cone lower sides and inlet, then onto building up the flare at the corner where it goes from nose to
bonnet. Also need to make the engine bulge and the one over the carb(s)
Al
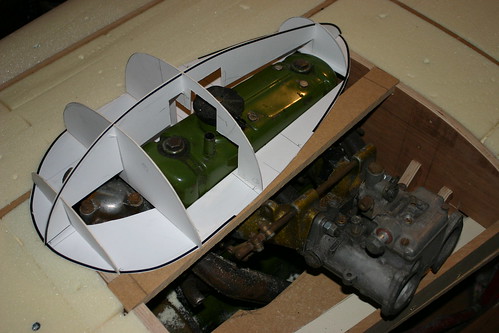
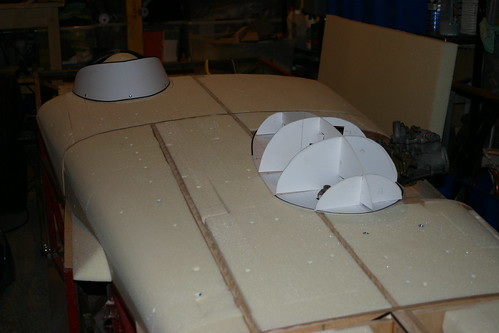
Mistron - 3/11/13 at 10:03 PM
Making a 'first draft' of the bulge over the engine. Looking a bit too big still, but I'll reduce it in the foam down to something
rather more modest.
Card templates are fairly rough & ready, but a quick way to get ideas into 3D to see where to start.
Al
steve m - 4/11/13 at 08:26 AM
Imho I think that bonnet bulge looks way way to big, as I would of blanked the oil filler off, and welded a new one on the back/front thus lowering
the bulge
Steve
Mistron - 4/11/13 at 07:37 PM
I agree, and even though the card shapes are very 'generous' as a starting point, I still think this has confirmed that I need to look at
the filler cap.
One of the cars at Bo'ness (an Elva, I think) had the cap moved, so that was already anticipated, but the Coldwell did run with a similar bulge
to this, so I wanted to check it first.
There will be a similar bulge over the carb though, whatever happens to the rocker cover, and a small bulge over the thermostat housing......
All good reasons to start with card, rather than going straight to the foam, as you can see what clearance you are leaving
Al
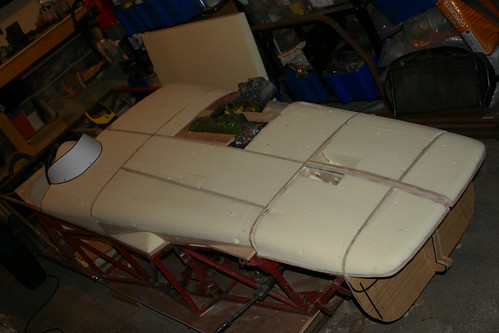
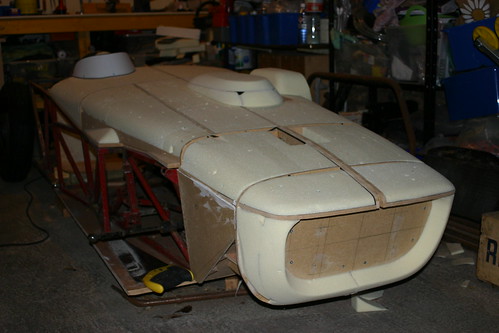
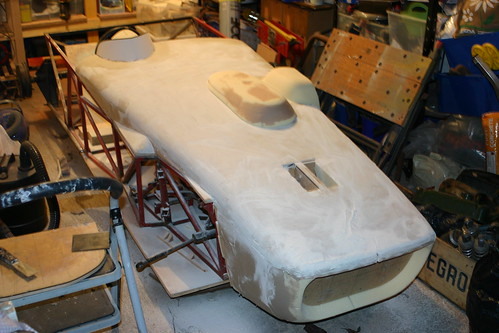
Mistron - 10/11/13 at 08:08 PM
Progress. If nothing else, it's motivating when I open the garage door!
Should get on to the under side later in the week
Al
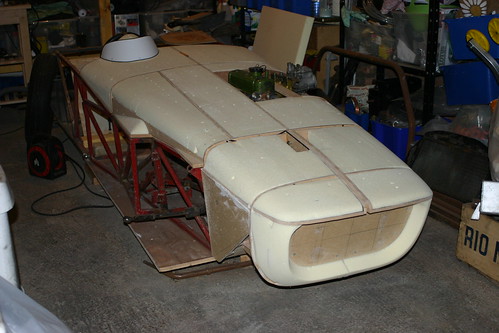
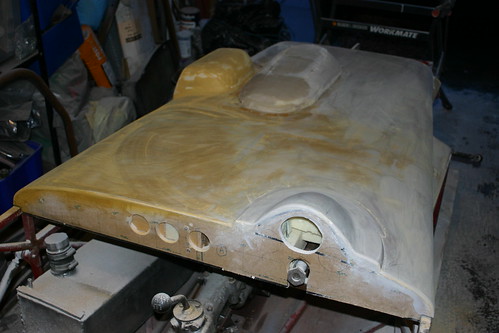
Mistron - 28/11/13 at 11:12 PM
Chopped off the filler cap, and will put a filler tube direct into the sump. Then I measured the clearance needed for both a Weber and twin SUs and
then made a start on the necessary bulges to clear them and the thermostat housing etc.
Because the bonnet line is so low the bulge over the carbs looks massive! but taking the edges off should make it a bit less boxy. Interesting to
compare it with the Coldwell
A couple of photos before I carry out a bit more trimming and refining:
And the Coldwell for comparison:
underside of the nose cone area next, along with the stiffening flares where it flows into the 'bonnet'
Al
[Edited on 28/11/13 by Mistron]
Angel Acevedo - 1/12/13 at 03:45 PM
In order for the Carburetor Bulge to look less "Protruding", couldn�t you make it a scoop? this way the size may be a feature.
Good work, seeing this post has made me think to get off my lazy b*tt and start working on my front wings.
Mistron - 1/12/13 at 04:15 PM
I'ot sure a scoop would work - I did consider it, but I think as the carbs come close to the edge of the chassis I'd need to make the bulge
bigger so there is lots of room round the inlets.
I might cut the face back quite a bit to reduce the bulk of the bulge, and will also remove quite a bit of the carners to give it a much more rounded
form.
I think..........
Al
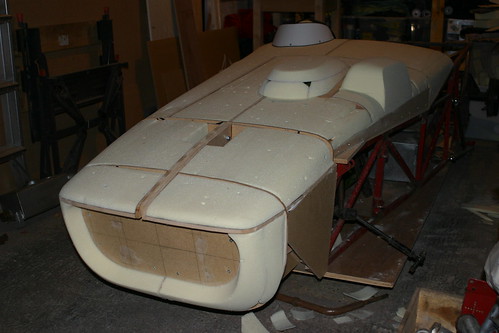
Mistron - 8/12/13 at 04:51 PM
A bit more progress today, mainly on the nose area.
Building up the underside structure to mount the foam:
Forgot to take photos of the foam before shaping it, but here it is fitted:
Need to stick some thin sheets to the side to give it a bit of crown, and then start on the flute where it sweeps up to the top mount . I've left
an angled gap between the nose and the front of the chassis to let some of the heat out, and it also stops it looking so 'boxy'
With Christmas and a kitchen replacement coming up, this might be the last pit of progress for a while, but it's a shame as steps like this are
quite motivating, I can really see it taking form now.
Al
Mistron - 9/2/14 at 09:59 PM
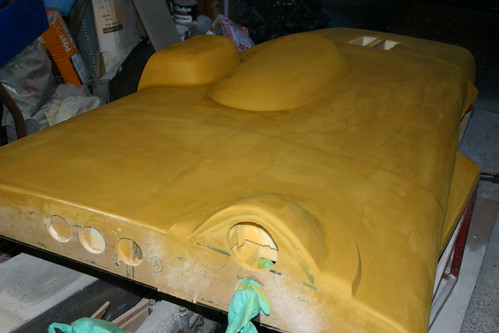
A bit of progress after a delay due to holidays, new kitchen, new job........
Starting to build up a skim of filler over the surface and taking out the gaps and adding a bit of strength to it.
(The gaps in the upper surface are purely to gain access to the attachment bolts, and won't be there in the actual mouldings)
Al
Matt21 - 10/2/14 at 07:25 AM
blimey!
A few years a go I made a model yacht using the same methods, timber frame, foam, shave into shape then filler over to make a fibre glass mould....
that was just over a meter long and a job i hope to never do again!
to do a whole car?! and to such a good standard! very impressed!
johnH20 - 13/2/14 at 03:26 PM
Hi, looking good. What combination of foam and filler do you use? I used to build surf boards using Styrofoam but was warned off polyester based
filler ( not that my shaping ever required filler of course! ) and always laminated with epoxy. When I built my nose cone for my car I used PU foam
cast ' in place' on my wood framework - very messy and I would not do it again. Permitted the use of commercial polyester based body filler
and laminating resin though.
Mistron - 13/2/14 at 11:28 PM
I use sheet polyeurethane foam from ECF which is primarily used for surf board making. You can cut, file and sand it to shape, then cover it in
filler, paint it ready for moulding. It does make a lot of dust, but is very easy to use. I ahve probably put a full 3.5 litre tub of fliller onto the
buck so far, gluing the sheets together and building up the surface.
http://www.ecfibreglasssupplies.co.uk/p-556-2-polyurethane-foam-sheets-50mm.aspx
Al
Mistron - 14/2/14 at 10:21 PM
Deal done on getting a mould made and the first lift from it
Hope to have it ready for that stage by mid summer

Al
Mistron - 2/3/14 at 06:30 PM
Made some progress - nice to get most of the foam skimmed. It really does feel it's coming together now.
Boring sanding filler though!

[Edited on 2/3/14 by Mistron]
Fred W B - 4/3/14 at 07:13 PM
Coming on nicely there
If you didn't see THIS before you might find it usefull
Cheers
Fred
Mistron - 4/3/14 at 07:27 PM
cheers Fred - will look out for those. The guide coat sounds particularly handy
Al
Mistron - 30/3/14 at 07:00 PM
Not had a chance to do anything to the buck for a few weeks, so nice to get a chance to make some decent progress today. Finally seeing it all in one
colour (admittedly only a filler primer guide coat, but still.....)
Lots of tidying still to do to the flutes over the front suspension mounts, but it's just a case of building them up with filler
For reasons of cost / time, I think I'm going to put on a 'conventional' '7' rear end in alloy and tube rather than moulding
one similar to the Mink. I may do that in the future, but at this stage I don't think it's the way to go at the moment.
Al
Mistron - 16/4/14 at 08:06 PM
No photos of progress, but I'm hopefull I'll have it 'dammed up' ready to go for moulding in a couple of weeks.
It'll have simple 90 degree returns on all edges, so simple dams to set up.
Al
Mistron - 27/4/14 at 06:44 PM
Had one of those days in the garage where you work all day and at the end it doesn't really look like you've made much progress, but in fact
a lot was achieved.
As well as finishing off the bottom of the nose section I made progress with cutting out and fitting the dams which set out the split in the mould and
also the returns on the mould edge to which the flat flanges will then be bolted so the return edges can be formed round the edges of the moulding. I
also built up the wee projections at the edge of the dash to soften the transition from the panel to the chassis as the right angle was a bit
'jarring'


(The final panel will be trimmed to the pencil line in the last photo)
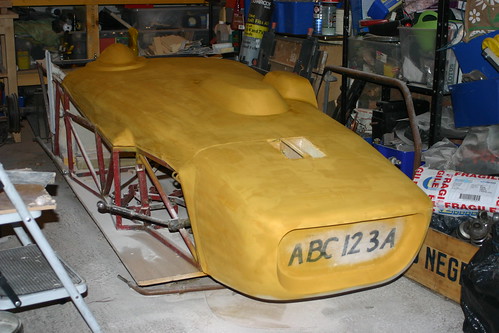
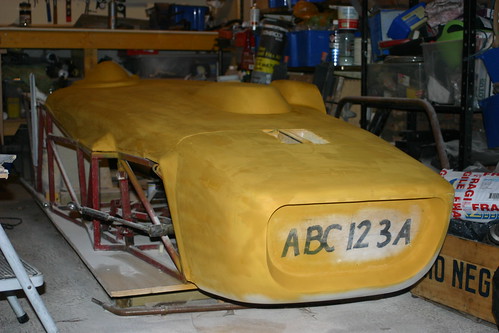
Mistron - 25/5/14 at 04:25 PM
50 shades of Grey?


Nah, Paint it black!


It's a wee bit ripply, but on the whole, I'm pretty chuffed with it. The black will show up any faults, hence the moulding will be in
OEW........
Right, I'm off to ring the moulder
Al
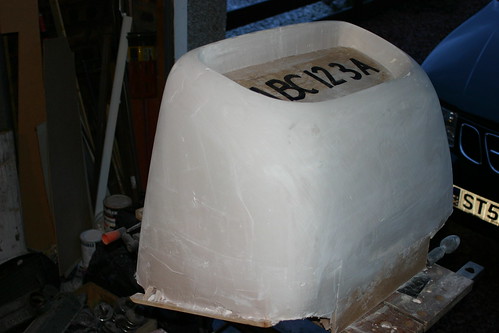
Mistron - 14/8/14 at 09:36 PM
Drum roll, please..............
A wee bit of trimming needed, but it looks pretty good!
It turns out that Halfords aerosol paint has a weird reaction with GRP moulds, so it'll need to be painted, but not bad for what it's cost
me.
Right, on with the rest of it !

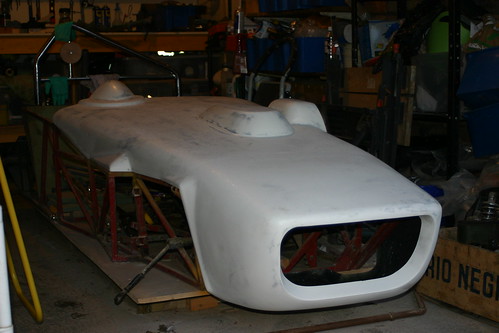


Al
Mistron - 29/3/15 at 05:21 PM
Been a while since I posted to this, as I've been a wee bit distracted by other projects.
I hope to get the rear frame of the chassis frame bent up in the next few weeks, and then I can get that mounted in place.
I have made a few bits of progress though - check out the funky crackle finish dash!

Just need to resist the urge to sell it as my head keeps gettign turned by other, more sensibe, projects and heaven forbid, working cars! :0)
Al
Mistron - 30/3/15 at 06:39 PM
Dilema time.
Do I:
A. Stick on a 'conventional' Lotus seven style rear end for ease / convenience / low cost / speed
B. Make a buck of a unique sculpted tail sort of in the style of the Coldwell which ties in with the front end. This will be messy / expensive / slow
/ may result in the thing never being finished!
My head tells me A, but I know that if I DONT do B, I'll probably wish I had.
Oh, or there is of course:
C. Sell it and get something that I can actually use on the road....
Hmmmm, not sure
Al
02GF74 - 7/4/15 at 07:55 PM
B. Tbe front is pretty much unique so do the same with the rear. In theory it should be quicker as there is a bit less to sculpt plus you've
done it once already.
Very impressive although the carb bulge on far lh side is either unnecessary ( nothing wrong with exposing air filters to the outside or could have
had a more gradual slope at the front to make the shape more slippery) but thats just me being picky.
Mistron - 7/4/15 at 08:12 PM
"aerodynamics is for people who don't know how to build engines" Enzo Ferrari
:0)
Al