Irony
|
| posted on 6/12/09 at 11:01 PM |

|
|
Viento Progress
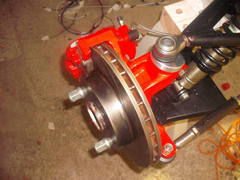
I just thought I would update you guys on my Viento progress. I have had it a 2 months now and I don't seem to have made much progress. It came
part built.
I have:
Stripped down the suspension greased and rebuilt.
Stripped down the suspension again and sorted the crush tube issue, rebuilt for the second time.
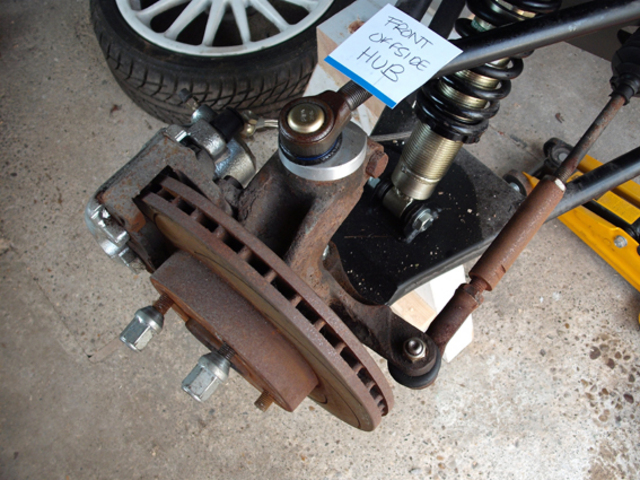
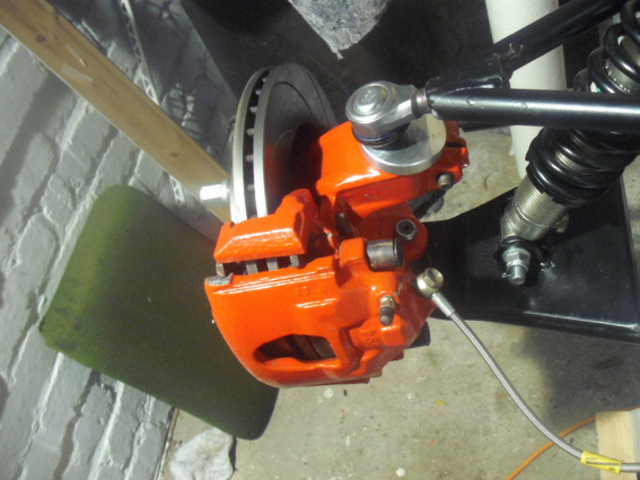
Rebuilt all the brake assemblies and stripped the rusty parts down to the bare metal and painted them. in three coats of marine paint.
Fitted pedal box and cylinders.
First stages of panel work completed.
This seems to have taken me ages and I don't seem to be making huge amounts of progress. But I am getting somewhere.
[Edited on 6/12/09 by Irony]
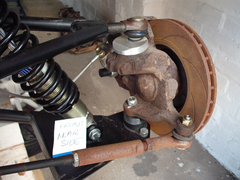 
Rescued attachment old.jpg
|
|
|
|
|
Irony
|
| posted on 6/12/09 at 11:03 PM |
|
|
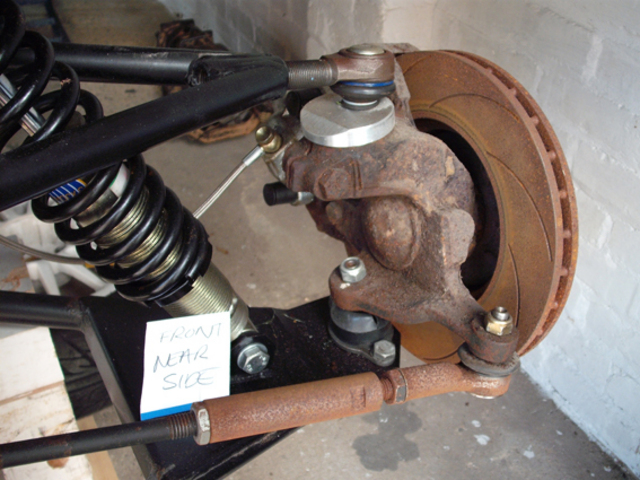
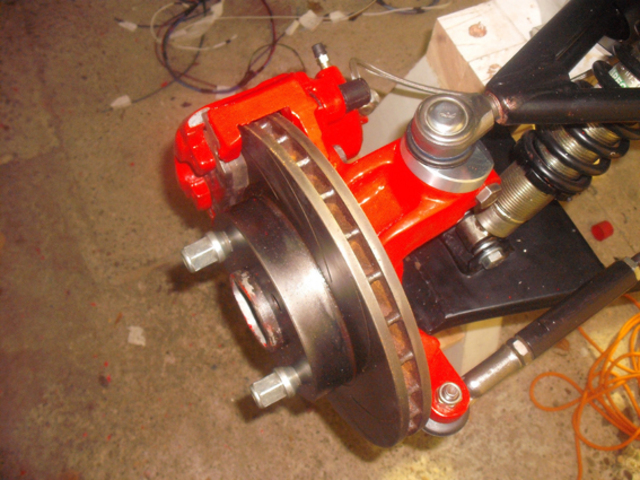
more images
Rescued attachment old2.jpg
|
|
|
Irony
|
| posted on 6/12/09 at 11:04 PM |
|
|
finished
Rescued attachment new.jpg
|
|
|
Irony
|
| posted on 6/12/09 at 11:05 PM |
|
|
finished2
Rescued attachment new2.jpg
|
|
|
DRC INDY 7
|
| posted on 6/12/09 at 11:31 PM |
|
|
Looks good trouble is perfection does take time and there will be times when you are working away for ages and nothing seems to be happening ie wiring
loom time and all the little bits that need fitting
But stick with it dont get the mid build blues
https://www.facebook.com/groups/462610273778799/
Puddle Dodgers Club
|
|
|
jollygreengiant
|
| posted on 6/12/09 at 11:33 PM |
|
|
Erm, I hope you've got locknuts for the top wishbone ball joint threads.
Beware of the Goldfish in the tulip mines. The ONLY defence against them is smoking peanut butter sandwiches.
|
|
|
Irony
|
| posted on 6/12/09 at 11:42 PM |
|
|
No I don't have any locknuts for the top threads. I did however notice there weren't any. But I couldn't think of a situation
where they would come undone. The top ball joint can't exactly unwind with the hub attached. It won't be a hardship to fit some though
assuming I can hold of some.
I will check in my 'box of randomness' that came with the kit.
|
|
|
dlatch
|
| posted on 6/12/09 at 11:48 PM |
|
|
rusty bits turning into shiny painted bits
thats progress 
problem with building a part built kit is doing one job just to find three others that need doing too 
|
|
|
jollygreengiant
|
| posted on 6/12/09 at 11:56 PM |
|
|
quote:
Originally posted by Irony
No I don't have any locknuts for the top threads. I did however notice there weren't any. But I couldn't think of a situation
where they would come undone. The top ball joint can't exactly unwind with the hub attached. It won't be a hardship to fit some though
assuming I can hold of some.
I will check in my 'box of randomness' that came with the kit.
Its not that they could come undone, more that, without the lock nut it allows a small moment of movement between the two sets of threads, the next
thing that happens is the two part company because there are NO threads left.
Apart from that its looking very nice.
[Edited on 6/12/09 by jollygreengiant]
Beware of the Goldfish in the tulip mines. The ONLY defence against them is smoking peanut butter sandwiches.
|
|
|
Irony
|
| posted on 7/12/09 at 12:00 AM |
|
|
I'd better get some then!! All I need to do now is find out what thread they are!
|
|
|
liam.mccaffrey
|
| posted on 7/12/09 at 01:49 AM |
|
|
M18x1.25, that really is a guess.
Can check with a calipers on the thread OD and use a bolt or tap of known pitch as a thread gauge
sorry if you already know how to suck those particular eggs
Build Blog
Build Photo Album
|
|
|
jollygreengiant
|
| posted on 7/12/09 at 11:18 AM |
|
|
quote:
Originally posted by liam.mccaffrey
M18x1.25, that really is a guess.
Can check with a calipers on the thread OD and use a bolt or tap of known pitch as a thread gauge
sorry if you already know how to suck those particular eggs
Nearly but not quite. M18X1.5mm is the size, or at least thats what it says on my tap that I used to clean the threads out with.
Beware of the Goldfish in the tulip mines. The ONLY defence against them is smoking peanut butter sandwiches.
|
|
|
wilkingj
|
| posted on 7/12/09 at 12:35 PM |
|
|
Little and often is the key to getting it done.
Its a LOT of work.
Keep at it, and you WILL get there.
You will fit some parts several times over!
We all know, as we have been there, done it, and got the T-Shirt (Luego Owners Club one at that! )
Hence we will give you all the support you need.
The Build will go in Fits and Starts. If you get a bit down, go to a show, and meet up with the rest of us, get someone local to take you for a
Blatt... It soon re-juvenates the will power!
I notice you have the brake hose on. Have you fitted the Side panel yet? If the side panel is not fitted, the all the front suspension will have to
come off!.
Its more about the order of fitting parts, than the parts themselves.
Hence you fit parts only to remove them, and then re-fit again.... and again (sometimes)
Its a lot easier to do some operations with out the panels fitted, and some you need them to be fitted first, or you cant fit the panel afterwards!
Dont worry... its par for the course when building a kit Car.
Also remember to take plenty of photo's, and post them in your archive.
Have a look in My archive, as there is a Lot of photos of the factory demonstrator, which I took to help me with my build.
ie where they placed the parts. to save me having to work out where and why.
What engine and box are you fitting?

1. The point of a journey is not to arrive.
2. Never take life seriously. Nobody gets out alive anyway.
Best Regards
Geoff
http://www.v8viento.co.uk
|
|
|
Irony
|
| posted on 7/12/09 at 01:03 PM |
|
|
The side panels are all fitted and I expect to take everything off again so I haven't tightened any bolts up and I intend to keep putting the
same nylok nuts back on untill I am sure and then do a big nylok nut swap at the end.
I am hopefully fitting a Rover V8 3.5l with either the Holley Carb it came with or the webber 500 that everybody seems to recommend. My Holley is in
dire need of restoration so I will cross that bridge when it comes to it. Any webber or Holley owners with advice.....?
Box wise I was thinking a LT77 as I have one but I will need a bell housing.
I was wondering what all you Rover V8 owners did about the exhaust, a DAX V8 exhuast would set me back the Princes Ransom of 2K, surely there must be
a locost (ish) option?
|
|
|
James
|
| posted on 7/12/09 at 02:24 PM |
|
|
Is it me? I can't tell amazingly well from those shots, but I think your top wishbones are upside down!
They should be set so that the top BJ is 'behind' the bottom BJ. And also, so that the threaded part (into which the top BJ screws) points
upwards away from the car.
Otherwise you're restricted the movement of your top BJ and it will bind.
But I maybe just going blind, or there's maybe something weird about the Viento!
Cheers,
James
------------------------------------------------------------------------------------------------------------
"The fight is won or lost far away from witnesses, behind the lines, in the gym and out there on the road, long before I dance under those lights."
- Muhammad Ali
|
|
|
Irony
|
| posted on 7/12/09 at 02:58 PM |
|
|
quote:
Originally posted by James
Is it me? I can't tell amazingly well from those shots, but I think your top wishbones are upside down!
They should be set so that the top BJ is 'behind' the bottom BJ. And also, so that the threaded part (into which the top BJ screws) points
upwards away from the car.
Otherwise you're restricted the movement of your top BJ and it will bind.
But I maybe just going blind, or there's maybe something weird about the Viento!
Cheers,
James
There is a specific way round for the top wishbones. I am at work now and I can't remember. I shall go home tonight and check. I don't
think they are the wrong way as I remember sitting there thinking about it for ten minutes. If they are I shall swap them over and at the same time
put the lock nuts on!
|
|
|
rusty nuts
|
| posted on 7/12/09 at 07:00 PM |
|
|
Hope you fitted the front tunnel side panel before fitting the pedal box, if not you may be taking it out again. Guess how I know. Got my lock nuts
from Lolocost which may be now Great British Sports Cars?
|
|
|
Paul (Notts)
|
| posted on 7/12/09 at 07:47 PM |
|
|
Dont get obsessed with how long it takes.
Just take your time and enjoy doing it. The best advice anyone ever gave me was to walk away from it and have a pint if something was not
working
DONT reach for a bigger hammer!
The more you think about a job the better the end product( at least thats what I say at work )
As for a Carb, I may have a Webber 500 and manifold going cheep around April time if my fuel injection conversion works.
Exhaust was one of the pricy items in the build even thought I got it for a massive cash discount at the right time. ( paid about £700 ) It will be
cheaper going to a custom exhaust builder that getting a dax one. One of the older threads has the name and address of the company that produced the
original exhausts for Old Luego before it went bust. They will still make them if you go direct for a reasonable amount.
Paul.
|
|
|
RK
|
| posted on 7/12/09 at 11:21 PM |
|
|
Looks very nice and shiny so far!
|
|
|
kenton
|
| posted on 10/12/09 at 08:06 PM |
|
|
Re exhaust options..
When i was building my viento 2 years ago luego had gone bust but i was able to buy direct from their supplier.
Tube engineers ltd. 01673862286.
manifolds £350 pair
silencers £240 pair
Polishing was extra all + vat.
kenton
|
|
|
Irony
|
| posted on 10/12/09 at 09:19 PM |
|
|
Cheers Kenton,
I just googled them and they are about ten miles from my house! hehe I shall ring tomorrow.
|
|
|
Findlay234
|
| posted on 11/12/09 at 09:37 AM |
|
|
Dont worry about the time scales. its taken me 6.5 years and ive just passed IVA this week. just remember its a hobby while building the car. I know
people who have built their cars in a couple of months but theyve definately spent A LOT more money than me and generally have more time. I have two
jobs which cuts time right down.... dont neglect friends and family for this either.
|
|
|


.jpg)