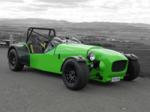
Miks15
|
| posted on 5/1/11 at 12:32 PM |

|
|
solidworks
I was reading through the canamsa bodywork thread by Fred W B. (if your reading your bodywork is rather amazing) and it got me thinking about doing
something similar. Well i say similar more like the first couple of posts, not making my own body from scratch 
Now and again i have a bit of time at both work and at uni where i can just mess about on solidworks, so i thought i might aswell do something useful
and that would look good.
So i was considering modelling up a car body in solidworks using the method fred did. So i was wondering if anyone knew if there was a way of
inputting loads of points into solidworks to create a surface. A bit like how fred describes it (i dont know how his mate did it in inventor).
I basically want to take a model, mark loads of 3d co-ordinates, input them in to solidworks and then press a button and get a 3d model.
Anyone any ideas?
Cheers
|
|
|
|
|
balidey
|
| posted on 5/1/11 at 12:43 PM |
|
|
You can kind of do what you are suggesting, but its not going to be easy. And SW is probably not the best tool for doing that.
Insert, features, freeform is probably the closest you can get to what you are suggesting. But I wouldn't.
Or insert, features, deform.
[Edited on 5/1/11 by balidey]
Dutch bears have terrible skin due to their clogged paws
|
|
|
wescottishmatt
|
| posted on 5/1/11 at 12:57 PM |
|
|
I've not tried it but the 'Surfaces' feature in solidworks may be of use. I did the SW course a few years ago but never use it at
work so not an expert.
It may be worth looking at the tutorials and try the 'Special type of models' - Moulded products design or the Surfaces tutorials see if
they are relevant.
When is did my model I just used standatd commands and the lines are a bit 'square' but was good enough for what I wanted.
Theres a couple of images in my photo archive if your interested.

|
|
|
Miks15
|
| posted on 5/1/11 at 01:11 PM |
|
|
ok cheers guys, its not for anything serious so probably isnt worth messing about with on a full car body!
Might have a play with smaller simpler shapes like a computer mouse or something
|
|
|
watsonpj
|
| posted on 5/1/11 at 02:43 PM |
|
|
you can but you'll have to buy an add in to import the data cloud
like this
the easiest way to do it is probably with
1. Sketch the curves in one dierction 2 to n (use splines on points and ensure end tangency conditions are understood and defined.
2. sketch curves in the other direction 2 to n (as above) but ensuring they close with the first diection. They can pass through common spline points
if required.
3. use boundary surfaces to create your surface.
see below for a simple one.
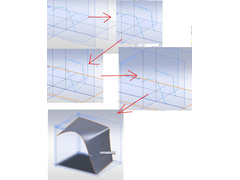 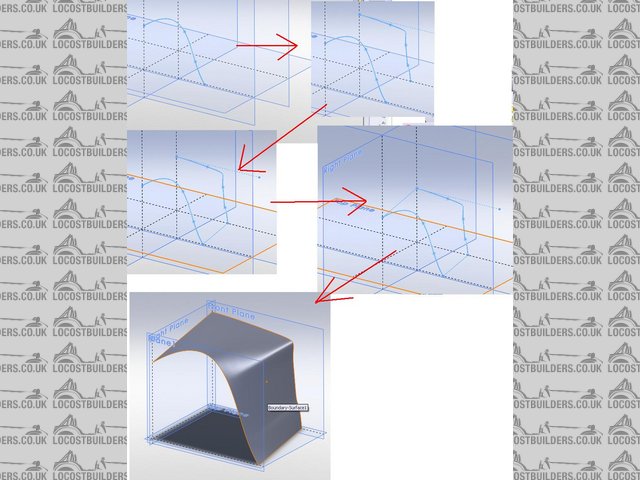
surfacing
I hope this is all clear enough but if you want a more detailed example (with more sections) I can do one when i'm not meant to be working  if
you like. if
you like.
regards Pete
|
|
|
Miks15
|
| posted on 5/1/11 at 03:02 PM |
|
|
i think i understand it, i have had a go with various different methods doing simple shapes, if anyone at work asks im just improving my solidworks
skills
|
|
|
watsonpj
|
| posted on 5/1/11 at 03:09 PM |
|
|
my trouble is I'm the boss so I'm meant to set the example
|
|
|
Liam
|
| posted on 5/1/11 at 03:39 PM |
|
|
Solidworks isn't the best package for making sexy curves. I tried to learn the surface tools by modeling a seven nosecone accurately and I did
OK but it was a bit messy and I remember having various problems when trying to thicken the surface into a solid. I was trying to do it with the
minimum amount of construction geometry/sketches (to avoid taking loads of measurements off the real nosecone) and rather using the power of the
surface tools. That's probably not the best way of doing it if you're actually trying to model something that exists accurately. Better
would be to take a load of measurements as you propose and end up with a stack of profiles/cross-section slices. Then you can just use the loft tool
and loft from one profile to the next one at a time straight into a solid. I.e. pretty much a digital version of the process Fred followed (if I
remember correctly what he did) - cutting out the wooden profiles, lining them up at the appropriate spacing then making the surface over.
I'm sure I can dig out the nosecone thread and I could send you the model at home if you want it.
|
|
|
Miks15
|
| posted on 5/1/11 at 04:12 PM |
|
|
oops just noticed the time, being making way to many surfaces just messing around best get back to doing some work
|
|
|
g60_edge
|
| posted on 5/1/11 at 04:41 PM |
|
|
Try and get your head around projecting a sketch onto a sketch.
So, draw a sketch in XY, another in YZ or something. Get the end points to align, then: insert, curves, projected, sketch on sketch, select the 2
you've just drawn.
I find this a good way of defines curves for constraining and guiding surfaces.
If you want to know more, let me know and I can be more descriptive.
|
|
|
watsonpj
|
| posted on 5/1/11 at 04:52 PM |
|
|
to be honest if you wanted to do a nose rather than thicken the surface I would patch fill the whole end(s) then shell to the desired thickness and
then punch the grill hole through. Thickening works ok but can leave some odd end conditions and also needs outside rads to be considered.
Also when surfacing it is easier/considered good practice to make curves/surfaces larger than required and then trimming back to suit. On large
surfacing jobs many people create large raw functional surfaces that define the overal design and then copy and chop them to size for panels,covers
etc. This method would work well for a car design and a seven has simple surfaces so its a good car to learn/practice on.
regards Pete
|
|
|