Tris
|
| posted on 10/3/12 at 04:42 PM |

|
|
Advice on moulding bonnet bulge for air box
Hello all,
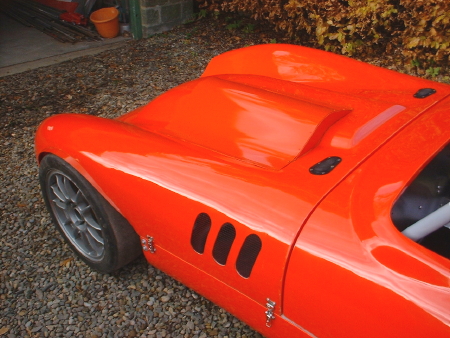
After some advice and ideas after spending the last hour or so trying to think of the best way forward to fibreglass a large hole thats currently in
my bonnet. I am trying to fit a honda CBR 1000rr engine into my (refurbished) Fury, and as you can see in the photo's below, the air box rather
sticks out somewhat ! (I've turned the carb's round by the way)


Ive now got rather a large hole that needs to be filled - i also have lots of Chopped Strand Mat and resin.
Can i ask - how would i best go about this ?
Cheers
Tris
[Edited on 10/3/12 by Tris]
|
|
|
|
|
Hugh_
|
| posted on 10/3/12 at 05:35 PM |
|
|
You could use chicken mesh to form the basic shape then glass, then fill. It'll be a huge amount of work to get an area that size smooth
though.
|
|
|
MK9R
|
| posted on 10/3/12 at 06:00 PM |
|
|
Have a look at my blog matey, I did exactly what you have done, twice! Next step is remove bonnet, then a layer of foam/cushions/bubble wrap, a
layer of carpet then a final layer of bin bag, then put bonnet back on. You may have to add or remove bits of foam to get it right. Now using masking
tape cover the platic bag and smooth it all out with the te and make joint to bonnet. Also mask over the surrounding bonnet area. Apply wax to masking
tape, then apply 2 or 3 layers of GRP. Once its all gone off remove and you have a plug for your mould. Clean it up and smooth it off, wax it up then
screw it back to the bonnet. You may now want to trim the hole a bit to get it closer to the mould of bulge. Now lay 2 or 3 layers into the mould from
the inside, lapping onto the inside of the bonnet. Once gone off remove screws and pull mould off. You will have a bit of rubbing and filling to do
before spraying, but far better than just laying CSM straight onto the bulge from the outside
Cheers Austen
RGB car number 9
www.austengreenway.co.uk
www.automatedtechnologygroup.co.uk
www.trackace.co.uk
|
|
|
MK9R
|
| posted on 10/3/12 at 06:02 PM |
|
|
Actually looking at your bonnet, my bulge mould mould as on the car at the moment may fit! Havve a look at my blog and let me know, I"ll post it
over bif you think it woud work
Cheers Austen
RGB car number 9
www.austengreenway.co.uk
www.automatedtechnologygroup.co.uk
www.trackace.co.uk
|
|
|
minitici
|
| posted on 10/3/12 at 07:16 PM |
|
|
I just used an 'S" shaped alloy sheet and closed off the rear when I fitted the body to this Busa powered Fury
Link to build
|
|
|
Tris
|
| posted on 10/3/12 at 08:31 PM |
|
|
Thanks austen - been over and looked at your excellent blog 
Think i will have a go following your method - didn't think of using masking tape !
Cheers
Tris
|
|
|
Tris
|
| posted on 13/3/12 at 09:34 PM |
|
|
Just as an update to this post, I've had good results using the method austen pointed me towards. Airbox first covered in a layer of carpet,
then a plastic sheet, and finally lots and lots of duct tape. Good application of mould release wax and hey presto.. Just got to glue the thing on now
and lots of sanding / filler !

[Edited on 13/3/12 by Tris]
|
|
|
Fred W B
|
| posted on 14/3/12 at 11:14 AM |
|
|
Nice result!
Can you not fit it from below, with the flange on the under side of the existing bonnet. Will be easier to make a neat job of blending it in?
Get yourself some of the stuff mentioned HERE
Cheers
Fred W B
[Edited on 14/3/12 by Fred W B]
You can do it quickly. You can do it cheap. You can do it right. Pick any two.
|
|
|
MK9R
|
| posted on 14/3/12 at 11:39 AM |
|
|
Or as I suggested lay it up from the inside, using the bit you have already made as the mould
Cheers Austen
RGB car number 9
www.austengreenway.co.uk
www.automatedtechnologygroup.co.uk
www.trackace.co.uk
|
|
|
ceebmoj
|
| posted on 14/3/12 at 11:47 AM |
|
|
quote:
Originally posted by MK9R
Or as I suggested lay it up from the inside, using the bit you have already made as the mould
I have been thinking of doing this over my air box after reading your blog. I take it the tape you use is the glossy type not masking tape? Is the
patten of the tape not left on the new peace of bonnet you moulded in?
|
|
|
MK9R
|
| posted on 14/3/12 at 11:53 AM |
|
|
quote:
Originally posted by ceebmoj
quote:
Originally posted by MK9R
Or as I suggested lay it up from the inside, using the bit you have already made as the mould
I have been thinking of doing this over my air box after reading your blog. I take it the tape you use is the glossy type not masking tape? Is the
patten of the tape not left on the new peace of bonnet you moulded in?
I use normal masking tape as its already waxy and doent react with the resin like some of the gaffa tapes. I have also used brown packaging tape which
works well. Yes you get the weave, but for a one off mould its easy to work on the finished product rather than the plug or mould
Cheers Austen
RGB car number 9
www.austengreenway.co.uk
www.automatedtechnologygroup.co.uk
www.trackace.co.uk
|
|
|
smart51
|
| posted on 14/3/12 at 08:26 PM |
|
|
From the photo, it looks a bit late now, but I made a new air box to fit under the bonnet, rather than making a new bonnet to fit the air box.
The other thing you could do is buy some of the yellow polyurethane foam that is used for insulation. It is not attacked by resin so you can laminate
straight onto it. Cut oversized blocks and stick them together then sit it over the engine and sand back to the desired shape. GRP on top of it.
Filler, sand and paint. Job done.
|
|
|
Mistron
|
| posted on 17/3/12 at 07:05 PM |
|
|
I used to make almost all of the bucks using Polyurethane foam, but it isn't the insulation stuff - that reacts with GRP. Get open cell PU foam
sheets from a GRP supplier.
First, build it up over the engine (making sure that you can lift it off vertically!) use filler to stick the foam sheets together
with the bonnet in place, shape the blocks of foam to your desired shape to fill the hole using rasps, course and fine sand paper.
Use filler to smoothe the foam to a good finish, filler prime and paint.
wax the bonnet and the finished foam
lay up GRP over the bulge and enough of the bonnet to give a location.
remove mould from bonnet and then break out the foam/ filler and sand the bonnet back to the GRP and feather the edges.
place bare bonnet into the mould (wax mould first!)
Lay up the bulge on the inside, overlaping onto the insid eof the bonnet by at least 3"
once cured, lay GRP and tissue on top side to reinforce the joint then fill, paint etc
The alternative is to use styling clay, but that is basically similar, but perhaps a bit more specialist.
Al
|
|
|