John Bonnett
|
| posted on 7/2/21 at 07:45 PM |

|
|
quote:
Originally posted by ettore bugatti
King zero project use 1/4" cold rolled steel, he bends over his knee or put it through the roller. But it is probably similar to what you have
already.
Or maybe ask what Gasolini is using on his Lancia special, although a preview showed filling pipes with sand and heating it.
Is the door glass also going to be Lexan?
Yes that's the same as I have or the metric equivalent. It really is very hard and tough. I do have the means to bend it but it would be
convenient if I could adjust the shape by hand by using a more malleable wire but sufficiently stiff and robust to allow the panels to be clamped
prior to trimming and welding.
I believe Gasolini already has a wooden station buck and I think he is building a supporting frame for the aluminium bodywork out of 10mm diameter
tube using the Superleggera (super light) technology developed by an Italian coachbuilder, Felice Bianchi Anderloni.

|
|
|
|
|
John Bonnett
|
| posted on 7/2/21 at 08:02 PM |
|
|
Sorry EB I forgot to answer your last question about the window material. Originally, I was planning on using glass electrically operated windows but
I've more or less decided against that route on the grounds of simplicity and saving in weight and there is a big saving in using polycarbonate
and just getting rid of the winding mechanism. I know this from experience with the lightweight which I changed from glass to lexan and back to glass.
|
|
|
John Bonnett
|
| posted on 8/2/21 at 08:20 PM |
|
|
Just in case anybody is interested here are a couple of close up photos of the rear quarter light frame. This is the left hand one now finished and
welded in.


|
|
|
John Bonnett
|
| posted on 14/2/21 at 06:31 PM |
|
|
After spending time hand forming the pattern for the rear light plate I realised that all that was needed was to roll two 90mm diameter rings cut them
in half to provide the ends for the two patterns. Two straight lengths and a couple of fusion welds. So easy but why didn't I think of that
first off?
I've been banging on about starting the wire frame and today the prevarications ended and I made a start. Wheel arch in place, rear lamp pattern
and three stations for the roof buck, the central one continuing to the rear of the car. I'm really pleased with how the curvature flows.
Obviously more sections to add but a good start and as symmetrical as I can make the roof.


|
|
|
John Bonnett
|
| posted on 14/2/21 at 08:03 PM |
|
|
And one more pic

|
|
|
Mr Whippy
|
| posted on 14/2/21 at 10:28 PM |
|
|
Wow really starting to take shape 
|
|
|
HowardB
|
| posted on 14/2/21 at 10:38 PM |
|
|
Have you seen a picture of a Disco Volante? Circa 2013.. ?
It would make a worthy muse.
Keep up the good work.. so impressed
Howard
Fisher Fury was 2000 Zetec - now a 1600 (it Lives again and goes zoom)
|
|
|
John Bonnett
|
| posted on 15/2/21 at 09:02 AM |
|
|
quote:
Originally posted by HowardB
Have you seen a picture of a Disco Volante? Circa 2013.. ?
It would make a worthy muse.
Keep up the good work.. so impressed
No I hadn't come across that model but I love Italian styling and if I could emulate something along those lines I'd be well pleased.
Making the wireform buck is going to be a try each bit and reflect and either proceed or take it out and try a slightly different shape. Without any
drawings or clay model I'm flying completely blind so as it develops it comes as a surprise as much to me as everyone else. But so far it is all
looking quite promising.
|
|
|
John Bonnett
|
| posted on 18/2/21 at 07:46 PM |
|
|
The wireform buck for the roof is nearly complete with just one transverse piece to insert. The 6mm rod is nowhere as difficult to work as I feared
and it really does stay where it's put. I've found that by welding tabs where the joins are going it is easy to clamp up so that nothing
moves during the welding. As one would expect the structure is extremely rigid.
The side of the car will taper both forwards and rearwards from the front of the two doors and to this end I have run a piece of bar to give the
curvature. The wheel arches are now in as well.
So far all is progressing well and it is heartening to see the shape of the body develop.


[Edited on 19/2/21 by John Bonnett]
|
|
|
steve m
|
| posted on 18/2/21 at 10:19 PM |
|
|
I bow to your experience, as the roof line, does appear to be a flowing line with the rear window (or have you lowered it  ) )
All looking good,
steve
Thats was probably spelt wrong, or had some grammer, that the "grammer police have to have a moan at
|
|
|
John Bonnett
|
| posted on 19/2/21 at 07:44 AM |
|
|
quote:
Originally posted by steve m
I bow to your experience, as the roof line, does appear to be a flowing line with the rear window (or have you lowered it )
All looking good,
steve
No Steve the roof hasn't been moved. I sometimes find it difficult to visualise the body line because it is easy to confuse it with the main
structure which it doesn't always follow. I'm going to cover the roof with paper as best I can to simulate what it will look like when
panelled. I'll do the same with the rest of the body as I go along so that if I'm not satisfied with the shape I can alter the buck before
getting too far down the line making panels.
I'll try to get a decent side view which should show how I've tried to make the curve flow from the windscreen over the roof and and down
to the rear window. I have to admit that I haven't done this for myself yet so I hope it will look okay. In any case it is what it is because I
don't have the heart to go back and start that section again.
[Edited on 19/2/21 by John Bonnett]
|
|
|
John Bonnett
|
| posted on 19/2/21 at 05:29 PM |
|
|
I've finished the wireform roof buck and it was with no little relief that the side view revealed quite a pleasing flowing curve that I was
hoping for. I then covered the wireframe with paper to give an idea of what the car will look like with a roof and I have to say that I'm really
pleased with the result.


|
|
|
John Bonnett
|
| posted on 20/2/21 at 09:27 AM |
|
|
After some serious consideration and a small nudge from EB I'm close to diching the Focus fuel tank in favour of a bespoke one in stainless
steel that will allow more boot space and room for the spare wheel. Actually having something in stock and therefore to all intents and purposes free
is a powerful argument to use it when working to a limited budget. But ultimately what I don't want to do is to compromise the build and regret
the decision when it is too late to change it. I've spoken to Simon Hall at SiFab who made a beautiful job of my G15 tank and he told me that he
has the correct flange to allow the fitting of the Focus in-tank pump which I also have. I think that was the clincher. My initial thoughts are to
install it immediately behind the firewall. I know it will raise the c of g compared with below the boot and behind the axle but I think that is the
only disadvantage.
|
|
|
John Bonnett
|
| posted on 26/2/21 at 05:27 PM |
|
|
Work on the buck is moving along slowly. A lot of guesswork has gone into the curves on the wire stations and it may well be that some of them will
need to be adjusted down the line but one has to start somewhere. Part of the problem has been in visualising the changes in curvature which has put
the poor old brain into overload at some points. There is a limit to what can be done with a paper pattern because it doesn't stretch but
nevertheless proved very helpful. I even formed a piece of aluminium to get an idea of how the changes in curvature might work. A bit of a knife and
fork job but it served its purpose.


|
|
|
John Bonnett
|
| posted on 3/3/21 at 07:00 PM |
|
|
I've spent a couple of days playing around with shapes on the rear quarter and have formed a panel to give an indication of how it might look.
Not the easiest to form because there's a lot going on with the curvature changes but I really like the concept which is absolutely in line with
what I'm hoping to achieve.
I used rare earth magnets to hold the paper to the buck while cutting out the pattern and they worked very well. I made the panel in two parts TIG
welding them together. I normally gas weld aluminium but at the moment I don't have any gas which I hope to rectify very shortly. This will give
the added benefit of being able to anneal the aluminium to make it easier to work. Not all panels need to be annealed but this one certainly would. I
have tried using MAPP gas which gives a high temperature but it is no where near as effective as oxy/acetylene.


|
|
|
HowardB
|
| posted on 4/3/21 at 08:23 AM |
|
|
wow!
nothing else to add!
Howard
Fisher Fury was 2000 Zetec - now a 1600 (it Lives again and goes zoom)
|
|
|
John Bonnett
|
| posted on 4/3/21 at 09:01 AM |
|
|
quote:
Originally posted by HowardB
wow!
nothing else to add!
That's very kind of you Howard. Thank you.
The thing with bodywork is that unlike mechanical parts which are either right or wrong, there really isn't a right other than not being
symmetrical and it all comes down to personal taste as to what shape is pleasing and acceptable. So there is lots of looking and thinking before
settling on the final shape. Having done this with this particular panel I'm favouring softening the curves a little by reducing the depth of
the valley so that it flows more easily from one section to another. This is another prime case of needing a starting point first and then it can
either be used or changed.
I'm not at the panelling stage but thought it would be interesting to get some idea of how the body might look with that piece done. Actually
that's not strictly true, I just had the urge to shape some metal!
|
|
|
Mr Whippy
|
| posted on 4/3/21 at 12:58 PM |
|
|

yeah that is sure looking like a DB5. Can't wait to see the car progressing now
[Edited on 4/3/21 by Mr Whippy]
|
|
|
John Bonnett
|
| posted on 4/3/21 at 01:42 PM |
|
|
quote:
Originally posted by Mr Whippy
yeah that is sure looking like a DB5. Can't wait to see the car progressing now
[Edited on 4/3/21 by Mr Whippy]
It only favours the DB5 in the arrangement of the rear lights and the follow through of the curvature down the length of the car. In all other
respects I don't think it will resemble anything that we are familiar with or can relate it to.
I'm going back a few steps today and remaking the curved stations used to form the three quarter panel that I did yesterday. The replacement
panel will have a less pronounced valley and will I hope be an improvement.
|
|
|
John Bonnett
|
| posted on 6/3/21 at 08:09 AM |
|
|
I think I probably mentioned that I'm going to use Jenvey DTH t/bs and this week I bit the bullet and bought them. They are certainly nicely
presented and good to know that they are made in the UK. I need the rear throttle body to determine the shape and size of the passenger footwell
before I can start fabricating that side of the car. I shall be getting a DTA ecu to go with the Jenvey kit and once I have everything I'll take
the engine and all the bits over to SRD to have it set up on their dyno. Once done I'll have an engine that'll start on the button which
will be a great step forward.


|
|
|
John Bonnett
|
| posted on 17/3/21 at 04:49 PM |
|
|
A lot of time has been in shaping and reshaping the wire stations aft of the rear quarter light trying to ensure that the curvature follows through
and flows from the roof down into the wing section. I'm not quite there yet but pretty close. I've had to regard the panel I made as
starting point A which as I mentioned is very necessary giving a fixed point either to build on or decide is not right and start again. This is the
position I was in and had to consign the panel to the bin which always hurts given the price of aluminium. My mentor and friend Trev D as been a
terrific help offering advice and suggestions. He has an uncanny knack of grasping the problem with only photos and my garbled description to go on
and coming up with a solution that I am able to cope with. He is a natural teacher and if ever he gets fed up with the big hammer he could always run
metal shaping courses.
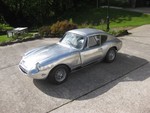
Before moving on to the next step the car was rolled out of the workshop to give it its first taste of the outside world and providing a chance to
have a good sweep up as well as an opportunity to see what it looks like at a distance.
I'm using the superleggera method of attaching the aluminium panels where possible and to this end have formed the rear valence edge using 10mm
diameter tube with a 15mm wide strip welded to it. With this in place, today's job was, after welding in some bracing, to remove the body from
the chassis so that it can be mounted on the rotisserie. It was a bit of a Heath Robinson arrangement using ropes and the engine crane but it came off
the chassis in one piece and without any unpleasant surprises.


[Edited on 18/3/21 by John Bonnett]
|
|
|
John Bonnett
|
| posted on 22/3/21 at 04:58 PM |
|
|
I've spent a bit of time working on the rotisserie and it is now finished. The first roll over was a bit of a buttock clencher but fortunately
it all went nicely and without any drama. I had taken measurements before I made the fixtures but nobody makes more mistakes than I do so I was hoping
for the best but expecting the worst. My worst nightmare was the whole rig toppling over so it was a great relief when it didn't. It is closest
to the ground when on its side but a gap is a gap no matter how small. It is all ready now for a day's welding attending to all the joints that
have been hitherto inaccessible.


|
|
|
nick205
|
| posted on 22/3/21 at 05:14 PM |
|
|
Nice work as always John.
Having the car rolled over like that will make welding/working on the underside so much easier.
I recall my Dad restoring an E-Type (replacing floor sections) some years back and having to weld on his back. Whilst the car stayed together the
language during the welding was bluer than blue!
|
|
|
HowardB
|
| posted on 22/3/21 at 05:22 PM |
|
|
that looks awesome - did you see the one on Binky? It had a wiper motor or similar for turning the chassis over -
Howard
Fisher Fury was 2000 Zetec - now a 1600 (it Lives again and goes zoom)
|
|
|
John Bonnett
|
| posted on 22/3/21 at 06:45 PM |
|
|
quote:
Originally posted by HowardB
that looks awesome - did you see the one on Binky? It had a wiper motor or similar for turning the chassis over -
I did Howard but all their work is awesome even if a bit over the top at times. A very talented and entertaining pair.
This will be the third time I've used the rotisserie and it really does make the welding of any part an absolute breeze. I cannot imagine how
Nick's dad coped working with the job above his head with all the dangers of molten metal dropping on him. If ever there was a time to excuse
bad language that would have been it.
I know I'm paranoiac about the rig tipping over which is why the front feet extend to full body width. Not necessary I know if the car is
pivoted in the centre and balanced which it is but I needed the full width for reassurance. I've used as the basis of my system two SGS engine
stands extended in height by about 4 inches and modified so that the upstand is vertical and not tilting back. They can be locked in almost any
desired angle by dropping a pin in the hole.
It was a bit of a landmark stage separating the body from the chassis because now the outstanding work can be done on both parts. The chassis can just
be turned over and placed on trestles to allow it to be fully welded underneath and at the same time the mounts for the ARB fitted. Once done the
chassis will be ready for paint. Following advice from learned friends, I'm departing from powder coating this time and will be spraying on Bilt
Hamber products that everybody seems to speak highly of. To be honest whatever I choose to apply will, given the amount of use and exposure to hostile
conditions, be absolutely fine and probably just 5 litres of Waxoyl would be sufficient so I'm not agonising over it. Everybody involved in
classic car restoration will have their own personal preferences (and hates) but that's what I've decided to go for this time. Rightly or
wrongly.
|
|
|