johnH20
|
| posted on 11/4/22 at 04:18 PM |

|
|
Painting plug for mold
I am making a plug to create a mold for a new engine cover. I am pretty familiar with fibreglass as I have made a few surf boards among other things.
Entirely different process though as they are built 'inside out'- no mould involved. Everything I have read on making a plug says finish
with 2 pack paint. I know this is nasty stuff ( read the sticky! ). So what is the alternative? I assume that strength of adhesion and possible
chemical incompatibility are factors to consider. I have a basic electric spray gun if that helps. Advice please.
|
|
|
|
|
HowardB
|
| posted on 11/4/22 at 04:35 PM |
|
|
In the dim and distant I have made a mould by hand painting with gel coat and then spending hours and hours gradually sanding and polishing to usable
surface. The release coat can make all the difference. I have also made single use tools using a rough pattern coverd in wax, albeit it, specially
designed wax.
In conclusion have a go at something small to perfect the technique and then scale up would be my advice
HTH
Howard
Fisher Fury was 2000 Zetec - now a 1600 (it Lives again  and goes zoom) and goes zoom)
|
|
|
Mike Wood
|
| posted on 11/4/22 at 05:54 PM |
|
|
Sorry, having posting problems.
What you planning to make the mould from? There are quite a few options. You can use and carve polyester foam that is OK with polyester resin. Can
also use wood, plasticine, plaster of Paris over chicken wire and newspaper, using a surform to shape the plaster.
[Edited on 11/4/22 by Mike Wood]
[Edited on 11/4/22 by Mike Wood]
|
|
|
Mike Wood
|
| posted on 11/4/22 at 05:57 PM |
|
|
Sorry, having posting problems.
Release wax, such as the brand Honey Wax is traditionally used along with a PVA release agent, see:
https://www.allscotltd.co.uk/wax-polishers-and-mould-preparation/release-agents-and-wax
[Edited on 11/4/22 by Mike Wood]
[Edited on 11/4/22 by Mike Wood]
[Edited on 11/4/22 by Mike Wood]
|
|
|
Mike Wood
|
| posted on 11/4/22 at 06:00 PM |
|
|
Sorry, having posting problems.
Useful book: https://www.veloce.co.uk/store/Competition-Car-Composites-p135968718
See also: https://www.youtube.com/watch?v=vp137oWIHpQ
&
https://www.youtube.com/watch?v=BOo8gxp3K3w
[Edited on 11/4/22 by Mike Wood]
[Edited on 11/4/22 by Mike Wood]
[Edited on 11/4/22 by Mike Wood]
[Edited on 11/4/22 by Mike Wood]
|
|
|
watsonpj
|
| posted on 11/4/22 at 11:17 PM |
|
|
I did it the easy way for the mould but the final parts need more finishing. Photos are in my archive in the airbox folder.
Basically foam board mould with polyfilla to create crn fillets, Then brown tape to seal, wax 3-4 times then your ready to mould.
The problem with this method is the finishing needs doing on the final part not the mould as any overlap/edges of the tape will show and need
sanding/filling before final finishing.
good luck with it Pete
|
|
|
Pete Jordan
|
| posted on 12/4/22 at 07:23 AM |
|
|
Easy composites https://www.easycomposites.co.uk/ has some really useful instructional videos on YouTube where they go through the whole
process of making an airbox. They use a brush on two pack finish, which they sell on their website, that is then sanded and polished.
Pete
Pete Jordan
|
|
|
russbost
|
| posted on 12/4/22 at 07:34 AM |
|
|
Hi John,
Depends on a few things really, are you aiming at getting a product from the mould that needs little more than a rub over with wet & dry paper
& a finishing coat, if so you have little choice other than using 2 pack as you'll need a fully finished plug that's as good as you want
the finished part to be. HOWEVER, 2k is really not very dangerous unless you're planning on using it & inhaling on a daily basis, for
something as small as an engine cover you're going to be spraying each coat for, what about 30 secs to a minute, I'd use an FFP2 mask &
hold my breath, then exit the area & leave well ventilated for 10 mins or so b4 next coat
However, if you're just making one, which I assume you are rather than going into production, then why not simply make the part you want in the
first place, as has already been said, foam & resin, chicken wire & papier mache, shaped aluminium, wood etc etc. get the approx shape you
want, put a couple of thicknesses of fiberglass mat over it, easy sand body filler, primer filler then paint - you'd be doing all of that to make
a mould anyway, why not go straight to finished part?
I no longer run Furore Products or Furore Cars Ltd, but would still highly recommend them for Acewell dashes, projector headlights, dominator
headlights, indicators, mirrors etc, best prices in the UK! Take a look at http://www.furoreproducts.co.uk/ or find more parts on Ebay, user names
furoreltd & furoreproducts, discounts available for LCB users.
Don't forget Stainless Steel Braided brake hoses, made to your exact requirements in any of around 16 colours.
http://shop.ebay.co.uk/furoreproducts/m.html?_dmd=1&_ipg=50&_sop=12&_rdc=1
|
NOTE:This user is registered as a LocostBuilders trader and may offer commercial services to other users
|
johnH20
|
| posted on 12/4/22 at 09:43 AM |
|
|
Thanks for the input so far chaps. Perhaps I did not make it clear in my initial post but the plug is made, just need to give a final gloss paint
finish. I am inclined to follow Russ ( mask up and hold breath then run for it! ). I did this in my youth and lived to tell the tale but I was
ignorant of the health risks then. I am definitely older and perhaps a bit wiser now.
|
|
|
Theshed
|
| posted on 12/4/22 at 03:39 PM |
|
|
I suggest the pattern coat gloss from Easy Composites. It sands very easily. You can brush/roller or spray. But......do use wax and pva. You will need
to flat and polish the mould but getting a mould stuck to a plug is no fun at all. PVA is old school but works perfectly.
|
|
|
Theshed
|
| posted on 12/4/22 at 03:43 PM |
|
|
Can be made to look like this.....with a lot of sweat and tears
 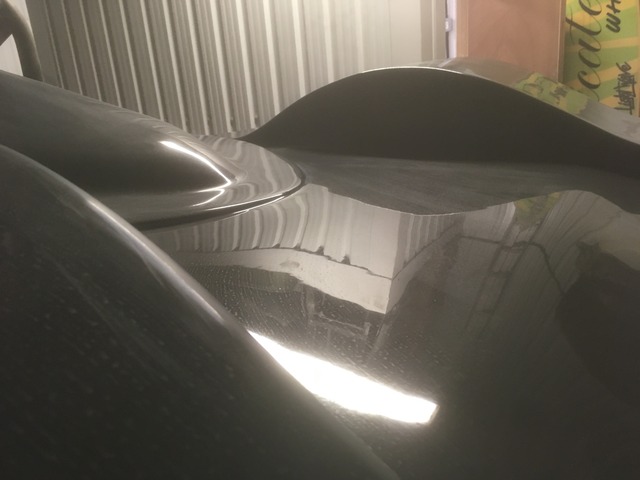
Description
|
|
|
johnH20
|
| posted on 12/4/22 at 04:42 PM |
|
|
Thanks, I am prepared for sweat but hope to avoid the tears!
|
|
|
SteveWalker
|
| posted on 13/4/22 at 11:11 AM |
|
|
quote:
Originally posted by johnH20
Thanks for the input so far chaps. Perhaps I did not make it clear in my initial post but the plug is made, just need to give a final gloss paint
finish. I am inclined to follow Russ ( mask up and hold breath then run for it! ). I did this in my youth and lived to tell the tale but I was
ignorant of the health risks then. I am definitely older and perhaps a bit wiser now.
While not advocating that approach, many restrictions and guidance on chemicals is likely based on 8 hours a day exposure in the workplace and is
likely of little risk to the occasional user.
|
|
|
Neville Jones
|
| posted on 12/5/22 at 10:53 PM |
|
|
Go to East Coast Fibreglass and get some Scott Bader Primecoat. Thin it with acetone. It can be sanded and buffed to a good polish. If you want a top
finish, get some Glosscoat. Thins and applies with acetone as well.
I've used the materials above since 1989, and never had an issue. Just clean out the spraygun promptly on finishing.
If you use PVA, you're doing something wrong.
Wax..6 or more coats. Let it dry/harden, buff it, leave it a few hours, then repeat. Six or more times.
PVA is for those who don't know better.
|
|
|
Theshed
|
| posted on 13/5/22 at 05:41 AM |
|
|
Just wax? That is brave. On a plug that will represent days and hours of work it is for me it is a priority to ensure release over surface finish
(which can easily be addressed by polishing the mould). Have a look at this link for an explanation of the issues.
https://rexco-usa.com/why-molds-stick/
|
|
|
Neville Jones
|
| posted on 13/5/22 at 10:16 AM |
|
|
quote:
Originally posted by Theshed
[bJust wax? That is brave. On a plug that will represent days and hours of work it is for me it is a priority to ensure release over surface
finish (which can easily be addressed by polishing the mould). Have a look at this link for an explanation of the issues.
https://rexco-usa.com/why-molds-stick/
Brave??? No! Informed and experienced.
I've seen that Rexco thing before.
I've used Meguiars wax for as long as I have used composites. (Beware the latest chinese fake wax. Tin looks the same, but the contents are far
from same.)
The single reason people have moulds stick to plugs is impatience, then ignorance.
Put plenty of wax on, apply in a circular motion, let it dry until it changes colour, dries and hardens, ... buff it, then allow the buffed wax to
harden up. A buffing machine with a lambswool pad is highly recommended.
Yes, it takes time. The biggest mistake people make is not allowing the buffed wax to harden. If you don't do this, the solvents in the next
coat of wax will take off the previous. If you don't allow this hardening time, and time for the initial dry before buffing, you end up with one
coat of wax at best, regardless of how many times you apply wax.
Patience. Do the job properly.
I get three coats on a day. One first thing in the morning. Another middle of the day, and a third at the end of day. Two days minimum for six coats.
Then another coat or two to make sure. Let the lsat coat harden overnight after buffing.
NEVER HAD A MOULD STICK WHEN I'VE DONE THE ABOVE . NEVER!
I haven't used pva on a plug since I was yelled at for suggesting it, before I got to my teens.
PVA has its place, for sealing raw timber on quick and nasty moulds before waxing.
|
|
|
Fred W B
|
| posted on 13/5/22 at 11:04 AM |
|
|
Waxing as above worked very well for me. I did 10 repeats.
regards
Fred W B
You can do it quickly. You can do it cheap. You can do it right. Pick any two.
|
|
|
Mr Whippy
|
| posted on 13/5/22 at 12:48 PM |
|
|
I think I'd just use normal car paints since the part you're laying will never touch it due to it being isolated by the release agent...
Personally I'd settle for a dull finish from the mold and just buff up the part when it comes out the mold, especially if just doing a one off,
and it will be easier to do.
|
|
|