David Jenkins
|
| posted on 20/4/08 at 03:45 PM |

|
|
Exhaust manifold blowing (again)
I thought I'd got this problem fixed, but it looks like it's still happening...
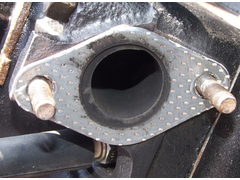
My x-flow has a 4-branch exhaust manifold, and ever since I've had it I've had problems with getting a good seal on cylinder no. 4. The
main difficulty is that the port has only 2 nuts to hold it tight, and no matter how tight I do them up I still get a small amount of leakage. This
can be seen at the top of the photo below (and yes, I do know the photo's 45 degrees on the tilt!). There's only so much you can tighten up
the nuts without causing damage.
I've put a straight-edge along the mounting faces and they seem quite good - not perfect, but the 3 parts are on tubing so there is a certain
amount of bendiness.
I've lived with this for ages as it didn't make a huge amount of difference, but now I've fitted a wideband lambda sensor boss (which
is why it's off the engine) and I want to get rid of all air leaks.
Is it possible to get thicker gaskets? Or is there some goo that would seal the gap?
 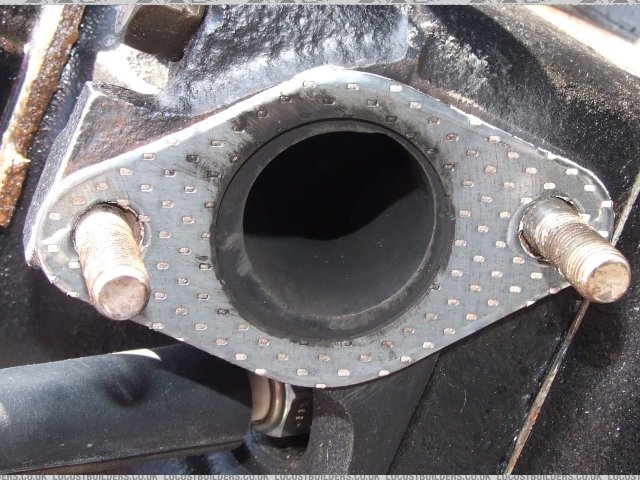
Rescued attachment exhaust_gasket.jpg
|
|
|
|
|
rusty nuts
|
| posted on 20/4/08 at 03:47 PM |
|
|
Exhaust assembly paste or silicon?
|
|
|
David Jenkins
|
| posted on 20/4/08 at 03:48 PM |
|
|
I don't want to use silicone as that would mess up the sensor... 
I could use exhaust joining paste I suppose...
|
|
|
DIY Si
|
| posted on 20/4/08 at 03:58 PM |
|
|
A light smear of exhaust paste either side of the gasket should cure that.
|
|
|
907
|
| posted on 20/4/08 at 04:00 PM |
|
|
Place a thickness of cardboard under the side that touches.
Tighten the bolts, then heat the pipe in a narrow ring with that nice set of bottles you have. 
Tighten bolts more and allow to cool.
Remove cardboard.
ATB
Paul G
p.s. Sorry
|
|
|
wonderfulweasel
|
| posted on 20/4/08 at 04:07 PM |
|
|
I've had the same problem with my crossflow. I think I finally solved it a couple of weeks ago. I used a light smear of (I think) hermatite red
on both sides of the gasket. I also made a steady bracket from the bellhousing to stop the manifold from shaking. I used brass nuts done up quite
tightly and then re-tightened once the engine was up to temperature. It seems to have worked so far.
|
|
|
nib1980
|
| posted on 20/4/08 at 04:14 PM |
|
|
i solved mine with exhaust paste and exhaust wrap over the top, worked a treat.
|
|
|
oadamo
|
| posted on 20/4/08 at 04:20 PM |
|
|
get it skimmed at an engineering company. i had to do it to my charade it was the only way to stop it.
adam
|
|
|
mangogrooveworkshop
|
| posted on 20/4/08 at 04:35 PM |
|
|
Copper washer might do the trick from a bec exhaust
|
|
|
cidersurfer
|
| posted on 20/4/08 at 04:51 PM |
|
|
I solved mine repeatedly blowing all the time by getting a set of copper gaskets from The 7
Workshop Not Losost though, about 4 years ago they were approx £30!
Apparently Ferriday Engineering also do copper gaskets...
shimming solid lifters is a job for a friend...
|
|
|
C10CoryM
|
| posted on 20/4/08 at 05:07 PM |
|
|
Quick fix: buy 2 of those gaskets and put both in.
Permenant fix: take the manifold to an exhaust shop (or machine shop) and get the flange ground flat.
"Our watchword evermore shall be: The Maple Leaf Forever!"
|
|
|
pajsh
|
| posted on 20/4/08 at 06:10 PM |
|
|
Hermetite Green I was told and worked OK.
Have used Red also.
HTH
I used to be apathetic but now I just don't care.
|
|
|
phil m
|
| posted on 20/4/08 at 06:45 PM |
|
|
Had the same problem myself on cylinders 2 and 3.
Looks like you have a large bore gasket (as I did ) Replace with standard size and it may fix it (it did for me)
|
|
|
David Jenkins
|
| posted on 20/4/08 at 06:59 PM |
|
|
quote:
Originally posted by phil m
Had the same problem myself on cylinders 2 and 3.
Looks like you have a large bore gasket (as I did ) Replace with standard size and it may fix it (it did for me)
Good thought... might look into that.
Also Hermetite red/green is a thought - and I do have a tube of exhaust assembly goo to try in the meantime.
Paul... what bottles? I'm not sure about wielding a blowtorch in near the engine either... I'm not sure I want to risk setting fire to the
thing, especially as I've almost finished the bike carb conversion at last! 
|
|
|
MikeRJ
|
| posted on 20/4/08 at 07:02 PM |
|
|
quote:
Originally posted by 907
Place a thickness of cardboard under the side that touches.
Tighten the bolts, then heat the pipe in a narrow ring with that nice set of bottles you have.
That's the way I'd do it if I had access to gas. Alternatively apply a file and liberal amounts of elbow grease to get the flange flat
and at the correct angle to form a seal.
|
|
|
David Jenkins
|
| posted on 20/4/08 at 07:20 PM |
|
|
quote:
Originally posted by MikeRJ
Alternatively apply a file and liberal amounts of elbow grease to get the flange flat and at the correct angle to form a seal.
Trouble is, it's not an area that's higher than the rest - I think it's a low spot. Or the flange is twisted away from the mounting
face a tiny bit. I'd have to file down all the other flanges to match!
The ideal answer would be to get the faces machined at an engineering shop, but it would be a pig to set it up in such a way that it wouldn't
move - it would have to be a big mill or surface grinder as well. With all these things, the more faffing about it involves, the higher the cost.
|
|
|
phil m
|
| posted on 20/4/08 at 07:33 PM |
|
|
David
Beat myself up on this one for ages - try the smaller gasket first - easy and cheap
|
|
|
NS Dev
|
| posted on 20/4/08 at 08:55 PM |
|
|
follow philm on the gasket differences, then if that's no good, use two gaskets.
I'm not a big fan of using goo on things that shouldn't need it.
On my XE I warped the flange when I welded it all up. There is one thin corner and it pulled up when welded.
I put a bead or two of weld on the sealing face then linished it all flat on a big belt linisher.
Retro RWD is the way forward...........automotive fabrication, car restoration, sheetmetal work, engine conversion
retro car restoration and tuning
|
|
|
MikeRJ
|
| posted on 21/4/08 at 12:51 AM |
|
|
quote:
Originally posted by David Jenkins
quote:
Originally posted by MikeRJ
Alternatively apply a file and liberal amounts of elbow grease to get the flange flat and at the correct angle to form a seal.
Trouble is, it's not an area that's higher than the rest - I think it's a low spot. Or the flange is twisted away from the mounting
face a tiny bit. I'd have to file down all the other flanges to match!
It's one of the outer branches, so there would be plenty enough flex in the manifold to make up for the tiny bit you'd need to remove with
a file!
[Edited on 21/4/08 by MikeRJ]
|
|
|
bimbleuk
|
| posted on 21/4/08 at 09:55 AM |
|
|
I've had similar fun on my car with both my exhaust and inlet manifold. In both cases I used a friends 5 foot long belt sander. Meant for wood
working but the belt seemed to remove both ally and steel with no issue. Though at times I was a little concerned about small sparks catching on all
the saw dust surronding the machine. I couldn't mount the exhaust manifold in a milling machine as it came in one piece.
On the exhaust manifold I tried a multi-layer steel gasket and ended up using a single layer with a smear of silicone RTV as a temporary fix. I was
quite suprised to find the silicone still flexible when I took it apart to flatten. Especially as I used standard stuff and not the high temp variety.
|
|
|


.jpg)