FuryRebuild
|
| posted on 12/7/13 at 09:29 AM |

|
|
First Carbon Fibre sandwich panel made
This post is also at my blog, with better layout.
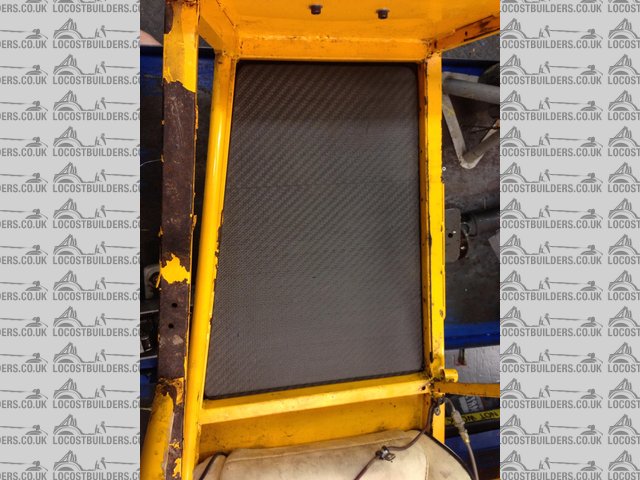
The original aluminium part weighed 960g, and this part weighs 524g. Thats a 55% saving in weight.
Description
So, this is my first carbon-fibre part. It is a resin-infusion aramid/foam/glass/carbon part designed to replace a aluminium floor panel. Unlike the
aluminium part which was riveted in, the composite part will be bonded in for good. This will reduce weight and increase rigidity in the chassis. All
in all, Im really pleased with the result, and the pictures below will show how I made it, and how strong it is.
The layup of the part is:
What Specification
Aramid 2/2 Twill Weave 300g
Closed Cell Foam 10mm
E-Glass 2/2 Twill 200g
Carbon Fibre 2/2 Twill 12k 450g
Epoxy Resin Normal, Slow
 
Description
Now that the parts are laid on the glass and vacuum bagged, I infused 200g of resin through. Sure enough, this wasnt enough, so I stopped the
infusion process, added another 100g of resin and completed the process. The infusion process slowed down towards the end, and the far-right corner
was the last to fill. Just as the corner filled, I had the input clamp tight, so the corner filled from resin already in the part. I dont think I had
too much resin in there.
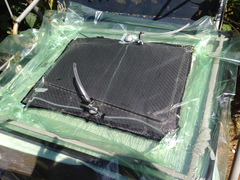 
Description
One fully infused, vacuum bagged part, sitting in the sun curing. I was lucky in having to work away from home for three days when the UK weather was
the best its been for a while so the part got a proper baking. For slow resin, 24 hours is a minimum before demoulding, and 36 is better. I got 72,
with three hot blasts of the mid-day sun.
 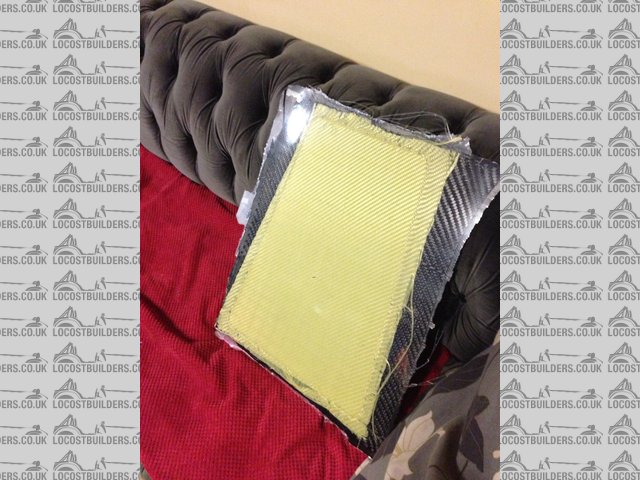
Description
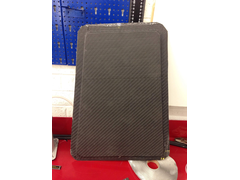
Heres the part popped from the mound. The easy-lease compound (4 applications, as per the instructions) worked a treat and the part popped off the
glass without a fight. You can see the aramid (yellow), which is the underside part of the car, facing the road surface. Aramid gives brilliant impact
protection. Its also incredibly strong, and a little more giving than carbon-fibre on its own.
 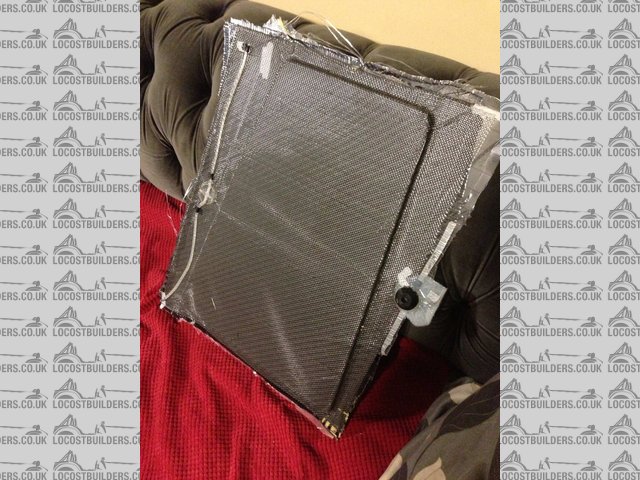
Description
Heres the side of the part that faces into the footwell. You can see the infusion spiral and resin bung still on the part because I havent removed
the peel-ply yet that this lot is all stuck to.
Description
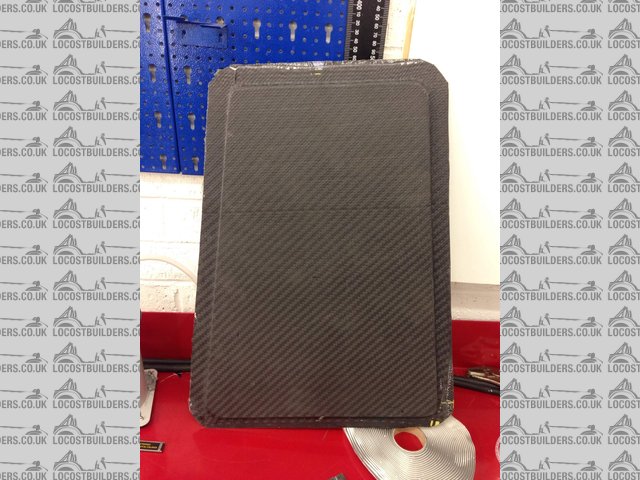
Lo and behold it came to pass that the part was peeled and trimmed.
Description
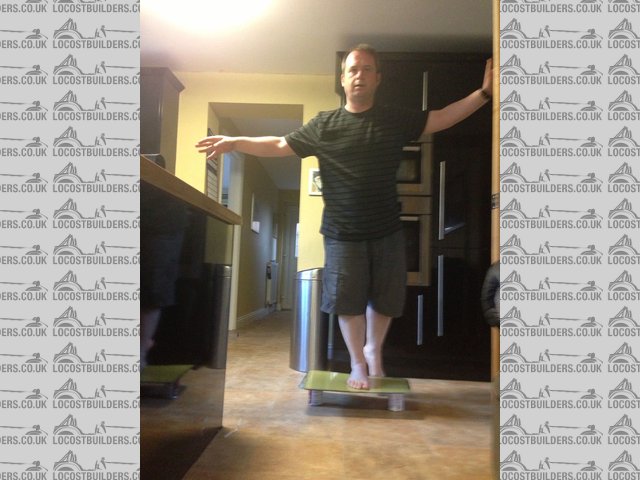
Heres the finished part, sat on two tins of soup, with my not inconsiderable self balancing on top of it. Note the lack of deflection.
When all you have is a hammer, everything around you is a nail.
www.furyrebuild.co.uk
|
|
|
|
|
Carbonman
|
| posted on 12/7/13 at 09:33 AM |
|
|
Get off the bloody forum and get the other panels done Lol
Looks good by the way
Carbon Copies Ltd
|
NOTE:This user is registered as a LocostBuilders trader and may offer commercial services to other users
|
omega0684
|
| posted on 12/7/13 at 09:44 AM |
|
|
Are you taking orders? 
What's panels are you planning to replicate from Ali to CF?
I love Pinto's, even if i did get mine from P&O!
|
|
|
v8kid
|
| posted on 12/7/13 at 10:35 AM |
|
|
Excellent I'm most impressed - how are you going to bond it to the steel frame and how much weight will this add?
I have tried bonding glass fibre with polyester resin (yup I know its different to epoxy but..) to steel and found that over time the bond fails due
to shear stresses at the join. I always assumed that this was due to differential expansion between the steel and the fibre.
How is this problem overcome? I'm assuming you are going to use an adhesive with some filler in it to fill the gaps hence the question of the
weight of the adhesive. On the other hand there is a weight saving from the pop rivets no longer needed but I can't quite get my head round
which is the greater.
The technique looks stressfull (for the inexperienced operator like me) - do you have time with the epoxy to make changes or does it all happen in a
rush?
Cheers!
David
You'd be surprised how quickly the sales people at B&Q try and assist you after ignoring you for the past 15 minutes when you try and start a
chainsaw
|
|
|
FuryRebuild
|
| posted on 12/7/13 at 10:41 AM |
|
|
Hi omega0684
I'm not taking orders - far too busy with other things as well. If you need help, see Warren (CarbonMan) on here.
I'm going to be replacing every non structural steel or ally panel and bond the new carbon panels in (using a special loctite adhesive designed
for the job).
Thanks
Mark
When all you have is a hammer, everything around you is a nail.
www.furyrebuild.co.uk
|
|
|
coyoteboy
|
| posted on 12/7/13 at 10:53 AM |
|
|
Nice, interesting to do the layup as one. I've been involved in the making of a few carbon/foamcarbon kiteboards - these were wet layup and then
vac-bagged as opposed to infusion. I never quite trust infusion but probably should!
Other option is you know you can buy 8x4 carbon/honeycomb/carbon panels off the shelf in various thicknesses?
Lovely to be ablet o make the part exactly as you like it. I was considering making some structural parts of my chassis from this technique but
I'm not sure I trust my construction skills in such a situation.
|
|
|
minitici
|
| posted on 12/7/13 at 11:00 AM |
|
|
looks good.
I was thinking of making a ballistic shield, for my clutch housing, using aramid cloth layups.
My clutch is going to be right next to my thigh on my 750 Trophy racer.
If that lets go at 8000 rpm it could be a little messy.
|
|
|
RK
|
| posted on 12/7/13 at 11:26 AM |
|
|
Nice work!
Want to make one of these for my Van Diemen Sports Racer, which currently has a steel floor. Winter project...
[Edited on 12/7/13 by RK]
|
|
|
coyoteboy
|
| posted on 12/7/13 at 11:58 AM |
|
|
How are you going to estimate the layup required, or are you going to just provide something to help?
|
|
|
snakebelly
|
| posted on 12/7/13 at 12:25 PM |
|
|
Have you remembered to seal the edges post trimming, when i sid my similar panels i used a dremel to "route" a slot in the permiter the
filled it with aixture of resin and a bulking agent. That way the cut foam edge cant be used as as an entry point for moisture, ating with composites
is fun is t it. We used the hammer trst on our saples and were very impressed
|
|
|
FuryRebuild
|
| posted on 12/7/13 at 02:41 PM |
|
|
Hi V8kid
I'm intending to use Hysol Loctite EA 9394. It's specifically designed for the job and cures in 2h at room temp. Both sides need to be
keyed, and I'll be doing that by having the chassis sand blasted, and the peel-ply side of the flange is already a perfectly keyed medium.
I'll degrease with either panel-wipe or acetone.
Coyoteboy - thanks for the suggestions for the panels - I knew I could do that, but I wouldn't have had the panels with the mounting flange, and
also I did this for my time and the base costs.
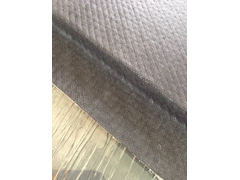
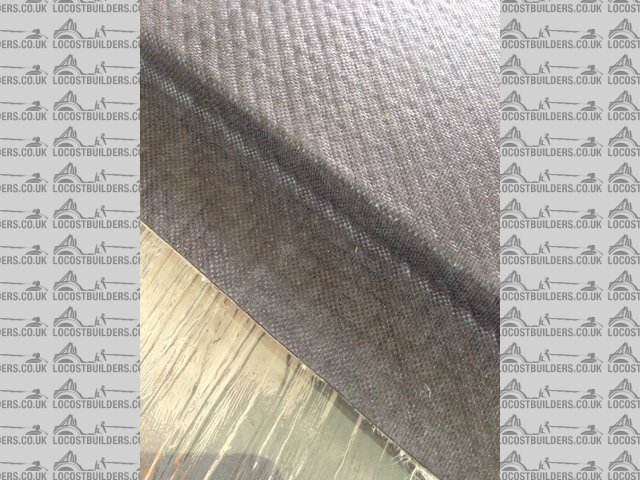
SnakeBelly - please see the photo below- the part runs down from the sandwich panel into a mounting flange. It will be bonded both on the sandwich
side and the flange (from below). The sandwich part of the panel is runs a 1-2mm relief all the way around between the panel and the chassis, which is
about the right amount for the adhesive.
And thanks all for the encouraging comments.
Mark
Description
When all you have is a hammer, everything around you is a nail.
www.furyrebuild.co.uk
|
|
|
FuryRebuild
|
| posted on 12/7/13 at 04:11 PM |
|
|
I'm wondering how to make a prop-catcher at the moment ...
quote:
Originally posted by minitici
looks good.
I was thinking of making a ballistic shield, for my clutch housing, using aramid cloth layups.
My clutch is going to be right next to my thigh on my 750 Trophy racer.
If that lets go at 8000 rpm it could be a little messy.
When all you have is a hammer, everything around you is a nail.
www.furyrebuild.co.uk
|
|
|
snakebelly
|
| posted on 12/7/13 at 06:35 PM |
|
|
ahh I see, we just made oversize sheets so we could use it wherever we wanted rather than making individual panels hence we had to seal the edges once
cut to size.
I admire your trust in adhesives but personally we used PU adhesive and rivets still as there isn't an adhesive made I would trust in this
application given the movement in the chassis and vibration!
|
|
|
atm92484
|
| posted on 16/7/13 at 02:03 AM |
|
|
Nice work on the panel - it looks really good.
-Andrew
Build Log
|
|
|
scudderfish
|
| posted on 16/7/13 at 06:19 AM |
|
|
How much in materials does it cost to make something like that?
Regards,
Dave
|
|
|
FuryRebuild
|
| posted on 18/7/13 at 08:15 AM |
|
|
Hi Dave
I recon about £35 to £40 quid but haven't fully calculated it by the cm2 and not including my time and the wastage in learning the pleating,
bagging techniques.
quote:
Originally posted by scudderfish
How much in materials does it cost to make something like that?
Regards,
Dave
When all you have is a hammer, everything around you is a nail.
www.furyrebuild.co.uk
|
|
|