jollygreengiant
|
| posted on 8/3/07 at 07:42 PM |

|
|
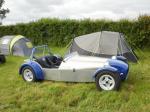
First pics of First attempt at dash.
Been a bit busy yesterday & today in/out of the garage. So here are a couple of shots of the dash so far in my first attempt. sorry if the
photo's are abit poor but it was getting dark & I was getting tired & hungry.
Here is the dash from the back of the car.
Rescued attachment 08032007.jpg
Beware of the Goldfish in the tulip mines. The ONLY defence against them is smoking peanut butter sandwiches.
|
|
|
|
|
jollygreengiant
|
| posted on 8/3/07 at 07:42 PM |
|
|
From above..jpg)
Beware of the Goldfish in the tulip mines. The ONLY defence against them is smoking peanut butter sandwiches.
|
|
|
jollygreengiant
|
| posted on 8/3/07 at 07:45 PM |
|
|
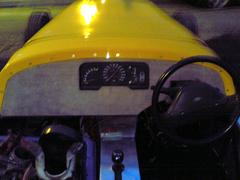
From approximate driving possition. Will need to cover dash & fit a perspex window over
guages..jpg)
Beware of the Goldfish in the tulip mines. The ONLY defence against them is smoking peanut butter sandwiches.
|
|
|
nib1980
|
| posted on 8/3/07 at 07:48 PM |
|
|
looking good, a lot better than me, which isjust a nig hole, with a birds nest of wires!
|
|
|
jollygreengiant
|
| posted on 8/3/07 at 07:53 PM |
|
|
quote:
Originally posted by nib1980
looking good, a lot better than me, which isjust a nig hole, with a birds nest of wires!
Been through that phase, you'll find the photos in my archive. Still got some bids nest at the back but its controlable now.
Beware of the Goldfish in the tulip mines. The ONLY defence against them is smoking peanut butter sandwiches.
|
|
|
nick205
|
| posted on 8/3/07 at 07:57 PM |
|
|
That's the best use of a donor instrument pod I've ever seen by far. Looks really good 
|
|
|
mainlandboy
|
| posted on 8/3/07 at 08:35 PM |
|
|
Looks neat and tidy. I also used the stock speedo and tach from my donor car (1982 Toyota Corolla) to save money. With a little bit of creative
effort, it can be made to look pretty good. Here is a pic of it mostly done:
http://banga.org/ipw-web/gallery/Marks-Locost-Project/168_6840_IMG
Mark
|
|
|
RichardK
|
| posted on 8/3/07 at 08:37 PM |
|
|
Did mine a few months ago, quite please with a bit of mdf a router, camping foam, lexan and some vynl.


More in my gallery for the interested
Regards
Rich
Gallery updated 11/01/2011

|
|
|
DavidM
|
| posted on 8/3/07 at 08:56 PM |
|
|
Coming along nicely Clive. That group pre SVA inspection may be sooner than we think.
David
|
|
|
Duncan_P
|
| posted on 8/3/07 at 09:22 PM |
|
|
I think it looks great!
I had dismissed re-using my sierra instruments, but yours has got me considering using them again.
|
|
|
RichardK
|
| posted on 8/3/07 at 09:39 PM |
|
|
Clive, not 100% sure but I thought I read somewhere not to use perspex as it can shatter, this is what I was going to use, I was advised to use lexan
which I got easily off ebay (an A3 sheet) which did the job great.
Cheers
Rich
Gallery updated 11/01/2011
|
|
|
jollygreengiant
|
| posted on 8/3/07 at 09:44 PM |
|
|
quote:
Originally posted by Duncan_P
I think it looks great!
I had dismissed re-using my sierra instruments, but yours has got me considering using them again.
Started with striping the pod, plastic off front, unclip rear connector surrounds, undo nuts on connector pins, remove circuit sheet. Remove
insturments from case. Then used hot cutter along rib on top that removed the upper forward lip. Then used an electric plane to bring it down to flush
& level all round the front edge. Cut off carefully with hot cutter the old plates used to hold front perspex retainer clips.
I figure that if I put a thin bead seal on the lip that will seal against the eventual perspex frontage.
Marked the outline on my wood and cut out hole. Folded 2 metal plates to screw to the inner face of the wooden panel, these engage on the top lip of
the pod. The bottom of the pod being retained on to the wood by 2 screws.
To finish I was thinking some carbonfibre type sheeting or padded vinyl. I shall sleep on it and think some more on it tomorrow.
Beware of the Goldfish in the tulip mines. The ONLY defence against them is smoking peanut butter sandwiches.
|
|
|
Duncan_P
|
| posted on 8/3/07 at 09:57 PM |
|
|
Great, thanks for the info. I might fish the gauges out of there box in the garage and amuse SWMBO by taking it all apart on the dining table......I
think its been long enough since any car parts being inside the house (bar the few bits in the study) for me to get away with it
Nearly chucked them the other day
|
|
|
wilkingj
|
| posted on 8/3/07 at 10:08 PM |
|
|
The beauty of building your own car, is that you can usethe donor gauges, and then change at a later date when the funds permit. And sell on the old
dash to recoup some cash.
1. The point of a journey is not to arrive.
2. Never take life seriously. Nobody gets out alive anyway.
Best Regards
Geoff
http://www.v8viento.co.uk
|
|
|
bbwales
|
| posted on 8/3/07 at 10:24 PM |
|
|
Hi this is how I altered the Sierra dash for my build, but notice the deliberate mistake.
Regards
Bob.JPG)
|
|
|
mistergrumpy
|
| posted on 8/3/07 at 10:59 PM |
|
|
The fact you've put Locust instead of Locost ot the fact you've no needles on your gauges. Although there does seem to be one peeping
through on the rev counter.
|
|
|
bbwales
|
| posted on 9/3/07 at 12:38 AM |
|
|
Yes the printer manager to do the miss spelling, all the needles are there though
Bob
|
|
|