westcost1
|
 posted on 1/6/07 at 03:24 PM posted on 1/6/07 at 03:24 PM |

|
|
Castor angle i want to get it right this time!
Hi all
I now this has been done lots before as I have spent the after noon looking through the past threads but I really want to get this right this time  . .I am building a book locost and using gts / rally design (locost) front wishbones and they have a poly bush and ½ bolt therefore a longer nut,
this ment that the lower suspension brackets and arm are further back than the book and are hard up against the rearmost upright. I put the top
brackets as far back as possible on the uprights to compensate but this doesnt even give me the 5.3 degrees castor angle stated in the book. I now
realise the importance on this angle and want to get it right. I plan to move the top brackets back and build a boxed in triangular section behind for
support. What I want to now is how much castor angle are other book locosts running to get self cantering I can fined lots on mks but not much on
the locost design is 7 degrees about right? And whats the best means for measuring this angle.
. .I am building a book locost and using gts / rally design (locost) front wishbones and they have a poly bush and ½ bolt therefore a longer nut,
this ment that the lower suspension brackets and arm are further back than the book and are hard up against the rearmost upright. I put the top
brackets as far back as possible on the uprights to compensate but this doesnt even give me the 5.3 degrees castor angle stated in the book. I now
realise the importance on this angle and want to get it right. I plan to move the top brackets back and build a boxed in triangular section behind for
support. What I want to now is how much castor angle are other book locosts running to get self cantering I can fined lots on mks but not much on
the locost design is 7 degrees about right? And whats the best means for measuring this angle.
Thanks Nick
|
|
|
|
|
nitram38
|
| posted on 1/6/07 at 04:24 PM |
|
|
between 5-7 is right for my car and should be for yours. A race car should only be around 3.
I am running 7 and the car is perfect at high speed with no wandering. It does mean that 3 point turns are a bit heavy, but that I can live with.
Remember that sva only requires your car to "attempt" to self centre so 5 degrees will probably do a 7.

|
|
|
SkinnyG
|
| posted on 2/6/07 at 03:18 AM |
|
|
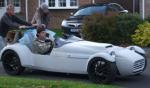
I initially built with 4.75° castor and there was almost no self-centering.
Re-did the upper arms for 7° and it is phenominally better.
A bit tough to steer like this though:
 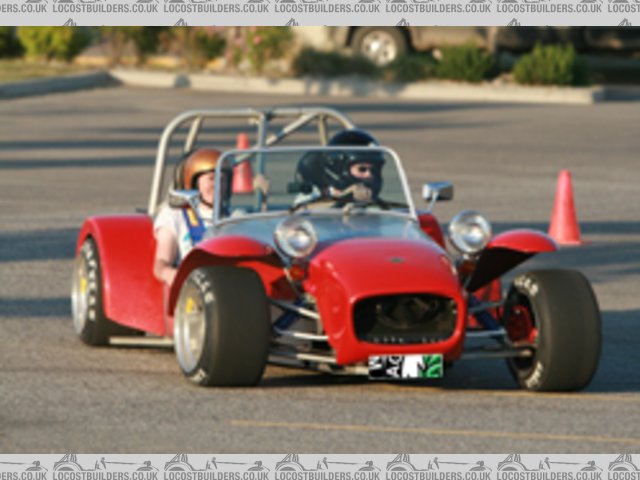
Rescued attachment Locost - Okanagan Racing.jpg
The Lethal Locost
|
|
|
Mark Allanson
|
| posted on 2/6/07 at 09:37 AM |
|
|
I have a hunter system at work so it was easy for me (£22,000 of laser computer aided geometry machine). I modded the upper wishbones to give 22mm of
upper setback, and did a quick check as per the pickie, got loads of self centring and the car drives like a dream
 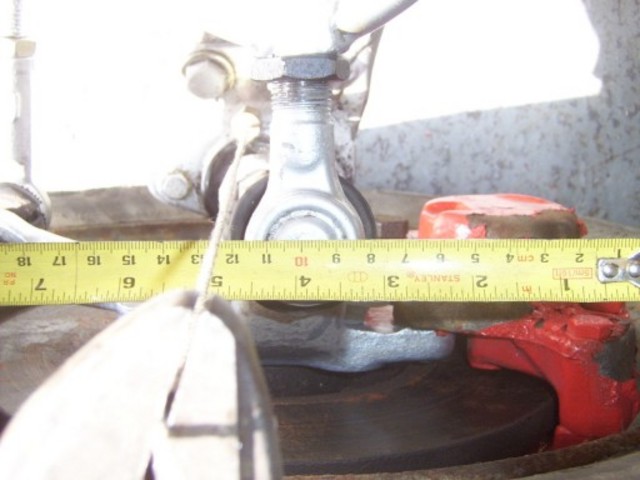
Rescued attachment Castor 2.jpg
If you can keep you head, whilst all others around you are losing theirs, you are not fully aware of the situation
|
|
|
westcost1
|
| posted on 2/6/07 at 10:20 AM |
|
|
Tanks for the replies thats cool I feel much more happy. The pic is just want I need mark cheers thats 22m centre to centre? Skinny g no wonder your
steering is heavy with those wheel and tyres on it  , must stick to the track like its on rails. , must stick to the track like its on rails.
[Edited on 2/6/07 by westcost1]
|
|
|
907
|
| posted on 2/6/07 at 10:21 AM |
|
|
I,ll second Mark's reply.
When I remade my top bones Mark posted a drawing showing 22mm. (thanks again)
I made them to that and they are fine. Stable on a straight road and enough self centre to pass sva.
Paul G
|
|
|
Mark Allanson
|
| posted on 2/6/07 at 11:30 AM |
|
|
I case you don't have it
 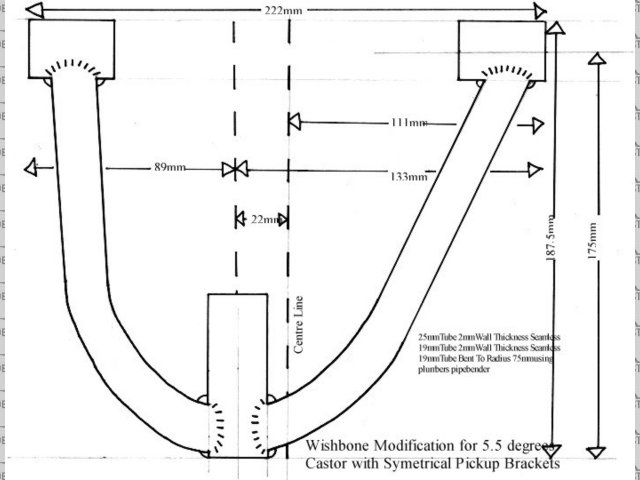
Rescued attachment Wisbone Modification.JPG
If you can keep you head, whilst all others around you are losing theirs, you are not fully aware of the situation
|
|
|
907
|
| posted on 2/6/07 at 03:23 PM |
|
|
Hi Mark,
A print off of that drawing is still pinned to my garage wall.
I can now go one stage further. I have the jig. (shows book & 22mm bone)
Paul G
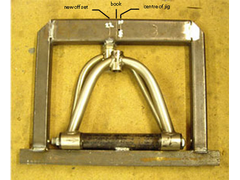 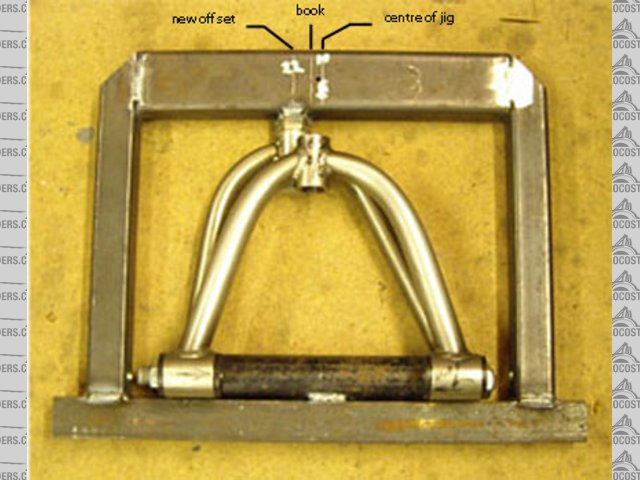
Rescued attachment wb-jig-s.jpg
|
|
|
Mark Allanson
|
| posted on 2/6/07 at 07:13 PM |
|
|
Paul, Glad it helped, by the way, that's the best wishbone jig I have seen so far
If you can keep you head, whilst all others around you are losing theirs, you are not fully aware of the situation
|
|
|
907
|
| posted on 2/6/07 at 07:52 PM |
|
|
Thanks.
On the minus side, it does rely on the ends of the bush tubes being dead square, i.e. turned on the lathe.
On the plus side, it does allow you to fully weld everywhere, and let it cool before removal.
atb
Paul G
|
|
|
westcost1
|
| posted on 8/6/07 at 12:56 PM |
|
|
Thanks for the replies chaps the new top wishbones look good but I really dont want to make new ones. Ok a quick update as usual its not as simple as
just moving the top wishbones back 22mm as the suspension strut clashes with the top arm so I have had to cut all the brackets off and will have to
move the bottom ones as far forwards as possible and may have to mount the suspension strut under the top tube rather than on the outside where it is
now. I have started making a jig as I have seen in some of you guys pic archives as this is the only way I can see of getting it right. Before I weld
the brackets on hopefully this weekend I want to check that the other dims (red ones in pic) in the book are right lol 
 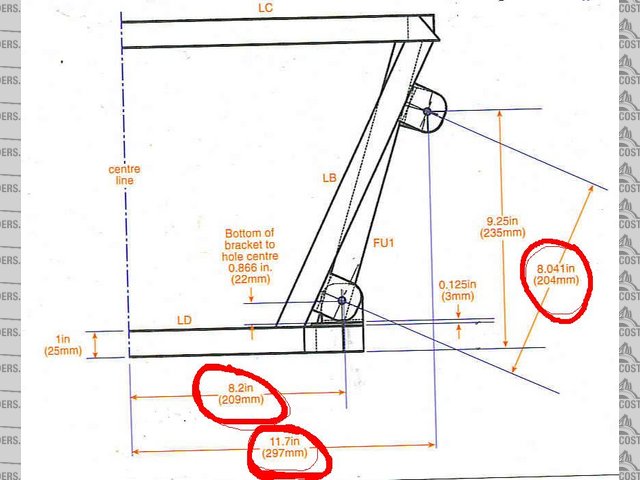
Rescued attachment locost sus.JPG
|
|
|