kingr
|
| posted on 27/3/04 at 12:08 AM |

|
|
Kingr's been busy in the garage....
Chassis sanded cleaned, primed, POR15ed and top coated. Ali cleaned, sanded, formed, drilled, riveted, etched, primed, painted and polished. Exhaust
is really coming on too.
 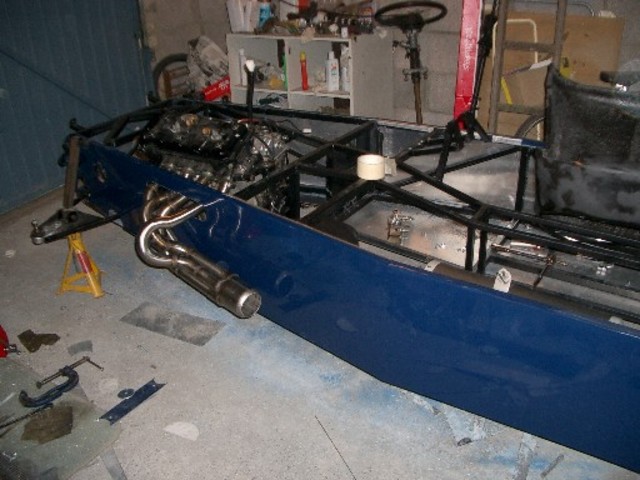
Rescued attachment IMGP0278small.JPG
|
|
|
|
|
kingr
|
| posted on 27/3/04 at 12:13 AM |
|
|
And one more slightly closer to the exhaust.
 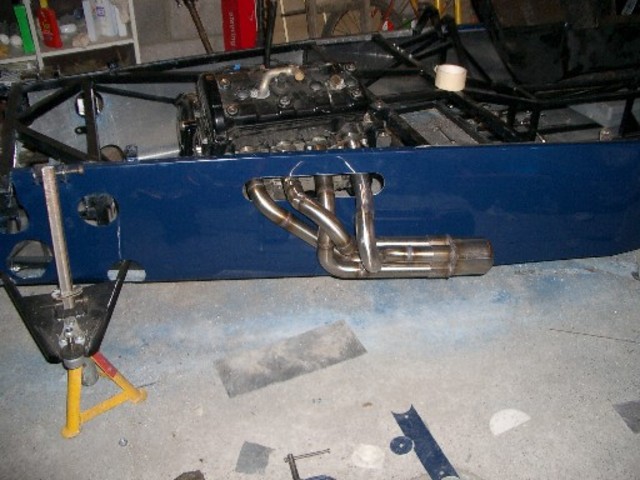
Rescued attachment IMGP0279small.JPG
|
|
|
sgraber
|
| posted on 27/3/04 at 04:43 AM |
|
|
oi oi oi oi oi!!!!
I see what you're up to! You're trying to build a REALLY nice car!
Well, from what I can see in the photos, it seems to be working!  You are doing a suberb job!!! You are doing a suberb job!!!
Anything you wish you could do over?
Graber
Steve Graber
http://www.grabercars.com/
"Quickness through lightness"
|
|
|
madforfishing
|
| posted on 27/3/04 at 07:44 AM |
|
|
Nice Job fellah.
I particularly like your abstract flooring design too.
Did you knock your exhaust downpipes and collector up yourself ? Nice.
|
|
|
pbura
|
| posted on 28/3/04 at 11:59 AM |
|
|
That's a beauty, King. The paint job looks X. 
Pete
Pete
|
|
|
kingr
|
| posted on 28/3/04 at 07:05 PM |
|
|
Thankyou all for your nice comments.
Sgraber : If I could redo one thing on the car so far, it would probably either be the chassis painting which didn't go as smoothly as I might
have liked, that said the finish is reasonable and very little of it will be visible in the finished car anyway, or, I'd redo the rear ali side
panels which are a little wobbly where they bend round the chassis member (although that will be covered by a trim strip in the end). Apart from that
I'm pretty pleased with how it's all gone together.
Madforfishing : Yes I made the headers up myself from 90 degree mandrel bends and sections of straight, all 316L stainless. The collector I bought
from custom chrome as a piece of 3.5" tube shrunk down to around 2.5" at one end and flared slightly at the other to mate with the 4 short
sections of 1 5/8" that I also bought from them.
As a side note I was working on the end can (off a 2002 R1) last night, thinking that it was only the body of the can itself that was made from
Titanium. Imagine my shock then when I came to weld the link pipe only to find that my stainless filler would flow in nicely but then crack as it
cooled!  In the end I had to cut thin rings off an unused section of link pipe, cut a slot into them, flatten them out and use that as filler. I
hope it won't be too brittle since you're supposed to shield titanium while it cools. Oh, and grinding titanium, in case anyone is
thinking of doing it, is not fun. It's like trying to sand wood with tissue paper! In the end I had to cut thin rings off an unused section of link pipe, cut a slot into them, flatten them out and use that as filler. I
hope it won't be too brittle since you're supposed to shield titanium while it cools. Oh, and grinding titanium, in case anyone is
thinking of doing it, is not fun. It's like trying to sand wood with tissue paper!
Kingr
|
|
|
redeye
|
| posted on 29/3/04 at 01:51 PM |
|
|
how did u paint the aluminium sides?
was there a particular process needed to give a good protective finish that wont peel off?
|
|
|
kingr
|
| posted on 29/3/04 at 03:46 PM |
|
|
Redeye :
I used acid etch primer and followed the instructions on there, ie. Thoroughly sand surface with coarse (120 or 180 grit ) paper, clean with degreaser
(not just panel wipe), then wash down thoroughly to get rid of degreaser remnants, then panel wipe, spray with etch primer (I used one mist coat and
two reasonably heavy full coats), then a couple of celulose primer coats (not strickly necessary, but it makes it easier to get a good surface to
apply top coat to, and it's reasonably high build, so should mask any small scratches left in the etch primer), then as many coats of top coat
as you feel like (god knows how many I did. Throw in loads of flatting (in between coats, not just at the end), then loads of polishing, waxing and a
bit of buffing and hopefully all you hard work will be rewarded. Incidentally, so that you don't either develop popeye arms or lose your mind, I
can heartily recomend Silverline's polisher, which is less than £40, 1300w and variable for all the speeds that you may need. Don't try to
use t-cut or any other non water soluble polish, they're all rubbish, I'd recomend either Farecla G3 liquid followed by G10 liquid, or the
3M equivalent (both seem fairly highly regarded, but Farecla is British, so they get my vote, plus you can order their products from screwfix). If you
flat with 1200 grit or better still 1500 grit, then polish it with G3, you'll get it to a mirror finish in no time at all, and hardly break a
sweat.
Kingr
|
|
|
Louis M
|
| posted on 31/3/04 at 02:33 AM |
|
|
What's the color on that beauty?
|
|
|
kingr
|
| posted on 31/3/04 at 11:47 AM |
|
|
I believe it's an old Ford colour, Galaxy Blue if I recall correctly although I also seem to recall that Ford has used the name Galaxy blue to
refer to loads of different colours. I can get you the code if you want.
Kingr
|
|
|