MakeEverything
|
| posted on 14/8/10 at 10:45 PM |

|
|
quote:
Originally posted by scudderfish
You need one of these
http://cgi.ebay.co.uk/Supercharger-Warning-Sticker-KO3-KO4-AUDI-TT-VW-GTI-/170405546045?pt=UK_CarsParts_Vehicles_CarParts_SM#ht_1334wt_914
Well, if that is the case, then ill wait til they pass out, then remove it for them...... 
Kindest Regards,
Richard.
...You can make it foolProof, but youll never make it Idiot Proof!...
|
|
|
|
|
MakeEverything
|
| posted on 16/8/10 at 09:23 PM |
|
|
Gadgets......
The new (first one was ordered the wrong size!) inlet rubber came today from my friendly ebay Koi centre supplier!!
All fitted using the longer band from the incorrect order, so not completely wasted.
 
Inlet Rubber
Also, on the way back from Birmingham, i "Popped" into peterborough to pick up another gadget......
 
Nitrous Home
 
Nitrous Home 2

[Edited on 16-8-10 by MakeEverything]
Kindest Regards,
Richard.
...You can make it foolProof, but youll never make it Idiot Proof!...
|
|
|
MakeEverything
|
| posted on 18/8/10 at 09:45 PM |
|
|
Unexpected Progress - An hour of fiddling...
Some unexpected progress this evening following a thread earlier discussing the objective 1/4 mile time of sub-10.
I think my objectives may be a bit ambitious, but then that should bring the performance up as high as possible within the safe limits of the engine
and equipment that i have.
Anyway, i think i may need to review the objectives once the car is running and all set up.
For now, here are the pictures of this evenings progress;
Foggers mounted into the inlet;
 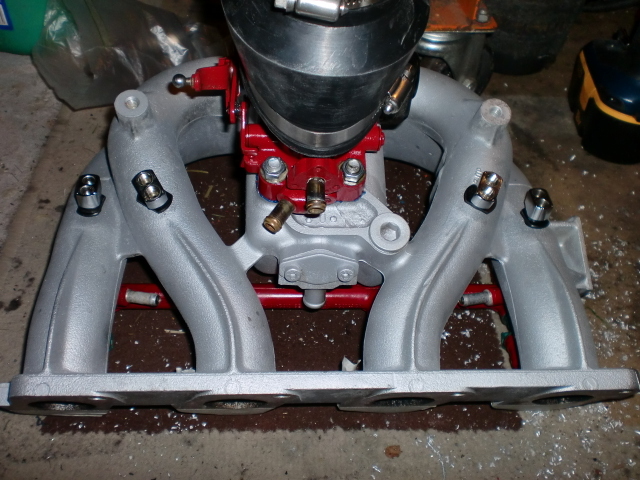
Manifold Nozzles in
 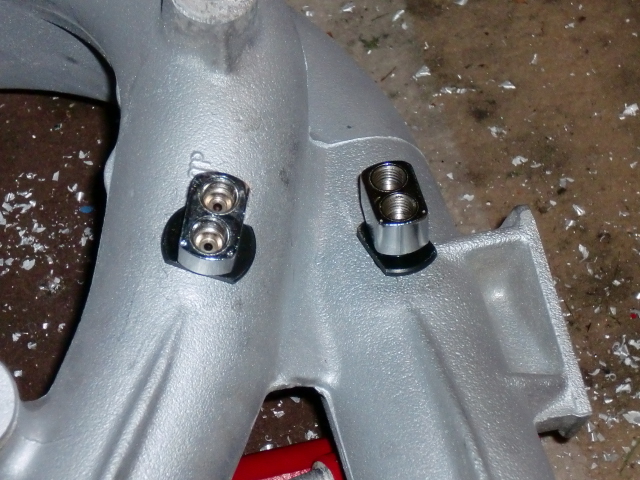
Fogger closeup
 
Inlet fogger
And with the 4mm nylon pipework connected. I plan to make some more at the correct lengths, but for now, the existing ones will do;
 
Nitrous connected
Manifold
The inlet manifold is mounted upside down, so that i can work on it easily. Needless to say, i DIDNT drill the manifold with it attached to the
engine, and it will be blown out before final fitment again.
Kindest Regards,
Richard.
...You can make it foolProof, but youll never make it Idiot Proof!...
|
|
|
l0rd
|
| posted on 22/8/10 at 09:40 PM |
|
|
I was waiting for some progress but this is more than i expected.
The only thing i can say
Renaults 21 used to have webbers. My uncle's 1.4 R21 had a double webber as well. 
I used to love the responce of the throttle with it.
|
|
|
MakeEverything
|
| posted on 30/8/10 at 02:10 PM |
|
|
Had a week off (Malta) last week, so ive had withdrawal symptoms from the project.
Made some progress today in that i have now permanently fixed the supercharger, and found a belt to fit it though it is a little slack and may need to
be shorter.
 
Fixed supercharger
Plan for next week is to get the engine trial fitted to the car and the mounts sorted out. Then start to make up the inlet hoses and exhaust, ready
for firing. Mechanics by day, electrics by night, so the evenings will hopefully be filled by making up the wiring loom and megasquirt.
Kindest Regards,
Richard.
...You can make it foolProof, but youll never make it Idiot Proof!...
|
|
|
MakeEverything
|
| posted on 1/9/10 at 11:00 AM |
|
|
Had a good start to the day. Managed to get the oil filter remote takeoff drilled and tapped to 20mm (19mm drill bit came today), and fitted to the
car.
 
Oil Filter Remote fitted 1
With barely enough room, even after grinding off the wrench stud.
 
Oil Filter Remote Fitted 2
This should be ok, as it i can use a strap wrench to remove it if i need to later on. Not sure if it will still be a problem after ive adjusted for
tightening the belt, but will see.
Also, i got fed up with moving the nitrous solenoids around the garage, so i knocked up a bracket for these that i had measured a template for before
going on holiday. This is the result;
 
Nitrous Solenoids Mounted
Looks quite nice and compact, though i might see if i can get some M6 countersunk screws and turn the bracket the other way up to make it even more
compact. Watch this space.
Kindest Regards,
Richard.
...You can make it foolProof, but youll never make it Idiot Proof!...
|
|
|
MakeEverything
|
| posted on 1/9/10 at 02:04 PM |
|
|
Thats Better;
 
Solenoid Bracket 1
 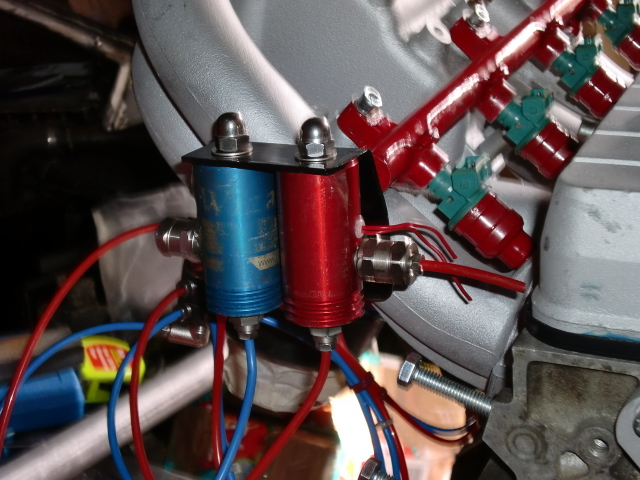
Solenoid Bracket 2
Kindest Regards,
Richard.
...You can make it foolProof, but youll never make it Idiot Proof!...
|
|
|
l0rd
|
| posted on 1/9/10 at 02:19 PM |
|
|
Welcome back. You got me worried for a sec. I was actually thinking of you a second before you posted.
Nice work.
|
|
|
MakeEverything
|
| posted on 1/9/10 at 03:01 PM |
|
|
quote:
Originally posted by l0rd
I was actually thinking of you a second before you posted.

quote:
Originally posted by l0rd
Nice work.
Thanks
[Edited on 1-9-10 by MakeEverything]
Kindest Regards,
Richard.
...You can make it foolProof, but youll never make it Idiot Proof!...
|
|
|
MakeEverything
|
| posted on 1/9/10 at 06:43 PM |
|
|
More progress tonight; The trigger wheel.......
 
Trigger Wheel Concentric
 
Trigger Wheel Concentric 2
 
Trigger Wheel Concentric 3
Sorry Andy! I was listening, but at least now i dont have to;
A) Get it machined
B) Send it away
C) Wait for it to be done!
All in all, a good day.
[Edited on 1-9-10 by MakeEverything]
Kindest Regards,
Richard.
...You can make it foolProof, but youll never make it Idiot Proof!...
|
|
|
l0rd
|
| posted on 1/9/10 at 08:19 PM |
|
|
3 things
Remove the rust befor welding the trigger wheel.
Paint the trigger wheel
you need to anodise the NOS solenoids (they are scratched )
[Edited on 1/9/10 by l0rd]
|
|
|
MakeEverything
|
| posted on 1/9/10 at 08:31 PM |
|
|
quote:
Originally posted by l0rd
3 things
Remove the rust befor welding the trigger wheel.
Paint the trigger wheel
you need to anodise the NOS solenoids (they are scratched )
[Edited on 1/9/10 by l0rd]
The pulley isnt rusty other than inside, which wont be seen anyway, but yes it will get cleaned and painted.
Will be painting the trigger wheel after welding.
The solenoids arent scratched, its the stickers that im pulling off in disgust once the engine is in.
Wizards of NOS wanted nearly £100 to "service" the two solenoids.
They are sooo cocky and full of their own shite, its unbelievable. Apparently, i bought a Wizards kit because i had confidence in their equipment to
purchase a second hand one! - Errr, no, i bought it because it was so cheap!
Kindest Regards,
Richard.
...You can make it foolProof, but youll never make it Idiot Proof!...
|
|
|
MikeRJ
|
| posted on 1/9/10 at 09:20 PM |
|
|
quote:
Originally posted by MakeEverything
I fitted the supercharger a little more permanently tonight as a trial fit to make sure its not too weak, only being supported at two points. I think
i might add some more mounting points later on, but for now it will get the engine in and serving its purpose.
 
Supercharger 1
With the way that i have mounted the supercharger, allows for a little movement laterally as well as longitudinally, so i can adjust the position for
the belt, to ensure correct alignment and tension. In hindsight, this was a good move, seeing as the measurements were impossible to get 100% spot
on.
 
Supercharger 2
My concerns about the oil filter were correct though, and i do need a remote oil filter housing, which i will mount towards the rear of the engine,
for ease of changing. I plan on changing the oil fairly frequently once i know the engine is good. Even more so if i put a rebuilt one in. Here is
a picture of the remaining space i have for the oil filter remote cover to go into. Sorry about the poor quality, i was stretching round the engine
to take it.
 
Oil Filter Dilemma
The inlet for the supercharger is being cut by a mate of mine in Cornwall, so that should be ready for fabrication next weekend all being well. This
will give me a 63mm inlet to match the intercoolers. The filter is a cone type which will be located where cold air is forced in.
You definitely need to support the supercharger better, with it hanging of a single bolt at the front and rear I think you are risking breaking the
casting around the bolt holes.
Also is a small, single v belt going to be up to the job?
|
|
|
MakeEverything
|
| posted on 1/9/10 at 09:48 PM |
|
|
I think you are right too. Ive been looking at this for a while, and i think a mount to the hole which passes through the whole charger should do the
trick. Just need to get round to designing it!
A single Vee belt should do, particularly as the supercharger isnt a heavy load in comparison to a water pump and alternator. Its certainly no more
than the power steering pump which was powered the same way.
Kindest Regards,
Richard.
...You can make it foolProof, but youll never make it Idiot Proof!...
|
|
|
MakeEverything
|
| posted on 5/9/10 at 09:36 PM |
|
|
Thought i would tack the trigger wheel on tonight and see if it was in fact concentric. Im pleased to say it was!! :first:
 
Trigger Wheel Tack 1
Took longer to get the TIG welder out, but at least its done now, and ready for fully welding and dressing.
 
Trigger Wheel Tack 2
I have the week off (Other than wednesday) so the objective of the week is to get the engine back in the car and ready for plumbing in.
Kindest Regards,
Richard.
...You can make it foolProof, but youll never make it Idiot Proof!...
|
|
|
MakeEverything
|
| posted on 6/9/10 at 12:34 PM |
|
|
Made and welded up the VR sensor bracket today. Its fairly substantial, but rather that than too weak.
 
VR Bracket 1
 
VR Bracket 2
Missing tooth should be 9 teeth ahead of the sensor.
 
VR Mounted 1
 
VR Mounted 2
[Edited on 6-9-10 by MakeEverything]
Kindest Regards,
Richard.
...You can make it foolProof, but youll never make it Idiot Proof!...
|
|
|
l0rd
|
| posted on 6/9/10 at 01:35 PM |
|
|
I am sorry to be such a pain in the **** but, i believe that this bracket doesn't look right compared to the high standards of work that you
have shown so far in your build.
 don't swear at me. don't swear at me.
|
|
|
MakeEverything
|
| posted on 6/9/10 at 02:51 PM |
|
|
quote:
Originally posted by l0rd
I am sorry to be such a pain in the **** but, i believe that this bracket doesn't look right compared to the high standards of work that you have
shown so far in your build.
don't swear at me.
lol, i think i know what you mean, but the actual bracket with the long holes were somewhat awkward to cut out by hand and bend to the same radius as
the trigger wheel! I might modify / trim the base plate when i take it off again, as it is rather large.
All in all, i was done by 3pm, and thats with interruptions!
 
Finished with Trigger Wheel
 
Close up of complete VR
I may also need to take some meat off of the VR bracket as i think it will interfere with the supercharger belt once the belt is tensioned. No major
drama, just needs to come off again.
[Edited on 6-9-10 by MakeEverything]
Kindest Regards,
Richard.
...You can make it foolProof, but youll never make it Idiot Proof!...
|
|
|
l0rd
|
| posted on 6/9/10 at 11:00 PM |
|
|
now that you have a template i am sure you can make another one that will be spot on.
Also, you might want to make a proper spacer for the VR bolt.
Now i am going to bed before i upset you
|
|
|
MakeEverything
|
| posted on 7/9/10 at 07:10 AM |
|
|
quote:
Originally posted by l0rd
now that you have a template i am sure you can make another one that will be spot on.
Also, you might want to make a proper spacer for the VR bolt.
Now i am going to bed before i upset you
Bloody hell, give me a chance!!
Ive got a longer bolt for that last night, which uses two nuts as spacers rather than a million brass washers.
Im going to keep the same bracket, but probably trim it down a bit so that its less intrusive. I need to cut the bottom off of it anyway, so that it
doesnt interfere with the supercharger belt.
Kindest Regards,
Richard.
...You can make it foolProof, but youll never make it Idiot Proof!...
|
|
|
MakeEverything
|
| posted on 7/9/10 at 10:34 AM |
|
|
Had a slow start to the day today. Expecting some rain at 10:00, i waited to see what the weather was going to do before dragging stuff out of the
garage.
Managed to get the engine in its original mounts again;
 
Engine Trial Fit 1
 
Engine Trial Fit 2
The supercharger hits the fuel tank and needs another 40-50mm clearance to fit and move. Next job is to modify the tank, check everything again and
refit once its all clean.
 
Charger Vs Tank!
Kindest Regards,
Richard.
...You can make it foolProof, but youll never make it Idiot Proof!...
|
|
|
MakeEverything
|
| posted on 7/9/10 at 05:19 PM |
|
|
Todays final efforts with all modifications made to Tank VR mount, supercharger adjustment and timing belt. Turned over by hand very well.
 
Todays efforts! :)
Kindest Regards,
Richard.
...You can make it foolProof, but youll never make it Idiot Proof!...
|
|
|
MakeEverything
|
| posted on 9/9/10 at 04:34 PM |
|
|
She's in!!
Progress from todays efforts.
 
She's in 1
 
She's in 2
 
She's in 3
Then it absolutely hammered down with rain!! The car got soaked, so is now drying out in the garage!
 
She's in 4
Next up, Wiring, Inlet plumbing, exhaust.
Kindest Regards,
Richard.
...You can make it foolProof, but youll never make it Idiot Proof!...
|
|
|
MakeEverything
|
| posted on 13/9/10 at 09:08 PM |
|
|
Had a pretty non-productive and lazy end of last week (also expensive), but i have now ordered;
New 3 core custom made Radiator
Adjustable Fuel Pressure Regulator with Gauge
Some more vacuum hose.... it was cheap!
New Radiator Fan
These should arrive this week, and im currently contemplating a race spec oil filter remote and heat exchanger.
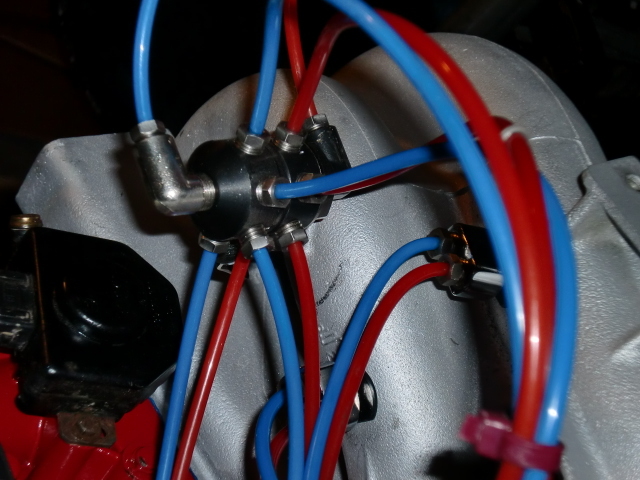
Tonight, i also managed to make a start on the wiring, which i started to enjoy (as suspected) once i eventually got stuck in. Managed to get the two
relays wired and the fuse box wired up. Just need to complete all the field wiring and get it done.
 
Wiring 1
 
Wiring 2
This is all working from my own wiring diagram, so i hope its right!!!!!
 
Wiring 3
Kindest Regards,
Richard.
...You can make it foolProof, but youll never make it Idiot Proof!...
|
|
|
franky
|
| posted on 13/9/10 at 09:11 PM |
|
|
You need to slow your progress down, you're making the rest of us look bad
|
|
|