Doctor Derek Doctors
|
 posted on 30/4/11 at 11:43 PM posted on 30/4/11 at 11:43 PM |

|
|
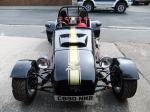
Finally its on its wheels!
After 6 months of saving, researching, buying and building the Life-Taker has finally come down from the bench and is on its wheels and a day of hard
work has also seen the engine positioned and a cradle tacked up to hold it.
 
Those in 'the know' will know what a long and difficult birth this car has had but now I'm hoping that the pace will pick-up and my
aim of having it out for the final race of the RGB season at Donnington will become a reality.
A few quick 'thankyou's' to Steve Hignette (for building such a great chassis), TimC, Scootz, Neil CB, Andy Bates and Matt (for
fronting me the money for the car in the 1st place)
(and yes I do know that the wheels are all over the place, this is only a trial fit)
|
NOTE:This user is registered as a LocostBuilders trader and may offer commercial services to other users
|
|
|
Mr Whippy
|
| posted on 1/5/11 at 03:11 AM |
|
|
looks very good 
bet it looks tiny now you've taken it outside, always amazed me how cars seem to shrink when removed in the garage
cool wheels too
Fame is when your old car is plastered all over the internet
|
|
|
Doctor Derek Doctors
|
| posted on 1/5/11 at 10:16 AM |
|
|
The thing that surprised me is how low it is and also how anyone manages to fit anything other than a motorbike engine into the engine bay.
Wheels were a great local scrapyard find, especially useful as they are narrow enough to fit it into the garage. Cortina Ghia wheels I believe.
|
NOTE:This user is registered as a LocostBuilders trader and may offer commercial services to other users
|
StevieB
|
| posted on 1/5/11 at 11:10 AM |
|
|
Ah, it's your car!
I'd seen Steve's picture diary thread on the chassis build and had been admiring the tubular chassis - I wondered what had become of it.
I'm currently planning a new build myself and have decided to go down the self build route - either locost based or terrapin - and your chassis
has given me some inspiration to do something a little bit different from the standard 'book' chassis.
Keep the updates coming!
|
|
|
Doctor Derek Doctors
|
| posted on 2/5/11 at 09:29 AM |
|
|
quote:
Originally posted by StevieB
Ah, it's your car!
I'd seen Steve's picture diary thread on the chassis build and had been admiring the tubular chassis - I wondered what had become of it.
I'm currently planning a new build myself and have decided to go down the self build route - either locost based or terrapin - and your chassis
has given me some inspiration to do something a little bit different from the standard 'book' chassis.
Keep the updates coming!
I'll aim to do more updates from now on, I was reluctent to do them before as progress was so painfully slow. When I bought the chassis I was
skint and couldn't buy anything, now I have a new job and some money but I'm far busier now (Contracting vs Full time employment).
Its a lovely chassis, wandering round Stonleigh yesterday made me appreciate how well designed and thought out it is and made me glad I used it as a
starting point rather than a box frame Locost. The only problem is that hardly anything has been 'off the shelf', and those bits that are
(like the steering rack) I have had to meticulously calculate the positions and build my own mounts. I now have a large pile of parts that have been
incorrectly bought as I didn't quite know what I needed.
Its definatley worth doing though, I think its the only way to go if you want to race or really get your teeth into some design.
Next jobs are to finish the engine cradle, connect and mount the steering column, get a prop made and start panelling the floor and engine bay.
|
NOTE:This user is registered as a LocostBuilders trader and may offer commercial services to other users
|
Doctor Derek Doctors
|
| posted on 23/5/11 at 06:37 PM |
|
|
Finally an update! Been on a bit of a bargain spree of late (seemingly buying 1/2 of the stuff from the 'For Sale' Forum.
Main work has been completing the engine mounting and cradle:
Also got my box of goodies through from AB Performance, including the exhaust manifold:
Some unbelievable sexy bits from Steve:
Race and Bling Wheels:
Loads of other bits in the pipeline as well, now just need some time to put it all together.
|
NOTE:This user is registered as a LocostBuilders trader and may offer commercial services to other users
|
mcerd1
|
| posted on 23/5/11 at 08:05 PM |
|
|
there can't be much weight left in that disc 
-
|
|
|
Doctor Derek Doctors
|
| posted on 24/5/11 at 07:24 AM |
|
|
quote:
Originally posted by mcerd1
there can't be much weight left in that disc
Yeah they're quite a bit lighter (~0.5kg) than a standard disc.
Problem with these new parts is that I'm now becoming obsessed with weight saving and wanting to buy more expensive lightwieght parts.
|
NOTE:This user is registered as a LocostBuilders trader and may offer commercial services to other users
|
mad-butcher
|
| posted on 24/5/11 at 11:49 AM |
|
|
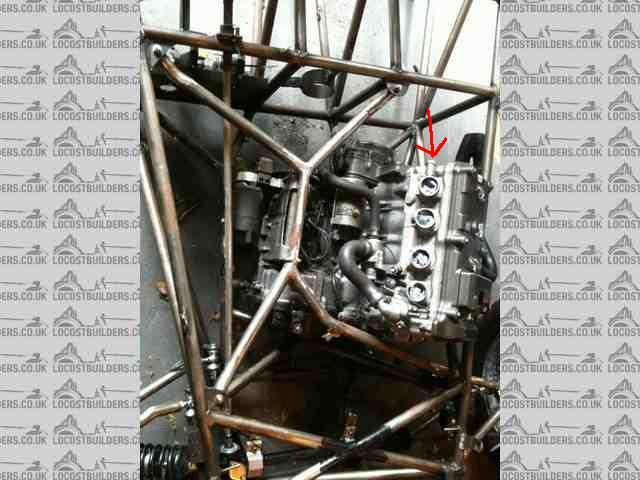
Bit concerned as to why you're not using one of the main engine mounts (arrowed ) or maybe I'm missing something.
[img]
Description
[/img]
Tony
|
|
|
welderman
|
| posted on 24/5/11 at 12:18 PM |
|
|
Problem with these new parts is that I'm now becoming obsessed with weight saving and wanting to buy more expensive lightwieght parts.
lol to above, i know what you mean 
[Edited on 24/5/11 by welderman]
Thank's, Joe
I don't stalk people
http://www.locostbuilders.co.uk/forum/23/viewthread.php?tid=172301
Back on with the Fisher Fury R1
|
|
|
blakep82
|
| posted on 24/5/11 at 12:29 PM |
|
|
that doesn't seem to be the same cradle that steve built for it?
why's that? his was painted black, had the engine mounts on, and fitted the top of the brackets, rather than being hung underneath

[Edited on 24/5/11 by blakep82]
________________________
IVA manual link http://www.businesslink.gov.uk/bdotg/action/detail?type=RESOURCES&itemId=1081997083
don't write OT on a new thread title, you're creating the topic, everything you write is very much ON topic!
|
|
|
Doctor Derek Doctors
|
| posted on 24/5/11 at 12:38 PM |
|
|
quote:
Originally posted by mad-butcher
Bit concerned as to why you're not using one of the main engine mounts (arrowed ) or maybe I'm missing something.
[img]
Description
[/img]
Tony
Its a difficult one.
It is mounted from 4 other mounts, the two at the bottom of the gearbox and the two under the head (none of which are visible in the photos) so from 6
points in total. There is knowehere really to run a mount from that lug to on the chassis where it will provide much in the way of added support as
the load path will be long and meet that chassis in the middle of a tube. I also don't want to add another branch to the Engine cradle as its
like chinese puzzle trying to remove and fit it already.
The 4 lower mounts have very short load paths and create good traingulation already, the engine is absolutley soild in there so I'm not too
worried.
|
NOTE:This user is registered as a LocostBuilders trader and may offer commercial services to other users
|
Doctor Derek Doctors
|
| posted on 24/5/11 at 12:44 PM |
|
|
quote:
Originally posted by blakep82
that doesn't seem to be the same cradle that steve built for it?
why's that? his was painted black, had the engine mounts on, and fitted the top of the brackets, rather than being hung underneath
[Edited on 24/5/11 by blakep82]
That cradle was for a ZX10R motor, that is a 919cc Fireblade engine so completly different to mount.
I was limited to £1500 on the engine front, it was either an unknown, un-prep'd and un-warrantied ZX10R from a scrappy or a lovely refreshed,
balanced, warrantied Fireblade with all the added bits (billet sump, clutch springs etc) from AB performance.
In the end it came down to the fact that I would rather be racing reliably than sat in the pits with a knackered engine. Maybe for late 2012 it will
get a CBR1000RR lump as an upgrade.
This debate has already been had so I'll leave it at that.
Edit forgot to say that the main reason that the old engine cradle was completely abandoned was the massive AB Performance Ram Air box (see pics in
top post) meant that the cradle was a complete no-go and had to be mounted under the mounting lugs and hand down.
[Edited on 24/5/11 by Doctor Derek Doctors]
|
NOTE:This user is registered as a LocostBuilders trader and may offer commercial services to other users
|
mad-butcher
|
| posted on 24/5/11 at 12:47 PM |
|
|
Fair comment, but the one arrowed is used by the bike manufacturer and is the one most cradle makers use because it's the easiest as in Blakes
photo.
tony
|
|
|
blakep82
|
| posted on 24/5/11 at 12:54 PM |
|
|
ah i see. hadn't realised it was a different engine.
hmm, what about a mounting arm from the top chassis rail?
________________________
IVA manual link http://www.businesslink.gov.uk/bdotg/action/detail?type=RESOURCES&itemId=1081997083
don't write OT on a new thread title, you're creating the topic, everything you write is very much ON topic!
|
|
|
Doctor Derek Doctors
|
| posted on 24/5/11 at 01:06 PM |
|
|
quote:
Originally posted by mad-butcher
Fair comment, but the one arrowed is used by the bike manufacturer and is the one most cradle makers use because it's the easiest as in Blakes
photo.
tony
Horses for course really, although it may be the easiest in other applications in this car its not the easiest. its the furthest from any stractural
point and is the one that inteferes most with the airbox.
The four bottom mounts are so solid you could probably even get away without the top cradle.
|
NOTE:This user is registered as a LocostBuilders trader and may offer commercial services to other users
|
Doctor Derek Doctors
|
| posted on 24/5/11 at 01:10 PM |
|
|
quote:
Originally posted by blakep82
ah i see. hadn't realised it was a different engine.
hmm, what about a mounting arm from the top chassis rail?
that would put a bending load into the middle of the top chassis rail (the longest tube in the chassis) and also intefere with my planned bonnet
fitment.
I'm not worried really.
I'll have to get a pic of the 'under head' mounts up as I think they would allay peoples fears.
2 weeks until I can get down and work on the car again...... bugger
|
NOTE:This user is registered as a LocostBuilders trader and may offer commercial services to other users
|
mad-butcher
|
| posted on 24/5/11 at 01:51 PM |
|
|
If you're using the ones I suspect you're using on the front of the engine aren't they in reality for mounting the radiator
brackets. hopefully won't matter.
The only reason for suggesting using original Honda mounts is speed of engine changing,
My rear lower mount is on the chassis top rear and 2 front are on the cradle, So in event of an engine blow-up at a trackday it's 8 nuts to
release exhaust, unhook clutch and throttle cables, electric cables, rad hoses, rear lower engine bolt and finaly the 4 cradle mounts then lift the
engine out complete with cradle, everything accessible from above, Just my opinion though after all it's your car
Tony
|
|
|
Doctor Derek Doctors
|
| posted on 24/5/11 at 03:44 PM |
|
|
That sounds like a good plan........ but the problem is the Ram Airbox stops me having a cradle that mounts over the top of the engine onto those top
mounts. The third picture in the first post shows the restriction on making an 'over hang' frame.
|
NOTE:This user is registered as a LocostBuilders trader and may offer commercial services to other users
|