Liam
|
 posted on 26/5/05 at 11:50 PM posted on 26/5/05 at 11:50 PM |

|
|
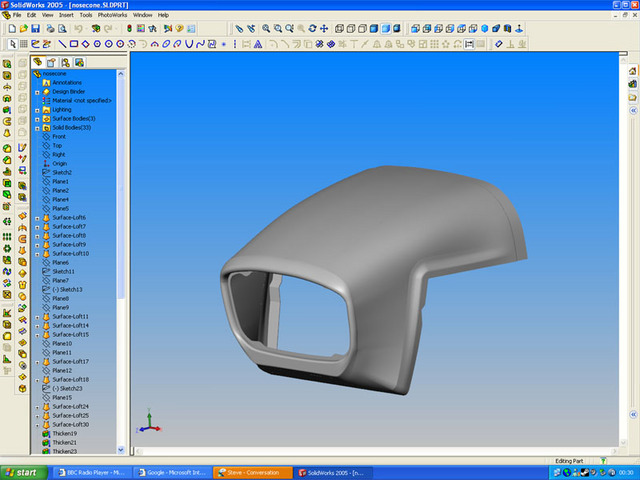
Solidworks Nosecone
Hello...
As a 'fun' way to learn about 3d surfaces and what not in Solidworks I decided to try and model the hardest bit of my locost (unless I try
to accurately model the enine I suppose) - the nosecone.
It's turned out reasonable and ought to be dimensionally OK. It's based on my Luego Locost nose so it's a caterham copy with straight
flanges to fit a book chassis.
I'm sure the curvature is off in plenty of places and i probably could have done stuff a lot more elegantly, but it was just a learning excersise
(and the damn thing's more complicated than it looks).
Anyway I'm making it available to other Solidworksing locosters who might want to play with it. It looks like this...
Liam
Rescued attachment nosecone.jpg
|
|
|
|
|
Liam
|
| posted on 26/5/05 at 11:51 PM |
|
|
It's about 10mb big zipped, so I'm not sure the best way to host it. Might try attaching it here...
|
|
|
Liam
|
| posted on 26/5/05 at 11:52 PM |
|
|
Hmmm, too big I think
|
|
|
Staple balls
|
| posted on 26/5/05 at 11:55 PM |
|
|
looks good 
and you have u2u
|
|
|
scoobyis2cool
|
| posted on 27/5/05 at 01:20 AM |
|
|
That looks awesome, nice one! I'd like a copy to have a play with if that's ok?
Cheers,
Pete
It's not that I'm lazy, it's that I just don't care...
|
|
|
niceperson709
|
| posted on 27/5/05 at 04:49 AM |
|
|
All very flash but the real question is could you actually make it ? having made my own S1 style droop snout nose cone I KNOW how much work is
involved and wonder why so many people waste their time doing cad models of bits for these cars . unless you have the hard ware to make this as a full
size model it is still down to shape and sand , adjust and re sand ...........
best wishes
Iain
Best wishes IAIN
life is not the rehearsal , it's the show so don't sit there thinking about it DO IT NOW
http://iainseven.wordpress.com/

|
|
|
flak monkey
|
| posted on 27/5/05 at 04:58 AM |
|
|
Very, very nice. Looks pretty accurate for shape. Like you say its the hardest bit to model. Well done!
If you want to host it on the web somewhere, I am happy to put it on my site with the CAD thats already there (referenced to you of course). If you
want to, just send me an email with the file in (could be worth creating an IGES file of it as well) and I will stick it up online.
Cheers,
David
Sera
http://www.motosera.com
|
|
|
Staple balls
|
| posted on 27/5/05 at 04:59 AM |
|
|
quote:
Originally posted by niceperson709
having made my own S1 style droop snout nose cone I KNOW how much work is involved and wonder why so many people waste their time doing cad models of
bits for these cars.
something like that a reasonably skilled cad operator could knock up in 2-3 hours.
it could be used to make sure the style is right, the dimensions are right, then used to print out a full set of templates to work from.
but... if you wanna sit in the garage, obsessively sanding for days on end.
|
|
|
niceperson709
|
| posted on 27/5/05 at 05:52 AM |
|
|
"it could be used to make sure the style is right, the dimensions are right, then used to print out a full set of templates to work from.
but... if you wanna sit in the garage, obsessively sanding for days on end"
Even with your full size templates it is STILL a case of sand sand sand fill and then sand again . I am an Artist used to working in 3D and there is
no way that even full sized templates you are going to avoid the hard slog UNLESS you have some very expensive profiling machines .
Still think that the images are nice but the real issue is can you make the actual Item .
best wishes
Iain
Best wishes IAIN
life is not the rehearsal , it's the show so don't sit there thinking about it DO IT NOW
http://iainseven.wordpress.com/
|
|
|
Rorty
|
| posted on 27/5/05 at 06:24 AM |
|
|
I've never met an Artist before. Would you rate your work higher than an artist?
Cheers, Rorty.
"Faster than a speeding Pullet".
PLEASE DON'T U2U ME IF YOU WANT A QUICK RESPONSE. TRY EMAILING ME INSTEAD!
|
|
|
niceperson709
|
| posted on 27/5/05 at 06:28 AM |
|
|
I've never met an Artist before. Would you rate your work higher than an artist?
??????????????????????????????????????
Best wishes
Iain
Best wishes IAIN
life is not the rehearsal , it's the show so don't sit there thinking about it DO IT NOW
http://iainseven.wordpress.com/
|
|
|
bigandy
|
| posted on 27/5/05 at 09:19 AM |
|
|
Look pretty good to me Liam!
I wouldn't mind a closer look at the model if you don't mind. I might be able to point out a better way of doing things in places. Then
again, I might not if you have excelled at learning SW!
You probably know this already, but even parts with complex curvatures start off with simple curves!
As for the can it be made thing, then i don't think any method of making soimething like that is going to be easy, unless (as mentioned earlier)
you have access to stupidly expensive NC machinery that can be driven from the CAD data.
However, modelling something in CAD before making it is really useful, as it allows the part to go through iterations of design before commiting to
manufacture. it is far far easier to correct something on the screen, than it is on a plug/mould!
As for the accuracy thing, then it is a very simple job to slice the part up into sections. these can be used as templates in foam sheet stacked
together, and it only requires sanding to smooth the shape. the profiles can be checked using sections generated from the model, so the end result
will be pretty good.
I'm not saying an artist couldn't create something as good, but not everyone is very artistically minded, so starting with a set of
accurate templates, and profiles generated from a CAD model, gives a large headstart!
Dammit! Too many decisions....
|
|
|
jambojeef
|
| posted on 27/5/05 at 11:31 AM |
|
|
Nice dude!
|
|
|
Liam
|
| posted on 27/5/05 at 11:36 AM |
|
|
Oh yeah. I have webspace!
Its hosted at...
Here
I'm not intending to make it at all! I already have one that i based the model on! As I said it was just an excersise in learning some 3D cad
features.
Bigandy - I guess the best way to have done it would have been as you'd make it, i.e. making a load of measurements, drawing loads of profiles
and lofting between them. Dunno really. The front aperture would still have been hard this way. I wanted to learn 3d surface lofting and so did it
this way after doing the 'nozzle' tutorial.
It looks not to bad but there are bits i'd see as 'bodged'. It wouldn't thicken into a solid, for example, so I had to
thicken each piece separately, unable to merge the results. So there are over 30 solid bodies, etc etc. Not as elegant as it might be. How would
you do it??
Cheers
Liam
|
|
|
Hellfire
|
| posted on 27/5/05 at 03:27 PM |
|
|
@ Rorty - the devil is in the detail

|
|
|
Tigger
|
| posted on 27/5/05 at 11:01 PM |
|
|
Liam,
Excellent drawing, I've been having a bash at Solidworks too and boy is it hard.
So much work for just a little item and curves are a pain.
I've been trying to do a Seven (yes a whole one) but it's been months so far (on and off) and it's still not finished - doh
Would you be able to send me your nosecone in a lower version (2004) as I can't open it to see how you've done it
My effort so far is below
Cheers
Tigger
[Edited on 27/5/05 by Tigger]
 
Rescued attachment Image1.jpg

|
|
|
Rorty
|
| posted on 27/5/05 at 11:14 PM |
|
|
Very nice too. How do you plan to make the finished car hover like that?
Cheers, Rorty.
"Faster than a speeding Pullet".
PLEASE DON'T U2U ME IF YOU WANT A QUICK RESPONSE. TRY EMAILING ME INSTEAD!
|
|
|
Tigger
|
| posted on 28/5/05 at 08:49 PM |
|
|
You mean yours doesn't Hover?
I thought they all did ......... especially over those perishing speed bumps - lol
Tigger
|
|
|
Peteff
|
| posted on 29/5/05 at 08:45 AM |
|
|
It's a tyre saving device . I'm working on an anti gravity drive at the moment but I can't get the local council to incorporate
the necessary metal it needs into their road finish. Also the car keeps attracting metal objects as it is magnetically charged, handy for parking
though, you just stick it to a fridge lorry.
yours, Pete
I went into the RSPCA office the other day. It was so small you could hardly swing a cat in there.
|
|
|