Alex_The_Educated_Novice
|
| posted on 2/2/11 at 04:52 AM |

|
|
Preferred Design Methods
I'm just starting out with my project (a mid-engined, two seat enclosed cockpit) and was just wondering about other people's methodology
for the design process. I ask this because funding for myself is a little tight, and the ambition at the moment is to simply get to the stage where
'I could build it if I had the money' (which comes with its own problems...).
So! Does anyone still draught things by hand? What are people's preferred starting points? Which parts of the process do people love and
hate?
Loving the forum btw.
Cheers!
Alex
|
|
|
|
|
interestedparty
|
| posted on 2/2/11 at 06:35 AM |
|
|
I would suggest that CAD is the way to go here. If you get good enough at it (I'm guessing you are not because if you were it wouldn't
even occur to you to draw it by hand) then you can have to whole thing designed down to the last nut and bolt before going anywhere near a workshop.
You will need to take lots of measurements of donor components, getting information on these is can be pretty tough.
As some day it may happen that a victim must be found,
I've got a little list-- I've got a little list
Of society offenders who might well be underground,
And who never would be missed-- who never would be missed!
|
|
|
Ivan
|
| posted on 2/2/11 at 06:44 AM |
|
|
There's nothing wrong with pencil and paper - a cousin of mine uses just that to design gearboxes for RR and other jet engines (used on most
commercial airliners for power generation) and control gear for flaps and wing and tail surfaces using that - however given the fact that you
can't progress beyond the design stage financially I think it would be well worth your while to take the opportunity to learn CAD as an
additional skill.
As said by Alex - it's easier to become more detailed in the design with CAD.
[Edited on 2/2/11 by Ivan]
|
|
|
m8kwr
|
| posted on 2/2/11 at 07:50 AM |
|
|
I started trying to design a single seater, and read books etc
I love the lotus 49, and that was inspiration, my thought process was to try and keep it simple, engine with carbs (less expensive to set up), a bike
engine, rear wheel drive, light weight, and single seater - and that is how it started.
I leant cad (solidworks), which I would say I am at a basic level and can draw parts, and assembly them to get them moving in 3d, to see how other
parts interact.
The main problem I had was the parts. I found that without the parts in front of people I could not put them into the computer, to see how there
interact with other. Sometimes I was lucky enough to find a part that someone else had put into solidworks or something similar - but in my head I
was thinking is it accurate!
So that was the issue I had to buy all parts before I could design how they would fit together, and sometimes you buy incorrect ones.
I am now at the stage (2 years I think), I have a lot of parts (engine, wheels, chain diff, steering rack, uprights, steering wheel, axles, fibreglass
single seater body, brakes - and a lot of steel gathering rust)
Due to work, family life, I am waiting for the haynes single seater book to come out (hopefully this year), then use all the bits on that. I started
out with good intentions, but something had to give. This is the overall style I was looking for, so why re-do something that someone is doing
I have spent probably 2-3k on bits alone (have not kept track), and nothing to show for it but bits; but one day it will turn into something special

The 2-3k is including some tools, like welder, but there are even more tools I want so this all needs to be in the budget, well it did mine.
I would not of changed anything I have done, because I know I will put all the parts together some day, I have learnt new skills, CAD, welding and
patience.
|
|
|
MikeCapon
|
| posted on 2/2/11 at 08:30 AM |
|
|
If you are using CAD lots of bits are available at 3dcontentcentral.
|
|
|
tilly819
|
| posted on 2/2/11 at 09:55 AM |
|
|
hi there, i am also designing a car from scratch and have some words of advice.
1) start with the tyres, sounds mad i now but trust me. and trust the people who told me...
2) track and wheelbase
3) suspension geomitary inc roll centres (static and instuntainious), camber curves, KPI, Caster, trail, etc etc etc
4) brakes
5) hubs and uprights
6) wishbones ( allow clearanes for wheel rotation on steering axis on front wheels)
7) steering ( worth taking into account at the geomitary stage if you are using a pre chosen rack since this will alow you to position inboard pivots
to coinside with the rack ball joints to minimise bumpsteer.
8) drivetrain
9) chassis (the bit that conects evrything elce together)
there is nothing wrong with designing by hand it just takes abit longer, the main advantages with cad in my mind is the ability to quicly modifigh
something if you make a mistake and duplicating and mirroring things is a doddle.
it sounds easy, it isnt be prepairied to spend alot of reading and resurcing and doing ALOT of drawings, i found that spending alot of time designing
one part can be a killer in terms of motivation in poticular the front uprights took me the best part of 6 months to achive the levels of strength,
stiffness, and weight (or rarther the lack of it)
it is also very important at a very eirly stage of the build to get to grips with the rules infact i would say it comes first even before tyres, read
the IVA manuel it will save you many a costly mistake.
hope this helps its not ment to put you off your quest just to forwarn you of the chalenges you are undertaking
wish you all the best of luck
tilly
F20C Haynes roadster 440 BHP/Tonne www.youtube.com/handmadeextreme
|
|
|
coyoteboy
|
| posted on 2/2/11 at 10:19 AM |
|
|
Tilly has it correct, start at the wheels and work inwards pretty much. Chassis is the last link in the chain. Make the body look how you want when
you know how the susp/chassis is underneath it.
|
|
|
blakep82
|
| posted on 2/2/11 at 11:47 AM |
|
|
theres a guy on here who's designing his own chassis, but he's doing the design build in woof first, once he knows it all works,
he's going to do it in steel. could be another idea?
CAD is good, the problem i personally find with it, its difficult to get scale of things. maybe thats just me though
________________________
IVA manual link http://www.businesslink.gov.uk/bdotg/action/detail?type=RESOURCES&itemId=1081997083
don't write OT on a new thread title, you're creating the topic, everything you write is very much ON topic!
|
|
|
interestedparty
|
| posted on 2/2/11 at 12:27 PM |
|
|
Whether you should start with the wheels first will depend on a lot of things, mostly what components you are using. If you need to use a donor car
then your starting point will depend on which parts you are using and whether you can place them differently to where they are in the donor or not.
For instance, if you are using an Escort rack and Sierra uprights, then a lot of decisions will already be made for you.
All depends on your budget, and what manufacturing/fabricating facilities are available. If those aren't a problem, then the tyres up approach
would be best.
As some day it may happen that a victim must be found,
I've got a little list-- I've got a little list
Of society offenders who might well be underground,
And who never would be missed-- who never would be missed!
|
|
|
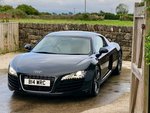
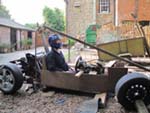
b14wrc
|
| posted on 2/2/11 at 12:28 PM |
|
|
Hi,
I think Blakep82 is talking about me, LOL. 
Yes, I am using a mixture of CAD and actually mocking up a full size model of the chassis in 25mmx25mm wood. All i have done is glued the wood
together with a hot glue gun and then screwed it. So it is strong enough to try fit bits together but I can alter it if it looks wrong. I have it in
my garage at the moment because the engine is on the mock up, but i often bring it into the kitchen to work on it, does not weigh much!
I actually started off by using 25mm masking tape on my kitchen floor, I marked the whole car out a few times this way before i went to the 2D CAD.
My car is actually based on the Haynes book and the Syliva Mojo, i looked at these two cars and took my wheel base from them. My Chassis is
constructed very similarly to the book, however has a longer back end to house my engine, and the front end was shortened quite a bit, plus its wider
by about 50mm.
It sounds easy to just copy the design of that car and modify it to suit the mid engined layout, but to be honest in my experience the chassis has
been tweaked that many times.... if i had built it all in steel straight off i would have wasted so much money!
I would recommend a mock up to any one, it really lets you see how the car will look, and you can get in it and feel how it will work, this you can
never get from CAD. Using a computer should defiantly be considered for producing accurate drawings you can follow at later stages.
Hope this helps you, if you have any questions give me a shout! I have been planning my car for nearly a year now, and reckon in about 3 - 6 months
the actual build will begin!
Cheers, Rob
|
|
|
blakep82
|
| posted on 2/2/11 at 12:30 PM |
|
|
quote:
Originally posted by b14wrc
Hi,
I think Blakep82 is talking about me, LOL.
and you'd be right  couldn't remember your name, even when i saw it i didn't remember lol couldn't remember your name, even when i saw it i didn't remember lol
________________________
IVA manual link http://www.businesslink.gov.uk/bdotg/action/detail?type=RESOURCES&itemId=1081997083
don't write OT on a new thread title, you're creating the topic, everything you write is very much ON topic!
|
|
|
b14wrc
|
| posted on 2/2/11 at 12:32 PM |
|
|
This was a while back, lots changed but you get the idea - I would say accuracy of this is +/- 5mm in places (wood bends) but i amend all this in the
CAD drawings, the final steel chassis will be made on a perfectly flat table.
Rob
|
|
|
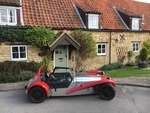
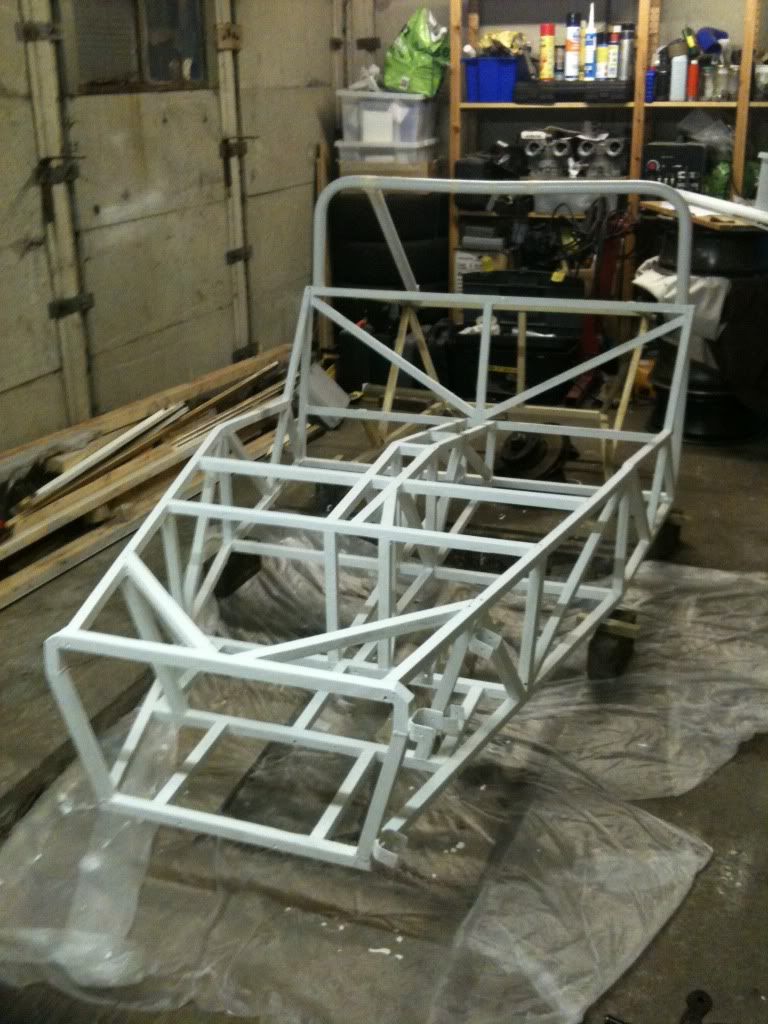
b14wrc
|
| posted on 2/2/11 at 01:08 PM |
|
|
This is one of my Development drawings, I have used the mock up to change this and vice versa.
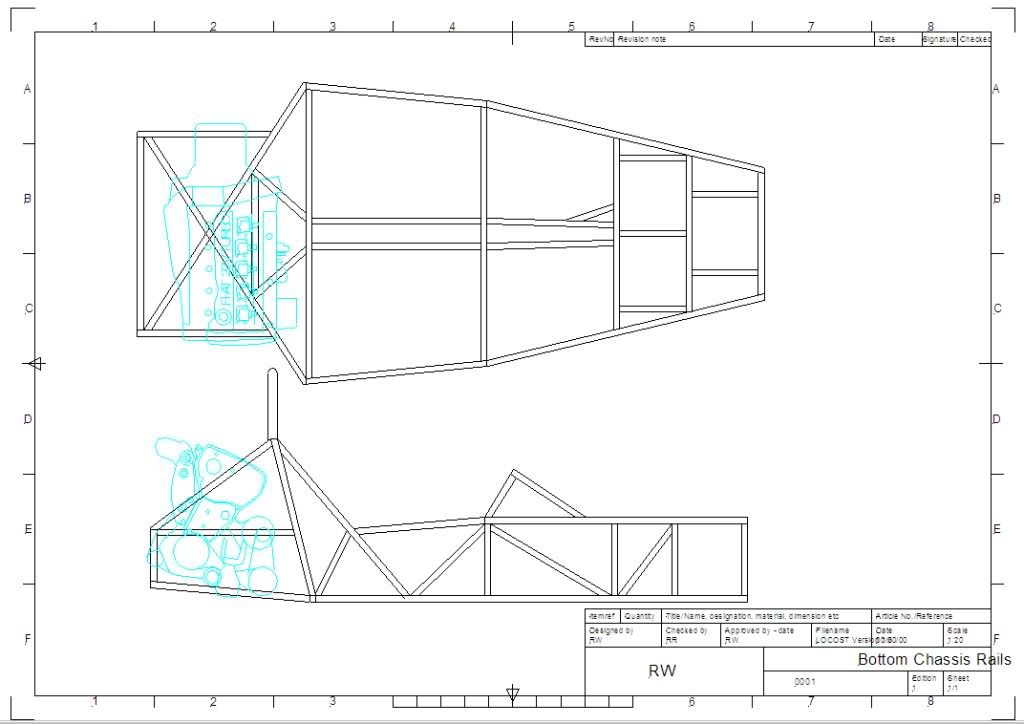
Rob
|
|
|
hughpinder
|
| posted on 2/2/11 at 01:44 PM |
|
|
The process will depend on several things:
Do you intend to race it - this may decide a whole host of things - look up the regulations first.
If not how important is absolutely the best handling - the order given by till819 is great for a race car where your hours dont matter and you will
have everything made to size/fabricated uprights etc, but for a midi, if you are sensible you will probably use off the shelf uprights, rack, engine
and gearbox etc as this reduces the design effort and cost. For instance decide on your chosen donor/engine- using a FWD car you can then use the
engine, box, driveshafts, (may be possible to modify the donors front uprights to use a the back, and then keep the standard brakes(upgrade later for
lightness))... This automatically defines the track width of the rear of the car.
I bought a mondeo as I decided on the 2.0 zetec engine (£150 for my donor), stripped it, sold a few bits and basically got my money back as well as a
engine/box/instruments ..... I then weighed and accurately measured the bits I intended to use, and made a few other parts decisions, then build a
ply/wood offcut drivers side centre tub to work out the width/length of the cabin and position of the gear lever, handrake etc etc To keep interest, I
am refurbishing/servicing items every now and then.
Having accumulated the actual measurements of the various bits I then went intot he design pretty much as for tilly819.
Then of course you realise its all theoretical and and you should just have built what looks right.
Having done a host of calcs in excel, the actual chassis layout and drawings is just hand drawn sketches.
ETA - If I was starting now, I'd get a duratec based donor - 18kg lighter engine, more powerful, and the exhaust exits on the side away from the
cabin, rather than just behind the drivers seat
Regards
Hugh
[Edited on 2/2/11 by hughpinder]
[Edited on 2/2/11 by hughpinder]
|
|
|
Fred W B
|
| posted on 2/2/11 at 05:14 PM |
|
|
Some more discussion
here
including my advice -
When starting out at least do the following, in this order:
Decide what the car is going to look like, i.e what body shell, if not original. This also determines wheel base dimension and the width over wheels.
i.e determine the wheel positions.
If original body, decide on at least the front and rear track, wheel base can be adjusted.
Decide on what tyres you will use, exact width and profile, and procure if you are serious.
Decide on what hubs/uprights/steering rack you will use and procure/make if you are serious
Decide on what rims/offset you will use and procure if you are serious
Decide on what engine and transmission you will use and procure if you are serious.
Position all above parts on garage floor or build table and sort ergonomics where do you fit?
If you are going to draw up in cad, finalize the position of all above parts in your model only now.
All the above could be an iterative process, but please complete it BEFORE you start the chassis.
Design suspension if you are not going to do the research to enable you to do this yourself the only options are:
Get someone else to do it for you
Copy an existing car, strictly only valid if using that cars uprights/hubs/wheels/tyres.
Guess
Once you know where the inner suspension points are, you can design the chassis, to accommodate all above. CAD / balsa model / cut and tack on build
table are all valid methods, but best results would be obtained by combining them. Please do not start with a Locost chassis and try to modify it to
accommodate a Rear engine drive train.
Cheers
Fred W B
[Edited on 2/2/11 by Fred W B]
[Edited on 2/2/11 by Fred W B]
You can do it quickly. You can do it cheap. You can do it right. Pick any two.
|
|
|
kb58
|
| posted on 2/2/11 at 07:55 PM |
|
|
Buy this: Kimini
book

Mid-engine Locost - http://www.midlana.com
And the book - http://www.lulu.com/shop/kurt-bilinski/midlana/paperback/product-21330662.html
Kimini - a tube-frame, carbon shell, Honda Prelude VTEC mid-engine Mini: http://www.kimini.com
And its book -
http://www.lulu.com/shop/kurt-bilinski/kimini-how-to-design-and-build-a-mid-engine-sports-car-from-scratch/paperback/product-4858803.html
|
|
|
JC
|
| posted on 2/2/11 at 08:25 PM |
|
|
Can I add 'pedal box' to the list of things to start with. Not essential but will define a lot of the cockpit dimensions and is a big
headache if you leave it too late. Believe me, i've had that headache!!!!!
|
|
|
Kwik
|
| posted on 2/2/11 at 08:32 PM |
|
|
youtube the formula sae or formula student videos, their are some solidworks tutorials (that will help you even if you don't use CAD.
this is my chain of thoughts for the same problem:
http://www.white-nova.blogspot.com/
i ended up stopping as well, my free trial of solidworks ran out
but am resuming with a new project, probebly same name based on allan stanniforths terapin
|
|
|
Alex_The_Educated_Novice
|
| posted on 2/2/11 at 10:03 PM |
|
|
I have to say that I'm blown away by the responses! Thanks everyone!
A lot of what you guys have said had crossed my mind, or I'd skim-read it in other threads/websites.
http://www.gmecca.com/byorc/dstratdesignapproaches.html gave me a few ideas, but it's the process of splitting it all up and thinking it through
- considering each thing on its own, and how it affects other components and the design overall. Ok, I understand that's the magic of it! This
is a learning experience for me. My Dad was a mechanic, but always wanted me to do something that didn't involve getting my hands dirty for a
living. But really, I crave the feeling of designing something from next to nothing, just light-bulbs in the brain (especially when you know a lot of
other people have had the same lightbulb light up for them at some point) and building it, and then watching it work. Mechanically speaking, I can
get my head around things fine. I just need some threads to strip as a learning tool.
I'm interested in CAD, and have done some 2D work already on the body style. I think I asked the question simply because I enjoy drawing with a
pencil so much! Like winding a wristwatch, instead of changing the battery. It crossed my mind that it might be possible to use scale model kits in
order to draw/model certain components. Of course, the accuracy of such models can be doubted. And that's not even mentioning tolerances...
As to mocking the thing up? I've marked a space on the driveway...
|
|
|
tilly819
|
| posted on 4/2/11 at 09:49 AM |
|
|
quote:
Originally posted by kb58
Buy this: Kimini
book
Recomended
Very good book, lots of usefull information
F20C Haynes roadster 440 BHP/Tonne www.youtube.com/handmadeextreme
|
|
|