John Bonnett
|
| posted on 18/3/15 at 08:09 PM |

|
|
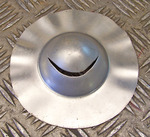
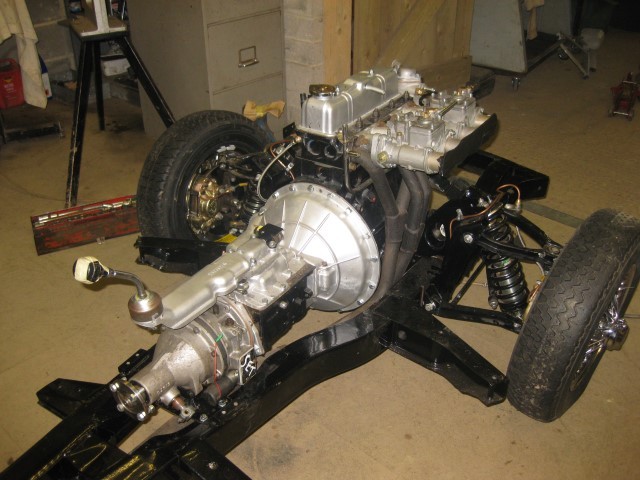
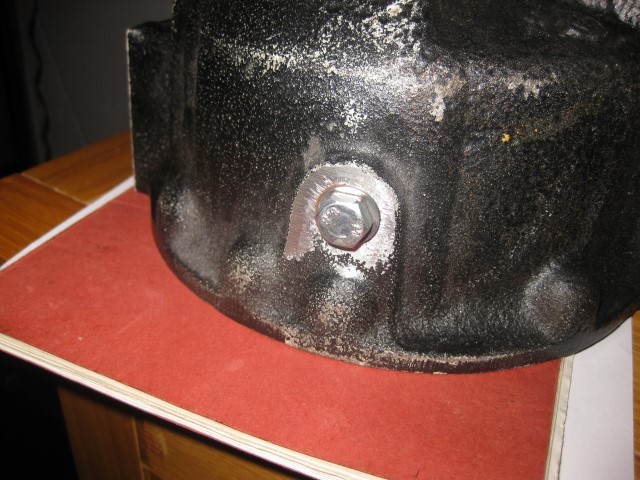
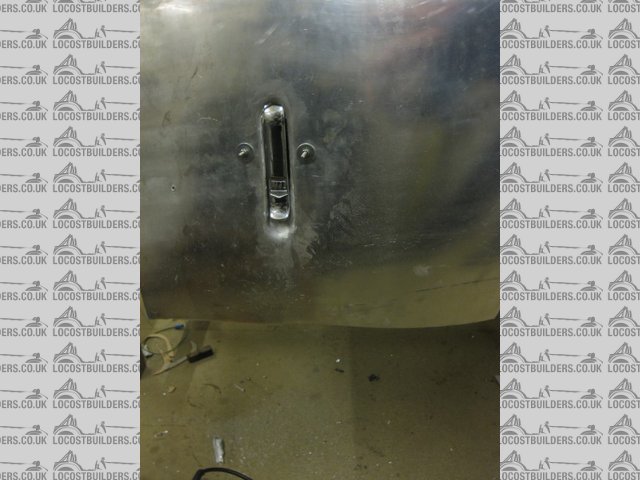
Well, I now have the engine, the gearbox is fitted and all is bolted in. So pleasing progress. I've decided to change the diff to a better ratio
and before doing that, I've drilled and tapped the casing for a drain plug. Early cars had a drain plug but this was later discontinued.
However, the boss is still present and being cast iron easy to drill and tap.
|
|
|
|
|
gremlin1234
|
| posted on 18/3/15 at 09:54 PM |
|
|
quote:
Originally posted by John Bonnett
Well, I now have the engine, the gearbox is fitted and all is bolted in. So pleasing progress. I've decided to change the diff to a better ratio
and before doing that, I've drilled and tapped the casing for a drain plug. Early cars had a drain plug but this was later discontinued.
However, the boss is still present and being cast iron easy to drill and tap.
all really (and I do mean really really) nice, however one question...
shouldn't there be a copper or fibre washer to seal?
or even a nice imperial taper fit?
|
|
|
John Bonnett
|
| posted on 18/3/15 at 10:06 PM |
|
|
quote:
Originally posted by gremlin1234
quote:
Originally posted by John Bonnett
Well, I now have the engine, the gearbox is fitted and all is bolted in. So pleasing progress. I've decided to change the diff to a better ratio
and before doing that, I've drilled and tapped the casing for a drain plug. Early cars had a drain plug but this was later discontinued.
However, the boss is still present and being cast iron easy to drill and tap.
all really (and I do mean really really) nice, however one question...
shouldn't there be a copper or fibre washer to seal?
or even a nice imperial taper fit?
There is a copper washer there sitting under the plain washer. You can just see it.
|
|
|
adithorp
|
| posted on 18/3/15 at 10:11 PM |
|
|
quote:
Originally posted by John Bonnett
quote:
Originally posted by gremlin1234
quote:
Originally posted by John Bonnett
Well, I now have the engine, the gearbox is fitted and all is bolted in. So pleasing progress. I've decided to change the diff to a better ratio
and before doing that, I've drilled and tapped the casing for a drain plug. Early cars had a drain plug but this was later discontinued.
However, the boss is still present and being cast iron easy to drill and tap.
all really (and I do mean really really) nice, however one question...
shouldn't there be a copper or fibre washer to seal?
or even a nice imperial taper fit?
There is a copper washer there sitting under the plain washer. You can just see it.
That'll tend to leak between the head and steel washer. You should have just the copper washer.
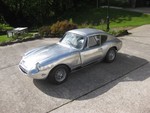
Looking good though. Best looking GT4 I've seen 
"A witty saying proves nothing" Voltaire
http://jpsc.org.uk/forum/
|
|
|
John Bonnett
|
| posted on 19/3/15 at 06:07 AM |
|
|
quote:
Originally posted by adithorp
quote:
Originally posted by John Bonnett
quote:
Originally posted by gremlin1234
quote:
Originally posted by John Bonnett
Well, I now have the engine, the gearbox is fitted and all is bolted in. So pleasing progress. I've decided to change the diff to a better ratio
and before doing that, I've drilled and tapped the casing for a drain plug. Early cars had a drain plug but this was later discontinued.
However, the boss is still present and being cast iron easy to drill and tap.
all really (and I do mean really really) nice, however one question...
shouldn't there be a copper or fibre washer to seal?
or even a nice imperial taper fit?
There is a copper washer there sitting under the plain washer. You can just see it.
That'll tend to leak between the head and steel washer. You should have just the copper washer.
Looking good though. Best looking GT4 I've seen
Yes you are right, it will leak. I put the plain washer there to give a bit more area to act on the copper washer but unless the plain washer were
welded to the bolt there is no seal. So thank you Adi. I'll sort it.
John
|
|
|
907
|
| posted on 19/3/15 at 06:37 AM |
|
|
Hi John
A flange bolt (non serrated type) would give a larger surface area to seal on.
Keep up the good work.
Paul G
|
|
|
John Bonnett
|
| posted on 19/3/15 at 06:46 AM |
|
|
quote:
Originally posted by 907
Hi John
A flange bolt (non serrated type) would give a larger surface area to seal on.
Keep up the good work.
Paul G
Indeed it would Paul; thank you. And thank you ALL not only for your very kind comments but also for keeping me on the right track.
John
[Edited on 19/3/15 by John Bonnett]
|
|
|
adithorp
|
| posted on 19/3/15 at 07:39 AM |
|
|
What size/thread is the plug? There might be a sump plug that's right for it. They often have a flange... though there's plenty that just
had a hex.
"A witty saying proves nothing" Voltaire
http://jpsc.org.uk/forum/
|
|
|
John Bonnett
|
| posted on 19/3/15 at 07:54 AM |
|
|
quote:
Originally posted by adithorp
What size/thread is the plug? There might be a sump plug that's right for it. They often have a flange... though there's plenty that just
had a hex.
It's M8 Adi. I'm sure that a copper washer and flange bolt will be fine.
|
|
|
John Bonnett
|
| posted on 23/3/15 at 07:34 PM |
|
|
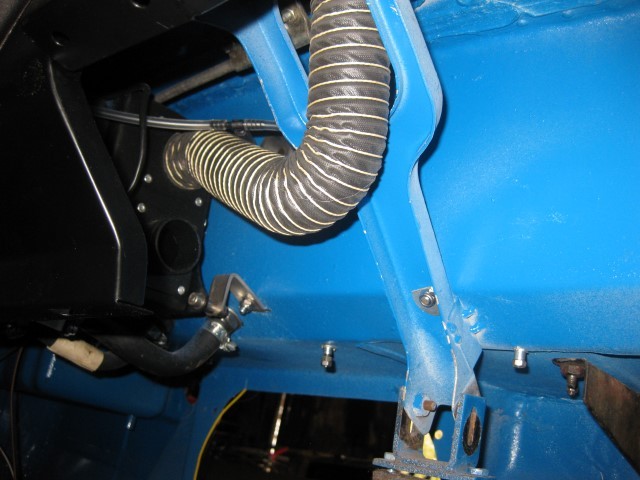
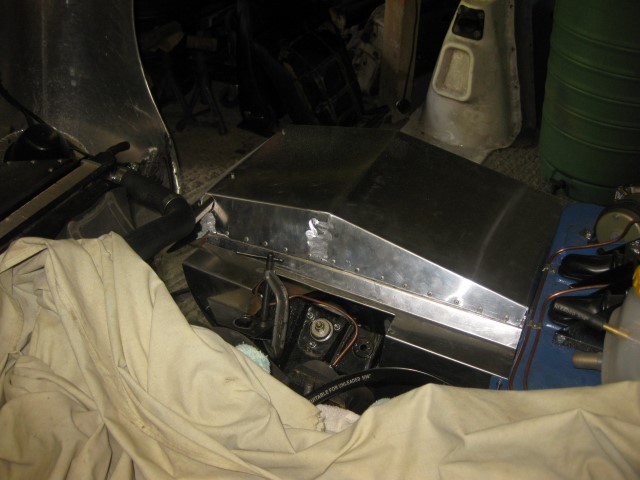
A bit more done today. The dashtop crashpad and the demister ducts are in and piped up to the heater. It was a trying job totally because of the
inaccessibility of the fixings underneath. But we got there in the end.
A much more pleasant job was the trial fitting of the oil cooler. I welded up a simple U shaped frame from extruded rectangular aluminium tube and
picked up on the mounts in the cooler. The frame and the ducting are away tomorrow for powder coater.

|
|
|
John Bonnett
|
| posted on 28/3/15 at 08:40 PM |
|
|
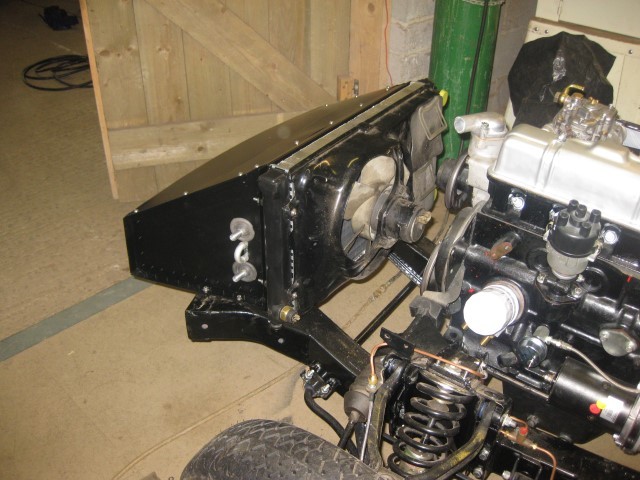
The radiator ducting came back in record time from the powder coaters; just twenty four hours turn-round. Terrific service and quality. All fitted now
together with the oil cooler.
We got the body back on this afternoon which went very easily thanks to a party of willing lifters. It is all bolted down now together with the
steering column. Now the body is on there are loads of things I can get on with not the least being finishing the wiring.

|
|
|
rdodger
|
| posted on 28/3/15 at 08:53 PM |
|
|
Great work as usual John.
I'm getting quite excited about seeing it finished. I bet you can't wait to see it all together?
|
|
|
John Bonnett
|
| posted on 28/3/15 at 09:39 PM |
|
|
quote:
Originally posted by rdodger
Great work as usual John.
I'm getting quite excited about seeing it finished. I bet you can't wait to see it all together?
I really can't now it's so close to completion. This project totally has taken me over and I'm working on it pretty much full time .
With the steering column in, all the plugs and sockets can be connected and then it's the moment of truth. Connect the battery time. How many,
if any of the circuits will actually work? Or will there be an almighty smoke up? Finger crossed. I'll report back.
cheers
John
|
|
|
John Bonnett
|
| posted on 13/4/15 at 07:55 PM |
|
|
Plumbing on the cooling side is now finished and the system filled with coolant.

The wiring would have been finished by now but I made a late decision to to give the dashboard its own loom connected by plugs and sockets. It took a
few days but it will be worth it not to find, once it's put back that a spade had pulled off one of the terminals which always used to happen on
my GT6.
|
|
|
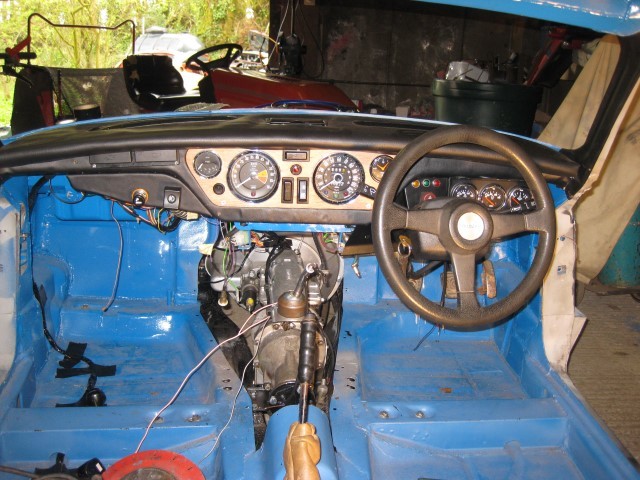
John Bonnett
|
| posted on 15/4/15 at 08:19 PM |
|
|
At long last, the wiring is finished and the dashboard fitted. Martin has done his bit on the bonnet which I am absolutely thrilled with and cannot
wait to see it fitted on the car.

|
|
|
rdodger
|
| posted on 15/4/15 at 08:54 PM |
|
|
WOW!
Just WOW! 
|
|
|
TheGecko
|
| posted on 16/4/15 at 07:26 AM |
|
|
quote:
Originally posted by rdodger
WOW!
Just WOW!
What he said!!! 
Looks fabulous John. Can't wait to see it all together.
Dominic
|
|
|
John Bonnett
|
| posted on 17/4/15 at 06:13 PM |
|
|
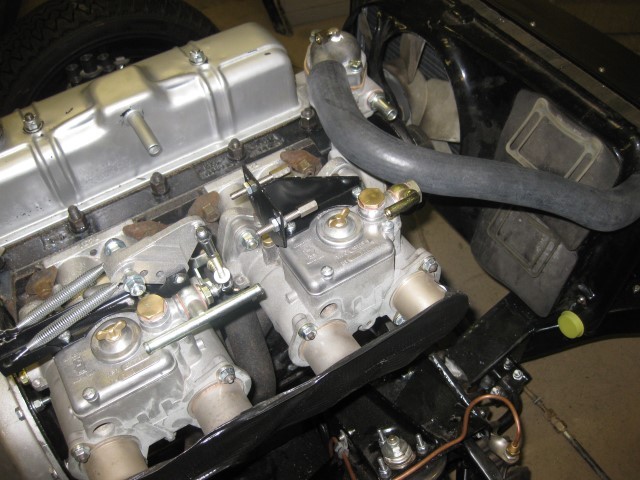
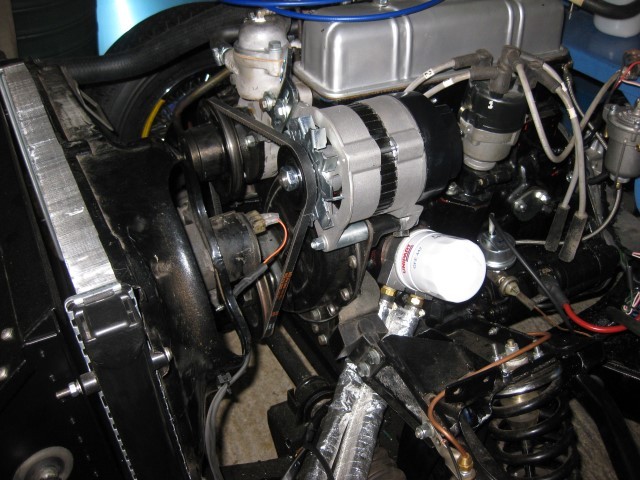
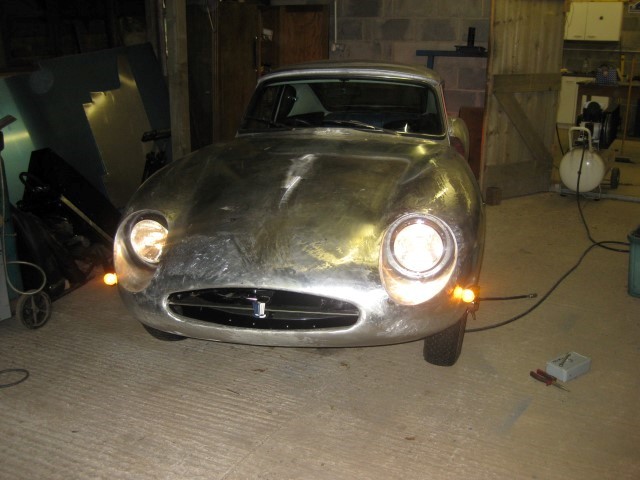
Nice to hear from you both and thank you for the encouragement. I'm collecting the bonnet middle of next week. I'm really hoping that
there won't be a clearance problem with the Webers. I set it up with the SUs on the other engine because at that stage I didn't have the
new one.
I'm moving ever closer into a start-up situation. The tank went in today and also the alternator the alternator so that the water pump is
driven.
I finished the exhaust system yesterday and connected the Rotoflex tie rods; both fiddly and time consuming jobs but done now.
A few pic follow


|
|
|
Angel Acevedo
|
| posted on 20/4/15 at 02:58 PM |
|
|
quote:
Originally posted by John Bonnett
Nice to hear from you both and thank you for the encouragement. I'm collecting the bonnet middle of next week. I'm really hoping that
there won't be a clearance problem with the Webers. I set it up with the SUs on the other engine because at that stage I didn't have the
new one.
I'm moving ever closer into a start-up situation. The tank went in today and also the alternator the alternator so that the water pump is
driven.
I finished the exhaust system yesterday and connected the Rotoflex tie rods; both fiddly and time consuming jobs but done now.
A few pic follow
First of all VERY GOOD WORK....
On a side track, Nice Tail lights; could you elaborate on Brand, Model, Supplier and Cost??
Thanks in advance.
Angel Acevedo
Beware of what you wish.. for it may come true....
|
|
|
pewe
|
| posted on 20/4/15 at 03:04 PM |
|
|
As an ex- GT6 owner it's been fascinating watching progress, John.
Looks like you could do with a genuine gear-knob?
If you don't have one let me know by pm and I'll donate one.
Cheers, Pewe10
|
|
|
John Bonnett
|
| posted on 20/4/15 at 03:44 PM |
|
|
quote:
Originally posted by pewe
As an ex- GT6 owner it's been fascinating watching progress, John.
Looks like you could do with a genuine gear-knob?
If you don't have one let me know by pm and I'll donate one.
Cheers, Pewe10
Pewe that is really kind of you, thank you. I do have the overdrive knob but probably won't fit it until after the tunnel is in. I really
appreciate your kindness and that of many others who have generously offered help and components along the way.
Had a big disappointment yesterday when after starting the engine the entire contents of the header tank were pumped straight into the exhaust pipe.
Cracked block, cracked head or head gasket; nothing trivial. The engine builder will have to sort it out but, working to a June deadline, that engine
will not be taking us to France. Fortunately I do have a serviceable 1300 which I'll transfer over the weekend. Meanwhile I've made a bit
more progress with the assembly of the fittings including putting in a rather poor looking seat. I have another pair of seats that I'll
re-upholster at the end. Meanwhile this pair will do a turn.


|
|
|
John Bonnett
|
| posted on 3/5/15 at 07:45 AM |
|
|
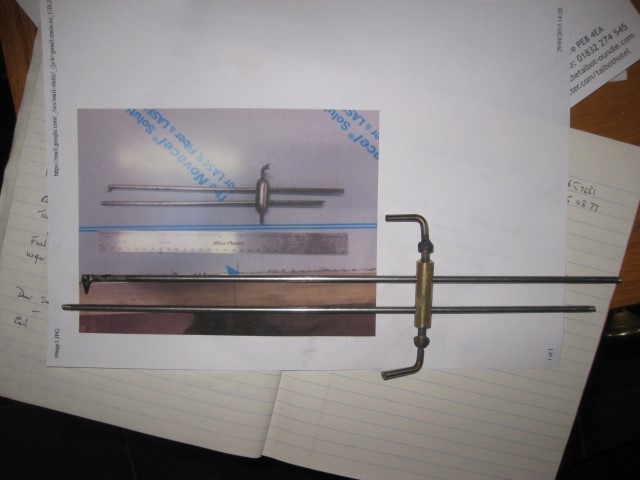
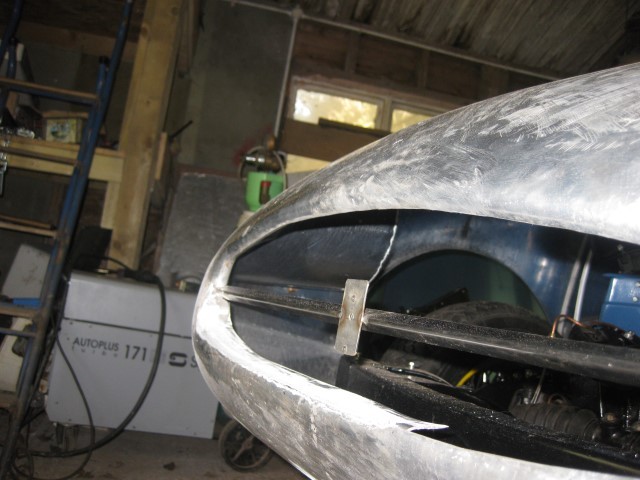
Well, I've got the bonnet back and it is over to me to finish it. First thing I've tackled is the the air intake aperture. To aid trimming
trev sent me a picture of a clever little tool he has made to mark an offset with the scribed line on the outside of the panel. It took less than half
an hour to make and it made the trimming really easy.
On the lower part of the hoop, I had to add some metal. This was done by using a TIG lap joint. I wasn't looking forward to this job but it went
okay and the joint is all but invisible.

|
|
|
John Bonnett
|
| posted on 18/5/15 at 06:24 PM |
|
|
Much to my relief, I've finished the bonnet without ruining it. This involved fitting additional tubes to support the front valence, wrapping
the aluminium around the tubes, clenching at the scuttle end and wiring the wheel arches. I also formed the bonnet catch recesses directly into the
bonnet rather than welding in the ones that I had made separately.
The lights are now fitted and the bonnet loom made and connected to the main loom. It was a very good feeling to connect the battery and see that
everything worked as it should.
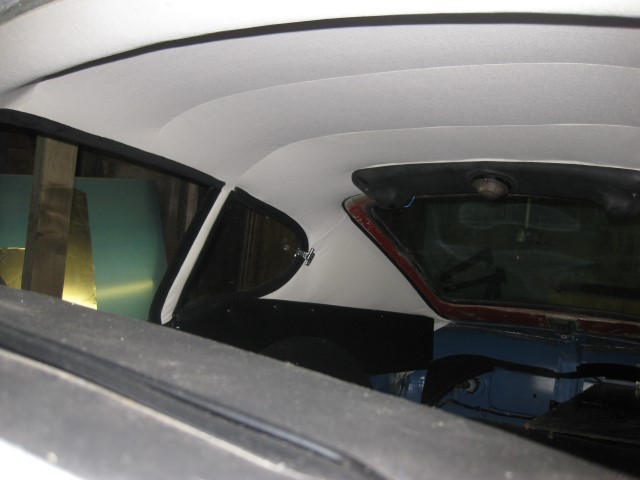
The windscreen and headlining are now fitted as well.
Today I've made a start on the inner wings. The list of things to do to finish the car is getting quite short now.


|
|
|
rdodger
|
| posted on 18/5/15 at 07:10 PM |
|
|
Amazing work as usual John.
It looks fantastic!
|
|
|
John Bonnett
|
| posted on 22/5/15 at 05:36 AM |
|
|
quote:
Originally posted by rdodger
Amazing work as usual John.
It looks fantastic!
Thank you. We are nearly there now and I'm really looking forward to seeing it roll out of the workshop and getting a distance view rather than
just close ups.
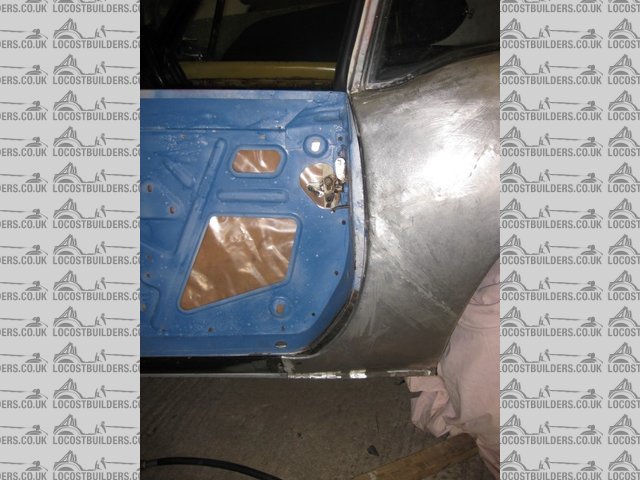
The door skins are underway and before fitting we have the opportunity of adjusting the shells to give a nice fit and good shut lines. I've
pretty much made the inner wings which although they will do the job they are intended for, are totally out of keeping with the rest of the car. They
need to be double curvature, not straight line folds so they'll have to go once we get back from France when I'll have time to make a buck
and do the job properly.
Another job I've got to do is to machine some thin wheel spacers; 5mm thick. MWS tell you to shorten the wheel studs so that the wire wheels go
back on their seats but if I do this I cannot fit bolt on wheels should I ever want to. The aluminium plate has arrived and doing a bit of machining
will make a pleasant change from bodywork.

|
|
|