Nash
|
| posted on 9/8/15 at 11:52 PM |

|
|
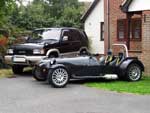
My Indy Refresh
I IVA'd and registered my Indy on the road in June 2010. Since then I've done over 40,000 miles and been as far as the the South of France
to the .... south and the Arctic Circle to the north. I've driven in Europe several times a year and in all weathers and conditions. I've
visited all four corners of the UK and driven the car all year round.... hard.
I've done Trackdays at Brands, Spa, Lydden, Donnington, Goodwood, Croft and Castle Combe. I've done Action days at North Weald and the car
has faultlessly looked after me for every mile regardless of how much I abuse it. I do maintain the car religiously but after fives years its time to
give the car a refresh.
The plan is as follows:
1. Strip the car down to the chassis. Sand blast the chassis and powder coat it (Waxoyl the chassis)
2. Cut in some triangulation around some know points
3. refurbish the dampers (Protech's)
4. Fuel Tank - while the back of the car is off I'm going to take the opportunity to put a long range tank in it. Makes sense given the main use
of the car.
5. Seats - my drivers seat was in two halves and had been welded three times. I have my eye on something a bit special in this space
6. Brakes - Some realignment of the brake pedal and maybe some front end upgrade if funds allow
7. A couple of surprises if funds allow as part of the re-assembly
So off we go:
The work on my Indy started in ernest this week. In order to get the work progressing (if I just did it alone I'd lose the rest of the summer)
and because Dick et al have great facilities and are doing the design for the new Long Range Tank and having it made as well as the upgrades to the
chassis triangulation my car is at Snodhurst.
Well Chris as my main man has made a good start this week is starting the strip down.

Diff is out and ready to go to Road and Race for bearings and seals

The interior is mostly stripped

Rear Wishbones and all the Dampers are off and the springs are now separate from the dampers. Dampers will be heading off to Protech for refurb this
week.

With some of the panels off we can now see the extent of the chassis condition. I painted the chassis in 2009 in a garage

Since then its done 40,000+ hard miles in all weathers so in fairness it owes me nothing but the reality is I need to decide how far to strip the car
back to sort the chassis.

The next job and the job for Chris for this week is to get all the blackwork off the car (Cage, wishbones, steering rack extensions, dash frame) and
get them away for re-powdercoating.

Next weekend myself and Chris will be finishing off the strip down and getting ready for making the chassis fully accessible for repainting in the
epoxy paint Mark recommended a few months back.
Day 2 of the Indy Upgrade.
Chris from Snodhurst removed the fuel tank and all the blackwork from the car during the week so it could go away for shot blasting and
re-powdercoating. The design for the new tank has been finalised with Dick so thats ready to be made. I posted the dampers back to Protech this week
for refurbing and the diff goes over to Road & Race this week for bearings and seals.
So today the plan was to remove the remaining bodywork, floor, engine & gearbox to expose as much of the chassis as possible so I can start
prep'ing it for paint.
The day didn't start when I wanted it to as, having worked some crazy hours this week at work I didn't manage to drag my butt out of bed
early and only got to the garage at 10am so lost a couple of hours.
The car started the day like this:

150 rivits in the floor to look forward to:

So I set about the side panels. I have found a way of taking about 5 kgs out of the car when I put it back together. Selaflex!! I forgot how much I
used when I put the car together !! Its superb as a bonding agent and stops the car rattling but it makes it quite the challenge to take the panels
off "gently".

Its also at this point you realise how many "little" things you add to the car during the "seasons" to make it suit you, an AC
adapter here, a clip there, a Knob over there.... All great at the time, ALL a pain in the 'arris when you are taking it apart.
An example. The brightwork around my front wishbones have 66 (yes sixty six) fasteners holding them in place. All need to be removed :roll:

So, long story sideways, I didn't get as much done today as I wanted. I lost time due to my laziness and underestimated how much work was in the
side panels. So the by 3pm this was the state of the car:


The side panels came off intact.......almost

So the floor, engine and box still need to come out and the wiring all needs bagging up so we can get in and prep the chassis.
Plan moving forward. This week I will re-vinyl all the interior panels and also the rear wheel arch carbon protection which has done its job in the
last 20,000 miles.
I'm now going to have a bath and a chinese and chill. Its been a hell of a week.
Day 3 - Getting Close to stippred:
So I lost Saturday completely due to traveling back from the North East. So today was day 3 of the strip down. The target was to drop the floor and
the back bulkhead and prepare the engine for removal.
First job is the rear bulkhead, drill the rivets out (wish I hadn't put so many in):

Next came the floor, all 150 rivets.
And then it was gone:

Now that the chassis is properly exposed it's clear that my original plan to simply jetwash the chassis and paint it with the epoxy is going to
take la long time AND not be as effective as I'd like so plan b which is to completely strip it and bead blast it and either powdercoat or epoxy
paint it.
Here's why:


Next was removing the wiring loom and preping the engine for removal, drill out all the brake and fuel line pclips so the engine and box comes out
tomorrow .
There is some triangulation to do on the chassis and further prep before blasting.
Next stop Saturday.
Oh for those that think I'm just standing around directing

Roll on Saturday, let's get back.
Day 4 - Stripped plus
As you will recall, I finished day 3 with everything ready to remove the drive train. So today started at 11am after I had domestic chores to finish
first thing :roll:
So the first job was to remove said drive train. Out came the engine and box.

This gave me access to the remaining p-clips and rivets holding in the wiring harness, fuel & brake lines. In short thrift the clips were
dispatched. Followed swiftly by the loom (including ECU, fuel cut-off, intercom and harness), the handbrake, prop and the afore mentioned brake and
fuel lines were 86'd (I'll replace those with new ethanol rated lines).


So finally a bare chassis.

We can now finally prep the chassis. So the plan is this week the work experience lad will remove ALL the selaflex and any proud rivet stems I
didn't get from the rails. This leaves the triangulation, chassis mods and filling of any "no longer required" holes to do and then
off for blasting and coating.
Preparation for reassembly:
While all the chassis work is going on I have been doing (and having done) some of the refurb work in my garage.
Today was mostly the CF vinyl wrap for the rear cycle wing protector's. Those that know the car will remember the existing wrap has lasted well
but does show signs of damage from "protecting" the wing:

I got a job lot of the 3M CF Vinyl from the bay and with the help of No.1 son and Ruth's hairdryer (sssshhh, she'll never know) Ben and I
set about re-covering the rear arches. Two layers of vinyl this time to see if the double thickness gives me twice the protection. The finished result
is good aesthetically, time will tell if it lasts the course?!

Finally for today I have started to Re-trim my dash panels. I am soliciting opinion on the edge trim. I may or may not go with the consensus but
I'll open it out to the great and the good.
Edge Trim, Gloss or Matt finish?:

....To be continued
Discuss............
[Edited on 10/8/15 by Nash]
[Edited on 10/8/15 by Nash]
[Edited on 10/8/15 by Nash]
[Edited on 10/8/15 by Nash]
[Edited on 10/8/15 by Nash]
It's What You Do Next That Counts.
Build It, Buy It, Drive It:
Southern Kit Car Club
|
|
|
|
|
SJ
|
| posted on 10/8/15 at 07:04 AM |
|
|
Wow! Mine was OTR in 2006 and I've done about 3500 miles.
Stu
|
|
|
02GF74
|
| posted on 10/8/15 at 08:19 PM |
|
|
quote:
Originally posted by Nash
All them image links, put XimgY before and X/imgY after, 
Where X is [ and Y is ] thats square brackets.
For example
|
|
|
Nash
|
| posted on 10/8/15 at 10:35 PM |
|
|
Pictures now showing. Thanks 02GF74
It's What You Do Next That Counts.
Build It, Buy It, Drive It:
Southern Kit Car Club
|
|
|
|