mcg
|
| posted on 19/9/18 at 03:16 AM |

|
|
Calling Wiring experts for general advice on technique and set up
Hi - I am considering re-wiring my f27 clubman over the winter as am having reliability issues with some of it. When building the car I did all of the
wiring myself using random coloured wires. Everything is hanging inside the scuttle which is a nightmare to access to diagnose any issues. Wires come
through into engine bay into a box that contains the fuse box. Fuse box is so tightly packed that again it is a nightmare to work with.
Everything has been working correctly in the past but I am thinking of rebuilding a loom that does it all proper and neatly, enabling sensible
access for maintenance. So...here are my questions:
1. How to people manage the access to the back of the dashboard?
2. Is the bottom of your scuttle enclosed so you dont have oddwires hanging down a bit into the footwell?
3. How do you neatly organise your fuse box so wiring and management of the system is good.
4. Wire colour system?
5. Wire connection types for electric components? (On pre trackday inspection I could see that certain connections like the reverse switch on the
gearbox have come loose)
6. How do I correctly set up the switched live connections when there are multiple feeds coming off of it? As I built the wiring set up one circuit at
a time, I found myself cutting into the ignition live feed (after fuse box) and soldering in take offs at multiple locations along the wire to feed
the various electronic components. Seems a bit messy but the best I could think of.
7. Organising relays in a good way.
If anyone has an idiots guide rough diagram to overall approach and set up that would be great to see!
Look forward to hearing.
Many thanks
Matt
|
|
|
|
|
jossey
|
| posted on 19/9/18 at 04:43 AM |
|
|
Hope this helps
1. How to people manage the access to the back of the dashboard?
I had my wiring loom cable tidied to the back of the dash with enough loose to allow the dash to drop down flat. Around 6 inch slack.
2. Is the bottom of your scuttle enclosed so you dont have oddwires hanging down a bit into the footwell?
Enclosed at passenger side and cable clips siliconed to underneath of scuttle to allow wiring to stay away from drivers space. And keeps wires away
from. Steering column a friend of mine got his entangled in his steering and caused an accident. I would have preferred to adhesive them to the back
of the dash away from the drivers area but my dash was carbon and nothing stuck to it for long. Not even tiger seal.
3. How do you neatly organise your fuse box so wiring and management of the system is good.
I bought a fuse box and attached to a shelf that dropped in the passenger side so I could change a fuse easier. Next time I'd move to under
bonnet like on westfields.
4. Wire colour system?
Copied the westfield wiring colours to help with issues.
New wiring I used black for earth and bought a lot of striped colours I could use and noted them in a book.
5. Wire connection types for electric components? (On pre trackday inspection I could see that certain connections like the reverse switch on the
gearbox have come loose)
The waterproof ones off ebay. Like these but not good for thick wiring.
https://rover.ebay.com/rover/0/0/0?mpre=https%3A%2F%2Fwww.ebay.de%2Fulk%2Fitm%2F392120375929
6. How do I correctly set up the switched live connections when there are multiple feeds coming off of it? As I built the wiring set up one circuit at
a time, I found myself cutting into the ignition live feed (after fuse box) and soldering in take offs at multiple locations along the wire to feed
the various electronic components. Seems a bit messy but the best I could think of.
Sorry no help on this. I think my solution was a bodge. Maybe. I used one of these inside an electrical box to distribute live.
https://rover.ebay.com/rover/0/0/0?mpre=https%3A%2F%2Fwww.ebay.co.uk%2Fulk%2Fitm%2F163084108306
7. Organising relays in a good way.
Sorry can't help.
Thanks
David Johnson
Building my tiger avon slowly but surely.
|
|
|
Nickp
|
| posted on 19/9/18 at 06:30 AM |
|
|
I used a pre made loom that matched my column stalks from here - http://www.premierwiring.co.uk/
I'd recommend doing it that way but it depends how much time you have on your hands?
I still had a fair bit of custom wiring to do as I used a BMW engine and all its loom / electrics.
All my wiring lays in an alloy cable tray behind the dash.
|
|
|
zetec
|
| posted on 19/9/18 at 07:28 AM |
|
|
While I could have made my own loom I too found it easier to buy a decent premade loom for the main circuits, and then just added my own loom for the
engine bay. The main advantage is that you get a colour coded loom to start off with rather than source all the individual colours yourself. But it
will depend if you are using stalk switches or individual ones. From my experience poor wiring is one thing that can make a good car a pain in the
arse, and if done right in the first place should almost be "fit and forget". Too do a neat job it is probably worth try to take the dash
out and then you can make sure each connection is 100% and the loom can be fixed in place.
" I only registered to look at the pictures, now I'm stuck with this username for the rest of my life!"
|
|
|
nick205
|
| posted on 19/9/18 at 08:34 AM |
|
|
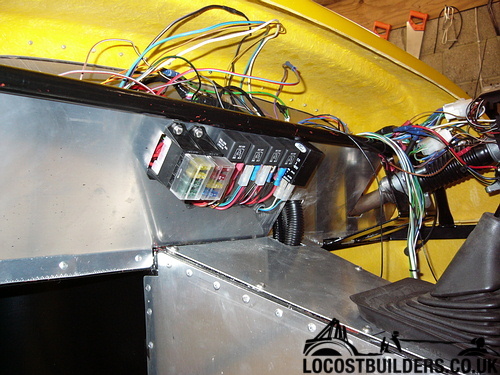
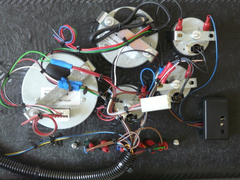
For my MK Indy I used a 2.0 Pinto engine and Vicky Green wiring loom. I made the dashboard myself and underneath (see photo below) I fitted an ally
panel with relays and fuses etc. so I sould reach them, but so that no wires were hnging down. My dashboard was also removable in case I needed to
get behind it for mods/repairs (never did though).
Not in the photo, but I also used permanent marker pen to write the function of each relay and fuse on the ally next to it to make it easier to
identify. IIRC the relay to the far right is the Ford hazzard flasher relay from the donor Sierra.
[Edited on 19/9/18 by nick205]
[Edited on 19/9/18 by nick205]
[Edited on 19/9/18 by nick205]
|
|
|
mcg
|
| posted on 19/9/18 at 10:59 AM |
|
|
thats great - thanks everyone. Plenty to think about and apply to my new set up.
|
|
|
Theshed
|
| posted on 19/9/18 at 12:02 PM |
|
|
Why get hung up on different colours? Neither aircraft nor motorsport looms bother with this. Just as good to use bands of coloured heat shrink at
each end. I would also suggest using heat shrink to bunch the wires together and stop them vibrating.
Get the right crimp tools for your connectors and use solder as a last resort (it corrodes and is bad with vibration).
If you want to add lightness then use light gauge wires for sensors and the like.
|
|
|
nick205
|
| posted on 19/9/18 at 12:30 PM |
|
|
quote:
Originally posted by Theshed
Why get hung up on different colours? Neither aircraft nor motorsport looms bother with this. Just as good to use bands of coloured heat shrink at
each end. I would also suggest using heat shrink to bunch the wires together and stop them vibrating.
Get the right crimp tools for your connectors and use solder as a last resort (it corrodes and is bad with vibration).
If you want to add lightness then use light gauge wires for sensors and the like.
Ditto on getting the right crimping tools for the crimps. Cheap tools often appear to work, but very often often make poor joints!
|
|
|
big-vee-twin
|
| posted on 19/9/18 at 01:44 PM |
|
|
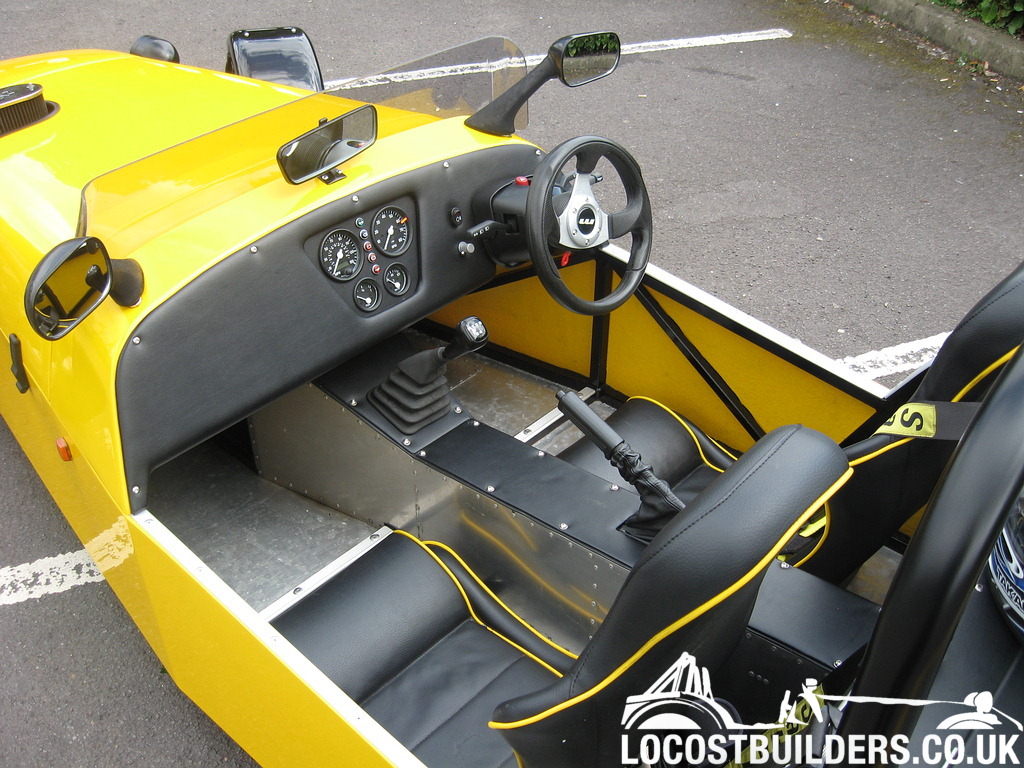
My dash is wired into a loom fastened to the back of the dash, it terminates into a multi pin plug and this allows me to remove the dash from the car
very easily, nothing hangs down underneath.
[img]
 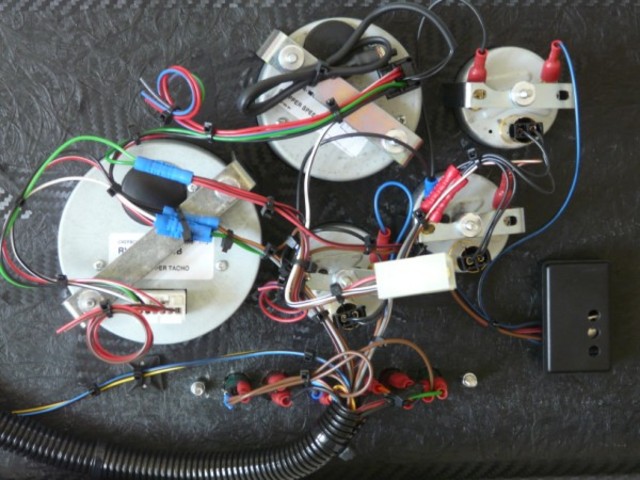
dashboard wiring
[/img]
[Edited on 19/9/18 by big-vee-twin]
Duratec Engine is fitted, MS2 Extra V3 is assembled and tested, engine running, car now built. IVA passed 26/02/2016
http://www.triangleltd.com
|
|
|
trextr7monkey
|
| posted on 19/9/18 at 06:17 PM |
|
|
If of any interest have the Vicki green loom diagram to give away on another section of the
forumhttps://www.google.com/imgres?imgurl=https%3A%2F%2Fimages.esellerpro.com%2F2466%2FI%2F752%2F92%2F44688.jpg&imgrefurl=https%3A%2F%2Fwww.megafa
ncydress.co.uk%2Fcurves-nun-costume-44688.html&docid=NJviOiZRPiXP1M&tbnid=GrTyfptJtavHKM%3A&vet=12ahUKEwjX7J38ycbdAhXMposKHUFDCUw4yAEQMyg0
MDR6BAgBEEM..i&w=900&h=1200&client=safari&bih=529&biw=320&q=nun&ved=2ahUKEwjX7J38ycbdAhXMposKHUFDCUw4yAEQMyg0MDR6BAgBEEM&a
mp;iact=mrc&uact=8
http://www.flickr.com/photos/14016102@N00/ (cut and paste this dodgey link)
Our most recent pics are here:
http://s129.photobucket.com/albums/p211/trextr7monkey/
|
|
|
snowy2
|
| posted on 23/9/18 at 03:36 PM |
|
|
there is a "How to" here on this site..... many folks have used it to rewire their cars with little or no issues....
sometimes you are the pigeon, most of the time the statue.
|
|
|