adam_moore
|
| posted on 26/8/05 at 07:46 AM |

|
|
PRE MOT/SVA PHOTOS
Hi,
Off for an MOt this afternoon and SVA at Derby on Wednesday. Thought I'd show you some pictures to see if anyone can notive anything obvious
that might fail SVA. Ignore the sharp edges around the suspension, I've got those covered.
I think I'm gonna get a bit wet this afternoon driving to the MOT station!
I've tried to insert these images into this post but they just come up as red crosses? Can anyone work out why they won't display. If you
follow the links, they take you to the pictures in my photo archive. Feel free to post them in the thread if you know how!
http://www.locostbuilders.co.uk/photos.php?action=showphoto&photo=dash1-low.jpg
http://www.locostbuilders.co.uk/photos.php?action=showphoto&photo=dash2-low.jpg
http://www.locostbuilders.co.uk/photos.php?action=showphoto&photo=engine-low.jpg
http://www.locostbuilders.co.uk/photos.php?action=showphoto&photo=exhaust-low.jpg
http://www.locostbuilders.co.uk/photos.php?action=showphoto&photo=front-low.jpg
http://www.locostbuilders.co.uk/photos.php?action=showphoto&photo=interior-low.jpg
http://www.locostbuilders.co.uk/photos.php?action=showphoto&photo=rear-low.jpg
http://www.locostbuilders.co.uk/photos.php?action=showphoto&photo=seats-low.jpg
http://www.locostbuilders.co.uk/photos.php?action=showphoto&photo=tunnel-low.jpg
[Edited on 26/8/05 by adam_moore]
|
|
|
|
|
Dillinger1977
|
| posted on 26/8/05 at 07:55 AM |
|
|
couldnt comment on any SVA things, but just wanted to say that looks like a very tidy job 
-Rog
|
|
|
ReMan
|
| posted on 26/8/05 at 08:20 AM |
|
|
Looks great, well tidy inside, I hope I can get mine looking that good.
From the experience I had watching my mates car pass at Derby you should be OK
One small thing  should'nt the fog lamp be on the right? should'nt the fog lamp be on the right?
www.plusnine.co.uk
|
|
|
Guinness
|
| posted on 26/8/05 at 08:22 AM |
|
|
I'd also add some u trim to your isolator key as that will need to pass the minimum radius requirements.
Other than that very tidy looking car, love the interior.
Good luck
Mike
|
|
|
adam_moore
|
| posted on 26/8/05 at 08:38 AM |
|
|
rollox, didn't realise about the fog light. Got an urgent order for another to put on the other side!
Thanks for the tip!
|
|
|
jos
|
| posted on 26/8/05 at 08:42 AM |
|
|
Are those motorbike side indicators on the front. If so how did you get the to flash at the correct rate. Ive got some with 10W bulbs and they flash
at over 120 per minute.
Also why do you want a pre SVA MOT. Youll need an MOT every year afterwards. Surely what you want is an MOT but without the paperwork. An MOT style
check if you like???
.: Motorsport / motor racing circuit / track wall art Apex Traxs :.
|
|
|
adam_moore
|
| posted on 26/8/05 at 08:43 AM |
|
|
It's gonna be an MOT check I think without the paperwork. Basically an excuse to drive it a few miles to check it out.
They are motorcycle indicators. As long as all three indiicators on the same side are flashing, its seems fine
[Edited on 26/8/05 by adam_moore]
|
|
|
shortie
|
| posted on 26/8/05 at 08:46 AM |
|
|
Looks lovely Adam, love the dash\steering wheel!
Only things I can see are that the isolator key area may need padding, can't see any rear reflectors and I am sorry to mention that I think your
fog lamp is on the wrong side, should be either on the centreline or towards the offside of the car.
Looks a lovely job though!
Good luck,
Rich.
|
|
|
shortie
|
| posted on 26/8/05 at 08:48 AM |
|
|
Could you not just move the one you have for SVA? Just cover the hole with the MK badge or something, better than buying another.
Rich.
|
|
|
adam_moore
|
| posted on 26/8/05 at 08:58 AM |
|
|
ref fog light I think I'll move it over the weekend and over the other side with some aluminium with edge trim around it. I've ordered the
other light now so I can pop it in to give a nice finish.
|
|
|
Donners90
|
| posted on 26/8/05 at 09:24 AM |
|
|
Lamp positions
In case you didn't already have it.
The car look awesome btw
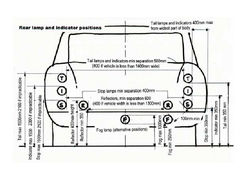 
Rescued attachment lampsrr.jpg
|
|
|
Locost?
|
| posted on 26/8/05 at 09:52 AM |
|
|
Don't know about SVA information but the car looks SWEEEEEET. An inspiration.
|
|
|
Hellfire
|
| posted on 26/8/05 at 10:42 AM |
|
|
SVA man will not like the battery securing - what stops it sliding side to side... or is there something hidden? 

|
|
|
Hellfire
|
| posted on 26/8/05 at 10:47 AM |
|
|
Not sure about the bottom of those headlight threads through the light bar.. are they protected with soft rubber or something.
Apart from the Fog light (oops  )... nothing looks obvious! )... nothing looks obvious!
|
|
|
omega 24 v6
|
| posted on 26/8/05 at 11:46 AM |
|
|
Don't the gearshift paddles need the edges radiusing?
Does the steering column need covered where it comes through into the engine bay (firewall).
Are the angles of visibility on the front indicators ok and not obscured by the tyres?
Other than that and the previous Fog light questions
MAN DOES IT LOOK SWEET OR WHAT?
well done.
|
|
|
adam_moore
|
| posted on 26/8/05 at 12:03 PM |
|
|
I don't think the paddle shift will have to be radius'd becuase it falls within the exempt zone around the steering wheel.
I was planning to cover the column this weekend as I too didn't think the SVA man would like to see it exposed.
No idea on the front indicators. I just extended them as everyone does and hope that they will be OK.
Thanks for you comment guys
|
|
|
westf27
|
| posted on 26/8/05 at 12:16 PM |
|
|
noticed your extinguisher,had to cover the top of mine,golf club cover or camera lens bag ?maybe yours has required edge radii
anyway nice clean tidy build
|
|
|
Winston Todge
|
| posted on 26/8/05 at 12:24 PM |
|
|
Great work Adam. Very impressive with a good attention to detail! I reckon that's what really sets a car apart from others...
That paddle shift! Awesome. How did you manufacture it? A fabricated collar clamped (?) around the column and then two ball joints as a fulcrum to the
paddle mechanism. How did you work out the point to attach the connecting rod to the back of the right paddle to get the correct travel and force
required to change gear? Trial and error or calculated?
Finally did you use a set of rod linkages or is there a thick cable running from the paddles to the gearchange?
Could you post as many pictures as possible of the mechanism from the paddle down to the gear lever on the box please!? It would be much appreciated!
Or send them to my email chunkimonki2000 at the usual hotmail dot com?
Thanks,
Chris.
|
|
|
adam_moore
|
| posted on 26/8/05 at 12:32 PM |
|
|
The paddle itself was lasercut from a dxf file by a local engineering company in aluminium. The column is a standard sierra with all the lock stuff
removed and then two bosses tig welded on either side. Unfortunatly this is not that easy. When the guy was welding the bosses on, the heat pulled the
paint through from the steel column section underneath and it basically prevented the welding. It does however seem to have enough strength as it is?
I used metal filler to clean it up. I hind sight, I'd have some sort of clamp or a custom column sleeve made to do the job.
Attaching the push pull cable was a bit of a trial and error process. A couple of drawings to work out what sort of travel i needed and hey presto.
Using a 2" travel heavy duty cable which you can see in the engine picture.
This is the company I got the cable from http://www.control-cables.co.uk/. About £45-£50 inc. ball joints.
It was fiddly but works a treat. I got the idea from another builder but can't remember his name - think he had a busa powered indy?
I'll post some more pictures next week.
[Edited on 26/8/05 by adam_moore]
|
|
|
givemethebighammer
|
| posted on 26/8/05 at 11:38 PM |
|
|
Very nice looking. Couple of things I have noticed. Are you using the battery isolator as an anti theft device for SVA purposes ? If so I don't
think you should be able to operate it when driving the car (put mine out of the way, under the bonnet for the SVA - haven't moved it yet). Also
watch the edges on the exhaust clamp. I covered mine in rubber sheet wrapped in heat proof cloth, secured with copper wire. The inspector did look at
this area - passed though.
Good luck
|
|
|