Avoneer
|
| posted on 28/10/05 at 08:36 PM |

|
|
What material to add bulges to bodywork?
If I want to add some cosmetic bulges/wings etc. to some of my GRP panels, what would be the best way of doing it?
I've thought about buying some 1" thick polyurethane foam sheet, sticking it on the GRP (once keyed with rough sand paper) with resin and
then sanding/cutting it to the desired shape and then resin over it.
Sand resin to a smooth finish and then spray.
Does anyone else have any suggestions or better/alternate methods?
Cheers,
Pat...
No trees were killed in the sending of this message.
However a large number of electrons were terribly inconvenienced.
|
|
|
|
|
flak monkey
|
| posted on 28/10/05 at 08:44 PM |
|
|
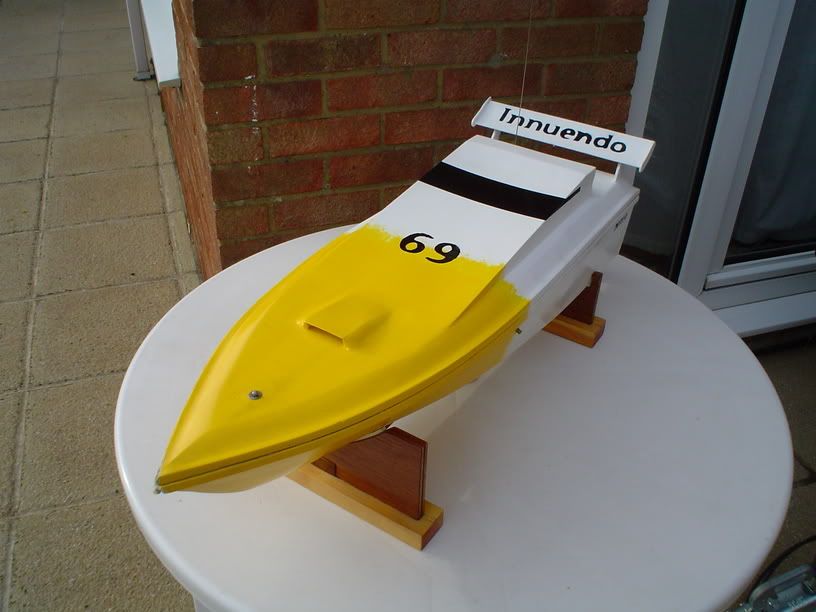
Resin itself is nasty stuff to sand...cloggs up the paper really easily, and will take you ages to get it dead smooth. I found this out when making
this boat....it probably took me a week to get a decent surface... 
There are several people making ready made scoops of different sizes.
Or you could make yourself some simple moulds up for them. Could probably knock one up from thin plastic sheet pretty quickly. Then lay up inside it,
you will get a decent-ish surface that will need onlya slight amount of finishing with wet and dry.
Others may have some better solutions however...
David
Sera
http://www.motosera.com
|
|
|
Dale
|
| posted on 28/10/05 at 08:53 PM |
|
|
A good link here showing making a scoop or something I cant remember. A trick was using dacron material brused over the last coat of resin to give a
denim like texture that a quick coat of bondo over would stick and fill easily.
Dale
http://www.streetrodstuff.com/Articles/Body/Play_With_Fiberglass/
Thanks
Dale
my 14 and11 year old boys 22
and 19 now want to drive but have to be 25 before insurance will allow. Finally on the road
|
|
|
RazMan
|
| posted on 28/10/05 at 09:41 PM |
|
|
I recently went through this very process!
I needed to reprofile my front wings of my middy project as they looked too square. I bought some fibreglass 'power bulges', cut them in
half and widened them with ally mesh.......JPG)
Cheers,
Raz
When thinking outside the box doesn't work any more, it's time to build a new box
|
|
|
RazMan
|
| posted on 28/10/05 at 09:41 PM |
|
|
.... bonded them to the existing wings and then blended them in..JPG)
Cheers,
Raz
When thinking outside the box doesn't work any more, it's time to build a new box
|
|
|
Volvorsport
|
| posted on 28/10/05 at 09:49 PM |
|
|
make it in ally , then use that as the mold!! . or just use some thin ally .
that poly foam is good - would need to coat it with some mat to give it strength aswell , might just be easier , to nock something up ini ally first
tho .
www.dbsmotorsport.co.uk
getting dirty under a bus
|
|
|
Avoneer
|
| posted on 28/10/05 at 10:48 PM |
|
|
I'm trying to add a small wing/spoiler to each side of my nose cone to cover the top bracket and ake the nose cone look a bit nicer, so not
worth me making a mould etc, and trying to keep it all light.
Might use the foam and then a layer of matt over everything.
Pat...
No trees were killed in the sending of this message.
However a large number of electrons were terribly inconvenienced.
|
|
|
Triton
|
| posted on 28/10/05 at 10:58 PM |
|
|
Pat,
I might just have what you are looking for......i will take a picture and post it tomorrow
Mark
My Daughter has taken over production of the damn fine Triton race seats and her contact email is emmatrs@live.co.uk.
www.tritonraceseats.com
www.hairyhedgehog.com
|
|
|
Avoneer
|
| posted on 28/10/05 at 11:12 PM |
|
|
Nothing to do with a Disney character is it Mark?
I was thinking more along the line of a 1" wide strip starting from the bottom corner of the nose cone - near the lower shock and going
vertically up, the curving towards the back of the cat and going horizontal towards the back of the car (above the light fitting and top socker
mount). Tapered at each end - like those ali wheel arches from the minis we talked about last Friday - if you see what I mean.
Pat...
No trees were killed in the sending of this message.
However a large number of electrons were terribly inconvenienced.
|
|
|
Volvorsport
|
| posted on 29/10/05 at 01:15 AM |
|
|
i think that foam shaped to wing profile , covered in 300g mat , would work well , still be light ect .
www.dbsmotorsport.co.uk
getting dirty under a bus
|
|
|
gustavo_brum
|
| posted on 29/10/05 at 03:50 AM |
|
|
Make a PU foam model, cover with filler and sand. Make a stucco mold out of it, then use this mold to make the bulge by laminating fiberglass into the
mold. The external finish will be as good as the model (which is easy to sand and polish) and you can make as many parts as you like afterwards.
stucco offers very good finish, but it will copy all the irregularities of the model, so take your time here. I´ve worked with this technique before,
but my model was modeled out of clay, which is even cheaper and easier to work with than PU, since you don´t need to apply filler and sand.
|
|
|
Avoneer
|
| posted on 29/10/05 at 08:32 AM |
|
|
Razman - those lights and bonnet vent work really well - car's coming on very nicley.
Pat...
No trees were killed in the sending of this message.
However a large number of electrons were terribly inconvenienced.
|
|
|
RazMan
|
| posted on 29/10/05 at 10:19 AM |
|
|
Cheers Pat, I'm pleased with my (rather slow) progress so far. 
Cheers,
Raz
When thinking outside the box doesn't work any more, it's time to build a new box
|
|
|
Avoneer
|
| posted on 30/10/05 at 10:15 AM |
|
|
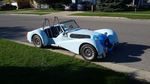
Ok, pic of what I am trying to do to help visualise:
It's the 1" wide strip that am I trying to replicate.
Cheers,
Pat...
 
Rescued attachment 1.jpg
No trees were killed in the sending of this message.
However a large number of electrons were terribly inconvenienced.
|
|
|
Avoneer
|
| posted on 30/10/05 at 10:16 AM |
|
|
Pic 2:
 
Rescued attachment 2.jpg
No trees were killed in the sending of this message.
However a large number of electrons were terribly inconvenienced.
|
|
|
RazMan
|
| posted on 30/10/05 at 01:32 PM |
|
|
I would make the new piece by bending a bit of ally into the required shape and use this as a kind of mould after covering it in packing tape (to stop
everything sticking). Then lay 2 - 3 layers of matting & resin onto the ally, separate the two when cured, trim it up and bond it with PU ahesive.
Cheers,
Raz
When thinking outside the box doesn't work any more, it's time to build a new box
|
|
|
Avoneer
|
| posted on 30/10/05 at 01:54 PM |
|
|
Cheers, that sounds like a good plan.
P.S. Do you like my new featherweight sponsered sides?
Pat...
No trees were killed in the sending of this message.
However a large number of electrons were terribly inconvenienced.
|
|
|
MikeRJ
|
| posted on 3/11/05 at 04:33 PM |
|
|
quote:
Originally posted by Avoneer
P.S. Do you like my new featherweight sponsered sides?
Very nice...do you have any concerns over weatherproofing? 
|
|
|
RazMan
|
| posted on 3/11/05 at 10:29 PM |
|
|
quote:
Originally posted by MikeRJ
Very nice...do you have any concerns over weatherproofing?
Never underestimate the power of Rice Crispies
Cheers,
Raz
When thinking outside the box doesn't work any more, it's time to build a new box
|
|
|
Avoneer
|
| posted on 3/11/05 at 11:12 PM |
|
|

Sorted out my "winglet" anyway.
See here:
http://www.locostbuilders.co.uk/viewthread.php?tid=33748
Pat...
No trees were killed in the sending of this message.
However a large number of electrons were terribly inconvenienced.
|
|
|


%20(WinCE).JPG)